Pin It

Showing posts with label Valentine's Day Gifts. Show all posts

Thursday, February 10, 2022

Sweet Talk, Valentine's Day Bag, Weekend Project, 2022 Stampin' Up! Spring Catalog

I don't often make many cards or gifty items for Valentine's Day. It's a one day thing and it's over. It's not like you decorate all month for it or prepare for weeks for it. You give a card, maybe some candy or a token of your love and that's it. Done. So I usually make one or two cards and sometimes a 3-D item. In my email today I got a "Treat Box" tutorial from Split Coast Stampers.  It was called a "Shaped Window Treat Box". Though it seems more of a bag to me than a box.  But I played along because I thought it was cute and would be fun.

The Designer Series Paper (DSP) is from the "Sweet Talk" 12" x 12" package and it was cut at 6-3/4" x 11-1/4".  The instructions for scoring and cutting on their site. I gave the size so you know what size piece of DSP you would need should you decide to make one. So if you've the a piece of DSP large enough, head on over there and take a look at the instructions. There's also a video. I just used the written instructions. Here's a link to the instructions, though I think you need to sign up to get them. They don't bug you or sell your info so your email won't be bombarded by a ton of junk mail.  I signed up many years ago and was a member for quite a few years but quit when the shop I worked at closed and I no longer had a job to help pay for fun things. There's a lot of techniques on their site plus TONS of card sketches (card layouts).  Every week there's something new. 

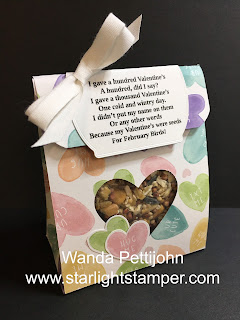
I added some birdseed to the bag and stapled the bag shut. I didn't like the squeezing of the sides to get the bag to close. If I were to make this again, I would add some score lines at the side pieces about 1" down from the top edge to make that "pinch" a bit easier and crisper.

I opted to do my bird Valentine's.  I hadn't done them in a few years. I think they are fun and school kids should give these out instead of cards and candy or whatever they give out now a days!  

The words are as follows:

I gave a hundred Valentine’s

A hundred, did I say?

I gave a thousand Valentine’s

One cold and wintry day.

I didn’t put my name on them

Or any other words

Because my Valentine’s were seeds

For February Birds!


I just printed them out and die cut them with a "Tasteful Labels" die. I lined up the die so the words were close to the bottom and folded the top edge over the top edge of the bag. I had stapled the bag shut and I glued the words on top. I added a bow and the bag was done. I can see making these for Easter!! Probably with candy this time!  LOL

This was a fun project and there's going to be some happy birds out there!

Thank you SO very much for taking your time to stop by and see today's Valentine's Day gift bag,
Wanda

Wednesday, January 24, 2018

Sure Do Love You, Lots To Love Box Framelits, Valentine's Day Box, January Paper Pumpkin

This isn't a very good picture of a box, it's pretty flat looking, but trust me, it's the new "Lots to Love Box" framelits.  

To make the box I used a piece of the Sweet Soiree Specialty Decorative Series Paper.  You need to cut two pieces. If there is a pattern to the paper, you need to remember to turn the framelit 180 degrees so the pattern is going the same direction all the way around the box.  Once I die cut my box, I then die cut the center heart.  Next I used the pretty heart border with some Versa Mark and white embossing powder. After heat setting the powder I took a piece of Window Sheet and glued it in place. I set one of the larger punches on top of it to hold it in place while it set up.  

I took out a sheet of mailing labels and stamped the "Love" from the January 2018 Paper Pumpkin set.  I wrapped 10 Hershey Nuggets and set them aside.  I stamped the "You make my heart happy" from the same Paper Pumpkin kit. I also used the vellum ribbon looking piece and the Calypso Coral ribbon looking piece from the Paper Pumpkin kit.  I used a few glue dots and set that in place on top of the box front.  I used Dimensionals to put the White word piece in place.  Then I taped the sides of the box together.  You want the cover of the box to have it's flaps on the outside, so tape accordingly.  I punched a half circle on the edge of the back piece, at the top so you have a better grip for opening the lid. 

Now here's a fun and helpful tip for you.  Clip the edges of the flaps about 1/8", on the fold that is closest to the end of the flap.  On the flap side, curl the clipped piece inward.  This will catch on those side flaps and make the lid stay shut.  Yup, even if you didn't glue/tape the sides perfectly.  If they are really off, then you will need to make a larger clip and curl it in a bit more.  This works 99% of the time!  I added a bow to the front using ribbon from the Paper Pumpkin kit and the box was done!!

Wasn't that fun?

Thank you for stopping by today,
Wanda


Sunday, January 14, 2018

Sure Do Love You, Lots to Love Framlits, Valentine's Day Gift for the Birds, Weekend Project.

I LOVE making these types of Valentine's Day gifts.  No candy, nothing for someone to set on a shelf but bird seeds!  No, not for the receiver to eat!!!  It's for the birds. A Valentine's Day gift for the birds.  Every so often I make one of these. I LOVE giving them out and in February in Minnesota, the birds love the treat!!

I used the new "Sweet Soiree" Decorative Series Paper" to make this box. The "Lots of Love" Framelits are fun and easy to play with.  

I stamped 5 hearts from the "Sure Do Love You" set using Blushing Bride ink. I die cut them and glued them in place on the front of the box.  Before I assembled the box, I used a Window Sheet to cover the heart after I had die cut it out.  I saved that die cut piece and used it to attach the words to. I taped the words together and then punched a hole in the piece.  After the box was set I added the bird seed. I used a 3" x 4" plastic zip bag.  I wrapped some silver fine thread around the box and tied the heart in place using the ends of that thread.  Oh, about the heart. I typed up the words and used my Blushing Bride ink pad and slid it across them. I die cut the words and then I taped them to the die cut piece from the center of the box.  

I have a couple I made in the past that you can take a look at.  One is found here.  Another can be found here. And my favorite can be found here.  My favorite one is more for a class or group project.  You can find the poem for this project on any one of those links.  

This was a fun box to make. And now I'm on a quest to see what all I can fit in that box so I can make more boxes and have more fun!!!

Thank you SO much for visiting today,
Wanda

Monday, February 06, 2017

Sending Love, Valentine's Day Bag, Weekend Project

Today you don't need any stamps or ink, unless you want to add something different on the front! I had made a bunch of these fun bags in December. I sold some at the craft fairs and I used some for gifts.  

I filled these with Valentine's Day candy!  These bags aren't very large so you don't need much candy!  I these bags are 2 Hershey Miniatures and 2 Reese's Peanut Butter Cups!  Such fun!

I found the instructions for the bag here.  It's easy enough to do too.  You just score a 6" x 6" piece of decorative paper.  The paper from the "Sending Love" 6" x 6" stack worked perfect. 

The scoring is as follows, 1-7/8", 2-7/8", 4-3/4, 5-3/4" . Turn 1/4 turn and score at 1", 5" and 5-1/2". Once you score these, fold all score lines, it will help you see them better.  You will need to snip the bottom to make the 1" fold over flaps.  Snip up 1" to the score line.  The other end has two smaller score lines.  These are folded over and used like a "cuff".  I like to put my bags together with glue.  I find it holds better than tape, even the super sticky tape.  Tape will eventually give way, give it time! That is why I prefer glue.  It doesn't take that long for glue to set up and if you make the bag first, the glue will set up while you are gathering and making the other elements of your bag.

Here I die cut 2 glitter hearts and set them in place with Dimensionals.  I also punched two holes in the top of each bag and threaded some Baker's Twine though them and tied a bow.  I actually tied the top shut using 3 knots and then I tied the bow!  They're not getting into this bag very easily!!! LOL

These are fun to make and would make great teacher to student, student to teacher, or student to student gifts.  Something nice to put in the mail box for your mail carrier. For a friends desk, for a neighbor, etc.  

Have fun with these!!!  Just a note here, these are very ADDICTIVE to make!

Thank you SO much for stopping by today,
Wanda

Saturday, January 28, 2017

Designer Tin of Cards, Valentine's Day Gift, Weekend Project


I have not done a "Weekend Project" in a while and with Valentine's Day a couple of weeks away, I thought I would create something fun. So I came up with the idea to make some tea holders.  These are fun and very easy to do.  I included the diagram for the layout.

You need a 8-5/8" x 3-1/2" piece of card stock for the base of the holder.  You will need to score it at 2-7/8" and 5-7/8". You will also need to cut off part of the right corner.  I measured about 1" from the bottom, you don't have to be exact, and I made a mark.  I lined that mark up in my cutter and cut from that mark to the score line on the left of that section.  

Next you will need to glue the edge of that 1" part plus the bottom edge.  This creates a pocket to hold the tea.  Once it is dry you can add your tea.  Before I added my tea, I stamped the words on the inside.  They are from the "Designer Tin of Cards" set.  I took a Real Red marker and colored in the heart.

In the meantime you can work on the front.  I used a 2-1/2" x 3-1/8" piece of Blushing Bride cardstock. I cut my decorative paper 2-7/8" x 2-1/4".  The decorative  series paper (DSP) I used here is from the "Falling in Love" pack.  

I cut a 6-1/4" x 3/8" strip of Blushing Bride cardstock for the belly band.  

After I glued my belly band in place I added the heart I punched out using the Blushing Bride glitter paper.  I set it in place on the band using Dimensionals.  Be careful to only set the Dimensionals on the band and not the DSP.  I added the Dimensionals directly to the band and set the heart on top.  I wanted to avoid accidentally sticking the heart to the DSP.  And that was it.  Super easy, very fun and adorable too!!!  Such a fun gift to pass out for those who can't have candy!!

Thank you SO much for stopping by today,
Wanda


Thursday, January 12, 2017

Swirly Bird, Mini Treats Bag Die, Sending Love Decorative Series Paper

Today I thought I would make a bird food Valentine.  I have not made one in a while.  I LOVE making these. 

For this one I used the "Mini Treat Bag" Thinlits die.  I used the hearts thinlits.  I typed up the words and printed them out. Then I die cut them.  I taped them on once I glued the bag together. I used "Sending Love" Decorative Series Paper.

I stamped the bird and fussy cut it out.  I set the bird in place using a Dimensional.

I tied a ribbon around it to finished it off.  

I filled little zip bag with bird seeds and added it to the bag.

You can see one I did several years ago, just click here.  The poem is there too, so if you wanted to make some, you can just do a cut and paste.  Then you don't have to type.  If I can avoid typing, I will.

These are fun to make and to give away.

Thank you for visiting today,
Wanda

Wednesday, February 11, 2015

Bow Builder Punch and Digi Paper Wrapping Paper

Today I am going to share with you a fun find.  I did a search on the net for some free Valentine's Day digi paper to download.  Oh my, there were SO many pretty papers to pick from.  I saw this one and downloaded it.  It is suppose to have a light tan strip/plaid background but it didn't print.  But that's okay, I like it the way it is.  I found this print here.  These little gifts are just some theater size boxes of candies.  So that means I could get by with a regular size sheet of copier paper. Though for things like this I do use 28# or 32# paper. I like the paper to be a little thicker for wrapping.  You can't see through it as easy.  

After I printed my paper and wrapped the candies, I proceeded to make the bows.  I used the new Bow Builder punch.  You have to punch the paper twice to get enough pieces, and you end up with one little rectangle that is extra and you just recycle it.  I did Google how to put the bow together because I hadn't seen one made before and I wanted to know what to do.  The best tip for this is to take your bone folder and curl the top bow pieces.  If you try to roll the paper, it cracks on the grain and it doesn't round very nice.  So curl the paper first. This also includes decorative paper but especially card stock (which is what I used here).

The video I watched said to use glue dots to hold the pieces together.  I used glue.  I clipped the pieces together as I glued them so I could just move on to the next one.  I had 5 bows to make, so by the time I finished one side of one bow on all 5, they were set up enough to do the next side.  It worked out well making more than one.  Once they were all assembled, I did stick it on the package with a glue dot.  These are fun and simple to make.

Thank you SO much for visiting today,
Wanda


Sunday, January 26, 2014

Off the Grid Valentine Envelope Punch Board Box!

That grid image from "Off the Grid" is such a fun stamp to play with.  Here I stamped it on a piece of white card stock and embossed it in gold.  I just cut it to fit my fun box I made.  Inside hides a Russell Stover Peanut Butter Heart!  

This box was very fun to make.  I had been surfing the net to find out how to make smaller boxes.  I found one that told me to cut my card stock 8" x 8" and score at the 3" mark.  It worked but the box was too big for what I wanted.  So I thought if I cut my card stock 6" x 6" and scored at 2" I may get closer to the size I am looking for and get this, I did!  I ended up with a 2-1/3" x 2-1/4" x 1-3/16" box.  Perfect for the candy!  And such a nice size to decorate too. Not too big and not too tiny!  

The words on the front are from the "Delightful Dozen" set.  I punched out two Real Red scalloped ovals and set them on the top and bottom of the large white oval.  I also punched out two Real Red small hearts.  One went on the front and the other is on the back.  It helps hold the tip of the box in place.  I didn't take a photo of it but it's just below the center.  The tip of the flap tucks in between it and the back of the box.  I just glued the bottom tip down and it provides enough space for the flap to fit in and stay shut.  I also tied a red ribbon around the box.  That alone would hold the box shut but adding the heart kept the tip down.  

I like the size of this box and I think it's going to come in handy for other things I make, including some of my clay stuff!!!  You can find the directions for the larger box here.  Like I said, I just cut my card stock 6" x 6" and scored and punched at 2" and 4".  Round one of the tips, that will be the flap of the box.  Fold on all the score lines.  Pinch in the two bottom corner pieces and glue them together and to the bottom of the box.  The original instructions just show you pinching the pieces.  I preferred to glue them so they would stay in place.  For the top two corner pieces I just clipped the one scored line next to the top of the box (on each side). I also trimmed that piece up a bit after clipping.  You will see that it looks a little too long.  Next I glued the bottom and side flaps together.  Make sure you get them even or your box will be lopsided.  I added the heart to the back of the box and then decorated the front.  Have fun with it!

Thank you SO much for visiting today,
Wanda

Monday, January 13, 2014

Expressions Love Notes

 Today I thought I would make a Valentine's Day gift.  Some thing useful!  I have not made very many of the file folders using the "Envelope Punch Board".  You can find lots of tutorials for it on Pinterest or by just Googling it.  For a quick tutorial to how I did this one was, I punched the top left corner in the center of the board.  I marked my board with a line using a fine tip Sharpie marker.  Then I slid the piece to the left 3" and punched again.  I flipped my card stock over and repeated that.  Just past the second punch you will be cutting off that strip of card stock.  If you look in the top photo, it's the piece (in red) that would normally be covering up the words.  Cut it off and repeat for the other side.  Insert the end of the card stock on the opposite side of the punch and round your corners.

I scored my card stock at 3-3/4" and 4-1/4".  It depends on the thickness of the pad of paper you are using.  The card stock was cut 5-1/2" x 8".  You lightly mark center and you can set the edge of the pad on the card stock and eye where you need to score too.  It really does depend on the thickness of your card stock.

I glued my notepad in place.

I used the Modern Medley decorative paper on the front.  The edges were rounded with the Envelope Punch Board.  I tied a ribbon on before I set the piece in place using Dimensionals.

The "love" is from the "Expressions" Thinlits die.

For the front I took a piece of Real Red decorative paper and cut it 5-1/2" x 4" and cut it like I did for the front of the folder.  Then I trimmed the bottom.  You can trim the bottom before you tape it on or you can add more tape and wrap it around the bottom of the folder.  And that's it.  Pretty easy and quick to do!

I'm not sure if you could have just taped the decorative paper on and then punched.  I'm not sure how thick the punch board will punch.  I didn't want to find out, I didn't want to break mine! I like to play it safe when it comes to stuff like that!

Wouldn't these make a great teacher's gift?

Thank you SO much for visiting today,
Wanda


Monday, January 06, 2014

Valentine's Day Candy Box Tutorial

Okay, you are going to have to be more creative with this than I was.  I have several to make so I tend to take the easy way out and decorate as little as possible.  This little box deserves a LOT more decorating than it has. 

There's not a whole lot to making these boxes.  I found a place on the internet that you can make your own box simply by entering in the measurements.  

Just go to the "Super Deluxe Tuckbox Template Maker" and have fun!  The measurements I entered to make this box are as follows: 8.78" x 3.75" x 1".  This size box holds 2 little Reese's Peanut Butter Cups.    It would probably hold 2 Rolos too, I didn't try it.  I was making this box to hold the peanut butter cups.  I added two hearts to the tops of the peanut butter cups.  I wanted to make the window bigger but the only way to do it was to cut it out by hand.  I didn't want to do that.  I wanted to use a punch and the oval one was the only one that would reach far enough into the box without cutting it at the corners and then being too large for the top.  So I used two oval punches and a piece of window sheet.  

Some tips for you when printing out the box you create.  Set your printer so it will print on the lightest setting. You will also need to cut a piece of card stock for the bottom of the box.  If you don't do this you will see the words that print out on the box.  There's no way to get rid of them.  Plus the bottom of the box looks prettier with some color added to it!  And when cutting out the box, there is a part on one of the flaps that has another score line and a longer cutting line (you will know what I mean once you print one out).  Do not score on that line and do not clip the line longer.  That score and cut is so you can fold the flap back further once it's opened.  It's more for a deck of cards.  Oh, there is one more thing.  The side flap has a grayed out area where you are to tape or glue.  Tape or glue on the other side of that.  It looks awful sticking to the outside of the box, only because it's not cut the same size as the side.  I think that covers the tips!


Have fun with this and PLEASE be more creative than I was!

Thank you SO much for visiting today,
Wanda

Wednesday, February 13, 2013

Donut Valentine from Pinterest

I ran across this cute idea on Pinterest.  I think most of the fun and cute stuff has now gone over to Pinterest.  I have spent a lot of time there but have enjoyed every minute of it.  You can see the original one here. It was made for someone going on an interview.  

I saw this a couple of days ago and knew Iwanted to make one for hubby for Valentine's Day.


I printed out the words on my computer and used the Sizzix die to cut out the heart.  

The red heart came from the new "More Amore" designer paper. I just took one of the hearts on the sheet and cut it apart from the sheet, taking care to cut the little bumps to match the ones on the heart and now you can't even tell where I cut the heart from the big sheet!  


I taped the words in place and then I tried my best to cover the small label on the package.  Fortunately for me Rainbow Foods doesn't use large labels on their packages so I was able to hid most of it.  I tried to get the label off but it just tore a bit and some of the top layer came off.  But this hid it enough.  Hubby likes donut holes and I bet  you anything he's not even going to notice there was a label on the container at all!!! LOL

Thank you SO much for visiting today,
Wanda

Tuesday, February 12, 2013

Valentine's Day Gifts

I have a group of people I wanted to make something fun and special for Valentine's Day.  I had made these before using the milk carton die.  You can see that one here.  I've also made them by filling wider bags and just making a nice header for them.  You can make them as simple or complex as you like.  

Today I stayed in the middle.  Not simple but not very complex either.  I made a pouch, filled a bag with bird seed and and decorated it.  

The pouch was simple to make. I took a piece of Real Red card stock and cut it 6-3/4" x 7".  On the 7" side I scored the piece at 1/2" and 3-3/4".  Fold the scores nice and sharp using a bone folder.  About 1-3/4" down on the front I marked the edges and cut them straight across.  Then I took a large cardboard Stampin' Up! ribbon spool and lined it up so it touched each side on the top and I traced the arch it created.  Then I cut out the arch. Once the arch was cut I could see where I needed to trim up the 1/2" piece.  I just used my scissors and cut below the front panel.  Once it's glued you won't be able to see if it's crooked or not.

Next I cut the front panel piece.  Cut the decorative paper 4-3/4" x 3".  I created the arch the same way as I did on the card stock.  Then I cut the inside decorative paper 3" by at least 5".  Mine were cut at 6" because I just cut the decorative paper in half to make it easier for me.  

Now you must first tape or glue the inside panel in place.  Then you will need to glue the bottom part plus the 1/2" strip.  Press the edges.  I used glue because it sticks better than tape.  You can use the bone folder if necessary.  Because I was making 15 of them I just did them assembly line style.  Once I got all the pockets glued together I taped the front panel on.  

I got on my computer and printed out the following words for the front.  
I gave a hundred Valentine’s
A hundred, did I say?
I gave a thousand Valentine’s
One cold and wintry day.
I didn’t put my name on them
Or any other words
Because my Valentine’s were seeds
For February Birds!

I cut them out and then I cut the panel behind them 1/8" bigger.  I taped the two pieces together and then set them in place on top of the panel.

I printed out the "Happy Valentine's Day" words on my computer and I punched them out with the heart punch.  I used the heart Sizzlet die and cut out 30 hearts.  I took the two Sizzlet hearts and glued the top bumps together.  You need 2 hearts per packet.  

I filled a 3" x 5" zip bag with bird feed and then I took the glued red heart and slipped it between the bag.  Then I stapled the heart to the bag.  I took a pliers and flattened the bumps of the staple down.  You can also use a hammer but the pliers is much quieter!  I do this because I like to tape my card stock over them so they don't show.  The back side will have the smooth staple on it and it will look a lot neater.  Plus you won't have to worry about anyone getting poked by the end of the staple.  Because of the texture of the Sizzlet heart I glued on the words heart.  

And finally you insert the seeds into the pocket and they are ready to go!

Have fun making these and thanks for stopping by today,
Wanda

Tuesday, February 05, 2013

Greeting Card Kids Valentine's Day Candy Project

This did not photograph well but you can get the idea.  I used one of those 1"x8" Cellophane bags I bought through Stampin' Up! quite a while back.  I still have a bunch of them left.  

I added some of those Conversation hearts to the bag and folded it shut.  I punched out two red scalloped circles and taped them together between the bag.  Then I stapled the circles to the bag.  I usually turn the stapler around the other way so the bumps are in the front and the smooth part is in the back but today I forgot to do that.  So with the bumps sticking out in the back I was about to scrap this piece and I got a bright idea. I took out my hammer and hammered those bumps flat.  Nothing is sticking up to poke or catch on anything.  Color me happy there!

Next I taped the white circle on the front.  But before I had taped it I with a sponge dauber, I sponged the center with Daffodil Delight and dragged the color outward.  If you click on the photo you can get a closer view of this.  

The image was cut out and colored and then taped in place.  An easier way to make this is to stamp directly on to the circle piece but I had this little girl cut out so I thought I would use it.

I took a fine point permanent marker (005 point) and wrote "Be Mine" in the tiny heart the girl is holding.  I didn't need any more wording than that.  And that was it.  Quick and easy yet cute!! Now I need to make a bunch more of these for some friends.  I hope they like these candies.  Personally I think they are horrible, I have never ever liked these.  LOL

Thank you SO much for visiting today,
Wanda

Saturday, February 02, 2013

Valentine's Day Candy Bar Holder

Get out your favorite Valentine's Day decorative papers and make one or more of these fun and easy candy bar holders.  

I went a bit further on mine and used the "Edgelits Adorning Accents" dies to give the front of the candy bar holder a more elegant look.  It takes a bit more time to do it plus a bit of thinking and measuring to get it straight.  Hence the other two being straight on the front!!! LOL

I got my pattern for these cute holders at Scor Pal.  I need to head over there more often, they have lots of fun things going on!! Here is the link to where you can get the instructions.  Just scroll down and you can see the download icon and get your own copy of the instructions.  They are easy to follow too.  They refer to this as a candy bar card.  I didn't make the front into a card, I just dressed it up simply because a card was going to accompany these.  They are more like a gift than a card!

Have fun making these.  I'm off to work on another fun project for you.  I should have it ready in a couple of days.  And no, it doesn't take that long to make, I just work on things a little at a time.  I sneak a few minutes here and there to get these projects done.

Thank you SO much for stopping by today,
Wanda

Saturday, February 18, 2012

Characters Made From Punches

I just love these characters that are made entirely from punches.  This cute panda was made by Irene (my new stamping friend!).  She came to my home on Thursday night for Stamp Till You Cramp. It was her first time here and I did warn her that my workroom is overwhelming.  I always recommend that newbies bring a list of cards they would like to make.  It helps them to not feel so overwhelmed and it also gives them some direction and feel for the room and where things are.  But personally, I don't know where everything is either!!! LOL  

Irene brought these cute panda treat bags for everyone!  Wasn't that just sweet of her?  Thank you Irene, everyone loved them!

I didn't show mine to my sister, I know it would have ended up going home with her!!!  She's a nut for this punched characters.  I may part with it sometime but not right now!!! I'm so mean!! LOL


Thank you SO much for visiting today,
Wanda

Tuesday, February 14, 2012

Happy Valentine's Day and Chocolate too!

Happy Valentine's Day to you! This is what hubby got today.  He is such a chocolate hound!! I have never seen a guy eat as much chocolate as he does.  I like it once in a while but not like he does.  My idea of a chocolate chip cookie is one that has only one chocolate chip in it!!! LOL  When I am finished baking I always state, "this last cookie is mine."  It usually has only one chocolate chip in it.  Funny thing here, everyone is fine with it!!! LOL  Anyway, I bought hubby one of these larger candy bars and I thought I would dress it up for Valentine's Day.  We did tell each other that we were not going to buy anything for Valentine's Day.  I told him I bought it so I could decorate it and show it off on my blog!!! LOL  Dressing up candy bars is such a quick and easy way to alter them and give them a personal touch.  These are fun to do for showers, Christmas, Easter, Birthday's, Graduation parties and of course Valentine's Day.  Or whatever other occasion you can think of.  I just think it's fun, quick and easy to do.  My niece is getting married in December and I am thinking of making some fun candy bars for her bridal shower!  Oh, you know me, I'll share them with you when I am done making them.  I suppose I could start the wrapper early and wait to buy the candy at a later date.  I did find the wooden candy bar I made years ago!!  I had taken a thin piece of craft wood and cut it the size of a candy bar so I could make wrappers.  Bag them and add chocolate later!!!

Anyway, when hubby gets home he will have his chocolate fix!  Hope you all enjoyed the day!

Thank you SO much for visiting today,
Wanda

Monday, February 13, 2012

Valentine's Day Box Full of Love!

 Today I whipped up a fun Valentine's Day box.  Ok, I didn't actually make the box today.  I made it a few weeks back.  I had ordered a box template that had a cover with it.  I was disappointed in the template and I returned it.  The template had two score lines between the natural "score" line of the box.  It made it very difficult to score it since it made two lines but you really didn't want to fold it there, you wanted to fold it in the middle of those two score lines.  It was difficult to work with so I returned it.  I had made this box and I struggled with it.  I was going to toss it but I decided to work with it, make something with it and not think about the struggle I originally had with it.

SO I used the Valentine's image from the  "It's a Wrap" set and I stamped Regal Rose on my mailing labels.  Once I got the labels put on my Hershey Nuggets I filled the box as you can see in the second photo.  I used the Sizzlets heart die and cut out the red heart.  Then I had the words printed from my computer and punched them out with the heart punch.  I used Glue Dots to put the pieces together.  I don't feel that the snail tape sticks well enough on the texture of that heart. And I also used Glue Dots to stick it to the top of the box.  Then I tied a white 1/4" grosgrain ribbon around the box and that was it.  Now you can make your own boxes too.  There is a box maker that you can access and make your own personal size boxes for free.  Just click here and you will be taken right to the site!  I have had a lot of fun making custom size boxes there!!  

Anyway, here is the little Valentine's Day gift I have ready for a special friend!  And no, this is not going in the basket.  I already gave my friend the basket FULL of the Valentine's Day gifts I've been making for the last few weeks and she LOVED it!!!  If you missed out on seeing the full basket you can see it by clicking here.  

Thank you SO much for visiting today,
Wanda

Sunday, February 12, 2012

A Valentine's Day Gift for You!

This is just for you!!!  You can download this photo and use it on the background of your Valentine's Day cards!  

I had taken the candies and set them out on a piece of copier paper.  I even got hung up on the paper and it went flying off the table along with the candies.  I wasn't all that upset about it, personally I don't care for the taste of these things.  As a kid I never liked them and as an adult I have not tried the.  I can only assume they taste as nasty as they did when I was a kid.  I remember the bitter taste of the red dyed words.  YUCK!!  Anyway, I picked them up off the floor, arranged them on the paper and took several photos.  Then I tossed the whole mess in the trash!!!  I just wanted to make that perfectly clear in the event that I had given some candy hearts to anyone this year!!!  You got the new, clean, fresh ones!!!

Here is what I did with the photo.  I not only used it on the cover but I also printed it out on a label sheet and wrapped it around the lip balm!  Use your imagination and have fun with this!

Thank you SO much for visiting today,
Wanda

Sunday, February 05, 2012

A Relaxing Valentine's Day Gift

This gift has absolutely NO candy in it!  It contains some bubble bath and bath fizzies, a scrungy scrubber thing and a wash cloth. Everything in it is in pinks, rose and red colors!  With soapy stuff in it you certainly don't want to add candy to it!

That reminds me of my purse.  I have a zippered part on the outside of my purse and I would keep my lipstick, a small bottle of perfume, gum, antacids, and my nail file in there.  I always kept those things in there.  Always until one time I went to grab an antacid and it tasted like perfume.  GROSS!!!  I would rather have the acidic stomach!!  The taste of perfume in your mouth does NOT go away for a long time.  Now I keep my gum and my antacid in the front pocket along with my cell phone.  So my cell phone smells like wintergreen. It beats the taste of perfume!!

Ok, back to this project.  I got this cute bucket at The Dollar Tree.  I put a little bit of paper crimps in the bottom (also from The Dollar Tree) and added the cute items as you see them.  It's a simple and easy to make gift.  I know my friend is going to love it.  And she needs it too.  Not that she is dirty!!!  LOL  She needs the relaxing part of it!!  Silly you for thinking that!!! LOL

I just need to make a card for her and it's all set to go!

Thank you for visiting today,
Wanda

Saturday, February 04, 2012

Valentine's Day Basket

Ok, here it is!! The Valentine's Day gift basket with all the things I've been working on and sharing with you these past few weeks!!!  

I did fill the bottom with Mylar crimps but those things just flatten out.  I prefer paper crimps, they stay a bit puffy and fluffy.  But the Mylar ones are ok for this because there was SO much stuff to go in the basket that had I used paper crimps all of this stuff may not have fit in it.

To see all the items in the basket you can go to here and have a look.  I went there and I scrolled down and I kept scrolling down and saw things I made several years ago for Valentine's Day too. I forgot some of that stuff and it was fun to see it all again!  Have fun looking!

Thank you SO much for visiting today,
Wanda