Pin It

Showing posts with label Just a Note Card. Show all posts

Saturday, August 30, 2025

Florals in Bloom, Simply Said, Note Cards, Stampin' Up!

Hello and welcome to my blog. Today I have a note card to share with you. Please read on to see how it was made.

The base of my card is a half-sheet of Basic White card stock. It opens on the bottom and the fold is on the top. 

I cut a 4" x 5-1/4" piece of Summer Splash card stock. On top of that is a 3-3/4" x 5" piece of Basic White card stock and was textured using the "Exposed Brick" embossing folder. I glued that to the Summer Splash piece. And then that was taped to the card base.

The focal pieces were cut using Summer Splash card stock, it measured 3-1/2" x 2-1/2" and the Designer Series Paper (DSP) is from the "Florals in Bloom" and it was cut at 3-1/4" x 2-1/4". I taped the two pieces together. Dimensionals were added to the back and set in place on the front of the card. It's about 1/2" from the left edge and about 3/8" from the top and bottom of the card base.

The words are from the "Simply Said" set and was stamped using Summer Splash ink. I cut it out using a die from the "Stylish Shapes" die set. 

A piece of Peach Pie was used for the layer behind the word piece. I cut it out using the 1-7/8" circle from the retired "Layering Circles" die set. I taped the two circles together and set them in place using Dimensionals on the right side and tape on the left side.

I had a dragonfly sitting on my worktable and glued it to the front of the card and the card was done.

This was a quick and easy card to make and it was a fun layout.

Thank you SO very much for taking your time to stop in and see today's note card,
Wanda

Wednesday, August 27, 2025

Impressions Abloom, Simply Said, Note Card, Stampin' Up!

Hello and welcome to my blog. Today I have a note card to share with you. Please read on to see how it was made.

The base of my card is a folded half-sheet of Basic White card stock. It opens on the right and the fold is on the left.

I cut a 4" x 5-1/4" piece of Basic White card stock and textured it using the "Damask Design" embossing folder. I glued that to the front of the card.

Next I cut the flowers from the "Impressions Abloom" bundle using Melon Mambo card stock. For the centers I had cut them from Basic White card stock and then colored them using the light Lemon Lolly over the whole thing and then tapped on dark Lemon Lolly. It shows up better in person.

The leaves were cut using a piece of Old Olive card stock.

The words are from the "Simply Said" set and were stamped using Old Olive ink. I cut them out using the second largest circle in the "Stylish Shapes" die set. I glued the circle in place about 3/8" from the right side and 1" from the bottom.

Three Dimensionals were added to the largest flower. I lightly set it on top of the card near the edge of the circle. 

Glue was added to the center of the other two flowers and they were set in place, slightly tucked under the large flower.

The leaves were cut from the stem of leaved I had die cut. Glue was added to the ends and they were slipped under the larger flower. Then the large flower was pressed in place. 

I added Wink of Stella to the center of each flower and the card was done.

This was a very quick and easy card to make. I let the flowers speak for themselves here. 

Thank you SO very much for taking your time to stop in and see today's note card,
Wanda

Monday, August 04, 2025

Painterly Pears, Simply Said, Just a Note, Friendship Card, Stampin' Up!

Hello and welcome to my blog. Today I have a super quick and easy note card to share with you. Please read on to see how it was made.

The Designer Series Paper (DSP) used here is from the "Painterly Pears" 12" x 12" package. I had made a card using this paper a few days ago and I cut another piece from that same sheet. 

The base of my card is a folded half-sheet of Basic White card stock. It opens on the right and the fold is on the left.

I cut a 4" x 5-1/4" piece of Mossy Meadow for the large layer.

The DSP measures 3-3/4" x 5". I stamped the word from the "Simply Said" set using Mossy Meadow ink. Then I taped this piece to the Mossy Meadow piece and that was then taped to the front of the card.

When I had cut the large pair on the card I made the other day and there was a small pear on the piece I had cut off. I didn't want to put it in the scrap bin so I thought I'd just fussy cut it. I didn't buy the dies that go with the DSP, and I don't know if there is a die for the small pear but I do know there's one for the large pear. I added a Dimensional behind the little pear and added it to the front of the card. The image has two pears together and I set it on the one that closely matched the pear I had cut. And that was all I did to make this card.

This was such a quick card to make and even fussy cutting was quick and easy because there wasn't a lot of jagged edges to cut around.

It was fun to just whip up a card in a flash. Sometimes you just need to do that and other times you need to play with lots of layers or pieces! I LOVE layers!

Thank you SO very much for taking your time to stop in and see today's note card,
Wanda

Friday, August 01, 2025

Simply Said, Painterly Pears, Note Card, Stampin' Up!

Hello and welcome to my blog. Today I have a super quick and easy card to share with you. Please read on to see how it was made.

The base of the card is a folded half-sheet of Basic White card stock. It opens on the right and the fold was on the left.

I cut a 4" x 5-1/4" piece of Mossy Meadow for the large layer.

The Designer Series Paper (DSP) from the "Painterly Pears" 12" x 12" package was cut at 3-3/4" x 5". 

The words are from the "Simply Said" set and were stamped using Mossy Meadow ink. I taped the DSP to the Mossy Meadow piece and then that was taped to the card base.

This set has two sheets full of pears and leaves that can be cut out with coordinating dies. I did not by the dies, just the DSP so I fussy cut the pieces. There is not a lot of jagged edges to cut so it didn't take long to cut the pear and the leaves. Dimensionals were added to the back of both pieces. I set the pear in place first and then I set the leaved on. And that was it. 

This paper is SO pretty and easy to work with. The sheet that the words were stamped on have images all around the edges with the center being white. It makes it great to cut it for a one sheet wonder. I cut the piece at 4". I didn't cut anymore off the sheet because I'm not sure what I'm going to do with them. I was just making what I had in mind and it turned out!  Don't you love it when what you designed in your mind looks like the end piece?  I know I do! 

This was a super quick and easy card to make and since there's another full sheet in the set, I may make another one in the near future.

Thank you SO very much for taking your time to stop in and see today's note card,
Wanda

Wednesday, July 23, 2025

Charming Day, Simply Said, Friendship Card, Note Card, Stampin' Up!

Hello and welcome to my blog. Today I have a friendship/note card to share with you. It's quick and easy to make. Please read on to see how it went together.

The base of my card is a folded half-sheet of Basic White card stock. It opens on the bottom and the fold is on the top. 

I cut a 4" x 5-1/4" piece of Designer Series Paper (DSP) from the "Perennial Lavender" 12" x 12" package. I taped it to the front of the card.

Next I stamped the flower image from the "Charming Day" bundle using black Memento ink on Basic White card stock. I colored the flowers in using both light and dark Highland Heather Blends pens. The leaves were colored in using both light and dark Lost Lagoon Blends pens. I don't think I've ever used Lost Lagoon for the color of leaves before but it works so well here. Once colored, I cut them out using the matching die. Dimensionals were added to the back and the piece was set in place on the bottom left corner of the card.

The words are from the "Simply Said" set and were stamped using Lost Lagoon ink. They were cut out using the die from the "Stylish Shapes" set. The layer behind it was cut using a 1-7/8" circle die (retired). I taped the layers together. Dimensionals were added to the back and the piece was set in place on the front of the card.  And the card was done. 

I thought about adding some embellishments but the background is a bit too busy for that. I think any embellishment would get lost in all that business. It looks fine the way it is. It was a fun, quick and easy card to make.

Thank you SO much for taking your time to stop in and see today's friendship/note card,
Wanda

Saturday, July 19, 2025

Simply Said, Perennial Lavender, Friendship Card, Note Card, Stampin' Up!

Hello and welcome to my blog. Today I have a note card to share with you. Please read on to see how it was made.

The base of my card is a folded half-sheet of Basic White card stock. It opens on the bottom and the fold is on the top.

I cut a 2" x 5-1/4" piece of Lost Lagoon card stock and textured it using the "Damask Designs" embossing folder. I chose 2" because the piece of Designer Series Paper (DSP) from the "Perennial Lavender" 12" x 12" package measured 3" x 5-1/4".  I wanted to use that piece of DSP but it didn't cover the whole front of the card. So I thought the Lost Lagoon card stock would make up the difference. But first it needed some texture. 

I glued the textured piece in place first and then the DSP was glued on top of that.

This piece of DSP had a nice open space on the right for some wording. Using Basic White card stock I stamped the words from the "Simply Said" set using Gorgeous Grape ink. I cut them out using a die from the "Stylish Shapes" set. Then I used a 1-7/8" circle die (retired) for the layer.  I taped the two layers together, added Dimensionals to the back and set the piece in place on the front of the card.

I added a couple of brass butterflies to the front and the card was done.

It's a simple card but has a nice look to it. I was glad I was able to use up that piece of DSP.

Thank you SO much for taking your time to stop in and see today's friendship/note card,
Wanda

Wednesday, July 16, 2025

Charming Day, Simply Said, Perennial Lavender, Friendship Card, Stampin' Up!

Hello and welcome to my blog. Today I have a friendship card to share with you. Please read on to see how it was made. 

The base of my card is a folded half-sheet of Basic White card stock. The large Basic White layer on top of it measures 4" x 5-1/4", it was taped in place.

The smaller Basic White layer measures 3" x 4-1/4". 

A 3" x 2-1/8" piece of Designer Series Paper (DSP) from the "Perennial Lavender" 12" x 12" package. I taped it to the bottom of the Basic White piece.

I took some linen thread and wrapped it around the center of the piece three times and I tied a knot. I left the tails long so I could trim them.

I stamped the flower from the "Charming Day" bundle using black Memento ink on a piece of Basic White card stock. I colored the flowers in using both light and dark Highland Heather Blends pens. And for the leaves I used both light and dark Old Olive Blends pens. This is SO much easier coloring than using markers. I cut the flowers out using the matching die. Dimensionals were added to the back and the piece was set aside.

The "hello" is from the "Simply Said" set and was stamped using Gorgeous Grape ink. Dimensionals were added to the back of the piece and it was centered on the front of the card.

The flower piece was then added. The linen ends were trimmed and a little brass butterfly was added.  And the card was done.

I do like how it turned out, it was quick and easy to make and it turned out better than what I had envisioned.  

Thank you SO much for taking your time to stop in and see today's friendship card,
Wanda

Sunday, July 13, 2025

Cute as Can Bee, Charming Day, Friendship Card, Thinking of You Card, Stampin' Up!

Hello and welcome to my blog. Today I have a friendship/thinking of you type card to share with you. Please read on to see how it was made.

The base of my card is a folded half-sheet of Basic White card stock. It opens on the bottom and the fold is on the top. 

I cut a 4" x 5-1/4" piece of Daffodil Delight card stock and textured it using the "So Swirly" embossing folder. I glued it to the front of the card.

The Designer Series Paper (DSP) is from the "Cute as Can Bee" 12" x 12" package. It measures 3-3/4" x 2-3/8". It was glued to the front of the card leaving 1/4" around the top, bottom and left side.

The hexagons were cut using the dies in the "Meant to Bee" bundle. A Basic Black and a Basic White were cut. Before taping them together I punched out the black circle using the 1-3/8" punch.  After taping them together I centered the piece on the front of the card and then glued it in place.

The bee is from the same "Cute as Can Bee" DSP and was fussy cut. Dimensionals were added to the back and it was set in place on the front of the card.  

The words are from the "Charming Day" bundle and were stamped using black Memento ink on a scrap piece of Basic White card stock. I cut it out using the second smallest die in the "Stylish Shapes" set. I taped it to the black circle and then that was placed on the front of the card using Dimensionals. And the card was done!

This was a fun card to make and I just love those little bees in that package of DSP!

Thank you SO very much for taking your time to stop in and see today's friendship, thinking of you card,
Wanda

Sunday, July 06, 2025

Thoughtful Journey, Simply Said, Friendship, Note Card, Stampin' Up!

Hello and welcome to my blog. Today I have a quick and easy friendship card to share with you. Please read on to see how it was made.

The base of my card is a folded half-sheet of Basic White card stock. It opens on the right and the fold is on the left.

I cut a 4" x 5-1/4" piece of Petunia Pop card stock for the layer. On top of that is a 3-3/4" x 5" piece of Designer Series Paper (DSP) from the "Thoughtful Journey" 6" x 6" stack. These stacks are so much fun to use. There's lots of different images and lots of pages per stack.  

The DSP was taped to the Petunia Pop piece and that was taped to the front of the card.

The words are from the "Simply Said" set and were stamped using Mossy Meadow ink. I cut them out using the round die from the "Stylish Shapes" set. I wanted a layer behind it but nothing too big. The next size circle in that set was just too big so I found my 1-3/4" punch and punched out the circle from a scrap piece of Petunia Pop.  You can also punch out the circle from the Petunia Pop layer before you tape the layers together.

I taped the word piece to the Petunia Pop layer. Dimensionals were added to the back and the card was done.

This was such a quick card to make. I was going to just use the DSP alone but I thought it really needed a layer. Plus it felt like it was just too simple without layers, though it still did look nice. 

Thank you SO much for taking your time to stop in and see today's friendship/note card,
Wanda

Tuesday, July 01, 2025

Beautiful Gallery, Simply Said, Friendship, Note Card, Stampin' Up!

Hello and welcome to my blog. Today I have a friendship/note card to share with you. Please read on to see how it was made.

The base of my card is a folded half-sheet of Basic White card stock. It opens on the right and the fold was on the left. 

I cut a 4" x 5-1/4" piece of Basic White card stock and textured it using the "Damask Design" embossing folder. I glued that to the front of the card.

Next I cut my piece of Designer Series Paper (DSP) from the "Beautiful Gallery" 6" x 6" stack. It was leftover from the card I made on June 29th.  It was sitting on my worktable (because I rarely put anything away) and I thought I'd make a card using it. I cut the piece to measure 3" x 4".  For the layer behind the DSP, I cut a 3-1/4" x 4-1/4" piece of Mossy Meadow card stock. I taped the two pieces together and then glued that to the front of the card. I prefer to glue anything that comes in contact with textured card stock because tape doesn't always stick. 

The words were stamped next. Using the "Simply Said" set I stamped them using Mossy Meadow ink on a scrap piece of Basic White card stock. I cut them out using a die from the "Stylish Shapes" set. The Mossy Meadow circle measures 1-7/8". I taped the two layers together. Dimensionals were added to the back and the piece was set in place on the front of the card.  And the card was done.

I was so glad I was able to use up that leftover piece of DSP (before it got ruined) and make a quick and easy card with it.

Thank you SO very much for taking your time to stop in and see today's friendship/note card,
Wanda

Friday, June 27, 2025

Simply Said, Extraordinary Flora, Note or Friendship Card, Stampin' Up!

Hello and welcome to my blog. Today I have a note card to share with you. I found it on Instagram. You can see the original card by clicking here. A new window will open. Please read on to see how it was made.

The base of my card is a folded half-sheet of Basic White card stock. It opens on the right and the fold is on the left. I cut a 2-1/2" x 5-1/4" piece of Designer Series Paper (DSP) from the "Brights" 6" x 6" stack. I taped it to the left side of the card front.

The words were stamped next. They are from the "Simply Said" set and were stamped using black Memento ink on a scrap piece of Basic White card stock. I cut them out using the 4th circle die in the "Stylish Shapes" set. Dimensionals were added to the back and the piece was set aside.

Next I cut the flowers from the "Extraordinary Flora" Washi tape strip. I added the strip to a piece of Basic White card stock and then cut them out using the matching die. 

I glued the pieces in place on the upper part first. Then the word piece was added and then the last 4 pieces. And the card was done.

Mine is a bit different than the original because I didn't have all of the same parts but I made it work. I did forget to add some bling to the card. I may add a few pearls or some retired dots or I may just leave it as it is since the DSP is speckled.

This was a fun card to make and SO quick too!

Thank you SO very much for taking your time to stop in and see today's note/friendship card,
Wanda

Saturday, June 07, 2025

Fully Flowering, Notes & Totes, Note Card, Stampin' Up!

Hello and welcome to my blog. Today I have a super quick and easy card to make. Please read on to see how it was put together.

The base of my card is a folded half-sheet of Basic White card stock. It opens on the right and the fold is on the left. 

The Designer Series Paper is from the Subtles 6" x 6" stack. I cut my piece at 5-1/8" x 1-7/8".  I had originally cut it at 5-1/4" x 2" but once I textured the Basic White piece it was too short because of the crimping. The folder I used for the crimping is the "Mini Corrugated" 3D embossing folder. I thought it was odd that it was called "mini" because I still have a Fiskars crimper and the pitch is almost exactly the same. Anyway, once the piece was crimped it shortened it from 5-1/4" to 5-1/8".  I also trimmed that piece to measure 1-7/8" wide. I glued the crimped piece on first and then taped the DSP.

Using a flower from the "Fully Flowering" ephemera package, I added Dimensionals to the back and laid it on top of the card to see where the words were going to go. 

I'm guessing at what this is going to look like the whole time because I had no plan when I started.

I took the words from the "Notes & Totes" bundle and stamped them directly on the DSP using black Memento ink. I was going to do a layer with them but once I set the stamp on top of the DSP while I got my ink out I saw how nice it would look right on the DSP. 

Once the words were stamped I removed the backing from the Dimensionals on the flower and I set it in place. 

I didn't have any current embellishments so I took some raindrops that I had in my stash and added 4 of them to my card using mono glue and the card was done.

I do like how it looks and I love how quick it was to make.

Thank you SO very much for taking your time to stop in and see today's note card,
Wanda

Sunday, June 01, 2025

Notes & Totes, Beautiful Gallery, Just a Note Card, Stampin' Up!

Hello and welcome to my blog. Today I have a "just a note" card to share with you. This card could also be used as a friendship or thinking of you card. Please read on to see how I made it.

The base of my card is a folded half-sheet of Very Vanilla card stock. It opens on the right and the fold is on the left.

I cut a piece of Designer Series Paper (DSP) from the "Beautiful Gallery" 6" x 6" stack at 5" x 3-3/4".  I taped that to a 5-1/4" x 4" piece of Old Olive. Before taping the DSP to it I punched out the hexagon piece using the "Heartfelt Hexagon" punch. I cut that 2" piece in half and set it aside. After taping the DSP to the Old Olive piece I taped that to the front of the card.

The words are from the "Notes & Totes" set and I stamped them using black Memento ink on a piece of Very Vanilla card stock.  I punched them out using the "Heartfelt Hexagon" punch. I taped the Old Olive hexagon pieces to the back of the vanilla hexagon piece. Dimensionals were added to the back and it was set in place on the front of the card and the card was done.

How simple and quick was that? And pretty too!

Thank you SO very much for taking your time to stop in and see today's note card,
Wanda

Monday, September 16, 2024

Simply Zinnia, Simply Said, Note or Friendship Card, Stampin' Up!

Hello and welcome to my blog. Today I have a friendship/just a note card to share with you. I will be sending this off in the mail tomorrow to a friend who's been so busy and is feeling worn out. I hope this cheers her up. I do not sign the cards. I put then in an envelope and then put that in a larger envelope and mail it off (with a little note on a separate piece of paper). When I saw this card on Pinterest I thought it would be a perfect one to help cheer her up. You can see the original card here. There were no instructions on how to make it so I had to wing it. Please read on to see how it was made.

The base of the card is a folded half-sheet of Basic White card stock. It was cut in half on the short side of the sheet so once cut it measured 4-1/4" x 11".  

A 4" x 5-1/4" piece of Cajun Craze card stock and Basic White card stock was cut. The Cajun Craze piece was taped to the front of the card.

The Basic White piece was stamped on using the zinnia image from the "Simply Zinnia" bundle using Crushed Curry ink. There's also a dotted image in the set that was used on the open spaces. Then I textured it using the "Distressed Tile" embossing folder. I didn't buy the zinnia folder, it was pretty but I was thinking it would retire too soon so I used what I had. After texturing it I cut it down to 3-3/4" x 5". I glued this piece on top of the Cajun Craze piece. 

Next came the fun part, the cutting of all the pieces. I used Cajun Craze, Crushed Curry, Garden Green and Basic White for the pieces. I assembled them all individually and then added them to the front of the card. I added the Crushed Curry one first, then the Cajun Craze one using a Dimensional behind each one. The Garden Green pieces were added next and the little star/buds were glued in place. 

The words are from the "Simply Said" set and were stamped using black Memento ink. I cut them using the third smallest stitched circle die from the "Stylish Shapes" set. I took my Cajun Craze marker and colored the edge. I had actually colored it using the "Crushed Curry" marker but it was too light so I colored over it. I was going to use my Blends pen but there was no Crushed Curry one, that's why I used a marker. Then I had to use the Cajun Craze marker because I thought the Blends pen might react differently to it. Did you really need to know all of that?  LOL  The word piece was set in place with Dimensionals and the card was done. Now to get it addressed and off in the mail for my friend.

This was a fun card to make, I do love gluing all of those pieces together. I think it's the details on it that make it more worthwhile to put together.

Thank you SO very much for taking your time to stop in and see today's note/friendship card,
Wanda

Thursday, July 11, 2024

Thoughtful Journey, Simply Said, Note Card, Friendship Card, Stampin' Up!

Hello and welcome to my blog. Today I have a super quick and easy card to share with you.

The base of my card is a folded half-sheet of Basic White card stock. It opens on the right and the fold is on the left.

I cut a 4" x 5-1/4" piece of Basic White card stock and textured it using the "Distressed Tile" embossing folder.  I glued that to the front of the card.

Next using the "Spotlight on Nature" dies I cut the second largest circle to cut the Designer Series Paper (DSP) from the "Thoughtful Journey" 6" x 6" stack. I set it in place on the front of the card using Dimensionals.

The words were stamped on a scrap piece of Basic White card stock using Mossy Meadow ink. I cut them out using the second smallest die in the same "Spotlight on Nature" dies.  I set it in place using Dimensionals on the left and a little bit of glue on the right.  And that was it, the card was done.

Embellishments could be added but I wanted to have a clean simple look.

I like how quick this card went together and how pretty it did turn out.

Thank you SO very much for taking your time to stop in and see today's note/friendship card,
Wanda

Tuesday, January 16, 2024

Go To Greetings, Nested Essentials, Perennial Lavender, Note or Friendship Card, Stampin' Up!

Hello and welcome to my blog. Today I have a pretty card to share with you that I found on the internet. You can see that card here. Mine is a bit different because I didn't have the same wording and I made a cutting mistake. Please read on to see how I made this card.

The base of the card is a folded half-sheet of Highland Heather card stock. It was cut in half on the short 8-1/2" side so once cut it measured 4-1/4" x 11".  It opens on the bottom and the fold is on the top. I cut a 4" x 5-1/4" piece of Basic White card stock and taped it to the inside.

Next I cut the background strip. The Gorgeous Grape strip is cut at 5-1/2" x 2-1/2" and the Designer Series Paper (DSP) from the "Perennial Lavender" 12" x 12" package and was cut at 5-1/2" x 2-1/4". I taped the DSP to the card stock and then that was taped to the center of the card.  Did you ever have a piece of DSP that you thought was kind of (for lack of a better word) ugly and then you see it used on a card and somehow it's not so ugly anymore? Well, that's how I felt about this piece of DSP.

Next was the larger squarish panel. Mine is cut at 4-1/4" x 3-3/4".  It should have been cut at 4" x 3-3/4". SO my DSP was cut at 4" x 3-1/2" where it should have been 3-3/4" x 3-1/2".  I taped the two pieces together and then taped that to the front of the card, centering it as much as I could by eyeing it.

The ribbon end pieces of card stock were die cut using the second and third dies from the "Nested Essential" set. The large one was cut from Gorgeous Grape and the smaller one was from Highland Heather. You can die cut your Gorgeous Grape one from the center of your squarish piece before you tape the DSP in place to save on card stock. I had some scrap so I used that.

I did not have the words used on the original card so I used the "Go To Greetings" set, white embossing powder and Versa Mark. I heat set the words on the center of the Highland Heather piece. Dimensionals were added to the back of the piece and it was set in place on the larger Gorgeous Grape piece. Then Dimensionals were added to the back of that piece and it was set in place on the front of the card. I eyed the distance between the left and bottom of the squarish DSP piece.

A linen bow was made and glued to the upper left corner of the word piece. I didn't add the rhinestone but I think I may add a brass butterfly, it's thin enough to go through the mail without incident. 

This was an easy card to make with lots of layers. I LOVE lots of layers. 

Thank you SO very much for taking your time to stop in and see today's note/friendship card,
Wanda

Sunday, September 10, 2023

Darling Details, Timeless Arrangements, Friendship or Note Card, Stampin' Up!

Hello and welcome to my blog. Today I have a card to share with you that I found on Pinterest. I thought it was a sweet card that could be used for a number of other occasions too. You can see the original card here. Please read on to see how I made this card. 

The base of the card is a folded half-sheet of Basic White card stock. The textured top piece wasn't sitting well with me. First of all I didn't have the same embossing folder, which is not a big deal, I just use something that I think looks nice.  My issue with the embossed pieces is that you can see how the Dimensionals added to the back make the piece look warped.  Had you ever noticed that before?  Me either. Not until I was making the card and I saw how thin some of these embossing folders make the card stock. I could really see the warps in the original card. So after embossing the piece I cut another 4" x 5-1/4" piece of Basic White card stock and I glued it to the embossed sheet. I set it aside to dry while I worked on the other parts of the card,.

Next I stamped the flowers from the "Darling Details" bundle. I used Melon Mambo stamped off once for the inside part of the flowers and I used it full strength for the outlines. Same with the leaves except I used Granny Apple Green ink. I die cut the pieces using the matching dies from the bundle. I also die cut the Basic White open flower pieces.

I tied a gold bow with large loops using some gold ribbon I had in my stash.  

The words are from the same "Darling Details" bundle and I stamped them using Wild Wheat ink. I didn't want to do any heat embossing. It's not one of my favorite things to do and the Wile Wheat color looked pretty golden to me. I die cut the words using the smallest rectangle die from the "Timeless Arrangements" bundle. The original card looks like it just cut the word piece on the paper cutter.  I was going to do that but wanted my piece straight! LOL

Then the circle was die cut. It's from the "Stylish Shapes" die set. It's the second largest one. I cut two because of the same warping issue.  I glued the two pieces together and set aside for a bit. 

I was now ready to assemble the pieces. First I set the embossed Basic White piece on the card front using Dimensionals.  See, no signs of warping.  Why did I not think of this before?  The card has a more professional look to it. Nice and crisp. 

Dimensionals were added to the back of the largest flower and the little flowers were set on it. I just held up the largest flower and set the smaller ones in place around it. I had enough small Dimensionals around the edges for the smaller flowers to catch one or two of them. I did the same with the leaves. Then I turned the flower over so I could see where there would be spaces to add some glue because I wanted to make sure the piece would stick to the circle. 

The circle was added next. It's about a 1/2" from the fold and I tried to center it up and down by eyeing it. It won't matter if it's not perfect. There's so much eye movement with the flowers and leaves that the eye will not catch if it's not perfectly centered.

Once the circle was added then the flower piece was set in place. The bow was slipped under the larger flower. And the white flowers were slipped in under the leaves. I did snip them so they fit better. The top two are from the same "branch". I cut it to fit on the left and took the leftover piece and slipped it in with a little bit of glue.

I snipped a little bit off the left part of the word piece and I set that in place using small Dimensionals under the "just". One about where the "j" is and one about where the "t" is.  And I called the card done.

No embellishments were added, I liked the look of it as it was. It had a nice clean crisp look to it. Going forward when I use embossed card stock that feels thin or loose after embossing my plan is to back it up with another piece of card stock for stability. I do like how it looks. 

Thank you SO very much for taking your time to stop in and see today's friendship/note card,
Wanda

Monday, August 21, 2023

Timeless Arrangements, Darling Details, Artistically Inked, Note Card, Stampin' Up!

Hello and welcome to my blog. Today I have a "different" card to share with you. I was playing around with some papers that I had and some pieces I had left over from making cards and changing my mind about colors. This is what I ended up with. Please read on to see how I made this card.

The base of the card is a folded half-sheet of Basic Whit card stock. My card opens on the right and the fold is on the left.

I cut a 4" x 5-1/4" piece of Basic White card stock and textured it using the "Exposed Brick" embossing folder. I had set it aside because I wasn't sure if I was going to glue it in place or use Dimensionals.

I die cut the rounded corners rectangle piece using two dies (at the same time) from the "Nested Essentials" die set. I used the two largest to make the frame. I used Night of Navy "Soft Shimmer" paper.

"Countryside Inn" Designer Series Paper (DSP) was used on the inside of that rectangle frame. I cut it just a bit smaller than the larger frame. I wanted it to be large enough to glue to the frame but trimmed enough to not overlap. 

The Basic White floral piece is from the "Artistically Inked" bundle. I set the piece over the DSP and moved it around until I thought it looked the best. Then I cut it to fit. I poured some glue on my silicone mat and spread it around and then I set the piece on top of the glue, pushed it down slightly with a scrap piece of copier paper and then set it in place on the DSP. 

The frame was glued in place next. And the pretty Boho Blue flowers behind the frame are from the "Timeless Arrangements" bundle. It was set behind the rectangle piece and moved around until I thought it looked nice. I did have to trim the ends a bit because they hung over too much and looked odd. Once they were trimmed it looked SO much better. Dimensionals were added to the back and the piece was set in place on top of the textured piece. It sits about 1/4" from the left side and 1/4" from the top. 

On a scrap piece of Basic White the words from the "Darling Details" set were stamped using black Memento ink. They were punched out using the "Double Oval" punch. The scalloped oval behind the word piece was punched out using the same punch from the piece of Soft Shimmer paper that was die cut from the center of the frame I had made. I glued the words to the Soft Shimmer piece, Dimensionals were added to the back and it was set in place on the front of the textured piece again placing it about 1/4" on the two sides.

I did decide to use Dimensionals on the back of the embossed piece and it was set in place on the front of the card base.

Crystal rhinestones were added to the card and the card was done.

This was a fun card and it turned out better than I had imagined. When I started it I didn't have high hopes that it would be decent.  

Thank you SO very much for taking your time to stop in and see today's note card,
Wanda


Thursday, July 13, 2023

Darling Details, Note Card, Stampin' Up!

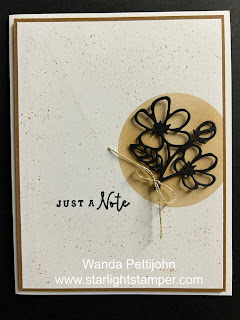
Hello and welcome to my blog. Today I'm going to share a card with you that looked SO much better in my head. But you all know I share them all with you. The good, the bad, and the ugly.  This one just doesn't seem to have any umph to it! I even speckled the background to help improve it but it didn't help! Please read on to see how I made this card and maybe you can improve on it.

The base of my card is a folded half-sheet of Basic White card stock. The card opens on the right and the fold is on the left.

I cut a 4" x 5-1/4" piece of Pecan Pie card stock. And I cut a 3-7/8" x 5-1/8" piece of Basic White card stock. I actually cut two so I could use one as a template.

I took the 2-1/8" circle die from the "Layering Circles" die set and I die cut one of the pieces of Basic White card stock. I made sure I cut off some of the edge. The two pieces of Basic White card stock were taped together with some painters tape so they wouldn't move. I took my blending brush and inked it up using Pecan Pie ink and scrubbed it over the die cut circle area. The top piece was removed and I had the stenciled Pecan Pie circle on my top layer.

The flowers were die cut from the "Darling Details" bundle using Basic Black card stock. I tied a piece of linen thread to the bottom. I laid the piece on the circle and then thought it would look better popped up. So I cut up some pieces of Dimensionals and added them to the more solid areas of the piece. I laid it on top of the circle and thought it looked better that way. Before setting it in place, I stamped the words from the same "Darling Details" bundle using black Memento ink. 

Once the words were done I took my Pecan Pie marker and flicked on some splats all over the piece. The piece was then taped to the Pecan Pie layer. Dimensionals were added to the back and set in place on the front of the card base.

The flower piece was added the card was done.

It was fun to make but not what I had in mind.

Thank you SO very much for taking your time to see today's note card,
Wanda

Wednesday, May 17, 2023

Darling Details, Friendship or Note Card, Stampin' Up!

Hello!  I'm not that thrilled about sharing this card with you.  This is not what was in my head when I started making the card.  And when I finished making it, I actually laughed out loud and said, "What a goofy looking card!" And it is.  But as always, I share the good, the bad, and the ugly with you!  I guess I can add "goofy" to that list! LOL

So I'm going to share with you how I made this card so you can improve on it!

The base of my card is a folded half-sheet of Basic White card stock I cut a 3-3/4" x 5" piece of Basic White card stock for the top layer.

I cut a 2-1/4" x 3-1/2" piece of scrap card stock for a template to draw the lines. I centered this piece on the top layer and drew the lines on the top and right side.

Next I stamped the flower from the "Darling Details" set using Berry Burst ink for the outline and Bubble Bath ink for the solid part. I die cut it with the matching dies. I also stamped the leaves using Granny Apple Green ink for the outline and Granny Apple Green stamped off once for the solid part.

I did set the flower on the top layer to see where the stem should be stamped. Then I stamped the stem using Granny Apple Green ink. 

The words are from the same "Darling Details" set and were stamped using black Memento ink.  

I set the flower and leaves in place using Dimensionals.  Then I laughed. I probably should have moved the flower down more and it may not have looked so goofy!  But it is what it is and I promise I will have a better card tomorrow!

Thank you SO much for bearing with me on this one,
Wanda