Pin It

Showing posts with label Father's Day Cards. Show all posts

Friday, May 31, 2024

Adventurous Sky, Take to the Sky, Masculine Birthday or Father's Day Card, Stampin' Up!

Hello and welcome to my blog. Today I have another masculine card to share with you. I found this one on Pinterest. You can see the original card here. I changed it just a little bit. It's such a simple card to make. Please read on to see how it was made.

The base of my card is a folded half-sheet of Basic White card stock. It opens on the right and the fold is on the left. 

A 4" x 5-1/4" piece of Boho Blue card stock was cut for the top layer. I textured mine using the "So Swirly" embossing folder. I glued that to the front of the card.

The strip of Designer Series Paper (DSP) are from the "Take to the Sky" 12" x 12"package. It was kind of nice to use up some scrap pieces. These pieces are cut 1" x 3" each and glued to the front of the card about 7/8" from the top edge. I centered the first one and then the other two were added. 

Next I stamped the plane from the "Adventurous Sky" bundle using Night of Navy card stock. The words were added next and then the piece was cut out using the third die in the "Nested Essentials" set. I did set the die over the plane before stamping the words because I wanted to make sure I got them in the right spot and straight. I put the piece in place on the front of the card and the card was done.

This was such a quick and easy card to make. It's a fun layout and I can see myself using it again sometime in the near future.

Thank you for taking your time to stop in and see today's masculine card,
Wanda

Wednesday, April 24, 2024

Let's Go Fishing, Father's Day Card, Stampin' Up!

Hello and welcome to my blog. Today I found a corner fold card with an orientation different than I have done in the past.  These cards are usually fun to make but for some odd reason I struggled with this one. Fortunately there was a video at the site to help me get it right. My problem is always that corner fold. Some papers don't like to fold as nice as others and this one caused me to struggle. But I did get it done! I found the card on Pinterest and the link from there will take you to the video.  Please read on to see how I made the card.

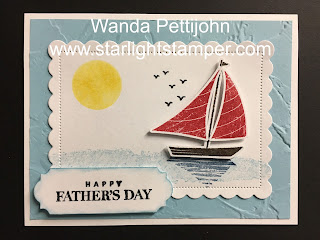
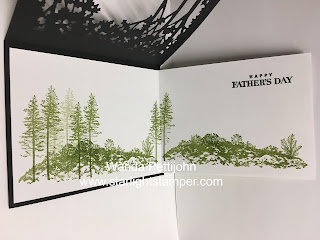
The base of my card is a folded half-sheet of Night of Navy card stock. Once cut in half on the short side, the piece measured 4-1/4" x 11".  It opens on the right and the fold is on the left. 

I taped a 4" x 5-1/4" piece of Very Vanilla card stock to the inside. Which I found brave because after taping I thought, what if I ruin the front. But I continued.

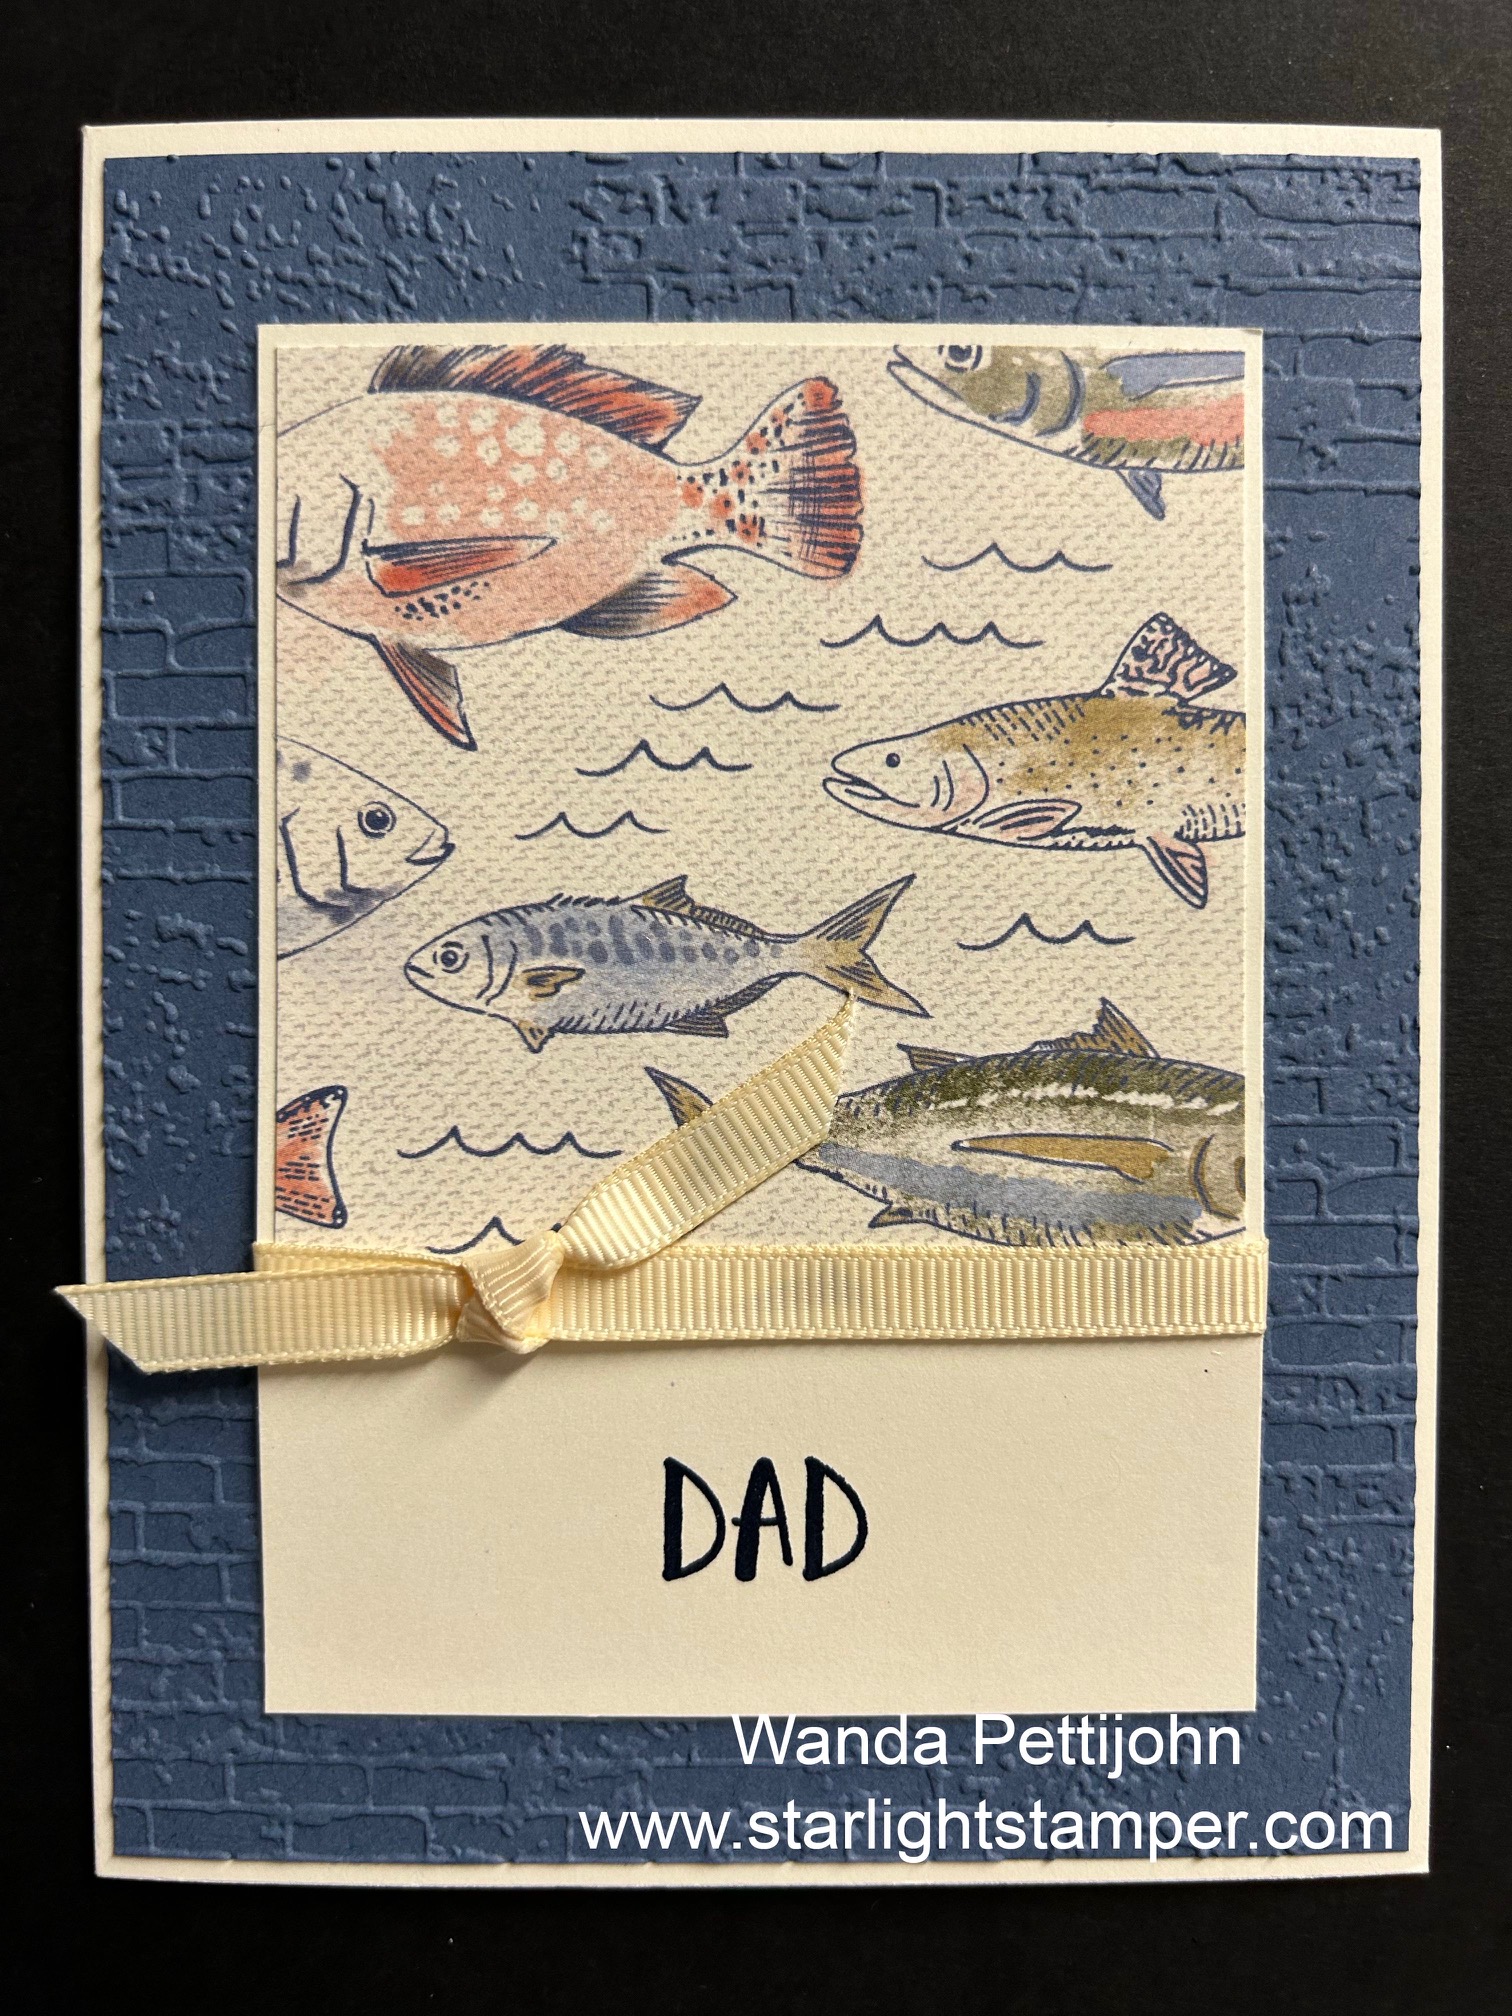
Next I cut a 4" x 5-1/4" piece of Designer Series Paper (DSP) from the "Let's Go Fishing" 12" x 12" package. 

Now when I mentioned that I had trouble folding mine, well that's because I didn't follow the directions and I just scored my piece and folded it over so it's not actually a corner flip card, it's just a corner fold. Had I followed the directions I would have had an easier time.  Though this way works and there was no cutting it was a bit more difficult to fold. 

I marked the top of my card at 1-7/8" and I marked the right side at 5/8" from the bottom. I scored it from mark to mark and I folded it over.

I took the DSP and also marked it but I went a little bit shorter, which I should not have done. If anything I should have just cut it on the inside of the marks to make it a hair shorter. Cutting it the way I did you can see the cut line on the DSP. But you might not have noticed that had I not pointed it out to you. After cutting the DSP I taped it in place. Then I glued down the corner.

For the focal piece I cut a 3" x 3" piece of Night of Navy card stock. On top of that is a 2-7/8" x 2-7/8" piece of Very Vanilla card stock and on top of that is a 2-3/4" x 2-3/4" piece of DSP from the same package. I taped all three of those pieces together and taped them to the front of the card.

The words were done on my computer because I didn't have any Father's Day stamps (that I could find) and I didn't purchase the fishing set, just the DSP. I die cut the words using the 4th largest stitched circle from the "Stylish Shapes" set and the Night of Navy circle was cut using the 3rd largest circle. I taped the two circles together and set them in place on the front of the card using Dimensionals. 

A 2-7/8" x 2-7/8" piece of Very Vanilla card stock was cut for the inside cover to hide the fold line and back of the Night of Navy square.

I colored a few pearls using the dark Night of Navy Blends pen and set them in place on the front of the card. And the card was done.

This wasn't all that bad to make but next time I will probably do it the right way. Though this was was a lot quicker!! LOL

Thank you SO very much for taking your time to stop in and see today's Father's Day card, 
Wanda

Wednesday, April 03, 2024

Gone Fishing, Days to Remember, Masculine Birthday Card, Stampin' Up!

Hello and welcome to my blog. I have a masculine birthday card to share with you today. Please read on to see how it was made. 

The base of my card is a folded half-sheet of Mossy Meadow card stock. This card opens on the right and the fold is on the left.

I cut two 4" x 5-1/4" pieces of Very Vanilla card stock. One I taped to the inside and the other I textured using the "Painted Texture" embossing folder. I glued that piece to the front of the card.

For my card I am using up pieces of Designer Series Paper (DSP). My DSP is from the "Gone Fishing" 12" x 12" package. 

The colorful fishing lures one measures 2" x 4" and the Mossy Meadow layer behind it measures 2-1/4" x 4-1/4".  I glued that piece on the front of the card and eyed it so it looked equal on the top, bottom and left side.

Next I cut a piece from the same package that measured 2" x 2".  I had stated that these were scrap but I did have to trim them a bit so they were nice rounded numbers. The Mossy Meadow layer behind this piece measures 2-1/4" x 2-1/4".  I taped that piece to the colorful lures piece.

The words are from the "Days to Remember" set and were stamped using a freshly inked (very juicy) black Memento ink pad. I punched it out using the oval from the "Dual Oval" punch. Using the same punch I punched out the scalloped oval. I taped the ovals together, added Dimensionals to the back and set the piece in place on the front of the card.

Using another piece of DSP from the same package, I fussy cut two fish for the front of the card. The small fish was glued to the bottom and the large fish has Dimensionals behind it.  And that was it, the card was done.

This was a fun card to make and I have lots more fish cut out to play with. It's amazing how many things you can fussy cut while watching tv!  This would make a nice Father's Day card too!

Thank you SO very much for taking your time to stop in and see today's masculine birthday card,
Wanda

Tuesday, April 02, 2024

Gone Fishing, Days to Remember, Masculine Birthday Card, Stampin' Up!

Hello and welcome to my blog. Today I have a masculine birthday card to share with you. Please read on to see how it was made.

The base of my card is a folded half-sheet of Very Vanilla card stock. It opens on the right and the fold is on the left.

I was using scraps from my "Gone Fishing" 12" x 12" Designer Series Paper (DSP) package. The denim looking piece measures 3" x 4" and the Boho Blue layer behind it measures 3-1/4" x 4-1/4".  I taped the two pieces together and then taped it to the front of the left side of the card.

The fishing lures piece measures 2" x 3-3/4" and the Boho Blue layer behind it measures 2-1/4" x 4". I taped the layers together and then taped that to the front of the card. I left about the same amount of space between the layers and the bottom edge of the card. It's about the same distance at the top part of the card. I also centered it on the denim piece so it looks like there's equal amounts of denim showing on each side of this strip.

The words are from the "Days to Remember" set and were stamped using black Memento ink. I punched them out using the "Double Oval" punch and using the same punch I punched out the scalloped oval. I taped the ovals together. Dimensionals were added to the back and the piece was set in place on the front of the card.

This is a very quick and easy card to make and it's great to be using those pieces of DSP that are just sitting in the bottom of the package. I have SO much DSP that I know I will never use it all up.  But I'll use what I can when I can! At least I'm making an effort, right? 

Thank you SO very much for taking your time to stop in and see today's masculine birthday card,
Wanda

Friday, September 15, 2023

Let's Go Fishing, Best Family Every, Dad Birthday or Father's Day Card, Stampin' Up!

Hello and welcome to my blog. Today I'm going to share another card with you using the same layout as yesterday. You can click here to see that card. I just wanted to show you how versatile this layout is. Please read on to see how I made today's card.

The base of my card is a folded half-sheet of Very Vanilla card stock. It opens on the right and the fold is on the left.

I cut a 4-1/8" x 5-3/8" piece of Misty Moonlight card stock and textured it using the "Exposed Brick" embossing folder. I glued the piece in place on the top of the card base.

Next I cut the Very Vanilla piece to measure 4-1/4" x 3-1/8".  The Designer Series Paper (DSP) I used is from the "Let's Go Fishing" 12" x 12" package and was cut at 3" x 3".  I taped that to the Very Vanilla piece. Like I had stated in my post yesterday, if you are not sure about the stamping of your words (anything can happen) you can add a little bit of tape to the center of the DSP and set it on top of the piece. If you mess up the stamping you can just remove the DSP and cut another piece of card stock. 

The "DAD" is from the "Best Family Ever" set and were stamped using Night of Navy ink.  Once the words were stamped I took a 4-1/2" piece of very old SO retired Very Vanilla ribbon and taped the ends to the back. I used snail tape along the area where the DSP edge is that you can see through on the backside. The ribbon ends were set in place and then taped down with scotch tape. I stayed away from the edges so I could have room for glue. The piece needs to be glued to the embossed card stock. Tape just doesn't make enough contact to stick well so I just use glue and I know it's going to stay.

I took a 4" piece of ribbon and slipped one end under the taped ribbon and a knot was tied. And the card was done.

See, super quick and easy! Oh and a very versatile layout!

Thank you SO very much for taking your time to stop in and see today's "dad" card,
Wanda


Monday, September 04, 2023

Go To Greetings, Timeless Arrangements, Let's Go Fishing, Masculine Birthday Card, Stampin' Up!

Hello and welcome to my blog. Today I have a quick and easy masculine card to share with you. Or a card for that special person that loves to fish! This card can also be used as a Father's Day card too. I found it on Pinterest, you can see the original card by clicking here.  There were no instructions, so please read on to see how I made this card.

The base of the card is a folded half-sheet of Very Vanilla card stock. The card opens on the right and the fold is on the left.

I cut a 4" x 5-1/4" piece of Boho Blue for the layer and a 3-3/4" x 5" piece of Designer Series Paper (DSP) for the top layer. It's from the "Let's Go Fishing" 12" x 12" package. I did not buy the bundle that goes with the DSP, only the DSP and I've been able to make many masculine cards for very little cost. There's lots of fun papers in this package and there's two full sheets of fish to fussy cut or to use the dies if you bought the bundle. I am considering getting another package of this DSP because of how many cards I can make at a low cost. The fish don't have a lot of jagged lines so fussy cutting is pretty quick, simple, and painless! I'm not a fan of fussy cutting but for these I make the exception.  I had cut two fish from the sheet of fishes. I taped the 3-3/4" x 5" piece of DSP to the 4" x 5-1/4" piece of Boho Blue card stock. I set them aside.

Then I die cut the rounded rectangles from the "Nested Essentials" die set. I used Boho Blue for the larger one and a piece of DSP from the "Let's Go Fishing" for the smaller one. I taped the two pieces together, added Dimensionals to the back and set them aside.

Next I stamped the words from the "Go To Greetings" set using Basic Gray ink on a scrap of Very Vanilla card stock.  Then I die cut them using the die from the "Timeless Arrangements" bundle. If you don't have that die, you can cut the piece to measure 1" x 2-3/8".  I took a small punch and punched a hole on each side for the thread. I cut two pieces of  linen thread to measure 4" each. I folded them in half and inserted the folded end in the hole on the front of the card and slipped the raw ends through the loop and pulled until it tightened up a bit around the hole. I repeated that for the other side.

Now I was ready to assemble my card.

I took the die cut Boho Blue and DSP layered piece and set it in place on the upper part of the card. I just eyed it so it looked like the top and sides were equal on three sides. It might not be perfect but it's close enough for me. Then I added some tape to the back of the words. While holding them by the strings I pressed them in place on the lower part of the card. I wrapped the ends of the threads around the back of the Boho Blue layer and taped it down with some scotch tape. The piece was then set in place on the front of the card base using double-sided tape.

The fish went on next. Dimensionals were added to the back of them and they were set in place on the rectangles and the card was done.

This was such a quick and easy card to make and when I first saw it on Pinterest I knew I just had to make it.  If I were to make another one I think I would take my Basic Gray marker and with the belly of the nib I'd go around the edges of the word rectangle so it has more of a finished look. But other than that I like it.

Thank you SO very much for taking your time to stop in and see today's masculine birthday card,
Wanda


Monday, June 26, 2023

Let's Go Fishing, Best Family Ever, Days To Remember, Masculine Birthday Card, Stampin' Up!

Hello and welcome to my blog. Today I have another masculine birthday card for you. This could easily be converted to a Father's Day card if needed!  Please read on to see how I made this card.

The base of the card is a folded half-sheet of Very Vanilla card stock. It opens on the bottom and the fold is on the top.

I cut a 4-1/8" x 5-3/8" piece of Boho Blue card stock for the layer. On top of that I taped a 4" x 5-1/4" piece of Designer Series Paper (DPS) from the "Let's Go Fishing" 12' x 12" package. 

I took the third largest stitched square from the "Stylish Shapes" set using another piece of DSP from the "Let's Go Fishing" and I die cut 2 squares. Then I took a piece of Boho Blue card stock and cut the layers behind the DSP that measures 2-1/15" x 2-1/15". I taped those two pieces together and then taped them in the corners of the front of the card.

The rectangle was cut from the same "Let's Go Fishing" DSP and was cut at 2-1/2" x 4" and the Boho Blue layer was cut at 2-3/8" x 4-1/8".  Dimensionals were added to the back and the piece was set in place on the center of the card base.

I fussy cut three fish from another piece of DSP from the "Let's Go Fishing" package. I set them aside until the words were done.

The words are from the "Days To Remember" and "Best Family Ever" sets. They were stamped using Boho Blue ink on a scrap piece of Very Vanilla card stock. I die cut them using the second smallest stitched circle from the "Stylish Shapes" die set. Then I die cut the "Boho Blue" circle layer using the die from the "Layering Circles" die that was just a bit larger than the stitched one. I taped the two circles together. Dimensionals were added to the upper part and tape on the lower part and the piece was set in place on the upper corner of the rectangle piece.

Dimensionals were added to the back of the fish and they were set in place on the rectangle and the card was done.

This was a fun card to make and I do like how it turned out. It's exactly what was in my head! That doesn't happen very often!

Thank you SO very much for taking your time to stop in and see today's masculine birthday card,
Wanda

Tuesday, March 21, 2023

Best Family Ever, Ready to Ride, Dad Card, Stampin' Up!

Hello there! I'm so happy you are here to see today's masculine card. I don't know about you but it's hard to find masculine cards because they are so limited. Today's card was one I made at Terri's Stamp-a-Stack (SAS). You can go to her site and find PDF files to download, lots of techniques and tips. She's a very talented lady and you won't  be disappointed. I was thrilled to see this card sample at Terri's event. I did not buy the stamp set/bundle because I had to stick to my budget.  

This card is also a fun fold card. This one actually has lots of space to write or stamp on the inside.  And here's how you can make one for you.

The base of the card is a 4-1/4" x 5-1/2" piece of Basic Black card stock.

The Very Vanilla piece was cut at 4-1/4" x 8-1/2" and folded in half and taped to the Basic Black piece about 1/4" from the left edge. 

You will need to cut a piece of Very Vanilla that measures 2-1/4" x 3-3/4".  The piece here was textured using the "Metal Plate" embossing folder.  What a fun folder! The layer behind it was cut at 2-1/2" x 4". The two pieces were taped together.  I prefer to glue mine because I have found that the tape is hit and miss on the surface due to the texture but once glue is set, it's there to stay! Dimensionals were added to the back of that piece and set aside.

The Designer Series Paper (DSP) is from the "Ready to Ride" 12" x 12" package and was cut at 4" x 4" and taped to the folded Very Vanilla piece. 

Fussy cutting is not one of my favorite things to do but it wasn't too bad here. And in the SAS packet you get three of them! I did cut the three and didn't whine at all!!! LOL Once the fussy cutting was done I set the motorcycle in place on top of the textured Very Vanilla layered piece. Dimensionals were added to the back but be sure not to add them to the last inch of the piece because you will tape your card shut! And you were done making your card.

I wanted to add some words to the card so I took out the "Best Family Ever" set and used the two stamps "to my" and "dad". I set them both up in my Stamparatus and made sure they were straight. I stamped them using black Memento ink on a scrap piece of Very Vanilla card stock. I die cut them using the fourth largest stitched circle from the "Layering Shapes" die set. Then I die cut the Basic Black circle from the "Layering Circles" die set. I taped the two layers together. I added two small Dimensionals to the back of the circle where it would be sticking to the checkered DSP background piece and I added a little bit of glue where it would be sticking to the textured Very Vanilla piece.  And the card was done!

This was a fun card to make and I think it would make a wonderful Father's Day card too. I'm not rushing the seasons but just looking ahead at what other occasion the card would work with.

Thank you SO very much for taking your time to stop in and see today's masculine card,
Wanda

Monday, May 09, 2022

Let's Set Sail, Celebrating You, Father's Day Card, Stampin' Up!

Today I was trying to use up a little more of the retired "New Horizons" Designer Series Paper (DSP) and here's what I ended up with.

The base of my card is a folded half-sheet of Basic White card stock. This card opens on the right and the fold is on the left.

I cut a 4-1/2" x 3-1/4" piece of Misty Moonlight card stock for the layer and a 4-3/8" x 3-1/8" piece of Basic White for the top layer.

I die cut the circle from the "New Horizons" DSP using the largest circle die.  I colored the top of the piece a little with some Cajun Craze ink.

I stamped the sails using Misty Moonlight ink and the boat using Soft Suede ink. Then I punched them out with the matching punch.  I set them on top of the circle to see where the birds were going to go.  Then I stamped the birds from the same "Let's Set Sail" set using black Memento ink.

The circle was set on top of the Basic White layer piece so I could see where the words would go. The words are from the "Celebrating You" set and were stamped using Misty Moonlight ink.

I taped the two layers together.  Then the circle was set on top. The boat was placed next and the sails were set in place using Dimensionals.  Then this piece was taped to the front of the card and the card was done.

This was a very fun and quick card to make. I think it could also be used for a masculine birthday, get well, thinking of you, or even a sympathy card.

Thank you SO very much for taking your time to stop by and see today's Father's Day card,
Wanda

Wednesday, May 04, 2022

Grassy Grove, Father's Day Card, Stampin' Up!

And the waiting continues.  I did not pay for the rush order so you're going to have to hear me whine until it arrives!!! LOL  And in the meantime I will have to play with what I have and count down the days!!

The base of my card is a folded half-sheet of Basic Black card stock.  This card opens on the right and the fold is on the left.

I die cut the tree scene from the "Grassy Grove" bundle. I also die cut the two deers. I tried to center the die as much as I could.

Then I added a piece of the "New Horizons" Designer Series Paper (DSP) to a piece of Basic White card stock that was cut at 5-1/4" x 4".  I cut two pieces that size.  One for the inside to write on.  After taping the DSP to the Basic White piece, I glued it onto the  Grassy Grove die cut piece. I added a little bit of glue to some of the tree branches so they wouldn't stick up. 

Next I tucked the deers in after adding tape to the back of them.

The words are from the "Celebrating You" set and were stamped using black Memento ink on a scrap piece of Smoky Slate card stock.  I trimmed it to measure 2-5/8" x 1/2". I snipped the ends and then added Dimensionals to the back and set it in place on the front of the card. 

This was a fun and super quick and easy card to make. What I like about this set is that it's versatile. This card could be used for a masculine birthday, get well, or a sympathy card.

Thank you SO very much for taking your time to stop by and see today's Father's Day card,
Wanda

Tuesday, April 19, 2022

Masculine Birthday or Father's Day Card, Stampin' Up!

My card today is probably closer to a masculine birthday card than a Father's Day card but it could work for both.  And it will work for both if you change the wording!! I found this card on Pinterest. You can see the original here. I did not find much info on how to make it, so here's how I did it. 

The base of the card is a folded half-sheet of Mint Macaron card stock. The layer on top of that is a 4" x 5-1/4" piece of Soft Succulent card stock. And the focal piece is a 3-7/8" x 5-1/8" piece of Basic White card stock.

The first thing I did was I stamped the water. I inked up the image using Mint Macaron ink and then I tapped the edges with some Soft Succulent ink but it didn't show up. I probably should have gone further inside the image or maybe used a darker ink. 

Next I stamped the boat from the "Let's Set Sail" set on a separate piece of Basic White card stock using Smoky Slate ink. I punched it out using the matching punch.

Then I stamped one sail using Soft Succulent ink and the other using Mint Macaron ink. I also punched those out. 

I set the boat in place on the "water" and then set the sales in their respective places but I didn't affix them yet. I needed to see where the words would go.

The words are from the same "Let's Set Sail" set and were stamped using black Memento ink.  Then the birds were added.

The sails were set in place.  A 4" x 5-1/4" piece of Basic White card stock was added to the inside and the card was done.

This was a very fun card to make and even though I didn't have the same card size as the original card did, I made it work and it turned out rather well.

Thank you SO very much for taking your time to stop by and see today's masculine card,
Wanda

Monday, April 18, 2022

Let's Set Sail, Father's Day Card, Stampin' Up!

I was thrilled to see that the "Let's Set Sail" set and punch made the cut. This is a fun set to play with and it's always good to have a couple sets that can be used for masculine cards.  I found this card here and made a few little changes.

The base of my card is a folded half-sheet of Basic White card stock. This card opens on the right and the fold is on the left.

I cut a 4" x-5-1/4" piece of Crushed Curry for the layer and then a 3-3/4" x 5" Basic White piece for the next layer. I taped the two layers together and then taped them to the card base.

The Designer Series Paper (DSP) is from the "Ice Cream Corner" 12" x 12" package. I measures 3-3/4" x 1-3/4".  I taped it to the bottom of the Basic White layer.  

I used the 3-5/8" x 2-1/4" Stitched Rectangle die for the Basic White focal piece and I cut the Crushed Curry layer behind it at 3-3/4" x 2-3/8".  
I took the Basic White focal layer and stamped the water using the image in the "Let's Set Sail" set and Pool Party ink. I stamped that image twice, though I could have moved it down a bit more but it still looks nice.

Next I stamped the boat pieces. The one sail is Crushed Curry, the other is Flirty Flamingo, and the boat is Pool Party.  I set the boat piece on top of the focal piece so I could see where to stamp the shadow image. I used Pool Party ink and I stamped that image twice.  Before I assembled the boat on the focal piece, I stamped the birds using black Memento ink and taped it to the Crushed Curry layer. The boat was set in place using Dimensionals and the same for the sails.

I tied a black and white piece of Baker's Twine around the piece and then added Dimensionals to the back and set it in place on the front of the card.

The words are from the "Many Messages" set (which is retiring) and were stamped using black Memento ink on a scrap piece of Basic White card stock.  The "Many Messages" set has a matching die that cuts all the words at one time. I only used the one word and die cut it out. Using scrap card stock works well for that.  Even though it's retiring, I'm not sure I'm ready to give it up. I like having all of those different shaped words and dies that fit each one. After the words were stamped and die cut, I took my Pool Party marker and ran the belly of the nib around the edge of the piece to add a touch of color. I added a Dimensional to the left side and tape to the right side and I set the piece in place on the card.  Under that piece I had taken my blending brush and made a sun but it got covered by the wording.

I colored two pearls black and set them in place on the front of the car and the card was done.

This was a very fun and easy card to make. What I like best about it is how colorful it is.

Thank you SO very much for taking your time to stop by and see today's Father's Day card,
Wanda


Monday, March 21, 2022

Let's Set Sail, Celebrating You, Father's Day Card, Masculine Card, 2022 Stampin' Up! Spring Mini Catalog

I have been using the "Celebrating You" set an awful lot. It's got a lot of fun wording in it and in different fonts.  I wanted to make a masculine card today and I saw the Father's Day wording so I went with that.  Here's how I made my card. 

The base of the card is a folded half-sheet of Basic White card stock. This card opens at the bottom and the fold is at the top.

I took a  4" x 5-1/4" piece of Balmy Blue card stock and textured it using the "Painted Texture" embossing folder. I glued it to the card base.

Then I die cut the scalloped edge rectangle from the "Colors & Contour" bundle. I stamped the water using Balmy Blue ink that was stamped off once. 

Next I stamped the boat using Early Espresso ink. The sails were stamped using Real Red ink. I punched them out with the matching punch.  I glued the sails to the mast and set it aside. 

I punched a 1" circle and used it as a stencil. I took my blending brush and scrubbed in some Daffodil Delight ink.  

Then I set the boat about where I wanted it to go so I could stamp the shadow. Did you ever get a stamp in your set and you look at it 15 different ways and still can't figure out what it is?  Well, that was this image for me. It wasn't until I saw it on a card someone had made and the lightbulb brightened up the room!!! LOL  Yup, it's a shadow!  I stamped it using Misty Moonlight ink. The birds were stamped using black Memento ink. 

The rectangle was then glued onto the front of the card. The sail boat was set in place using Dimensionals.  

The words are from the "Celebrating You" set and were stamped using black Memento ink. They were die cut using a die from the "Ornate Frames" die set. I took my blending brush and brushed the edges using Balmy Blue ink. I set the word piece in place using Dimensionals and the card was done.

This is a very quick and easy card to make. And I like the set even more now that I know what all the pieces are for! LOL  

Thank you SO very much for taking your time to stop by and see today's Father's Day card,
Wanda


Tuesday, March 08, 2022

Let's Set Sail, Celebrating You, Father's Day Card, 2022 Stampin' Up! Spring Mini Catalog

I am still on a quest to use as much Designer Series Paper (DSP) as possible but I'm spotting some pretty cards on Pinterest that I'd like to make that have no DSP at all.  Defeats my quest, doesn't it?  LOL  Oh well, I'll try to use up as much as I can, when I can.  SO, today's card uses a sheet from the "New Horizons" 6" x 6" package.  I did find this card on Pinterest. You can see the original card here. 

The base of the card is a folded half-sheet of Basic White card stock. A 4"x 5-1/4" piece of Basic White card stock was cut for the textured layer. I textured it using the "Painted Texture 3D" embossing folder. I didn't have the same folder that was used on the original card so I just used what I had. All you need is a neutral texture. And if you don't have any embossing folders, you could crunch the piece up and open it back up or you could just leave it plain.  I glued my textured piece to the card base.

I cut the DSP at 4-1/4" x 3" and the Misty Moonlight card stock was cut at 4-1/2" x 3-/4".  

The words are from the "Celebrating You" set. I was looking for words of sympathy but I didn't have any that would fit in that area that were current. I could have used retired but I figured I could easily make this into a Father's Day card using the words from that set. I stamped them using black Memento ink. 

The birds are from the "Let's Set Sail" set and were stamped using black Memento ink. I taped the DSP to the Misty Moonlight piece. Dimensionals were added to the back and they were set in place on top of textured piece and the card was done.

This is a very quick and easy card to make. I may see about making a sympathy card using retired words. I don't have very many in my stash.

Thank you SO very much for taking your time to stop in and see today's Father's Day card,
Wanda


Sunday, March 06, 2022

Grassy Grove, Many Messages, Thank You Card, 2022 Stampin' Up! Spring Mini Catalog

I found today's card on Pinterest. I was looking for a sample card using the "Grassy Grove" set. I wanted to keep it simple and quick. Plus I wanted to use some Designer Series Paper (DSP). I found the card here

The base of the card is a folded half-sheet of Basic White card stock. This card opens on the bottom and the fold is on the top.

I cut a 4" x 5-1/4" piece of Soft Succulent card stock for the layer.

A 3-7/8" x 5-1/8" piece of Evening Evergreen card stock was cut for the layer the trees were cut from. 
The trees are die cut using the "Grove" dies. 

A piece of DSP from the "New Horizons" 6" x 6" stack was cut just under 3-7/8" x 5-1/8".  I glued around the edges of the Evening Evergreen piece and set it on top of the DSP. I got mine a bit off and trimmed it with my scissors.  I added Dimensionals behind it and set it on top of the Soft Succulent piece. 

The words are from the same "Grassy Grove" set and were stamped on a scrap piece of Evening Evergreen using Versa Mark. Then heat embossed with gold embossing powder. I die cut them using the "Message" dies from the "Many Messages" bundle. There's a lot of fun dies in that set. It's fun because the words are all on one stamp and the dies are all on one piece of metal. So you can cut 20 words at one time. I only cut the one I needed. I was glad those words fit into that space because I really liked the ribbon look. I glued the word piece to a 2-1/16" x 1-1/16" piece of gold foil card stock. Dimensionals were added to the back of it and it was set in place on the front of the card.

I added a few gold "Metallic Pearls" to the front of the card and the card was done.

I want to play with this set some more. There's a LOT of DSP in that stack and there's some fun deers in the die set.  This would make a great Father's Day card, Masculine Sympathy card or Masculine get well card. Another versatile set!  I think I'll try another card without the DSP for those of you who didn't purchase the "New Horizons" package.

Thank you SO very much for taking your time to stop by and see todays' masculine card,
Wanda

Saturday, February 19, 2022

Grassy Grove, Father's Day Card, 2022 Stampin' Up! Spring Catalog

Father's Day? Yup, I have SO many birthday cards in my stash but only a few Father's Day cards.  Though this card could be used for a masculine birthday, but also a masculine get well, sympathy or thinking of you cards.  But I opted for Father's Day today. I found this card here but I couldn't find the front of the card but it wasn't difficult to figure out. You can see the original inside of the card here

The base of this card is a folded half-sheet of Basic Black card stock. This card opens on the bottom and the fold is on the top. The original card opens on the right with the fold on the left. I had already cut my card stock before I looked at the construction of it. But either way works, so make it the way you like. Whichever way you make it, it's not going to stay shut. I had to use a small clothespin to hold it shut for the picture. 

I die cut the front with the die from the "Grassy Grove" bundle, the die set is called "Grove Dies". 

Next I cut a 10-1/2" x 4" piece of Basic White card stock. I scored it at 5-1/4" and folded it in half. This piece will open on the left and the fold will be on the right.  

A 3-7/8" x 5-1/8" piece of Designer Series Paper (DSP) from the "New Horizons" 6" x 6" stack was used for the background. Some grass was stamped on the bottom using Old Olive ink and the trees were stamped using Old Olive ink. I did use my Crumb Cake marker and drew up the stem but it wasn't dark enough. But had I used Early Espresso it would have been too dark. So if I were to make this card again, I would just use Old Olive ink on the whole thing. I set this aside.

On the inside I stamped the hills and trees using Old Olive ink. I also stamped the words from the "Celebrating You" set using Mossy Meadow ink. I thought Old Olive would be too light.

Then I taped the DSP to the front and this piece was taped to the inside of the card. 

I closed the card so I could see where the deer would go. I die cut my deer using Basic Black card stock, it was what was left over from the center of the forest scene I cut on the front of the card. I used double sided sticky paper behind the deer because I didn't want to mess around with glue or tape, especially on those thin legs.  And that was it. The card was done.

I thought this card would be a lot more difficult to make than it was. I was surprised at how quickly it went together and how easy it was.  The DSP did most of the work! 

Thank you SO very much for taking your time to stop by and see today's Father's Day card today,
Wanda

Thursday, February 03, 2022

Let's Set Sail, Masculine Birthday or Father's Day Card, 2022 Stampin' Up! Spring Mini Catalog

I found this fun and adorable card at "Claire Daly Creates". I have followed her blog for several years and have enjoyed her posts. She's very talented.

The base of the card is a folded half-sheet of Basic White card stock. The card stock was cut in half on the short side so once cut it measured 4-1/4" x 11".  This card opens at the bottom and the fold is at the top.

A 4" x 5-1/4" piece of Basic White card stock was cut and then die cut with the circle die. The second largest circle die from the "Layering Circles" die set. I should have cut the circle up a bit higher because I could hardly get the word piece in place.  

Next the piece was textured using the "Tasteful Textile" embossing folder. 

I took a 3-1/4" x 3-1/4" piece of Basic White card stock and used my Blending Brush to scrub on some Pacific Point ink for the sky.  That is such a pretty color. I set this piece in my Stamparatus and I set the birds stamp where I thought they were going to be placed. Then I stamped the birds using Pacific Point ink. Then this piece was glued to the back of the circle.

Two strands of white Baker's Twine was tied around the top of the piece but it should have been tied around the piece after it was set in place on the front of the card with Dimensionals. OOPS!!!  I think it would have made it easier to tie!  Live and learn, right.  Or just pay better attention!  LOL

The sail boat was then made. The boat was stamped using Basic Gray ink and the sails were stamped using Real Red ink. There's a matching punch too!  Made it easy to cut the pieces!  I love matching punches and dies. I set these pieces aside.

The words are from the same "Let's Set Sail" set and were stamped using Basic Gray ink. They were cut out using the smallest "Stitched Rectangle" die in the grouping of 8 dies. I added Dimensionals behind it and set it in place on the bottom left corner. 

Then I was able to add the boat. I glued the base of the boat in place. The sails were added using Dimenisonals. And the card was done.

It's a very quick and easy card to make and I would love to make a couple more with a "Father's Day" message and adding the Baker's Twine around the whole card front and not just the textured piece. 

Thank you SO very much for taking your time to stop by and see today's masculine card,
Wanda

Thursday, January 13, 2022

Let's Set Sail, Senior Years, Masculine Birthday Card, 2022 Stampin' Up! Mini Catalog

The new stuff arrived!  YAY!  So today I thought I'd use the new "Let's Set Sail" set and matching punch!  Ya gotta love those matching punches and dies!!! I know I do!  

The base of my card is a folded half-sheet of Basic White card stock. My card opens on the right and the fold is on the left.

I cut a 5-1/2" x 3-7/8" piece of Designer Series Paper (DSP) from the "Simply Marbleous" 6" x 6" stack from the Sale-a-Bration catalog.  I taped it to the front of the card.

I took a piece of DSP from the "New Horizons" 6" x 6" stack and die cut it using the 4th largest stitched die in the "Rectangle Stitched" Framelits.  If you don't have these dies you can cut the piece 2-5/8" x 4".  And I cut the Basic White layer behind it 1/4" larger. So it would measure 2-7/8" x 4-1/4". 

I stamped the boat using Soft Suede ink and the sails were stamped using Pool Party ink on Basic White card stock. I did stamp and punch them all separately because I tried to cut them all together and I made a mess of it, so I found it easier to just cut them one at a time. I added small Dimenisonals behind them and set them in place on the stitched rectangle piece of DSP. Then I stamped the birds using black Memento ink.

The words are from the "Senior Years" set and were stamped on a piece of Basic White card stock using Soft Suede ink. I cut the piece 3/8" x 1-1/2".  I added Dimensionals behind it and set it in place on the DSP.

I added Dinensionals behind the stitched rectangle piece and set it on the Basic White piece. Then I wrapped some white Baker's twine around the two pieces 3 times and tied a not in the front. This piece was glued to the front of the card and the card was done.

I do like how this card turned out. It's a great masculine card and would be a great Father's Day, sympathy or thinking of you card too.

Thank you SO very much for taking your time to stop by and see today's masculine card,
Wanda

Sunday, June 20, 2021

Handsomely Suited, Father's Day Card, 2021-2022 Stampin' Up! Catalog

What I really like about some of the Stampin' Up! stamp sets with the matching dies is that they are easy for children to play with and create. My granddaughter who just turned 6 made this card for her dad. 

The tie is from the matching dies set "Suit & Ties". And the Designer Series Paper (DSP) used for the tie is from the "Well Suited" 12" x 12" package. Super easy to cut.

The words are from the "Handsomely Suited" set and were stamped using Night of Navy ink. I let my granddaughter stamp the words on by herself too.  After all it was her card to make but I was there if she needed me.  

I did cut the base of the card for her though, it was a folded half-sheet of Basic White card stock. 

When she was done stamping the markers came out and she wrote on the inside and also filled it with lots of hearts!  I didn't take a picture of that because I felt it was personal.

I think she did a great job on the card and her dad will love and cherish it.  And there was also a bonus here. She had gotten a Rainbow Loom and after a few minutes of teaching her some tricks to avoid the bracelet falling apart and little rubber bands flying around the room, she caught on and even mastered it. She made a total of 13 of them before her dad came to pick her up. She made a special one for her dad and put it inside the envelope. 

She had fun making this card and was SO proud of it.


The envelop was sweet too! 

To all the dads out there, I hope you had a most wonderful day.

Thank you SO very much for taking your time to stop by and see this sweet Father's Day card,

Wanda

Monday, April 12, 2021

Handsomely Suited, Father's Day Card, 2021 Stampin' Up! Spring Catalog

Today I thought I would have some fun with the "Handsomely Suited" set/bundle. I ordered the bundle so I could get the stamps and dies together. There's some fun dies in there and I hope to play with them sometime soon. But for today, this is what I came up with. Something fairly easy and fun for Father's Day.

The base of my card is a folded half-sheet of Basic White card stock. On top of that is a 4" x 5-1/4" piece of Designer Series Paper (DSP) from the "Well Suited" 12" x 12" package. I taped the piece in the middle  area because I knew I had to remove it for the second cutting. After taping, I used the third smallest "Stitched Rectangle" die and die cut the center. I lined up all sides as best as I could to get it centered or to give the appearance of being centered! 

After cutting I removed the DSP. I took the DPS and used the next size up "Rectangle Die" and centered it around the cut out area. I taped it in place with a couple pieces of Post It tape to hold it in place and I cut it out. The stitching doesn't show up so well on the DSP but it is there! Then the DSP was taped to the front of the card. You may want to put the DSP on top of the card first to make sure it all lines up. Mine was a hair off in centering and once I turned the piece around to the top was on the bottom and the bottom on the top it fit much better. So it's not perfectly centered, it just looks like it.  After making sure I got the pieces on the right spot I taped it to the front of the card. Before you cut out the piece you could add a tiny piece of DSP to the top so you'd know which end was up. I didn't think of that until just now!  DUH!  Gotta love those "DUH" moments! LOL  

Next came the words from the "Handsomely Suited" set. I stamped them using Pacific Point ink. My pad was a bit dry so it's not as solid as I would have liked it and I even stamped it in the Stamparatus. You almost have to use that to get the words straight. I put a scrap piece of copier paper on the front of the card and then stamped the words to make sure they were straight and centered. Then I stamped the words. But I didn't remember to check the edges of my stamp and I got ink by the "Have".  UGH.  And I had to stamp twice because the ink was too light. So I inked up the words again and I remembered to clean the edge but it was the wrong side.  Again, UGH!  So now I had this nice dark mark on my card. The first time it was light. So the words "now you did it" rang in my head.  What to do?  What to do?  I had some colored sequins so I thought I'd use a royal blue one to cover that mark. It worked and I was hoping it wouldn't give it too much bling for a masculine card.  I think it will work. It's just one sequin, any more and I think it would be too much. Oh and one more thing about the words. I covered the bottom word "Handsome". I didn't want that on my card. Not that the person receiving it isn't handsome but it just didn't seem right on a Father's Day card to someone who isn't my father. 

So now onto the bowtie. I die cut it from a piece of DSP from the same "Well Suited" package. There's even an oval for the center of the tie to die cut. I cut out the bow and the center piece. Before I had added the words I was thinking of putting the bow on one of the corners but it gave it that "Hello Kitty" look so I decided to do the words first. After seeing the space that was created from masking off the "Handsome" on the words I realized I had a gap to fill. When I centered the stamp I included the "Handsome" in the space. But I think this was a happy accident. (I make a lot of those!).  I added Dimensionals to the bottom of the bow and the bottom center of the bow and set it in place. Then I added the center of the bow. Before you stick the bow, make sure none of it sticks to the inside of the card.  Once the bow was added, the card was done. 

I like how it turned out. It's masculine looking and a perfect card for Father's Day. It would also make a great masculine birthday card too! This was fun to make and I can see myself using this layout again.

Thank you SO very much for taking your time today to see this easy Father's Day Card,
Wanda