Pin It

Showing posts with label General Cards. Show all posts

Thursday, March 04, 2021

Sweet Strawberry, 2021 Stampin' Up! Spring Catalog

Here's another card I ran across on Pinterest and just had to make. I love the black and red theme. I also love the Buffalo Plaid background. You can see the original card here

The base of the card is a folded half-sheet of Basic White card stock. Next is a 4-1/8" x 5-3/8" piece of Real Red card stock. Die cut a 3-5/16" oval from the center of the Real Red piece and set it aside. It's the second largest die in the package of "Layering Ovals" dies.

The Buffalo Plaid background piece was cut at 4" x 5-1/4" and taped on top of the Real Red piece.  A piece of black ribbon was wrapped around the two pieces before they were taped to the front of the card.  I cut my ribbon about 6-1/2" long. I added some double sided tape to each end and set it in place on top of the Buffalo Plaid piece. I also added some scotch tape to the ends of the ribbon on the backside to hold them in place better. Now the piece was ready to be taped to the front of the card.

The strawberries were stamped using black Memento ink for the outline and Poppy Parade for the solid part. I was going to use Real Red but forgot. Most of the strawberries I'd been stamping were made using Poppy Parade.  I didn't notice until I was assembling the card. I had to fussy cut my strawberries because my punch is on backorder and is not here yet. 

I stamped all the images using black Memento ink. The solid part of the stems were stamped using Granny Apple Green ink and so were the leaves. The little flowers were stamped only with no center coloring and they were fussy cut as well, though they would have been anyway, the punch is only for the strawberry and stem.  

The curls are from a die from another company. It's actually from a winter one and I had to cut off the snowflakes to make it work.  

I needed to die cut a Basic White oval that measured 2-15/16", it's the third largest oval in the set. And I die cut a Basic Black scalloped oval just a bit larger than the white oval. I taped the three ovals together.  

To assemble, I taped the leaves down first and then the center strawberry. The other two strawberries were set in place using Dimensionals and the little flowers were set in place using a Dimensional on each one as well. The little curls were slipped under the strawberries.

The piece was set in place on top of the card using Dimensionals and the card was done.

This was a very fun card to make and would be even more fun if I didn't have to fussy cut!  But it was worth it. I like the looks of this card.  I'm not sure if I should add some words on the bottom right. I will stamp something and just set it there to see if I like it or not.  It's such a pretty card as it is. The original card had "hello" across two of the strawberries.  

Thank you SO very much for taking your time to stop by and see what I did today,
Wanda


Saturday, July 06, 2019

Wiggle Worm, Humorous Card, Get Well Card, 2019-2020 Stampin' Up! Catalog

Today I wanted to play with the "Wiggle Worm" set.  I wasn't going to get this set but I remembered I had a lot of fun many years ago with a different bug set that Stampin' Up! had so I decided to buy it.

The base of my card is a folded half-sheet of Basic Black card stock.  On top of that I taped a 4" x 5-1/4" piece of Pear Pizzazz Designer Series Paper (DSP) from the 6" x 6" Subtles pack.  You get 40 sheets in that pack and they last a very long time. I like it now that they are 6" x 6" instead of 12" x 12"  I rarely put a dent in those and they were so expensive. These are more affordable. 

I cut a strip of Whisper White card stock that measured 1-3/4" x 5-1/4".  I textured it with the "Layered Leaves" embossing folder.  I taped it to a piece of Basic Black card stock that measured 1-7/8" x 5-1/4" and I taped those to the DSP.  

I stamped the cute bug using black memento ink on a 2-1/8" x 2-1/8" square of Whisper White card stock.  I colored him in using the light Granny Apple Green Blender Pen.  Then I drew around the square body parts using the light Old Olive Blender Pen.

I colored the wings using both the light and dark Smoky Slate Blends Pens.  I colored the wings in with the light first and then went round the inside edges using the dark pen.  Click on the photo for a better view.  

I colored the mouth in using the light Flirty Flamingo Blends Pen.  

I colored the bottom part of the bug in using the dark Daffodil Delight Blends Pen.  I stamped the "highlights" around the bug bottom using Daffodil Delight ink.

After the coloring, I cut a 2-1/4" x 2-1/4" piece of Pear Pizzazz card stock and a 2-3/8" x 2-3/8" piece of Basic Black card stock and I taped those layers together.  

The words were done on the computer. The font I used was "Curlz MT".  I don't know if I had added it to my computer or if it came with it.  I just liked the way it looked and ran with it. It's size 12 and I did bold it.  I cut the words out and it measured 2-3/4" x 1-1/2".  I cut a 2-7/8" x 1-5/8" piece of Pear Pizzazz card stock and a 3" x 1-3/4" piece of Basic Black card stock.  I taped the layers together.  I taped the word layers in place on the card front and I set the bug image in place using Dimensionals.  

And for the final touches, I put a little glue on the bug bottom and sprinkled on some Dazzling Diamonds glitter to give it a bit more glow! And I added some Wink of Stella to the wings.

I think this card was very fun to make. It makes me smile to look at it.  I love the poem.  I found it on the internet many years ago.  I tried to find the author but from what I have seen, it's anonymous but thought to be a British author because of the word "bum".  I just love it and I thought it fit well with this image.

Thank you ever SO much for stopping by today,
Wanda

Tuesday, March 20, 2018

Lots of Lavender, Spring Card, 2018 Occasions Catalog, Card Technique

Today I'm going to share with you a version of the "Double Point Fold Card".  

I used the "Whole Lot of Lovely Decorative" Series Paper (DSP) and the "Southern Serenade" stamp set from the 2018 Occasions Catalog.

You can see how to do this technique by watching the video here.  

I colored my flowers in using the Wisteria Wonder light and dark Blends markers and the Old Olive light and dark Blends markers.  

You don't even have to be good at coloring to use those markers and make your work look fabulous.  I just scribbled on the flower petals with the lighter color and added the darker color in the centers. If you click on the photo you can see the coloring a lot closer.  I colored the entire leaves with the light Old Olive and just added some of the dark Old Olive where I thought it would look best.  Super easy to color, trust me!!!  I colored over the flowers with "Wink of Stella" and then added pearls to each flower.  And that was it.  It's a fun card to make and I LOVED the coloring the best!

Thank you SO much for visiting today,
Wanda

Friday, January 26, 2018

Amazing You, 2018 Sale-a-Brations Card

This card is far from the one that was in my head, though I do like how it turned out.  The one in my head was kind of a mess anyway!! LOL

This was fun to make, though I am not a big fan of heat embossing but I sucked it up and did it anyway!!!

The base of my card is a folded half-sheet of Bermuda Bay, the next layer is a 4" x 5-1/4" piece of Pool Party and the top layer is a 3-7/8" x 5-1/8" piece of Whisper White.

I masked off the edges of the Whisper White piece. I used removable tape, though I think some retired Washi tape would work well too. I always forget to use that. I took copier paper and some removable tape and masked off about 1" on the bottom and 1-1/2" on the top.  You don't have to be exact.  Then I stamped the flower from the "Amazing You" set using VersaMark and I heat embossed white embossing powder on it.  Leaving the masks on, I sponged in some Pool Party ink first and then some Marina Mist.  I could have added some Bermuda Bay, but that color was just too dark and the Bermuda Bay ribbon from the "Shimmer Ribbon Combo Pack in the 2018 Sale-a-Bration catalog blended in nicely.  I was glad because I don't have a lot of current ribbons.

After sponging, I took a paper towel and wiped across the sponged band to make sure there was no wet ink on the flowers.  Still leaving the masks on, I stamped some Crump Cake images on the bottom part and the top right.  I removed the mask and stamped an entire flower on the upper left side.  

The words are from the same "Amazing You" set. I stamped them using Bermuda Bay ink.  I wanted to use a piece of a paper doily but I didn't have any current ones, so I decided to use the scalloped tag punch and cut off the scallopy end of that tag.  I had used a piece of Whisper White that I had spritzed with Pool Party ink mixed with rubbing alcohol and I added about 8 drops of Wink of Stalla to give it a shimmer.  I wrapped the new Bermuda Bay ribbon around the card and taped the edges on the backside.  I slipped the scalloped tag topper under the ribbon and I tied a ribbon bow to hide the hole of the tag.  

I die cut the "amazing" from the "Celebrate You" thinlits dies using the metallic silver card stock.  I glued the word in place and set it aside to dry while I taped the other layers together. By the time I was ready to tape the front panel on, the word was set up enough to work with.  And that was it.  But now that I look at it, I think it could maybe use some rhinestones.  Or maybe not???  I do like how the card looks, just as it is.

Thank you SO much for visiting today,
Wanda

Monday, June 26, 2017

Wild About Flowers, Accordion Fold Technique, 2017-2018 In Colors Card

Here is another fun "Accordion Fold" Technique card.  This card was made by Shelly.  I need to check with some of these gals to see if they have a blog that I can link back to.  

This card was made using the new Powder Pink in-color.  The set used here is "Wild about Flowers".  I need to get me some of that new ribbon too!!!  I don't have very many accessory things here, well, current ones that is.

You can find the instructions to make this fun fold here.  It's a very fun and easy technique.  You can decorate all of the sides of the folds or just the "visible" ones.  I usually just decorate the "visible" ones because I think I need a place to write a little note on the inside somewhere!

Thank you SO much for stopping by today,
Wanda
 

Wednesday, May 17, 2017

Remarkable You, Paper Piecing Technique

I received this card last night at Terri's Tuesday Technique Night.  It was made by Shelly.  The technique was called "Paper Piecing".  It's where you stamp the image on the base cardstock, here it's the Whisper White oval and then you stamp the image again onto decorative paper.  Then you hand cut the image inside the stamped lines and set the cut piece in place over the stamped image on the Whisper White piece. The card I posted yesterday shows the technique a bit closer. You can see that card by clicking here.  It's kind of like coloring in the image but you're using Decorative Paper instead of inks or markers. 

The set used here is "Remarkable You."  I don't have this set, but I do love the flowers in it.  I'm not going to order it, the new catalog is coming out in about 2 weeks and I'm looking forward to ordering some new stuff! 

This is a fun technique, please read yesterday's post to see how the technique is done.

Thank you SO much for visiting today,
Wanda

Saturday, October 15, 2016

Jar of Love, Hair Gel Technique

Today I'm going to share with you a technique card I made at Terri's last Technique Night.  This is the "Hair Gel" technique.  I have never done this technique before.  I thought it was a fun technique to do but not sure if I would make anymore.  You can't mail them unless you actually go to the post office so they can stamp ORM-D on the envelope.  The bag the gel is in could become damaged and leak all over the place.  It's only hair gel, but they don't know that.  So you'd have to hand deliver a card like this, which is okay too.  As for me, I don't think I will make anymore. But I am going to post the directions on here because you never know.  I might want to do it again if I see something that looks like it should be under water!!! LOL

To make this we stamped the jar from the "Jar of Love" set.  Then we used the die that came with it and cut out the center of the jar.

Next we put some hair gel in a plastic cup and added a little inker to give it some color.  We stirred gently.  If you stir too fast, you can get too many bubbles in it. We used the bags that Stampin' Up! sells and added a spoonful of hair gel.  Try to work out as many bubbles as possible.  Then we folded and taped and folded and taped and folded and taped the bag so it wouldn't leak.  I've seen these done with small zip bags too.  If I were to make another one, I would use the zip bags.  But Stampin' Up! demonstrators would probably use the other method because they can promote the plastic bags that Stampin' Up! sells.

Once the bag was taped so it wouldn't leak, we taped it to the back of the jar piece.  There is a Whisper White piece of card stock behind the jar piece that is cut the same size as the jar image (3-1/2" x 2-1/2").  Then that piece was set in place on the blank piece using Dimensionals.  Then the whole thing was set in place on top of the decorative paper and textured card stock.

I added some half round pearls to mine, only because I had picked up the block with the fish on it and someone had gotten ink all over it.  I wasn't aware of it and I touched my card.  So I hid those little marks of orange ink with the pearls.  It fit with the theme of the card, and had I not told you why they were there you would have thought they went with the design of the card.  Am I right?  LOL

That was pretty much it.  It's a very quick and simple technique to do, just a little messy.  Oh and it smelled pretty!!! LOL

Thank you SO much for visiting today,
Wanda

Sunday, August 21, 2016

Papillon Potpourri and August 2016 Paper Pumpkin Alternate Card

I got my August Paper Pumpkin kit last week and I didn't have time to play with it.  I opened it up and was delighted that it was filled with card stuff instead of 3D things.  I prefer to make cards with my kit.

The brightly colored focal piece is really a pocket card that I trimmed up so I could use it on a full size card.  There's 3 of those pocket cards in the kit. They are printed on both sides so I can make 6 focal pieces with it.  I may make one pocket card but I'm not sure. For now I'm going to play with them cut up.

I stamped the "For You" that came in the kit.  I used Memento Black ink on it. The kit came with Early Espresso.

For my background I stamped the little flower that came in the kit. I used Smoky Slate and I stamped off once before I stamped it on the card.

I stamped the butterfly from the "Papillon Potpourri" set using the Smoky Slate ink directly from the pad.  Then I punched it out.  The main color in the focal piece is Mint Macaron, so I used that for the back border layer, the focal piece layer and for the butterfly.  I set the focal piece and the butterfly in place using Dimensionals.  I added some pearls to the butterfly and that was it.

You can see other Paper Pumpkin ideas here.  

Thank you SO much for visiting today,
Wanda

Wednesday, June 22, 2016

A Bella & Friends Birthday Card Open Panel Technique

Today's card comes to you via Terri's Tuesday Technique night.  It was made by Julie.  I didn't want to buy this set but now I'm thinking about adding it to my wishlist. I still want the cat set below it on page 101 of the 2016-22017 catalog. I LOVE cats but after seeing Julie's card, I may want to get the dog set too.  And it looks like she used the new circles and scallops framelits too.  I LOVE the smaller scallops.  Too darn cute.

The technique used here is the "Open Panel" one. It's super easy to do. I have made several of these and they are fun.  You can see my card here and you'll also find the instructions for it there as well.  Be sure to check it out.  There's another link on there that leads you to the first card I made using this technique.  There's SO many fun possibilities with this technique.

Thank you SO much for visiting today,
Wanda

Saturday, December 19, 2015

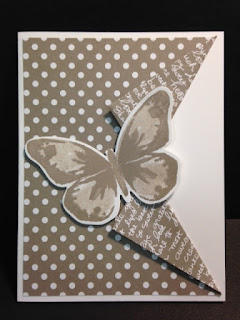
A Watercolor Wings Peek-a-Boo Card Technique

Today I a going to share a card technique that I learned at Terri's last Technique Night.  It's a super easy, quick and fun technique. 

We used the "Watercolor Wings" set.  I don't have this set.  It's on my wish list but I have so many sets that I doubt I would have much time to play with it.

To make this card we took a folded half sheet of Whisper White cardstock.  Then we took a piece of decorative paper that was cut 4" x 5-1/4".  We rolled the paper to find the center of the long side.  We gave it a little pinch to mark it and then we cut it the length of the snips.

Next you fold back the snipped pieces.  When you are done it sort of looks like a collar.  

And then to decorate it we used Dimensionals to the left wing and center of the butterfly.  If you want to add words, you will need to do it before the butterfly is added.

I told you it was quick and easy, didn't I?  And I LOVE the effect!!!

Thank you SO much for visiting today,
Wanda
 

Friday, June 12, 2015

You've Got This General Card

Last night I attended Terri's ever so fun Stamp a Stack.  This was one of the cards we made.  It's from the "You've Got This" set.  I believe that set is on my wishlist.  It's way down on the list though. I wasn't sure I really wanted it.  Has that ever happened to you? You see a set you're not sure of and then you see what has been done with it and then you want it!!  That happens to me a lot.  Sometimes I think I'm losing my creativity.  

This card was super easy to do.  Though there was fussy cutting on the flower.  I'm so spoiled by dies and punches now that cutting with scissors is something I try to avoid at all costs.  

I love how clever Terri was with the stem.  It's the leaf from the Bird Builder punch.  I never would have thought of that!!! Leave it to Terri to come up with those creative ideas!!

The paper is the new Watermelon Wonder.  The stem is Pear Pizzazz, the base of the card is Basic Black and the focal layer is Whisper White.

The background image was stamped using Memento ink.  And that image comes with the flower image!!!  I do so love that background!!

I had a great time and I have a few more cards to share with you in the next week or so!

Thank you SO much for visiting today,
Wanda

Wednesday, February 25, 2015

Mother's Love General Card

Today's card is made using one of my most favorite layouts.  I LOVE it because it allows you to use those smaller images.  It really brings them up front.  They don't seem so small and lost.

I used the Crisp Cantaloupe color for the card.  It's got several layers but it went together very quickly.  I was able to use some of the paper from the decorative pack too.  I never seem to go through all of that pack before the colors retire.  I find it hard to believe that I can't use up a pack in 2 years!!!  

This card can be used for a number of occasions too!  After I get done posting here, I am going to add a pearl to the center of the flower.  Seeing it in the photo I thought the center of that flower could use something.

This is a fun card to make.  I've made lots of them and I will probably make lots more.  Instead of the ribbon and bow, you can add words there to narrow down an occasion if you want.  Or you can let the inside of the card speak for you!

I am pre-posting my card today.  Tonight I am going to be making a sterling silver spinner ring.  It is our Christmas gift from our boss.  We are all being treated to a class on silver smithing!! I'm so excited about this class.  Not just because I get to play with fire, but because I get to play with silver and learn to hammer, form, and solder!!!  I will take a photo of it and share it with you tomorrow!!

Thank you SO much for visiting today,
Wanda

Wednesday, October 29, 2014

A Flower Shop and Gorgeous Grunge Stamp a Stack Card

Today I am going to share with you another card I made at Terri's Stamp a Stack.  I love the Flower Shop set. And what could make a Flower Shop card even better???  Gorgeous Grunge!!!  Another set I love to play with.  Oh and don't forget the Petite Petals set.  The best part about these sets is, they have matching punches.  Well, not the Gorgeous Grunge set but the other two!!! 
I have gotten SO spoiled by sets that have matching punches.  I tend to buy them over other sets because I just hate to cut out stamped images anymore!!!

Isn't this just a fun and pretty card?  The flowers with the rhinestones were set in place using Dimensionals.  This card can be used for SO many different occasions.  The Coastal Cabana card stock is such a pretty color and when I look at this card it just makes me feel happy!  It's got a calm feeling to it to me!

This is a super fast Stamp a Stack card to make.  I think this would be pretty in other colors too.  I may have to give that a try sometime soon!
Thank you SO much for visiting today,
Wanda

Monday, October 27, 2014

For All Things Fall Card

Oh my, this was such a sweet card to make.  This is another card from Terri's Stamp a Stack. 

I LOVE the colors of this card.  That Mossy Meadow is such a pretty green.  The decorative paper is from the "Color Me Autumn Designer Paper.  I do like the "For All Things" stamp set but I didn't order it.  I just didn't see myself making a lot of fall cards.  I have too many other stamp sets that I have hardly used.  Why do I do that?  I buy the ones I like, not a big surprise.  But I find myself not using the sets as much as I thought I would.  And I usually make at least one card a day!! 

Ok, back to this fun card.  We stamped off on the background image and then stamped on the Very Vanilla card stock.  Then we inked up the leaves image and stamped on top of the background stamped area.  Then the piece was punched out using the 2-1/2" circle punch. A ribbon was tied around the panel and taped in place on top of a piece of Very Vanilla.  Then that piece was taped in place on top of the card.

I just love card with that little strip of decorative paper.  It's a great way to get a bit of color on a card and yet leave enough paper to make a bunch of cards.  Perfect for those of you who do Stamp a Stacks.

Thank you SO much for stopping by today,
Wanda

Sunday, October 26, 2014

Bloom With Hope and Hardwood

Today I'm going to share with you a card I made at Terri's wonderful Stamp a Stack.  I LOVE attending her events.  She's such a talented person! 


This card was fun to make.  I used the Hardwood background stamp using Strawberry Slush card stock and ink.  I also sponged the edges of my card.  I tore the front about 3/4" inward and I sponged that edge too.


The white piece was punched with the Scalloped Tag TopperPunch and Strawberry Slush Thick Twine was tied to the top.  That piece was stamped using the "Bloom with Hope" set.  I sponged the edges of that piece too.  And then that piece was set in place using Dimensionals.

I LOVE the color of this card and I love the Hardwood background in the same color as the card stock.  It's a nice effect.

Thank you SO much for visiting today,
Wanda

Monday, October 13, 2014

Lovely as a Tree General Card

Okay, I confess.  A couple of days ago I used the large single tree from the "Lovely as a Tree" set and I did not put the set away.  I was glad I hadn't because I was thinking of Christmas cards and I thought it might be fun to make a winter solstice card.  I know, here in Minnesota it's very unlikely to have green grass in the winter!!!  I wasn't thinking when I was picking out the colors.  The grass is green and the sky is blue! I learned that as a kid!! LOL  I used Coastal Cabana for the sky.  I think Soft Sky may have been the way to go to give that look of winter.  And I would probably not do anything on the ground.  Or maybe some ultra fine white sparkly glitter!  I'm not a big fan of glitter but I will use it if I think it will greatly improve the look of the card of give the illusion I'm trying to go for! 

After making this card I think I may pass on using this set for our Christmas card.  I like how this card turned out but I don't think I want to make it our Christmas card.

This is a super easy and very fun card to make!  

Thank you SO much for visiting today,
Wanda

Wednesday, August 06, 2014

Petite Petals

I had found a fun card on Pinterest (that I forgot to save so I could link).  It had three layers of decorative paper at the bottom.  I used Washi tape.  It had a square frame, I turned mine on end.  It had flowers on the frame and it had a butterfly.  The original card was more elegant looking than mine.  I am so sorry I didn't save the link.  If you know of this card, please let me know who made it so I can link it.  I do know it was not made using Stampin' Up! products.  

I changed the background dots too.  Oh and did you see my butterfly?  I used Washi tape on card stock and then I punched it out.  I just tried to make this card as simple as possible.  

Adding the pearls to the flowers and to the corner of the frame gave it a more finished look.

The base of my card is a half sheet of Crisp Cantaloupe.  I think that about covers it!

Thank you SO much for visiting today,
Wanda 

Thursday, June 26, 2014

Work of Art and Flowering Flourishes

 I am SO loving this "Work of Art" set.  I'm sure you can tell that because I made a card using it yesterday!!! And I may use it again tomorrow!!! LOL

I found this card made by Nan Cee's at Split Coast Stampers. The minute I saw it I knew I had to make it.  Of course I didn't pay close enough attention so my first attempt was way too dark.  Stamp off on the Mossy Meadow and the Blackberry Bliss.  The top color of the Blackberry Bliss is actually a 4th generation inking.  I stamped off then I stamped on my card stock, I moved the stamp up on top of the first stamping, and I stamped again.  Then I moved it up one more and stamped again.  So ink up your stamp well because it has to stamp 4 images (one on scrap paper and 3 on your card).  Does that make sense?  

Then I stamped the "Flowering Flourishes" image using black StazOn.

I punched out the butterfly using the Blackberry Bliss card stock and I placed a half a Dimensional under each wing.  I did not remove the protective layer on the top, just on the bottom to make it stick to the card.  I glued the butterfly in place in the center of it and then added the half Dimensionals.  By not removing the protective piece, the wings will stand up nicer.  So when your card is sent through the mail, once it's opened the wings should pop back up.   

I just LOVE the look of this card.  I did change the orientation of the butterfly a bit but that was because I didn't get the stamped images centered as well as I wanted to so I put the butterfly up on top more to fill in the extra white space.  It was a lot of fun to make too.  Oh and you can whip out quite a few of them in not time at all!

Thank you SO much for visiting today,
Wanda

Thursday, April 03, 2014

Springtime Hello

It is springtime but you would never know it here in central Minnesota.  It's the winter that won't die!  We are in the midst of yet another snowstorm.  Hopefully this will be the last of them.  I'm SO ready for spring!

Today I thought I would share with you a card I made using the "Springtime Hello" set.  I just love this bee but didn't think I could make a card just using the bee so I added a flower to it.  But now I'm thinking that I really can make a card with just the bee.  I will work on that tomorrow and share it with you!!

This was a very easy card to make, even though it contains several panels and layering.

I used a marker to color in the flowers and leaves.  I huffed on them and then stamped the image.  The bee was stamped using black StazOn and the body was colored in using the Daffodil Delight marker.  The pretty decorative papers came from the "Fresh Prints" Designer Series Paper DSP) Stack. There's 48 sheets in that pack to play with!  

The base of my card is Pool Party.  It wasn't listed on the front of the paper pack but it did blend well with the DSP.  I used Coastal Cabana card stock for my layering.  And that was about it.  Very simple and quick.  It's a fun "general" occasion card.  It could be a birthday card, thinking of you card, friendship card or even a get well card.

Thank you SO much for visiting today,
Wanda

Tuesday, September 17, 2013

Papillon Potpourri Card

Today's card is another that comes from you via Terri's latest and extremely FABULOUS Stamp-a-Stack.  I do not own the beautiful Venetian Romance decorative paper.  And now I'm wishing I would have ordered some.  It didn't grab me in the catalog but in person it's SO pretty.  

This is a very simple card to do.  A few layers and some punching and die cutting and you're done.  Well, you do need to stamp the butterfly before you punch it out.  

As I'm looking at the Crisp Cantaloupe card stock and the Soft Suede card stock together I can see myself using those two colors in a fall card.  I keep thinking on those lines because the new in colors are such soft colors that they remind me of spring and summer and I'm thinking I won't be using them much this winter.  

It's hard to see it in the photo but the butterfly has 3 pearls going down the center.  It's such a lovely card!  

Thank you SO much for visiting today,
Wanda