Pin It

Tuesday, November 30, 2010

Deck the Halls Designer Fabric and Paper

Glad you made it back. I know you were curious to see what I did with that fun flower I made yesterday. Well, I altered a note holder and added the flower to it.

These little note boxes are easy to cover. I just cut the decorative paper to fit around the box and about an inch or so higher. You do need to have some extra on top to fold over.

Once I got the paper around the box I added a piece of ribbon. The edges meet under the flower so the ribbon has a smooth look all around!

I glued the flower in place and put the paper back inside the box! Super easy and SO quick too!

These could make great teacher gifts and they are something the kids can help you work on. This would also be a fun Stamp Camp item too! I'm going to hang onto mine and sell it at the next craft fair. I say that now but I will probably end up giving it away!!

Thank you SO much for visiting today,
Wanda

Monday, November 29, 2010

Deck the Halls Designer Fabric Flower

I bought this fabric and I've actually caught myself hoarding it! I'm trying SO hard not to hoard these things anymore! SO as I was looking on the Stampin' Up! web site I saw a flower made using the "Scallop Circle #2" Sizzix die and actually said out loud, "that flower is SO cute and I think I have that die!" I went over to the dies and sure enough there it was, hardly used at all. So the fabric meets the die and 8 scallops later I'm putting this little holiday flower together.

I took one piece of cut fabric and folded it in half and then folded that in half again and I put a pin in the center of it to hold it shut. I did this for all of them but you have to work at it one at a time. I just put two points together. The pieces were side by side and I sewed at the point. Yes, hand sewed with a needle and thread! I did this for the next two. Then for the remaining four I layered them on top and sewed them onto the bottom layer, one at a time.

I placed the adorable green button from the "Candy Cane" designer buttons pack and I sewed it on.

This is such a cute "bobble." It could be used on a hair clip, as a pin, an ornament for the tree, decorations for a Christmas gift or anything your imagination can come up with. And tomorrow I will show you what my imagination came up with. I'd show you today but I don't have it done. I've been slacking off!!! LOL Tune in tomorrow!

Thank you for visiting today,
Wanda

Sunday, November 28, 2010

Quick Christmas Card!

This card was made by Sharon, a VERY creative stamper. Don't let her tell you different. She has some great ideas when stamping. The last time she was here to stamp she brought some cards she had made and this is one of them.
I am not sure if the front of the card is decorative paper, gift wrapping paper or a pre-made card front. She layered it on top of a piece of white card stock cut a bit larger than the colored image. She punched a hole in the colored top layer and centered an epoxy sticker on it. This epoxy sticker is of Santa with a bag of toys. Click on the photo to see a closer view. I just love how the tree in the large image and the Santa in the small one keep the "theme" going. I thought it was a cleaver idea and a great way to use those smaller epoxy stickers. I tend to use them on a package. Kind of boring but now I have a new use for them!!! Aren't they cute on a card.
You can make your own epoxy type stickers by stamping on card stock and adding some Crystal Effects to it. After it dries you add the tape and stick it in place. Ok, it's not so much a sticker until you put the tape on it!! I will be having a tutorial on it soon. There is a little trick to it to keep the ink from running. I will share that tip with you and you will soon be using those little stamp images in whole different way!

Thank you Sharon for letting me share your wonderful card with everyone!

And thank you SO much for visiting today,
Wanda

Saturday, November 27, 2010

Little Ornaments Wheel Weekend Project

I think these little wheels are SO darn cute. I need to use them more. I did buy the "Little Ornaments" one because I just couldn't pass it up! Isn't it cute? You may need to click on the photo to see them closer!

Now these little candies would make great little gifts for anyone. Pop some in the mail box, give some to teachers and friends. They are pretty much suitable for anyone.

I don't remember what blog I saw these and I'm SO surprised at myself that I remembered them at all. I think seeing the bag of Life Savers was what triggered the memory! I wish Life Savers would trigger more memory issues. Then they would surely live up to their name!!! LOL

To make these I used the "Curly Label" punch. I was able to use scraps for these. Gotta LOVE that!! I punched the labels out. Then I scored them but I did find that you can just fold them in half without scoring and they folded just fine. I stamped the words on. These words came from the "Teeny Tiny Wishes" set. And I sponged the edges.
As I recall the label headers were stapled to the candies. I didn't really like that. I don't like seeing staples on my stamping. SO I used some Sticky Strip tape and attached them that way. It holds just as well as the staples and I didn't have to struggle with trying to keep it all straight and staple at the same time.
Once you tape the candy inside and fold the label closed you are done! SO simple and extremely quick. Though when you make a whole bag of them it doesn't seem quick. But if you look at the big picture they don't take long to make one!

Toss them in a basket at your upcoming holiday events! They are SO cute and colorful!
These would be great for a Make n Take, a Class Project and it's even something that the kids can help with!

Thank you SO much for visiting today,
Wanda

Friday, November 26, 2010

Tags til Christmas Card

It just seems like the day after Thanksgiving is the day you bring out all of your Christmas stuff and start decorating and for many of you, you begin your shopping. I stay at home as much as possible. I have gone shopping on the day after Thanksgiving a couple of times in my life. The first year after we were married I ventured out and did not enjoy the day. It was just too crowded for me. SO the next year I thought I would get groceries that day instead. I had come to the conclusion that any place that had a cash register was going to be swamped. Since then I just stay at home and dig out the Christmas tree and decorations and play Christmas music or pop in a holiday DVD. It's SO much less stressful, unless the lights are in a big knot! LOL

SO to kick of the Christmas season I have a fun card that Nancy designed. The snowman is from the "Tags til Christmas" set. This snowman is SO cute!! I have used him on several cards. You can't see it in the photo but the card has the Smooch Spray all over it. I like this set because if you don't want to use it to make tags, it still gives you the option to use it for cards! This is a great quick, simple and clean looking card. Thank you Nancy!!

Thank you all for visiting today (after your shopping!),
Wanda

Thursday, November 25, 2010

Happy Thanksgiving!

I hope you all are enjoying the day. Hopefully you didn't have to work too hard preparing the meal. I spent some time cleaning off my dining room table so we could eat at it! It's always full of beading stuff! I cooked and did dishes! Now I'm relaxing and I may just fill the table full of beads again so I can make a bracelet or two. It's SO relaxing!

I have a couple of cards to share with you today. They are Thanksgiving cards from the last Shoebox swap. The next DIVA Day and Shoebox swap is coming up and the theme is Christmas cards. I can't wait for that one! I'm SO excited for Christmas. I LOVE the lights, the music, the darkness around 5 pm! And I do love the snow!

SO onto the cards! The first one (the one with the bird) was designed by Sandy. I actually put mine together wrong. The orientation is not correct on my card. The card was to be turned so the short side (the fold) was on the top. I was so in awe at the cuteness of the card I didn't pay attention when I was putting it together! I like it the way it turned out. It's such an adorable card. I SO love using that bird punch! Thank you Sandy for the fabulous card!

The next card is by Juliann. The image of this card was stamped on with VersaMark and the colors were chalked in. I forgot how much fun chalks are. I love how we used that little strip that comes off when you are done punching the scallop edge. I was SO glad I punched mine straight so my thin strip was nice and straight! Thank you Juliann for such a pretty card and the great idea on using that little strip that I usually toss!

Thank you all for visiting today, enjoy the rest of your holiday!
Wanda

Wednesday, November 24, 2010

Greeting Card Kids Sketch Challenge

Wow, these Wednesdays sure do sneak up on me rather quickly!! I almost forgot about the sketch. I'm TRYING to get the house cleaned up for Thanksgiving. Mostly the dining room table. It's FULL of beading stuff! And I know after I get it all put away I will not remember were I put certain beads and will be spending so much time trying to hunt them down! I think I need a better organizational system.

Anyway, onto this fun card. When I see a square card posted at SplitCoastStampers I tend to not want to play that week. But lately I have been and after making the card for today's sketch I came to the conclusion that I am no longer intimidated by square cards. Not that I will be making a lot of my cards square. It costs too much to mail them, so I will be sticking with the regular size ones. And of course at SplitCoast you do have the option of working with the card at 4-1/4" x 5-1/2". But I stuck with the size they posted and FINALLY... I no longer fear them. I just jumped right in on this one.

I thought it was fun to play with the "Polka Dot" and the "Petals-a-Plenty" embossing folders. And of course I can't forget about the most wonderful snowflakes using the "Northern Frost" die. They are just too pretty. And when you add bling to them it's even prettier!

For my layers I added the following: 1 is Whisper White card stock and the "Polka Dot" embossed paper. Layer 2 is a piece of "Deck the Halls" decorative paper. Layer 3 is a piece of Cherry Cobbler card stock. Layer 4 is a piece of Always Artichoke card stock that was embossed with the "Petals-a-Plenty" folder and layer 5 is the "Greeting Cards Kid" image on Whisper White card stock. I colored it in with a blender pen and markers.

And I topped it all off with the cute snowflakes from the "Northern Frost" die. One of my favorite dies. And of course I had to add some rhinestones to the snowflake and the tree to give it that magical touch!

I was pleased with this card when I was done. Mostly because I did not even whine when I saw it was a square card and also because I was able to make the card square!! Color me happy!

Thank you for visiting today,
Wanda

Tuesday, November 23, 2010

Falling Leaves Thanksgiving Gift

It's always so fun when you can recycle! I love to take jars and fill them with goodies and decorate the outsides.

I needed a quick and simple Thanksgiving gift so I took a jar I had cleaned out and thought I would play around with it. The first thing I needed to do was to see what Thanksgiving sets I had that wasn't retired. Not that it really mattered but I do try to work with the current sets as often as I can. I found the "Falling Leaves" set and thought I could have some fun with it.
The first thing I did was punched out some scallops and circles to see which ones would fit best on top of the jar. After doing that I punched them out in the colors I wanted. Here I used Pumpkin Pie, Chocolate Chip and Whisper White.

Next I stamped the leaves in Pumpkin Pie and Chocolate Chip. I cut them out with my snips. Now that was the part that took the longest and yet it really wasn't all that long to cut out 3 leaves.
I stamped the circle image from the set in Pumpkin Pie and punched it out.

I took my Pumpkin Pie ribbon and added Sticky Strip to the back of it and taped it in place around the edge of the jar lid. I stuck on my largest scallop with the Sticky Strip as well. Then I set all the layers in place. I didn't quite secure the top layer. I wanted to make sure I got the leaves where I wanted them and then I pressed down on that circle to set it in place.
I tied two pieces of ribbon around the neck of the jar, Pumpkin Pie and Chocolate Chip. I tied the bow but it didn't want to stay so I did glue it in place. I filled the jar with those cute candy pumpkins and viola! It was done! It was a quick and easy project to do and to be honest here, I thought it was a lot of fun to do it too!

Thank you SO much for visiting today,
Wanda

Monday, November 22, 2010

Paisley Prints Thanksgiving Card

Oh my, I just can't believe how my day got away from me. It was such a busy day and by the time I was able to get down to my workroom it was LATE! So my post is a little late tonight but not by much!

This beautiful card was designed by Amy from our DIVA group. I can't say it enough, they are such a great bunch of gals and SO talented.

The leaf images on the card are from the "Paisley Prints" set. Again, another set I don't have but was fortunate to get to play with it a bit. Though Amy did stamp the one leaf and had them all cut out for us!! It's SO funny, we just LOVE those cards with the cut out images set higher on the card with Dimensionals but we don't like to cut them out!!! You whine and you cut it out. You put the card together and you are SO happy with the end results. So then what was the whining all about? I don't know, I think I just like to whine about it at first!! LOL

This was a very fun card to make and I LOVE the color scheme here too. Not the usual fall colors but they sure are pretty together.

Thank you Amy for allowing me to share your fabulous creation with everyone!

I am working on some fun projects so be sure to check back.

Thank you for visiting today,
Wanda

Sunday, November 21, 2010

Acetate Tissue Paper Technique Technique Page

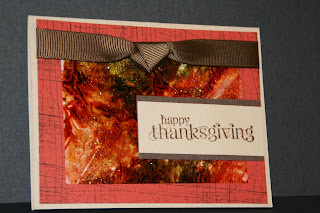
It's about time I post another technique page and what better way to display it than with the card Sue A. made for the DIVA shoebox swap!

Her card was a big hit on DIVA Day! It's such an awesome technique too. And it's fairly easy to do. I have not tried it yet but will be after I submit this post. I plan on doing mine in blues to work it in with a Christmas/winter (maybe snowman) theme! Wish me luck! I'll just follow the instructions given to me and posted on here for you!

This is another page in the 4th set of Technique Pages. I have other techniques about ready to post soon too but I've had so many other fun things going on that I have not been able to squeeze them in. But trust me, they are coming!

Ok, onto this technique. You need the following items: tissue paper, Window Sheets, inkers, Crystal Effects and Dazzling Diamonds (optional but such a pretty touch it adds), oh and rubber gloves are nice to have too!

Pour some Crystal Effects on your Window Sheet. Drop some inker colors around the sheet. With your fingers move the Crystal Effects and inkers around on the sheet until it is covered. Add some Dazzling Diamonds if desired. Cover the Window Sheet with the tissue paper and allow to dry. You can heat set it but be careful, the base of this is a plastic Window Sheet. It's just best to let it dry naturally. That's it. It's more of a "how patient can you be" type technique, since you have to wait for it to dry. It's best to do it at night and in the morning it's ready to play with! Have fun with it. I'd LOVE to see what you do with it!

This technique will be on a 6" x 6" piece of card stock as were all of the other techniques. I am just showing a finished item using the technique.

There are still a few technique pages left for sale plus they are on CD for you to print out to hold Technique Club with. Each CD also contains a photo of the finished technique page to copy or for reference. Click here to see the sets.
edited on 11-23-10: The window sheet side is facing up. The piece was taped in place on the tissue paper side.

Thank you SO much for visiting today,
Wanda

Saturday, November 20, 2010

Day of Gratitude

This is another one of those sets I had pondered over buying and didn't. And yet I got to play with it at DIVA Day! That is another fun thing about being a part of the DIVA group!

This card is such a fascinating card. It was designed by Connie. She is such a creative stamper. Her cards never cease to amaze me.

She used the Square Lattice embossing folder for the background. But here's the fun and cool thing about the card. The "flower" part was stamped first and then cut out. After that it was placed on the More Mustard layer and then dry embossed. It now looks like it's a single piece of card stock. That embossing just melded the papers together. It's SO cool! I think if you click on the photo you can get a better view of it.
This is also a great card (changing the wording of course) for a masculine card.

It's such a great Thanksgiving card! Thank you Connie for letting me share it with everyone!

Thank you SO much for visiting my web site today,
Wanda

Friday, November 19, 2010

Bells & Boughs Christmas Card

I can't believe how many pieces were cut out to create this beauty. Teresa, my downline designed this card. She is SO talented. It was her swap for DIVA Day last Sunday. She used the "Bells and Boughs" set. It's such a fun set to play with.
She cut out all the pieces and it's difficult to see in the photo but there is Crystal Effects on some of those pieces. It added such a beautiful touch to the centers of the flowers. Click on the photo for a closer view.

There are SO many fun elements to this card. The brushed gold card stock that was cut using the "Top Note" die. This piece was cut in half.

The satin and organza ribbon that is tied around the brushed silver card stock.
The background is done using the "Christmas Collage" stamp. She inked it using Real Red ink, which is the same color as the base of the card.
The images were colored in with markers. And the layers of flowers were attached using Dimensionals. It's such a pretty card and it was a BIG hit on DIVA Day!
Thank you Teresa for allowing me to share your card with everyone and for designing such a fabulous card!!
And thank you SO much for visiting today,
Wanda

Thursday, November 18, 2010

Candy Cane Christmas Fabric Mittens Weekend Project


I was playing around with the "Candy Cane Christmas" fabric. I cut out 4 mittens and I cut out one piece of felt for lining for each pair of mittens. I pinned them together and hand stitched them in red.

The top part of the mitten is just a piece of white felt I cut out and glued in place. I didn't want to stitch it, stitching there would distract from the hand part of the mitten.

I took some black craft wire (it was all I had on hand) and made some loops in it. I poked a hole in the mitten and inserted the wire. I wound the wire around the paper piercing tool and squished it as flat as I could get it against the fabric. I repeated this for the other mitten. The mittens measures 4" x 3" each. With the wire the whole thing measures 8" tall by 6" wide. I'm not sure if I'm going to hang this on the tree, on the wall or give it away! Click on the photo for a closer view.

There's lots of other weekend projects (over 125) on my web site. Take a look, just click here.

Thank you SO much for visiting today,
Wanda

Wednesday, November 17, 2010

A Cardnial Christmas Sketch Challenge Card

This is the card I made for this weeks Sketch Challenge over at SplitCoastStampers. I am so partial to this stamp set. I have used it many times and never grow tired of it.
I did have a little trouble with the card. I wanted to use Bravo Burgundy card stock. I liked it better with the berries in the background paper but the Bravo Burgundy ribbon looked just awful on it. I switched the color over to Real Red and I was much happier with it.

SO for the base of my card, it is now Real Red. The next layer is from the "Deck the Halls" decorative paper pack. Actually all three of those layers came from that pack of paper. There's LOTS of pretties in that pack!

The bird is from "A Cardinal Christmas" set. I stamped the bird using black StazOn. I let it dry for a few minutes. I went and cut out my card stock while it was drying. It doesn't take too long to dry but I had just inked the pad and wanted to be sure it was dry before I applied my markers to it. I didn't want to smear it nor did I want black permanent ink on my Real Red marker. I colored in the leaves in using Always Artichoke and the birds beak and feet were colored in using More Mustard. I colored directly from the marker, no blender pen was used here.

The background was sponged in using a dauber sponge and Crumb Cake ink. The edges were sponged in using Chocolate Chip ink.

I attached the ribbon before I put the card together. And that is pretty much all there was to the card. I like how it has a "richness" to it.
If you have time I highly recommend you play with the layout. It was a fun one!
There is a post on SplitCoast that has a link to ALL of the sketches. Pick one and play with it. I went back to that page and I downloaded a few of them I didn't have. I keep them all in an album and when I need one I know where they are. Each week I print the sketch, cut it out and put it in my album after I'm done making it. Go have some fun! You don't have to post yours on SplitCoast if you don't want to but I think it's fun if you do! The people there are SO nice!

I look forward to getting a comment with the link to your card posted at SplitCoast!!! (Game on!!!)

Thank you SO much for visiting today.
Wanda

Tuesday, November 16, 2010

Bright Blessings Thanksgiving Card

Sunday was our DIVA Day event and shoebox card swap. I SO love those card swaps. I am among a very talented group of gals and all of the cards are ALWAYS fantastic!!

This card was designed by Diane. She used the "Bright Blessings" jumbo whee. She embossed the words on so we just had to put the card together.

The Pumpkin Pie piece on the background was done using the "Square Lattice" embossing folder.

Now these fabulous leaves are from the "Leaves #2" Sizzix die. I don't have this die but what is fun about these swaps is, you get to play with some of the things you don't own! Sometimes it leads to adding the item to your wish list too!!! You should see my wish list!!! LOL

These leaves were also textured with the "Square Lattice" embossing folder. They are such a wonderful touch to this card.

This card could also be used for a masculine birthday card or a fall thank you card.

Thank you Diane for letting me show everyone what a fabulous card you made!

Thank you for visiting today,
Wanda

Monday, November 15, 2010

Jolliest Time of the Year Christmas Card

Can you believe it's the middle of the month already? And Thanksgiving is next week!! WOW, is time every going fast!
Ok, onto this card. I just LOVE this "Jolliest Time of the Year" stamp set but I "just" love the snowman only! It's not that the other images aren't cute, it's just that I LOVE snowmen!! And as you can see, this is NOT a snowman on the front of this card!!! I thought I would broaden my horizons and give these other images a try. I have used them before but not like I have used the snowman one!
For my background I used glossy card stock and the "Jolly Jingles" jumbo wheel. I inked it up with VersaMark and rolled it three times across the card stock. I did ink it up every time I rolled it. Then I took Garden Green and Real Red ink and sponged in the colors. It made such a pretty background. At first I thought it was a bit too busy but once I got the card together I did like it.

I did the words on the computer. I had printed out 3 sheets of them for our Christmas cards and I just took one. I'm not sure if it will make the count short for our cards. I'll know once I start to put them together!!! I'll just print out another sheet. I want a bunch of word stamps that fit in that 1-1/4" circle punch! And if I can't find them, I just make them! Is that called being resourceful?

I colored Santa in using a blender pen and markers. I sponged the edges with Real Red ink and layered it on Real Red card stock.

When putting cards together like this, I make sure I use glue dots behind the image piece to make sure it sticks to the embossed piece. Sometimes tape runners just don't hold.

Before attaching the embossed piece to the card base I taped a piece of 5/8" white grosgrain ribbon around it and tied a bow. It was just what that part of the card needed!

It's a fun and very cheery Christmas card!!!

Thank you SO much for visiting today,
Wanda

Sunday, November 14, 2010

Summertime Splendor Checkbook Cover

I don't write checks as often as I use to and when I looked at how ragged my checkbook cover had become I realized I needed to make a new one. And I wanted to make it quick but yet have it look nice.

Well, I searched my computer to see what beautiful downloads I had and I ran across the "Summertime Splendor" one I bought this past spring. I SO love the orchid flower one so I printed it out. I did set my printer to print at it's highest quality and I printed on Whisper White card stock. I did print it just a touch bigger than I needed so I could trim to fit perfectly.

After the trimming was done I used the corner rounder and it was ready for the checkbook cover! The photo is showing the front and back of the checkbook cover. It gets folded in half and most of the flower will show. I think it's a very pretty cover!

SO simple too. I suppose I could have added some verbiage on the front but I liked the look of it just as it was.

These make great gifts and would be fun at a Stamp Camp too. And they may even sell well at a craft fair, you don't know until you try!

Thank you SO much for visiting today,
Wanda

Saturday, November 13, 2010

Autumn Days Candy Topper

I think the "Autumn Days" set is a pretty versatile one. Plus it's a GREAT set for making masculine cards. You just can't seem to find enough of those, can you?

For this cute little treat bag I started out with some candy pumpkins and a 3" x 4" plastic zip bag. I set the pumpkins inside so they were "tops up."

Next I cut a piece of Pumpkin Pie card stock 3-1/8" x 4". I folded it in half on the long side. I put the zipper part of the bag inside the fold, all the way to the top and I stapled it together using two staples.

Then I cut a piece of Very Vanilla card stock I had decorated with the leaf from the "Autumn Days" set. I stamped the leaves on using Crushed Curry, Cherry Cobbler and More Mustard. I know, there's no Pumpkin Pie ink on the vanilla. It was just too bright of an orange for the topper. This little vanilla piece was cut 1-7/8" x 3-1/8". I cut two and put one on the back. I wanted the staples to be completely covered. I sponged the edges with More Mustard before I taped them in place on top of the Pumpkin Pie card stock.

I stamped the"HAPPY THANKSGIVING" in using Chocolate Chip ink. I punched them out with the Word Window punch and sponged the edges with More Mustard. I taped them in place in the center of the header. SO quick and SO simple! A fun and quick way to make some sweet treat gifts for fall or Thanksgiving.

Thank you SO much for visiting today,
Wanda

Friday, November 12, 2010

Under the Stars

This is such a great masculine card. I LOVE this set. I bought this set and have only used it once. I have a fun idea for it and I do need to get it done before the set retires or before I forget I have the set!!! LOL

My downline Teresa made this adorable card. I have seen many cards that Teresa has made and this gal LOVED to cut images out. Or so it would appear. On most of the cards I've seen she's done a lot of cutting. And this card is no exception.

Every item on this card is cut out! And her sense of humor is the same as mine. I thought the bear should be spraying his pits with the skeeter spray too!!! I likehow she used the Dazzling Diamonds to make it look like the sprayer is spraying. And it was used on those dreaded mosquitoes too. I'm SO glad we had gotten a frost to kill them off for the season!

I was guessing that the background was done using webbing spray but it doesn't really feel like it. I will have to ask her what it is and how she did it and hopefully post a tutorial on it!

It's such a cute card and I'm SO lucky to have gotten it from her.
Thank you Teresa!

And I thank you SO much for visiting today,
Wanda

Thursday, November 11, 2010

Every Little Bit Christmas Card

The "Every Little Bit" set is such a fun set to play with. I use to cringe when I had tiny stamps and really didn't know what to do with them other than to stamp tons of them across a piece of card stock and use it as a background.

This layout is one of my most favorite. It allows me to use those tiny stamps and they become the focal part of the card and not a background!

I have made SO many cards using this layout that I could almost do it in my sleep!

The photo doesn't do this card justice. It makes it look like the Marina Mist card stock doesn't match the decorative paper but in real life they match very well.

I used Whisper White for the base of my card. It is something I RARELY do. The base of my cards is usually a dark color (mostly black) with the white layered on top.

I am having second thoughts now on my choice for our Christmas card this year. I am really liking this one but I have begun cutting the card stock for our card and really can't change now. Bummer!

Oh, I almost forgot. The decorative paper here is from the "Candy Cane Lane" download. It's a piece I had left over from another project. And it's a piece I did before I resized it to make the circles round instead of so elliptical. But I like them both ways so it really doesn't matter. Please remember that if you print these out yourself to use 28 or 30 pound paper. It's a nice quality paper. Set your printer to the finest quality too. You will get some beautiful papers that are easy to work with and have a nice quality feel to them. If you're going to print them out yourself, why not go for the best image you can?

This is a very simple card to make once you know what you are doing!

I'm nearly finished with a fun project to share with you. Hopefully that will be tomorrow!

Thank you SO much for visiting today,
Wanda

Wednesday, November 10, 2010

Greeting Card Kids Christmas Card

This is my card for this weeks Sketch Challenge at SplitCoastStampers. I am NOT thrilled with it at all.

When the sketch came in my email I knew I wanted to use the "Greeting Card Kids" set but I didn't know where I was going with it. And that is obvious by the look so of this card.

I am thinking it's because the background is SO huge and that is why I'm not liking it.

I do like the little girl in the scalloped circle. I colored her coat, hat and wagon using Riding Hood Red ink. The scarf, mittens and her tights are colored in using Bashful Blue. The tree is colored in using Garden Green and I colored in her face using Blushing Bride maker. The background around her and the wagon is done using Daffodil Delight and a blender pen.

I sponged the circle with Riding Hood Red.

I added some ribbon to the strip behind the circle. I needed to tone that spot down. I don't like the looks of it and I taped it on with some really sticky tape so it's not going anywhere!

The snowflake is from the Northern Frost die. It's one of my favorite dies. I LOVE snowflakes!

The background paper is from the "Candy Cane Lane" download. I bought it and just print out the paper as I need it. I LOVE those downloads!

And that was pretty much it to the card. Oh, the wording was done on my computer.

Thank you SO much for visiting today,
Wanda

Tuesday, November 09, 2010

Faux Flocking Technique

I have not forgotten about the technique pages. I have been working on them, just no time lately to post them. So with the holiday season coming I thought I would make a Christmas card and use this fun technique on it.

All you do is use your distressing tool on some card stock. You keep the fuzz and fluff it leaves behind and use it as the snow or whatever it is needed for on your project. Click on the photo for a closer view.

This adorable snowman came from the "Tags Till Christmas" set. I've only used one image in this set and this wasn't it!! I had used the "dec 25" one. I probably bought this set because of this cute snowman!! You know me and snowmen!!

For the base of my card I used Marina Mist. The next layer is a piece of Night of Navy. On top of that is a piece of the "Candy Cane Lane" image. I ran out of that paper a while back so I've been printing some off from the download I bought. I think it's a PERFECT way to keep the card stock you just LOVE. This is a very pretty snowflake background and I'm glad I downloaded it. And tonight I actually tweaked it enough that the round circles in the background are actually round. Here they are slightly oval because I didn't have the image centered on the screen before I printed!! As simple as that! But I'm using this slightly distorted one because I already printed it out and on 32# paper (which I think is a bit spendy) and I had the printer set at "top quality" to get the best printed image.

The word were done on the computer. I printed out 3 pages of them tonight because I decided what card I'm going to make for our Christmas card this year and I need those words for it. If you're curious it is the card I made the other day. You can click here to see it. Now I'd better get cracking on getting the pieces cut and the card put together!!

This was a fun card to make. I do like making the faux flocking but I don't think I'd like to do it for 130 Christmas cards!!! I think it will be fun to use it at Easter time for bunnies oh and on Santa's hat, mitten cuffs, etc.! Lots you can do with it!

This technique makes #10 in this set of 20. I will be posting more soon. I have them set up on my desk. It's just a matter of squeezing them in with all the things I want to show you before Christmas. I have some very fun and unique projects to show you but I have to finish them up first! I've got a TON of started projects. It's going to be great to get them all done and see the top of my desk again!

Thank you for visiting today,
Wanda


Monday, November 08, 2010

Aviary Get Well Card

This is another one of those sets that I think is SO stinkin' cute! It has to be those cages that attracted me to this set. I don't use it very often and I should. I needed to make a get well card and as I was looking through my stamp sets my eye caught this one and I ran with it!

I took a half sheet of Peach Parfait card stock and folded it in half. Then I took a 1/4 sheet of Whisper White card stock and trimmed two sides 1/8". I sponged the edges with Peach Parfait ink and taped it in place on the card base. I cut a piece of Whisper White 4-5/8" x 2" and then I stamped the image on using Chocolate Chip ink. I cut a Peach Parfait layer 4-3/4" x 2-1/8" and layered the stamped piece on top.

I cut a 2" x 2" square and put it in an embossing folder and embossed it. I cut the square in half along the diagonal. I put each triangle on the back side of the stamped image layer and I just taped everything in place on the front of the card.

The words were done on the computer and I punched them out using a 1-1/4" circle. Then I cut a 1-3/8" Chocolate Chip circle. And I layered those two circles on top of a Peach Parfait scalloped circle. And that was it. It was a very easy and quick card to make. Bright and cheery too, perfect for a get well card!
Thank you for visiting today,
Wanda

Sunday, November 07, 2010

Jolliest Time of the Year

I am such a snowman person! I just LOVE them and the cuter they are the more I have to have them! When the new Stampin' Up! catalog comes out the first thing I do is look for a new snowman for our Christmas cards. And then if I don't see one I like, I wait (not so patiently!) until the Holiday mini comes out. But there are times I run across these sets I already have and I dig them out and play with them again!

I love this snowman from the "Jolliest Time of the Year" set! I made a card with him last week too. Ok, confession time here. I hadn't put the set away, it was just sitting there begging me to play with it one more time before I put it back on the shelf and forget about it again!
So, onto the making of this card. The base of the card is Marina Mist. On top of that is a piece of Basic Black. And on top of that is a piece of Whisper White that I sponged with Marina Mist ink.
The next layer is Basic Black card stock cut 3-1/2" x 4-3/4". On top of that is Marina Mist cut 1/8" shorter than the black layer. I ran it through the Big Kick with the Northern Flurry embossing folder.

On top of that is a piece of Basic Black card stock cut 2-1/2" x 3-3/4". And layered on top of that is a piece of decorative paper cut 1/8" smaller. The paper is from the "Candy Cane Lane" download. The design prints out smaller because I don't have a printer that prints 12" x 12". And that's ok. I LOVE this paper at any size it would print out! Snowman and snowflakes, you can't go wrong with either!

My wording was done on the computer and punched out. When I do words on the computer I usually set up the page to have several columns and then I print out a full page of words for future use.

The snowman is cut using the wood block to measure it. I do this with almost all of my cards. I measure the block and cut the card stock the same size. It seems to be working for me so I run with it! I sponged the edges with Marina Mist and taped all the layers together.

I really like how this card turned out. It's not going to be the one we use for our family card but it is one I'd consider. I had better get a move on getting those family cards done. I like to get them done by December 1st. I often finish them up the day after Thanksgiving. And usually in October we take a couple of days off and head up to Duluth. While on the way up there I am working on the cards. I didn't bring any part of our Christmas cards with this year. I am still up in the air as to what I want to make. I have no idea why I'm being so indecisive this year! UGH! It's frustrating!
Thank you SO much for visiting today,
Wanda

Saturday, November 06, 2010

Morning Cup Card

I told myself about a dozen times I was NOT going to buy this set. I think it was out of protest because I liked the other coffee cup sets. But as time went on and I saw so many cute cards made with it, I broke down and bought it.

I have not used it yet! This card was made at a previous DIVA Day event. I believe it was Sandy who designed this cutie!
I just love those stacked cups. Kind of looks like my kitchen on a weekend! LOL
I thought it would be difficult to stamp the words like that but it was actually pretty easy. And it isn't very crooked at all!! Shocker, huh? LOL
I love the colors and how clean and simple this card looks.

Thank you Sandi for letting me show your wonderful card to everyone!

And thank you for visiting today,
Wanda
I have some fun projects I'm working on and will be posting soon but first I have to get through this craft fair weekend and be able to think clearly again!


Friday, November 05, 2010

Baroque Northern Frost Christmas Card

The "Baroque Motif" set is one I like using when making wedding card. I love the swirls in the card and with the winds blowing yesterday this set came to mind! We didn't have snow but it will be here soon enough. It's going to get colder so snowflake cards are a good thing to make right now.

For my card I used Bashful Blue card stock. On top of that I put a layer of Marina Mist. The top is Whisper White card stock.

I stamped the image using the Basic Black ink. Which I regretted after I stamped it and was working on the card. I thought the ink was dry and as I was embellishing it I smeared it. I tried to get the smear off with an eraser. It took a lot of it off but not enough.

I used the Northern Frost die to make my snowflakes. I set them in place on the card near the swirls. In the center of each one I added a pearl. It's a very quick and simple Christmas card.

Thank you SO much for stopping by today,
Wanda

Thursday, November 04, 2010

Kind & Caring Thoughts Birthday Cards

Nope, you're not seeing double. I needed to make 2 birthday cards for hubby's twin sisters. Their birthday is on the 9th. I can't believe I'm actually done with the cards before the birthday happens. I was not good all year long about getting birthday cards out on time. And what is REALLY sad about that is, I could have gone into my samples and taken one of them. But no, I always have to make a new fresh card and in this case, cards! And his sisters are identical twins. Twins run on hubby's side of the family. His mom had twins, his mom's sister had twins and one of hubby's sisters had twins. It didn't even skip an generation! YIKES! And they are ALL identical. It is still tough to tell the cousins and the nieces apart unless they are with their hubby's then I can. What is REALLY funny is, when my hubby looks at photos of his sisters when they were kids he can't tell who is who and I can! Anyway, on to this fun card!

The "Kind & Caring Thoughts" is a Hostess retired set. I will be putting that in my web store sometime soon. I need to make more room for the new sets I have that are just sitting on my ledge. I do have some room for them but I'm a bit lazy when it comes to cataloging them and getting them shelved.

These cards were SO simple to make. I stamped the image using Mellon Mambo ink. I did huff on it before I stamped it. I find that if you do that for images that have the flat dark areas on it, the image turns out more solid. I think it looks pretty good!
The words were done on the computer. I had done up a whole page of them so I had them when I needed them. I even printed out a sheet of them on Very Vanilla card stock so I have them in both colors. I amazed myself there, I usually don't think that far ahead when I'm printing out stuff!!

This was an extremely quick card to make too. Just stamp, layer, punch and tape! SO simple and quick!

Thank you for visiting today,
Wanda

Wednesday, November 03, 2010

Jolliest Time of the Year Split Coast Sketch Challenge

This weeks Sketch Challenge was a real challenge for me. I am SO out of my comfort zone when it comes to square cards. But I stuck with it and played with the pieces and I actually finished my card as you can see!!

I used the snowman from the "Jolliest Time of the Year" set. I SO love this snowman!!!
Tonight I purchased a few My Digital Studio downloads and one of them was the "Candy Cane" decorative paper. I had purchased the pack and went through it pretty fast. SO I thought I would get the download and print out my own as I need it. I especially LOVE the snowflake paper. I have LOTS of plans for that in future projects. I used it on the #1 layer.
My #2 layer is also from that same download. I think these little multi-colored polka dots are just TOO adorable. I can see myself using them for other occasions.

The #3 layer is a piece of Marina Mist card stock. Nothing was done to it, no texture or VersaMark images, just plain.

The #4 image is the snowman from the set. I used a blender pen for the Marina Mist around the snowman body and the rest was colored in directly from the marker. I sponged the edges with Marina Mist.

The snowflake was fun. It came from the "Northern Frost" die. I'm SO glad I purchased that die. I LOVE all of the different snowflakes on it. I picked out the snowflake I thought would fit the #5 spot best. I pressed it on the VersaMark pad and then dipped it in the Iridescent Ice embossing powder. I heat set it and then did it again for a thicker layer. Next I took a pearl, I took the sticky stuff off it and affixed it to the snowflake with Crystal Effects. I wasn't sure the sticky part would stay on the embossing and I knew Crystal Effects would hold! I set it in place with a Zot. I was digging in my stuffed cupboards in my workroom and found a box of them so I thought I should start using these things up. I totally forgot I had them. I guess that's a sign that you have TOO much stuff!

And that was it. The square card was not as bad as I thought it would be. And I am still not fond of them!! LOL

If you have time to play, give this layout a try. I just print them out and cut the layers as close as I can to the size on the printout.


Thank you SO much for visiting today,
Wanda

Tuesday, November 02, 2010

Gifts of Christmas Dove

Sorry I'm late in getting this posted. I've had such a busy day/week and it isn't over yet!
On my weekly surfing the net adventures I ran a cross this wonderful dove card. I found it at Stamper's Pad. It's such a nice clean looking card. A card that is just perfect! I LOVE the gold on white.

The images are stamped with VersaMark and sprinkled with gold embossing powder. The embossing powder is then heat set.

I cut my top layer the exact size of the wood block. Then I stamped on it and heat embossed it. I layered it on top of a piece of brushed gold card stock that was cut 1/4" wider around than the top piece.

Next I stamped the second image in the two corners, sprinkled them with embossing powder and heat set them.

I taped the top layer in place and that was it. SO easy peasy!!

Thank you SO much for visiting today,
Wanda

Monday, November 01, 2010

Candy Cane Christmas Fabric Tree Ornament Weekend Project

I was having some fun with the Christmas fabrics. I LOVE both sets but I think I am more partial to the "Candy Cane Christmas" one. I think it's just those cute little polka dots that catch my eye.
To make these you will need:
1-1/2" Styrofoam ball
Fabric cut 6" x 6"
1/2" grosgrain ribbon
Cord for hanging (I used Linen thread here)
Sucker sticks

Insert the sucker stick into the Styrofoam ball. You want it to go in about 1/3 of the way. You may want to use Styrofoam glue here. I first tried a glue dot thinking it would hold but it didn't. I ended up using craft glue after I got the fabric on.

Next find the center of the fabric and set it at the top of the Styrofoam ball. Wrap it around the ball and tie it with the ribbon. Tie the ribbon in a bow. This is when I glued the stick to the fabric with craft glue. And then I attached a hanging cord. I used a piece of linen thread. I threaded a needle with it and just took a stitch on the top and tied the ends together.

These are very easy and SO much fun to make. They will look SO adorable on any Christmas tree or even on top of gift packages!

You can do these as a Make N Take, a Craft Fair item, a fun item for the kids to help with and even a Stamp Camp project!

Thank you SO much for visiting today,
Wanda