Pin It

Showing posts with label Snowman Cards. Show all posts

Friday, October 25, 2024

Sentimental Christmas, Snowy Wonder, Christmas Labels, Snowy Scenes, Christmas Card, Stampin' Up!

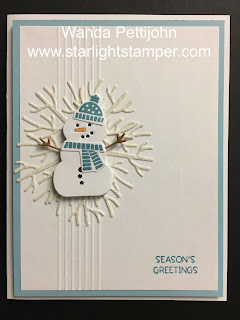
Hello and welcome to my blog. Today I have a snowman Christmas card to share with you. Please read on to see how it was made.

The base of the card is a folded half-sheet of Basic White card stock. It opens on the right and the fold is on the left.

I cut a 4" x 5-1/4" piece of Basic White card stock and textured it using the "Snowflake Sky" embossing folder. I glued it to the front of the card.

Next I cut my layers. The larger uses Designer Series Paper (DSP) from the "Sentimental Christmas" 12" x 12" package. It measures 2" x 3-1/2" and the Shaded Spruce layer behind it measures 2-1/4" x 3-3/4". I taped the two layers together and then glued them to the front of the card about 3/8" from the top edge and 3/8" from the fold. 

Then I cut the next layers. I used Basic White for the top layer, it measures 2" x 2-1/2".  I used my Blending Brush and I scrubbed on some Pool Party ink. My ink pad was a bit dry so I had to press harder on the pad with the brush. I didn't brush off on scrap paper first, I went directly to the card stock and I had to press down harder to get any color on the card stock. I would swirl clockwise and then when I changed to counter clockwise more ink came off the brush so I got some fun and interesting patches on the piece. I like what I saw so I kept it. Now if I were to try to recreate that, it may not turn out. I'm hoping I can because it's a fun look. The Shaded Spruce layer behind it measures 2-1/4" x 2-3/4".  I taped the two layers together. Then I glued the layer to the front of the card. There's about 3/8" of the DSP showing on the three edges. 

The snowman is from the "Snowy Scenes" 12" x 12" package. I have the "Snowy Wonder" bundle and there's a die in there that will cut a lot of the snowmen that are printed on one of the sheets of DSP.  How fun is that?  I love it when I can play with layers and texture and use printed images to save a little time. The trees are also from that same sheet the snowman came from.  And there's dies for those too! There was a snowman on the sheet that was missing the upper part of the ear muffs and there was one at the bottom of the sheet that was missing most of it's body so I used the die and cut out both. I cut the head off at the scarf of the bottom one and taped it to the top one and now I have another full snowman. I may add a little snowflake embellishment or even some twine over the area where the scarf line is so it won't look like it was pieces together. But that's for another day. I was just adding that so you don't cut through your half snowmen, there's a way to save them! Anyway, Dimensionals were added to the back of the snowman and it was set in place on the front of the card. Tape was added to the trees and they were added as well.

The words are from the "Snowy Wonder" bundle and were stamped using Pool Party ink on a scrap piece of Basic White card stock. I cut them out using the dies from the "Christmas Labels" bundle. I also cut a Shaded Spruce one too. I cut the words out by snipping the piece at the tips. Then I taped that to the Shaded Spruce piece. Dimensionals were added and the piece was set in place on the front of the card.

When I was cutting the other pieces I was cutting out snowflakes at the same time. It saves time plus I can get a bunch of them cut and save some for later. I used three of them on my card. I added a pearl to the center of each one and that was it, the card was done.

This was a fun card to make. I love snowmen and I'm hoping to go out this winter and make one. It's been quite a few year but now that I have a new hip I can resume playing in the snow! I hope to never outgrow that! LOL

Thank you SO very much for taking your time to stop in and see today's Christmas card,
Wanda

Thursday, September 19, 2024

Joyful Images, Sophisticated Sled, Christmas Card, Stampin' Up!

Hello and welcome to my blog. Today I have a Christmas card to share with you. Please read on to see how it was made.

The base of my card is a folded half-sheet of Basic White card stock. I cut a 4" x 5-1/4" piece of Basic White card stock and I textured it using the "Falling Snow" embossing folder. I glued it to the card base.

Next I cut the frame using the "Countryside Corners" dies. I used the third and fourth largest dies. I set them up on my card stock and used post it tape to hold them in place while I cut them from Basic White card stock. Then I took the third one and I cut another piece using Basic White card stock. Using my Blending Brush I scrubbed on some Balmy Blue ink. I should have used Pool Party because of the colors on the snowman.

That snowman, adorable snowman is from the "Joyful Images" printed and precut images. I thought the set was so cute and it was a great price for all of the pieces you get. I plan on making more cards using them. But for today I used the snowman one. He's so cute and I'm very partial to snowmen.

I took that frame I made and added Dimensionals behind it and set it on top of the Balmy Blue piece I colored. I didn't stick it on top, I just set it there so I could see where the words would go. The words are from the "Sophisticated Sled" bundle and they were stamped using black Memento ink.  

Once the words were stamped I set the frame in place. Then the snowman was added using glue on one side and a few Dimensionals on the other side. I glued this piece to the front of the card.

I glued on a bunch of snowflakes from the "White Loose Snowflakes" container. They are SO darn cute too. I think they will be fun to use them in a shaker card.  I'll have to try that sometime soon.

This was a very fun card to make. I glued each snowflake in place which was the only thing that took the most time but it was SO worth it.

Thank you SO very much for taking your time to stop in and see today's Christmas card,
Wanda

Friday, November 11, 2022

Framed & Festive, Snowman Magic, Christmas Card, Stampin' Up! 2022

My plans are to mix some themes with this new "Framed Floret" bundle. Yesterday I made a birthday card and today I worked the piece into a Christmas card. There's SO much you can do with this set. I am looking forward to making some get well cards and thinking of you cards too, plus some other birthday and Christmas cards. 

Today's card was fun and easy and of course one I like because it's got a snowman on it!

The base of the card is a folded half-sheet of Soft Succulent card stock. This card opens at the bottom and the fold is at the top.

I cut two pieces of Basic White card stock that measure 4" x 5-1/4" each. One for the front and one for the inside. The one for the front needed to be stamped on so I didn't tape it to the card yet. But the inside one I did tape down.

Next I cut a 3-3/4" x 5" piece of Designer Series Paper (DSP) from the "Lights Aglow" 6" x 6" stack. I took one of the oval dies from the "Framed Florets" die set and die cut the center of the DSP. I saved the pieces for a future card (maybe). I save everything!!

Then I die cut the a piece using the same die and Soft Succulent card stock. I needed the outer ring but I did save the oval, just because it's what I do. LOL

I used removable tape and taped the DSP to the Basic White piece so I could see where the words needed to go. I set the word piece up in my Stamparatus and stamped them using Evening Evergreen ink. The words are from the "Framed & Festive" set that came in the bundle. 

Then I proceeded to make the snowman from the "Snowman Magic" bundle. I die cut two snowmen. On one I die cut the face and I saved the nose. This one is the front piece. On the second piece, the back piece, I colored in the face area black so when the front piece is added the eyes and mouth will be black. I had die cut two arms and colored them in using my Bronze Blends pen. I glued them in place on the second piece and then I glued the front piece to the back. When I die cut the snowman I had also die cut a few snowflakes from the set. I often do that and sometimes end up with extra. Today I didn't have any extra.

I took the nose piece and colored it using my dark Pumpkin Pie Blends pen. I added a tiny amount of glue and set it in place.

The scarf was stamped using Soft Succulent ink and die cut, it was glued in place on the snowman.

Then I die cut a Basic Black had and glued it to the top of the snowman's head. I also cut a tiny sliver of Daffodil Delight card stock and glued it to the hat for the band.

The buttons were drawn in with my Basic Black marker, but there is a button stamp you can use. I didn't feel like setting everything up in the Stamparatus for that so I just drew them in. 

Now to assemble the card. I taped the Basic White piece with the words on it to the front and then the DSP on top of that. Next the Soft Succulent frame was glued in place.

The snowman was set in place using Dimensionals and the snowflakes were glued in place. A crystal rhinestone was added to the center of each snowflake and the card was done.

I was pleased with the way the card turned out. I thought the seriousness of the DSP and the whimsical snowman might clash but they did go well together. I think adding the snowflakes aided in that.

Thank you SO very much for taking your time to stop by and see today's Christmas card,
Wanda


Monday, November 07, 2022

Snowman Magic, Penguin Place, Christmas Card, The Good, The Bad and the Ugly

Yup, another "The Good, the Bad and the Ugly" card. This is not what was in my head but this is how it came out on paper!  I am not fond of it at all. But as you know, I share them all with you. Mostly because I shouldn't suffer alone!!! LOL

I'll share with you how I made this card and I'm hoping that I will find some other DSP or something to make it better.

The base of my card is a folded half-sheet of Basic White card stock. This card opens on the right and the fold is on the left. So far so good! LOL

I cut a 3-3/4" x 5" piece of Basic White card stock for the top layer. I had used my Blending Brush to scrub on some color. Here's the deal there. I had uses Granny Apple Green on it a few days ago and yesterday I added some Shaded Spruce. I was going to clean it up so I was scrubbing it on some scrap paper and I liked the color so I used that on the Basic White piece.  And again, so far so good.

Then I took the largest stitched circle from the "Stylish Shapes" die set and die cut the Designer Series Paper (DSP) from the "Santa "Express" 12" x 12" package. I cut it in half. I also die cut a Blushing Bride circle and cut that one in half as well. I taped the two circles together leaving a little bit of an edge showing at the bottom.

I cut a 1/4" piece of Evening Evergreen card stock for the band across the edge of the circles. I didn't measure how long, I just snipped off what I didn't need.

I also die cut the ribbon looking pieces using Blushing Bride and Evening Evergreen card stock. I taped the two pieces together and centered the top one as much as I could. I cut it at 1-5/8" long from the tip to the straight edge. I taped that just under the edge of the Evening Evergreen strip. 

A Blushing Bride tree was die cut. I am not sure where things went wrong but it was right around here.

Using Basic White card stock, I die cut the snowman. I die cut two bodies and one of them I die cut the face and I saved the nose which I colored using my dark Pumpkin Pie Blends pen. I stamped the scarf using Soft Succulent ink and die cut it. The arms were die cut using Basic White card stock and colored in using the Bronze Blends pen. A Basic Black had was die cut and a sliver of Daffodil Delight card stock was added for the band on the hat. I glued the arms to the snowman body without the face. In the face area of that snowman I colored it in with my Basic Black marker. Then I glued the two snowmen together. I glued the nose in place. The scarf and hat were added and using my Basic Black marker I colored in a few buttons. I added Dimensionals to the back of the snowman and set it aside.

I had die cut three snowflakes from the "Snowman Magic" bundle using Basic White card stock and se them aside.

The words are from the "Penguin Place" set and were stamped on the bottom right corner using Evening Evergreen ink.

So to create the ugly part, I set the half-circles on the top layer to see where the tree should go. The tree was glued in place and then the circle was taped in place. The ribbon piece was added next and two snowflakes were glued to it. Then the snowman was added. And the last snowflake was added to the upper right area. And for a final touch, I added a crystal rhinestone to the center of each snowflake. The top layer was set on the front of the card using Dimensionals and the card was done.

I am not fond of this card at all, though I do like the snowman. LOL

Thank you SO very much for stopping by to see today's interesting Christmas card,
Wanda

Sunday, November 06, 2022

Snowman Magic, Christmas Card, Stampin' Up! 2022 Fall Catalog

You guessed it. I did not put away my "Snowman Magic" bundle. It's still sitting on my worktable, so I thought I'd make another card using it. And I will probably be making a few more before Christmas too. I think most of our holiday cards this year will be done using this set. I just love this snowman.

The base of my card is a folded half-sheet of Basic White card stock. I cut a 4-1/8" x 5-3/8" piece of Shaded Spruce card stock for the layer and a 4" x 5-1/4" piece of Basic White for the top layer and I set them aside.

I die cut the snowman from the "Snowman Magic" bundle. I also die cut the arms and the hat was cut using a scrap piece of Basic Black card stock. Then I stamped the scarf and die cut the scarf and another snowman, plus I put the face die on the first snowman and die cut that all at the same time. I like to cut a lot at one time.

I colored the snowman's arms using my Bronze Blends Pen. You can also use the Crumb Cake marker or Crumb Cake card stock to cut them out. Then I glued the ends to the second snowman I die cut. I took my Basic Black marker and colored in over the face area and then I glued the two snowmen pieces together.

The scarf was glued in place. When I die cut the face, I kept the nose piece. I colored it using my dark Pumpkin Pie Blends Pen. I glued it back in place.

A sliver of Daffodil Delight card stock was cut for the band of the hat and that was glued in place on the hat. Then the hat was glued on top of the snowman's head.  I made some black dots on the bottom ball of the snowman and it was done.

I die cut a 2-1/8" circle and took my Blending Brush and scrubbed on some Shaded Spruce ink. Then I cut a Shaded Spruce scalloped circle for the back layer. I taped those two layers together. Dimensionals were added to the back and the piece was set aside. 

A 2" x 4" piece of Designer Series Paper (DSP) from the "Santa Express" 12" x 12" package was cut at taped to the bottom of the Basic White piece. I cut a 4" x 1/4" piece of Shaded Spruce card stock was cut for the strip.

Then I took the circle piece and set it on top of the card front to see where the words would go. The words are from the "Snowman Magic" set and were stamped using Shaded Spruce ink. Once the words were done I set the piece in place using Dimensionals. Then I set the circled in place. The snowman was also set in place using Dimensonals.

And for a final touch, I added a tiny crystal rhinestone to the snowflake under the word "magical" and the card was done.

This was a fun card to make and once again I was able to use a scrap piece of DSP!

Thank you SO very much for taking your time to stop by and see today's Christmas card,
Wanda

Saturday, November 05, 2022

Snowman Magic, Santa Express, Christmas Card, Stampin' Up! 2022 Fall Catalog

I ran across a card I has started a while back. It was a folded half-sheet of Basic White card stock and the front had 2-1/8" cut off. And that was it!  Pretty much a blank canvas, huh? LOL  Not a great find but I thought I'd work with it and get it off my worktable. So read on to find out what I did .

I took a 2" x 5-1/4" piece of Designer Series Paper (DSP) from the "Santa Express" 12" x 12" package and I taped it to the front. 

Then I took out the snowman die from the "Snowman Magic" bundle and die cut two of the bodies. I cut a pair of arms, and a snowflake. Then I stamped the scarf using Granny Apple Green ink and die cut it with the matching die and I also die cut the hat at the same time, oh I had cut the second snowman with this pass and the face on the first snowman on my Big Shot. I like to try to cut as much as I can with one pass.

I colored the arms using my Bronze Blends Pen. I took the second snowman and I colored in the face area using by Basic Black marker. Once the top snowman is set in place the eyes and mouth with will be black. Nice way to do that, huh?  I had saved the nose when I cut the face out. I colored it with my dark Pumpkin Pie Blends Pen. 

The hands were glued in place on the second snowman and then the top snowman was glued in place, sandwiching in the hands. Then I glued on the scarf and then the nose. The had was glued on the top part of the head. I had cut a super thin strip of Daffodil Delight card stock and glued it on the had for the band.

Next I die cut a stitched circle from the Stylish Shapes die set using Basic White card stock. I had used the third largest circle. And I took the second largest circle and die cut a Granny Apple Green circle. 

I took the smaller circle and my Blending Brush and scrubbed on some Granny Apple Green ink. Then I taped the two circles together. 

The snowman was added using Dimensionals. I had taken my black marker and added the buttons on the bottom part of the snowman. I could have used the stamp but I was too lazy to get it set up in my Stamparatus. 

I added the snowflake with a dot of glue. 

The words are from the "Snowman Magic" set and were stamped using Granny Apple Green ink. I added a little rhinestone to the snowflake on the word part and on the one I added to the snowman circle.

The circle piece was set in place on the front of the card. I added Dimensionals to the left side of the circle and I added Dimensionals along the edge of the flap, that way I wouldn't have to be concerned about going over that edge with the Dimensionals and sticking the card shut. And that was it.

This was a very fun card to make. I'm partial to snowmen and I'd like to make a few snowmen cards to send out this year.

Thank you SO very much for taking your time to stop by and see today's Christmas card,
Wanda

Sunday, October 16, 2022

Snowman Magic, Penguin Place, Christmas Card, Stampin' Up!

I found a card on Pinterest that I thought I would give a try BUT I found out that the triangle dies are retired and I do try to use current products as much as I can. SO I improvised. Read on to see how I made this card with my changes. You can see the original card here

The base of my card is a folded half-sheet of Basic White card stock. This card opens on the right and the fold is on the left.

On the link there were no instructions on how the rectangle frame had been done. I did try to use two thicknesses of card stock but it didn't give the same appearance, so I ended up just die cutting the rectangle from a piece of Basic White card stock. I used the third largest rectangle from the "Rectangle Stitched Framelits" set. 

Since the triangle dies were retired, which I found sad because I don't recall using them much at all, I ended up using my stitched square dies from the "Stylish Shapes" set. I used the second and third largest dies. I cut them in half on the diagonal. The Designer Series Paper (DSP) I used is from the "Lights Aglow" 6" x 6" stack. Since the squares were cut in half the long side didn't have any stitched marks, so what I did was I die cut two pieces from the smallest long rectangle dies in the "Rectangle Stitched Framelits" set.  

The green and cream colored pieces were taped together and the red rectangle strips were taped on top. I did cut the rectangle strips in the center area because they were too long. Then I taped the piece to the Basic White stitched rectangle piece. 

The words were stamped next. They are from the "Penguin Place" set and were stamped using Cherry Cobbler ink. Dimensionals were added to the back and the piece was set in place on the front of the card.

The snowman was die cut using some scrap Basic White card stock. I die cut two, one for the front and one for the back. The face was then die cut. I saved the nose and colored it with my Pumpkin Pie marker.

The arms were die cut and colored with the Bronze Blends pen. You can also use Crumb Cake or Early Espresso card stock. 

I stamped the scarf using Soft Succulent ink and die cut it with the matching die. At the same time I die cut the hat using a scrap piece of Basic Black card stock.

On the second snowman piece I colored in the face area using my Basic Black marker. I set the first snowman on top to make sure the eyes and mouth showed up black. I stamped the buttons on the bottom part of the snowman body using black Memento ink.

Next I added a dot of glue on each side of the body for the arms. I pressed them down a bit and then I glued the first snowman to the back. 

The nose was added next using a toothpick and a little bit of glue.

The scarf was glued on and then the hat. For the band on the hat I cut a sliver of Daffodil Delight card stock and glued it in place. 

Dimenisonals were added to the back of the snowman and it was set in place over the red rectangle strips.  And the card was done.

I had a lot of fun making this card and I'm pleased with the way it turned out.

Thank you SO very much for taking your time to stop by and see today's Christmas card,
Wanda

Friday, September 30, 2022

Snowman Magic, Penguin Place, Christmas Card, Stampin' Up!

This card was SO much prettier in my head than what ended up on paper! And it's a bit better in person than it is on the screen, but just a little bit!

The base of my card is a folded half-sheet of Basic White card stock.  I cut a 4" x 5-1/4" piece of Balmy Blue card stock for the layer. Then I cut a 3-3/4" x 5" piece of Basic White for the focal piece.

I took the focal piece and set it on my scoring board. I turned it over so when I was done the raised bumps would be on the front. I scored the backside at 3/4" and every 1/8" up to 1-1/2".

The words are from the "Penguin Place" and were stamped using Balmy Blue ink.  I taped that piece in place on top of the Balmy Blue piece

The snowman was die cut using the die from the "Snowman Magic" bundle. I die cut two, one for the front and one for the back. I do this because I like to sandwich the arms between the layers, plus I color the face in on the back one using my Basic Black marker so when the face is die cut, the eyes and mouth are black and nice and neat looking. 

So once the snowmen were die cut, I die cut the face on the top one. I saved the nose and colored it with my Pumpkin Pie marker.  Then I stamped the buttons on the bottom part of the snowman.

I die cut and colored the arms using my Bronze Blends pen. You can also use Crumb Cake or Soft Suede Blends or markers.  I glued the arms to the second snowman. Then I glued the two snowman pieces together.

I stamped the had and scarf from the "Snowman Magic" set using Balmy Blue ink. I die cut them with the matching dies. I glued them in place. I added Dimensionals behind the snowman and set it aside.

Then I die cut the trees using glitter paper that has double-sided sticky paper behind it. I die cut 5 of them. The tree is from the same "Snowman Magic" bundle. I arranged them in a circle and set the snowman on top. 

It's different!!  LOL 

Thank you SO much for taking your time to stop by and see today's "different" Christmas card,
Wanda

Monday, September 26, 2022

Snowman Magic, Christmas Card, Stampin' Up! 2022 Fall Mini Catalog

I have been having a lot of fun with the "Snowman Magic" set/bundle. Bundle because it's got matching dies!!  I LOVE that!  

The base of my card is a folded half-sheet of Granny Apple Green card stock. This card opens on the right and the fold is on the left.

I took a piece of Designer Series Paper (DSP) from the "Celebrate Everything" 12" x 12" stack and colored in the trees using my markers. I used Granny Apple Green, Garden Green, and Old Olive for the trees. I used Soft Suede for the trunks and I used Daffodil Delight for the stars. Once those were all colored I taped the DSP to the front of the card. That piece of DSP measured 4" x 5-1/4".

Next I made the frame using the die cut from the "Fabulous Frames" die set. I cut one out of  Granny Apple Green and one out of Basic White card stock. I used a double-sided sticky sheet on the Granny Green piece. I wanted it to be a sticker so I wouldn't have to do a lot of fine gluing.

I took the rectangle from the Granny Apple Green piece and set it aside. Then I took the rectangle from the Basic White piece and prepared the background. I tore a piece of card stock to make a hilly line for the snow and I used my Blending Brush and scrubbed on some Balmy Blue in the background. I added snowflakes but you can't see them. I used my chalk pen to do that. I have one with the tip so damaged because I use it on the edge of the cap to flick the ink onto my paper. But this time I just tapped it onto the sky but it doesn't show up on the photo much. You can click on the image and maybe you can see it better.

The words are from the same "Snowman Magic" set and were stamped using Garden Green ink. I die cut a tree from the die set using Garden Green card stock. I colored the trunk with my Bronze Blends pen because it was out. Soft Suede would have been my first choice but this pen was just sitting there.

I die cut two snowmen, one for the front and one for the backing. I colored the face of the backing one in using my Basic Black marker.  Then I die cut the face on the front piece. When you set the front piece on the back piece, the eyes and mouth will be black.  Super easy way to do those tiny parts. The hand were colored in using the Bronze Blends pen, see why that was sitting out?  The buttons were stamped using Basic Black ink. I glued the arms on the snowman but on the backing piece. This way you can see where they will go easier. Then I glued the two snowmen together.  I did save the nose when I die cut the face and I colored it in using my Pumpkin Pie marker. I used a tiny amount of glue on a toothpick and set the nose in place.

A hat and scarf were stamped using Granny Apple Green ink and were die cut. They were glued in place on the front of the snowman. Then I set the snowman on top of the rectangle piece using Dimensionals.

The rectangle piece was taped inside the frame and for a final touch I glued a snowflake on the front and added a little crystal rhinestone to the center.  A 4" x 5-1/4" piece of Basic White was added to the inside and the card was done.

This was another fun card to make. I LOVE snowmen! And I do love how this card turned out. 

Thank you SO very much for taking your time to stop by and see today's snowman Christmas card,
Wanda

Monday, September 05, 2022

Snowman Magic, Stylish Shapes, Christmas Card, Stampin' Up!

This is not what I was thinking when I started out making this card. I was going to go with a floral motif but ended up with a snowman. Skipped fall all together!!! LOL

To make this card you will need the "Snowman Magic" bundle, the "Stylish Shapes" die set, Blends pens in Dark Pumpkin Pie, Dark Basic Black and Bronze, some glue, Balmy Blue ink, Night of Navy ink, some Dimensionals, Basic White card stock, and a crystal rhinestone.

The base of this card is folded half-sheet of Basic White card stock. This card opens on the right and the fold is on the left. I cut a 4" x 5-1/4" piece of Basic White and die cut the stitched square shape using the second largest die in the "Stylish Shapes" die set. Then I textured it using the "Brick & Mortar" embossing folder (I forgot to include that one in the list). I used brick because I was going to use flowers but since I had it done and switched gears, I just thought I'd use it anyway.

I set the embossed piece on top of my card base to see where the words would go. I lined up the words through the opening and stamped them using Night of Navy ink. Then I set the embossed piece in place using Dimensionals.

Next I die cut two snowmen using the die from the "Snowman Magic" bundle. I also die cut a pair of arms at the same time. Then I stamped the hat and scarf and set them up to be die cut. I set the face on the snowman and die cut all three at the same time.

I colored the arms using my Bronze Blends pen. I colored the nose using the dark Pumpkin Pie Blends and I colored in the face area on the second snowman using the Basic Black Blends pen. 

The arms were glued in place on the second snowman and then it was glued to the first one. The nose was glued on and then the hat. I stamped the buttons using black Memento ink before I set the scarf in place.

The snowman was then set in place on the front of the card using a few Dimensionals. Be careful not to put any where the opening is.

A crystal rhinestone was added to the snowflake in the words and the card was done.

I'm not overly fond of the card. It's okay but I think it would be better with a  snowflake background. Or maybe some embellishments. Or maybe a shaker card??

Thank you SO very much for taking your time to stop by and see today's Christmas card,
Wanda

Thursday, September 01, 2022

Snowman Magic, Snowman Christmas Card, Stampin' Up!

This card started out using a tag for behind the snowman and I had no idea where I was going to go with it.  And then I looked at the words in the set and knew the tag would look lost with the size of those words. So I just faked it as I went and this is what I came up with!

The base of my card is a folded half-sheet of Basic White card stock.

I cut a 4" x 5-1/4" piece of Balmy Blue card stock for the layer and I taped it to the card base. 

Then I cut the Designer Series Paper (DSP) from the "Lights Aglow" 6" x 6" stack. It measured 3-1/4" x 4-1/2".  I taped that to the Balm Blue piece. 

The words are from the "Snowman Magic" set and were stamped using black Memento ink. I die cut them using the second largest stitched circle die from the "Stylish Shapes" set. 

Next I die cut two snowmen, one for the front and one for the back. On the front one I die cut the face and when I die cut the face, I saved the nose.  I had also die cut the hands. Then I die cut the hat using Basic Black card stock. The scarf was stamped using Balmy Blue ink on a scrap piece of Basic White card stock. I die cut that along with a snowflake. I had cut a super thin strip of Daffodil Delight card stock yesterday and I had some left, so glued it to the band of the hat.

On the second snowman I colored in the face area with my Basic Black Blends pen. Next I colored the arms using the Bronze Blends pen. I glued the arms to the front of the second snowman. I colored the nose using the dark Pumpkin Pie Blends pen. The first snowman was glued on top of the second one and then the nose was glued in place.

I stamped the buttons on the snowman using black Memento ink. I probably could have just stamped them on the bottom because the top ones hardly show. I glued on the scarf and the hat. Dimensionals were added to the back of the snowman and I set it aside.

I added Dimensionals to the back of the word piece and I set it in place on the front of the card.

The smaller circle is the third largest in the "Stylish Shapes" set and was cut from a piece of Basic White card stock. I used my Blending brush and scrubbed on some Balmy Blue ink. I added Dimensionals behind it, except in the area where it was going to be touching the word piece, I added a little bit of glue there. I set the circle in place.

Then the snowman was set in place on top of the circle. And for the final touch, I colored a snowflake using my Wink of Stella pen, added a dot of glue on the circle and set the snowflake in place. A crystal rhinestone was added to the center and the card was done.

I still like yesterday's card better and this one couldn't be used for our family card because I don't have enough of the DSP to handle the job! Not that every one has to look alike but every one needs to be a lighter color and there's not enough!

Thank you SO very much for taking your time to stop by and see today's Christmas card,
Wanda

Wednesday, August 31, 2022

Snowman Magic, Merriest Frames, Christmas Card, Snowman Card, Stampin' Up!

Today I thought I'd work on a card for a possible family Christmas card. This one is a candidate, though I have a couple of other ideas to try out before I decide. This card was fun to make. There was no fussy cutting but there was paper tearing and that's another one of the things I don't care much for. Also heat embossing but that's not on this card so I'm good with tearing!! But if I had to add all three, well then I'd be purchasing my cards this year!!! LOL

The base of my card is a folded half-sheet of Basic White card stock.  This card opens on the right and the fold is on the left. 

I cut a 4-1/8" x 5-3/8" piece of Balmy Blue for the layer and then I cut a 3-7/8"  x 5" piece of Basic White for the top layer. I textured that top layer using the embossing folder from the "Merriest Frames" bundle. 

I measured the inside of the frame that embossing folder creates and it was 2-1/8" x 2-7/8". I cut a piece of Basic White for that space. 

The snowman was die cut from the "Snowman Magic" bundle using Basic White card stock. I cut out two of him. I also cut 2 arms and a snowflake at the same time. Then I cut the second snowman along with another snowflake. I also stamped the bow tie and die cut that too. And the hat was die cut from a scrap piece of Basic Black card stock. I also took a scrap piece of Daffodil Delight over to my cutter and cut a tiny sliver for the band on the hat. And the last thing I cut was the face of the snowman. I saved the nose.

I took out my Blends pens and I colored the arms using the Bronze pen. I colored the face area on the second snowman with the dark Basic Black pen. And I colored the nose using the dark Pumpkin Pie pen.

The arms were glued to the front of the second snowman body. Before I glued the top snowman on, the one with the face die cut, I made sure the eyes and mouth would all be black. Once the two snowman bodies were glued together, I put the nose back in place. Then I glued the hat and bow tie. I added Dimensionals to the back and set it aside.

I thought that rectangle I cut needed some color so I took my blending brush and scrubbed on some Balmy Blue ink. Then I tore a piece of Basic White card stock that was 2-1/8" wide and about 2" tall. I tore it to about 3/4" tall. I taped it in place on the bottom of the Balmy Blue inked rectangle. Then I taped that rectangle to the front of the card.

The snowman was set in place and I added the two snowflakes. I ended up coloring them and the torn snow with my Wink of Stella pen. I recommend doing this before you set them in place. I added a small crystal rhinestone to the center of the two snowflakes and the card was done. 

I'm happy with how it turned out and how easy it was to make it.  It's a good candidate!

Thank you SO very much for taking your time to stop by and see today's Christmas card,
Wanda
Friday, July 29, 2022

Snowman Magic, Christmas Card, 2022 Stampin' Up! Fall Mini Catalog

When I saw this card I knew I just had to make it. I love the Balmy Blue color. It's a nice cool color and is very welcome during this hot month of July! I found this card on Pinterest but it didn't lead me to the card. I did get to the web site and I did look around a bit for the card but after a while I gave up and went about it on my own. So here's how I made the card.

The base of the card is a folded half-sheet of Balmy Blue card stock. This card opens at the bottom and the fold is at the top.

I cut a 4" x 5-1/4" piece of Designer Series Paper (DSP) from the "Subtles" 6" x 6" stack. I taped it to the front of the card.

The circle is from the "Stylish Shapes" die set. I used the second largest one on a piece of Basic White card stock. I stamped the words on it using the ones in the "Snowman Magic" set. What I love about the clear stamps is you can bend them. I bent them around the circle. The original card is a thank you card, I wanted a Christmas card, so I changed the words. 

The snowman was die cut from a piece of Dazzling Diamonds glitter paper. I stamped the face on. I set the piece in my Stamparatus because I knew I wouldn't get the face dark enough with the first stamping.  I colored the nose in using my Pumpkin Pie Blends pen. I was going to use a marker and then I remembered that the ink probably wouldn't dry on the glitter but I knew it would with the Blends pen. I set the snowman on the circle and took a pencil and marked where the arms should go. I stamped the arms using Early Espresso ink. Then I taped the snowman in place.

The hat was stamped with black Memento ink and the scarf was stamped with Balmy Blue ink. I die cut both using the matching dies. 

Next I stamped the bird using Balmy Blue ink. I wiped the ink off the beak and then colored it in with the Pumpkin Pie marker. I used a dot of glue to hold the bird in place. Glue was also used to set the scarf and hat in place.

The snowflake frame was die cut using Basic White card stock and foam strips were added to the back. I laid it on top of the DSP to see where the circle and frame would go. I taped the circle down and then the frame. And that was it.

This card did take a little bit of time to make. There's lots of pieces and "stuff" to do to make it. But it's SO worth it. It was fun and I'd love to make more.  I want to play with that frame some more too.

Thank you SO very much for taking your time to stop by and see today's Christmas card,
Wanda

Sunday, November 07, 2021

Christmas Card, Crochet Snowman Card, Weekend Project

Today I'm going to share with you a card I made using a crochet snowman I also made. I was going to wait to post this until I had the instructions because I'm sure some of you will want to know how to make the cute snowman.  I'm not great at crocheting, so if I can make this guy, so can you! I know the basics to get by!

The base of my card is a folded half-sheet of Basic White card stock.  I had a  4" x 5-1/4" piece of Seaside Spray (retired) card stock and I don't know where this Designer Series Paper (DSP) came from but I liked the snowflakes.

I found the "Merry Christmas" in a retired set and stamped the words in Real Red.  I taped the DSP to the card stock and then taped the piece to the front of the card.

I set my snowman in place using glue dots. I made him so once removed he's an ornament for you tree. The hanger is tucked behind his body. The worst that happens here is the DSP tears or the glue dots stick to the yarn. It's easy to remove the glue dots from the yarn and once you remove the snowman, do you really want to keep the card??? LOL

Now I do not have the instructions ready. I was hoping to but I had gotten my booster yesterday and it's kicking me in the butt. I've had chills, headache, sinus pressure, my teeth hurt, every joint in my body hurt, my arm hurt at the injection site and I'm extremely tired.  And as soon as I get done posting this, I am going to go lay down again because apparently 12 hours of sleep isn't quite enough!  Though I am feeling a little better but not enough to be in my workroom for very long because I'm freezing. So I grabbed this card on my worktable and decided I'd post it and add the instructions at another time.  What's so odd is, I never had any symptoms from the first two shots, besides a little bit of a sore arm on the second dose.  All in all, I'd still recommend getting the booster, it beats getting sick from the virus. As you can see, I'm here able to type up my post!!

So I thank you in advance for your patience and I'll get the pattern printed out soon and online.

Thank you SO very much for stopping by to see today's Christmas card,
Wanda

Friday, December 18, 2020

Snowman Season, Christmas Card

Christmas is drawing near and there are not too many more days left to make Christmas cards. If no other card themes are needed, I will probably be making 7 more Christmas Cards. I look at the stamp sets I bought and I have hardly used them. I always say it's going to make me think twice about my next order but then I see the new stamp sets and the ideas fly and next thing I know I'm whining again about buying too many to use before they retire.  My workroom is full of retired stamp sets and I will be slowly adding them in my web store. I say slowly because it's not fun getting something ready to sell that way. But I am going to work really hard on at least working on posting one pile.  Maybe it will motivate me to work on the next one and so on!!! (Lots of piles of retired stamp sets).

So for today's card, here's how it was made. I took a folded half-sheet of Whisper White card stock for my card base. This card opens at the bottom and the fold is at the top.

I used the "Snowman Season" set to make this card. I LOVE snowmen and this set carried over from last year. It also comes with a matching punch so there's no fussy cutting. Last year there was some wonderful Designer Series Paper (DSP) that had snowmen and hats on it that matched the punch.  That was fun and easy!!

I took a 4" x 5-1/4" piece of Whisper White card stock and I taped two strips of DSP from the "Snowflake Splendor" pack that also carried over from last year.  The strips measured 4" x 1-1/4" and 4" x 1-5/8".  I taped the large one to the top and the smaller one to the bottom.  That left a nice white opening for the words.  I stamped them later.

I stamped the snowman with black Memento ink and punched it out. Then I punched the arms out of Early Espresso card stock and the hat was stamped using black Memento ink and punched it out. I colored the hat using Daffodil Delight, Garden Green, Real Red and Soft Suede markers. The snowman was colored in using Blushing Bride for the cheeks, Pumpkin Pie for the nose and Sea Side Spray for the shadowing on the snowman body. 

I glued the hat to the snowman and then the arms. 

I cut a stitched oval using the second largest oval and Sea Side Spray card stock.

A matching scalloped oval was cut using Whisper White card stock. I taped those two ovals together. I set the ovals on top of the card so I could see where the words needed to go.

The card was set in the Stamparatus and the words from the "Snowman Season" were stamped using Pacific Point ink. 

Next the oval was set in place with Dimensionals and the snowman was also added with Dimensionals and the card was done.

This was a very quick and easy card to make. And I REALLY like how it turned out. 

Thank you SO very much for taking the time to stop by today and have a look,                                      Wanda

Thursday, September 10, 2020

Life is Beautiful, Snowman Season, Winter or Christmas Card, 2020 Stampin' Up! Holiday Catalog

I found this fun card on Pinterest. This card was just too cute not to copy. 

The base of the card is a folded half-sheet of Balmy Blue card stock.  This card opens on the right and the fold is on the left.

Two 4" x 5-1/4" pieces of Whisper White card stock were cut. One for the front and one for the inside. 

I didn't have the fence that the original card had so I used one that that I had for many years.  I die cut it from a piece of Early Espresso card stock.

The tree is from the "Life is Beautiful" set and was stamped using Early Espresso ink. I stamped it on the left side and it went beyond the edge of the card stock.  You may want to move the tree up a bit, more than I did so it gives the tree more dimension or a little distance.  

The snowflake image is from the "Life is Beautiful" set and was stamped using Balmy Blue ink. 

The bottom of the card was sponged in using Balmy Blue ink and I also scrubbed a little of it into the top of the tree.

I glued the fence in place. My fence wasn't long enough so I had to cut it to stretch it out. The open are of the fence is behind the snowman and no one will ever know (unless you tell them!!!).  

The snowman is from the "Snowman Season" set and was stamped on Whisper White card stock using black Memento ink and then punched out using the matching punch.  The hat was punched from a scrap of Basic Black card stock. The arms were punched from a scrap of Early Espresso card stock, and the nose was punched from a scrap of Pumpkin Pie card stock.  I glued the nose in place. Then I glued the hat on top. The arms were glued in place on the back and were also taped in place with some scotch tape.  I colored the left side of the snow balls using my light Balmy Blue Blends pen. I cut a sliver of Real Red card stock and glued it on the hat.

The words are from the "Snowman Season" set and were stamped using Real Red ink.

The snowman was set in place using Dimensionals.  The second piece of Whisper White piece was taped to the inside of the card and the card was done.  It's just too darn cute!!!  I like this new "Life is Beautiful" set. I wasn't going to buy it out of protest. Stampin' Up! comes out with a tree set and it's in the catalog for a couple of years than it's retired.  Then a couple of yeas later a new tree is available for a couple of years and it goes on.  This is the third tree set I've bought in the time that I've been stamping.  I hope it will be around for a couple of years.

I had a fun time making this card.  Our weather has cooled down here and we even had a frost warning last night, so a snowman card isn't that far off!!! I hope we have a very long fall.

Thank you SO much for taking the time to stop by today,
Wanda

Monday, August 24, 2020

Snowman Season, Christmas Card, Winter Card, Arrow Fold Technique

I have never done a "Ribbon Fold" card before.  I though it looked pretty cool and was hoped it would be easy. It is. There's lots of videos on YouTube on how to make this card. Many of them are from Europe and the cards are bigger.

The base of my card is a folded half-sheet of Whisper White card stock.  This card opens at the bottom and the fold is at the top.

On the top part of the card you need to make a light mark in the middle on the edge. I made a small pencil dot at 2-3/4".  Then I scored each side half way too, at 2-1/8".  Now you need to score the piece.  You will line up the fold of the card (on the edge) to the center pencil mark on the 5-1/2" side.  Score it. Then move the card stock so the point is at the score line and the side pencil mark is also on the score line. Score it. Repeat this for the other side.

For the folding part, with the front of the card facing you, fold the long scored lines inward. Then fold the smaller one outward. Look at the second photo, you will be able to see this better.  Once they are folded, use a bone folder to make nice sharp folds.  These folds won't stay down so you are going to have to glue them.  Be careful to only glue the parts that are to be touching each other. 

Next I took a 4" x 5-1/4" piece of Designer Series Paper (DSP) from the new "Snowflake Splendor" 12' x 12" pack.  You will be cutting this piece.  Mark the bottom center at 2-1/8".  Line the corner and that pencil mark on your paper cutter and cut.  Repeat for the other side.  Keep the pieces together or it will be like a puzzle trying to match them.  

Take the two triangles and tape or glue them to the inside of the card.  See the second photo for placement. 

You can stamp your words on the inside if you's like. Or you can leave it blank and use the words on the front.  

Tape the larger triangle. It's not going to line up perfectly but if you get it close enough no one is going to notice.  

For my card I used the "Snowman Season" set. I was glad it wasn't retired. I like that it has a matching snowman punch to go with it.  I stamped the snowman on Whisper White card stock.  I used my light Pool Party Blends Pen to color the background. I used the dark Pumpkin Pie for the nose, light Petal Pink for the cheeks, and light Smoky Slate for the ground and bottom of the feet. 

I took my Wink of Stella brush and colored in the snowman and snowballs.  Then the image was die cut using the 2-3/8" circle die. And a scalloped circle was cut from Pool Party card stock for the back layer. I taped those two pieces together and set them in place on top of the arrow part. Make sure your Dimensionals don't hang over or they will get on the white part of the arrow and the circle won't lay flat. 

For a final touch I added some "Snowflake" sequins. I was SO glad to see that those were brought back from last year. I had bought 2 containers of them and didn't use as much as I thought I would. To help with the static, I had put a tiny 1/2" x 1/2" square of a dryer sheet in the container.  I placed the little snowflakes around the front of the card using some Tombow multi glue.  And that was it.

Isn't this a fun and cute card?  I like this layout and I'm going to have to try it again.

UGH, I tried to get both photos in there with the words on the side and it didn't work. I don't know what I did wrong but apparently I need practice when adding two photos.

Thank you ever SO much for taking the time to stop by today,
Wanda

Wednesday, December 11, 2019

Snowman Season, Christmas Card

The "Snowman Season" is still my favorite set this holiday season. I love the embellishment kit and I just had to try to work that into my card today.

The base of my card is a folded half-sheet of Real Red card stock.  On top of that I taped a panel that consisted of 1-1/2" strip of Designer Series Paper (DSP) from the "Let it Snow" 12" x 12" paper pack.  I cut it 1-1/2" x 5-1/2".  The Whisper White layer behind it is cut 1-3/4" x 5-1/2"/  I taped the two layers together and then I taped them to the card base.

I got out my oval dies and I took the largest scalloped oval and the next two smaller ovals (not with scallops) and I die cut them using Whisper White card stock and Real Red card stock.

I punched out a snowman using the punch and Dazzling Diamonds glitter paper.  I taped him in place. I did have a bit of trouble getting the tape to stick to the back of my glitter paper so I just took an emery board and roughed up the back a bit and then the tape had something to stick to.  

I took out my "Let it Snow" embellishment kit and added two eyes. I did have to cut the bigger end off the nose so I could use it on this snowman's face.  I gave him two eyes using the smaller coal looking pieces in the kit.  I used two larger ones for the buttons.  

Those cute arms are in the kit.  They are brown enamel and look like sticks.  But you can also either color the arms from the punch or punch two using Early Espresso card stock.

I took out a red scarf and red hat and glued them in place.

I taped all the ovals together and then I added Dimensionals to the back.  Before setting the oval in place, I stamped the "Let it Snow" from the "Snowman Season" set using black Memento ink.

I added a Whisper White piece of card stock to the inside and the card was done.

I think he's SO darn cute.  I have quite a few scarves and hats left over in my kit. I will need to use them up before they retire.  

Thank you SO much for stopping by today,
Wanda

Monday, December 02, 2019

Snowman Season, Christmas Card, 2019 Stampin' Up! Holiday Catalog


I told you yesterday that today's card would be better!  

The base of my card is a folded half-sheet of Real Red card stock.  On top of that is a 4" x 5-1/4" piece of Whisper White card stock.  On that piece I stamped the snowflakes from the "Snowman Season" set using Pool Party ink.  I stamped them at an angle, leaving the top left open for the words.  I stamped the words from the same "Snowman Season" set using Real Red ink.

Next I cut a 1-1/8" x 4" strip of Designer Series Paper (DSP) from the "Let it Snow" 12" x 12" pack.  I taped the DSP to the Whisper White piece using snail tape. I taped it 7/8" up from the bottom edge of the Whisper White piece.  

I took some Real Red "Curly Ribbon" and taped the edges to the back of the Whisper White piece.  I finally got to use my new spool of ribbon!  It's so soft, fuzzy and cute!

I punched out a snowman from the "Let it Snow" DSP.  Yup, there's a sheet of snowmen that match the punch!!!  I also punched out another snowman using a scrap piece of Whisper White.  I punched out the arms using Early Espresso and the hat was punched out from a piece of the DSP in the "Let it Snow" pack.  I taped the arms to the Whisper White snowman piece.  Then I added snail to the entire piece and set the printed one on top.  For the hat, I punched out one using Early Espresso card stock.  I added a little tape to the bottom part of the hat and affixed it to the back of the snowman's head.  Then I covered the back of the printed hat with snail tape and taped the two hat pieces together.  I added some Dimensionals and set the snowman in place.  Be sure not to add Dimensionals to the areas where the ribbon runs across the snowman.  It will make it bulge in those areas and not stick well in the other areas.  

I had a die cut snowflake sitting in my stash and I affixed it to the DSP. I added a rhinestone that I colored using the Real Red Blends pen.  I used the dark one for this.  

I set the panel in place on top of the card base using Dimensionals.  And for the final touch, I added a 4" x 5-1/4" piece of Whisper White card stock to the inside for writing on.

Thank you SO much for visiting today,
Wanda

Sunday, December 01, 2019

Snowman Season, Christmas Card, Snowman Card, 2019 Stampin' Up! Holiday Catalog

This is NOT the card that I had pictured in my head when I started this project!!!  UGH!!  (as in ughly!!!)  And as usual, I share with you the good, the bad and the "ughly"!  And this one is surely ugly!!!

The base of my card is a half-sheet of Whisper White card stock.  On top of that is a 2" x 4" piece of Balmy Blue Gingham Designer Series Paper (DSP).  It's from the Subtles Collection 6" x 6" paper pack. I set it in place with snail tape.

I took a half a doily and sponged the backside with Balmy Blue ink.  I added a little tape to the middle and set it in place on the edge of the DSP.  

I die cut some snowflakes and I sponged them with Balmy Blue, but only on the edges. 

I stamped the snowman from the "Snowman Season" set using Whisper White card stock and I punched him out with the matching punch.  I had left enough room on the card stock so the arms punched out too.  I colored those with the Early Espresso marker.  I also punched out another snowman and I sandwiched the arms between it.  This way the arms will be more stable and won't fall off.  If you glued them they probably wouldn't fall off either.  I colored the snowman's nose with the Pumpkin Pie marker. I added a little Powder Pink ink to the cheeks using the marker.  Before setting the snowman in place, I set him on the card to see where the words should go. 

The words are from the "Snowman Season" set. I stamped them using Night of Navy ink.

I set the snowman in place using Dimensionals.

I added the snowflakes using Dimensionals and I set a crystal rhinestone in the center of each one. I added a couple of extra rhinestones to the card.  

The tree is from the "Let it Snow" 12" x 12" DSP package.  I had fussy cut a stocking cap and a tree but ended up using the felt hat and scarf from the "Let it Snow" embellishment kit.  I just glued them in place plus a small Dimensional behind the parts that hung off the snowman. I did that just for stability.  I did add the little tree using a Dimensional. I had cut it out so, why not.  It couldn't ruin the card anymore than it already was.

And there you have it!  An interesting and horrible card!  I will have a much better card for you tomorrow. I promise!

Thank you SO much for bearing with me today,
Wanda