Pin It

Showing posts with label 2021 Holiday Catalog. Show all posts

Monday, December 27, 2021

Pansy Patch, Stitched Snowflake, Thank You Christmas Card, Stampin' Up!

I needed to make some thank you cards to send out for some Christmas gifts I had received. SO I opened up Pinterest and there was this pretty snowflake Christmas card and I thought how great that would look for a thank you card. You can see the original card here. I did change it a little.

The base of the card is a folded half-sheet of Basic White card stock.  Then I cut a 3" x 3" piece of Basic White card stock and textured it using the "Wintry" 3D embossing folder. Then I cut a 3-1/8" x 3-1/8" piece of Real Red card stock for the layer.

Before taping the textured Basic White piece to the Real Red piece, I die cut the snowflake from the "Stitched Snowflake" die set. I added a little Tombow glue to the snowflake and then set it in place on top of the textured piece. While that was drying, I got out some red and white Baker's Twine and wrapped it three times around the piece and tied it in a bow.  I added a little dot of glue behind the bow to hold it in place.  Then I glued the Basic White piece to the Real Red piece.

Dimensionals were added behind the Real Red piece and set on top of the card for placement for the words.

The words are from the "Pansy Patch" set and were stamped using Real Red card stock. Once the words were stamped, I removed the backing on the Dimensionals and set the piece in place on the front of the card and the card was done. Or so I thought. The center of that snowflake looked like it needed something so I took a 3/8" circle punch and punched out a piece of silver foil card stock. I didn't like the way that looked so I took out the "Subtle Shimmer" sequins and glued on in place in the center of the snowflake and now it was official, the card was done.  Now I'm off to make several more. So glad I left the word piece in my Stamparatus. I almost always stamp my words in the Stamparatus. I no longer trust my stamp pads or me to stamp them solidly the first time.  Plus when making more than one card, even if it's only two, it's nice to have it set up a head of time. You just ink and stamp and maybe have to repeat but at least it's there waiting for you to make one more or many more impressions!   I need to make 3 more so I'm off to do that. It will be quick and easy to do.

Thank you SO very much for taking your time to stop by and see today's holiday thank you card,
Wanda

Friday, December 24, 2021

Stampin' Up! 2021 Holiday Catalog, Penguin Place Christmas Card

My last "Penguin Place" card for the year. Tomorrow is Christmas and after that I shouldn't need any more Christmas cards!!  But I will need a birthday card. The husband's birthday is the day after Christmas. Poor guy!!  We've always celebrated it separate from Christmas. He never got a gift that was for Christmas and his birthday from us.  So onto today's card.

I found this one on Pinterest and I loved the layout. It happened to be a sketch challenge.  You can see the original card here. I did change it a little. I did click through the link but had no luck with measurements, so here's how I made the card.

The base of my card is a folded half-sheet of Basic White card stock. On top of that is a 4" x 5-1/4" piece of Fresh Freesia card stock. I did it that way to save on my Fresh Freesia card stock.  Then I cut a piece of Designer Series Paper (DSP) from the "Penguin Playmates" 12" x 12" package at3-7/8" x 5-1/8".  That will be taped on top of the Fresh Freesia piece.

Next I cut the two strips in the background. I cut them at 7/8" wide and 4"long for the DSP and 1" wide and 4-1/8" long for the Basic White layer behind it. I taped them to the front of the card about 1-1/16" from the side(s) and almost 3/4" from the top or bottom. What's left in the middle just happens!

I did like the stitched circle and I still have my dies so I took the largest one and cut it from Fresh Freesia 4" x 5-1/4" piece.  

I fussy cut the characters from a sheet of the DSP, even a tree!! I don't care much for cutting the trees but I did find it easier if I snipped either side of the trunk first and then the bottom of the trunk. After that I just carefully worked my way up and then down the tree.  I think the tree took longer to cut than the characters did. 

The words are from the same "Penguin Place" set and were stamped using black Memento ink on a 1/2" x 3" piece of Basic White card stock. 

To assemble, I taped the Fresh Freesia piece on top of the card base, then the DSP.

The strips were added next. 

For the circle, I first taped the bear down, then the words. The penguin was next and the fox was added last. I turned the circle over and added Dimensionals. I don't know if that was how the original card was made but I thought it should be popped up. I do like the look of it popped up.

Isn't it adorable? See why I just had to make it?  I LOVE this layout and I hope to use it again sometime.

Thank you SO very much for taking your time to see today's Christmas card,
Wanda

Thursday, December 23, 2021

Penguin Pals, Snowman Season, Christmas Card, 2021 Stampin' Up! Holiday Catalog

With only a couple of days till Christmas, I'm still making Christmas cards. There's a few I needed to make to hand deliver.  Which is a good thing because I don't think the mail service could get them to their destination in time, even if it's just across town! I often make a lot of my hand delivered cards with lots of bling and raised elements because I don't have to think about paying extra postage.  

I decided to make today's card a bit more festive with the penguins and the colors.

The base of my card is a folded half-sheet of Basic White card stock. This card opens on the right and the fold is on the left.

I cut a piece of the dotted Designer Series Paper (DSP) from the "Penguin Playmates" 12" x 12" package at 4" x 5-1/4".  I cut 1-1/2" off the top and turned it over. Then I taped the two pieces to the front of the card.

I cut a 5/8" x 4" piece of Basic White card stock and stamped the "Merry Christmas" from the "Snowman Season" set using black Memento ink. I think Just Jade ink would have been prettier but I didn't think about it till just now.  

Then I cut a 7/8" x 4" piece of Just Jade card stock and layered the word piece on top. I taped the layers to the front of the card, lining up the top edge to the bottom edge of the 1-1/2" strip of DSP.

The penguin was punched out using the "Penguin Builder" punch and Basic Black card stock for the body and Basic White for the belly/face part. I taped those two pieces together.  Then I stamped the eyes using black Memento ink.  I finally got the eyes where they looked fairly normal. Some of my penguins eyes were very weirdly placed.  Poor little guys!!! LOL  Then I stamped the bow tie using Just Jade ink.  See how pretty the words would be in that color?  And the feet were stamped using Pumpkin Pie card stock and Pumpkin Pie ink. They were punched out using the "Penguin Builder" punch and glued in place. I thought it would be a bit too messy to tape them. I'm not good taping tiny pieces but a dot of glue is perfect for me. 

I die cut a circle using the 1-7/8" using the Just Jade dashed looking DSP.  And I used the 2" scalloped die on a scrap piece of Just Jade card stock. I think I'm down to just scraps now.  It's going to be retiring in a few months so do I just tough it out or buy a full package?  Not sure I can use a whole package up before it retires.  Though there is the variety pack.  Hmmm. I'm going to have to give that some serious thought.  Okay, once I got the circles cut, I taped them together and I set them in place on the card using Dimensionals.  

The penguin was taped in place and I thought the card was done. SO as I was putting the words back in the "Snowman Season" container, a snowflake fell out of it so I took it and glued it to the front of the card next to the penguin. I thought it could use some bling, so I took out the "Subtle Shimmer" sequins and glued a few to the card and now the card was done.

This was a very fun card to make and I love how cheery it looks.

Thank you SO very much for taking your time to stop by and see today's cheery Christmas card,
Wanda

Wednesday, December 22, 2021

Penguin Place, Gift Tags, 2021 Stampin' Up! Holiday Catalog

I was in need of a couple of gift tags. I didn't want to run out to the store and buy more. Like I'd find any this late in the month anyway.  I could have gone online and found some to download but if I'm going to download, print and cut, I might as well just make my own!  So here they are. 

I used the retired "Scalloped Tag Topper" punch. I didn't have anything current that would look cute. And it really didn't matter, it's not like the tag is going to be saved and cherished for all eternity! LOL   I punched a 2" x 4" piece of Basic White card stock. I cut and punched two, one of Fresh Freesia and one of Soft Sea Foam card stocks.  

The Basic White tags were cut at 3" x 1-1/2".  I was careful to try to get the piece inside the punch equally on both sides.

I took a scrap piece of the Fresh Freesia snowflake Designer Series Paper (DSP) from the "Penguin Playmates" 12" x 12" package and the Soft Sea Foam trees too.  I cut them at 2" x 1-3/4" each. I taped them to the bottom of each large tag.

Then I took some DSP that had the penguins sitting and I punched them out using the "Penguin Builder" punch. I added Dimensionals behind them. I set them on the Basic White tags but didn't affix them. I needed to see where the words were going to go. 

I set the words up in my Stamparatus. I needed to mask off part of the words on the stamp so only the "Be Merry" were exposed.  Then I inked it up with Soft Sea Foam ink and stamped the words.  I headed back to my cutting board because I forgot to remove the post it tape I had covering the words I didn't want.  UGH.  So I got the one done for the Fresh Freesia tag.  For the second tag, I managed to mess that one up too. And again, UGH!  Back to the cutting board.  I actually messed it up twice.  The third time was a charm, right?  Wrong. I had taken out the Mint Macaron ink thinking that might have been what I needed but it wasn't.  Not looking, I grabbed it and stamped the words.  I decided to just use them. Again, it's not like the tags are going to be saved! 

Next I affixed the penguins.  Then I grabbed some white Baker's Twine and some ribbons and threaded them through both tags at the same time. I looped them through the opening from front to back and slipped the ends through the loops and pulled.  I trimmed the ends and the tags were done.  I probably could have gone to and come back from the store quicker than it took me to make these with all the mistakes!!! LOL But they are done. They are homemade and as soon as I get done typing this, they will be on a couple of packages!

They were fun to make (excluding the mistakes). I like how they look and I love the colors.

Thank you SO very much for taking your time to stop by and see today's Christmas tags,
Wanda

Tuesday, December 21, 2021

Penguin Place, Candy Holder, Weekend Project

Today's "Weekend Project" is a fun candy holder I found on the internet. I thought it was so cute and would be perfect for a little teacher gift, stocking stuffer or something for the mail and delivery carriers. I found how to make them here. A little friendly tip here. If you are one who likes to play along, I recommend you either watch first or follow along with my tip.  The video for these cute holders starts at 11:06 in the video.  Before these, Christmas cards were made.

You will be instructed to cut the DSP from the "Penguin Place" at 2-5/8" x 6".  On the long side you will be scoring it at 3-3/4" and 4-1/8".  And the short side was scored at 3/8" on each side.  You also need to be aware of the orientation of your DSP. The first one I made, I had the DSP the wrong direction so when I started to fold my holder up, the characters inside were upside down.

At the top part of the piece you cut off 1-7/8" from the top down on each side. And you will be snipping the little scored areas between the 3-3/4" and 4-1/8".  You will snip to the 3/8" score line and then you will need to snip little "V's" off the sides of each of those little tabs.  After that was done (this is where I should have watched instead of followed along) you glue the piece.  You need to use a punch for the top piece to create the hole for hanging. I slid my piece in and the bump on the top of the piece is flat. You can really see it in the middle holder. Now you probably wouldn't have noticed had I not told you. But I did because I wanted you to know what yours could look like if you don't punch it before assembling. And when you punch it before, turn the punch over so you can see where it's going to punch. You don't want to cut off too much on the top.  

I used Ghirardelli chocolates for mine. They fit perfectly. Lindt's were used in the original holders.

I did not tie off my ribbon on the tip like it was done in the video. I just tied the 7" piece of ribbon in a knot and called it a done deal!!  

I wasn't fond of fussy cutting those little trees but I did it, I did three of them!! The two penguins were punched out and the fox was fussy cut. The characters were set in place with Dimensionals.  Set the tree and character in place with the candy in the holder. It will give you a somewhat firm surface to press down onto.

And that's it for the tips and how I made mine. These were very fun to make and I'd make more if it weren't so late in the season now. And they were pretty quick to make too!

Thank you SO very much for taking your time to stop by and see today's cute candy holders,
Wanda

Monday, December 20, 2021

Penguin Place, Christmas Card, 2021 Stampin' Up! Holiday Catalog

I have SO much Designer Series Paper (DSP) left from the "Penguin Playmates" 12" x 12" package.  I have fussy cut and punches out characters and used a lot of it for backgrounds but I still have a lot left. And using the small amount I did on today's card shouldn't even count!!! LOL

The base of my card is a folded half-sheet of Basic White card stock with a 4" x 5-1/4" piece of Soft Sea Foam card stock for the layer.

The focal piece was cut at 3-3/4" x 5". I textured it using the "Wintry" 3D embossing folder. That folder doesn't cover the entire area so I had to move the folder over and do the side that didn't get embossed the first time through the Big Shot.  You can hardly tell.  And I'm not going to point it out to you. You can get by with this as long as you have some images that will cover those areas. Or something SO fantastic that it takes the eye away from the background!! I'm going with the images that cover here because it's not fantastic!!! LOL

After embossing the Basic White piece, I glued it in place on top of the Soft Sea Foam piece.

I took the 1-5/8" and 2-1/8" circle dies and I took the DSP and set it on top of a scrap piece of Basic White card stock (you can use Soft Sea Foam card stock instead).  I set the circles on top of the DSP and taped them down with some post it note tape. I didn't want them shifting on me.  I slipped the Basic White piece under the DSP and I die cut them at the same time. I wanted to make sure that circle was firm and not flimsy from just using DSP. I was going to tape them together before I die cut but I didn't want the sticky tape on my dies and I didn't want to use a lot of tape to cover and area that wasn't going to be needed. So once it came off the Big Shot, I taped the pieces together. 

Next I fussy cut the penguin from a piece of the DSP in the package. I placed him in and behind the circle and glued him in place. I added Dimensionals to the back and set it aside.

The words are from the "Penguin Place" set and were stamped using black Memento ink on a 1-1/8 x 5/8" piece of Basic White card stock. I cut a piece of Soft Sea Foam 1-3/8" x 7/8" for the layer. I added Dimensionals to the back and set it aside.

Then I set the circle in place on the front of the card and then the words.  I added some sequins from the "Subtle Shimmer" container. It was just enough to give the card a little bling.  And that was it.

This was a very quick, easy and fun card to make.

Thank you SO very much for stopping by today,
Wanda

Sunday, December 19, 2021

Penguin Place, Snowman Season, Shaker Card, 2021 Stampin' Up! Holiday Catalog

I had bought the "Snow Globe Shaker Domes" and had only used them once. I found a card on Pinterest and there was the globe, which I forgot I had. SO I stopped my searching and decided to go with this card. You can see the original card here. I tried to search for instructions but there was no direct link to the card, so here's how I made it. 

The base of my card is a folded half-sheet of Basic White card stock. The original card used a folded half-sheet of Just Jade card stock. I don't have enough Just Jade to do that so I had to work with what I had. I cut a piece of Just Jade card stock to 4" x 5-1/4".

Then I cut a 3-7/8" x 5-1/8" piece of Designer Series Paper (DSP) from the 12" x 12" "Penguin Playmates" package. The dotted paper is SO cute.  I also cut a 3" x 3-1/2" of the Fresh Freesia snowflake DSP for behind the dome.

The penguin and tree were fussy cut out from another piece of DSP. They were set in place on the Fresh Freesia piece of DSP.  I piled some of the cute "Subtle Shimmer" sequins on the penguin's belly and stuck the dome in place over them. For placement of the tree and penguin, I did set the dome over the area to know what type of space I had to work with.  Once the dome was placed it's placed. There's no moving it. I thought my penguin was a little crooked but once it was all together, it looked fine. I had set the penguin and tree in place using Dimensionals.  Those sequins were a bit touchy to work with today. My house is very dry with this cold weather we've been having.  I usually put a tiny square of dryer sheet in my sequins to keep them from getting full of static.  SO they were stuck to my fingers and everywhere else too! UGH.  A few huffs on it and they fell off.  I got my dryer sheet square and it's now in the container!

I did not have the die that helps with the dome, so I had made a template from the piece that protected the sticky tape on the dome. I traced it and cut it out using card stock so it was nice and firm.   I had taken the dotted DSP and added a 1-3/4" x 3-7/8" piece of Basic White card stock to the bottom.  Then I took my template and traced around it so I knew where to cut for the dome. Once the cutting was done I placed the piece over the dome to make sure it fit. Then I removed the protective piece and exposed the tape. I set the DSP piece on top.  Then I glued it to the DSP and then it was glued to the card base.

The words are from the "Snowman Season" set and were stamped using Just Jade ink. That piece measures 3-3/4" x 5-1/8".  I set it in place with Dimensionals and the card was done.

It's a pretty quick and easy card to make and would probably be quicker if I had the dome die but I made it work so I'm happy.

Thank you SO very much for taking your time to stop by and see today's Christmas card,
Wanda

Saturday, December 18, 2021

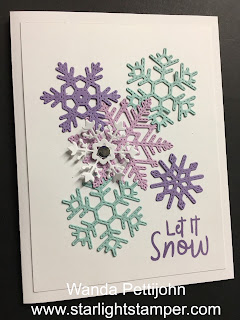
Snowman Season, Stitched Snowflakes, So Many Snowflakes, Christmas Card

I love snowflakes. I love snow. I live in Minnesota and winter with snow is a big part of the package! I can deal with all of it except the ice. So as I was cleaning up my worktable, I found several snowflakes and thought I'd make a snowflake card.  This is not what was in my head. FAR from it! But I'm sharing it with you so you don't make the same mistake!!! LOL

The base of the card is a folded half-sheet of Basic White card stock.  

A 3-7/8" x 5-1/8" piece of Basic White card stock was cut for the top layer.

I cut the snowflakes using the "Stitched Snowflake" dies. I used Fresh Freesia for the center one. The purple ones are Highland Heather and the bluish ones are Pool Party. 

The white one off to the left is from the "So Many Snowflakes" die set. 

I laid the snowflakes on the top of the card stock to see where the words should go. I stamped them from the "Snowman Season" set using Highland Heather ink. Then I taped that piece on top of the card base.

I glued the snowflakes in place. Yup, glued. I didn't use the double sided stick paper. Though it would have been nice if I had. But I just took some Tombow Mono glue and spread it thinly on a piece of the backing paper I saved from my Dimensionals. (I save everything, just ask my husband or look around in my workroom). I took another piece of the backing paper and after setting the snowflake in the glue, I pressed it down with the other piece. Then I set it in place on the front of the card. I did lift up a few branches on the center snowflake so I could slip other ones under it. 

I took the white snowflake and added a Dimensional behind it. I was going to add a rhinestone to the center but decided that since it was going to go in the mail, I thought I should try to keep it flat, so I punched out a silver foil circle and glued it in place.

And that was it. This was fun to put together but not what I had in mind.  It's colorful!! I can say that much!

Thank you SO very much for taking your time to see today's snowflake card,
Wanda

Thursday, December 16, 2021

Bright Baubles, Christmas Card

I don't feel that I've played with the "Bright Baubles" set/bundle enough. It was kind of expensive and I've hardly made any cards with it. I did find this card on Pinterest. I changed it a little but it's pretty much the same. You can see the original card here.

The base of the card is a folded half-sheet of Real Red  card stock. This card opens on the right and the fold is on the left.

I cut a 4" x 5-1/4" piece of Basic White card stock. I was going to die cut the "Joy" from the center but then I remembered that I would have to do some serious gluing so I just taped it on the front of the card as is. 

The top layer is a 3-7/8" x 5-1/8" piece of Real Red card stock and I textured it using the "Merriest Frames" embossing folder. The folder is much larger than the piece of card stock I was using so some of the details got cut off but it still looks good. I glued that piece in place. I prefer glue because of all of the texture. There isn't always great surface contact when using tape but with glue it doesn't matter. As long as some glue adheres to the piece below it, it's not going anywhere once it dries!

Next I die cut the bulb shape using some Designer Series Paper (DSP) from the "Peaceful Prints" 12" x 12" package. 

I die cut the "Joy" bulb using the die from the "Delicate Baubles" die cut set on a piece of Basic White card stock that a double sided sticky sheet was added to make it a sticker once it was cut.  I affixed this piece to the DSP bulb piece.

The bow was die cut from a piece of gold foil card stock. I trimmed the top of the bow later.

The bulb was set in place using Dimensionals. I set it in place on the front of the card, centering it as much as I could. Then I trimmed the top part of the bow.

I stamped the words form the "Bright Baubles" set using Real Red ink on a 3/4" strip of Basic White card stock. I trimmed the ends to fit. I had trouble getting the point right and I kept trimming it and trimming it until I just had to stop before I was too far into the words. It's kind of like that pencil you can't get quite sharp enough and by the time you are done taking it in and out of the pencil sharpener, it's half the size you started with!!  That happens a lot to me with colored pencils!  LOL

This was a fun card to make and I just used what I had here to try to recreate as close as I could.

Thank you SO much for taking your time to stop by and see today's Christmas Bauble card,
Wanda

Monday, December 13, 2021

Penguin Place, Penguin Playmates, Pop-Up Christmas Card, Weekend Project

Today I thought I would have some fun making a pop-up card. It was an experiment and I learned what not do to! LOL Here's how I made the card.

First lets talk about the front. I cut a half-sheet of Basic White card stock on the short 8-1/2" side so it measured 4-1/4" x 11" when I was done. Then I folded it in half. My card opens at the bottom and the fold is at the top. 

I cut a 4" x 5-1/4" piece of Shaded Spruce for the layer. Before I taped it down I die cut a circle using the largest die in the "Circle Dies" set. It measured 2-15/16".  Then I taped the piece on top of the front of the card.

A 3-3/4" x 5" piece of Designer Series Paper (DSP) was taped on top of the Shaded Spruce piece.

I die cut the dashed circle piece using a scrap of the DSP and the second largest circle die. I taped those two circles together.

The bear was fussy cut and set in place on the circle using Dimensionals. Then the entire piece was set in place on top of the card. 

I tied a silky white bow from some ribbon that was 5/8"wide. I set it in place with a large glue dot.

Now for the inside.  I made the pop up part and added the images. I am going to see if I can include the PDF for it here.  If not, I will add a photo of it. 

I then printed out the pattern onto a piece of Basic White card stock. I fussy cut the two pieces. I did trace a second set that has no writing on it because I could see the writing on my card but you really have to look at the inside part of it to really see it.  You could probably turn it over but there will be a light rectangle where the words would go. But you could do the words on a strip of card stock and tape it to the front.  Or you can just leave it as it is and ignore the marks in the inner part of the piece.

When you are done fussy cutting it out, you are going to score on all the dotted lines. I did score on both sides of the three lines that all cross each other. You want to soften them up a bit and scoring on both sides took care of that.  Then you are going to want to fold them in mountain and valley folds. It's a bit tricky but you can do it.  

I stamped the words from the "Snowman Season" set using Real Red ink. I had to do this now if I wanted to have it directly on the piece and not added later.

I cut the circle behind the bear and glued it in place. I added that first because I needed to make the slit for the mechanism and it had to go through both the fussy cut piece and the DSP.  I inserted end B into the slit and folded the piece upward. I glued it in place. Then the other end of the mechanism was glued in place. I folded that end downward and glued it to the area marked with an "A".  

Now I was ready to decorate my pieces. I fussy cut the bear and glued him in place.  I could have omitted adding the circle before the mechanism and raising the circle up higher but I was still experimenting.  If I were to make another one I think I would take that fussy cut circle and make it into a 1-1/4" rectangle that would be about 1-1/2" high.  But for now it's a circle and a little low on the card. 

I fussy cut the fox and snowman and glued them in place. I had added the glue to the side pieces and then added the characters. I did have to trim a bit of the card stock behind them, I didn't want any showing.  

Then the penguin was added. I die cut a 2-1/8" circle of the DSP with the trees in the design and I glued it to the tab that was sticking up. The penguin was added and the card was done. 

When you're holding it and opening it, it doesn't look so bad but the penguin could have been lower on the piece so the other two characters could be seen better. And the words could be stamped directly to the inside of the card.  There's other ways to make this work! I thought about trimming around the penguin so only a little bit of the tree paper shows, then the characters behind it could be seen better.  Still experimenting!!!

The inside cover could use some finesse too, but like I said, it was an experiment and I did learn a lot!

Now to figure out how to get the PDF available to you. From what I could figure out with my limited computer skills, I think you will just have to click Pop-Up PDF and you will get the pattern. If it doesn't work, please look on the right side bar, scroll down to where you can see my email and contact me and I'll send it to you!  I found this a bit confusing to do but I hope I did get it right. 

Thank you SO much for taking your time to stop by and see today's pop-up card,
Wanda

Sunday, December 12, 2021

Bright Baubles, Christmas Card, Stampin' Up! 2021 Holiday Catalog

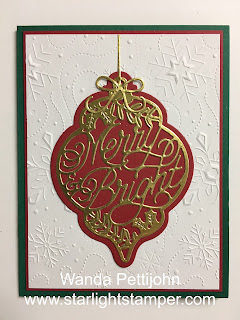
I knew this card was missing something. Oh well, it's done and it's just okay.  I found this card on Pinterest. I'm always on the lookout for some pretty cards made using the "Bright Baubles" bundle. You can see the original card here

The base of my card is a folded half-sheet of Shaded Spruce card stock. This card opens on the right and the fold is on the left.

I cut a 4" x 5-1/4" piece of Real Red card stock. To save some card stock you can cut out the Real Red bulb shape from the center. No one will know it's missing once the Basic White piece is attached. The Rea Red piece was taped to the front of the card and the bulb shape was set aside for now.

For the Basic White piece, I textured it with the "Wintry  3D" embossing folder. The folder doesn't cover the full piece so I had to emboss on the left and then line it up and emboss on the right. There was a snowflake in the center that got cut off and looked a bit odd but the bulb hid it so now it just looks like it was embossed on the whole sheet from a larger folder!  Mission accomplished. I just think this folder is SO pretty and I was glad I was able to make it work.  

The bulb was die cut using gold foil card stock. I had used a double-sided sticky sheet to make this into a sticker because I'm not fond of gluing all of those little lines to make it stay in place.  I also die cut the bow. What I liked about this bow was that it was threaded through the loop of the bulb from the front to the back instead of just sitting on top.  I taped the bulb in place on the front of the card and then I trimmed the top "string/hanger" of the bow. 

A 4" x 5-1/4" piece of Basic White card stock was added to the inside and the card was done.  This was a very fun and easy card to make even though I forgot to tuck a couple of die cut snowflakes behind it. I like it anyway.  

Thank you SO very much for taking your time to stop by and see today's Christmas card,
Wanda

Tuesday, December 07, 2021

Penguin Place, Christmas Card, 2021 Stampin' Up! Holiday Catalog

Today I found this little darling on Pinterest. I thought it was so cute that I just had to make it.  One thing here that caught my eye was the textured background. I liked the idea that it was not a full sheet of card stock. It really couldn't be because the embossing folder isn't a big one. It's 3-1/4" wide. You can see the original card here.  

The base of the card is a folded half-sheet of Basic White card stock. This card opens on the right and the fold is on the left.

I cut the embossed piece 3-1/4" x 5-1/4". It was textured using the "Wintry 3D" embossing folder.  I glued it to the front of the card. I tend to glue textured pieces because I know they will stay put. With tape I'm never sure if there is enough surface contact to keep the piece in place.

I punched out the penguin body using Basic Black card stock. And the belly/face part using Basic White card stock. I taped the two pieces together. Then I stamped the eyes from the "Penguin Place" set using black Memento ink. The beak was stamped using Pumpkin Pie ink and the bow tie was stamped using Just Jade ink. 

The feet were stamped on a scrap piece of Basic White using Pumpkin Pie ink. I glued them to the body piece.

The hat was stamped using Just Jade ink and was fussy cut. I didn't fussy cut the bottom part of the hat, I left it in kind of a cone shape so I could tape it to the back of the head while lining it up with the top of the head. Then I added Dimensionals to the back and set it aside. I made sure my Dimensionals went over the feet area and the hat area to give those pieces some extra hold.

I stamped the package with Misty Moonlight ink. I fussy cut it out and then I taped it to the right wing of the penguin. 

The Designer Series Paper (DSP) was cut at 2-1/2" x 3-1/2" and was taped to a 2-3/4" x 3-3/4" piece of Basic Black card stock. 

I stamped the words from the "Penguin Place" using black Memento ink on a 3/8" piece of Fresh Freesia card stock. My piece was a little long so I didn't have to be so concerned about getting it centered on the strip. I added tape on the back and then I centered it on the DSP and trimmed the ends after. 

Black and white gingham ribbon was taped to the back of the piece. I also taped it down with scotch tape to make sure it will stay in place. I slipped the ribbon end (while still on the spool) under the taped ribbon and tied a knot. Then I trimmed the ribbon. You waste less ribbon doing it this way.  Dimensionals were added to the back of this piece and set in place on the front of the card.

The penguin was added and the card was done.

So cute, huh?  See why I had to make one? I'm not sure if I got their measurements right but it's close enough. It looks good to me!

Thank you SO very much for taking your time to stop by and see today's Christmas card,
Wanda


Monday, December 06, 2021

Penguin Playmates, Snowman Season, Christmas Card, 2021 Stampin' Up! Holiday Catalog

I liked yesterday's card and the site that I found it there was one in Fresh Freesia that I thought was pretty, so I thought I'd give this one a try, especially since I had the measurements.  Why not, right?

The base of the card is a folded half sheet of Basic White card stock. This card opens on the right and the fold is on the left. 

I cut a 4" x 5-1/4" piece of  Designer Series Paper (DSP) from the "Penguin Playmates" 12" x 12" package and I taped it to the front of the card.

I fussy cut a penguin from the DSP, I added Dimensionals on the back and set him aside.

Then I die cut a snowflake. (I'm not whining here about not having the same snowflake, you read enough of that yesterday!!! LOL). I used some card stock that I had the double sided sticky sheet attached to it. I had made a large sheet so it would be available when I needed it.

I cut a 3" x 5-1/4" piece of Basic White for the center strip. I used Fresh Freesia and my blending brush to scrub on some Fresh Freesia ink.  I taped this strip on top of the DSP.

The snowflake was added to the upper part of the strip.

The words are from the "Snowman Season" set and were stamped using Versa Mark. I embossed them using white embossing powder. The Fresh Freesia strip the words are on was cut 3/4" x 3". I added Dimensionals on the back and set it in place 3/8" up from the bottom of the Basic White strip.

I added the penguin and then a few sequins from the "Subtle Shimmer" sequins package. And that was it, the card was done. 

I like this card a lot. So much more than yesterday's bear card. I think it's the color that is more appealing to my eyes.  

Thank you SO very much for taking your time to stop by and see today's Christmas card,
Wanda


Sunday, December 05, 2021

Penguin Playmates, Snowman Season, Christmas Card, 2021 Stampin' Up! Holiday Catalog

Did you ever want to make a card you saw but didn't have all the same items to create it?  I have seen this card many times on Pinterest and I've wanted to make it but I didn't have that beautiful snowflake. I didn't order any so there I was with big sad eyes regretting not buying that and about 40 other things I saw!!! LOL  But I thought I could just use a snowflake I had here and be happy with it. I guess it doesn't take much to make me happy because it worked.  Though I still have regrets about not getting those snowflakes. This isn't the only card I saw with it on it! You can see the original card here

The base of the card is a folded half-sheet of Basic White card stock. This card opens on the right and the fold is on the left.

I cut a 4" x 5-1/4" piece of Designer Series Paper (DSP) from the "Penguin Playmates" 12" x 12" package and taped it to the front of the card.

Then I fussy cut the bear from another piece of the DSP. I cut it close to the image, pretty much right on the image.  Then I die cut my snowflake from and old die I had. I did use the double sided stick sheet to make it into a sticker because I don't like gluing things that are not very wide. I get glue all over my fingers and sometimes on everything else!  I set them aside for now.

The Basic White strip in the middle was cut at 3" x 5-1/4".  The bear and snowflake were set on top in the area they were about to be placed and then I took my blending brush and scrubbed on some Misty Moonlight ink. I had marked my area on the upper and lower part of where I wanted the Misty Moonlight ink to be.  The snowflake hid the upper pencil mark and the pencil mark in the lower area disappeared.  Once the ink was brushed on to my satisfaction, I set the snowflake in place about 1/4" from the top and then  set the bear in place using Dimensionals.

I stamped the words from the "Snowman Season" using Versa Mark. I heat embossed them with White embossing powder. That strip of Misty Moonlight measured 3" x 3/5".  The "Merry Christmas" fit in that space perfectly. I set the words in place using Dimensionals.

Then a few sequins from the "Subtle Shimmer" sequins pack were set in place on the front of the card with a tiny dot of glue and the card was done.

I hope you like this card as much as I do. I love the background behind the bear. It makes him stand out more.  And the colors are very pleasing to the eye!  I'm glad I decided to use what I had so I could recreate this card.  

Thank you SO very much for taking your time to stop by today to see this cute bear Christmas card,
Wanda


Saturday, December 04, 2021

Penguin Place, Christmas Card, 2021 Stampin' Up! Holiday Catalog

Blogger fixed their photo issue!  YAY!!!  I was able to add my photo today with no issues. So here we go!

I opened up Pinterest and this was the first card I saw. I thought it was so cute to I got out my materials to make it.  There was no link but I did Google the name on the front of the card. I found Julie's blog and I went through 20 pages to find the card but I couldn't so I gave up. I didn't have that kind of time to invest in searching.  It would be nice if people could provide a direct link to their cards.  You can see the original card here. So here is how I made it.

The base of the card is a folded half-sheet of Fresh Freesia card stock. I cut the sheet in half on the short side so when I was done cutting it measured 4-1/4" x 11". I scored and folded it at 5-1/2".

Next I cut two 4" x 5-1/4" pieces of Basic White card stock and I taped one to the inside and one on the outside.

The Designer Series Paper (DSP) if from the "Penguin Playmates" 12" x 12" package. I cut that piece at 3-7/8" x 5-1/8".  I taped that to the Basic White piece on the outside. 

I cut a 3-1/8" x 4-1/2" piece of Basic White card stock and I took the 2-1/8" circle die and die cut the hole. I did this before texturing because I didn't want to crush the texture.  Then I textured it using the "Brick & Mortar" embossing folder.  I took a 2-1/2" x 2-1/2" piece of Basic White card stock and I die cut a circle using the 1-7/8" die.  I taped it behind the circle on the textured piece. Then I cut another 2-1/2" x 2-1/2" piece of Basic White card stock and taped it to the back of that second circle. After that was done I taped that piece to a 3-1/4" x 4-5/8" piece of Fresh Freesia card stock.

A 2-1/8" x 3-7/8" piece of Fresh Freesia card stock was cut for the strip behind the focal piece. The snowflakes were stamped on it using Fresh Freesia ink. It was taped in place and then the focal piece was taped on top of that.

The fun striped piece is from the same "Penguin Playmates" DSP and was cut at 3/4" x 4-1/4". I glued that piece in place. I wasn't sure if the ends would come back up on me, so I thought I'd use glue and be sure they'd stay down.

The packages were stamped on a scrap piece of Basic White using Fresh Freesia, Misty Moonlight and Soft Seafoam ink. I fussy cut them. 

Next the words were stamped using Misty Moonlight ink on a scrap of Basic White card stock. They were also fussy cut.  The were set in place on the card using Dimensionals. Then the packages were taped in place except the Misty Moonlight one, it was set in place with a Dimensional. 

I punched out the penguin shape from a scrap piece of Basic White.  The penguin is from the DSP and it was fussy cut very close to the printed image. I gage the little guy a Fresh Freesia bow tie. Then it was taped to the Basic White penguin that was punched out. I added a few Dimensionals on the back and set it in place on the bottom of the smaller circle.

A Fresh Freesia bow was tied and set in place with a glue dot.  And that was it.

This was a very fun card to make. Lots of little pieces, but too darn cute and so worth it.

Thank you SO very much for stopping by and seeing today's Christmas card,
Wanda

Friday, December 03, 2021

Bright Baubles, Snowman Season, Christmas Card, 2021 Stampin' Up! Holiday Catalog

I have been having some issues with Blogger tonight and I can't get the photo to load. It's not just today's photo because I tried to add one from yesterday and it created the same problem, no image.  I found the original card here. I pretty much copied it as it was except for the background. I have no idea what the issue is. It's not my computer because I tried this on two different computers.

I will describe how the card was made though.  The base of the card is a folded half-sheet of Shaded Spruce card stock. I cut the card stock in half on the 8-1/2" side. So after it was cut it measured 4-1/4" x 11".  I folded it in half. This card opens on the bottom and the fold is on the top.

I cut a 4-1/8" x 5-3/8" piece of Crumb Cake card stock and taped it to the front of the card.  Then I cut a 4" x -5-1/4"piece of card stock that was textured with a snowflake embossing folder. I glued that to the Crumb Cake piece.

I die cut the tree from the "Bright Baubles" set. I did use double sided sticky sheet so I could make this into a sticker because I hate gluing pieces like this.  I cut the piece using Early Espresso ink. Then I cut the piece again using Shaded Spruce. I also used the sticky sheet on that too.  There's an outline bulb piece and I cut one using Basic White card stock.   I also slipped the top part of the die in the Big Shot to cut a Daffodil Delight star. I did not use the double sided sheet for that, I just added a dot of glue.

When I removed the pieces from the Early Espresso frame, I threw them in the garbage. When I removed the pieces from the Shaded Spruce tree, I threw them in the garbage. I had to go digging for them. UGH.   LOL

I set the Early Espresso frame onto the Basic White bulb shape. Then I added the Shaded Spruce pieces to the tree and the star on top.  I also used my Wink of Stella pen on the star and tree. It just needed some shimmer.

The bulb was set in place on the card using Dimensionals.

The words are from the "Snowman Season" set and were stamped using Shaded Spruce ink. I die cut them using a Stitched Rectangle die for the words. I set them in place using Dimensionals.

I tied a green ribbon to the top of the bulb and a 4" x 5-1/4" piece of Basic White card stock on the inside of the card and the card was done.

This is a really pretty card and I'm sorry the image won't open on here. I will be looking into this further.  

Blogger seems to be working now. I did leave the blank photo on here not only to show you what I had to deal with yesterday but also there's no way to remove it.  I guess they are not done fixing their issues yet.  Thank you for hanging in there!

Thank you SO very much for taking your time to stop by and for your patience and understanding,
Wanda

Thursday, December 02, 2021

Snowman Season, Penguin Playmates, Stitched Snowflakes, Christmas Card

I LIKE IT!!!  Not too often do I finish a card and immediately like it.  They often have to grow on me or wait until I start writing my post with it on my screen to really "see" the card.  But this one I liked right away and still like it.  I've made plenty of "Polaroid" technique cards but this one is one I just REALLY like!  Ok, now let me tell you how I made it so you can make one too!

The base of my card is a folded half-sheet of Basic White card stock. I cut a 4-1/8" x 5-3/8" piece of Misty Moonlight card stock and taped it to the front of the card.

Then the Designer Series Paper (DSP) from the "Penguin Playmates" 12" x 12" package was cut at 4" x 5-1/4" and taped to onto the Misty Moonlight card stock. 

For the Polaroid technique you just cut the Basic White piece at 3" x 3-3/4".  I like to add a layer behind mine so it stands out better. That piece is Misty Moonlight and was cut at 3-1/8" x 3-7/8".  I set these pieces aside. I needed to stamp on them.

For the center of the Polaroid piece, I cut a piece of Misty Moonlight card stock at 2-1/4" x 2-1/4".  Then I cut the DSP at 2-3/8" x 2-3/8".  I taped the two pieces together.

I die cut a snowflake from the "Stitched Snowflakes" die set using Basic White card stock.

Then I die cut the penguin using the 1-1/8" circle die from the Circle Dies set. I wanted a border behind it but the next larger size circle was too big, so I grabbed the smallest scalloped circle and used that. I die cut it from a scrap piece of Misty Moonlight card stock.  I taped the two circles together.

I set the squares on top of the "Polaroid" piece so I could see where the words would go. I wanted some long words, something that would fill up that area.  The "Merry Christmas" from the "Snowman Season" set did just that, with just a bit of room to spare! I stamped them using Misty Moonlight ink.

Next I taped the square in place on top of the "Polaroid" piece. Then I taped the snowflake in place. I just added tape to the center of it. It's not going to show.  Dimensionals were added to the back of the cute penguin circle layers and I centered it as much as I could over the snowflake.

The Polaroid piece was set in place using Dimensionals and the card was done.

This was a very fun card to make and once again, I REALLY like it! I love the colors and the layout!

Thank you SO very much for taking your time to stop by and see today's Christmas card,
Wanda

Monday, November 29, 2021

Bright Baubles, Delicate Baubles Dies, Christmas Card, 2021 Stampin' Up! Catalog

I'm playing with the "Bright Baubles" set again. Well, not really again, I haven't played with it for a while so I thought I should get it out and see what I can create with it.  Here's how I made today's card.

The base of the card is a folded half-sheet of Basic White card stock. This card opens on the bottom and the fold is on the top.

I cut a 4" x 5-1/4" piece of Pacific Point card stock. Before I taped it on top of the card base, I die cut the solid bulb image from the "Delicate Baubles" die set and I set it aside.

Then on top of the Pacific Point card stock is a 3-3/4" x 5" piece of Basic White card stock that I textured with a snowflake background. I didn't have anything current that would work, so this is what I used. I glued it in place on top of the Pacific Point piece. I prefer to glue because there's so much texture that I'm never sure if I get enough tape on it to hold it in place. But I do know the glue will hold it. I prefer to use the Tombow Mono glue because it doesn't not warp your card stock. I have a love hate relationship with this glue. I love how it holds but I hate it when I get it on my fingers because I find it difficult to get off.

Next I die cut the "Joy" bulb from the "Delicate Baubles" die set. I did use a double sided sticky sheet on my Basic White card stock to make this a sticker instead of something I needed to try to tape or glue in place. It saves SO much time and it's a lot cleaner too! I set this piece on the Pacific Point solid bulb. I added Dimensionals behind it and set it aside.

I cut a 1" x 5" strip of Pacific Point card stock and glued it to the front of the card about 1" up from the bottom edge of the embossed piece.  I wanted that area to have something but what? I thought ribbon might be pretty but I wanted some lacy ribbon.  So I took out my "Natures Thoughts" die set from the "Positive Thoughts" bundle and I die cut the fun border strip using the sticky backed card stock to make it into a sticker too. I cut the piece to fit my area. I cut the left piece so it was three bumps long. I removed the backing and set it in place on the left side of the card. Then I removed the backing on the remainder of the other piece and set it on the right. 

The bulb was placed over the the Pacific Point strip.  A bow was tied and set in place with a glue dot and the card was done.

Did you ever get that panicked feeling when you go to open the card and it won't open because you are trying to open the fold?  I did. I don't often check when I'm putting a card together, I just assume I have it right. I did have it right!  My card was folded so perfectly that the ends matched exact that it was difficult to separate them.  I caught a break there!! LOL

This was a very fun and easy card to make. I do like how it looks. I think that border strip piece fit this card perfectly!

Thank you SO very much for taking your time to see today's Christmas card,
Wanda

Sunday, November 28, 2021

Penguin Place, Penguin Playmates, Christmas Card, 2021 Stampin' Up! Catalog

I have a fun and quick card for you today.  I love this layout. You can use it for a lot of other sets too, it's quick and simple.

The base of the card is a folded half-sheet of Fresh Freesia card stock. It was cut on the short side. It measured 4-1/4" x 11" after cutting.  I folded it in half at 5-1/2".

I cut a 4" x 5-1/4" piece of Basic Black card stock for the layer.

The Designer Series Paper (DSP) was cut at 3-3/4" x 3-1/2". The dotted piece was the backside of the top piece and was cut at 1-1/2" x 3-3/4".  I taped those to the Basic Black piece and then taped them to the front of the card base.

I fussy cut a penguin from another sheet of DSP. I could have used the matching punch but I was too lazy to get up and get it and since it was only one penguin and simple cutting, I just took my scissors and cut it out. 

Then I had to get up anyway to die cut the circle. I took a scrap piece of DSP and die cut a 1-7/8" circle. I glued the circle to the front of the card and then I set the penguin in place using Dimensionals.

I stamped the words from the "Penguin Place" set using black Memento ink. I trimmed it to measure 1-1/8" x 9/16".  I cut the Fresh Freesia layer 1/8" larger all around. I taped the two layers together and then set it in place on top of the card using a couple of Dimensionals.

A 4" x 5-1/4" piece of Basic White card stock was taped to the inside of the card and the card was done.

This was a very fun and quick card to make. I love the fun background too!

Thank you SO very much for taking your time to stop by and see the fun penguin Christmas card,
Wanda


Saturday, November 27, 2021

Stitched Snowflakes, Penguin Place, Christmas Card, 2021 Stampin' Up! Holiday Catalog

Today I thought I'd make a snowflake card. Still no snow on the ground here in central Minnesota but it is a bit chilly.  And I know the snow will come.  What we had a couple of weeks ago here melted. What the people in the upper part of Minnesota got a couple of weeks ago they still have! They will get more too! SO for today I'll look at snowflakes on paper.

The base of my card is a folded half-sheet of Basic White card stock.  I cut a 4" x 5-1/4" piece of Basic White card stock for the top layer.

I took a 1-7/8" circle and I placed it behind the top layer piece so I could see where center was. Then I stamped the words from the "Penguin Place" set using Real Red ink. 

The snowflakes were colored using my Wink of Stella pen, (something I'm going to be adding to my Christmas wish list!) and I colored each snowflake to give it some sparkle. 

I have a lightbox so I set my front layer piece on it and slid the 1-7/8" circle behind it, making sure the words were centered.  Then I glued on each snowflake around the circle. You could lightly draw the circle with a pencil but I think it would be a little difficult to erase once the snowflakes are in place. You'd have to be really careful at the placement of the snowflakes to cover the lines. But it can be done. Anyway, I used my lightbox and glued each one around the circle. I removed the circle and added Dimensionals to the back of the piece and set it in place on top of the card base. 

Tiny crystal rhinestones were added to the center of each snowflake and the card was done.

This is a very fun, quick and easy card to make.

Thank you SO very much for taking your time to stop by and see today's Christmas card,
Wanda