Pin It

Showing posts with label Birthday Gifts. Show all posts

Friday, July 11, 2025

Extraordinary Flora, Party Favors, Weekend Project, Stampin' Up!

Hello and welcome to my blog. Today I have a fun weekend project to share with you. It's great for birthday parties, weddings, anniversaries or whatever party you have in mind. It's simple to do. Please read on to see how to make these.

I took Pearson's Peppermint Patties for the candy. You can use other covered round candies too. I just like the mints because the are great for after eating at a party.

Using the smallest circle die in the "Stylish Shapes" set I cut 3 using Basic White card stock. I stuck them to the backs of the patties using tear and tape. You want something pretty sticky for this. Do NOT use hot glue or even school glue. It's best to stick with the double sided tape. Glue dots would work too.

Next I took a panel of my "Extraordinary Flora" washi tape and placed it on Basic White card stock. Then I cut them out using the matching die. Using mono glue I glued two of the flowers down. On the melon colored one I added a tiny flower using a Dimensional.

On the purple one, I glued one flower over the flower that was already on the image and I used Dimensionals on the other two flowers.

And for the third one I just added a few small Dimensionals to the back of it and set it in place on the circle.  And that was it.

If you need to make a lot of these, a roll of the washi tape should do it, there's 66 sets per roll.  33 of the melon and 33 of the purple.  These make great party favors! I thought they went together rather quickly. It would be a lot quicker if you had a circle punch instead of a die. As long as it covers the back of the mint without going over the edges it will work. A 1-3/8" is about as big as you'd want to go.

Thank you SO very much for taking your time to stop in and see today's party favors,
Wanda


Monday, June 02, 2025

Extraordinary Flora, Gifts, Weekend Project, Stampin' Up!

Hello and welcome to my blog. Today I have a fun 3D project to share with you. This is a fun and super quick gift to make. Please read on to see how it was made. 

Terri has a great tutorial on how to cut out the "Extraordinary Flora" Washi tape using parchment paper. You can see her fantastic video here. Subscribe to her channel, it's free and it's FULL of wonderful cards and techniques. You can see that video here

After cutting out my flowers I affixed them to a clean Oui yogurt jar. Make sure you wipe it down with ribbing alcohol and let it dry before you add the flowers. 

Arrange the flowers to your liking. Rub them down with your fingers and that's it. 

Put a battery operated tea light inside and enjoy the beauty of the flowers showing through. It's SO much prettier in real life and with a candle "glowing" on the inside.

This would make a great gift or just keep it for yourself!

Thank you SO much for taking your time to see my quick and easy weekend project,
Wanda

Friday, August 09, 2024

Enduring Beauty, Adventurous Sky, Birthday Card, Stampin' Up!

Hello and welcome to my blog. Today I have a card to share with you that I found on Pinterest. I just love red, black and white on cards. I found the card here. A few changes were made but for the most part it is very similar. I wasn't able to track down the measurements so I had to wing it. Please read on to see how I made this card. 

The base of my card is a folded half-sheet of Real Red card stock. After cutting in half it measured 4-1/4" x 11".  It opens on the bottom and the fold is on the top.

A 4" x 5-1/4" piece of Basic White card stock was cut and taped to the inside.

The top layers are cut as follows. The Basic Black piece measures 4" x 5-1/4" and the Basic White layer measures 3-3/4" x 5".  I cut the Basic White layer after I textured it using the "Exposed Brick" embossing folder. I taped the Basic Black piece on top of the card base and then glued the Basic White piece in place.

Next the flower image from the "Enduring Beauty" bundle was stamped on a piece of Basic White card stock using black Memento ink. This bundle comes with stencils and I started with Real Red ink on my Blending Brush but I couldn't get it dark enough so I ended up coloring with my Blends Pens. I used the dark Real Red and light Cherry Cobbler on the flowers and both light and dark Granny Apple Green for the leaves. There's not a lot to the coloring just fill it in with the lighter color and add some highlights with the darker color and you're done. The piece was then cut out using the matching die in the bundle. Dimensionals were added to the back and the piece was set in place on the front of the card.

The words are from the "Adventurous Sky" bundle and were stamped on a scrap piece of Basic White card stock using black Memento ink. I cut them out using the die in the bundle. I snipped the ends so they were straight. Then the piece was set in place on the front of the card.

I took some linen thread I had and tied a double bow. I pulled a little on one end on each side so the loops weren't exactly the same. It was then set in place using a coupe of small glue dots. You can glue it in place too, either will work.

I thought about adding some bling but I liked it the way it was. It keeps your eye focused on the red flowers. They eye is attracted to red and had I added some red bling it wouldn't have the same feeling that it has being plain.

This was a fun card to make and it was super quick to make too.

Thank you SO much for taking your time to stop in and see today's birthday card,
Wanda

Sunday, May 19, 2024

Flowers of Beauty, Unbounded Love, Friendship, Birthday, Thinking of You Card, Stampin' Up!

Hello and welcome to my blog. Today I have a card with LOTS of layers that I found on Pinterest. I clicked on the link but didn't find any measurements. You can see the original card here. Please read on to see how I made today's card. 

The base of the card is a folded half-sheet of Basic White card stock. It opens on the right and the fold is on the left. I cut a 4" x 5-1/4" piece of Basic White for the layer and on top of that layer is a 3-7/8" x 5-1/8" piece of Basic White that was textured using the "Exposed Brick" embossing folder. I glued that piece to the first piece I cut and then I taped those two to the front of the card.

Next I took a 2-1/2" x 3-5/8" piece of Azure Afternoon card stock and textured it using the "Distressed Tile" embossing folder. Then I cut 1-1/8" strips off the 2-1/2" side so the strips measured 1-1/8" x 3-5/8".  You need four of these strips. Dimensionals were added to the back and the strips were set in place on top of the "Distressed Tile" piece. I added the top and the bottom pieces first and then the middle ones.

Then I die cut the largest circle from the "Everyday Details" die set using Basic White card stock. I glued it on top of the Azure Afternoon strips.

The flowers from the "Flowers of Beauty" bundle were stamped next using Misty Moonlight ink for the outline and Azure Afternoon ink for the petals on a piece of Basic White card stock. I colored the centers with my Daffodil Delight marker and I cut them out using the matching dies in the bundle. You need three of these flowers. I set them in place using Dimensionals. Taking the "Everyday Details" circle I had cut, I added the top flower first, then the one on the right and then the left one. Where the flowers touch each other no Dimensionals were added. I didn't want them to be bulgy. 

For the leaves I stamped them on a scrap piece of Basic White card stock using Old Olive ink for the outline and Granny Apple Green ink for the solid part. I die cut them using the matching die. I did do something a little different on my leaves to give them a lighter and darker color. I inked up one leaf first, stamped it and then inked both and stamped them. I used my Stamparatus to do that so I could stamp in the same place more than once and get the ink exactly where it needs to go. I cut the leaves out using the matching die in the bundle. I used a little bit of glue on the leaves and tucked them under the flowers. 

The words are from the "Unbounded Love" bundle and were stamped using Misty Moonlight ink. I cut them using the smallest circle in the "Everyday Details" die set. Dimensionals were added to the back and it was set in place on the front of the card and the card was done.

This card did have a lot of layers and pieces but I thought it was SO worth it. The original card added ribbon and linen thread. I opted not to. I didn't have any ribbon that would match and I thought the linen thread didn't look good alone so I left it off.

I think this is a very versatile card too.  Even the wording on it "hello" could be for a birthday, thinking of you, get well, or friendship card. 

Now this was the card I was going to make yesterday but after playing around with the flowers I ended up with what I posted, which I was happy with but I do like today's card SO much better.

Thank you SO much for taking your time to stop in and see today's friendship or birthday card,
Wanda


Sunday, March 05, 2023

Petal Park, Toffee Coffee, Weekend Project, Stampin' Up!

Hello, I'm so happy you found your way here today. I have a fun and easy project for you to make. It's a "Toffee Coffee" label. And the recipe too!!! I made this for a friend of mine and I hope she loves the beverage as much as my hubby and I do. I did use my computer for the printing and I used the "Petal Park" set for the flowers. 

The jar is what the instant coffee came in. After using all the coffee, I removed the label and washed out the jar and lid. I got this coffee at the Dollar Tree. I know it's cheaper to buy a larger container at the grocery store but I was at the Dollar Tree and I had just ran across the recipe so I thought I'd give it a try with the smaller amount in case it's not good since we don't usually drink instant coffee in our home.

I measured the space the label would be taped to so I could adjust the size of the words so it would look nice.  I did have to print it out several times (on draft mode) to get the size right. Plus on the back the ingredients and instructions are listed. 

Once I got the label part to size, I stamped the flowers from the "Petal Park" set using black Memento ink and then coloring them in using my light Balmy Blue and light Daffodil Delight Blends pens. 

The width of my label was a bit smaller than my packing tape so I was able to get the label on a piece of tape and affixed it to the jar. If it wouldn't have been wide enough I was prepared to use clear contact paper.  

After I got the label on I added the Toffee Coffee mixture and put the cover on. And that was it.

Now you probably want the recipe, right?  Well, it's pretty simple. It's equal parts. I make mine by the cup. I used a cup of instant coffee, a cup of coffee creamer and a packed cup of brown sugar. I put it in the blender to make it even smoother and less grainy. I put mine in a large bowl with some food safe silicone packets because the brown sugar is moist and I don't want any mold to grow. I don't know if it would but I'm not going to take any chances.  

I think these would be great for gifts and I'm playing around with the idea of selling them at the fall craft fair.  Now go make some and give them to your friends or for yourself!!

Thank you SO very much for taking your time to stop in and see today's fun project!
Wanda

Thursday, June 03, 2021

Pansy Patch, Pansy Petals, Birthday Card, 2021-2022 Stampin' Up! Catalog

I'm loving the "Pansy Patch" set and matching Designer Series Paper (DSP). I found this pretty card on Pinterest and I thought I'd give it a try. I don't know where the scalloped edge rectangle came from but I did know that I didn't have it, so I used what I had. You can see the original card here

The base of the card is a folded half-sheet of Basic White card stock. This card opens on the right and the fold is on the left.

A 4" x 5-1/4" piece of the new "Fresh Freesia" card stock was used for the layer. I taped that piece to the front of the card.

Then I die cut the rectangle piece. I didn't have the scalloped rectangle die so this is what I found in my stash and I thought I'd just go with it and it worked. I used largest lacy rectangle die from the "Ornate Style" bundle.  

The words are from the "Pansy Patch" set and were stamped using Fresh Freesia ink. I set it up in my Stamparatus to stamp the words and I'm glad I did because I needed to stamp them twice to get them dark enough.  I didn't buy the stamps, I had bought the ink refills and empty cubes for the in colors. I don't use them often but sometimes it's nice to have them, so this was a more economical feasible way to do it. I may not have inked the cube enough but it's better to have not enough ink than too much (if you're using the Stamparatus).

I cut a 1-3/4" x 2" piece of DSP from the "Pansy Petals" 12" x 12" package. The original card had three small strips of the checked DSP, but I didn't want to mess with the cutting and lining up so I just made it one piece and moved on quicker. I taped the DSP to the front of the lacy rectangle.  

The flower was die cut from a sheet of the DSP and the leaves were die cut from a different piece of the DSP.  

The lacy piece was set in place using Dimensionals. Then the flower was set in place using Dimensionals. I didn't press it down because I needed to add some tape to the back of the leaves and slip them under the flower.  Then I could press the flower down.

This was a fun card to make and very pretty too. It's got such a soft sweet look to it.

Thank you SO very much for taking your time to pop in and see this sweet card,
Wanda

Monday, September 09, 2019

Sailing Home, Wonderful Moments, Masculine Birthday Card

Today I found a fun card on Pinterest that I thought I would make.  I love making masculine cards and for me it's difficult to find masculine cards that I want to make. You can see the original card here.  

The base of the card is a folded half-sheet of Whisper White card stock. On top of that is a 4" x 5-1/4" piece of Basic Black card stock.  And on top of that is a 3-3/4" x 5" piece of Whisper White that was textured using the "High Seas" 3-D embossing folder.  I LOVE the looks of this folder, it's got such great movements.

I die cut the largest "Stitched Oval" using Whisper White card stock.  I stamped the birds from the "Sailing Home" set using black Memento ink.  I set the oval in place using Dimensionals.

I stamped the lighthouse on Whisper White card stock using black Memento ink.  I die cut it using the matching dies that go with the "Sailing Home" set.  I set the lighthouse in place using tape on the left side and Dimensionals on the right side.

I die cut the ships wheel using gold foil card stock.  I glued that piece in place.  The piece is not real wide and adding snail could get kind of messy, so glue is the way to go for me.

I stamped the words from the "Wonderful Moments" set using black Memento ink on Whisper White card stock.  I die cut them with the fun die that is in the "Smooth Sailing" dies that match the "Sailing Home" set.  I set that piece in place on the card using a Dimensional on the left and tape on the right. 

I added three rhinestones to the card, one on the greeting piece, one by the birds and the final one on top of the lighthouse.  And that was it, the card was done.

This was a very fun and quick card to make.  And it's a GREAT masculine card!!!

Thank you SO much for stopping by today,
Wanda


Wednesday, March 18, 2015

A Cheerful Critters Free Standing Pop-Up Card Technique Card

Last night at Terri's Technique night, the gals made a Free Standing Pop-Up card.  You can find the instructions for it here at Split Coast Stampers.  

This is a very fun card to make.  Oh and it's easy too!!!  

The set used here is Cheerful Critters.  It's in the Spring Catalog.  

On this card we also did the masking technique.  We covered the top 2/3 of the white card stock and than stamped the bottom (with the post it covering the white).  Then the bottom was sponged (with the post it still on the white).  Then the post it was removed and the bunny was stamped on.  

A ribbon and flowers were added for some extra embellishments.  The gals had a great time making this card.  It's fun to have something unique now and then, isn't it?

Thank you SO much for visiting today,
Wanda

Saturday, February 21, 2015

Crazy About You YoYo Spinner Card and Tutorial

Today I'm going to share with you another YoYo Spinner card. This one was done at Terri's downline technique night.  Normally I am setting things up there but Terri told me that I could make my own cards.  I was thrilled.  I wasn't prepared but I managed to get the card put together and I had a great time.  It was the first time my sister was there so I got to sit by her too.  It was a nice night.  

My card looks a bit warped because it is.  I used a glue stick to put it together (remember, I said I had come unprepared!!!).  And I also had a problem with distinguishing my right from my left.  It doesn't easily show up on the photo (unless you look closer) but my fold is on the right!!!  I know, it's a card for left handed people!!! LOL

You can see my other Yo Yo Spinner card and a link to instructions and a video on how to do this yourself.  Click here.   Just a tip here.  When assembling the card it's important to remember that the two window sheets don't need to be a specific size.  They just need to be small enough to hid behind the spinning image.  So if  you can use your Big Shot and Thinlits to cut your circles.  Window sheets can jam a punch and sometimes damage it.  So use your Big Shot if you can.

Also on this card, the tiny flowers were put together with a Dimensional in between and the thread (with a knot tied in it).  Pearls were added to each side.  

When assembled, the Window Sheets will be touching each other.  The thread winds around the dimensional.  I thought it was suppose to go between the window sheets.  Don't do that.  It will make your brad pull through the card stock.

For this card only one image was stamped, unlike the one in the instructions where there were two stamped.  That was because one had to be set on top of the other to cover the brad.  Here the tiny black flower hid the brad.  Whatever works for you!!!

The stamp set used here is Crazy About You.  Such a fun set.  I have it and have not used it yet.

I think that about covers it!  So go make one, they're fun!!!

Thank you SO much for visiting tonight,
Wanda

Saturday, March 24, 2012

It's a Wrap Gift Box

 It's a Wrap (holidays and occasions) sets are among my favorite ones to play with.  I LOVE being able to stamp on a label and wrap it around a candy nugget and make some fun gifts and party favors!!  It's quick and easy to do too!

Here I used the Happy Birthday image and wrapped them around Hershey Nuggets.  Six of them fit in this recycled Build a Brad box.  I save everything because I never know when I'm going to need it.  Ok, not quite everything but everything I think is cool and can be used for something in the future.  Sometimes it's the near future but most of the time it's way off into the future.  I have been running across "stuff" and actually using it now!!! Amazing and a bit shocking, isn't it?? LOL

After setting the candies in the box I tied it shut with a ribbon.  Then I stamped the happy birthday from the Teeny Tiny Wishes set.  I punched the words out using the Word Window punch and then I used the Label punch and taped the words on top of it.  VERY easy and super quick too!  What more can you ask for?? Well, more empty Build a Brad containers would be nice but I only had a couple of them!!  This is a fun gift.  My other container is going to be filled like this but in a Christmas theme and will be used as a stocking stuffer. 

This was a lot of fun.  I may have to make some more soon but using a die cut box!!  A little more work but not much, it is a die cut after all and they not only cut but they score too!!

Thank you SO much for visiting today,
Wanda

Sunday, July 31, 2011

Cheerful Treats Sucker Holder Weekend Project

Yup, there's 40 suckers there!!!  I did one a while back with 50 suckers.  Now that was difficult to get into the Styrofoam square.  40 was much easier.  I think 30 wouldn't be enough.  You'd need a smaller cube for that or bigger suckers so the foam doesn't show.

I covered 5 of the sides of the cube in Bashful Blue card stock.  On top of that I added squares of the decorative paper from the "Cheerful Treats" download.  "Cheerful Treats" sounded like the perfect name for paper for a project like this!!! It was indeed cheerful!!!  Once the dp was in place I tied a ribbon around the cube. 

The words were printed out on the computer and punched out.  I used the die cut to make the scallop.  I glued it on a thin wooden stick I had.  I don't remember what the stick was from but a chopstick will work too.  Just remember, you are only allowed one set per dinner purchased.  Don't go taking a bunch for crafting.  I have a nice little stash of them because I ask for a set each time I order Chinese food.  So be kind and only take what what you are entitled to.  

Once I got the outside all decorated I added the word stick in the middle.  Then I started putting the suckers in.  

When I had made the 50th birthday one a while back I had gotten the idea from my friend Sara.  She has "Sara's Creative Adventures" blog.  Go check it out.  She has a lot of fun things on there to make, great cards to see and other things to spark your interests!!

Thank you SO much for visiting today,
Wanda

Sunday, October 24, 2010

It's the Thought Notebooks

I don't like to throw anything away before it's time! I don't like to throw scrap paper away either. I print "stuff" off the Internet, like coupons, etc. I cut out the coupons and there is some nice paper left. SO I cut it in 2-1/2" x 2-1/2" pieces to make these little notebooks out of. In time I can accumulate a lot of little pieces of paper. And in time I will punch the papers and start decorating them.
The decorating starts by looking in the scrap paper container. I can use up a lot of scrap paper this way. Today I found some Bashful Blue card stock so I went with it. I had printed out some Elegant Soiree paper a while ago and ran across some scraps of that too. And trust me here, scraps is all you need for these little notebooks! I purchased the Elegant Soiree download and just printed it out. It is like the paper in the catalog but the paper there is 12" x 12". The best I can print out is 8-1/2" x 11". The image is a bit smaller but it still works fine for what I was using it for. I did print it out on 30# copier paper. You really do need a heavier paper to print on than the standard 20#. The image prints out much nicer and you do want it to have a nice quality look to it.

Now I do know that turtles are not blue but this one had to be colored blue because there was no green in the decorative paper! So why not a blue turtle? The turtle and the owl are from the "It's the Thought" set. It's retired but it's one of those sets I have not played much with so I thought it would be great for a few notebooks. I will eventually give it up and sell it but for now I'm using it on some little notebooks! Blue turtles and all!!!

I am actually making some headway in cleaning off the counter that is behind my worktable. It's full of papers and other "stuff." That is where I found a lot of papers that were not only cut but punched out for notebooks. SO I'm taking the time to make these notebooks and get the counter cleaned off at the same time. And that is where I found the decorative paper scraps too!! I just keep putting these things in piles.

I have a plastic jug that I'm putting these little notebooks in as I make them. The craft fair is coming up in a couple of weeks and I'm going to be selling these little notebooks at it. When I do craft fairs I usually have these little notebooks in it and they sell out! It's a great way for me to get rid of my little pieces of paper and make them useful! I LOVE to recycle and make things into something useful again!

Thank you SO much for visiting today,
Wanda

Thursday, July 08, 2010

Milk Carton Gift Box Weekend Project

I thought it was time for another weekend project. It's been a while since I've posted one. I was playing with the Sizzix Milk Carton die. It's my most favorite die of all!!! I LOVE using it and creating with it.
Today I created a mini milk carton. Imagine that, a mini milk carton from a milk carton die!!! I was also playing with the "Sweet Scoops" stamp set. I stamped the ice cream cone image all over a half sheet of card stock. Then I ran the card stock through the Sizzix Big Kick with the Milk Carton die and got my milk carton cut out. It's all scored for you too! Before I assembled the box I cut out a window and added a piece of acetate to cover the window. I glued the bottom flaps and side together.
I also made a little stand for the inside of the box. I measured the bottom flaps of the box and added 1/8" on all sides. I scored those sides at the 1/8" mark. I then folded the score lines. In each corner is a tiny little scored square. I cut those away and folded the flaps down. I inserted the stand inside the box and placed my adorable little ice cream cone eraser inside. Isn't it just adorable? When I saw it in the store I HAD to buy it. This "Sweet Scoops" set immediately came to mind. You will need to click on the photo to get a closer view of that eraser. It's just TOO darn cute!!!
I was glad I got to play with it before the set retires. A lot of times I get these ideas and buy the stuff and by the time I get around to making something with it the set has retired. Though I suppose I could still make up my item, not everyone lets go of their retired sets. Plus I can always sell what I make with it so I guess I should just start digging out some of that "stuff" I've bought and tucked away.

I added a piece of Pretty in Pink ribbon to the top of the milk carton and it just finished it off nicely. Personally I think it turned out cute and I may have to pick up another eraser when I'm out and about shopping!! I LOVE making these milk cartons and I especially LOVE making them as bath salt gifts. They hold a little baggie of bath salts perfectly and they really do make a WONDERFUL gift. I'm going to be making some for the upcoming fall craft fair. I keep saying that about a lot of things and I have nothing made. I guess I'd better get cracking on it, fall will be here before I know it! It always seems like after the 4th of July the summer just flies by. So on that note I will close here so I can hit publish and you can see my creation! And I will get out some card stock and start cutting out the milk cartons. I think that part would probably take the longest in making these bath salt boxes. And I have to remember to stamp the copyright logo on the bottom flap before I assemble the box. It's SO much more difficult to do it when the box is assembled!!!

Thank you SO much for visiting today,
Wanda

Saturday, April 17, 2010

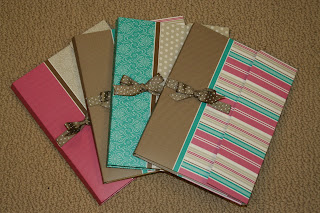
Thoroughly Modern Folders Notebooks

These fun notebooks were made using the Stampin' Up! "Thoroughly Modern File Folders."

I was perusing through the tutorials in the SplitCoastStamper's "Resource Gallery" and thought I would give these adorable folders a try. I had a few folders left in the package I had bought and I figured I could give one a try.

Much to my surprise they were easier than they look! And speaking of "look" I think they look FABULOUS! I like these folders because you can refill them. A folder that can be reused! Such a deal and a welcome concept in this day and age! It's SO important to recycle when you can and reusing is something I LOVE to do when I can. Oh and let's not forget what great gifts these will make.

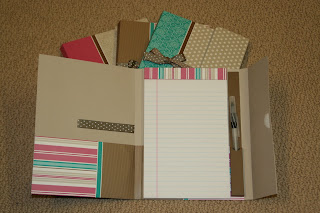
Now you can embellish them a lot more than I SplitCoast or I did. I just copied theirs. I didn't want to add anything more than the ribbon that they added. Though I did put a little different twist on mine that I thought enhanced the folder even more. I added the pen holder! Isn't it just TOO cute and a much needed addition to the folder. Oh and there was room for it too, like it was meant to be there! I got that fabulous pencil holder at "Capture the Moment." This link will take you directly to the tutorial for the pencil holder. Click on the photos for a closer view, especially the one with the notebook open so you can see the pencil holder better.

I think these would be a great item for the fall Craft Fair so I will probably be ordering more folders so I can whip up a bunch for the sale! Hope I have time to make more! It always seems that I can't find the time to do things lately. There is always something that comes up. Today it's a computer "thing." My poor old laptop is on it's last legs and I thought I would tend to the issue before it crashes forever and my info is lost! SO we took the tower computer from upstairs and brought it down to my workroom. I was going to have the tower on the floor but there was an issue with the shortness of cords. UGH! And not to mention the issue with short extension cords. There were cord going across both sides of my worktable. SO unacceptable. A trip to the store and some creative moving (actually it was just a bit of clearing off things on the ledge) and the computer was starting to look like it would work down here for me. It's weird to have such a big screen and a "real" keyboard. I'm so use to the laptop that this keyboard seems exceptionally long. A number pad, how odd to see on my worktable! It's all up and running and there is about an hour left for the info from my laptop to be completely transferred to this computer. And if I can remember to shut off the mouse when I'm done all will work out fine! If not I'll be spending a lot of money on batteries until I learn! A "normal" mouse didn't work because the cord was too short. So for now I'm happy with the way it's going and looking and really, isn't that what it's all about? My happiness? LOL

Ok, back to this cute notebook. You can either use a magnet or Velcro to close it. I opted for the Velcro because the file folders are so stiff and I don't think a magnet will hold it shut. Plus too much pulling on a magnet could rip the paper on the folder. Velcro has some give and pliability to it.

Give them a try, especially that ever SO cool pencil holder!

Thank you SO much for visiting today,
Wanda

Saturday, January 09, 2010

The New Sizzix Milk Carton Die Cut!

WOW! I can't even begin to tell you how THRILLED I was when I saw that Stampin' Up! is offering a milk carton die cut!!! I LOVE making milk cartons and filling them with "stuff!" I didn't enjoy having to cut and score them but I did like to make them. I have lots of fun things planned for this die cut. Some I have made already but will not be posting on here yet. I am going to be demoing them at the end of the month at the Stamp Share and then I will post them on here.

For today's post I made the milk carton using white card stock. It's filled with "love!" And Red Hots!! LOL I used the "Heart's O Plenty" wheel and Real Red ink. Those little hearts on that wheel are just the perfect size for this milk carton. I did stamp the hearts before I cut the milk carton out. Before I assembled it I cut out the circle for the window. You can use a 1" circle punch for that. But in doing this you will need to fold up the bottom flap and punch though it and the side of the milk carton. The only drawback in doing that is you will now have a circle cut out at the bottom of the carton. You could fold the flaps in so it doesn't show but you really want to fold that flap in last so you have a smooth front to your milk carton. Adding the heart punched border like I did hides the bottom edge.

After the hole is punched I covered it on the inside with a piece of acetate. Wheel that was drying I punched a 1" hole in a piece of scrap Real Red card stock. Then I took the 1-1/4" circle punch, lined it up over the 1" hole and punched out a ring to place on the window opening. The front just needed something more. Without the window it looks a bit plain.

Next you can tape or glue the carton together. I opted for the glue. Then I added the strips of the heart punched border to the top and bottom of the carton. Then I filled the carton with Red Hots. I glued one side shut on the top and the other side I used a half a small glue dot. I wanted it shut but not permanently. Removable tape wasn't strong enough to keep it shut. If I were making these for a craft fair I would probably use a few tiny dots of glue to hold it shut. Just enough to keep it shut but still be easy enough to open.

Looking at it all closed up I thought it could use something else. But what? A ribbon or a bow would look out of place on it. Oh and it did. I did tie a bow and well, let's say I was just TOO ugly to even take a photo of it on there!

I thought I would play with the "I (Heart) Hearts" stamp set. There is a cute "Love" stamp in it. I stamped it four times and cut each one out by hand. I do need to buy a small heart punch!!! After I cut them out I glued them in place on the carton. I started out with the three on the top part of the carton but it left the bottom part asking for something more. I was going to add the 4th "Love" I had cut out but it was too small in contrast for that window. I tried one of the new red corduroy buttons but it blended in too much and got lost. I needed something white! I got out a white jumbo brad and I had to cut the prong off to about 1/4" long. I folded them back into the back of the brad and stuck it on the carton using a pop up glue dot. Now this is something you will want to do BEFORE you put the box together. I had nothing to press the glue dot against when I pressed it in place. The box bent a bit adding it. Then I stuck the "Love" on using Crystal Effects. I have taped card stock to these brads but it doesn't stick for long. It does stick but not permanently. With the Crystal Effects I know it's not going anywhere.

And there you have it! And adorable milk carton ready to give to your Valentine! Isn't it SO cute? Like I said, I have lots of things I'm making with this die and I'll be sharing them with you so stay tuned!

Thank you SO much for visiting today,
Wanda

Sunday, December 20, 2009

Cover It Up!

Another Santa Theme item for you. Making sleeves is a perfect way to cover up these little Russell Stover candies. I bought some of these for stocking stuffers. I REALLY didn't want to wrap them and it dawned on me that these things are from Santa and to be put in the stocking, SO why not use the "Santa Theme" on them!!

All I did was take a piece of red card stock the same width as the box. I wrapped it around the box and then made sharp folds on the lines the wrapping created. I glued the red on the back of the package. Then I tore some white card stock for the fur on Santa's coat. I glued it in place.

I took a piece of black card stock cut 3/4" wide and wrapped it around the box to form a belly band. Not that this needs a belly band, sleeves don't usually require one!

Next I punched out 3/4" circles from black card stock and glued them in place above and below the belt.

For the buckle I used a 1" piece of More Mustard card stock and a piece of black card stock that measured 3/4". I glued them in place and it was all done. I made quite a few of these and it didn't take long at all. I LOVE projects that go fast and don't make me wish I hadn't begun them!!! Always a good thing when that happens. So now I need hide these until Christmas eve when Santa comes!

You can make these sleeves with pretty much any size box (depending if you want the card stock to be one piece or two) Though with the "fur" part you can always hide the seams of the paper there and it's always ok to have a seam in the back. So you actually could make this a very big sleeve if you went as far as to use 12" x 12" card stock! I like to keep them small. The bigger the box you do the more difficult it is to get those circles for the buttons. I like punching better than using a circle cutter. It's more convenient and I'm all about convenience and easy!!

For more "Santa Theme" items click here.

Thanks SO much for visiting today,
Wanda

Sunday, November 15, 2009

I Went in my Workroom to Chew Gum and Stamp and.....

... I'm all out of gum!!! SO I took the gum wrapper and opened it up, took out the foil stuff on the inside and traced it onto some decorative paper.

I made my Luminary out of this same Stampin' Up! "Four Seasons" paper and the "Snow Buddies" set. I must like both of them. Well, we all know how much I LOVE that paper. I hoarded it for the longest time and now I'm using it up. I'm going to be sad to see it all used up but hey, at least I used it! What was I saving it for? I guess if I really liked it so much that I didn't want to use it I should just frame it!!! Can you see that on your wall? A frame with some paper in the middle?? LOL Ok, so I'm using it!!

I LOVE it when I use up a pack of gum that has a fun wrapper to cover. I did try once to make a pattern using the wrapper but the card stock and the decorative papers are just not firm enough. The only paper that worked with that was the glossy stuff.

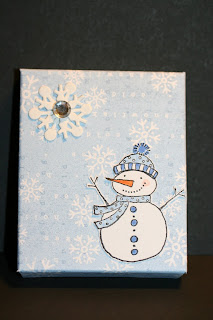
After I traced the package on the paper I cut it out and glued it on the box with a glue stick. Then I stamped the snowman, cut him out and then colored him. I use to color it after I stamped it and then cut it out but I would often smear the ink from holding it and it transferring from my fingers to other parts of the piece where I didn't want it. SO now I cut first and then color. And actually it makes more sense. What if I got it all colored and as I was cutting I cut an arm off or something else important? But then again there is that other side. What if I got it all cut out and I was coloring it and the table got bumped and messed up the coloring? I guess what it all comes down to here is do what works best for you!!!

I have this adorable snowflake die cut and I ran a piece of thin white chipboard through it and punched out 3 of these snowflakes. I put two of them together to form one and added a rhinestone in the center. I thought it could use a little something more in that corner. Now if this was something that was going to go back in a purse or pocket I don't think I would have added the snowflake. The edges can get caught on things and bend or tear off. But I'm filling mine with some fun bath salts (in a baggie of course) and using it as a stocking stuffer.

These make great little hostess gifts, customer appreciation gifts, Make N Takes, Craft Fairs and a fun Stamp Camp item. If you need to make a lot and can't chew enough gum you'll have to trace the pattern and work with it that way. Though for a Stamp Camp or Make n Take item the receiver can cut the pattern out themselves!!

I try to make something with my gum package every time I empty one! It's a fun way to recycle too!

Thank you SO much for visiting today,
Wanda

Saturday, October 31, 2009

Sweet Treats Flower

Isn't this absolutely adorable? I got this from the ever so talented Terri!!! She gave this to me at the Stamp Share.

The flower petals are made using an oval punch. They are attached to a couple of pieced of large round scallop piece of card stock. If you click on the photo you can see the scallops between the petals.

The back scallop circle is folded in half and is held shut with the paperclip. Removing the paperclip is how you get access to the Skittles inside!

The glass is filled with Skittles and a craft stick is attached to the flower and then placed in the glass. It's just such an adorable flower. This is something I'm going to save for a spring project! Do you think the Skittles will be any good by then??? I have SO many projects with "old" candy in them!!! And when I need a some for a new project I just take the old stuff and recycle it!! That way I don't have to keep buying candy (especially chocolate) that I don't like to eat! Now Skittles on the other hand..... YUM!!

I just LOVE this flower and I'm keeping it on the shelf in my workroom FOREVER!!! Just TOO adorable, isn't it??? These would be great for Hostess gifts, Customer Appreciation, Make N Takes, Craft Fairs, Get well gifts (instead of real flowers) Birthdays and such a FUN Stamp Camp item!!!

Thank you SO much for visiting today,
Wanda


Tuesday, May 05, 2009

I Got Lazy!

I was working on some fun candy bars I had made and after seeing how many I needed to decorate I instantly got lazy!!! I was originally going to make them all with the flowers on them and the punched border but after looking at the stack of candy bars I knew I needed to find some other design that was quicker.

The second one was the one I decided to go with. It was much quicker to make and I think it has a softer look to it. Though I think I may sponge the edges of the large white background piece and that should finish it off nicely.

It was also the first time I got to play with my Sale-a-Brations set. Shocker, huh??? LOL I picked that set because I knew I would be using it for candies and bath salts and probably some other gift items along the way. "A little Something for you" says it all, doesn't it?

The candy is made by taking chocolate chips and melting them. I added some Heath Bar Chips (toffee chips) in just before I poured it in the candy mold. The mold forms 4 pretty large squares with valleys in them so you can crack it and eat only one square (if you can restrain yourself)!!!! The candy bar measures 2-1/2 x 4" and about 5/8" thick. I find it easier to melt the chocolate chips than it is to actually make the chocolate myself. I like doing things quick. Making it yourself as opposed to melting the chocolate chips to me is like trying to reinvent the wheel!!! Nestle makes great chips and it makes a great candy bar. You can add Rice Krispies to the chocolate too, I bought the toffee chips for something different. I used milk chocolate chips and tomorrow I do need to make about 3 more bars so I may use semi-sweet for those who prefer the darker chocolate (YUCK!!! - not me, I'm a milk chocolate fan. Dark chocolate gives me the Robitussin shivers!!! LOL)

Once the candy bars were cool and set (you get to make two at a time and I pop them in the freezer to speed up the process) you just pop them out and wrap them up. I have a roll of purple cake decorating/candy wrapping foil. I use it mostly to wrap bath fizzies in! SO I was just using what I had. You can use regular foil or Saran Wrap. And in the cake decorating part of Michael's or Joann's you can get smaller amounts of the foil. These make GREAT gifts and chocolate chips go on sale a lot!!!

Thanks SO much for visiting today,
Wanda

Friday, April 03, 2009

Weekend Project! Reed Diffusers

WOW! I haven't done one of those in a LONG time!!!

This one is fun and I hope this post turns out ok, I think I have more photos than I do words!! Things get kind of weird on here when that happens. But "weird" is something I'm SO familiar with it will just blend right in!!! LOL

I was shopping at The Dollar Tree and found these reed diffusers. It's the latest thing in scenting your home. They take no electricity and the only drawback is if it were to be tipped over. They do contain fragrance oils and that could ruin wood finishes and carpets. If you have small children and can not put this in a place that is TOTALLY out of the way then I don't suggest you use these. I have cats but cats are not into perfumy things so I'm safe with mine here. Plus I only have a few of them. One in each bathroom and one in the guest bedroom. After a while you get use to the smell and you think you can't smell them anymore. But it's like that with almost all other air fresheners anyway.

SO on to this project. I had picked mine up at The Dollar Tree. Now there you really do get what you pay for. I got the "ocean breeze" scent. I have never been to the ocean and if it smells like that I will never be going!!! It had a cheap plastic like smell to it. I dumped the stuff out, rinsed out the bottle and proceeded to make my own.

I had been shopping at The Chemistry Store and I bought my diffuser base there. I have shopped there for many things and it is an Internet company you can trust. I also got my reeds there too. I bought the 12" ones and figured I could just cut them in half when I need them.

These little bottles came with reeds so I didn't need any right away but when I was ready to refill it, I did need new ones. To cut them in half is easy too. Just mark with an x-acto knife where 6" is. On a solid cutting surface place the blade of the knife on the mark you made and roll the blade across the reed. The reed will roll and as it rolls apply pressure. It will either snap or if you think it's close enough you can stop and snap it yourself. These reeds are very easy to cut and when it gets warmer out I'm taking mine out to the band saw and while they are all still in the rubber bands I'm just going to quick cut them all at one time. I will save out a couple of packages of them as I do have a few other bottles that are a bit taller. My sister prefers a certain fragrance in these diffusers and she saves me her bottles when she is done with them. Months earlier I receive the cap and later follows the bottle. The bottles she gives me are smooth on the outside and I thought of adding a die cut to it but then I thought about the oils of the bottle and one drop on the designing work I would add will ruin it. SO I was going to opt for a bow and again it's not necessary. SO my problem resulted in how to make this a stamped project. Well, easy enough. I'm making these diffusers for gifts so it's the packaging that is the stamping project!!!

Oh, almost forgot to tell you about the fragrance. You can pick some up in the soap making sections of your local craft store or you can go to Majestic Mountain Sage and order some there. They have TONS of scents and again it is another company I have dealt with for many years and love and trust them. One of the fragrances I got there was "Frosted Snowflakes." Oh my is that ever a pretty and soft scent!!! It had the word snowflake in it, I HAD to buy it!!! LOL Though the favorite sent I buy there is Fresh Cotton. There's lots to pick from. Only fallback is you don't know what they smell like until you receive them. If that is a concern of yours I suggest you get your fragrance at your local craft store. And if you have a coupon you can save some money too. These are essential oils or fragrance oils and they are not real cheap. You'll see as you shop there. Oh and I do believe The Chemistry Store carries scents too, I just found them to be a bit higher than Majestic Mountain Sage.

Ok to begin, you have your clean bottle and your reeds. I just mix my "mixture" right in the same bottle I'm using as my finished project. I mix one part fragrance to six parts diffuser solution. You can increase that ration if you feel your scent is a very strong one. Mix a small batch to test it first. If you are going to fill more than one you can mix it in a glass bowl. Use glass or a plastic that you are going to toss. Plastic hold the scent, glass doesn't. Then when you get the right scent for your nose pour the mixture into the bottles. Make sure you wipe them off when you are done. Oils on the glass make them slippery and you could drop them and make a bigger mess with it than you want.

Now with the bottle(s) filled place the cap back on to keep the liquid inside. I took my reeds and instead of an ugly rubber band around them I used some cute ribbon to match my card stock. I tied it around the reeds and then tied it in a bow! SO cute!!!

For the packaging. If you scroll down on the right of my blog, on the screen, just above the "My Mood Is" icon is a place on the Internet where I go make my box patterns. You are limited though to the size boxes you can make. The box for this project didn't fit in their parameters but I was able to print out enough of the box to get some basic measurements to do a flap over flap box instead of a tuck box. So if you need a box that you know is a bit larger you can get the basic measurements at that site too!

By doing the box on that site I was able to determine that I needed a piece of card stock 8-1/2" (love that, no cutting on one side!!!) by 9-3/4". Now before you begin scoring, if you want any design images on the box this is the time to do it. It can be done after you score but it's not as easy as it is at this point.

My scoring begins with the 8-1/2" side at the top of my scoring tool. Score at 1-3/4", 3-1/2", 5-1/4" and 7". The remainder of the card stock is not equal to the other pieces you just scored. It is a bit smaller but it doesn't matter, that is the part you put the tape or glue on to hold it together. You can mark it lightly with a pencil, it won't show when you are done. I will sometimes draw a light "X" on that piece.

Now turn your card stock so the 9-3/4" edges is at the top of your scoring tool. Score at 1-3/4". Turn the card stock and do the other end the same. That piece you marked with an "X" has two little square boxes at both ends. Remove those, you don't need them. And along that whole top and bottom you will snip in 1-3/4". You don't need to measure when you snip you will reach the score line and know when to stop. You will snip all of those little squares on both ends. These are the flaps to the top and bottom of the box.

Once you are done with the snipping you are ready to assemble the box. I used the Stampin' Up! Sticky Strip for the long side. I wanted something that was going to hold well. So you first tape that side together. Now looking at the box you will see that seam. The seam goes in the back. Turn that seam towards the back so you are looking at the front of your box. Fold in the side flaps first then the back flap and then the front flap. The front flap folds towards the back. This gives the front of the box a nice clean look. Yes, it does matter which flaps you fold in first. The side ones not so much though if you did left and then right on the side flaps you will want to do left and right on the top to keep it uniform.

Now that you know which flaps go where tape or glue the bottom flaps in place. Fill your box and tape or glue the top flaps. Or you can let the ribbon you tie around it hold the top down. That way the box stays nice when it is open. That one is your call. If you are making it for a gift it is ok to do it that way but if you are making it for a craft fair you may want to tape them shut. Ribbons could fall off in transit and you'd be spending a bit of time retying ribbons. NOT fun!!

Decorate the front as you like. Here I used the Stampin' Up! "Lots of Tags" Sizzlets and "All Holidays" stamp for the words. You can stamp the words first before you punch them out with the oval or go freehand. I opted for the freehand because I knew it would be too difficult to keep the oval from moving with the Stamp-a-ma-jig. It worked out just fine. I sponged the edges. Punched out a small flower and added a brad. I glued it all together and affixed it to the box. Oh for the background of the box I used the Stampin' Up! "Whimsey" wheel. I was fortunate to have a Bashful Blue cartridge for my wheel. It sure saves a LOT of time. Especially if you are making more than one!!

I think I remembered everything If not you can always email me with any questions. Please don't ask questions in the comments, Blogger does not have the capability of allowing use to reply back from there.
I guess I had enough words for the photos, they all fit on here just fine! Have fun with this. You can use other glass bottles, as long as you can put the cover back on them. Unless you are just using it for your own personal use you won't need a cover!

Thanks SO much for stopping by and have a great day!
Wanda