Pin It

Sunday, July 31, 2022

Santa Express, Santa's Delivery, Christmas Card, Stampin' Up!

I still had the "Santa Express" Designer Series Paper (DSP) sitting out (I know that's no big surprise, I don't put things away right away!!) so I thought I'd make another card using that DSP. Here's what I came up with. I'm trying to find a quick and easy Christmas card to make for this year. I am cutting back on how many I sent out. At $.60 for a postage stamp, you have to start cutting back.

The base of my card is a folded half-sheet of Basic White card stock. This card opens on the bottom and the fold is on the top.

I cut a 5-1/8" x 1-7/8" piece of the dotted DSP from the "Santa Express" 12" x 12" package. I taped it to a 5-1/4" x 2" piece of Poppy Parade card stock. Then I taped that to the bottom part of the card, leaving equal amounts of white showing on the bottom and two sides.

The Santa train image was die cut from a piece of DSP in the same "Santa Express" package.  

I cut a 2-7/8" x 2-5/8" piece of Basic White card stock was cut for the layer behind the train. And a 3" x 2-3/4" piece of Poppy Parade was cut for the layer behind the Basic White piece. I taped the two together and then added the train using Dimensionals. Dimensionals were also added to the back of the piece and it was set aside.  Though I did lay it on top of the card to see where the words would go. 

I found the best place for the words were to the right of the card. I stamped them from the "Santa's Delivery" set using Poppy Parade ink. 

I thought the card needed something else so I looked at my ribbons and found some green trim and thought I'd just add it for sparkle and color. I was going to use gold but when I saw the green I thought I'd just use it. I took a glue dot to hold the trim together and I set it in the area where the train layers would be added. Once I adjusted it enough to where I liked it, I pressed down on it. Then the train piece was set on top and the card was done!

This was a very fun card to make and there's quite a few Santa's on a sheet plus you can stamp and die cut your own!

Thank you SO very much for taking your time to pop in and see today's Christmas card,
Wanda

Saturday, July 30, 2022

Santa's Delivery, Santa Express, Christmas Card, Stampin' Up!

Well, if this isn't festive looking!  I bought the "Santa's Delivery" bundle and the "Santa Express" 12" x 12" Designer Series Paper (DSP) and today I thought I'd play with them. And here's what I came up with.

The base of my card is a folded half-sheet of Poppy Parade. I cut a 4" x 5-1/4" piece of Basic White for the inside and I set it aside for later. I used to tape them in right away but if I ruined the front then I had to deal with the inside. So now if I ruin the front I can trim it down and use it on a Basic White layer and no  one will be the wiser!!! I cut two strips of the dotted DSP at1" x 5-1/4" And I cut two Garden Green strips at 1/2" x 5-1/4". The Basic White focal piece was cut at 3" x 5-1/4". 

I took my Pear Pizzazz marker and flicked on some splatter over the Basic White piece.

Next I die cut two images from the "Santa Express" DSP package. I added Dimensionals to the back. Then I set them on top of the focal piece for placement so I could see where the words would go.

The words are from the "Santa Delivery" set and were stamped using Poppy Parade ink.  Once the words were stamped I taped the Garden Green strips to the top and bottom edge, leaving about 1/4" showing.

I taped the dotted strips to the front of the card. One on the upper part and one on the lower. Then I taped the focal piece with the Garden Green strips attached to the front of the card.

The die cut images were set in place on the front of the card and the Basic White piece was added to the inside and the card was done.

This was a fun card to make. I like how festive it looks. The bright cheery colors of Christmas!

Thank you SO very much for taking your time to stop by and see today's Christmas card,
Wanda

Friday, July 29, 2022

Snowman Magic, Christmas Card, 2022 Stampin' Up! Fall Mini Catalog

When I saw this card I knew I just had to make it. I love the Balmy Blue color. It's a nice cool color and is very welcome during this hot month of July! I found this card on Pinterest but it didn't lead me to the card. I did get to the web site and I did look around a bit for the card but after a while I gave up and went about it on my own. So here's how I made the card.

The base of the card is a folded half-sheet of Balmy Blue card stock. This card opens at the bottom and the fold is at the top.

I cut a 4" x 5-1/4" piece of Designer Series Paper (DSP) from the "Subtles" 6" x 6" stack. I taped it to the front of the card.

The circle is from the "Stylish Shapes" die set. I used the second largest one on a piece of Basic White card stock. I stamped the words on it using the ones in the "Snowman Magic" set. What I love about the clear stamps is you can bend them. I bent them around the circle. The original card is a thank you card, I wanted a Christmas card, so I changed the words. 

The snowman was die cut from a piece of Dazzling Diamonds glitter paper. I stamped the face on. I set the piece in my Stamparatus because I knew I wouldn't get the face dark enough with the first stamping.  I colored the nose in using my Pumpkin Pie Blends pen. I was going to use a marker and then I remembered that the ink probably wouldn't dry on the glitter but I knew it would with the Blends pen. I set the snowman on the circle and took a pencil and marked where the arms should go. I stamped the arms using Early Espresso ink. Then I taped the snowman in place.

The hat was stamped with black Memento ink and the scarf was stamped with Balmy Blue ink. I die cut both using the matching dies. 

Next I stamped the bird using Balmy Blue ink. I wiped the ink off the beak and then colored it in with the Pumpkin Pie marker. I used a dot of glue to hold the bird in place. Glue was also used to set the scarf and hat in place.

The snowflake frame was die cut using Basic White card stock and foam strips were added to the back. I laid it on top of the DSP to see where the circle and frame would go. I taped the circle down and then the frame. And that was it.

This card did take a little bit of time to make. There's lots of pieces and "stuff" to do to make it. But it's SO worth it. It was fun and I'd love to make more.  I want to play with that frame some more too.

Thank you SO very much for taking your time to stop by and see today's Christmas card,
Wanda

Thursday, July 28, 2022

Scary Cute, Halloween Card, 2022 Stampin' Up! Fall Mini Catalog

Today I decided I'd give the "Celebrate Everything" 12" x 12" Designer Series Paper (DSP) another try. I used the same DSP as yesterday but today I colored in the pumpkins. I used both light and dark Pumpkin Pie Blends pens. I colored every other pumpkin with light and the same for the dark. And dark Old Olive for the stems. I like the background SO much more, don't you? It's just what it needed.

The base of my card is a folded half-sheet of Basic Black card stock. I had started out using Basic White but ended up trimming it down as a layer, it was just too blah. The Basic Black made a big difference.

I cut a piece of the DSP at 3" x 3-1/2".  I colored in my pumpkins and layered it with a 3-1/4" x 3-3/4" piece of Old Olive. I taped the two layers together and then taped it to the bottom part of the card. 

The Basic White focal piece was cut at 2-1/8" x 2-5/8" and the Old Olive layer was cut at 2-3/8" x 2-7/8". The trick or treaters from the "Scary Cute" set were stamped using black Memento ink. I set it up in my Stamparatus so I could ink it up a couple more times to get a nice solid black image. I love that handy tool!! Then I stamped the words from the same set using Pumpkin Pie ink. I taped the two layers together. A moon was die cut using Daffodil Delight card stock and glued in place. Dimensionals were added to the back and the piece was set in place on the front of the card and that was it. 

This was a very quick, easy, and fun card to make. I do like the pumpkins colored in SO much better. And it didn't take long either. I just scribbled over the area. The black background hid any coloring that went outside the lines. I could have been careful coloring but I knew I didn't need to. 

Thank you SO much for taking your time to stop by and see today's Halloween card,
Wanda

Wednesday, July 27, 2022

Scary Cute, Halloween Card, Stampin' Up! 2022 Fall Mini Catalog

This is not the card that was in my head. It came out on paper SO different!!  But it is what it is and you know I post the good, the bad, and the ugly!

So if you REALLY want to give this card a try, here's how I made it.  I started out with a folded half-sheet of Basic White card stock. This card opens on the bottom and the fold is on the top.

Next I cut a piece of Designer Series Paper (DSP) from the huge "Celebrate Everything" 12" x 12" package. There's 48 sheets of lots of occasions of paper in that pack. I thought the ghosts and pumpkins were cute and the strips are on the backside. The bottom piece was cut at 5" x 2" and a piece of Basic Black card stock was cut at 5-1/4" x 2-1/4" for the layer. Before I taped this piece to the bottom of the card I stamped the words from the "Scary Cute" stamp set using black Memento ink.

The ghosts and pumpkin piece was cut at 2-1/4" x 4" and a Crushed Curry piece of card stock was cut at 2-1/2" x 4-1/4" for the layer. I set this layer in place using Dimensionals.

The trick or treater is from the "Scary Cute" set and was stamped using black Memento ink on a piece of Basic White card stock. I die cut it using the oval from the "Fabulous Frames" die set. Then I die cut another piece using Basic Black card stock. 

I colored in the sky using my Blending brush and Crushed Curry, Sweet Sorbet, Tahitian Tide, and Old Olive ink pads. I stamped on the bats but only one of them made it plus the tips of another one, but it's still cute. I used scotch tape on the back of the oval and frame to hold them together. I could have fussy cut an oval just a bit larger than the Basic White one and glued or taped them to that but I didn't think of that until just now!  But the scotch tape worked so I'm not complaining.  I set the oval in place using Dimensionals on the bottom and tape on the upper part.  And the card was done!

It was fun but it's not what was in my head. Mostly the oval. It's too colorful for the DSP.  This DSP looks like it would be fun to color in the pumpkins too.  Maybe on a future card.

Thank you SO much for taking your time to stop by to see my interesting Halloween card,
Wanda

Tuesday, July 26, 2022

Caroling Mice, Santa's Delivery, Christmas Card, Stampin' Up! 2022 Fall Mini Catalog

I decided to take the next stamp set off my stack (and by the way, my stack is not all that tall) and I thought I'd stamp the little Christmas mouse from the "Merry Mice" set. 

The base of my card is a folded half-sheet of Pacific Point card stock. This card opens on the right and the fold is on the left. I added a 4" x 5-1/4" piece of Basic White on the inside. I like to add it first so when I'm done working on the front I am done!

I cut a 4" x 5-1/4" piece of Designer Series Paper (DSP) from the "Celebrate Everything" 12" x 12" package.  There's 48 sheets in this huge package of DSP. I taped it to the front of the card.

Next I stamped the mouse from the "Caroling Mice" set using black Memento ink on a scrap piece of Basic White card stock.  I colored him in using my Blending pen and markers. The jacket was colored in using Pacific Point. The scarf is Poppy Parade. The hat is Granny Apple Green. The body is Crumb Cake. And I did use Poppy Parade on the inside of the ear, the nose and the mouth. I made sure it was not very bright at all before I colored with it.

I die cut the piece using the 2-11/16" circle, it's the second largest from the "Layering Circles" die set.

I used my Blending brush to color in the sky with Pacific Point.

The ground was colored in using the Wink of Stella pen. I also to the pen and flicked the brush along the edge of the opening of the cap so it would splatter sparkle over the circle. 

Then I die cut a Pacific Point scalloped circle the next size larger for the layer. I taped the two circles together and added Dimensionals to the back.

The words are from the "Santa's Delivery" set and were stamped using Pacific Point card stock on a 2_ x 3/4" scrap piece of Basic White card stock. The Pacific Point card stock behind it was cut at 1-2/4" x 1". The two pieces were taped together and Dimensionals were added to the back. 

The circle and words were set on the front for placement. Once I saw where I thought they looked best I removed the backing and affixed them in place.  And the card was done.

Such a cute mouse! Such a fun Christmas card.  I'm not fond of making Christmas in July stuff. I don't even shop Christmas in July. So, if there's Christmas in July, does that mean we can have fireworks on December 4th???  LOL

Thank you SO very much for taking your time to stop by and see today's Christmas (in July) card,
Wanda

Monday, July 25, 2022

Awash in Beauty, Flowering Flowers, Birthday Card, Stampin' Up!

I was going to move onto another new stamp set but I saw this card and I had a scrap piece of "Awash in Beauty" Designer Series Paper (DSP) sitting on my worktable so I thought I'd make this card. There's no information on how to make it. There's no link to a blog to hunt down some information, so here's how I made this card.

The base of the card is a folded half-sheet of Basic White card stock. I cut a piece of Merry Merlot card stock to measure 4" x 5-1/4" and I taped it to the front of the card base. 

Then I cut a piece of Basic White card stock that measured 3-3/4" x 5". I textured it using the "Painted Texture" embossing folder. I glued this piece to the top of the Merry Merlot card stock.

Next I cut my DSP to measure 1-1/2" x 3-1/2". The green piece is the backside of the floral piece. And the Merry Merlot layers behind them measure 1-3/4" x 3-3/4". I taped the two layers together and then I set them in place on the front of the card. The green piece was set in place about 1/2" from the top edge of the card and 1/2" from the fold and the floral piece is 3/8" from the bottom of the card and 1-3/8" from the fold. I should have added two strips of card stock behind it for a little bit of height.  The piece kind of bends a bit on the right because of the two layers it's attached to on the left. 

The words are from the retired "Flowering Flowers" set. I was trying to find some larger long birthday words in my current sets but I didn't have any, so this was the best I could do. I stamped them using Merry Merlot card stock on a 3/4" x 2-3/4" piece of Basic White card stock. I cut a 1" x 3" piece of Merry Merlot card stock for the layer. The words were taped to the Merry Merlot layer and was set in place on the front of the card using Dimensionals. The words are set 7/8" from the top and 3/8" from the right side. 

I had a few sequins left over from the "Noble Peacock" rhinestone package. I have quite a few of those left over.  If I didn't have those, I would have just colored some clear ones using my Blends pens. And the card was finished.

This was a very fun card to make and it was nice to use up some scraps!

Thank you SO very much for taking your time to stop by and see today's birthday card,
Wanda

Sunday, July 24, 2022

Scary Cute, Halloween Card, Stampin' Up! 2022 Fall Mini Catalog

I found today's Halloween card on Pinterest. I'm trying to work through the stamp sets I recently got and the "Scary Cute" one was next in line.  There's some fun silhouettes in the set that I will be trying at sometime between now and Halloween. You can see the original card here.

The base of the card is a folded half-sheet of Basic White card stock.  On top of the card base is a 4" x 5-1/4" piece of Designer Series Paper (DSP) from the "Black & White Designs" 12" x 12" package. I taped it on top of the card base.

Next I die cut the frame, house, bats and moon. I also die cut the larger bats and cat at the same time to save for another time. Why not? I had room on my piece of Basic Black card stock and those dies were just sitting there.  Only makes sense, right?  I also die cut a Basic White framed piece. The Basic Black framed piece was glued in place over the Basic White piece. Then I added the moon, the house, and then the bats. The piece was set in place using Dimensionals.

The "Halloween Happiness" words were stamped using black Memento ink on a scrap piece of Basic White card stock. I die cut them with a die from the same "Scary Cute" bundle.  

I tied a bow using white Baker's Twine. I added a dot of glue to the DSP and set the bow in place. The words were set in place over the bow. I used a Dimensional on the left side and a little glue on the right side.

I had some black enamel dots so I thought I'd add them to the front of the card and the card was done.

This was a fun, quick, and easy card to make.

Thank you SO much for taking your time to stop by and see today's Halloween card,
Wanda

Saturday, July 23, 2022

Wonderful World, Color & Contour, Happiness Abounds, Birthday Card, Stampin' Up!

One of the blogs I like to follow is "Claire Daly Creates".  She is very talented and has some really pretty cards. I have copied many of her cards. I've watched some of her videos too. She's from Australia and I LOVE her accent!!! LOL So not only is she talented but she's fun to listen to!  Today's card is one of hers. You can see the original card here. And here's how I made it.

The base of the card is a folded half-sheet of Pear Pizzazz card stock. The sheet of card stock was cut on the 8-1/2" side so once cut it measured 4-1/4" x 11".  I scored it at 5-1/2" and folded it in half. A 4" x 5-1/4" piece of Basic White was added to the inside.

Next I cut a 4" x 5-1/4" piece of Designer Series Paper (DSP) from the "Wonderful World" 12" x 12" package. On the original card was cut at 4-1/8" x 5-3/8".  I didn't want to cut my DSP at 4-1/8" because it would limit me on measurements for future cards. You can cut the sheet at 4" across the top and get 3 strips. Cutting each strip at 6" and you have 6 pieces of DSP.  If I cut the one at 4-1/8" it only allows me to get 4 pieces that would work for a full background. SO I just went with what I thought was more economically feasible for me. But it did create a problem in making the card, I still went with it. 

SO, I taped the DSP to the front of the card.

Then I stamped the flower from the "Wonderful World" stamp set. I love it that the stamp set and DSP are named the same. It makes it easier to know what set it goes best with.  I used Orchid Oasis ink to stamp the flower on a piece of Basic White card stock.  I didn't have the watercolor paper that was used in the original card so I went a different rout. I took my Orchid Oasis ink pad and my blending brush and scrubbed on some in over the flower. It was the best substitute I could think of. Then I die cut the piece using the second largest scalloped die from the "Color & Contour" bundle. I set it on top of the card front using Dimensionals. 

The words are from the "Happiness Abounds" set and were stamped using Versa Mark on a piece of Crumb Cake card stock. I sprinkled white embossing powder over the words and heat set them. That strip measures 5/8" x 3-1/2". 

A Linen Thread bow was tied and set in place on the front of the card using a dot of mono glue. Two strands of linen were used to make the bow. Then the words were set in place over the bow using Dimensionals. I made sure that no Dimensional was on top of the bow or my word piece would stick up too much in one spot.  I had to move my Dimensional because I didn't eye it right!! LOL  But if you don't press them down in place right away the are easier to move.

I thought the card needed a little bling so I added 3 crystal rhinestones. I didn't add the two ribbon pieces under the scalloped piece, mostly because of the size of my DSP threw off the placement of the scalloped piece. I had the one piece of DSP but I didn't have the vellum stuff. And I didn't have the torn vellum piece for under the words and bow. So I just made do with what I had and this is how my card turned out.  It's okay if you don't compare them.

It was a fun card to make and Claire's site is a fun one to look at!! It went together pretty fast and it was easy enough to do. 

Thank you SO much for taking your time to stop by and see today's birthday card,
Wanda

Friday, July 22, 2022

Best Witches, Halloween Card, 2022 Stampin' Up! Fall Catalog

Now for something completely different.  I still want to play with the hippos set but I thought I'd just take one of the new sets off the pile and play with it. I found this card on Pinterest. You can see the original card here. The original image is on top of a candy box. There's directions there for the box.

The base of the card is a folded half-sheet of Basic White card stock. This card opens on the right and the fold is on the left.

I cut a 4" x 5-1/4" piece of Granny Apple Green card stock for the first layer, it was taped to the card base. Then a 3-3/4" x 5" piece of Designer Series paper from the Brights Collection 6" x 6" stack was taped on top of that. 

I used the third largest stitched rectangle from the "Rectangle Stitched" framelets die set on a piece of Granny Apple Green card stock.

Then the fourth largest die was used to cut the Basic White piece and a scrap piece of Pumpkin Pie card stock. 

The witch was stamped on the Basic White piece and colored in using my Blender pen and ink pads. I used Basic Black, Blushing Bride, Pumpkin Pie, Daffodil Delight, Soft Suede, and Gorgeous Grape.

The Pumpkin Pie piece was cut from a 1-1/4" x 3" piece of Pumpkin Pie card stock that was die cut using the same size die as the Basic White piece. And the top edge was scalloped using the die from the "Color & Contour" bundle.  Had I known the ribbon would be covering up my piece I wouldn't have used the scalloped die. It's hiding under the ribbon. I taped the Pumpkin Pie piece to the bottom of the Basic White piece. The two stitched rectangles were taped together. Dimensionals were added to the back and the piece was set in place on top of the DSP that is on the card base

Next I added the ribbon. I cut it 4" long and taped the ends behind the piece. I tied a bow and glued it to the side of the ribbon.

The frog was set in place using a Dimensional. I added some Wink of Stella to the frog, the flames and the bubbles and the card was done. 

This was a fun card to make. I'm really not ready for Halloween stuff yet but I want to play with my new stuff.

Thank you SO much for taking your time to stop by and see today's Halloween card,
Wanda

Thursday, July 21, 2022

Happiness Abounds, Hues of Happiness, Wedding Card, Stampin' Up!

I found today's card on Pinterest. I was going to be working on a card using one of the newer sets I got but when I ran across this one I just couldn't help myself.  You can see the original card here. The link there doesn't lead to any instructions or measurements so here's how I made the card.

The base of my card is a folded half-sheet of Basic White card stock. This card opens on the right and the fold is on the left.

I cut a piece of Melon Mambo at 4" x 5-1/4".

A piece of Designer Series Paper (DSP) from the "Hues of Happiness" measures 3-3/4" x 3-1/4".  And I cut a piece for the top (which is the backside of the floral piece) at 3-3/4" x 2".  I taped the top piece down first and then the bottom piece. The bottom piece will overlap the top piece a bit. I just lined up the top and side edges for the top piece and the bottom and side edges for the bottom piece. 

I cut a 1/2" x 4" piece of Basic White card stock to stamp the words from the "Happiness Abounds" set. Melon Mambo ink was used there. A 3/4" x 4" piece of Melon Mambo card stock was cut for the layer behind the words. The words were taped to the strip and the strip was taped to the front of the card about 1-5/8" down from the top of the card base.

A flower from the "Hues of Happiness" DSP was die cut and set in place using Dimensionals.

Two crystal rhinestones were colored using the dark Melon Mambo Blends pen and the card was done.

This is a very quick, easy, fun, and pretty card to make. I think it will make a lovely wedding card but changing the words it can be used for many other occasions.

Thank you SO very much for taking your time to stop by and see today's wedding card,
Wanda


Wednesday, July 20, 2022

Happiness Abounds, Hues of Happiness, Thank You Card, Stampin' Up!

It's not a hippo card, is it?  LOL  I promised you I'd make something other than a hippo card but there's another one I want to make in a day or two!!! But for today I had run across this card and thought I'd give it a try. I did make a little change to the front. You can see the original card here

The base of my card is a folded half-sheet of Gorgeous Grape card stock. This card opens on the bottom and the fold is on the top.

I textured the front of the card using the "Pretty Flowers" embossing folder. I thought that area needed something. 

I cut the Designer Series Paper from the "Hues of Happiness" 12" x 12" package at 2-3/4" x 4".  I taped it to a piece of Fresh Freesia card stock that was cut at 2-7/8" x 4-1/8".  I added Dimensionals to the back and set it in place on the front of the card.

Then I stamped the words from the "Happiness Abounds" set using Gorgeous Grape ink. They were stamped on a scrap piece of Basic White card stock that measured 3-3/8" x 3/4".  My words are kind of crooked because my stamp is a bit misshaped. I put it back in the stamp case aligning it up with the printed words there.  Hopefully it gets it's natural shape back. I have no idea what happened there. Anyway, I taped the words in place on top of the DSP. The right side hangs over about 1/4".

On the inside a 4" x 5-1/4" piece of Basic White card stock was added.  At the bottom a 3/4" x 5-1/4" piece of the DSP was added and just above that is a 1/4" x 5-1/4" piece of Fresh Freesia card stock. And that was it, the card was done.

This was a fun, quick, and easy card to make. Plus it's pretty!!

Thank you SO very much for taking your time to stop by and see today's thank you card,
Wanda


Tuesday, July 19, 2022

Hippiest Hippos, Thank You Card, Stampin' Up! 2022 Fall Sale-a-Bration

I know, I was going to move on and play with a different set but when I saw this card I thought I should give it a try. The original card looks like it was made using the inside of envelope flaps. I didn't have those envelopes so I thought I'd just fake it. There were no instructions linked to the image so I winged the whole card. You can see the original card here

The base of the card is a folded half-sheet of Basic White. This card opens on the bottom and the fold is on the top. 

The Designer Series Paper (DSP) is from the Regals  6" x 6" stack, it's Cherry Cobbler. I cut it on the corners and had to trim it up a bit because I wasn't straight. The piece measures 5-1/2" across the long edge. The sides are 4" and from the long edge to the point it's 2-7/8". After cutting the DSP I taped the piece to the corner of a piece of Basic White card stock. I left about 1/8" edge. I had to trim one side and the long side. The long side is the same as the DSP, there's no white edge showing. Then repeat this for the bottom piece.

Tape the bottom piece down first and then the top piece. 

Next I stamped the hippo from the "Happiest Hippos" set using black Memento ink on a scrap piece of Basic White card stock. I colored in her body using my Blender Pen and Smoky Slate ink. The tutu and shoes were colored in using my light Cherry Cobbler Blends pen.

I die cut a Basic White circle using the third largest scalloped circle from the "Layering Circles" die set. Dimensionals were added to the back and the piece was centered on the front of the card.

Then the hippo was added using Dimensionals.

The words were done on my computer. I was looking in my sets for a "thank you" that would fit in the smallest circle die from the "Layering Circles" die set but no luck. I used the font "Cheddar Salad" and the font size is 28.  Just in case you want to type out your own. I printed it out on Basic White card stock and then die cut it. A Dimensional was added on the left side and tape to the right side and then the piece was set in place on top of the scalloped circle.

Those cute little flowers are made using one of the dies in the matching die set and Blushing Bride card stock. A dot of glue was placed on the scalloped circle and the flowers were set in place. A crystal rhinestone was set in the center of each flower and the card was done.

I think it's adorable and I'm glad I decided to make it. Now for tomorrow I won't use the hippo set!!! I promise!!!

Thank you SO much for taking your time to stop by and see today's thank you card,
Wanda

Monday, July 18, 2022

Hippiest Hippos, Artistically Inked, Thank You Card, Stampin' Up! 2022 Fall Sale-a-Bration

Today I thought I'd play with the "Hippiest Hippos" set one more time before I move on to something else. I just think they are SO darn cute but they will still be cute in a week or so too!!! LOL

The base of my card is a folded half-sheet of Basic White card stock. I took a 1/4 sheet of Starry Night card stock and textured it using the "Pretty Flowers" embossing folder. I glued it to the card base.

Then I cut a piece of Basic White card stock at an angle on the left and right side. Mark the left side 4" down. Mark the top edge at 4".   Make a mark about 5/8" up from the bottom and about 3" from the left side. Cut the left side from the 4". Set it up in your paper cutter and cut a straight line from that left mark to the bottom mark. Repeat for the top mark.

I used a mask from the "Artistic Mix" decorative masks set and scrubbed on some Tahitian Tide ink using a Blending Brush. 

The hippo from the "Hippiest Hippos" set was stamped using black Memento ink on a scrap piece of Basic White card stock. I colored it in using Smoky Slate ink and my Blender pen. I added a little Sweet Sorbet ink to the nostrils. The flower was colored in using Tahitian Tide ink and the leaf on the stem was colored in using Pear Pizzazz ink. I added a little Wink of Stella to the flower for some additional bling. Dimensionals were added to the back of the hippo and I set it aside.

I took a scrap piece of Tahitian Tide card stock and die cut the tag from the "Designer Tags" set. I had just gotten this set and thought I should use it. Dimensionals were added to the back and the piece was set in place on the front of the card. I did move it after the pick because it is a bit crooked. Then the hippo was added.

The card looked like it still needed something so I added a few rhinestones and the card was done.

This was a very fun and easy card to make and it's got a fun background too.

Thank you SO very much for taking your time to stop by and see today's thank you card, 
Wanda

Sunday, July 17, 2022

Happiest Hippos, Lovely & Lasting, Birthday Card, 2022 Stampin' Up! Fall Sale-a-Bration

I have been having fun playing with the "Happiest Hippos" set. Here's another card I came up with.

The base of my card is a folded half-sheet of Basic White card stock. This card opens on the bottom and the fold is on the top. 

I cut a 4" x 5-1/4" piece of Tahitian Tide Designer Series Paper (DSP) from the in-colors 6" x 6" stack. I folded the left side up two inches from the top and it ended up being folded up on the right side at 1/4". Part of the corner went over the right edge so I just trimmed it off. I taped the fold shut.  Then I taped the DSP to the front of the card.

The hippo from the "Happiest Hippos" set was stamped using black Memento ink on a scrap piece of Basic White card stock. I die cut her out and then I colored her. I used Tahitian Tide ink and my Blender pen. I didn't have the markers or Blends pens but I still have my Blender pen. And since I still had the pen out I just colored in the hippo using the Smoky Slate ink pad. I lightly added a touch of Polished Pink ink to the nostrils and mouth. 

There are a lot of cute accessories in the die set. I love this little umbrella. I die cut one using a scrap piece of the DSP and another one using Early Espresso card stock. I only kept the handle of the Early Espresso piece. I glued it to the handle of the DSP piece and then I glued the umbrella to the hippo's hand. I set it aside to dry.

In the meantime I die cut the tag from the "Tailor Made Tags" die set. I used the second largest tag with the "clipped" corners. I scrubbed on some Tahitian Tide ink using my Blending Brush. Dimensionals were added to the back. I didn't affix the piece but I did set it on top of the card to see where the words would go.

The words are from the "Lovely & Lasting" set and were stamped using Tahitian Tide ink. 

Next I affixed the tag and then the hippo on top.  I tied a white bow and glued it in place and the card was finished.

This was a fun card to make and I REALLY like this layout.  I think I should have used the striped DSP for the umbrella instead of the flowers.  But it's still cute.

Thank you SO very much for taking your time to stop by and see today's birthday card,
Wanda

Saturday, July 16, 2022

Wonderful World, Celebrating You, Anniversary Card, Stampin' Up! 2022 Fall Sale-a-Bration

I found this fun card online and thought I'd give it a try. I was looking to make an anniversary card and here's how I did it.

The base of my card is a folded half-sheet of Crumb Cake card stock. This card opens on the right and the fold is on the left. 

I cut a piece of DSP from the "Wonderful World" 12" x 12" package. The piece measures 4" x 3-3/4". I taped it to the upper part of the card.

Then I took a 2-1/4" x 3-3/4" piece of Basic White and stamped the flower from the "Wonderful World" set. I used my Rich Razzleberry and Pear Pizzazz markers to color it in. 

A 2-1/2" x 4-5/8" piece of Rich Razzleberry card stock was cut for the layer. I used the scalloped die from the "Basic Borders" die set to trim the bottom slightly. Meaning I didn't take much off to create the scallop. I tied a piece of white Baker's Twine around the bottom part and tied a bow. Dimensionals were added to the back and the piece was set in place in the upper right corner.

The words are from the "Celebrating You" set and were stamped using Rich Razzleberry ink. I was going to fussy cut around them like I had seen in the original card but my words were pretty much squared off so I just cut them on the paper cutter. They measure 1/2" x 2-1/4". And the Rich Razzleberry layer behind it is cut at 3/4" x 2-1/2". The words were taped to the layer and a Dimensional was added to the left side and tape to the right. The piece was set in place on the front of the card.

A few sequins were added too. One on each flower and one to the bottom area beneath the words.

A 4" x 5-1/4" piece of Basic White was added to the inside and the card was done.

This was a super quick and easy card to make.

Thank you SO very much for taking your time to stop by and see today's anniversary card,
Wanda

Friday, July 15, 2022

Wonderful World, Pansy Patch, Birthday Card, Stampin' Up! Fall Sale-a-Bration

Today's card is a pretty simple one. It was easy and fun to make too.

The base of my card is a folded half-sheet of Basic White card stock. I cut a 4" x 5-1/4" piece of Melon Mambo card stock for the layer. On top of that is a 3-3/4" x 5" piece of Designer Series Paper (DSP) from the "Wonderful World" 12" x 12" package. I taped it to the Melon Mambo piece. Then that was taped to the front of the card. 

Next I took a 5" x 1" strip of Basic White card stock and textured it using the "Pretty Flowers" embossing folder. I cut a 5" x 1-1/4" piece of Melon Mambo card stock for the layer. I taped the two pieces together and then taped them on top of the DSP. I centered the strip as much as I could without measuring.

The flower is from the "Wonderful World" set and I used markers to color it in. Melon Mambo for the flower and Garden Green for the leaves and stem. I die cut it using the 2-1/8" round die from the "Layering Circle" die set. I also die cut a scalloped circle for the layer using the 2-9/16" die. For a short cut here, I used the 4th largest circle die and the 3rd largest scalloped die. I could have cut the scallop from the larger layer but I had some scraps to use up or I would have. 

The words are from the "Pansy Patch" set and were stamped using black Memento ink. I punched them using the "Double Oval" punch. I punched the scalloped oval using the same punch and a scrap piece of Melon Mambo card stock. I taped those two layers together. 

Before I affixed the circle and oval with Dimensionals, I added some gold cord to the card for a bit of color and texture. I didn't quite get the cord even on both sides but when I do stuff like that I just say, "it's a handmade card" and leave it at that!!  Once the cord was down I set the large circle in place and then the oval one. I used both tape and Dimensionals on that one.  I had an enamel dot that matched so I added that to the flower piece. And the card was done.

I told you it was a quick and easy card to make.

Thank you SO very much for taking your time to stop by and see today's birthday card,
Wanda

Thursday, July 14, 2022

Hippiest Hippos, Artistically Inked, Friendship Card, Stampin' Up! 2022 Fall Sale-a-Bration

I'm loving this new "Hippiest Hippos" set/bundle. There's three adorable hippos in it. I used one yesterday and today I thought I'd give this one a try. Isn't she cute?

To make my card I used a folded half-sheet of Basic White card stock. Then I cut a 4" x 5-1/4" piece of card stock. I textured it using the "Painted Texture" embossing folder to give it some texture. 

I stamped the hippo from the "Hippiest Hippos" set using black Memento ink. Then I die cut her out with the matching die. She's easy enough to fussy cut but I got the dies instead. Then I colored the body in using my light "Smoky Slate" Blends pen. I colored the skirt and shoes in using my light Melon Mambo Blends pen. I added a little of the dark Flirty Flamingo pen to the skirt. I added Dimensionals behind her and set it aside.

Next I die cut a circle from the "Layering Circles" die set. I used the 2-7/16" one and I used the next size larger scalloped circle, the 2-9/16" one using Flirty Flamingo card stock.  I used my blending brush to scrub on some Melon Mambo ink for the background. Be careful when doing the scrubbing, the brush holds a lot of ink. You can scrub some off first or you can just start in a spot where you know it will be covered up. I scrubbed in the center on this one and then just worked my way out.  It makes a nice highlighted background. I taped the two layers together and added Dimensionals to the back.

The words are from the "Artistically Inked" set and were stamped using black Memento ink on a scrap piece of Basic White card stock. I die cut the layers using the smallest circle from the "Layering Circles" die set and I die cut the smallest scalloped circle using a scrap piece of Melon Mambo. You can always die cut it from the larger Melon Mambo circle before you tape it to the Basic White circle. I happened to have some scraps so I used them. You can only have so much scrap card stock before it gets to be a big mess that continues to grow!!  But if you put it in recycling you regret it because there is probably a piece in it you could have used, right?  I need to get rid of that kind of thinking so my workroom won't look so messy!!! Okay back to the card, I got sidetracked!!  I taped the two small circles together and I set them aside. They will need Dimensionals but they have to be strategically placed or they will not lay nice on the larger circle.

Before I assembled my card I took some Melon Mambo ribbon that I had and cut it at 6-1/2" long. I taped the ends to the back of the embossed piece of card stock. Then I added Dimensionals to the embossed piece and set it in place on top of the card base.

The scalloped circle was set in place and then the hippo on top of that. The words were set in place using a Dimensional at the 6 and 9 o'clock positions and a bit of tape was added to the open are that will be touching the larger circle.

I tied a bow and glued it to the ribbon strip. I had some rhinestones that were retired and since they looked like they fit in, I added them to the front of the card. I was going to use a paper punch and punch some Melon Mambo dots but I liked the bling of the rhinestones.  And the card was finished. 

I do like how it turned out. I think this little hippo is adorable and I'm looking forward to playing with it some more soon.

Thank you ever SO much for taking your time to stop by and see today's friendship card,
Wanda

Wednesday, July 13, 2022

Hippiest Hippos, Very Best Occasions, Birthday Card, Stampin' Up!

NEW STUFF! My order arrived and I have even more new stuff to play with. I've barely used the other stuff and now I have even more.  Though I didn't buy as much as I usually do because I realized I don't have time to play with it all to justify the cost of the items.  Today's set "Hippiest Hippos" is a Sale-a-Bration free set.  Though it's really not free, you need to spend $50 to get it, you more or less earn it. So with that said, here's how I made this card. 

The base of my card is a folded half-sheet of Basic White card stock. I started out with a half-sheet of Real Red card stock but it was just too much. The Basic White helped tone it down. This card opens on the bottom and the fold is on the top.

I cut a 4" x 5-1/4" piece of Real Red and taped it to the front of the card.

Then I cut a 4-3/8" x 2-7/8" piece of Mint Macaron card stock and a 4-1/8" x 2-5/8" piece of Basic White card stock for the layer. On that layer I taped a 3-7/8" x 1-5/8" piece of Designer Series Paper (DSP) from the "Rings of Love" 12" x 12" package. I was looking through the paper and wasn't all that thrilled at what I saw for use on this card until I turned the papers over and there it was, this fun plaid type paper. SO I ran with it. That is why I used Mint Macaron on the layer.  I taped the DSP to the small Basic White piece.

Next I die cut the oval using the die from the "Fabulous Frames" set using Basic White card stock. I taped the oval to the frame using scotch tape on the back. Then I die cut a Blushing Bride oval and glued just the frame part on top of the Basic White oval frame. I scrubbed on a little Mint Macaron ink on the center of the frame but it doesn't show up well on the photo.

Once I had the oval done, I set it on top of the Basic White piece with the DSP taped to it so I could see where the words were going to go. The words are from the "Very Best Occasions" set using black Memento ink.

The hippo is from the "Hippiest Hippo" Sale-a-Bration set and was stamped using black Memento ink. I die cut it with the matching die set. Then I colored it in using the light and dark Gray Granite Blends pens. I used the dark Petal Pink Blends pen on the nose and toe nails. And I used the light Real Red Blends pen on the flower and the dark Mint Macron Blends pen on the leaf. I also used the Wink of Stella pen on the flower to give it a bit of a sparkle. I set the hippo in place on top of the oval using Dimensionals. I added the oval to the rectangle using Dimensionals and I added the rectangle using Dimensionals too.

The flowers were die cut using the die from the matching hippo set. I used Daffodil Delight card stock on them. I added a dot of glue behind them and set them in place on the Real Red part of the card. I also added a dot of Wink of Stella to the center of each flower.  And that was it, the card was done.

This was a very fun card to make and it doesn't hurt to have that hippo so darn cute either!!! LOL

Thank you SO very much for taking your time to see today's birthday card,
Wanda


Tuesday, July 12, 2022

Artistically Inked, Awash in Beauty, Friendship Card, Stampin' Up!

Today's card is an easy and quick one. Plus you get to use some of that busy Designer Series Paper (DSP)  on the background.

The base of my card is a folded half-sheet of Basic White card stock. On top of that is a 4-1/8" x 5-3/8" piece of Balmy Blue card stock. And on top of that is a 4" x 5-1/4" piece of DSP from the "Awash in Beauty" 12" x 12" package.

I cut a 1-1/2" x 3-1/4" piece of DSP from the same package for the ribbon looking piece. And I layered it using a 1-5/8" x 3-1/4" piece of Basic White. I snipped the left end of the DSP and then snipped the Basic White piece on the left end to match. I taped the two pieces together and then taped them to the front of the card, centering it.  

I cut a 1-3/4" x 3" piece of Basic White card stock and stamped the "hello" from the "Artistically Inked" set using Old Olive ink. Then I cut a 1-7/8" x 3-1/8" piece of Balmy Blue card stock for the layer. I taped the two pieces together. I actually set them in place on the left side of the card and then saw the little flowers were upside down so I had to quickly but carefully remove it so I could put it on the right so the flowers looked normal!  LOL  If the piece would have gone on the left side, the words could have been done separately and a layer added behind them, then placed over the bottom corner of the Basic White panel. 

Next I die cut the stem and the flower from a piece of DSP from the "Awash in Beauty" package. I set the flower in place on the Basic White panel using Dimensionals. Then I set that piece in place on the front of the card using more Dimensionals. Wink of Stella was added to the flower (it's too bad it doesn't show up on the photo, because it's really pretty) and the card was done.

This was a fun, quick, and easy card to make. It would have made a great card for several other occasions as well. 

Thank you SO much for taking your time to stop by and see today's friendship card,
Wanda

Monday, July 11, 2022

Lovely & Lasting, Awash in Beauty, Thinking of You Card, Stampin' Up!

I have been having a lot of fun with the "Awash in Beauty" Designer Series Paper (DSP). The 12" x 12" package has so many fun images and you can whip up cards really fast with them and they are beautiful cards too. The images are just too pretty!

The base of my card is a folded half-sheet of Basic White card stock. This card opens on the right and the fold is on the left.

A 4" x 5-1/4" piece of DSP from the "Awash in Beauty" package was taped on top of the card base.

I took another piece of the DSP from the same package and using the die from the "Fabulous Frames" set was used over one of the flower clusters. I used the same die to cut a frame of Basic White so the flower image can be set in the center. Then I cut a 2-1/2" x 3-1/8" piece of scrap card stock, mine was Basic White. I taped this to the back of the framed piece so it was more solid. I made sure all the seams on the back had tape covering them so this piece wouldn't be coming apart. I added Dimensionals to the back and set the piece in place on the front of the card.

The words are from the "Lovely & Lasting" set were stamped using Balmy Blue ink. I die cut them with the 4th largest stitched circle from the "Stitched Shapes" die set. And I die cut a 1-7/8" Balmy Blue circle for the layer behind it. I used the 5th largest circle from the "Layering Circles" die set. I taped the two circles together. Dimensionals were added to the back on the areas where they were not going to touch the framed piece. The circle was set in place and the card was done.

This was a very easy card to make. I think it turned out well and I LOVE that floral image. 

Thank you SO very much for taking your time to stop by and see today's thinking of you card,
Wanda

Sunday, July 10, 2022

Lovely & Lasting, Thinking of You Card, Stampin' Up!

I love the look of the panel cards but I often struggle with getting them lined up right.  Today I thought I'd try one with a solid background and just tape the panels down instead of layering them and placing them that way. This way was SO much easier.

The base of my card is a folded half-sheet of Basic White card stock. This card opens on the right and the fold is on the left.

I cut a 4-1/8" x 5-3/8" piece of Basic White card stock and textured it using the "Pretty Flowers" embossing folder.  It will be  glued to the front of the card base.  Don't glue it yet. I always share why I use glue, it's because the textured areas don't seem to have enough flat space to make good contact. It might stick with tape but then again, it might not. I don't want to take any chances, so I just use glue.

Next I cut a 3-3/4" x 4" piece of Cherry Cobbler card stock for the back layer. Then I cut the strips of Designer Series Paper from the "Awash in Beauty" 12" x 12" package. I cut it at 3-3/4" x 1-1/8".  I taped those strips to the Cherry Cobbler piece. Then the Cherry Cobbler piece was glued to the textured piece of card stock. Lining up the left, top, and right sides. I took some Cherry Cobbler ribbon that I had and wrapped it around the front. My piece was about 5-1/2" long. I taped the ends to the back of the textured piece using scotch tape. Then I glued the textured piece to the card base. 

The words are from the "Lovely & Lasting" set and were stamped using Cherry Cobbler ink. I die cut them using the 4th largest stitched circle from the "Stylish Shapes" die set. I also die cut a Cherry Cobbler circle using the 5th largest circle die from the "Layering Circles" die set. I taped the circles together and added Dimensionals to the back. I set the circle in place on the center area of the ribbon and the card was done. I was going to add a bow to the side of the circle on top of the ribbon piece but I liked the simple look of the card so I left it. But you can always dress it up a bit more if you'd like.

This was a fun, quick, and easy card to make. I like doing the panels this way and found it a whole lot less stressful!!

Thank you SO very much for taking your time to stop by and see today's thinking of you card,
Wanda

Saturday, July 09, 2022

True Beauty, Awash in Beauty, Friendship Card, Stampin' Up!

I had purchased the "Designer Tags" die set and didn't remember what I had in mind for getting it. SO today was a blank canvas day and I thought I'd just make up something.  This is what I came up with.

The base of my card is a folded half-sheet of Basic White card stock. This card opens on the bottom and the fold is on the top. I was straightening up my worktable and I found the card base already cut and folded so I just thought I'd use it. You can make your card open any way you'd like.

I cut a 4" x 5-1/4" piece of Polished Pink card stock and I textured it using the "Pretty Flowers" embossing folder. I glued it on top of the card base.

Then I cut a 5-1/2" x 2" piece of Designer Series Paper (DSP) from the "Awash in Beauty" 12" x 12" package. I glued it in place too. I find glue works much better than tape when one or both of the surfaces are textured. Tape doesn't seem to make enough contact for it to stay in place well. 

I took a scrap piece of Merry Merlot card stock and die cut the tag using the die from the "Designer Tags" set. It does cut out the center so I cut a Basic White one so I'd have the exact size for the center. I did cut a 2-1/2" x 3-1/8" piece of scrap card stock. I used Basic White but you can use any color, it won't show. I glued it to the tag with the Basic White piece in place. I needed the tag with the center to be one piece. It was nice and sturdy now too!  I set that in place on the front of the card using Dimensionals. I centered it as much as I could.

Then I die cut the flower and stem from a piece of DSP from the "Awash in Beauty" DSP. I added Dimensionals to the back and set it in place on the tag. I trimmed the bottom of the stem because I didn't like how it hung over the tag.

The words are from the "True Beauty" set and were stamped on a piece of scrap Basic White card stock using black Memento ink. The die used to cut it out is from the "Stylish Shapes" set. I lightly sponged the edges with Polished Pink ink.  I took two small pieces of card stock a bit smaller than the dimensional and I glued them together. Then I stuck them on one end of a Dimensional. The Dimensional was added to the  word piece on the right. I added a tiny amount of glue to the little piece of card stock and a little to the left side of the word piece so it would stick to the tag while the Dimensional with the two little pieces of card stock would stick to the textured layer. I did this because the tag was two thicknesses of card stock and if I set the word piece in place without that extra thickness the right side would have dipped down a bit. I wanted it to be level. And when I was done with that the card was done.

This was a very quick, easy, and fun card to make. I was a bit surprised because I had no idea what I was doing when I started it.

Thank you SO very much for taking your time to stop by and see today's friendship card,
Wanda


Friday, July 08, 2022

Happiness Abounds, Hues of Happiness, Birthday Card,

I have not done the "Floating" technique in a while. I had done a "Floating Frame" card a while back. You can see that card here. You can get more details on how do make it too.

The base of my card is a folded half-sheet of Basic White card stock. This card opens on the right and the fold is on the left.

I cut a 4" x 5-1/4" piece of Highland Heather card stock for the layer. Then I cut a 3-7/8" x 5-1/8" piece of Basic White for the top layer.

I die cut my flowers and leaves from the "Hues of Happiness" 12" x 12" package of Designer Series Paper (DSP).  I used the largest stitched circle from the "Stylish Shapes" die set. 

The flowers and leaves were place around a circle I traced onto a piece of card stock. I traced the outside of the circle only. The flowers and leaves were added using one Dimensional on each and I exposed the sticky part a little bit so it stayed in place. Then I die cut it with the circle die. 

Next I placed the pieces on the 3-7/8" x 5-1/8" piece of Basic White card stock. I did lightly trace a circle on it too. I erased it as I put the pieces in place. If you read the instructions on the link I posted above, Press n Seal was used. I didn't use it, I just winged it. I set the pieces in place using additional Dimensionals.  Everything is added with Dimensionals.

Once done putting the pieces in the circle and erasing the traced circle, I stamped the words on the front of the card. They are from the "Happiness Abounds" set using black Memento ink.  

I didn't like the look of the background so I thought I would speckle it using my Old Olive marker. I just flicked the tip of the marker from the inside edge of the cap to the outside. I covered the circle with the first circle I had die cut so it didn't get speckles on it.  

The Basic White piece was taped to the Highland Heather piece and that was set in place on the card base using Dimensionals and the card was done.

This was a fun card to make. It's also a fun technique to do too!

Thank you SO very much for taking your time to stop by and see today's card and technique,
Wanda

Thursday, July 07, 2022

Artistically Inked, Wedding Card, Stampin' Up!

The "Artistically Inked" stamp set/bundle has been a very fun one for me. I have had a lot of fun making beautiful cards with it. When I saw this card on Pinterest I thought I'd give it a try knowing that I didn't have all the elements to make it. I just used what I had. You can see the original card here

The base of the card is a folded half-sheet of Basic White card stock. This card opens on the bottom and the fold is on the top.

A 4" x 5-1/4" piece of Rich Razzleberry card stock was cut for the layer. And on top of that is a 3-3/4" x 5" piece of Soft Succulent card stock. I didn't have the background that was used on the original card, so I used the "Pretty Flowers" embossing folder. I glued this piece to the Rich Razzleberry piece and then I taped that to the card base.

Next I die cut the flower image from the "Artistic Dies" set using Basic White card stock. I added a dot of glue to the area where the center of the piece would be and I set it in place.

The ribbon is some retired stuff that I had here so I thought it matched close enough and I used it. It looks like I tied it in a bow but I just gathered it like that and I stapled it together. The word piece would hid the staple so all was good!! I also glued the ribbon in place.  I thought it would stick better with glue.

Then I die cut the flowers using some gold foil paper. I also punched out some other leaves from a retired punch using gold foil paper. I set these aside.

The words are from the "Artistically Inked" set and were stamped on a scrap piece of card stock using Rich Razzleberry ink. I die cut them using the 3rd smallest die from the "Stylish Shapes" die set. Dimensionals were added to the back and the piece was set on the front of the card. I didn't press down because I might need to slip a leaf under it and I didn't want the Dimensional to be in the way. After the leaves were slipped under I pressed down on the circle.

The last thing I added were the three little flowers from the "Artistically Inked" set. Those were stamped using Fresh Freesia ink and cut out using the matching die. I glued those little flowers in place and the card was done.

As I looked at this card I realized that you can use those little flowers in the place of embellishments and still have a stunning card!

This was a fun card to make. Lots of pieces with a touch of elegance!

Thank you SO very much for taking your time to stop by and see today's wedding card,
Wanda


Wednesday, July 06, 2022

Happiness Abounds, Hues of Happiness, Fancy Fun Fold, Wedding Card, Stampin' Up!

I ran across this card today while looking for something else. Isn't that how it goes?  And I totally forgot what I was originally looking for. That's how it goes in my life!!! LOL What caught my eye was the use of that lacy looking die that comes in the "Happiness Abounds" bundle.  There is a video but I got a bit frustrated with it because it had been recorded live so the gal was asking the viewers what they wanted in color and layouts, etc. I found it a bit irritating because it was taking a lot of time to make a card that really would only take under 15 minutes to make. I'm not saying don't watch the video, I'm just giving you a heads up on how this video is. But I will share with you all the measurements (that I found hard to get off the video too).

The base of my card is a folded half-sheet of Basic White card stock. This card opens on the bottom and the fold is on the top.

This card was scored on the long side at 4-1/4" and 7-1/4". The first score is the center fold of the card. The smaller area is folded upward. 

I cut a 5-1/2" x 1" piece of Designer Series Paper (DSP) from the "Hues of Happiness" 12" x 12" package. This piece was taped on the small folded piece. Make sure you tape it so it's on the front of the card.

Next a 1" x 5-1/4" piece of Basic White card stock was cut for the bottom piece. I textured mine using the "Pretty Flowers" embossing folder. I glued that piece in place on the bottom part of the card. I folded the card shut for placement. It's actually glued to the inside part of the card.

The upper piece measures 2-1/4" x 5-1/4" piece of Basic White card stock. I used the lattice type die from the "Blooming Happiness" die set. I had to position it so I could die cut it twice to fit on the whole piece of card stock. I set this piece in place using glue. Then I glued that small flap piece down. In the video she used Dimensionals to hold it down. I wanted my piece flat so I just glued it.

A 2-1/2" x 3" piece of Basic White card stock was cut for the background for the flowers. There's a border edge die in the set and it was used on the left side of this piece of card stock. 

The flowers were die cut from the "Hues of Happiness" package and set in place on that 2-1/2" x 3" piece of Basic White card stock. The leaves were die cut and set in place with tape. The smaller leaves on the left side were fussy cut. 

Dimensionals were added in the area where the 2-1/2" x 3" piece of card stock will sit and it was set in place.

I had a purple candy dot so I added that to the upper right corner and the card was done.

There was no room for words. Well, no place that they would look nice and not ruin the beauty of this card. I thought it looked like a wedding card so I'm putting it in my wedding card stash.

This was a fun card to make and I can see myself making another now that I have the measurements.

Thank you SO very much for taking your time to stop by and see today's wedding card,
Wanda

Tuesday, July 05, 2022

True Beauty, Friendship Card, 2022-2023 Stampin' Up! Catalog

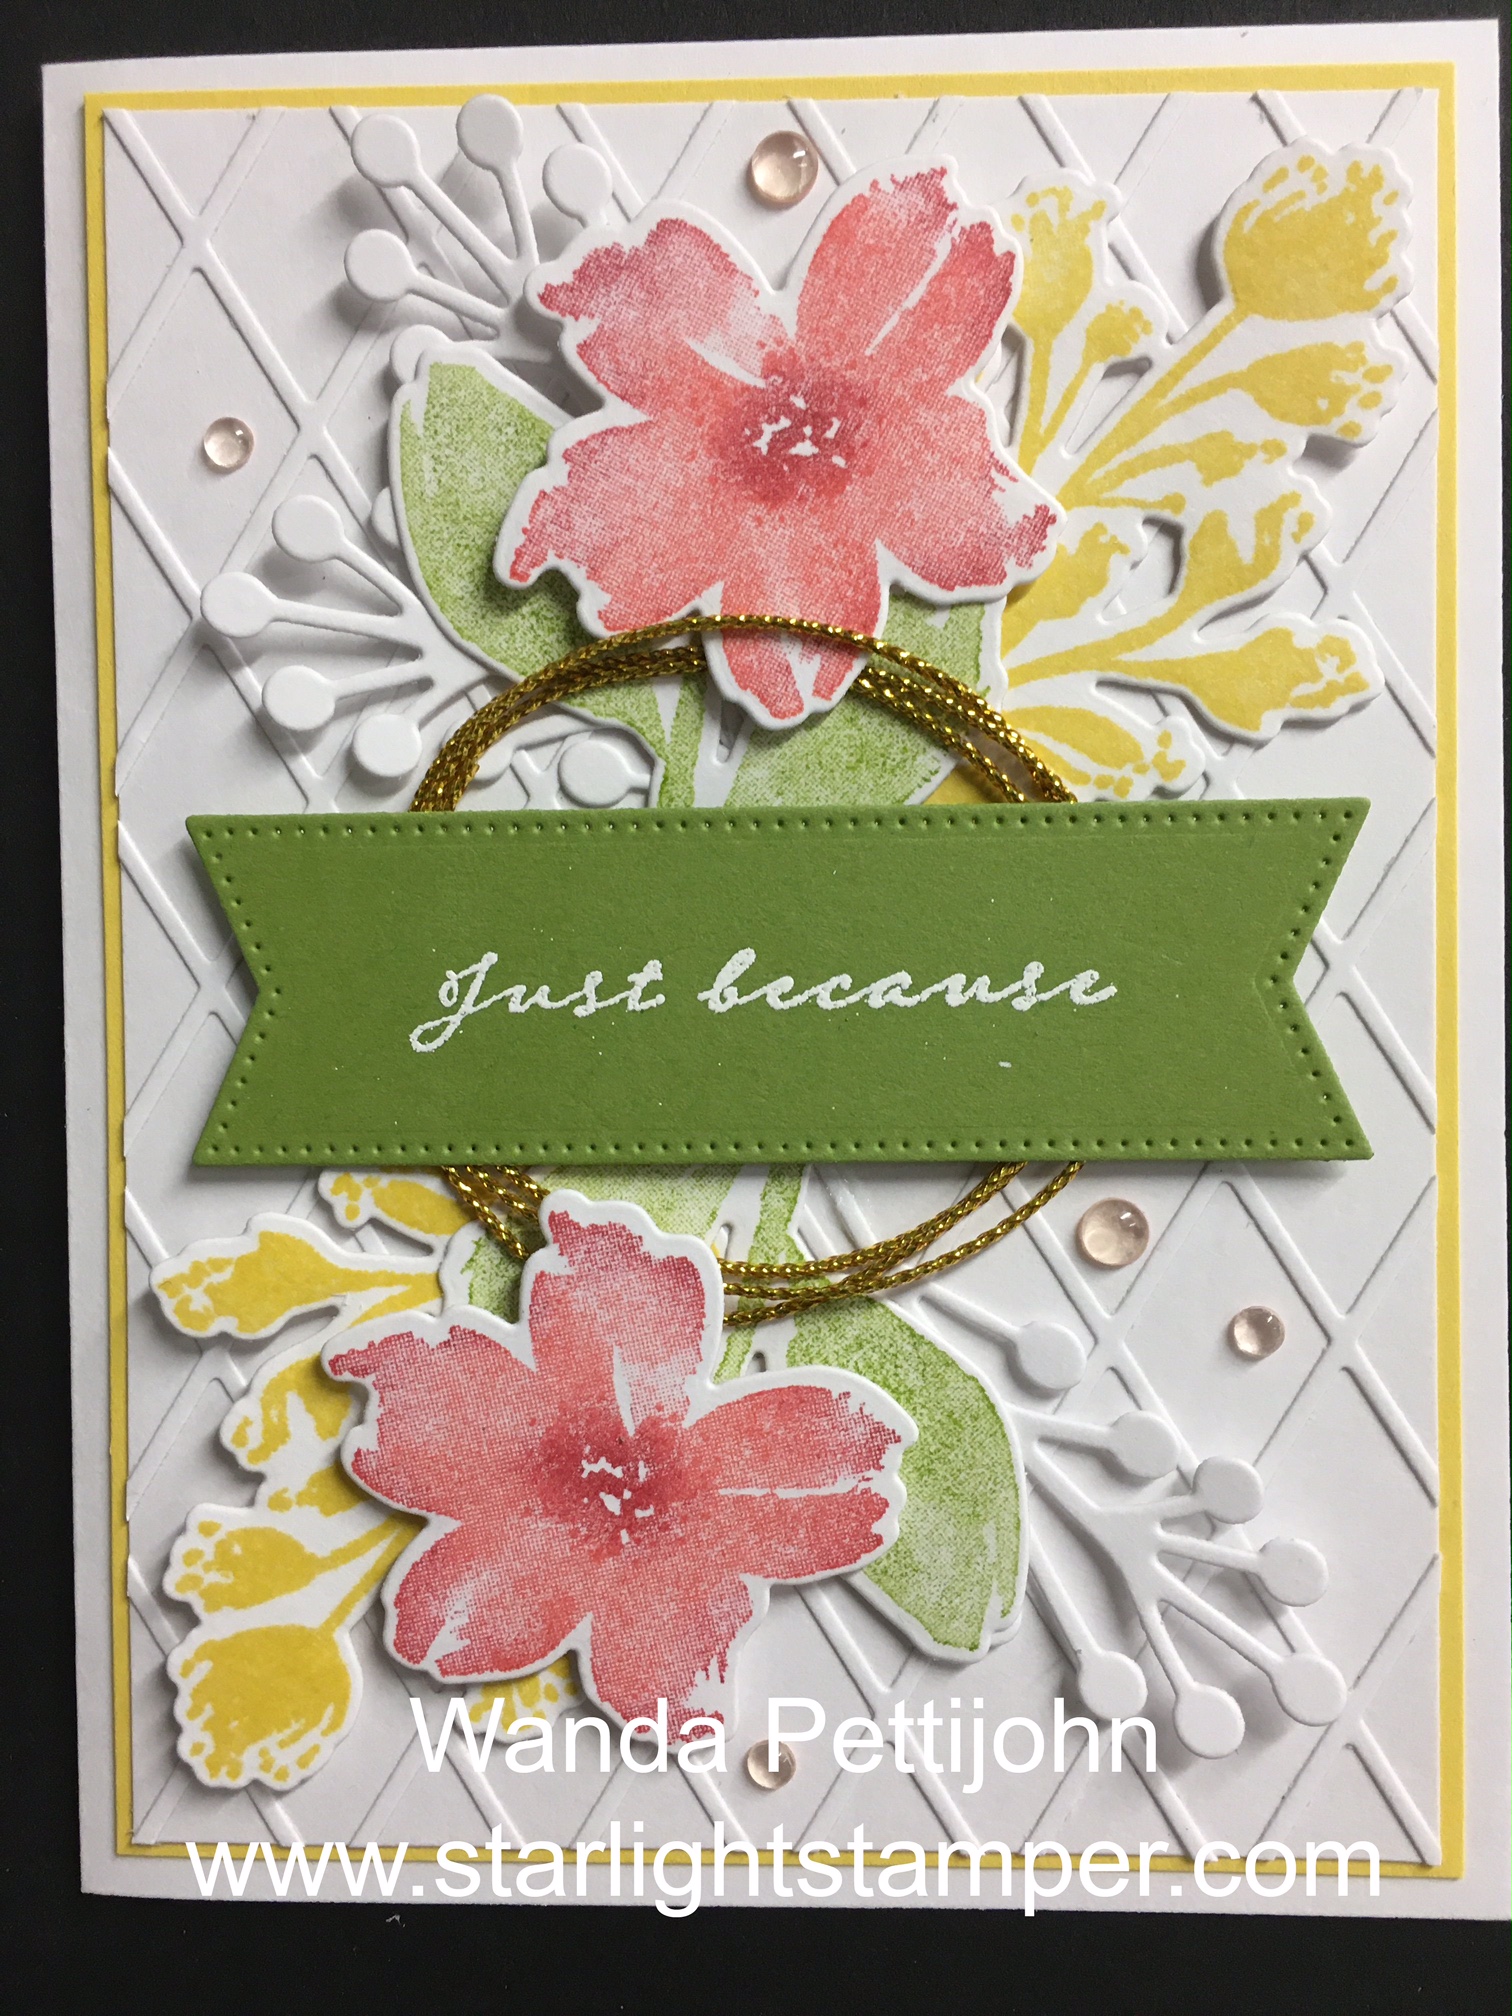
Okay, open your 2022-2023 Stampin' Up! catalog to page 66.  There it is right in the middle of the page, this card.  I thought I'd give it a try. I was looking for something else when I noticed this card.  I don't think I've made any cards that came directly from the catalog, not that I recall anyway. I only changed the card base color.

The base of my card is a folded half-sheet of Basic White card stock. This card opens on the right and the fold is on the left. 

I cut a 4" x 5-1/4" piece of Daffodil Delight and taped it to the front of the card. 

Then I die cut the lattice piece from the "True Beauty" bundle. I used Basic White card stock and double-sided sticky sheet to make it into a sticker. The last time I used this die I ended up using glue and it was such a mess. This time I put a piece of card stock on top of the cutting plate to make the piece a little bit thicker. It cut all the way through this time and I was able to remove it easily. I do recommend removing all the inside diamond shape pieces first before removing the piece. They could stick to the back and you'd be picking off much more pieces than you want! I affixed this lattice piece to a 4-1/4" x 5-1/2" piece of Basic White card stock. I made sure it was on the piece as straight as I could get it. I did use one side for a guide because I'd be trimming away the sides anyway. Then I trimmed the piece to measure 3-7/8" x 5-1/8" and I taped it to the front of the card on top of the Daffodil Delight piece.

I stamped the pieces using Daffodil Delight ink, Granny Apple Green ink, and Flirty Flamingo ink. I stamped and die cut the Daffodil Delight piece. Then I stamped the Granny Apple Green leaves with the stem but I did stamp off once because I needed a lighter color.  Then I die cut them. And when I say them, I made two of everything except the white ones with the round balls on the end, I cut three of those. And for the flower, I used Flirty Flamingo ink, I stamped off once and then I took my blending brush and picked up some Cherry cobbler ink. I tapped it on the center of the flower and around the edges to give it a little bit of color and then I die cut them.

The words are from the same "True Beauty" set and were stamped on a piece of scrap Old Olive using Versa Mark. I used white embossing powder and heat set the words. I die cut them using the ribbon die from the "Stylish Shapes" dies. I didn't have the same die as in the catalog but this one worked just fine.

I taped the ends of the white pieces on first, then I added the Daffodil Delight pieces. Next I added the leaves with the stems. I did have to cut about 1" off the ends of the stems.

I took some gold cord and wrapped it in a circle three times. I used a cut piece of scotch tape to hold the ends together.  I set it on the center of the card. Dimensionals were added to the word piece on both ends and in the center. I set the word piece in place and it held the gold cord circles down. I pulled up a circle in the upper part because that's what it looked like they did in the catalog but I didn't do it on the bottom because I thought I'd end up bending the petal on the flower and I didn't want that bend to show. But later it dawned on me that the circle wasn't taped or glued down so I was able to slide one of the circles up and over the flower with no bending on the petal. 

I took a few of the "Polished Dots" that I had leftover. I do not know what was used on the card in the catalog but I had these dots so I used them. 

This was a fun card and a fun find!  I guess I need to take a closer look at the card samples in the catalog, there's some wonderful gems in there!

Thank you SO very much for taking your time to stop by and see today's friendship card,
Wanda

Monday, July 04, 2022

Happiness Abounds, Stylish Shapes, Thank You Card, Stampin' Up!

Once again I found another card that uses the busy Designer Series Paper (DSP) that I have such a difficult problem with. I found this card here but I did change it a bit. 

The base of my card is a folded half-sheet of Basic Black card stock.  Normally I grab for the white but this time I thought I'd go with the black and it worked!! This card opens on the right and the fold is on the left. I added a 4" x 5-1/4" piece of Basic White card stock to the inside.

I cut a 4" x 5-1/4" piece of Fresh freesia card stock for the front. I stamped the flower image from the "Happiness Abounds" set using Fresh Freesia ink. The edges were sponged using the blending brush and Fresh Freesia ink. I also scrubbed a little Fresh Freesia ink to the center of the flowers. I forgot that stamping your own background was fun and effective. I hadn't done it much since DSP and embossing folders came out! Once the piece was done I taped it to the front of the card base.

Next I cut a 2" x 4" piece of DSP for the focal point. The DSP is from the "Hues of Happiness" 12" x 12" package and this piece is very busy and I was SO thrilled to be able to use it. I also cut a 2-1/4" x 4-1/4" Basic Black layer for the DSP. I taped that in place on the front of the card. I centered the top and bottom but didn't on the side by the fold. I should have but I wasn't thinking at the time! 

The words are from the same "Happiness Abounds" set and were stamped using Black Memento ink on a scrap piece of Pool Party card stock. I die cut it with a die from the "Stylish Shapes" set. I set the words in place using Dimensionals. And the card was done.

Super quick, extremely easy, and very fun!

Thank you ever SO much for taking your time to stop by and see today's thank you card,
Wanda