Pin It

Thursday, February 28, 2019

Hello Cupcake, 2019 Stampin' Up! Sale-a-Brations, Birthday Card

Only a month left and this little gem retires.  I LOVE using this cupcake image.  It's such a perfect card for adults and children.  I found this card here, but I did change it a little.

The base of the card is a folded half-sheet of Gorgeous Grape.  On top of that is a 4" x 5-1/4" piece of Whisper White.  I stamped the words from the "Hello Cupcake" set using Gorgeous Grape, Melon Mambo and Pool Party ink.  Then I taped it to the card base.

I cut a 3" x 4" piece of Basic Black card stock and die cut the scalloped oval from the center. And if I were smart, I would have cut the stitched oval from the Whisper White piece but the brain isn't in full gear today!  Fortunately I had a scrap piece.  I die cut the ovals and set them aside.  I cut a 2-7/8" x 3-7/8" piece of Designer Series Paper (DSP) pack "How Sweet It Is" from the new 2019 Occasions catalog.  I taped it to the Basic Black layer and I taped those layers to the Whisper White piece. 

I stamped the frosting using Melon Mambo ink.  I set it aside to dry a bit before I fussy cut it out.  I stamped the cupcake bottom using Gorgeous Grape ink.  Then I stamped the cake part using Crumb Cake ink.  I taped the two ovals together and then taped them to the DSP. 

I fussy cut the frosting and I set it in place using Dimensinals.  When I look at it on the screen, I think I should have added some "sprinkles" to the frosting.  It needs something.  But other than that I do like the card.
Thank you SO much for visiting today,
Wanda

Wednesday, February 27, 2019

Beauty Abounds, Beautiful Boutique, Birthday Card, 2019 Occasions Catalog

I thought I would step away from the Sale-a-Bration sets for a few days and make a card from some of the other sets I ordered in the Occasions catalog.  In order to get the fun Sale-a-Brations sets you need to buy some other items from either the main catalog or the Occasions catalog.

I found this card on Pinterest. You can see it by clicking here.

This card is made of a half-sheet of Whisper White card stock.  

First I stamped the long flowery image. I used Sahara Sand ink. I colored in the parts of the leaves that have slash markers on them using the Sahara Sand marker.

Next I colored in the flowers using a Blender Pen with the Blushing Bride and Daffodil Delight markers. I used the Soft Sea Foam marker and Blender Pen for the leaves too.

I stamped the dots using Crumb Cake ink, stamping off once. I stamped all along the bottom and up the right side.

Then I stamped the bubble images using Crumb Cake ink but I did stamp off once. I had used both bubble image stamps in the set.

The words are from the "Beautiful Bouquet" set. I stamped them using Soft Suede ink on Whisper White card stock.  I die cut the words using the stitched oval die.

I die cut the butterfly using Blushing Bride card stock on the thicker image and Daffodil Delight on the thinner one.  I cut off the antenna on the Blushing Bride one.  I glued the two pieces together.  I put a piece of Whisper White card stock behind the butterfly and trimmed it up so you couldn't see any white on the edges.  

I die cut some leafy looking images from the set using Vellum. I colored the Vellum with the Soft Sea Foam marker. I set them aside to dry.  I added a bit of tape to the card front where the words were going to be covering it and stuck the Vellum pieces in place.  

I set the words in place using Dimensionals.  And lastly, I added the butterfly using Dimensionals and the card was done.

This was a fun card to make and I LOVE the colors used here.  It's such a soft looking card.

Thank you SO much for visiting today,
Wanda

Tuesday, February 26, 2019

Perennial Birthday, Sheet Music, Botanical Butterfly, Birthday Card

I was looking at my stamp sets and I came across the "Sheet Music" one and realized that I don't use it very often. SO I decided I would work up a card with it plus using something from the Sale-a-Brations catalog.  

The base of my card is a folded half-sheet of Whisper White card stock.  

I stamped the "Sheet Music" on Whisper White card stock using black Memento ink.  I cut that piece to 2-3/4" x 2-3/4".  I cut a 3" x 3" piece of Balmy Blue for the layer. I taped those two pieces together.

The words are from the "Perennial Birthday" set. I used black Memento to stamp them.

Next I punched a butterfly from the "Botanical Butterfly" Designer Series Paper (DSP) 12" x 12" pack from the Sale-a-Brations catalog.  I used the "Butterfly Duo" punch to punch the butterfly from the DSP.

I set the square layers in place using Dimensionals.  I added a Dimensional to the butterfly and set it in place on the music image.  I added three small rhinestones to the center of the butterfly and the card was done.  As quick and simple as that.

Thank you SO much for stopping by today,
Wanda

Monday, February 25, 2019

Beauty Abounds, Happy Birthday Gorgeous, Botanical Butterfly DSP, Birthday Card

I found a fun card on the internet but I didn't want to make a long thin card. I wanted to keep my card at 4-1/4" x 5-1/2".  So I worked with the image a bit and this is what I came up with. You can see the original card here.  


The base of my card is a folded half-sheet of Whisper White card stock. 

I stamped the side images from the "Beauty Abounds" set using black Memento ink. I'm not that great at getting things perfectly centered but unless you don't examine the card too closely you won't notice it.  After stamping the flowery part I took the larger bubbles image from the same set and stamped them using Granny Apple Green ink.  Then I took the smaller bubbles image and stamped them using Balmy Blue ink.  I trimmed this piece to 5-1/2" x 2-3/8".  I cut a Balmy Blue layer that measured 5-1/2" x 2-5/8".  I taped those two layers together. 

I set the layers on top of the card base and I lightly drew a pencil line using the layers as my edge.  I stamped the words from the "Happy Birthday Gorgeous" set using black Memento ink.  I took my art gum kneadable eraser.  That eraser is a must to have. It removes graphite and will not ruin your card stock.  If you draw lightly there will be no trace at all of the lines. If you press hard with your pencil, it will still erase the graphite but there will be and indentation from the pressure you used. You can knead them and shape them to whatever you'd like. Sometimes I find I need to shape them into a cone to erase what I need erased. I even took a piece of the eraser kneaded and shaped it so it fit in my mechanical pencil.  I just highly recommend them.  

Next I taped the two layers to the card base.  I die cut a butterfly from the "Botanical Butterfly" 12" x 12" Designer Series Paper pack.  It's a Sale-a-Bration item.  I have had lots of fun with all of the butterfly images in this pack.

Taking a scrap piece of Whisper White card stock I cut the second to the largest stitched circle die.  I used the "Starburst" punch and punched one of Balmy Blue. I taped the Whisper White circle to it and then taped the two of them to the stamped image.  I added the butterfly with Dimensionals and the card was done.

I thought it was a fun card to make. What I liked was that the bubbles helped color in the details of the image so I didn't have to do any coloring with markers. 

When I saw this card on the internet I knew I just had to make it.

Thank you SO much for visiting today,
Wanda


Sunday, February 24, 2019

Home to Roost, Happy Birthday Gorgeous, Bokeh Dots, 2019 Stampin' Up! Sale-a-Bration, Birthday Card

Today's card is a pretty simple one, though I tried to make it difficult.  I thought I would just stamp the "Bokeh Dots" image, trim it up and then layer it with a piece of Basic Black card stock. So I set out to do that. I stamped three of the images because I thought I may mess them up and I wanted to have at least one good one.  After getting the image stamped to my satisfaction I realized that the image really needed to be stamped directly onto the Whisper White focal piece.  UGH!!!  So I set those pieces aside for maybe another day and went on to do the card right!  I had found this card on the internet.  You can see the original card here.

The base of the card is a folded half-sheet of Basic Black card stock.  The card stock was cut in half on the 8-1/2" side.  You can cut on the 11" side, it doesn't matter. I just had this piece in my pack of Basic Black card stock and I thought I would use it.  

On top of the card base is a 4" x 5-1/4" piece of Highland Heather that later will be taped to a 3-7/8" x 5-1/8" piece of Whisper White.

I tried to center the "Bokeh Dots" image as best as I could and I inked it up using Balmy Blue and Gorgeous Grape.  I sponged on the colors.  Directly from the pad was WAY too dark and looked funny, even after stamping off.  I have never had much luck with this image.  I never get the dots to pop out like everyone else does.  I need to work with it more and see if I can get those images more defined.  But for today it mostly looks like the colors were just sponged in and that is okay too. I like the looks of it.

After stamping the "Bokeh Dots" image I then stamped the wheat image from the "Home to Roost" Sale-a-Bration set.  I used black Memento ink.  After that dried a bit, I put a piece of scrap card stock over it and began drawing in the dots and dashes using a fine point Sharpie marker.  I then taped the Whisper White piece to the Highland Heather piece.

Next I wrapped a piece the burlap ribbon around the two pieces and taped the ends on the back.  I also added a piece of the Highland Heather ribbon from the Sale-a-Bration book around and on top of the burlap ribbon and I taped those ends to the back.  I took some linen thread and wrapped it around my fingers in a figure 8 and added a glue dot in the middle to hold it in place. I set that on top of the Highland Heather ribbon.  I added another glue dot on top of that and tied a Highland Heather bow and set it in place.

The words are from the "Happy Birthday Gorgeous" set. I stamped them using black Memento ink. I punched them out using the "Classic Label" punch.  I set it in place using glue dots. 

I added a 4" x 5-1/4" piece of Whisper White to the inside and the card was done.

After figuring out how to work the focal image, the card went together really fast.  I think it's pretty and makes a lovely birthday card.  Seeing it on the screen now I think it would also make a serene sympathy card.

Thank you SO much for stopping by today,
Wanda
 

Saturday, February 23, 2019

Touches of Nature, Beautiful Bouquet, Birthday Card

The one thing I REALLY like about the "Subtle" embossing folder is that it looks like linen.

The base of my card is a folded half-sheet of Whisper White card stock.  On top of that is a 4" x 5-1/4" piece of Whisper White that was textured using the "Subtle" embossing folder.

I cut a 2" x 3-1/2" piece of Whisper White card stock and I stamped the flower bunch from the "Touches of Nature" set.  I textured it with the "Subtle" embossing folder.  Then I colored the flowers in using the Real Red marker and the Pear Pizzazz marker.  I should have colored it before textured it.  It would have made the coloring a whole lot easier.  I just wasn't thinking. I set this piece in place using Dimensionals.

The words are from the "Beautiful Bouquet" stamp set. It was great to use a small scrap of Whisper White card stock. I have LOTS of scraps here that I need to start using up or at least start using. I taped the upper left part of the circle using snail tape and used Dimensionals on the bottom and right side of the circle.  

This was a super easy and quick card to make. Quicker if you color first and then texture!!! LOL

I love the look of white on white. It's got such an elegant look to it.

I chose this set because I really like it and I think it will be retiring in a few months.  I have a lot of sets I think are going to be retiring. I need to play with them more!!!  But there's too many new ones. UGH!! A vicious circle!!!

Thank you SO much for visiting today,
Wanda

Friday, February 22, 2019

Botanical Butterfly, Butterfly Duet Punch, Happy Birthday Gorgeous, Birthday Card, 2019 Stampin' Up! Sale-a-Bration

Today's card was fun and easy to make.  I wanted to make a happy spring looking card because we are headed for another big snowfall starting tonight and going through Sunday.  I LOVE snow, but I think we've had enough now!!

The base of my card is a folded half-sheet of Highland Heather card stock.  On top of that is a 4" x 5-1/4" piece of Whisper White.

I cut a 1-1/2" x 4" strip of Designer Series Paper (DSP) from the "Botanical Butterfly" 12" x 12" paper pack.  I layered it with a 2" x 4" piece of Gorgeous Grape card stock.  I taped the DSP strip to it and then taped the strip to the Whisper White piece.  Now normally I don't tape before I stamp but today I did because I put the piece in the Stamparatus so I could stamp it again if needed.  The words are from the "Happy Birthday Gorgeous" set.  I stamped them using black Memento ink.

I punched out the butterflies from the "Botanical Butterfly" DSP pack.  I sponged them using Pumpkin Pie ink.  I set them in place using Dimensionals.  I added some crystal rhinestones and the card was done.  I did add a 4" x 5-1/4" piece of Whisper White card stock on the inside for writing on!

This was a fun card to make and now I'm going to hunker down for the weekend of snow!

Thank you SO much for stopping by today,
Wanda

Thursday, February 21, 2019

Hello Cupcake, 2019 Stampin' Up Sale-a-Bration Birthday Card

This is a very clean and simple card.  I love this "Hello Cupcake" set. I find it easy to work with and I don't really mind fussy cutting the frosting.  Though I only had to make one. If I had to do more I may have whined about it a bit more, you know me!!!

The base of my card is a folded half-sheet of Basic Black card stock.  On top of that is a 4" x 5-1/4" piece of Berry Burst.  I'm trying to use up the in colors since they will be retiring in a few months.  I don't even think I've used the Lemon Lime Twist color in that collection.

The focal piece is Whisper White and it was cut 5" x 3-3/4".  I stamped the cupcake bottom and the words using Early Espresso ink.  Next I stamped the cake part using Flirty Flamingo stamped off once. 

I stamped the frosting using Berry Burst ink and the sprinkles were stamped using Early Espresso ink.  I stamped the little heart pick using Flirty Flamingo straight from the ink pad.  I set them aside to dry a bit.  I taped the layers of the card together and then I fussy cut the frosting and the heart pick.  I set the frosting in place using Dimensionals and I glued the end of the frosting pick on top.  And that was it.  Even with the fussy cutting, this card went together really quick!!  I added a piece of Whisper White card stock to the inside for writing on.  It's not fun to write on black!

What's great about this set is that it can be used for children or adults!

Thank you SO much for stopping by today,
Wanda

Wednesday, February 20, 2019

Geared Up Garage, Wonderful Moments, Masculine Birthday Card, 2019 Stampin' Up! Occasions Catalog

I bought this fun "Geared Up Garage" set because I tend to buy most of the masculine sets that Stampin' Up! comes up with.  There are not very many masculine sets and I like to make cards for men too, mostly birthday and Father's Day. This set will cover both occasions.  I found this card on Pinterest.  You can see the original card here, I did change a few things.  

The base of the card is a folded half-sheet of Whisper White card stock.  On top of that is a 4" x 5-1/4" piece of Coastal Cabana card stock.  On that piece I stamped the car image many times using Coastal Cabana ink. I wrapped a piece of White Baker's Twine (that was what I had on hand) around the layer twice and tied a knot. I had tied a bow but because it was a masculine card I just knotted it instead.

I cut a 2-1/4" x 4-1/4" piece of Sahara Sand card stock.  I layered a 2" x 4" piece of Sahara Sand on top it that was textured using the "Subtle" embossing folder.  

I die cut the largest stitched circle and stamped the "Happy Birthday" from the "Wonderful Moments" set using black Memento ink.  I also stamped the exhaust smoke piece using Gray Granite ink. I stamped once on the left and then again on the right without inking up the image again.  I stamped the nuts using Crushed Curry ink.  I set the circle in place using Dimensionals.

I stamped the car and die cut it out.  I colored it in using the light Smoky Slate Blends pen. I colored the lights in using the light Daffodil Delight Blends pen.  I set the car in place using Dimensionals.  And that was it.  A super quick and easy masculine card. 

This would also make a great Father's Day card.

Thank you SO much for visiting today,
Wanda

Tuesday, February 19, 2019

Beautiful Bouquet, By the Bay, 2019 Stampin' Up! Sale-a-Bration, Masculine Birthday Card, Vertical Stretch Technique

 Okay, not being a computer person I struggled with that bottom photo. I could not get the orientation right and it took me 5 tries.  I was about to give up and leave it upside down but I gave it one more try and I finally got it right.  UGH.  Please don't ask me how I did it, I couldn't tell you and I'm not sure I could do it again without all of the drama that went along with this one!!! LOL

Tonight I am going to be participating in a swap and this is my card. I'm not thrilled with the color combination but I was working with limited papers.  It is what it is.  Besides, it's a technique swap so I did the technique.  This technique is called "Vertical Stretch".  You can see the instructions on how to do it here.  I am not fond of this technique. The card does fold into a regular size stamped card and fits in an A2 envelope but the card does not stay closed, no matter how hard you burnish the folds.

The base of my card is a folded half-sheet of Basic Black card stock.  This was cut on the 8-1/2" side.

I used the "Share What You Love" Specialty Designer Series Paper (SDSP) on the top two sections and Whisper White on the bottom.

The image is from the "By the Bay" 2019 Sale-a-Bration set.  I had stamped and colored this image a few days ago. You can see that card here and how I did it.  I layered the image using Tranquil Tide card stock.  The image layer was set in place using Dimensionals.

The words on the inside are from the "Beautiful Bouquet" set. I stamped them using black Memento ink on Whisper White card stock and layered it with a Tranquil Tide scalloped oval.   I left the bottom unstamped so it can be written on.

I can't say this was fun to make, I didn't really like this card. I don't care much for the technique, mostly because the card does not stay closed.

Thank you SO much for visiting today,
Wanda


Monday, February 18, 2019

Home to Roost, Happy Birthday Gorgeous, Masculine Birthday Card, 2019 Sale-a-Bration

I found a fun card on Pinterest using the "Home to Roost" Sale-a-Bration set.  I thought it was such a cute set.  You can see the original card here.  

Should I ever make another one, I will make sure I don't turn the rooster upside down. That way I would get more rooster heads in the background.  I had taken a half a sheet of Whisper White card stock and I planned on making a couple of cards but half way through I dropped the stamp on the card stock and rendered it unusable.  SO I just ended up with the top half being good and going from there. 

The base of this card is a folded half-sheet of Basic Black card stock.  On top of that I cut a 4" x 5-1/4" piece of Whisper White card stock.  I stamped the roosters from the "Home to Roost" set using black Memento ink.  I colored in the top part of the chicken the comb and the thing under it's neck using the Real Red marker.  I stamped a rooster on a piece of scrap white and die cut it using the stitched circle die. I also die cut a scalloped circle to fit the rooster circle. I had ended up with a rooster background piece measuring 3-1/2" x 4".  I taped it to the Whisper White piece. 

I took a piece of Real Red card stock and textured it using the "Hardwood" embossing folder.  I cut the piece 4" x 2-1/4" and taped it to the bottom of the Whisper White piece.  I taped it all down on top of the card base. 

I set the Rooster circles in place using Dimensionals. 

I stamped the words from the "Happy Birthday Gorgeous" set using black Memento ink.  I punched it using the "Classic Label" punch. I added small Dimensionals to the left and center and I added some snail to the right side. 

I took two strands of linen and tied a bow. I set the bow in place using a small glue dot.

I added a 4" x 5-1/4" piece of Whisper White card stock to the inside and the card was done.

I think this makes a great masculine birthday card!!

Thank you SO much for visiting today,
Wanda

Sunday, February 17, 2019

Floral Frames, Botanical Butterfly, Happy Birthday Gorgeous, Birthday Card

Today's card was fun to make. I had found it while surfing the net and just had to make it.  There's some minor changes but for the most part it's the same (but mine is in English!!! LOL). You can see the original card here.  

The base of the card is a folded half-sheet of Whisper White card stock. On top of that you are going to find lots of pieces from the "Floral Frames dies.  There's the center circular piece. I did have to die cut a circle from the center so it was open.  I'm saving that circle for another project (someday, maybe! - add it to the pile of someday's and maybe's!) 

I started out using a sponge dauber and added the Highland Heather circles. There's four of them on the card.

Next I added that circle piece using Dimensionals.  I had die cut 5 other leaves from the die set using Whisper White card stock.  I glued the ends of them under the circle.  

Then I took my black marker and made the dots on the card. 

I took a scrap piece of Whisper White I had and stamped the words on it.  My piece measures just a hair over 1/2" x 2-1/4".  I stamped the words from the "Happy Birthday Gorgeous" set using black Memento ink.  I set this piece in place last.

I punched out the butterfly from the "Botanical Butterfly" Designer Series Paper 12" x 12" pack.  It was a free Sale-a-Bration item.  I LOVED the butterflies in this pack and when I found out there was a punch to go with it, well... I was sold on it!  The punch is called "Butterfly Duet". 

I took some gold thread and wrapped it around my fingers about 4 times and used a small glue dot to hold the ends and strands together. I formed a figure eight with it and used another small glue dot to hold them all in place.  I set the thread on the circle and the glue dot made it stick in place.  

Then I added a Dimensional to the center of the butterfly and set it in place on the circle.  I took the word piece and added a Dimensional to the left side. I added a little snail tape to the top left side and I added a dot of glue on the circle where the words would be.  I set the word piece in place and pressed down lightly on those three areas.

I had some enamel dots (they are expired) and I set them in place on the car and the card was finished.

This was a fun card to make.  I love the look of it.  I think it would also make a great wedding or anniversary card.

Thank you SO much for visiting today,
Wanda

Saturday, February 16, 2019

Butterfly gala, Happy Birthday Gorgeous, Birthday Card

I found today's card on Pinterest.  I thought it was such a fun looking card. I LOVED the look of the Gingham Gala Designer Series Paper (DSP).

The base of the card is a folded half-sheet of Whisper White card stock. On top of that is a 4" x 5-1/4" piece of Whisper White card stock.  

I cut the DSP 2-1/2" x 4".  Before I cut the DSP, I took my clear ruler and I drew the lines in using a black marker. I thought that was the worst part of the card. It took a while to do and I still didn't get it centered on some of the squares.  Though it does look okay as it is. I just thought it was a lot of work.  I taped the DSP in place and then I tied the black Baker's Twine around it twice and made a bow.

I die cut a 2-1/8" circle using Whisper White card stock and then I die cut a larger scalloped circle using Basic Black card stock.  Both were from scraps, which is nice to do. I end up with TONS of scrap card stock.  I taped those two layers together. 

I stamped the butterfly, again on a piece of scrap Balmy Blue card stock using black Memento ink.  I punched the butterflies out using the "Butterfly Duet" punch.  I colored the butterflies with the Wink of Stella.

The words are from the "Happy Birthday Gorgeous" set. I stamped them using black Memento ink.  The Whisper White card stock measures a little over a half inch wide. It was a scrap piece.  And it was 2-3/4" long before I punched the end using the "Triple Banner" punch. 

Now to assemble the card. I took the 4" x 5-1/4" piece with the DSP on it and added it to the card base using Dimensionals.  I taped the two circles together and set them in place using Dimensionals. 
Next I added a glue dot to the back of the tiny butterfly and attached it to the larger butterfly.  I set the butterflies in place using a Dimensional.  I added three little rhinestones to the spine of the butterfly.  I taped the words in place, only adding tape to half of the strip.  And that was it.

I do like how it turned out but I would really have to stop and think about doing those stripes again. I would REALLY have to love the card before I attempt that again!!!

Thank you SO much for visiting today,
Wanda

Friday, February 15, 2019

By the Bay, Perennial Birthday, 2019 Stampin' Up! Sale-a-Bration, Birthday Card

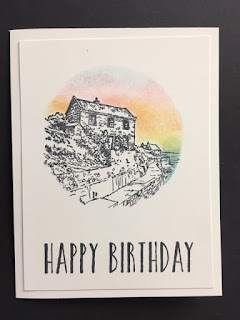
I found another card on Pinterest that used the "By the Bay" 2019 Sale-a-Bration set.  I find this set difficult to work with because I feel that I need to color it in. But here the color is in the sky and I liked it.  It was easy enough to do too!

The base of the card is a folded half-sheet of Whisper White card stock.  On top of that is a 3-7/8" x 5-1/8" piece of Whisper White.

I had stamped the image on copier paper and cut it out to use as a mask.  Now to make a more effective mask, cut inside the lines because when you sponge, the ink rarely gets close enough.  I also die cut the circle using a piece of card stock cut 3-7/8" x 5-1/8".

I set the card stock with the circle cut out of it on top of my card stock so I could see where to stamp the image.  Don't stamp the image with the card stock on top.  You won't get a nice image on the left side. I set my stamp up in my Stamparatus to make sure I got enough ink and got the image in the exact spot I wanted it to be in.

After stamping the image, I taped the mask over it using removable tape.  I sponged in the colors.  At the bottom right and at the very top I sponged in some Balmy Blue ink.  Then at the top, below the Balmy Blue ink I sponged in some Flirty Flamingo, below that I sponged in some Pumpkin Pie and the last color I sponged in was Daffodil Delight. 

I stamped the words from the "Perennial Birthday" set using black Memento ink.  I taped the stamped piece to the card base and the card was done.

I like stamping with this image using this method, it sure made it a lot easier and quicker!

I think this makes a great masculine birthday card!

Thank you SO much for stopping by today,
Wanda

Thursday, February 14, 2019

Hey Love, All My Love, Anniversary Card, 2019 Stampin' Up! Occasions Catalog

For today's card I used one of my most favorite layouts. I LOVE this layout because you can take the smallest image and make it the focal point of your card.  This cute little bird is from the "Hey Love" set that my friend Katie brought with her yesterday and shared it!  Thank you Katie!

The base of the card is a folded half-sheet of Whisper White card stock.  The card stock was cut in half on the 8-1/2" side.  This card opens at the bottom.

On top of the card base is a 4" x 5-1/2" piece of Lovely Lipstick card stock.  I had to work to make colors work on this card because I only had one sheet of Lovely Lipstick card stock that came in a pack of paper as a gift.  

On top of the Lovely Lipstick piece is a piece of Whisper White cut 3-1/2" x 4-1/2"  I taped those layers together and set them aside.

I cut a piece of Melon Mambo 4-1/4" x 3".  I also cut a piece of Designer Series Paper (DSP) from the "All My Love" 12" x 12" pack at 4-1/8" x 2-7/8".  I added a small piece of tape to the area where the circle will be punched from.  You just want a little piece of tape there, just enough to hold the two pieces together while you punch.  You will be punching the DSP and card stock at the same time.  I used the 1-1/4" circle punch to do that.  I just dropped the piece into the punch until it stopped. I lined up the sides and I punched it.  I took the DSP and put a piece of scrap copier paper behind it and took the 1-3/8" circle punch, lined up the circle and punched out the ring.  Now the DSP circle will form a border for the 1/4" circle on the card stock.  Now you can tape the two pieces together.

I stamped the bird, colored it and added it to the back of the DSP layer using Dimensionals.  Then I tied the ribbon around the piece.  I added more Dimensionals to the back and attached it to the card front.  

The words are from the retired "Teeny Tiny Wishes" set.  I punched them out with the "Classic Label" punch. I set them in place using small Dimensionals.  And that was it.

I liked the idea that I could use a Valentine's Day themed card and make it work for another occasion.  It's all about versatility!

Thank you SO much for visiting today,
Wanda

Wednesday, February 13, 2019

Hey Love, Valentine's Cay Card, 2019 Stampin' Up! Occasions Catalog

I don't often make Valentine's Day card and I didn't think I was going to make any this year because I didn't purchase any of the new sets. But today I had a couple of friends over to stamp and one of them brought their new Valentine's Day set, "Hey Love".  I stamped a few images from it and this one I finished today.

The base of my card is a folded half-sheet of Lovely Lipstick card stock.  On top of that is a 4" x 5-1/4" piece of "All My Love" Designer Series Paper (DSP).  

I stamped the cute gorilla on a 2-1/2" x 2-1/2" piece of Whisper White card stock using black Memento ink.  I colored it in using Blends markers.  I used Light Crumb Cake, Light Cherry Cobbler and Dark Petal Pink.  I layered the piece using a 2-3/8" x 2-3/8" piece of Melon Mambo card stock.  

I stamped the words from the "Hey Love" set using black Memento ink.  I punched them out using the 1-1/4" circle punch.  I punched out a 1-3/8" Melon Mambo circle and taped it to the word circle. 

I set the gorilla layered pieces and the word pieces in place using Dimensionals. 

And there you have it a fun, quick and cute Valentine's Day card!!

Thank you SO much for visiting today,
Wanda

Tuesday, February 12, 2019

Dandelion Wishes, Get Well Card

Today I wanted to play with a doily and one of those square images from the "Petal Promenade" 12" x 12" Designer Series Paper (DSP) pack.  I had cut several of them out a while back and I found one on my worktable when I was cleaning it off.  So after I got half way through the cleaning I stopped to work on the card.  I was obsessed with the square and just had to make it. So the only way I could get my cleaning done was to stop and work on the card and then go back to cleaning when I was done!  But to be honest here, I didn't get much more cleaning done after that!!!

The base of the card is a folded half-sheet of Whisper White card stock. On top of that is a 4" x 5-1/4" piece of Fresh Fig card stock that I textured using the "Subtle" embossing folder.  I like that folder, it gives the card stock the look of linen paper.  And it was just enough texture to the background without taking away from the focal part.

I stamped the words from the "Dandelion Wishes" set using black Memento ink.

I cut a 3-1/8" x 3-1/8" square of Berry Burst card stock and taped it to the focal piece.  I added Dimensionals to the back and set it aside.

I cut a doily in half.  I removed the protective covers to the Dimensionals and set the doily on it, catching a couple of Dimensionals. I added a little bit of glue to the back of the doily and then set the pieces in place.

I tied a Berry Burst Metallic edge ribbon bow and used a glue dot to hold it in place. 

I added a few rhinestones to the card and it was done.

I thought it was a fun card to make. I LOVE how you can use so many different colors of card stock to blend with the image piece.  I chose those colors because I have a lot left and they will be expiring in a few months.  I rarely use up all of the in colors before they expire.

Thank you SO much for visiting today,
Wanda

Monday, February 11, 2019

Lovely Lattice, Dandelion Wishes, 2019 Sale-a-Bration, Get Well Card

 I found this fun card on the internet.  I did change it a little because I didn't like how the markers bled through the card stock.  

The base of my card is a folded half-sheet of Whisper White card stock. On top of that I used a 4-1/8" x 5-3/8" piece of Fresh Fig. I was going to use the Rich Razzleberry but I wanted something darker to bring out the darkness of the center of the Rich Razzleberry flowers.

I cut a piece of Whisper White card stock 4" x 5-1/4".  I stamped the image from the "Lovely Lattice" 2019 Sale-a-Bration set using black Memento ink. 

I colored the flowers in using Daffodil Delight, Rich Razzleberry and Old Olive light and dark blends pens.  I also used the Soft Sea Foam to color in the lattice part of the image plus to color around the flowers.  On the original card the light Smoky Slate was used.  Mine is on back order so I thought the Soft Sea Foam would do the trick and it was just subtle enough to work! When I got done coloring I had looked on the back side of the coloring and didn't like what I saw. SO that is when I realized I would have to trim it and layer it.

The words are from the "Dandelion Wishes" set. I stamped them using black Memento ink. 

I colored three pearls using the dark Daffodil Delight Blends pen.  I set them in place on the card front.

I taped the layers together and the card was done. 

It was a fun card to make and this is the type of coloring I like to do!

Thank you SO much for stopping by today,
Wanda

Sunday, February 10, 2019

By the Bay, 2019 Stampin' Up! Sale-a-Bration, Thinking of You Card

Today I struggled a bit with this "By the Bay" Sale-a-Bration set.  I am not big on coloring detailed images and this one had a lot of detail.  I ended up grabbing the Blender Pen, a clear block and my markers.  

The base of my card is a folded half-sheet of Whisper White card stock. 

On top of that is a 4" x 5-1/4" piece of Balmy Blue that I textured with the "Subtle" emnossing folder that gives the paper the look of linen.  I did stamp the words before I embossed.  And they were straight too!  I don't know, it must be the angle of the photo that makes it look  crooked. Looking at it in real life I see them on there straight!  

I cut a piece of Whisper White card stock 3-3/8" x 2-1/2" and I stamped the image from the "By the Bay" set.  I colored the greens using the Granny Apple Green marker.  I also used the Soft Suede and Crumb Cake markers to color in the brown areas.  The roof was mostly Soft Suede and I did add a little Cajun Craze as I was coloring in the house front.  

I added some Balmy Blue to the water area and I sponged in the sky using Balmy Blue ink. 

It wasn't as bad as I thought it would be but coloring like this is still not as fun as using the Blends pens.

Once I got the image colored I cut a 3-1/2" x 2-3/8" piece of Basic Black card stock and layered it behind the image.  Then I set the layers in place using Dimensionals.  And the card was done.  

You can look for this stamp set at the end of March in my web store.  It's one I don't think I'll be using much at all.

Thank you SO much for stopping by today,
Wanda


Saturday, February 09, 2019

Botanical Butterfly, Perennial Birthday, Birthday Card

Today's card is a quick and simple one.  Even quicker when you find the textured piece in your mess!  LOL

The base of this card is a folded half-sheet of Whisper White card stock.  This card opens on the right.

On top of the card base is a 4-1/8" x 5-3/8" piece of Highland Heather card stock.  

The focal piece is a 4" x 5-1/4" piece of Whisper White that was textured using the "Lovely Floral" embossing folder. 

I stamped the "Happy Birthday" on the bottom of the embossed piece using the "Perennial Birthday" stamp set and Highland Heather ink.

The butterflies are from the "Botanical Butterfly" 12" x 12" Designer Series Paper (DSP) from the 2019 Sale-a-Bration catalog.  Remember the other day when I whined about all of those butterflies that I had punched out and set somewhere?  Well, I found them and either I was delusional or it was wishful thinking, but there were only a couple punched out!!!  So much for a good memory! Though I didn't remember where I had set them so why should I remember if I punched them out or not?? LOL  Getting old is SO fun!!!  Never a dull moment!

I set the butterflies in place using Dimensionals.  The little butterfly was punched from one of the larger butterflies that were on the edge of the DSP.  It had a part of the wing cut off but I didn't want to put it in recycling when I could punch a little one from the image, and that is what I did here!  Cute, huh?

I think this would also make a great Sympathy card or even a pretty Mother's Day card.

Thank you SO much for visiting today,
Wanda

Friday, February 08, 2019

Hello Cupcake, 2019 Stampin' Up! Sale-a-Bration, Birthday Card

I'm not sure what it is about this card that made me want to make it.  Was it the cute little flowers in the corners or was it the Coastal Cabana color?  Or both?  I found this card on Pinterest.

The base of the card is a folded half-sheet of Whisper White card stock.  I stamped the two corners with the flowers in the "Hello Cupcake" set.  This is a fun Sale-a-Bration set and easy to use too.

I cut a piece of the Coastal Cabana Designer Series Paper (DSP) 4-3/8" x 3".  I die cut the rectangle using the stitched rectangle Framelits. 

I stamped the cupcake bottom using Coastal Cabana ink.  I stamped the icing part using Highland Heather ink and the words were stamped using Melon Mango ink.  I taped the two layers together and I then taped those to the front of the card.  And that was it.

It's a very quick and simple card to make.  And I just LOVE the colors!

Thank you SO much for visiting today,
Wanda


Thursday, February 07, 2019

Southern Serenade, Botanical Butterfly Designer Series Paper, Birthday Card

The Botanical Butterfly 12" x 12" Designer Series Paper (DSP) had a matching punch.  There is a sheet of colorful butterflies that you can punch out.  Plus I also found that there is a sheet of uncolored butterflies that match the punch as well. I had used the sheets in my pack that had the colored butterflies.  The paper was cut into many pieces because I was using butterflies as I needed and had lots of pieces sitting around.  SO I took some time out and punched out all of those butterflies and now I can't find them!!!  So much for trying to be efficient!  LOL

I had a piece of the uncolored butterfly paper sitting in the front part of the package and it looked like it would fit in the punch, so I took it out and sure enough, much to my surprise it did!  SO I punched it out and sponged on the color using Balmy Blue ink. I sponged lightly on the top wings and darker on the bottom. I also added just a little Highland Heather ink to the center part of the butterfly.  And that was it.  Simple enough to color, huh?

The base of this card is a 1/4 sheet of Basic Black card stock. On top of that I cut a piece of Whisper White at 4" x 10-1/2".  I folded it in half and taped it to the card base.  

I stamped the words from the "Southern Serenade" set using black Memento ink.  I die cut the words using the stitched circle die. I made sure the words were down toward the bottom part of the circle.  I cut a scalloped circle for the layer using Basic Black card stock.  I taped the two layers together.

I took a 4" x 2" piece of the Balmy Blue gingham DSP from the 6" x 6" Gingham Gala pack.  I taped it to the front of the card and then I tied a Balmy Blue organza ribbon around the card and I tied a knot. I added a glue dot to hold the ribbon in place.

I added Dimensionals to the circle layer and set it in place on the card.  I also added a Dimensional to the back of the butterfly and set that in place on the circle and the card was done.

This was a very quick card to make. I think it has such a sweet look to it.

Thank you SO much for visiting today,
Wanda

Wednesday, February 06, 2019

Hello Cupcake, Birthday Card, 2019 Stampin' Up! Sale-a-Bration

Today's card was supposed to be quick, clean and simple!  I got the clean and simple part right!!!  The not so quick came because I fussy cut all the cupcake pieces.  A big DUH on that one! Don't ask me what I was thinking, I wasn't!  Had I just stamped all three images and cut them out as one, then the quick would have fit!  Oh well, live and learn, right?

The base of my card is a folded half-sheet of Whisper White card stock. On top of that I had cut a 3" x 4-1/4" piece of the Highland Heather gingham Designer Series Paper (DSP) from the 6" x 6" pack in the 2019 Occasions catalog. Before I set the piece in place I stamped the words from the "Hello Cupcake" set using black Memento ink.

I cut a 1/2" x 4-1/4"  strip of Gorgeous Grape card stock and taped it over the edge of the DSP.

I stamped the bottom part of the cupcake using Soft Suede ink. I stamped the cupcake part using Crumb Cake and the frosting part was stamped using Gorgeous Grape.  Now you can cut the image out!  As one piece!!!

I die cut a stitched oval and also a Gorgeous Grape scalloped oval. I taped the ovals together and then I added the cupcake using Dimenisonals.  I set the oval in place on top of the card using Dimensionals.  

I wanted to add something to the frosting, it looked a bit blah.  I thought some Wink of Stella would do it nicely!  The Wink of Stella picked up some of the Gorgeous Grape color and moved it around the frosting.  Which I thought was okay because it gave the frosting a bit more color.  I liked it a whole lot better with the pinkish look that the Gorgeous Grape gave off when colored with the Wink of Stella.

And now the card is complete!

This was fun to make and I can see myself making more later down the road.

Thank you SO much for visiting today,
Wanda

Tuesday, February 05, 2019

Home to Roost, Wonderful Moments, Masculine Birthday Card, 2019 Stampin' Up! Sale-a-Bration

I found a fun card on Pinterest using the "Home to Roost" Sale-a-Bration set and I wanted to make it. I did not have the background texture that was used in the original card and I didn't have the Blueberry Bushel colors that were used.  SO I thought I would use what I had and make it work.

The base of the card is a folded half-sheet of Whisper White card stock. On top of that is a 4-1/8" x 5-3/8" piece of Pacific Point card stock. Before I did anything else, I die cut the scalloped square from that piece of card stock.  No one was going to see the hole in the piece, it will be sandwiched between the layers.

I took a 4" x 5-1/4" piece of Whisper White card stock and textured it using the "Tin Tile" embossing folder.  This folder is SO pretty when you use it on the foil papers.  I taped this piece to the Pacific Point piece. 

I stamped the "Buffalo Check" image using Pacific Point ink. If you use it in the Stamparatus you can ink and re-ink it many times until you get a nice solid image.  I cut that piece  2-1/2" x 4".  I used a piece of the 1/4" organza ribbon to cover the edge of the Buffalo Check piece.  I taped the two layers to the card front.

I die cut a stitched square and stamped the background using Sahara Sand ink.  I stamped that image twice.  I taped that layer to the scalloped square layer. I stamped the rooster from the "Home to Roost" set using black Memento ink.  I fussy cut it out and then colored it using the following Blends pens, Light Pumpkin Pie, Ivory, Light and Dark Pool Party, and Poppy Parade.  I added some Pacific Point color to the tail using the Marker since there is no Pacific Point Blends.   I set the rooster in place using Dimensionals.  I added Dimensionals to the back of the square layers and set it in place on top of the card.

The words are from the "Wonderful Moments" set. I stamped them using Pacific Point ink.  Black ink would have stood out much better.  I punched the words using the "Classic Label" punch. I set them in place using Dimensionals.

This was a fun card to make and I am really liking this rooster image.  I'm not usually a big fan of roosters or chickens but There's something about this one that I'm drawn to.

Thank you SO much for visiting today,
Wanda


Monday, February 04, 2019

Botanical Butterfly DSP, Dragon Fly Dreams, Birthday Card

I have wanted to play with the "Delicate lace" edgelits dies for a while now. I did use the larger more lacy looking one quite a while back but I hadn't found time to get it out again and work with it. So today I thought I'd give it a try.  Normally on a card like this, with the exposed panel, I would usually just cut the pieces and maybe add a layer but I thought this would be a great place to try the lacy edgelits.  

First I cut the outside edge one and then I cut the other side.  I don't really care so much how this looks. I think I would just prefer to cut the edges and add a layer.  Though this card was easy enough to make.

The base of the card is a folded half-sheet of Whisper White card stock. I also cut a 4-1/4" x 5-1/2" piece of Whisper White for the inside front.  I needed somewhere to tape the Designer Series Paper (DSP) to.

After die cutting the edges I stamped the words.  They are from the "Dragonfly Dreams" set. I stamped them using black Memento ink.

The DSP is from the "Botanical Butterfly" 12" x 12" paper pack.  I cut a 3-1/2" x 5-1/2" piece and I taped it to the Whisper White piece and then I taped the outside edge onto that piece as well.  I added tape to the inside of the front of the card and slipped the 4-1/4" x 5-1/2" piece of Whisper White card stock in place.  And the card was done.

Thank you SO much for visiting today,
Wanda

Sunday, February 03, 2019

Butterfly Gala, Floral Romance SDSP, Beautiful Bouquet, Birthday Card

One more card using the "Butterfly Gala" stamp set before I move on to something else.  I found this card on Pinterest and this is how it turned out for me.  

The base of the card is a folded half-sheet of Whisper White card stock.

On top of that is the fun layers.  The "Floral Romance" Specialty Designer Series Paper (SDSP) was used here.  The piece I used is printed vellum.  I cut it 4-3/4" x 1-3/4".  I also cut a 4-3/4" x 1-3/4" piece of Whisper White card stock to layer behind it.  I just taped it to the vellum with snail tape.  I didn't notice the tape showing up behind the vellum.  I then cut a 5" x 2" piece of Basic Black card stock and layered the vellum piece on top.  I taped that to the card front.  

I stamped the words from the "Beautiful Bouquet" set using black Memento ink.  

I stamped the butterflies from the "Butterfly Gala" stamp set using black Memento ink.  I colored them in using the light and dark Rich Razzleberry Blends pens.  The package of SDSP listed Fresh Fig as one of the colors in the paper but the Blends don't come in Fresh Fig and I wasn't in the mood to use a Blender Pen to do my coloring today.  I think it looks fine.  

This was a very quick and simple card to make.

Thank you SO much for visiting today,
Wanda

Saturday, February 02, 2019

Butterfly Gala, Beautiful Bouquet, Birthday Card, 2019 Stampin' Up! Occasions Catalog

I ran across a butterfly card on Pinterest and I didn't want to go through all the work so I tried a short cut.  I should have gone through the work!!! LOL  You can see the original card here.  I did not use the same colors because I didn't purchase the in colors this time around.

The base of the card is a folded half-sheet of Daffodil Delight card stock.  This card was cut in half on the 8-1/2" side and it opens at the bottom.

I added a 4" x 5-1/4" piece of Whisper White card stock to the top of the card base.

I cut the gingham Designer Series Paper (DSP) 1-1/4" x 1-1/4" each.  I taped them in place using snail tape.

I stamped the butterflies from the "Butterfly Gala" stamp set using black Memento ink. I colored the top part of the butterfly using the light Pumpkin Pie Blends pen and I used the other Pumpkin Pie Blends marker for the bottom part.  I punched them out with the matching punch.  I set them in place using Dimensionals.

The words are from the "Beautiful Bouquet" set using black Memento ink. I die cut the words using the square stitched framelits.  That square measures about 1-5/8" x 1-5/8".  I set the square in place using Dimensionals and I added some enamel dots to it.

The original card die cut the three squares on the left and put the DSP behind it.  I didn't want to do all of that measuring to get the die straight and hope it didn't move in the Big Shot while going through.  So I took the short cut and am not thrilled with the card but it's okay.  If I were to do this again I think I would have layered the DSP squares with Basic Black card stock and the word piece too.  I do like the butterflies.  And I do have to say, I did have fun making this card.

Thank you SO much for stopping by today,
Wanda

Friday, February 01, 2019

Home To Roost, Beautiful Bouquet, Masculine Birthday Card, 2019 Stampin' Up! Sale a Bration

I was looking for a fun and easy masculine birthday card and I found on on Pinterest that I just changed a little and made it into a birthday card. You can see the original card here.

The base of this card is a folded half-sheet of Crumb Cake card stock.  This piece was cut on the 8-1/2" side and opens at the bottom.  I sponged the edges with Crumb Cake.

I cut a 4" x 5-1/4" piece of Bermuda Bay card stock. I sponged the edges with Crumb Cake.

I cut a 3-3/4" x 5" piece of Crumb Cake card stock and stamped the "Hardwood" background image on it using Crumb Cake ink.  I sponged the edges.

I die cut the stitched rectangle using the Bermuda Bay piece I had cut and sponged. I cut from the center so I wouldn't waste any card stock.  I sponged the edges.

I die cut a Very Vanilla piece of card stock using the stitched rectangle dies and I stamped the rooster first and then the words.  The rooster is from the Sale-a-Bration set "Home to Roost" and the words are from the "Beautiful Bouquet" set. I stamped them both using black Memento ink.

I colored the rooster using the following Blends markers, Bermuda Bay (light and dark), Daffodil Delight, Poppy Parade, Crumb Cake (light), and Pumpkin Pie (light).  I sponged the edges.

I taped the larger layers together and taped them to the card base.  I taped the rooster image panel to the Bermuda Bay stitched piece.  I added a piece of Burlap Ribbon to the center of the card front and then set the rooster layers in place using Dimensionals.  And that was it.  I thought it was a pretty quick and simple card to make.  I think it's a great masculine card!

Thank you SO much for visiting today,
Wanda