Pin It

Showing posts with label Business Boosters. Show all posts

Wednesday, March 01, 2017

Stampin' Up! Color Keeper Chart 2015-2018 Colors

Today I finally finished an updated version of the Color Keeper wallet.  The one in my web store was outdated and I had forgotten about it until I received several emails asking for a current one to order.  So, here it is.  It's SO great to finally get this project done!

Once you order the PDF file, you can print out as many copies as you like to give to your students, downline, etc. You can even print them out and hold a class that you charge for! Yup, you can even make money off this!!  You will trim the edges and measure and cut cardstock for the "wallet". Add a belly band if you want.  Here I used a piece of ribbon that I stapled together and added a punched flower to cover it.  Just slide the ribbon off and open the "wallet".  Decorate it as you desire.  Use current stamps to promote them, use your imagination!  It's a great business booster.

It's a great way to keep track of what colors you have and if it's an ink pad, marker, cardstock, or refill.  

Use the color described in the word and you'll have a very colorful and pretty wallet.  

It's now in my store and you can order a current copy here. Or you can look to the right sidebar and click on "Shopping is just a click away" and you'll be taken directly to the store.  

Thank you SO much for visiting today,
Wanda

Friday, April 22, 2016

Botanical Builder & English Garden Lip Balm Holder Weekend Project

Today I wanted to play with something more 3-D than just a card. I had opened up one of the drawers in my workroom and I saw a tube of lip balm.  I had not made a lip balm holder in a long time and there's been so many stamp sets that have come and gone since then that would have been great for this project.  

The pattern is a very simple one and I had found it on Split Coast Stampers.  Here's a little tip for you though.  Not all lip balms are the same height or roundness.  You will need to adjust the top and bottom four cuts so you can add your lip balm.  I would cut and score a piece of copier paper and practice with that before I cut my decorative paper.  

I used the "English Garden" decorative paper here. I embellished it with a flower from the "Botanical Builders" framelit dies.  In the center I added a Daffodil Delight candy dot.  Those are retiring and I have a lot of them to use up! I'm such a hoarder.

Now before I assembled the front, I layered my decorative paper on a piece of Mossy Meadow card stock.  I took some ribbon (mine is retired but I need to start using things up around here) and I taped it to the front center of the holder. Then I glued the layers in place.  You really do need to use glue here because tape just won't hold.  Unless you use some really strong tape.  I prefer the glue because I know that once it dries it's going to hold.  I did set a punch on top of it while the glue was setting up and while I was working on the flower and leaf.  

The reason this lip balm is white is because it is designed for you to add your information on it.  Print it out on a label and wrap it around the lip balm.  Now when you give these to your customers or potential customers they will have your info.  Business cards get lost, misplaces or tossed, but most people hang on to their lip balms!!  LOL

Here is another tip for you if you are planning on making a lot of these.  Print out the pattern from Split Coast Stampers.  Cut it out and use it as a template.  Make sure you mark your top and bottom lines so your holder is custom made for your lip balms.  Those top and bottom lines are what keep the lip balm from falling out of the holder.

These are very fun and really quick to make (and a template would speed up the process!).  Click here to see the Valentine's Day one I made. I made a Halloween one that included a little mirror tile on the inside!  I can't find the link to that, sorry.  I buy my bulk lip balms here.  Have fun making these!

Thank you SO much for visiting today,
Wanda

Thursday, March 06, 2014

Scalloped Tag Topper Punch Business Booster For You


 Get out your business cards and make them into something that the ones who get them keep them for a while!


I took my business card and used the new "Scalloped Tag Topper Punch" and punched it.  Then I took two sheets of copier paper and cut them the same size as my business card (before punching).  For the backing I used a piece of Whisper White card stock that was cut the same size as the business card.  Then I punched the copier paper and the Whisper White card stock.  

Stack them all together with your business card on top and tie them with some Baker's Twine. I did glue the twine because I didn't want it to come untied.  As simple as that.  Now when someone gets one of these business cards they have some note paper in their purse as well.  Your card will be in their possession a bit longer!

Thank you SO much for visiting today,
Wanda


Monday, February 02, 2009

Another Item Using the Sizzix Scalloped Bag Die

Here is another project I did using the Sizzix Scallop Bag die. I took a piece of decorative paper and just ran it through the machine. I did cut the paper down to 3" x 12". Though you can use a piece of regular card stock for this. The die is just under 11" so it will work just fine.

After getting the piece cut I scored it. I measured in from the straight end 5-1/2" and I scored it. Then I moved the paper in until it measured 8-3/4" from the straight end and I scored it there.

Between the two scores is where I took the bottle cap and traced it onto the paper. Then I found a punch that fit close enough to that circle. If you find the circle is just a touch too tight you can repunch a little sliver off and it shouldn't show.

I folded in the score marks and then set it in place on the bottle. I didn't decorate it because this is not what I am using the bottle for. Plus it allows you to be creative. And you can show me what you make with it!!!

You can fold up the long straight piece and make a pocket for your business card or something else to go with the theme you are working with.

This is the 5th item I have made using the Sizzix "Bag with Scallops" die. Figure out the price of that die and divide it by 5 and you are getting 5 different uses for it for a small price for each!!! Such a deal, huh???

If you want to see the other items I made using this die just click here.

Thank you SO very much for visiting today,
Wanda

Sunday, February 01, 2009

Another Fun Bag Using the SIzzix Bag With Scallop Die

Here's a fun and quick way to make those open sided bags for your candies. This is unbelievably quick. I LOVE giving those open sided bags as gifts and I also love making them with bath salts in them. Well, now I can make them SO much quicker!!! Imagine the time I will save!!!

I took a piece of decorative paper and cut it 3" wide. It needs to be at least 11" long. I ran it through the machine and folded the scores that the die created.

I filled my baggie with Red Hots. Please be sure to use baggies that are meant for foods. It really does make a difference. The ones that are made to hold food are clean and have been inspected. I don't know if the plastic on them is different or not. There is SO much talk about how plastic in contact with foods is not good for you because of the plastic emitting some type of chemical. Anyway, I put the candy in the baggie and I actually stapled it to the inside of the bag along the straight edge. Then I folded the top over and decorated it.

To keep it closed I was going to tape it but thought that wasn't such a good idea. I may have done that had I put a window in the front. But since I didn't I opted to use some thin magnets. One went under the scalloped flap and the other went on the outside of the front panel. The flap hides it until it's opened. I was going to put it on the inside of the package but the thin magnets I have weren't strong enough to hold through the paper like that. But for display purposes it worked just fine.

I have one more project you can make using that very same "Bag with Scallop" die. I'm sure there are more ways to use it and if you know of one you can let me know and I'll give it a try and post it on my blog!!!
If you want to see the other items I made using this die just click here.
For those of you who are demonstrators, it's always nice to show how you can get more than just one use out of an item you are promoting.

Thank you very much for visiting my blog today,
Wanda

Saturday, January 31, 2009

Getting the Most Out of Your Sizzix Scallop Bag Die

I have the new Sizzix "Bag with Scallops" die cut. My first project with it was just a bag. Well, not an ordinary bag but a Valentine's Day bag complete with candy inside. To add a bit more to that bag I punched a hole in the one panel and added a piece of acetate (transparency) for a window to view what was in the bag. Kind of takes the surprise out of what is in the bag!!! LOL
Then the second thing I showed using the same bag die was a Valentine's Day box. Just click on the links to view either one of them. As with all of the photos on my blog, just click on them for a closer view of the images.

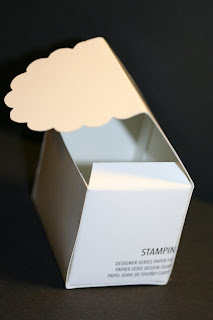
Next I made a smaller box with side flaps. For this one I didn't have to run any more card stock or paper through the machine, just the one! To make this box I first used a piece of chipboard that came in my decorative paper packs by Stampin' Up! That must have meant I used up a package of it!!! I find that highly unlikely, I'm such a hoarder!!! What probably happened was that I had purchased 2 packages and I merged what was left in the one to the new one!!! That sounds more like me!!! LOL

I ran that chipboard through the Sizzix using the bag die. Before you do this you want to make sure that the side you are going to have showing is the side you have face up on the die. You don't want the score marks on the side pieces to show on the outside of your box. You will not be folding those score marks in so if they don't come out on the chipboard it's no big deal. Once you have the pieces cut out you are going to be marking and cutting them down. Using your paper cutter, insert the straight end of the long strip (not the scallop end) in and cut off 1-7/8".

The next score mark that the die made you keep along with the following one. You will score the next line at 1-7/8" from the second score line from the straight edge. And your final score will be at 1-5/8" from the score line you just made. Next to the newest score line you will see the original score line the die made. DO NOT fold it or it will show on the outside. Fold the one you just made. Now you have two choices here. You can either keep the scallop on and work with it, decorating it and probably taping it, gluing it or using a magnet to keep it in place. Or you can cut it off at that original score line. I chose to cut my scallop off and decorate the front of my box. Set it aside.

Now pick up your side panels and cut 2-1/4 off the top of it and then score at 1/4" from the newly cut edge. Fold in the side and bottom scored lines only. Also fold the scored areas in on the long panel, except for the one closest to the scallop if you are keeping the scallop.

If you want to add a window to your box, now is the time to do it. Once you start attaching the sides it is almost impossible to add it. I would also recommend adding the acetate piece as well. Or you can leave it open depending on what you are putting inside.

Next take the side pieces and on the little scored piece cut a little wedge off each side. It will help the lid of the box close better. You will want to do the same thing to the little piece on the long panel (if you cut off the scallop). Cutting the wedge there will help that edge on the lid to go in the box nicer. Did you notice the words on the side of my box??? I wasn't paying attention to what side of the material I as cutting on!!! It's important to pay attention there. Especially if you are using double-sided decorative papers!!! OR chipboard that has wording on it!!!! LOL And the only way to cover it is to cover the whole box. Adding a layer just won't do it, it won't cover it all. But fortunately this box was for demo so I squeaked by on that one!!! LOL

To assemble, begin with the bottom flap of the side pieces. I used Aleen's Tacky glue to affix mine. I wanted something that would hold quickly and hold well. Mostly I was going for the quickly thing. Most liquid glues hold well!!

Once the bottom side pieces are glued into place and the glue is set enough, move on to gluing the sides to the front or the back. You do not want to glue a right side and then the left, you want to glue fronts or backs. Once the pieces are glued and the glue is set you are ready to decorate it up as you like. I used some hearts and ribbon for mine. Inside I added 4 Ghiradelli candies, there is room for 5 but I only had 4. They fit perfectly in the box and I didn't even plan it that way!!! Hmmm, it must have been meant to be!!! LOL

Tomorrow I will show you one more way to get the most out of this Sizzix die!!

Thank you ever so much for visiting today,
Wanda

Monday, January 07, 2008

Takin' Care of Business!

Here is a card I made for the "business" side of stamping. I use to work in a real estate office and the agents would order Forget-Me-Not flower seed packets and put their business card labels on the backs of them. Or should I say, they'd have "us" office workers do it for them. It's designed to get their name out there and to hopefully generate business. SO I got to thinking. Why can't this work for stamping?? Personally I just like the idea of sending out flower seeds. I have made several other cards that hold flower seeds.

This one is very simple to make too. I printed out the poem onto white card stock and then cut it to fit. I needed the width to be 4" and the length I had to work with because of the length of the poem. With this poem the white card stock length is 8-1/2". I folded it at 3-1/2" and added a thin line of glue to the sides. Before gluing I wheeled on the flowers from Stampin' Up! The whee is called "Fast Flowers." I used the flower punch in the "Three for You" kit. I sponged the edges and then punched out 3 little dots to put in the center of the flowers. I sponged all the edges and then glued the sides. I taped the pocket to the background and inserted the flower seeds.

Be sure to put your business label on the back of the flower seeds. The company I ordered them from is Sanzo. They will sell them to you either way, blank on the back or you can order them with your business information printed on each packet. It's all in what you want or need. The page to the seed packets can be found by clicking here. What is nice about this is the blank ones are 25 cents per package and there is no minimum to order, so you can get as many as you need or want.

I think these would be a nice "Welcome to the Neighborhood" little gift too. Not just for demonstrators to give out but for everyone else. Just make a pocket card and insert the seeds. Be sure to write or add a label to the back of it with your name and address on it and welcome your new neighbor to the neighborhood. You can hang it on their door, hand it to them personally or mail it to them. Just a nice gesture for a new neighbor! I will add that card on the next post. So back to this card.


I'm adding the poem in the event you would like to use it for your customers.

Hello my Friend, it’s been a while
Since I’ve heard from you.
Just checking in to ask you if
there’s anything I can do.


You’ve has some time to view the book.
There’s so many things to see.
Please let me know if I can help you
place an order with me.

I’ve enclosed some flower seeds
To plant in the ground or a pot.
I want you to think of me
When blooms the Forget-Me-Not.
© 2008 Wanda Pettijohn

Thank you SO much for stopping by,
Wanda