Pin It

Showing posts with label Children's Birthday Cards. Show all posts

Tuesday, May 13, 2025

Wildflower Birthday, Stylish Shapes, Birthday Card, Stampin' Up!

Hello and welcome to my blog. Today I have another birthday card using the "Wildflower Birthday" 12" x 12" Designer Series Paper (DSP).  Please read on to see how quickly this card went to gether.

The base of my card is a folded half-sheet of Basic White card stock. It opens on the right and the fold is on the left. 

I cut a 4-1/8" x 5-3/8" piece of Blueberry Bliss card stock for the layer. On top of that is a 4" x 5-1/4" piece of Soft Sea Foam card stock and on top of that is a 3-3/4" x 5" piece of DSP. I taped these layers together.

The balloon is from the "Wildflower Birthday" package and was set in place using Dimensionals.

The words are from the "Simply Said" set and were stamped using Blueberry Bushel ink. I cut them out using the die from the "Stylish Shapes" set. I set it in place on the lower left using Dimensionals.

I added some "Itty Bitty Bokeh" sequins to the front and the card was done.

This was such a quick card to make and it has a fun and cheery feel it to it. This would be great for a child, a teen or even an adult!

Thank you SO much for taking your time to stop in and see today's birthday card,
Wanda

Monday, May 12, 2025

Darling Dinos, Children's Birthday Card, Stampin' Up!

Hello and welcome to my blog. Today I thought I'd grab a different theme other than the "Wildflower Birthday".  I still have more pieces in that package to use and I will but today I had to switch it up. My order will be here on Thursday so that means Friday I should have a card using the new stuff! I found today's card on Pinterest. I changed it up some to fit what I have in my stash. You can see the original card here. Please read on to see how I put this card together. 

The base of my card is a folded half-sheet of Basic White card stock.  It opens on the right and the fold is on the left. I cut a 4" x 5-1/4" piece of Boho Blue card stock. On top of that is a 303/4" x 5" piece of Basic White card stock. 

I took that piece of Basic White card stock and stamped the stone/rock images on it using Boho Blue. My ink pad was over inked so I had a little issue with it not stamping nice. But I just went with it because I had no choice.  I stamped these images in the upper right corner and lower left corner. I then taped the Basic White layer to the Boho Blue layer and then that was taped to the card base.

Next came the Designer Series Paper (DSP). It's from the "Timeless Plaid" 6" x 6" package. I cut it at4" x 2-1/2".  I taped this to the front of the card, centering it as much as I could by eyeing it.

The dino was stamped next. It's from the "Darling Dino's" bundle. I stamped it using black Memento ink on Basic White card stock. I didn't purchase the Boho Blue Blends Pen or marker so I used the ink pad and my Blending pen. I colored the belly with my Daffodil Delight marker.

I cut a 3" x 2-3/8" piece of Basic White for the background on the focal piece. I stamped the flower from the bundle 4 times across the bottom. One flower is hidden behind the dino.  I colored the flowers using Boho Blue and my Blending pen. Daffodil Delight for the flower centers and Granny Apple Green for the leaves. Using my Blending Brush I scrubbed on some Granny Apple Green on the "grass" area. Taking another Blending Brush I lightly scrubbed on some Boho Blue in the sky.

The rocks were stamped using black Memento ink and were cut using a matching die. I didn't remove the piece from the die though. I took my Blending brush and Pecan Pie ink and colored the rocks while they were still in the die. I had stamped them and cut them out and then colored them with the Blending brush and it colored over the white edge and I didn't like the look. Though I did have the option of fussy cutting the rocks but I thought I'd try scrubbing on the color while the card stock was still in the die and it worked. 

I cut a 3-1/4" x 2-5/8" piece of Boho Blue for the layer. I taped the Basic White piece to the Boho Blue piece. Next the Dino was taped down. Dimensionals were added to the rocks and they were set in place.  Dimensionals were added to the back of the piece and it was set in place on the front of the card.

The words are from the same bundle and were stamped using black Memento ink. I cut them out on my paper cutter. I added Dimensionals to the right side and tape to the left and set it in place on the front of the card and the card was done.

This was a fun card to make and I do like the colors I used. It's perfect for a boy!

Thank you SO much for taking your time to stop in and see today's birthday card,
Wanda

Saturday, May 03, 2025

Darling Dinos, Children's Birthday Card, Stampin' Up!

Hello and welcome to my blog. This seems to be the longest time of stamping for me. It's the time from when the new catalog hits my worktable until I can order and get the new stuff! So what that means is I now have to play with what I have and with what is going to be retiring, even though I really like the set. The "Darling Dinos" is one of those sets I really like and yes, it's going to be retiring. So I thought I'd make a card with it today and share it with you. Please read on to see how it was made. Plus I have a tip on layouts to share with you.

The base of my card is a folded half-sheet of Basic White card stock. It opens on the bottom and the fold is on the top.

I cut a 4" x 5-1/4" piece of Designer Series Paper (DSP) from the "Floral Delight" 12" x 12" package. I taped that to the card base.

Next I cut the strips. The DSP for the strips is from the "Timeless Plaid" 6" x 6" package. I cut three of them at 1/2" x 3-3/4". And the Basic White layer behind them was cut at 2/4" x 4".  I taped the pieces together and then I taped them to the front of the card. The edge of the right strip is about 7/8" from the side of the card. The spaces between the strips is 1/8".  

Then I cut the circle using the 5th smallest die in the "Deckled Circles" set. I cut it from a piece of Basic White. Using my Blending Brush I scrubbed on some Daffodil Delight ink. Dimensionals were added to the back and it was set in place on the front of the card about 1/2" from the right edge.

The dino was next. I stamped him using black Memento ink. I cut him out using the matching die. I colored him with my light Old Olive and light Daffodil Delight Blends pen. Dimensionals were added to the back and it was set in place on the circle. I just placed it where I thought it looked best.

The words are from the same set and were stamped using black Memento ink. I cut the piece to measure 2" x 1". The Daffodil Delight layer was cut at 2-1/4" x 1-1/4".  I taped the layers together. I added Dimensionals to the back and set the piece in place on the front of the card. And the card was done.

I often make a copier paper template/sample of my cards so I can use the layout again at another time. I write down the measurements on the piece and I just recently started writing down the dates I  used the layout so I can go look at it for colors and contrast if needed. I have a stack of these on my worktable. I took my stack out today and I set the dino on top of areas on the samples until I found one that looked like it would best display the image. This one won today! It's fun having these layouts so I can see exactly what I'm getting and the size is exact. It makes it easy to put together a card with lots of layers too.  It's also versatile. The sample is portrait and my card today is landscape. I moved the word piece too.  So I'm not stuck with only one way to play with the layout.

This was a fun children's card to make and I thank you for taking your time to stop in and see it,
Wanda

Wednesday, April 30, 2025

Darling Dinos, Children's Birthday Card, Stampin' Up!

Hello and welcome to my blog. Today I wanted to play with the "Darling Dino" bundle. I found this card on Pinterest that I just had to make. There was no link so I had to guess at the measurements. You can see the original card here. Please read on to see how I put this card together. 

The base of my card is a folded half-sheet of Basic White card stock. On top of that is a 4-1/8" x 5-3/8" piece of Misty Moonlight.

The Pecan Pie piece was cut at 3-5/8" x 4-7/8" and the Basic White piece on top of that was cut at 3-1/2" x 4-3/4".  I taped the white piece to the pecan piece. 

Three strips of Designer Series Paper (DSP) from the 'Timeless Plaid" 6" x 6" stack. Each strip measures 1" x 4-1/2". They were taped to the Basic White piece. 

A piece of linen thread was wrapped around the piece twice and a bow was tied at the left side. It was then taped on top of the Misty Moonlight piece.

Next came the stamping. The dino and flowers from the bundle were stamped using black Memento ink. I cut them out using the matching dies. The dino was colored using both light and dark Pecan Pie Blends pens and light Misty Moonlight. The flowers were colored in using light Misty Moon light, light Daffodil Delight and light Old Olive Blends pens.  

On the original card it looks like they masked the "Happy Birthday" words from the bundle. I don't like to mask so I just printed out the words on my computer. I used the RGB code for Pecan Pie. That code is R=169, G= 116, and B=74. I used Ariel Black font at 14 pt. Once I printed them out I cut them using the 9th die in the "Deckled Circle" set. I set the dino on the card stock so I could see where I needed to tape down the die.

The grassy area on the bottom was made using my light Old Olive Blends pen. I just dotted it on. I didn't do it fast because I didn't want any dashes, just dots. 

I set the dino where it was going to go and then taped the flowers down. I added Dimensionals behind the dino and set it in place on the circle. Dimensionals were added to the back of the circle and it was set in place on top of the card and the card was done.

I LOVE the richness of the colors on this card. My colors are a bit different than on the original card but that's okay, I like them both.

Thank you SO much for taking your time to stop in and see today's children's birthday card,
Wanda

Wednesday, April 16, 2025

Darling Dinos, Children's Birthday Card, Stampin' Up!

Hello and welcome to my blog. Today I have a children's birthday card to share with you. And none of it uses anything from the "Storybook Moments" bundle!  Shocker, huh? LOL  Please read on to see how I made today's card.

The base of my card is a folded half-sheet of Basic White card stock. It opens on the right and the fold is on the left.

I cut a 4-1/8" x 5-3/8' piece of Old Olive card stock. On top of that is a piece of Designer Series Paper (DSP) from the "Timeless Plaid" 6" x 6" stack. I cut it at 5-3/8" x 3". I taped this piece to the Old Olive piece.

A 3-1/8 x 3-7/8" piece of DSP from the same stack was cut and taped to the top of the Old Olive and DSP pieces. It's about 1/2" from the left edge and 3/4" from the top and bottom.  

Next I stamped on a piece of Basic White card stock to create the ground. I used Pecan Pie and my Blending Brush to scrub on some color. Using the rocks image from the "Darling Dinos" bundle, I stamped the rocks using Pecan Pie ink. Then I used the second largest circle from the "Stylish Shapes" die set to cut the circle out. Once it was cut out I took the Old Olive ink and the "grass" stamp and added grass along the top of the dirt.

The dino was stamped using black Memento ink on a piece of Basic White card stock. I colored it in using the light Old Olive Blends Pen and the light Mossy Meadow Blends pen. I didn't color the toes, I left them white. I cut him out using the matching die. I also stamped the party had and cut it out. I colored it in using both light and dark Daffodil Delight Blends Pens. 

I taped the dino to the circle and then the circle was added to the front of the card using Dimensionals. I added the party hat using a single Dimensional. 

The words are from the same bundle and were stamped on a piece of Basic White card stock using black Memento ink. I cut it out using the third largest die from the "Stylish Shapes" set. I set it in place using Dimensionals.

I thought the circle looked to blah so I added a little bit of bling. I had some retired rhinestones from the "Noble Peacock" package and the card was done.

This was a fun card to make. I just love these dinos, just too cute!

Thank you SO very much for taking your time to stop in and see today's children's birthday card,
Wanda

Tuesday, March 11, 2025

Darling Dinos, Children's Birthday Card, Stampin' Up!

Hello and welcome to my blog. Today I have another children's birthday card to share with you. Please read on to see how it was made.

The base of my card is a folded half-sheet of Basic White card stock. It opens on the right and the fold is on the left.

I cut a 3-3/4" x 5" piece of Granny Apple Green card stock and textured it using the "Dotted Circles" embossing folder. I usually emboss first and then cut but with all of these dots I thought I might crush some after embossing. I glued this piece to the card base.

Next I stamped the images from the "Darling Dinos" bundle. I colored the dino using both light and dark Granny Apple Green Blends pens. The belly, spots and spine were colored in using the light Daffodil Delight Blends pen. The balloon was colored in using both light and dark Daffodil Delight Blends pens. The rocks were colored in using both light and dark Smoky Slate Blends pens. 

There's two sets of rocks. One was stamped on a separate sheet of Basic White card stock and the other was stamped on the focal piece. I cut the piece to measure 3-1/4" x 4-1/2". I laid the dino on the center to see where I needed to stamp the rocks on the left.  I also set the words in place and stamped both the rocks and words at the same time. Then I colored those rocks in.

Dimensionals were added to all of the die cut pieces and they were set in place on the front of the card. I took my Basic Black marker and drew the balloon string on. And that was it, the card was done.

This was a very quick and easy card to make. I love the greens on the dino, it's bright and cheery. I went with a yellow balloon so it could be for a boy or girl who love dinos!

Thank you SO very much for taking your time to stop in and see today's children's birthday card,
Wanda

Monday, March 10, 2025

Darling Dinos, Children's Birthday Cards, Stampin' Up!

Hello and welcome to my blog. Today I have a children's birthday card to share with you that I found on Pinterest. I clicked on the link and got some help with the colors but that was about it. I did change it a little. You can see the original card here

The base of my card is a folded half-sheet of Basic White card stock. It opens on the right and the fold is on the left. I cut a 4" x 5-1/4" piece of Summer Splash card stock for the layer. And on top of that is a 3-3/4" x 5" piece of Basic White card stock.

For the diamond shape on the Basic White layer I made a template. I don't know if there's a diamond shape die cut, I am not familiar with all of the Stampin' Up! products. So making a template was the best way to go for me. Here's how I made mine. I took a 3-3/4" x 5" piece of copier paper and I folded it in half on the long side. I opened it up and folded it on the short side. You want to open it up because just folding it in half and then folding the half in half will cause the piece to shift a bit.  I opened the piece up. On the long side I made a mark 3/8" in on each side and on the short side (top and bottom) I made a mark 1/2" in. I set the piece in my paper cutter and cut from mark to mark. Then I took this template and set it on top of a 3-3/4" x 5" piece of card stock and traced the diamond and then I cut it out. I wanted a stiffer template plus one that didn't have fold marks on it. I didn't want to take any chances on the ink going under the copier paper.  Once the template was done I lined it up with a 3-3/4" x 5" piece of Basic White card stock and colored it in using my Blending Brush and Summer Splash ink. After reading about the making of the original card, Balmy Blue was used for the diamond. Either one works. 

The only things I bought for the in colors is ink pads and card stock. I don't purchase the Blending Brushes or markers, it's just too expensive. So since I didn't have the Summer Splash marker I used my Coastal Cabana marker and it matched well enough that no one will notice the color difference. 

Once the diamond was done being stitched around I stamped the hearts.

The dino and balloon from the "Darling Dinos" bundle. I stamped them using black Memento ink on Basic White card stock. Using the matching dies I cut them out. 

I took my Blender pen and colored the dino in using Summer Splash ink. I did have the Lemon Lime Twist Blends Pen so I colored in the rest of the dino using it.

The balloon was colored in using Petunia Pop ink. I still had my Blender pen out so I thought I'd use it. I forgot how fun it was to use the Blender pen.

Dimensionals were added behind the dino and balloon and it was set in place on the front of the card. I took my Basic Black marker and drew the balloon string.

The words are from the same set and were stamped using Summer Splash ink. I cut them out using a die from the "Stylish Shapes" set. I snipped the left side to make it fit the card.

For the embellishments I had some very old rain drops so I thought I'd use them. The two in the diamond blended well enough but the one on the white part didn't so I took my Blender pen and made little "Summer Splash" circles. I glued the rain drops to them and the color came through and it looks SO much better. I'm so happy I figured that out because I have lots of rain drops to use up!

This was a fun card to make. I love dinosaurs and these little guys are SO cute!

Thank you SO very much for taking your time to stop in and see today's children's birthday card,
Wanda

Sunday, February 16, 2025

Darling Dinos, Children's Birthday Card, Stampin' Up!

Hello and welcome to my blog. Today I have a cute children's card to share with you that I found on the internet. You can see the original card here. I did make a few changes. Please read on to see how I put the card together. 

The base of this card is a folded half-sheet of Basic White card stock. I cut a 4" x 5-1/4" piece of Misty Moonlight card stock and textured it with the "Modern Herringbone" embossing folder. I glued it to the card base.

On the inside I stamped the "Hope you're birthday is dino-mite" using black Memento ink.

The Designer Series Paper (DSP) is from the "Timeless Plaid" 6" x 6" stack and I cut it at 3" x 3".  Behind that is a 3-1/4" x 3-1/4" piece of Pecan Pie card stock. I taped the two pieces together. Dimensionals were added to the back and it was set in place on the front of the card about 1/2" from the sides and top.

Next I stamped the dino from the "Darling Dinos" bundle using black Memento ink on a piece of Basic White card stock. I colored him in using Blends pens. I used both light and dark Crumb Cake. Light Misty Moonlight, and light Pecan Pie. It was then punched out using the 2-3/8" punch. Dimensionals were added to the back. Before setting it in place I die cut a ribbon piece from the "Stylish Shapes" set using Boho Blue card stock. I stamped the pebbles image using Boho Blue ink. I cut the piece in half and taped it to the front of the card about 3/4" from the edge of the Pecan Pie piece. the top is hanging over about 3/8" from the Pecan Pie edge. The dino was then set in place.

The words were stamped using black Memento ink on a piece of Crumb Cake card stock.. I cut them out using the ribbon die from the "Stylish Shapes" set. I set this piece in place on the front of the card using Dimensionals. It's about 5/8" from the bottom edge and equal space on the ends. 

I used some retired "Candy Dots" for the embellishments and the card was done.

This was a fun, easy and super cute card to make.

Thank you SO very much for taking your time to stop in and see today's children's card,
Wanda

Friday, January 31, 2025

Storybook Moments, Simply Said, Children's Birthday Card, Stampin' Up!

Hello and welcome to my blog. Today I have a birthday card to share with you that could be used as a children's card too. Please read on to see how it was made.

The base of my card is a folded half-sheet of Basic White card stock. It opens on the right and the fold is on the left. 

 I cut a 4" x 5-1/4" piece of Designer Series Paper (DSP) from the "Storybook Moments" 12" x 12" package. I taped it to the card base.

Next I cut some strips of DSP from the same package. They measure 1/2" x 3-3/4" and the Basic White layer behind them measure 3/4" x 4".  I taped the DSP to the layers and then that was taped to the front of the card. The bottom one starts about 7/8" from the edge of the card base and there's an 1/8" distance space between the strips.

Using the second smallest rectangle die in the "Nested Essentials" set I cut two Basic White pieces. I scrubbed on some Lost Lagoon ink on the bottom piece using my Blending Brush. I did lightly scrub a little bit on the upper piece too but not as much as the bottom piece. I just didn't want either of them to be so bright. I set the bottom one in place using Dimensionals. It's about 1/2" up from the bottom and 5/8" from the right edge. Though I think it could have been 3/4" from that edge so I didn't have to worry about the tail being so close to the edge. I thought it might hang over but I managed to move the fox over just enough. The fox came from the same "Storybook Moments" DSP package, there's two pages of punch outs that are filled with cute characters.  I set the fox in place using Dimensionals too.

Next the words from the "Simply Said" set were stamped using Lost Lagoon ink on the second rectangle. I set it in place using Dimensionals. It's 3/8" from the fold and from the top edge.

The cute little butterflies were punched out from that fun page and were set in place using Dimensionals and the card was done.

This was a fun card to make and I can't wait to play with more of those characters. I can't wait to get my hands on the bundle because there's some cute frames in there to set these characters on.

Thank you SO very much for taking your time to stop in and see today's birthday card,
Wanda

Monday, March 04, 2024

Cutest Cows, Days to Remember, Birthday Card, Stampin' Up!


Hello and welcome to my blog. Today I have another "Cute Cows" card to share with you. This is a fun stamp set and I love adding that wiggling piece behind it to make it a more interactive card. Please read on to see how I made today's card.

The base of my card is a folded half-sheet of Basic White card stock. The Designer Series Paper (DSP) is from the "Be Mine" 12" x 12" package. It's nice to be able to use the Valentine's Day DSP for other card occasions. I hate being stuck with DSP that is designated for a certain occasion. Versatility is what it's all about for me. I cut that piece of DSP 4" x 5-1/4".  I had taped it to the front of the card base. I had done this a couple of weeks ago and set it aside. 

I also found the stitched square on my table and thought I'd work it into this card too. It's from the "Stylish Shapes" set and was cut on a scrap piece of Basic White card stock. Sometimes I like finding pieces on my worktable that I can use on a card but I forget what sets they come from and I have to do research! On this square I scrubbed on some Granny Apple Green on the bottom and Soft Sky on the top using my Blending Brushes. I stamped some grass using Granny Apple Green ink. Then I cut a 2-5/8" x 2-5/8" piece of Daffodil Delight card stock. I taped the squares together and then taped it to the front of the card about 1/4" from the top and side edges.

The words are from the "Days to Remember" set and were stamped using black Memento ink on a scrap piece of Basic White card stock. I punched them out using the "Double Oval" punch. Using the same punch I also punched out the scalloped oval in Daffodil Delight card stock. I taped the ovals together. Dimensionals were added to the back and the piece was set in place on the front of the card.

The cow was stamped using black Memento ink and was punched out. I colored in the spot with my Basic Black marker and the nose with my Petal Pink marker. I glued on my wiggle spring piece using the Tombow Mono glue and pressed it on the cow's head. I let it sit for a minute and then I added glue to the bottom of the piece and set the whole thing on the front of the card, over the upper part of the cow's body. And that was it, the card was done.  Fun, isn't it?

I'm having issues with my photos coming though and will post it as soon as I can get it to come through.

Thank you SO very much for taking your time to stop in and see today's birthday card,
Wanda

Monday, February 19, 2024

Submarine Life, Children's Birthday Card, Stampin' Up!

Hello and welcome to my blog. Today I have a fun children's card to share with you. I thought it looked cute so I had to make one. I saw the original card on Pinterest but my computer rebooted and I lost the link. If you know who is the original designer of this card, please let me know so I can give them a link back. Please read on to see how I made today's card.

The base of the card is a folded half-sheet of Basic White card stock. It opens on the right and the fold is on the left.

I cut a 4" x 5-1/4" piece of Lost Lagoon card stock for the layer. I taped that to the card base.

Then I cut a 3-3/4" x 5" piece of Basic White card stock to stamp on. I first stamped on the waves at the top. I used Pool Party, Balmy Blue and Coastal Cabana inks.

Next I stamped the seaweed on the bottom. I used Garden Green and Lemon Lime Twist inks.

The starfish and crab at the bottom were stamped using Lost Lagoon ink.

The fish were stamped using Pool Party ink. Using my Blending Brush I scrubbed on some Balmy Blue over he whole piece.

The words are from the same set, which I forgot to mention, it's the "Submarine Life" set. I used Lost Lagoon to stamp them.

Using a scrap piece of Basic White card I stamped the submarine and the propeller. These two pieces were punched out. I glued the propeller to the back of the submarine. Using a spring I glued it to the front of the card and then to the back of the submarine. It's now a wiggly submarine. Just thought I'd add a little more fun to the card. 

This was a fun card to make. LOTS of stamping but so worth it.

Thank you SO very much for taking your time to stop in and see today's children's birthday card,
Wanda

Friday, July 07, 2023

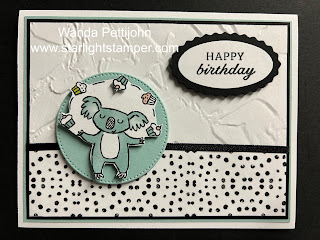
Zoo Crew, Days To Remember, Children's Birthday Card, Stampin' Up!

Hello and welcome to my blog. Today I have a fun, quick, and easy children's card to share with you. Please read on to see how this card was made.

The base of the card is a folded half-sheet of Basic White card stock. I cut a 4" x 5-1/4" piece of Pool Party card stock. Then a 3-7/8" x 5-1/8" piece of Basic Black card stock was cut, and the top layer is a 3-3/4" x 5" piece of Basic White card stock was cut.

I took the top Basic White layer and textured it using the "Painted Texture" embossing folder.  A 1-1/4" x 5" strip of Designer Series Paper (DSP) was cut from a sheet in the "Zoo Crew" 12" x 12" package. I glued that to the bottom of the Basic White piece. Then that piece was glued to the Basic Black piece. I took some Basic Black (retired) ribbon and taped the ends onto the back of the piece.

Before attaching the Basic Black layered piece to the Pool Party piece, I die cut the stitched circle from the center of it. I used the 3rd largest one. Once the Basic Black piece was attached to the Pool Party piece, I taped it all to the Basic White card base.

The cute little koala bear was fussy cut from a different sheet in the "Zoo Crew" package.  I had a cupcake that was chopped off from the factory cutting so I fussy cut it out and used a piece of Dimensional and attached it to the cupcake and matched it up with one in the juggling circle! It's too bad there was only one, it would have been fun if all of them could have had one pop up.  But I'll take the one because I had already cut it and it was fun!  The koala bear was set in place on the Pool Party circle using Dimensionals and the circle was set in place on the front of the card using Dimensionals.

The words are from the "Days to Remember" set and were stamped using black Memento ink on a scrap piece of Basic White card stock. I punched them out using the "Double Oval" punch. I also punched out a scalloped Basic Black circle using the same punch. I taped the words to the scalloped oval and added Dimensionals to the back and the piece was set in place on the upper right of the card and the card was done.

This was a quick and fun card to make. Such a cute koala bear, huh?

Thank you SO much for taking your time to stop in and see today's children's birthday card,
Wanda