Pin It

Showing posts with label Teen Birthday Cards. Show all posts

Tuesday, May 13, 2025

Wildflower Birthday, Stylish Shapes, Birthday Card, Stampin' Up!

Hello and welcome to my blog. Today I have another birthday card using the "Wildflower Birthday" 12" x 12" Designer Series Paper (DSP).  Please read on to see how quickly this card went to gether.

The base of my card is a folded half-sheet of Basic White card stock. It opens on the right and the fold is on the left. 

I cut a 4-1/8" x 5-3/8" piece of Blueberry Bliss card stock for the layer. On top of that is a 4" x 5-1/4" piece of Soft Sea Foam card stock and on top of that is a 3-3/4" x 5" piece of DSP. I taped these layers together.

The balloon is from the "Wildflower Birthday" package and was set in place using Dimensionals.

The words are from the "Simply Said" set and were stamped using Blueberry Bushel ink. I cut them out using the die from the "Stylish Shapes" set. I set it in place on the lower left using Dimensionals.

I added some "Itty Bitty Bokeh" sequins to the front and the card was done.

This was such a quick card to make and it has a fun and cheery feel it to it. This would be great for a child, a teen or even an adult!

Thank you SO much for taking your time to stop in and see today's birthday card,
Wanda

Friday, April 26, 2024

Rock & Roll, Rock Star, Teen Birthday Card, Stampin' Up!

Hello and welcome to my blog. Today I have a teen birthday card to share with you. I found it on Pinterest and thought I'd give it a try since I had almost a full package of Designer Series Paper (DSP) from the "Rock & Roll" 12" x 12" package. You can see the original card here. Please read on to see how I made the card.

The base of the card is a folded half-sheet of Real Red card stock. It opens on the right and the fold is on the left.

I cut a 4" x 5-1/4" piece of Basic Black card stock for the layer and a 4-1/2" x 5-1/4" piece of Basic White for the inside. I taped that piece in place.

A 3-3/4" x 5" piece of Basic White card stock was cut for the front of the card.

The DSP was cut at 2" x 3-3/4". Did you ever look at the pieces after you cut them and think you cut them too small. Somehow when they come off my cutter they look smaller than I thought they should be. I did have the size right but it just looked small to me. Anyway, after cutting the DSP I cut a Real Red piece to measure 2-1/4" x 3-3/4". I taped the two layers together. I set them on top of the card so I could see where the words should go.

The words are from the "Rock Star" set and were stamped using black Memento ink. After stamping the words I taped the DSP layer to the front of the card about 5/8" up from the bottom edge.

The guitar was stamped next and die cut. Then colored using the dark Real Red Blends pen.

The circle is from the "Everyday Details" set and was cut from a scrap piece of Basic White card stock. At the same time I also die cut the stars using a scrap piece of Real Red card stock. I taped the circle in place and then I glued the bottom part of the guitar in place. I added a small dot of glue and set the stars on the card and the card was done.

This was a quick and fun card to make. I may make some more using different colors. I have an awful lot of DSP left!

Thank you SO much for taking your time to stop in and see today's teen birthday card, 
Wanda

Tuesday, January 30, 2024

Rock Star, Rock & Roll DSP, Birthday Card, Stampin' Up!

Hello and welcome to my blog. Today I wanted to make a masculine/teen birthday card and I wanted to use the same card layout as yesterday and this is what I came up with. Please read on to see how the card was made.

The base of my card is a folded half-sheet of Basic White card stock. Once cut on the 8-1/2" side the piece measures 4-1/4" x 11".  

A 4" x 5-1/4" piece of Basic White piece of card stock was cut so the Designer Series Paper (DSP) could be taped to it. I like doing it this way so I can make sure I get my pieces on evenly. You can tape your DSP directly to the card base and omit the 4" x 5-1/4"piece of card stock. I'm not that confident so I just cut the piece.

The DSP is from the "Rock & Roll" 12" x 12" package. I cut a 4" x 4" piece from one of the sheets. Then I cut that sheet at 2-3/4" leaving me with a 1-1/4" piece for the bottom part of the card. I taped these pieces to the 4" x 5-1/4" piece I cut. 

Then I took a 6" piece of black ribbon (not a Stampin' Up! product) and I taped the ends to the back of the 4" x 5-1/4" piece. If you didn't use this piece you will need to tie the ribbon all the way around the card. I didn't want to add a knot or a bow to the card because I wanted to keep it masculine looking. Once the ribbon was on I taped the piece to the card base.

Next I stamped the words from the "Rock Star" bundle using black Memento ink on a piece of Basic White card stock. I die cut it using the die from the bundle. I also die cut two of the lightening bolt pieces using Basic Black card stock. I set the word piece in place using Dimensionals and I glued the lightening bolds to the front of the card and the card was done.

I'm not a big fan of monochromatic cards and to me this one seems a bit blah. I think the next time I use that DSP I will be adding some color to it. Other than the color, I do like the layout. It was a very quick and easy card to make.

Thank you SO very much for taking your time to stop in and see today's masculine/teen birthday card,
Wanda


Monday, May 15, 2023

Enjoy the Rhythm, Birthday Card, Teen, Masculine, Stampin' Up!


Hello! I'm glad you found your way here today. I have another card using the "Enjoy the Rhythm" set.  This one made me laugh. I found a card on Pinterest using a stamp that was similar.  My card is not half as nice but it is what it is! You can see the original card here. The set used there is not a Stampin' Up! set but I thought I would try to make this set work. It did work but not as well!

The base of the card is a folded half-sheet of Basic White card stock. The card stock was cut in half on the short side so after it was cut it measured 4-1/4" x 11".  This card opens on the bottom and the fold is on the top.

I cut a piece of Whisper White card stock that measured 4" x 5-1/4" and I textured it using the "Painted Texture" embossing folder.  I glued it to the front of the card base.

Next I stamped the drums from the "Enjoy the Rhythm" set using black Memento ink on a piece of Basic White card stock. I die cut them with the largest stitched circle die in the "Stylish Shapes" die set. 

Then I die cut the ring. I used the largest die and the second largest die in the set. I set them on a piece of Basic White card stock and die cut them both at the same time. I used post it tape to hold them so they didn't shift in the Big Shot. I glued the ring to the stamped circle. Dimensionals were added to the back and the piece was set in place on the front of the card.

The words are from the same set and were stamped using black Memento ink on a scrap piece of card stock and punched out using the "Double Oval" punch. I set the words in place on the front of the card using Dimensionals and the card was done.

I like how quick I was able to make a card but I'm not happy that it didn't turn out as I hoped it would. But as I said at the beginning of this post, it is what it is. And you all know I share the good, the bad, and the ugly with you.  This one is not ugly but it's leaning a lot towards the bad!  LOL

Thank you SO very much for taking your time to stop in and see today's birthday card,
Wanda

Sunday, May 14, 2023

Enjoy the Rhythm, Birthday Card, Masculine Card, Stampin' Up!

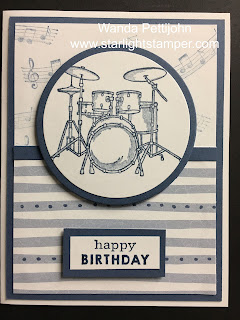
Hello! Today I have a fun card for you that is quick and easy to make. It can be used for that music lover in your life. Please read on to see how the card is make.

The base of the card is a folded half-sheet of Basic White card stock. I cut a 4" x 5-1/4" piece of Misty Moonlight card stock. And then I cut a 3-3/4" x 5" piece of Basic White card stock.

The Designer Series Paper (DSP) is from the "Countryside Inn" 12" x 12" package. I cut it at 2-3/4" x 5". I

I stamped the music from the "Enjoy the Rhythm" set to the Basic White 3-3/4" x 5" piece using Misty Moonlight ink that was stamped off once. I stamped on the card stock twice before I re-inked it and stamped off again.  I taped the DSP to the bottom of that piece and I added a 5" x 1/4" piece of Misty Moonlight card stock as a divider between the Basic White card stock and the DSP. 

Before taping the stamped Basic White piece to the Misty Moonlight layer, I die cut the largest circle from the "Layering Circles" die from the center of that piece of card stock. Then I taped the Basic White piece to it and I taped that to the card base,

The drum set is from the "Enjoy the Rhythm set and was stamped using Misty Moonlight ink. I die cut it with the second largest circle in the "Layering Circles" die set.  I taped the two circles together and set them in place using Dimensionals. 

I stamped the words from the same set on a scrap piece of Basic White card stock. The piece measured 1-5/8" x 5/8" after trimming. The Misty Moonlight layer behind it measured 7/8" x 1-7/8". I taped the layers together and set the words in place using Dimensionals and the card was done.

I love monochromatic cards. This one is perfect for both male and female. Great for teens! It was a fun card to make.

Thank you SO very much for taking your time to stop in and see today's birthday card,
Wanda

Tuesday, January 31, 2023

Enjoy the Rhythm, Teen Birthday Card, Stampin' Up!

Hello! I'm so happy you came to see today's card. I thought I would play with a new set. The "Enjoy the Rhythm" set. I wanted to have a set that would be good for teens and especially boys. There's so many floral cards that lean towards females so I thought I'd get a set that would cover all three, females, males and teens!! Plus I think it would be great Father's Day or dad's birthday card as well. Read further to see how I made this card.

The base of my card is a folded half-sheet of Basic White card stock. This card opens on the right and the fold is on the left

I stamped the background using the musical notes from the set and Balmy Blue ink. I stamped off once and then stamped twice on the card before I inked up and stamped off again. 

The Designner Series Paper (DSP) is from the "Dandy Designs" 12" x 12" package. I cut a 5-1/4" x 1-1/2" piece and a 5-1/2" x 1-3/4" piece of Balmy Blue for the layer. I taped the two pieces together

I stamped the guitar from the "Enjoy the Rhythm" set using black Memento ink and I die cut it using the second largest die in the group of four dies in the "Rectangle Stitched" framelets set. I cut a Balmy Blue layer that measured 1-1/2" x 3-1/2".  I taped the two pieces together.

Next I stamped the words from the same set using black Memento ink. I die cut them using the second smallest circle die from the "Layering Circles" set. And I used the second smallest scalloped circle for the layer behind it, cutting it from a scrap of Balmy Blue card stock.

I was now ready to assemble my card.

The DSP strip was taped to the right side of the card. Something I don't usually do, my strips seem to go to the left but today I thought I would change it up. It's about 5/8" from the side edge.

Then I set the guitar piece in place using Dimensionals. It's about 1" from the fold and about 1" from the top and the bottom of the card.

Dimensionals were added to the right side of the word piece and double-sided tape to the left and that piece was set in place on top of the guitar piece.  And the card was done.

I had second thoughts about this set after I saw it in my order but now that I've looked at it closer I can see a lot of possibilities with it. This was a fun and quick card to make.

Thank you SO very much for taking your time to stop in and see today's teen birthday card,
Wanda

Monday, July 26, 2021

Sweet Ice Cream, Birthday Card, 2021-2022 Stampin' Up! Catalog

While I was looking for something else on Pinterest, I ran across this card and there was something about it that caught my eye and I had to give it a try. I didn't have enough Bermuda Bay card stock so I improvised. 

The base of my card is a folded half-sheet of Basic White card stock. The original card is done using a half-sheet of Bermuda Bay card stock. I did like that look so I just scaled down the layers to make the Basic White card base work.

The Bermuda Bay layer was cut at 4-1/8" x 5-3/8". And the Pool Party layer on top of that was cut at 4" x 5-1/4".  There, now I got the colors that were used on the original card and could have a Basic White card base. I taped the two layers together and then I taped them to the front of the card.

I cut a scrap piece of Designer Series Paper (DSP) from the "Ice Cream Corner" 12" x 12" package. My scrap measured 1-1/2" wide and I cut it to 4-1/2" long. I was glad I was able to use that strip of DSP. You can make your DSP piece wider if you'd like. I just went with the piece I had. I cut a 1-5/8" x 4-5/8" piece of Bermuda Bay card stock for the layer. I taped those two layers together and then I taped it to the left side of the card.

The focal piece is cut from a piece of Basic White and it measures 2-1/4" x 3-1/4" and the Bermuda Bay layer was cut at 2-3/8" x 3-3/8".

I took the Basic White piece and I stamped the dots using the image from the "Sweet Ice Cream" set using Pool Party ink. The words were added next. They are from the same "Sweet Ice Cream" set and were stamped using Soft Suede ink.  I taped those two layers together and then taped it to the front of the card.

I stamped the ice creams using Petal Pink, Crushed Curry and Soft Sea Foam inks. I punched them out using the matching punch. I stamped the sprinkles using Soft Suede ink.

The cone was stamped using Cinnamon Cider ink and the "texture" was stamped using Soft Suede ink. I punched that piece out.

I glued the Soft Sea Foam colored ice cream to the top of the cone. Then I glued the Crushed Curry ice cream to the Soft Sea Foam ice cream and then the Petal Pink ice cream was glued in place.  I added Dimensionals to the back and I set the piece in place on the Basic White focal piece. 

I had some pale yellow rhinestones so I thought I'd add them to the focal piece and the card was done.

This was a very fun, quick and easy card to make. I SO love this ice cream set. I saw another fun and clever card made using this set and I'm thinking about giving it a try since it involves images that I have not used yet. I'd like to say that I used every image in this set before it retires (whenever that is)!

Thank you SO much for taking your time to stop by and see this fun ice cream cone birthday card,
Wanda

Tuesday, July 13, 2021

Sweet Ice Cream, Birthday Card, 2021-2022 Stampin' Up! Catalog

This was such a sweet card. I saw it on Pinterest and just had to make it. I didn't have some of the same items but I made it work. You can see the original card here

The base of the card is a folded half-sheet of Basic White card stock.  On top of that is a 4-1/4" x 5-1/2" piece of Basic White card stock that was textured using the "Brick & Mortar" embossing folder. I glued it to the front of the card base.

I cut a 1-5/8" x 5-1/2" piece of Designer Series Paper (DSP) from the "Ice Cream Corner" 12" x 12" package. I used the scalloped edge from the "Scalloped Contours" dies. I lied up the bottom edge of the die to the bottom edge of the piece of DSP.  I glued the DSP to the top of the card on the textured piece.

I stamped the ice cream tops using Flirty Flamingo, Granny Apple Green, and Bermuda Bay inks. The cone was stamped using Cinnamon Cider ink and the texture on the cones was stamped using Early Espresso ink. The sprinkles on each ice cream piece was stamped with the matching colors. I punched them out using the coordinating "Ice Cream Cone Builder" punch.  

The first ice cream piece was glued to the top of the cone.  Then it was set in place using Dimensionals. The next ice cream was glued to the card base by only adding glue to the top part of the ice cream. It was then repeated for the top piece of ice cream.

The words are from the same "Sweet Ice Cream" set and were stamped using Early Espresso ink. I used the retired "Rectangle Stitched" framelets on both of the word pieces. If you don't have those dies the peices measure 1-1/4" x 3-1/4" and 1/2" x 2-1/2".  The larger one was glued in place and the thinner one was set in place using Dimensionals.  And the card was done.

This was a very fun card to make and I was happy that the package of DSP had some striped designs to make the awning. It just seemed perfect for the card. 

This card can be used for adults, teens and children. It's just a perfect image for all ages!

Thank you SO very much for taking your time to stop by and see this fun birthday card,
Wanda


Monday, May 18, 2020

Music From the Heart, Birthday Card, 2020 Stampin' Up! Spring Catalog

Today's card was directly from Pinterest.  You can see it by clicking here.  I thought it was such a sweet card, plus it was from the "Music From the Heart" set that I have not played with much.  And I think this set may be retiring at the end of this month.  That makes me sad because I didn't get to play with it as much as I thought I would.  Which tells me that I bought too many stamps and I need limit the amount of stamps I buy in the new catalog.  And with our annual garage sale cancelled because of the virus, I didn't get to sell my old sets to get money for the new ones.  SO, I will be limiting my shopping this time around.  A lot of thought will go into my purchases instead of just buying because I like it.

Let me tell you how I made this card.  The base of the card is a folded half-sheet of Whisper White card stock. 

On top of that is a 3-1/2" x 4-3/4" piece of Basic Black card stock.

The Whisper White layer was cut 3-3/8" x 4-5/8".  I didn't stamp the words until I had made the squares.

I stamped the piano from the "Music From the Heart" set using black Memento ink.  Then I die cut it using the second largest "Stitched Squares" dies. 

I cut a 2-3/8" x 2-3/8" Basic Black square and I taped the stitched square to it.  I added just the tiniest amount of tape to the back of the square and set it in place on the larger Whisper White piece so I could see where the words were to be stamped.

I stamped the words from the "Music From the Heart" using black Memento ink.  I also added the musical note from the same set, using black Memento ink.

Next I die cut the paper ribbon.  I used the die from the "Ornate Borders" dies and I used Real Red card stock.  The card stock made the top layer look lumpy, so I would recommend using Dimensionals to set the stitched square in place on top of the Basic Black square.  Or maybe ribbon wouldn't be as bulky. I taped the Real Red strip to the Basic Black square. I left the right side long so I could trim it once I got the squares set in place. I just used a scissors and trimmed it off.

I taped the large panel layers to the card base and the card was done.

This was a very quick and easy card to make. I like the looks of it and I like the red in the middle. The eye is attracted to red and your eyes are drawn right to the center of the card, just where you want it to be.  And from there it moves to the words.  

Have fun making one, it's a fun birthday card for males, females and even teens!

Thank you SO much for taking the time to stop by today,
Wanda

Sunday, February 09, 2020

Music From the Heart, Birthday Card, Stampin' Up! 2020 Spring Catalog

Today I decided to play with the new Stampin' Up! 2020 Spring catalog's "Music From the Heart".  I thought this set was so darn cute.  There's a fun guitar and a grand piano in the set too. I'm sure I will be playing with those in a few days.

The base of my card is a folded half-sheet of Basic Black card stock.  On top of that is a 4" x 5-1/4" piece of Real Red card stock.

I stamped the images on a 3-3/4" x 5" piece of Whisper White card stock using black Memento ink.  The hearts were stamped using Real Red ink and then just stamping two more times without inking it up again.

The notes were added one at a time and I probably should have space them out a little bit more so there isn't that big space at the end of the music staff.

I stamped the treble clef and colored the heart in using my Real Red marker.  

The words are from the same set and were also stamped using black Memento ink.

I taped all the layers together and I added a 4" x 5-1/4" piece of Whisper White card stock to the inside and the card was done.

This was a very quick and easy card to make.  The part that took the longest was putting the notes on in the right spot. I wanted them to be the "Happy Birthday" song notes.  

What's fun about this card is that it can be for male or female and even teens!  But it's perfect for that music lover!!!

Thank you SO much for stopping by today,
Wanda

Wednesday, March 28, 2018

Epic Celebrations, 2018 Sale-a-Bration, Teen Card

Of all the cards I have made using the "Epic Celebrations" set, I do like this one. But the one I made a few weeks back is still my favorite.  You can see that card here.

This card I found on Split Coast Stampers.  Yup, I still go on there now and then. Sometimes I even post a card there! Not as much as I use to but it's still a fun site to post and visit! You can see the original card here.  There's not too much difference at all, I had all the same materials. Though I did use the Blends pens for my coloring.  I'm SO hooked on those pens.

The base of this card is a folded half-sheet of Night of Navy.  On top of that is a 4" x 5-1/4" piece of Whisper White card stock.  The 3 different strips of Washi Tape were added.  The tape is from the "Basic Pack 3" set in the 2017-2018 main catalog.  I've hardly used any from those rolls.  Story of my life when it comes to Washi tape!!!

I stamped the words from the "Epic Celebrations" set using Night of Navy ink on Whisper White card stock. I die cut them with the second largest stitched circle die.  I found the scalloped die that was just a little larger than the stitched one and die cut a piece of Bermuda Bay card stock.

The guitar was stamped and fussy cut out. I colored it with the Bermuda Bay light Blends pen and then colored some highlights with the Bermuda Bay dark pen.  I colored the handle part (I don't know my guitar parts names!) using light Crumb Cake and I colored in the darker areas that you see using the dark Crumb Cake Blends pen.

The guitar is taped onto the stitched circle and the stitched circle with the scallop attached were set on the card front using Dimensionals.

And that was it. A super quick and easy card to make. I REALLY like the looks of this card.
Thank you SO much for visiting today,
Wanda


Tuesday, March 27, 2018

Epic Celebration, Beautiful Bouquet, Teen Birthday Card, 2018 Sale-a-Brations

Once again I played with the "Epic Celebration" Sale-a-Brations" set and I used the "Picture Perfect" Decorative Series Paper (DSP).  But this time I used the backside of the DSP.  On the back of this piece is a photo of rows of package bows.  It's pretty but I find it difficult to work with those images.  Fortunately I found the card I made yesterday and liked the image so I ran with it.  But today I was looking for something festive and I found it on the back of the DSP.

To make this card I used a folded half-sheet of Island Indigo. On top of that is the DSP that was cut 4-1/8" x 5-3/8".  The Basic Black piece was cut 3-7/8" x 5-1/8" and the Whisper White piece was cut 3-5/8" x 4-7/8".  I had first cut my Whisper White piece 4-1/4" 5-1/2" and trimmed it down after I was done stamping and coloring.

I stamped the guitars and colored them in using Blends markers. 

The words are from the "Beautiful Bouquet" set, I stamped them using black Memento ink. I die cut them with the oval die and I die cut a scalloped oval. I used the Basic Black layer to cut my oval from. It's hidden under the Whisper White piece, so why not???  When I remember to do that!!  I set the words in place using Dimensionals and the card was done. 

What a fun teen birthday card!!  It was super quick to make too.  I didn't use anything to line up the guitars, I just eyed it and it turned out just fine!!

Thank you SO much for visiting today,
Wanda

Friday, March 23, 2018

Epic Celebrations, Birthday Delivery, Teen Birthday Card

I don't make very many teen birthday cards, mostly because there are not a lot of teen orientated stamps!  The "Epic Celebrations" 2018 Sale-a-Brations" set is a perfect teen stamp set.  If you color the shoes pink you have a teen girl card!!!  Simple as that.  

I opted to play with this set today because there's only a week or so left until Sale-a-Brations ends and I never feel like I got to play with the sets as much as I wanted to.  So I have devoted most of my time to making cards using the Sale-a-Brations sets and then when it's over I will move on to the other sets I bought in the Occasions catalog.  There were just too many fun stamp sets to play with!!

For this card I used a folded half-sheet of Smoky Slate card stock.  On top of that is a 4" x 5-1/4" piece of Night of Navy.  And the Whisper White piece is cut 3-7/8" x 5-1/8".  

I stamped the shoes and colored them in with the Smoky Slate and Night of Navy Blends markers. Those are such fun markers to play with. I like coloring with them more than using a blender pen. The blender pen tends to make the paper pill if you work in one spot too long.  You don't have that problem with the markers.  Plus they color so smoothly too, there is no demarcation from going over the color again, or touching up.  Now ya gotta love that!!!

After coloring the shoes I made a little bit of a shadow under them with the Smoky Slate pen.  I stamped some dots using the Smoky Slate ink pad and the dotted stamp that came in the set. 

The words are from the "Birthday Delivery" set and I stamped them using Basic Gray ink.  It's a pretty plain and simple card.  Perfect for a teenager.  They will look at it, take the money out and toss the card!!!

So there you have it, a very fun and easy teen birthday card!

Thank you SO much for visiting today,
Wanda

Wednesday, March 07, 2018

Epic Celebrations, 2018 Sale-a-Bration, Card for Teens

I think the "Epic Celebrations" Sale-a-Brations set is a lot of fun. It's such a great teen card.  There's not a lot of teen stamp sets out there.  

The base of this card is a folded half sheet of Crumb Cake. The card was cut on the 8-1/2" side at 4-1/4".  It opens from the bottom.  On top of that is a 4-1/8" x 5-3/8" piece of Tranquil Tide. And on top of that is a 4" x 5-1/4" piece of the "True Gentleman" Decorative Series Paper (DSP).

I die cut the scalloped Tranquil Tide piece and the oval scalloped piece from the piece that was layered on top of the card base.

I stamped the shoes and the words using Very Vanilla card stock.  I used black Memento ink for that. I colored in the shoes using the Tranquil Tide marker.  Super quick and easy!!
I layered the shoe image on top of the round scallop and the words on top of the oval image.  Oh, I used the Stitched Oval die for the words. I set the two in place on top of the DSP using Dimensionals. 

It's a pretty basic and simple card to do.  And the "True Gentleman" DSP is a lot of fun to play with.

Thank you SO much for visiting today,
Wanda

Wednesday, February 07, 2018

Epic Celebrations, Party Panda's Teen Birthday Card, 2018 Sale-a-Brations

What a fun teen birthday card.  To me it looks like a masculine teen card.  Something that I rarely see in handmade cards.  

I found this card on Pinterest.  I believe the original card was done in German but you can use whatever wording  you want.  I was mostly attracted to the colors used.  You can see that original card here.  I tried to go directly to the source but I wasn't able to.

I made this card by using a folded half-sheet of Pacific Point card stock.  On top of that is a 4" x 5-1/4" piece of Whisper White.  I had stamped the shoes and colored them using Pear Pizzazz ink and Pacific Point using a blender pen.  I added a little bit of Smoky Slate to the right side and between the shoes to give it some depth.  Another way to give it some depth is to fussy cut the shoes out.  Doesn't sound fun to me!!! LOL  After I stamped the shoes I punched them out using the new "Starburst" punch.  Remember when we use to use a different punch (many years ago) and we'd turn the punched piece and punch it again to get a starburst look?  Now we can achieve it with just one punch!  I punched a 2-1/2" circle using Pacific Point card stock.  I taped the two pieces together and set them aside.  

On the Whisper White piece, I stamped the dots that came with the "Epic Celebrations" set. I stamped the Pear Pizzazz dots first and then the Pacific Point ones. But I did stamp off using the Pacific Point ink.  Once those were stamped I set the circles on top of the card to see where to stamp the words.  The words are from the "Party Panda" set. I used black Memento ink to stamp them.  Then I set the circle layers in place using Dimensionals and the card was done.  I think the longest part of this card was the coloring and that really didn't take that long.

Thank you SO much for visiting today,
Wanda