Pin It

Showing posts with label Masculine Thinking of You Cards. Show all posts

Friday, September 27, 2024

Thoughtful Wishes, Thoughtful Journey, Simply Said, Thinking of You Card, Stampin' Up!

Hello and welcome to my blog. Today I have a "thinking of you" card to share with you today. I found it on the internet and I did make a few small changes. Please read on to see how it was made.

The base of my card is a folded half-sheet of Basic White card stock. It opens on the right and the fold is on the left. 

A 4-1/8" x 5-3/8" piece of Misty Moonlight card stock was cut and then textured using the "Distressed Tile" embossing folder. I glued it to the front of the card.

Next I cut the Designer Series Paper (DSP) from the "Thoughtful Journey" 6" x 6" stack. I cut my piece at 2-1/8" x 4-1/2". The Fresh Freesia layer behind it was cut at 2-1/4" 4-5/8" and the DSP strip was taped to it.

I die cut the leafy image on the side using another piece of DSP from the same package. The die is from the "Thoughtful Wishes" bundle. I turned the tree strip over and added a line of tape on the back and then turned it over so it was face up and then pressed it down onto the die cut piece. Then the piece was glued to the front of the card. I only used glue on the layered piece.

The words are from the "Simply Said" set and were stamped using Versa Mark on a scrap piece of the DSP that was from the cutting the tree panel.  It's great when you can use scraps, isn't it? I sprinkled white embossing powder on the words and heat set them. Then I cut them out using the dotted rectangle die from the "Everyday Details" set. I set the piece in place on the front of the card using Dimensionals. 

I added a couple of "Faceted Gem" on the front and get this, they are currently in the catalog!  I was just as surprised as you! LOL

This was a fun and quick card to make. It looks like it could be used for other occasions like a sympathy card, a get well card and even a masculine birthday card,  I like how it turned out. I had made two at the same time since I was cutting the DSP I just cut the trees from the other side and was able to get two cards from the one sheet. Plus there's a little strip left from the center of the image and I might use that for a future card.

Thank you SO very much for taking your time to stop in and see today's thinking of you card,
Wanda

Tuesday, June 04, 2024

City Sights, Thinking of You Card, Stampin' Up!

Hello and welcome to my blog. Have you ever seen a handmade card, a stamp set or a stamping kit and just obsessed about it until you bought it or copied it?  Well, that's what happened here. I don't usually purchase kits. I saw the "City Sights" kit and thought it was so cool.  And I thought about it and thought about it and finally decided I needed to get it. Well, I got it and today I thought I'd play with it. Please read on to see how I put this card together.

The card base is preprinted and scored so you just fold it in half. I punched out the corrugated piece, the word piece and the city scape piece. The kit came with a cube of Pebble Path ink and stamps. I stamped the skyline on the punched out piece and that was it for the stamping.  Pretty simple and quick. 

Next I put the card together. First thing to put on was the corrugated piece, it was set in place with the Dimensionals that were included in the kit.

Then the city scape piece was added. Dimensionals were added to the top and some Tear n Tape to the bottom part, also included in the kit. 

The words went on top of the city scape using more Dimensionals. 

And for the final touch, three copperish colored "pearls" were added and the card was done. 

I just love the background on this card. I'd love to see Stampin' Up! come up with some Designer Series Paper (DSP) using a city background like that. It's SO pretty.  This was a fun kit to play with. There's also another style card in the kit and sometime soon I'll put it together and share it with you.

Thank you for taking your time to stop in and see today's thinking of you card,
Wanda

Wednesday, February 08, 2023

Playing in the Rain, Beautifully Happy, Thinking of You Card, Stampin' Up!

Hello! So happy to share today's card with you. I was looking through the "Rain or Shine" 12" x 12"package of Designer Series Paper (DPS) and found these fun rain drops. So I pulled the sheet out. Then I found another fun sheet with a fox, a bunny and a turtle on them. And there's lots of embossing on the sheet. The fox here has his hat and shirt embossed.  So cute! Read on to see how I made this card.

The base of my card is a folded half-sheet of Basic White card stock. It opens on the right and the fold is on the left.

I cut a 4" x 5-1/4" piece of Balmy Blue for the large layer. Then in the center of that piece, I die cut the 4th largest stitched rectangle from the "Rectangle Stitched" framelits set.  Once that was cut I taped the Balmy Blue piece to the front of the card.

A 3-3/4" x 5" piece of DSP was cut for the next layer. Those raindrops are also embossed. I taped that to the Balmy Blue layer.

Next I die cut the Basic White stitched rectangle using the 5th die in the same "Rectangle Stitched" set. I stamped Balmy Blue rain drops on it. They are from the "Playing in the Rain" set. I did stamp off once before I stamped on the rectangle. 

Before I taped the two rectangles together, I took some Balmy Blue ribbon I had and taped two pieces to the Balmy Blue rectangle. I did snip the piece of ribbon because I wanted to make sure it wouldn't be bulky and bulge on the Basic White piece. The Basic White piece was taped on top and then the rectangles were centered on the front of the card using Dimensionals.

The fox was fussy cut out. There's matching dies but I didn't buy the set, so I had to fussy cut. It wasn't too bad. The umbrella handle was a bit touchy and a weak spot but I managed!! LOL Dimensionals were added to the back and the piece was set in place on top of the rectangle.

The words are from the "Beautifully Happy" set and were stamped using black Memento ink on a scrap piece of Basic White card stock. I punched them out using the "Double Oval" punch. I also took a scrap piece of Balmy Blue and punched out the scalloped oval from the same punch. I taped the two pieces together. A Dimensional was added to the bottom left and tape to the upper right and the piece was set in place on the front of the card. And that completed the card. 

This was a fun and pretty quick card to make. Even with the fussy cutting, I can see myself making another one in the near future.

Thank you SO very much for taking your time to stop in and see today's thinking of you card,
Wanda

Friday, April 08, 2022

Grassy Grove, Masculine Birthday, Sympathy or Father's Day Card, Stampin' Up!

When I saw this card on Pinterest, I wanted to make it. I had not played with the "Grassy Gove" bundle in a while. It's such a beautiful set and in a few minutes you can have a beautiful card. I found the original card here

The base of my card is a folded half-sheet of Old Olive card stock. I cut two 4" x 5-1/4" pieces of Basic White card stock. One for the front and one for the inside. I taped one on the inside. And the other I die cut the forest scene using the die from the "Grove Dies" package. 

I took a piece of Designer Series Paper (DSP) from the "New Horizons" 6" x 6" stack and I cut it at 3-7/8" x 5-1/8".  I turned the white piece over and I used my Mono glue to affix the DSP to the card stock. I could have used a sticky sheet to make the whole piece a sticker but I forgot about it at the time. The glue worked well. I just ran it all around the outside edge and then put tiny little dots on the areas I thought would stick up. I set it aside to set up for a minute or two.

Then I taped the layers to the front of the card base and that was it.  I didn't add any words because I wasn't sure what I was going to use it for. But it can be used for a masculine birthday, Father's Day, masculine thinking of you, a sympathy card, or even a masculine get well card.  It's such a pretty scene and a SUPER EASY card to make!

Thank you SO much for taking your time to stop by and see today's masculine orientated card,
Wanda  

Monday, March 07, 2022

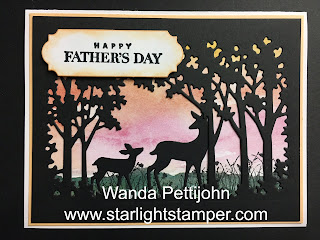
Celebrating You, Grassy Grove, Father's Day Card, 2022 Stampin' Up! Spring Mini Catalog

What I really like about this "Grassy Grove" set is that it's a perfect masculine set. It's great to use for a masculine birthday, Father's Day, get well, thinking of you, and even a sympathy card. My set was still sitting out (no surprise there, right?  LOL) so I thought I'd make another card with this set. It's super easy and quick too!

The base of my card is a folded half-sheet of Basic White card stock. The layer on top of it is a 4-1/8" x 5-3/8" piece of Pale Papaya card stock. You could make the card base a half-sheet of the Pale Papaya card stock if you want. I didn't because I was trying to save on my colored card stock. 

I took a piece of Basic Black card stock and cut it to 4" x 5-1/4".  I die cut the tree image using the die from the "Grove" die set that came with my "Grassy Gove" bundle. Then I cut a piece of Designer Series Paper (DSP) from the "New Horizons" 6" x 6" stack.  I cut it just a hair shy of the 4" x 5-1/4" size the Basic Black die cut piece is.   

Then I took some Basic Black card stock that I had sitting around with the double sided sticky sheet on it and die cut the two deers in the "Grove" set. 

I set the die cut tree piece on top of the DSP to see where I needed to stamp the grass from the "Grassy Grove" set. I used black Memento ink to stamp the grass in two places.  

Next I set the DSP down and put the Basic Black die cut tree on top to see where I wanted the deers to go. I removed the backing on the deers and set them in place. Then I glued the die cut tree image to the DSP. That piece was then glued or taped to the Pale Papaya piece. And then that was affixed to the card base. 

The words are from the "Celebrating You" set and were stamped on a scrap piece of Basic White card stock using black Memento ink. I die cut them with the die from the "Ornate Frames" die set. I took my blending brush and brushed the edges with Pale Papaya ink. I set the piece in place with Dimensionals and the card was done.

I think it turned out well. I LOVE the background. It's like a pretty sunset. I can seem making more of these for a masculine birthday, thinking of you and get well. They are quick, easy, and fun to make too.

Thank you SO very much for taking your time to stop by and see today's masculine card,
Wanda


Sunday, March 06, 2022

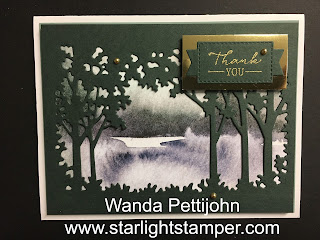
Grassy Grove, Many Messages, Thank You Card, 2022 Stampin' Up! Spring Mini Catalog

I found today's card on Pinterest. I was looking for a sample card using the "Grassy Grove" set. I wanted to keep it simple and quick. Plus I wanted to use some Designer Series Paper (DSP). I found the card here

The base of the card is a folded half-sheet of Basic White card stock. This card opens on the bottom and the fold is on the top.

I cut a 4" x 5-1/4" piece of Soft Succulent card stock for the layer.

A 3-7/8" x 5-1/8" piece of Evening Evergreen card stock was cut for the layer the trees were cut from. 
The trees are die cut using the "Grove" dies. 

A piece of DSP from the "New Horizons" 6" x 6" stack was cut just under 3-7/8" x 5-1/8".  I glued around the edges of the Evening Evergreen piece and set it on top of the DSP. I got mine a bit off and trimmed it with my scissors.  I added Dimensionals behind it and set it on top of the Soft Succulent piece. 

The words are from the same "Grassy Grove" set and were stamped on a scrap piece of Evening Evergreen using Versa Mark. Then heat embossed with gold embossing powder. I die cut them using the "Message" dies from the "Many Messages" bundle. There's a lot of fun dies in that set. It's fun because the words are all on one stamp and the dies are all on one piece of metal. So you can cut 20 words at one time. I only cut the one I needed. I was glad those words fit into that space because I really liked the ribbon look. I glued the word piece to a 2-1/16" x 1-1/16" piece of gold foil card stock. Dimensionals were added to the back of it and it was set in place on the front of the card.

I added a few gold "Metallic Pearls" to the front of the card and the card was done.

I want to play with this set some more. There's a LOT of DSP in that stack and there's some fun deers in the die set.  This would make a great Father's Day card, Masculine Sympathy card or Masculine get well card. Another versatile set!  I think I'll try another card without the DSP for those of you who didn't purchase the "New Horizons" package.

Thank you SO very much for taking your time to stop by and see todays' masculine card,
Wanda

Sunday, February 06, 2022

Let's Set Sail, Catch You Later, Masculine Birthday Card, 2022 Stampin' Up! Spring Mini Catalog

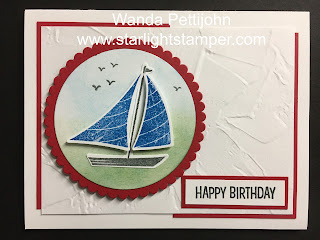
I thought I would bring out the "Let's Set Sail" set again and make a masculine birthday card. Here's what I came up with. Oh, and it was exactly what was in my head when I was thinking about how to make it!  Once in a while things work out! LOL

The base of my card is a folded half-sheet of Basic White card stock. This card opens at the bottom and the fold is at the top.

I cut two pieces of Real Red card stock measuring 2-1/2" x 3-5/8" for the back layers.

A 3-5/8" x 4-7/8" piece of Basic White card stock was cut and then textured with the "Painted Texture" embossing folder. I glued the Real Red pieces to the upper left and lower right corners of this piece of card stock and I set it aside to dry.

I die cut the second largest circle from the "Layering Circles" dies using Basic White card stock. I used my blending brush and scrubbed in some Soft Sea Foam at the bottom. Then I added some Mossy Meadow. I wanted a greener looking ocean because I needed a blue sky. I used Pacific Point ink for the sky and I also moved a bit of that color into the sea too. 

The sail boat was stamped using Basic Gray ink for the boat and Pacific Point for the sails. I punched them out using the "Sailboat Builder" punch. I set the pieces on the circle so I could see where to place the birds. I stamped the birds using Basic Gray ink. Then the boat was set in place on the circle using glue. I added the sails using Dimensionals. 

Next I punched out the largest scalloped circle using Real Red card stock. I taped the Basic White circle to the scalloped circle. Dimensionals were added to the back and the piece was set aside. I wanted to make sure I had room for the words.

The words are from the "Catch You Later" set and were stamped using Basic Gray ink on a piece of Basic White card stock that measured 1/2" x 1-7/8".  I cut a 5/8" x 2" piece of Real Red card stock for the layer. I taped the two pieces together and then glued them to the bottom right side of the card.

Then the large circle was set in place on the textured piece. This was then glued to the card base and the card was done.

This card could be made into a masculine get well card, thinking of you card, and even a sympathy card.

Thank you SO very much for stopping by to see today's masculine birthday card,
Wanda


Wednesday, June 16, 2021

Mountain Air, Thinking of You, Masculine Card, 2021-2022 Stampin' Up! Catalog

I was planning on making a masculine card and I saw the "Mountain Air" set that I bought last year and have never used. As I'm looking at the set I realized why. It's a bit more challenging that I thought it would be.  I was looking on Pinterest for some inspiration but wasn't seeing anything I liked so I just thought I'd give it a try in pieces.

I die cut the tree from the dies using Mossy Meadow ink. I cleaned up all the pieces that didn't just pop out and set it aside. 

I liked the mountains but I didn't like them all in a long row like they are on the stamp. SO I stamped them anyway using Balmy Blue ink. 

Then I stamped the smaller tree line that was just as long as the mountain line. I used Basic Gray for that.  I was liking what I was seeing.

There's cloud images in the set so I stamped a few of them using Balmy Blue ink that was stamped off once.

I decided to make this into a circle layered card. I love making those type of card using smaller images. It puts that tiny image into focus.  But I usually us it with two different size punches. So I need to look for two different size circles because those punches I usually use are way to small for this scene.

I ended up using the second largest Stitched Circle die and the next size larger plain circle die.  I cut a 3-7/8" x 5-1/8" piece of Basic Gray and a 3-3/4" x 5" piece of Basic White card stock. I die cut the largest circle first on the Basic White piece.  I set the die on the card stock and the tree over it to see where the circle needed to be moved so there was enough room for the words.  Then I set the circle in place and die cut it.

I set the Basic White piece on top of the Basic Gray piece.  Then I set the die inside the Basic White circle and lined it up. I held the die in place and removed the Basic White piece. I taped the die down so it wouldn't move and I ran it through my Big Shot.  

Next I stamped the words from the "Peaceful Moments" set using Basic Gray ink. Then I taped it to the Basic Gray piece. Dimensionals were added to the back and set in place on the card base.

I taped the top part of the tree and then added some glue to a piece of scrap paper and pressed the bottom part of the tree in it and then set the tree in place and the card was done.  

I now liked this set. But I can only make so many of these cards before it gets boring and I don't enjoy working with the set anymore.  But there are other shapes to explore!!!  And who knows, maybe I'll find something on Pinterest that will rock my world and I'll have to try to recreate it!

Thank you SO very much for taking your time to see today's masculine card,
Wanda

Friday, April 09, 2021

Art Gallery, Thinking of You Card, 2021 Stampin' Up! Spring Catalog

My "Art Gallery" set was still sitting out and I found out today I was in need of another thinking of you card. This is a fun and easy set to play with. Plus there's matching dies!!!  Gotta LOVE that.

The base of my card is a folded half-sheet of Basic White card stock. This card opens on the right and the fold is on the left.

I cut a 4" x 5-1/4" piece of Basic White card stock and textured it using the "Brick & Mortar" embossing folder (and it is NOT retiring).  I love the looks of this folder. It works with both female and masculine cards. I glued my textured piece in place. With some of the more dimensional embossed pieces, I will use glue to make sure I get it to stick better. Sometimes with the tape it will go on the whole area but because the area dips in, it won't stick to the card base. So I just glue it and I know the glue will solidly hold my piece in place.

I stamped the stem and leaves image using Old Olive ink. I die cut them with the matching die. Dimensionals were added to the back and set aside.

The flower was stamped using Daffodil Delight for the larger image and Crushed Curry for the second step image. Then I stamped some Mango Melody in the center using the small center stamp. I die cut the flower out using the matching die. I didn't like how the Mango Melody looked, so I ended up drawing over that image using some Tombow Mono glue. I let the glue dry and once it was dry I added a piece of gold foil and pressed it onto the sticky glue. Tombow Mono glue remains sticky once it's dry. Ever try to remove it from your fingers? What a mess!  I have a love hate relationship with this glue! LOL After the foil was pressed onto the glued area I took a stipple brush and brushed away the gold that didn't stick. It brushed away easily because the gold foil is so thin and fragile. You could use a toothbrush to do this too. Once I got all the loose gold foil off it ended up as you see it. Pretty, huh? I added Dimensionals to the back.

The words are from the same set and were stamped using black Memento ink on a scrap piece of Basic White card stock. I die cut it with the rectangle die from the bundle.  And now I was ready to assemble.

I set the stem piece in place and then the flower on top. I was going to have the words go over the stem but it didn't look quite right so I added it below the flower and I think it worked there much better. And the card was done!  

This was an easy and fun card to make. Plus super quick. I need to use that gold foil more often, it's fun and pretty!

Thank you SO very much for taking your time today to see this easy to make flower card,
Wanda


Monday, December 28, 2020

Forever Fern, Peaceful Moments, Thinking of You Card, 2020 Stampin Up! Catalog

I was checking my list of cards I have in my stash and I do not have very many "Thinking of You" cards. So here's today's card.

The base of the card is a folded half-sheet of Whisper White card stock. 

The textured pieces was done using the "Old World" embossing folder. I cut that piece 4" x 5-1/4" but after it was textured I needed to trim the short side so it measured 3-7/8" x 5-1/4".  I was pretty sure I cut it right before the embossing. So to be sure, cut yours at 4" x 5-1/4" and if after embossing the sides aren't even all the way around when set on top of the card base, you will need to trim it up.  But if I measured wrong that disregard the rambling above!!! LOL

I used the 4th smallest "Stitched Rectangle" for the focal piece. It's the rectangle from the group of 8 in the pack. That piece measures 2-1/2" x 3-1/4".  I stamped the leaf bunch from the "Forever Fern" set using Old Olive ink. This image was stamped twice. You can see the angle of the images by looking at the stems. It was kind of a corner to corner stamping. And the image was inked up both times.

The image was also inked up using Night of Navy ink on a piece of Whisper White card stock. I used the die to cut it out. After cutting it, I added it to the top of the rectangle piece using Dimensionals.  I tied a double bow using some linen and I glued it to the Night of Navy stem. I set this aside while I worked on more elements of the card.

I taped the textured piece t the card base.

Then I stamped the words from the "Peaceful Moments" set using Night of Navy ink on a piece of Whisper White card stock.  I took the smallest stitched rectangle and die cut the words out.

The Night of Navy triangle is actually a rectangle piece of scrap that I added some tape to and worked on onto the focal piece so it looks like a rectangle. 

Next Dimensionals were added to the back of the focal piece and the word piece and they were set in place on the front of the card.  And that was it. 

This was a very simple and quick card to make. It will also be a great birthday, sympathy, get well or Mother's Day card.  This is a very versatile set, that is why I bought it.

Thank you SO much for taking the time to stop by and have a look today,
Wanda

Sunday, November 08, 2020

Snow Front, Masculine Christmas or Holiday Card

As I promised, no Paper Pumpkin card today.  Though I have several other ones I'd like to make from that kit. I thought last months kit was fun but this one is just as fun and prettier because it's Christmas themed. I found this pretty card on Pinterest.  It's kind of busy but yet it's got some fun things going on in it. You've got the sun setting behind the mountains, pine trees in rows, a cute snowman and a little dear by a pond. You can see the original card here

The base of the card is a folded half-sheet of Mossy Meadow card stock. 

The focal piece was die cut using the largest "Stitched Rectangle" dies. The layer behind it is Coastal Cabana. I tried to cut it 4" x 5-1/4" but the stitched die piece was not 1/8" smaller, so you will need to adjust the size on your paper cutter.  My focal piece is Very Vanilla card stock.

I stamped the two mountains first using Soft Suede ink. I used a sponge dauber and So Saffron to make the sun.

The trees on the right were added first and then the green hills. Both were stamped using Mossy Meadow ink. Then the trees in the front and middle were added.

Balmy Blue that was stamped off once was used for the blue hills. The snowman and pond were also stamped using Balmy Blue ink.

The deer was stamped using Soft Suede ink.

I took my Basic Black marker and colored in the snowman hat and I used the Pumpkin Pie marker to make the snowman nose orange.

The layers were taped together and a 4" x 5-1/4" piece of Very Vanilla card stock was added to the inside and the card was done.

There was a lot of stamping on this card but it was worth it. It's a great winter/holiday card. It could even be used for a masculine birthday, get well, sympathy or thinking of you card.  It was a fun card to make!

Thank you SO much for taking the time to stop in today,                                                                          Wanda