Pin It

Wednesday, November 29, 2006

Gifts for a Friend

I made these gifts for a dear friend of mine. I hitched a ride with her to a stamping event. I am not fond of driving where I've never been before and begging rides is something I do often! My younger sister often refers to my getting rides as, "Driving Miss Lazy!" Anyway, I appreciated the ride and I made these for my friend.

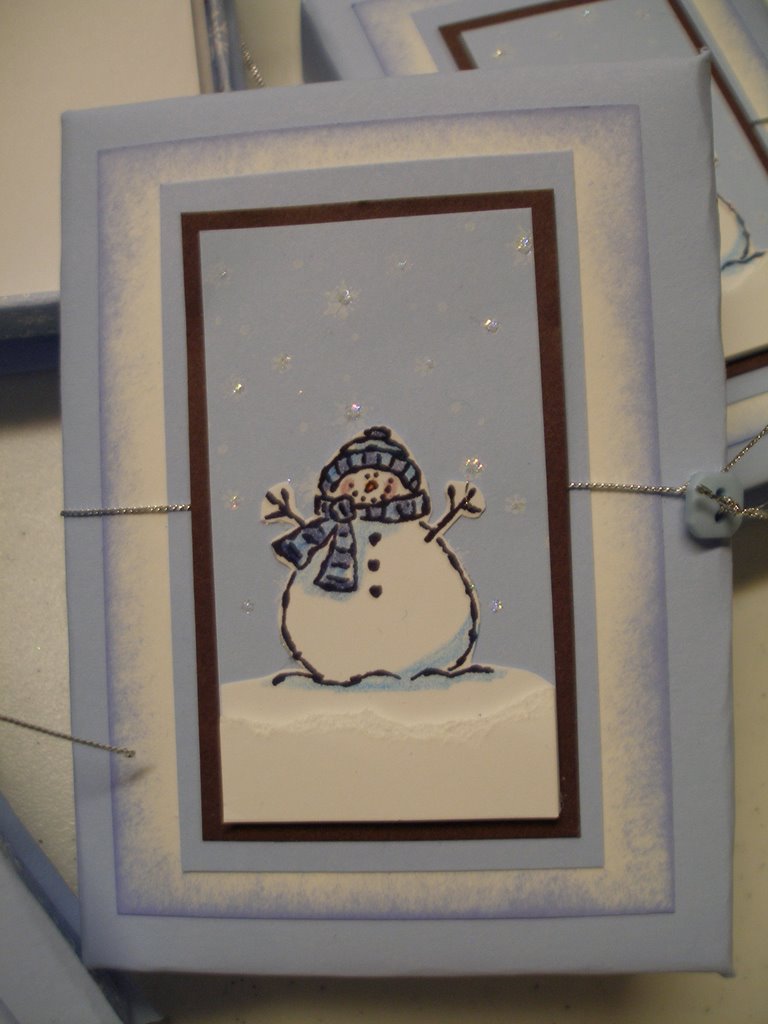
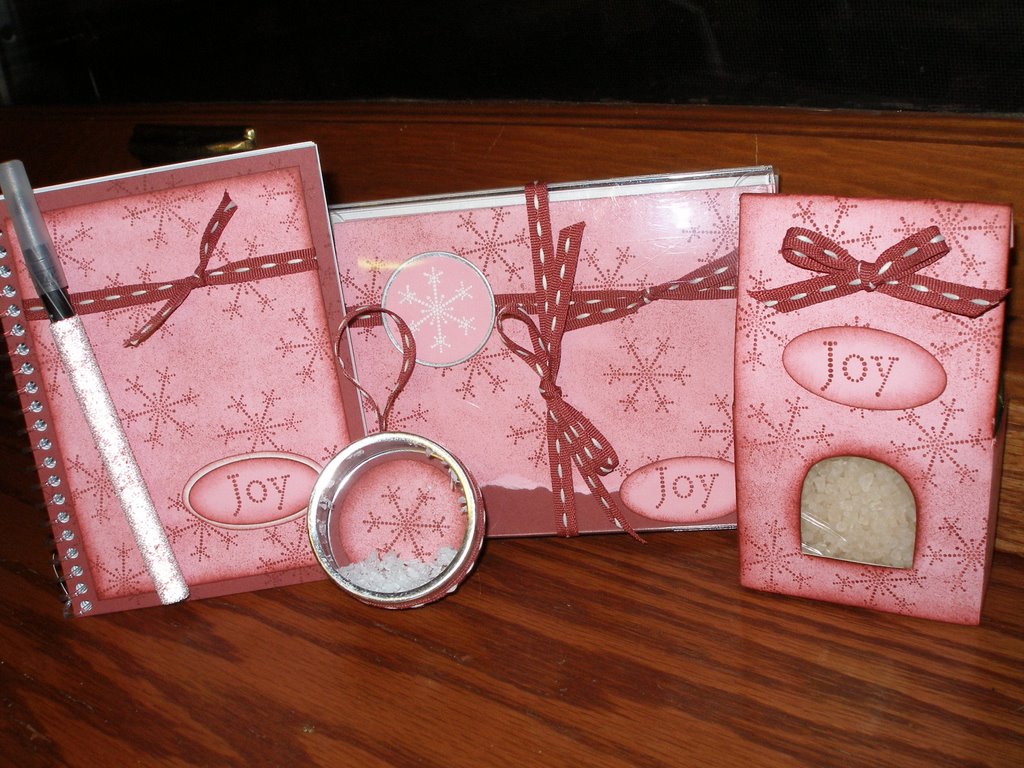
Using the Stampin' Up! set "The Snowflake Spot" I made her a 4 1/4" x 5 1/2" notebook with a beaded pen. A tree ornament from a tin. I got a great deal on these tins at Oriental Trading. They are not fancy but they do the job! I ran the cranberry ribbon around the tin and made a loop with it for hanging. I made her a package of 4 gift cards and envelopes and put them in a plastic card holder and tied it with the cranberry ribbon! And lastly is the bath salts I got at Michael's in their dollar section. I just covered the front and lower sides with the card stock.

I used only two colors of card stock to make these. The Cranberry Crisp and Pretty in Pink. I did a lot of sponging which altered the Pretty in Pink color enough to soften and tone it down.

My friend was surprised and she really liked her gifts. They were very fun to make too!

Tuesday, November 14, 2006

Faux Typewriter Keys Earrings

Here are the earrings I made using the Faux Typewriter Keys technique. The jewelry glue I used is called "Zap a Gap." I used it to glue the "keys." I used the round end to bracelet toggles. It was the perfect size for the "keys" to fit and still show enough to give the earrings a bit of flair! These were very fun to make. I did forget to mention in the instructions on the watch that you do NOT want to use VersaMark to get the embossing powder to stick. It will make your image cloudy. Perhaps it will work better on a different color of cardstock but not on black! Feel free to email me with any questions.

Faux Typewriter Keys Watch

I have seen some faux typewriter keys done using Crystal Effects. These were done with clear embossing powder.

To make the keys:

First I took some black cardstock and white craft ink and stamped the letters on it using the "Alphabits" set from Stampin' Up! I took the 1/4" round punch and lined up the letter I wanted and punched it out. Then I put a tiny piece of Snail Adhesive on top of a standard size paper fastener and held the prongs with a clothespin. I heated it up with the embossing gun. I then dipped it in the clear embossing powder and repeated this method a number of times. Once I got the thickness I wanted I held the paper fastener straight up so it would cool and settle evenly. Sometimes the letters would slide and I would just take a toothpick and slide them back into place while it was still hot. Once it's cool you can't do anything to it until you heat it all up again. Don't worry about drips either. On a few of them I got too much embossing powder and it started to run off on one side. I just took a toothpick and ran it around the edges and removed it. If this should happen to yours you may want to take another look at the "key" to see if it needs just one more dipping to even things out. Once the "keys" have cooled you want to remove the prongs. You can do this by taking a plyers and pulling up on one prong and cutting it as close to the edge as you can. You will want to leave just a little bit left so you can fold it to the inside. If you cut right to the edge it will show on your final product. Repeat this for the other prong. Now you will want to take some jewelry glue or super glue and glue it to your backing. The backing here was the watch band. This band had blank circles of metal on it and the paper fasteners were the perfect size for it! Lucky me!! I preferred to use this method over the Crystal Effects method because this one was ready to touch once the paper fastener cooled! I am not a patient person!!!

I made a pair of earrings using this method too. I will post them soon.

Sunday, November 12, 2006

Monster Spray


Monster Spray! I had this poem for years. I have no idea where I had gotten it from or who the original author is, sorry. I've seen other versions of the poem on the Internet.

Here I just printed out the poem on Whisper White card stock and stamped the monsters on using the "Booglie Eyes" set from Stampin' Up! What's really great about this is that you can use your Halloween sets all year long now!!

Here's what I did to make these! I colored the monsters in with markers and in a few spots I used markers and a blender pen. I sponged around all the white areas with Brilliant Blue and Only Orange ink. I sponged the edges with Brilliant Blue and glued it onto the can with the Stampin' Up! Anywhere Glue Stick. Amazing little glue stick!!!! A note here, I used Brilliant Blue here because the lids to the spray cans were blue and I wanted it to match. These were fun to make.

This monster saying goes:

Monster Spray

Every night

when I'm asleep

Into my room

the monsters creep.

I call to mom

"Please come and stay!

And don't forget

the monster spray.

She comes right in

and sprays right here.

Then all the monsters

Disappear!

Again, this was another fun project!

Note Paper Holders Close-up

Note paper holder. This is a close-up of the note paper holder. You can make out the sparkling snowflakes a little better here. And you can see the snow layer in the foreground a little better too.

Note Paper Holders


I made these from some note holders I had gotten at Michael's. I took them apart. I used the snowflake decorative paper from Stampin' Up! on the paper holder part and I used Bashful Blue card stock to cover the entire front of the holder. Once the glue dried on both of those pieces I glued the holder to the inside of the cover. It didn't want to stay shut so I drilled two holes in the top side edge and attached a Stampin' Up! button using silver cording. I took a piece of Whisper White card stock and sponged the edges and taped it on top of the box. Followed by a layer of Ballet Blue card stock and then Chocolate Chip. I took the smaller piece of Bashful Blue card stock and stamped snowflakes on it using the white craft ink pad. While the ink was still wet I sprinkled some Dazzling Diamonds glitter on it. I stamped the snowman from the "Tags and More" set. I cut him out after coloring him. I left enough room on the bottom so it fit on top of the Chocolate Chip card stock with enough taken off the edges to see the layer. I also tore a piece of the Whisper White card stock and using Dimensionals I placed it just under the snowman to give it the look of a snow layer. I wish I would have taken a side view photo so you could see the snowflake decorative paper on it. The blues of the paper matched the Bashful Blue on the cover and just competed the holder. It was a very fun project to do!

Monday, November 06, 2006

Lotion Bottles


I decorated these lotion bottles I had gotten at Target's Dollar Spot. I used them for a Hostess Appreciation event I had. I am SO impressed with the Stampin' Up! Anywhere Glue Stick. "Anywhere" really describes it!!!

Note Holder and Matching Notes


I made the box holder from some left over paneling we had in the garage. I covered it with Stampin' Up! decorative paper using the Anywhere Glue Stick! I made 4 matching cards and even added some decorative paper to the inside flap of the envelope to give it a more elegant touch. It was fun to make but very time consuming. I will probably be giving it away as a gift to some lucky friend!