Pin It

Showing posts with label Valentine's Day Cards. Show all posts

Friday, February 14, 2025

Heart Shaped, Valentine's Day Card, Stampin' Up!

Hello and welcome to my blog. Today I did get the Valentine's Day card made for my mom. I found one on Pinterest that I liked, you can see it by clicking here. I changed it a bit and used items that I have on hand. Please read on to see how it was made.

The base of the card is a folded half-sheet of Petunia Pop card stock. It opens on the right and the fold is on the left.

I cut a 2-1/2" x 5-1/4" piece of Designer Series Paper (DSP) from the "Timeless Plaid" 6" x 6" stack.  I taped it to the left side of the card leaving a 1/4" border on the top, bottom and side.

A 3" x 4-1/4" piece of Blackberry Bliss card stock was cut for the layer. On top of that is a 2-3/4" x 4" piece of Basic White for the focal point.

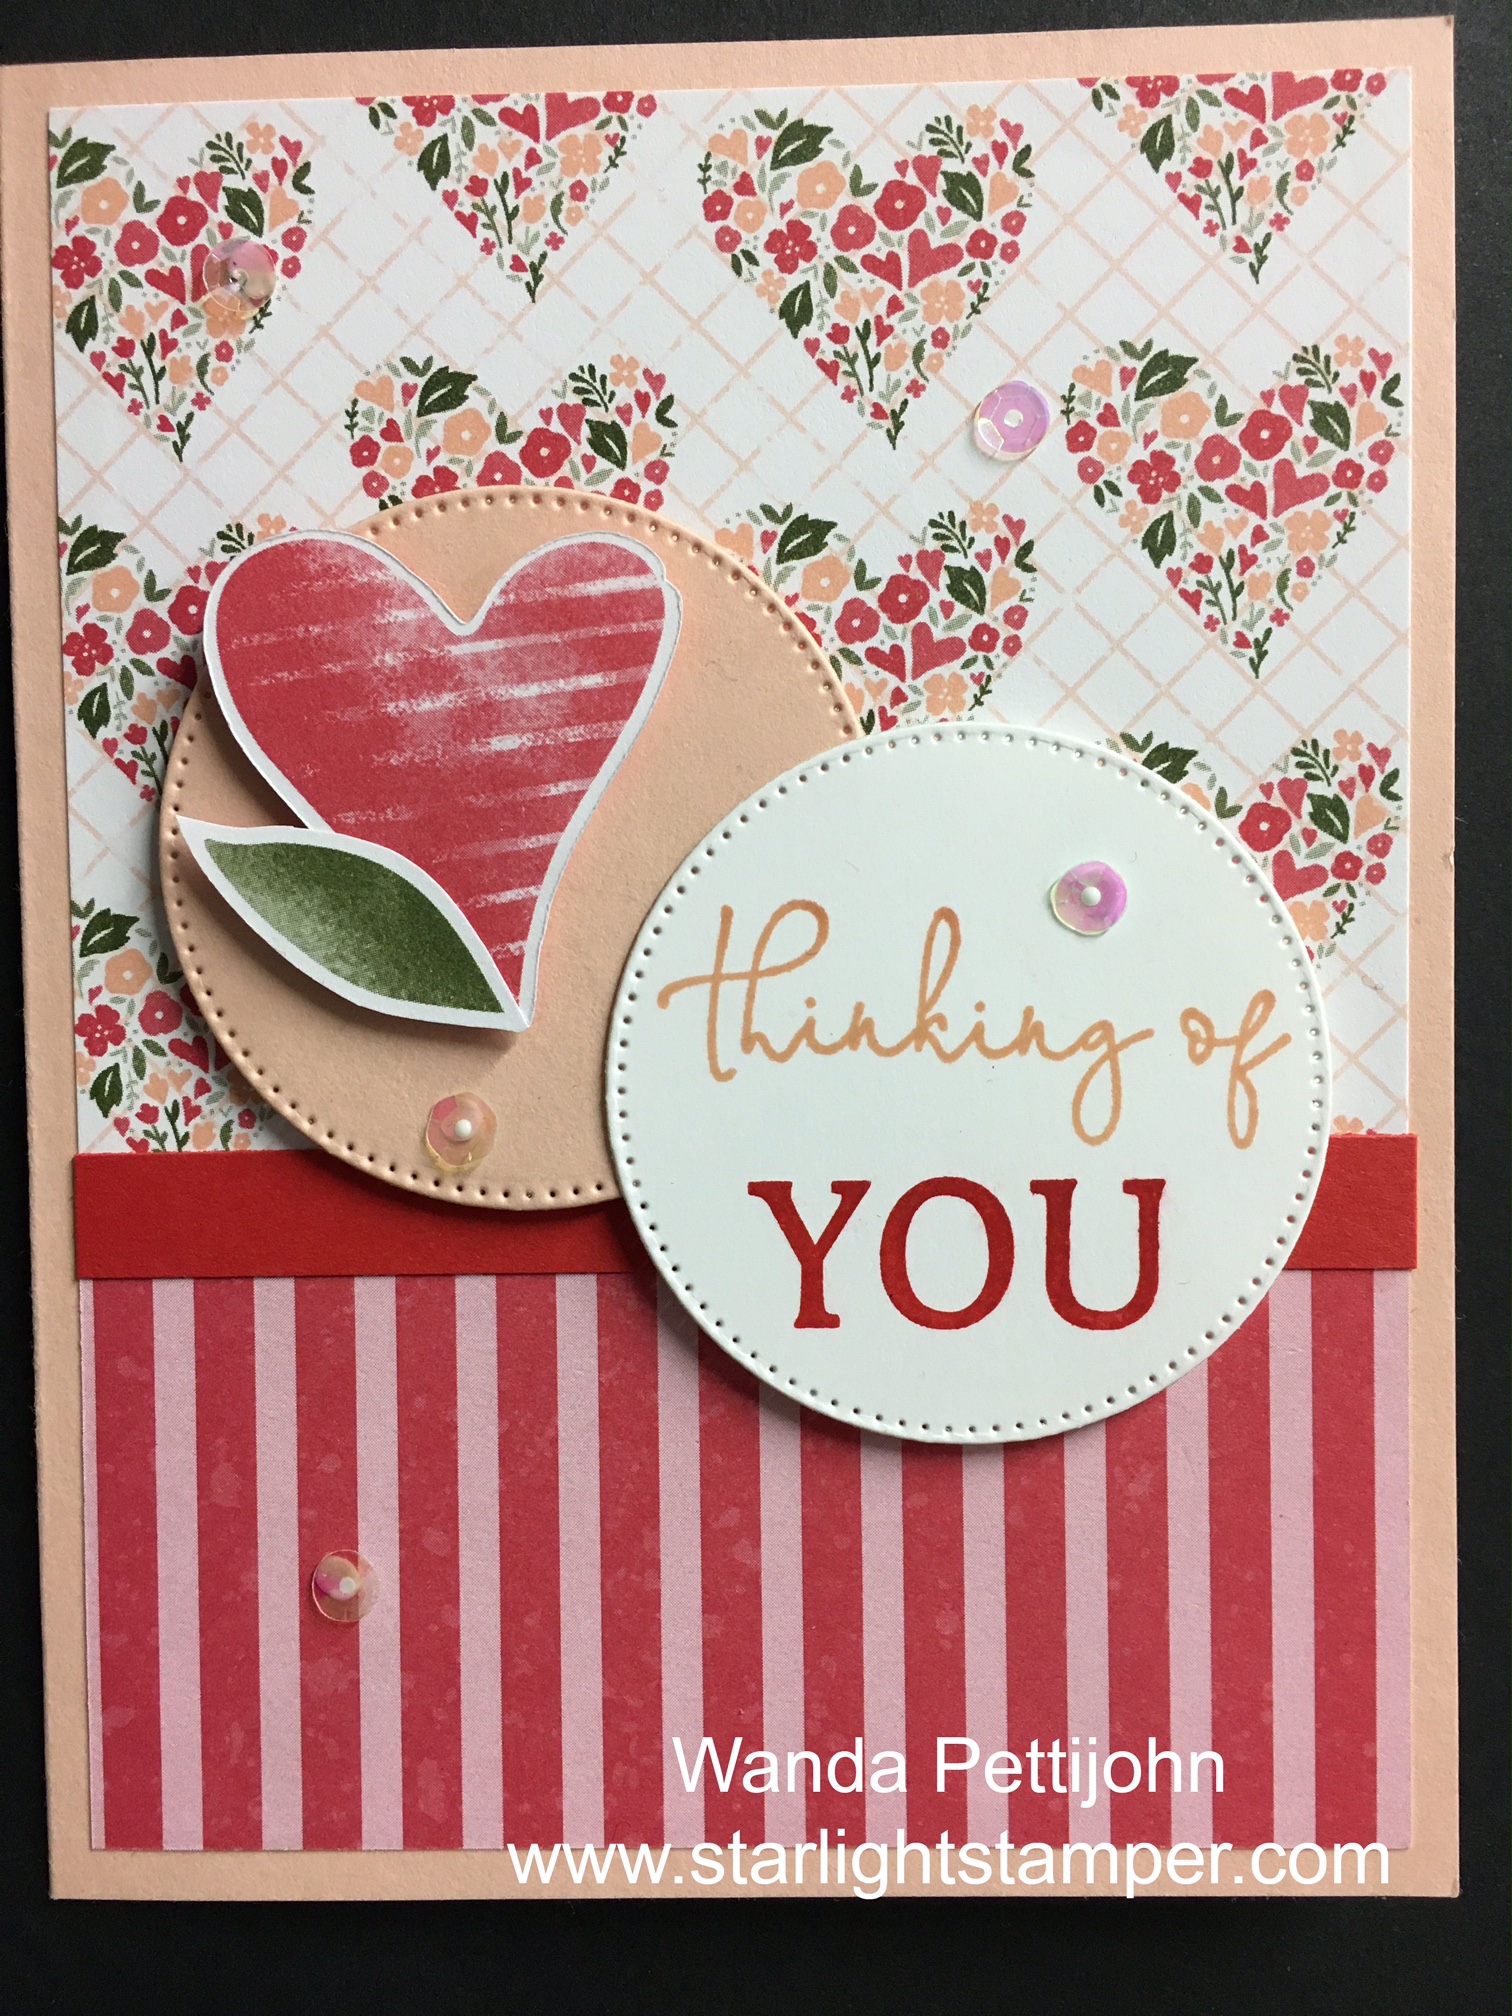
I stamped the heart from the "Heart Shaped" bundle using Soft Sea Foam ink. Using the matching heart die I cut the heart from the same colored piece of DSP in the "Timeless Plaid" stack. I added little dots of glue to the leaves and set it in place over the Soft Sea Foam stamped image.

Three flowers were cut, two from Petunia Pop and one from Blackberry Bliss card stock. I glued them in place on the side of the heart. I wasn't sure what I was going to put in the centers. I needed something low because I didn't want to pay extra postage to mail it. I ended up using some retired sequins I had. I also glued a couple of them to the outside of the heart.

The words were done on my computer because I didn't have any sets with those words. I cut them out using the die from the same "Heart Shaped "bundle. I snipped off the ends because it was a bit too long, which is too bad because it's such a pretty die. Dimensionals were added to the back and it was set in place under the heart.

Dimensionals were added to the whole piece and it was centered on the front of the card and the card was done. 

The card has a soft subtle look and I'm sure my mom will love it.

Thank you SO very much for taking your time to stop in and see today's Valentine's Day card,
Wanda

Monday, January 29, 2024

Bee My Valentine, Valentine's Day Card, Stampin' Up!

Hello and welcome to my blog. Today I have a Valentine's Day card to share with you that I found on Pinterest. You can see the original card here. Please read on to see how I made it.

The base of the card is a folded half-sheet of Basic White card stock. After cutting it in half on the short side it measures 4-1/4" x 11" 

I cut a 4" x 5-1/4" piece of Basic White to tape the Designer Series Paper (DSP) to because I wanted to wrap and tape the ribbon around to the back of the card instead of tying it all the way around.

The DSP is from the "Bee Mine" 12" x 12" package. The piece I used was cut at 4" x 4" and then cut at 2-3/4" and you're left with a 1-1/4" piece. The larger piece was taped to the top of my Basic White piece and the smaller was taped to the bottom. That smaller piece is the backside of the cute bee paper. 

The words were stamped next and are from the "Bee Mine Valentine" bundle. I stamped them using black Memento ink.

I took a 6" piece of red ribbon (non-Stampin' Up! because I didn't have any current ribbon) and I taped the ends around the back of the Basic White piece. I slipped the ribbon still on the spool under the taped ribbon and I tied a knot. Then I cut the ribbon from the spool. I will be adding a glue dot under the bow to hold it all in place.

Tape was added to the back of the Basic White piece and it was set in place on the front of the card. I didn't have the pretty flowers that are on the original card but I do remember buying some "Loose Daisy" embellishments so I may glue a couple of those on. I think it will be cute.

This was a fun card to make and I LOVE the layout. Using this layout you could make 9 cards from one 12" x 12" sheet of DSP. I will be using this layout more in the future.

Thank you SO very much for taking your time to stop in and see today's Valentine's Day card,
Wanda

Sunday, January 28, 2024

Bee My Valentine, Valentine's Day Card, Stampin' Up!

Hello and welcome to my blog. Today I have a Valentine's Day card to share with you. I thought I'd get a jump on them. I need to make a few this year so it's best for me to start a little early. Please read on to see how I made today's card.

The base of my card is a folded half-sheet of Basic White card stock. It opens on the right and the fold is on the left. 

I cut a 2" x 5-1/2" piece of Daffodil Delight card stock for the layer and a 1-3/4" x 5-1/2" piece of Designer Series Paper (DSP) from the "Bee Mine" 12" x 12" package. I taped the DSP to the card stock and then taped that to the front of the card about 1/4" from the fold.

For the layer under the focal piece I cut a 2-1/4" x 3-1/4" piece of Daffodil Delight card stock and a 2" x 3" piece of Basic White card stock for the top piece. 

Next I stamped the body of the bee from the "Bee My Valentine" set using Daffodil Delight ink. Then I stamped the stripes and face at the same time along with the antenna but they were stamped a little ways away from the bee because they were fussy cut and glued on.  I used black Memento ink for that. The bee was punched out with the matching punch

The wings were stamped using the heart shaped piece first and Balmy Blue ink that was stamped off once. Then the outline of the winds was stamped using Balmy Blue fresh off the ink pad. They were punched out using the same punch. 

I set the bee on top of the rectangle layered piece to see where the words should go. I stamped the words from the same set using black Memento ink. 

Dimensionals were added to the back of the bee body and it was set in place on the layered focal piece. Tape was added to the back of the wings and they were slipped under the bee body and the card was done.

This was a very fun card to make. I just love the fresh cheery looking colors.  Now to come up with a new idea for another Valentine's Day card! That's the hard part of card making for me.

Thank you SO very much for taking your time to stop in and see today's Valentine's Day card,
Wanda

Monday, January 15, 2024

Bee My Valentine, Valentine's Day Card, Stampin' Up!

Hello and welcome to my blog. Today I have a Valentine's Day card to share with you. Please read on to see how I made it.

The base of my card is a folded half-sheet of Basic White card stock. It opens on the right and the fold is on the left. 

I cut a 4" x 5-1/4" piece of Real Red card stock for the layer. I taped that to the front of the card.

Next I cut a 3-3/4" x 5" piece of Daffodil Delight card stock for the large top layer. I did not tape that down yet, I needed to add the words but I didn't want to add them until I made the squared layers.

For the squared layers I cut a 3" x 3" piece of Designer Series Paper (DSP) from the "Bee Mine" 12" x 12" package. I taped that to a 3-1/3" x 3-1/4" piece of Real Red card stock. I laid that on top of the Daffodil Delight piece to see where the words would go. Then the words from the "Bee My Valentine" bundle were stamped using black Memento ink. Once stamped the Daffodil Delight piece was taped in place.

The square layers were added using Dimensionals and the card was done.

Fun, huh? Super quick and easy too!

Thank you SO very much for taking your time to stop in and see today's Valentine's Day card,
Wanda

Saturday, February 04, 2023

Dainty Delight, Valentines Day Card, Thinking of You Card, Stampin' Up!

Hello! So happy you found your way here today. I have a fun layout to share with you. I found it on Pinterest but I changed it a lot. You can see the original card here. (edited on 2/7, the link is broken and I don't know why)

The base of my card is a folded half-sheet of Poppy Parade card stock. This card opens on the right and thee fold is on the left. I cut a 4" x 5-1/4" piece of Basic White card stock for the inside and one for the outside. I taped them both in place.

Next I cut a 3-3/4" x 5" piece of Designer Series Paper (DSP) from the "Country Floral Lane" 12" x 12" package. I taped that piece to the front of the card.

The circles were what drew me to the card. I loved that layout on the one I saw on Pinterest and thought I'd convert it into something that I had the materials for. The circles are from the "Stylish Shapes" set, I used the second largest and the second smallest. The fun part with this is you get to use the circle you punch out on the same card. No having to hang onto it for a future card. I added Dimensionals behind the larger circle and set it in place on the front of the card. Then I added the smaller circle using a Dimensional on the left side and tape on the right side.

A heart was fussy cut from the same DSP. I added a Dimensional to the back and set it in place on the small heart.

The springs are from the "Dainty Delight" bundle. I die cut three of them and added the little hearts I saved from the "Framed Florets" bundle. I had made a couple of cards a while back and I saved the hearts from the oval die. I save everything!!  You never know when you'll need it.  After die cutting the three  pieces using Basic White card stock, I colored the stems with my light Granny Apple Green Blends pen. Then I took the hearts and glued them to the piece. I moved them down a bit on the flowers that were on the stems so it looked like white hearts behind each flower. Then I slipped the stems into the bottom part of the circle. I had to trim each stem because they were too long. And I used them for the extra leaves in the circle. 

The words are from the "Dainty Delight" set. The whole phrase was "Sending love during the season of growth" but I just wanted the "sending love" part so I masked off the other words. The piece measured 3/8" x 1-1/2". I set the words in place using Dimensionals and the card was done.

This was a fun card to make and I still really like the circles layout!

Thank you SO very much for taking your time to stop in and see today's card,
Wanda


Sunday, January 29, 2023

Very Best Occasions, Country Floral Lane, Valentine's Day or Anniversary Card, Stampin' Up!

Hello there! So glad you could make it here. I have a fun layout I found on the internet but I didn't bookmark where I was and now I can't find it to give the person credit for it. So if you know who's layout this is, please let me know so I can give them credit. 

The base of the card is a folded half-sheet of Basic White card stock. I cut a 3-7/8" x 5-1/8" piece of Basic White card stock for the top layer.

The rectangle is from the "Stitched Framelits" die set. I used the second longest one in the group of four in that set. Then I cut a scrap piece of Designer Series Paper (DSP) from the "Country Floral Lane" 12" x 12"package. It measured 1-1/8" x 3-1/8".  I cut it on the right side of the 1/8" mark to make it just a hair shorter. The DSP was taped to the stitched rectangle piece.

Then the circle was die cut using the second and third smallest circle dies in the "Stylish Shapes" die set. 

The cute little hart and leaves were fussy cut from a piece of DSP in the same "Country Floral Lane" package. 

And the words are from the "Very Best Occasions" and were stamped using Poppy Parade ink.

To assemble the card I taped the DSP strip to the rectangle piece. Dimensionals were added behind it and it was set in place on the front of the card.

The circle was added next using Dimensionals on the left side and a bit of glue on the right. Then the heart and little fussy cut leaves were glued in place.

The piece was then set on top of the card base using Dimensionals and the card was done.

I really like this layout. It was fun, quick and easy too!

Thank you SO very much for taking your time to stop in and see today's Valentine's Day card,
Wanda

Friday, January 27, 2023

Sentimental Park, Country Floral Lane, Thinking of You Card, Stampin' Up!

Hello, so happy to see you are here today! I have a fun card that can be used as a Valentine's Day card, a Mother's Day card, a Birthday card, a Wedding or Anniversary card and of course the Thank You card that I made today. It's a fun and quick card to make.

The base of my card is a folded half-sheet of Petal Pink card stock. It opens on the right and the fold is on the left.

The Designer Series Paper (DSP) is from the "Country Floral Lane" 12" x 12" package and the top piece was cut at 3-1/2" x 4" and the bottom piece was cut at 1-3/4" x 4". You can cut it however you'd like, just make sure the two pieces equal 5-1/4" x 4".  

I cut a 3/4" x 4" piece of Poppy Parade card stock for the strip to cover where the two pieces of DSP meet. I taped the DSP to the front of the card and the strip was taped over the are where the two pieces meet.

I die cut a stitched circle from the "Stylish Shapes" using the third largest one on a piece of Petal Pink card stock and one on a piece of Basic White card stock.

The words are from the "Sentimental Park" set and were stamped using Petal Pink on the "thinking of" and Poppy Parade on the "YOU".  

The heart and leaf were fussy cut from a piece of DSP from the same "Country Floral Lane" package. 

To assemble the circles, I set the Petal Pink one on first. The leaf was glued to the heart and then it was put in place on the circle using Dimensionals.

The Basic White circle was added using tape behind the "th" of thinking and Dimensionals were added to the rest of the circle. It was set in place on the front of the card.

I had some sequins from another project so I thought I'd use them on my card. I added 5 of them to give the card a little bling but not too much. I took the picture before the glue dried on the sequins but it did work out fine because you can see where they are better!

This was a quick and fun card to make. That DSP is very fun to work with.

Thank you SO very much for taking your time to stop in and see today's thinking of you card,
Wanda

Wednesday, January 25, 2023

Very Best Occasions, Country Floral Lane, Valentine's Day Card, Stampin' Up!

Hello! I'm glad you are stopping in to see today's Valentine's Day card. Though it could be used for other occasions, such as friendship or with different wording, an anniversary or thinking of you card. 

The base of my card is a folded half-sheet of Poppy Parade card stock. The card opens on the right and the fold is on the left.

I cut a 3-3/4" x 5" piece of Basic White card stock. Then I cut a piece of Designer Series Paper (DSP) from the "Country Floral Lane" 12" x 12" package at 3-5/8" x 4-7/8" and I taped it to the Basic White piece. And then I taped that to the front of the card base.

The DSP strip was cut at 4-7/8" x 1" and the Poppy Parade layer behind it was cut at 4-7/8" x 1-1/8". I taped the two pieces together and then taped that to the front of the card about 1-3/4" from the fold.

The words are from the "Very Best Occasions" set and were stamped using Poppy Parade ink on a piece of Basic White card stock. I die cut them with the 4th largest stitched circle from the "Stylish Shapes" die set. I made sure I had the words lower on the circle so I could add the hearts. 

I had to fussy cut the hearts and leaves from the "Country Floral Lane" DSP package because I forgot to order the punch. I glued the flowers in place on the circle. Dimensionals were added to the back of the circle and it was set in place a little off center. I just eyed it until I thought it looked good.

This was a fun card to make, even with the fussy cutting.

Thank you SO very much for taking your time to stop in and see today's Valentine's Day card,
Wanda

Monday, January 23, 2023

Adorable Owls. Playing in the Rain, Valentine's Day Card, Stampin' Up!

Good day to you! I'm very happy you found your way to my blog. I found a card on Pinterest that I thought I'd make and share with you. I did change it a bit due to supplies on hand. You can see the original card here

What drew me to this card was the stenciled background. I remembered I had purchased those stencils but hadn't used them yet. SO it was a perfect find for me. The stencils are from the "Artistic Mix Decorative Masks" set.

The card starts out with a folded half-sheet of Basic White card stock. This card opens on the right and the fold is on the left.

I took the stencil and taped the upper left and bottom right corners down on the front of my card. I used post it tape, you don't want anything that will ruin your card base.  Then I took my Blending Brush and Real Red ink and scrubbed it on, trying to keep most of it in the middle. I always start where no one will see it. Here it's the middle so I started there and worked my way outward.

Next I stamped the owl from the "Adorable Owls" set using Black Memento ink on a scrap piece of Basic White card stock. I die cut it using the second largest stitched circle from the "Stylish Shapes" die set. Then I die cut a Real Red scalloped circle using the die from the "Layering Circles" set that was just a bit larger than the stitched circle. 

Then I colored in the owl. I used my Blends pens for this. Light Pumpkin Pie was used for the feet and beak. The top of the head and wings were colored in using light Soft Suede and the face and outer part of the belly was colored in using light Crumb Cake. The eyes were colored in using both light and dark Balmy Blue and the bow tie was colored in using both light and dark Real Red. The original card make a bit of shading around the owl. I liked that but I forgot to add it to my card. I will see if I can do it later. Dimensionals were added behind the circles and they were set aside.

The words are from the "Playing in the Rain" set and were stamped using Real Red ink. 

The circle piece was then set in place. I didn't have the hearts that were used on the original card so I took some hearts I had saved from using the "Framed Florets" oval die with hearts all around the oval. Yes, I am one who doesn't throw stuff away.  My workroom is full and I hate to get rid of stuff because I may need it.  I glued those tiny hearts all over the card. They were Real Red and Flirty Flamingo. And when I was done with that, the card was complete (other than the light gray under and around the owl).

This was a fun card to make and I really did like stenciling, I had not done any in years.

Thank you SO very much for taking your time to stop in and see today's Valentine's Day card,
Wanda

Friday, January 14, 2022

Sweet Conversations, Valentine's Day Card, 2022 Stampin' Up! Spring Mini Catalog

A sweet friend of mine (Colleen) came over today and she brought some of her new stamp sets with her. She was gracious enough to share them with me. I found this fun card on Pinterest and used her set to make it.  I changed the card a little.  Not because I didn't like how the original card was made but because I don't know vertical from horizontal (apparently! LOL) and I didn't stamp and cut the right size Coastal Cabana heart.  So I had to rearrange the hearts too. So here's how my card went together.

The base of the card is a folded half-sheet of Basic White card stock. This card opens on the bottom and the fold is on the top.

I die cut a piece of Designer Series Paper (DSP) from the "Sweet Talk" 12" x 12" package. I used the rectangle die from the "Ornate Layers" set.  I taped that piece to the bottom of the card front.

Next I die cut the lacy Basic White piece using another die from the same die set. 

I stamped the words from the "Sweet Conversations" set using black Memento ink.

Then I stamped the hearts. I used Pale Papaya, Granny Apple Green, Daffodil Delight, Coastal Cabana, Flirty Flamingo and Gorgeous Grape inks. I stamped the word piece first and with the same color ink I stamped the solid image.  There's matching die so I die cut each heart.

Then I die cut a "Stitched Rectangle" it was the largest one in the grouping of four in the "Rectangle Stitched" framelitsset.  I cut it in half because it was too large for that space. Dimensionals were added behind it and then it was set in place on the front of the card about 1-3/8" from the bottom edge of the card base.

I added the larger hearts using Tombow mono glue. And the two smaller ones were added using a Dimensional. 

I didn't have the candy looking pieces that are on the original card so I used the "Ice Cream Corner Sprinkles" pieces.  They matched the colors of the DSP and hearts pretty close so I went with it. I used my Tombow mono glue to set them in lace.  And that was it, the card was done.

This was a very fun card to make and I do have some regrets about not getting it but I have SO many new sets to play with and I am grateful to my friend that I was able to play with her set and make this fun Valentine's Day card!

Thank you SO very much for taking your time to see today's Valentine's Day card,
Wanda

Sunday, February 14, 2021

Kangaroo & Company, Valentine's Day Card, 2021 Stampin' Up! Spring Catalog

I was looking for a fun card to make using the "Kangaroo & Company" set. I wanted to make Valentine's Day cards for my granddaughters. I had seen one a few days ago but I didn't save it and if you forget to save something you saw in Pinterest you'll never see it again. I have not had good luck searching for things I saw. Anyway, I found this card and thought I'd work with it. What I liked about the original card was the circle behind the kangaroo and the red hearts.  So here's what I came up with.

The base of my card is a folded half-sheet of Basic White card stock.  On top of that is a 4" x 5-1/4" piece of Coastal Cabana card stock.

The Basic White piece on top of that was stamped using the words from the retired "Everything Festive" set. I didn't have any current sets with nice size Valentine's Day greetings.  But I'm sure you can find something current to use on your card if you need it to be current. I had stamped the words using black Memento ink and then I took my Blender pen and wiped off each heart until it was clean. I stamped the black and then I cleaned the stamp so I could use my Real Red marker and color the hearts and stamped them, I did have to color them twice because once was just not dark enough. Then I textured the piece using the "Subtle" embossing folder.  I set this piece aside.

I die cut the circle using the largest "Stitched Circle" die on a piece of Designer Series Paper (DSP) from the "Oh So Ombre" 6" x 6" stack.  After cutting the circle out I textured it using the "Painted Texture" embossing folder.  I glued it to the "Subtle" textured piece. part of the circle hung over the edge. I trimmed that off.  Then I glued the piece in place. I often glue the textured pieces in place because sometimes they just don't stick. So I play it safe and glue them all.

The kangaroo from the "Kangaroo & Company" set was stamped using black Memento ink. I colored it using the light and dark Crumb Cake Blends pen and the Ivory Blends pen. The nose and ears were colored in using the light "Petal Pink" Blends pen. Then I die cut the kangaroo.  Last time, which was the first time I played with the set I had fussy cut the kangaroo. It wasn't a big deal because it was super easy to cut, not a lot of corners or turns. I had purchased the dies but forgot I had them. They were with another set. When I buy bundles I put them together with a rubber band and I matched up the kangaroo dies with some other set (don't ask me why, I have no idea why I did it).  But after I realized I had the dies I was anxious to use the set again.  

I stamped the hearts from the set using black Memento ink and I colored them in using the dark Real Red Blends pen. I also die cut those out. I tucked them in the slit that was created when the kangaroo was cut. I glued the flowers in place. The set is designed to be able to stamp tiny words on a tiny rectangle that is attached to the hearts or flowers or the two other images in the set and you pull them up from the kangaroos pocket to read the greeting.  I was going to do that but I decided that I would make a wobbler card.  These are very easy to make. All you do is take some very thin wire. I used 28 gauge. I had first used 20 gauge but it didn't wobble as much. The thinner the wire the better. Then you wrap the wire around a round pen or pencil about 4 times. I punched out two 5/8" circles of scrap card stock and I taped the wire to the circles using some scotch tape that I cut in half. I just centered the tape on the circle and slipped it between the bottom wire and folded the ends of the tape down to hold it in place. I repeated that for the other end. I used glue dots to affix the wire piece to my image and another glue dot on the other end to hold it onto the front of the card.  I have another card coming tomorrow using this technique so if you don't understand how to make this, please stay tuned and you will be making it like a pro!  Once the kangaroo was in place the cards were done. Now all I need to do is sign them and drop them off with some fun Valentine's Day candies.

This was a very fun card to make (cards, I made two the same). 

Thank you SO very much for taking your time to see what I created today,
Wanda

Friday, January 29, 2021

Valentine's Day Card, January 2021 Paper Pumpkin Alternative Card

I still had my Paper Pumpkin things sitting out so I thought I would use that strip that was left over from yesterday and work it into a card.  Here's what I came up with.

The base of the card one of the cards from the January 2021 Paper Pumpkin kit.  I taped the strip from the card that I cut off yesterday.  It's about 1/4" from the fold of the card.

Then I stamped the snail from the kit using black Memento ink. I masked him and then sponged on some Pear Pizzazz ink for grass. I also added a little grass to the bottom of the post of the mailbox.

I colored the snail with my light Petal Pink Blends pen. And the heart shape in the shell was colored with the light Poppy Parade Blends pen.

The words are also from the kit and were stamped using black Memento ink.  

I set the mailbox panel in place on top of the card base using Dimensionals, which came in the kit too.

I thought the snail could use some googly eyes so I found some in my workroom and glued them on. 

One of the medium sized hears was added to the envelope inside the mailbox. It needed something extra too.

And here you have it, a super quick and easy Valentine's Day card.  I have three more in the kit to do up. I'm not sure what I'm going to do with them but it won't be until sometime next week.

Thank you SO very much for taking your time to stop by today to have a look and sometimes a laugh,
Wanda

Thursday, January 28, 2021

January 2021 Paper Pumpkin Alternative Card, Valentine's Day Card

It was Paper Pumpkin day today. I thought I should open up my package and play with the stuff inside. My package/box didn't arrive on time and when it did arrive I realized why it was late. There was a big hole in the side of the box. My address was completely gone but there was a bar code on the package and the package was all taped up.  Who knows what happened but it did arrive and believe it or not, everything was inside undamaged!! So that's the story of my Paper Pumpkin box.  I wanted to find an alternative card to make. Not that the layouts in the kit weren't fine, I just wanted something more. I found a fun video here and loved the card. It's easy to make and cute too.

The base of the card is one of the striped cards from the kit. I cut off the right side on the front about 1-1/4".  The video said about 1-1/2" and the strip was used for another card. I didn't say on the video long enough to see what was done with that strip. I will watch the remainder this weekend. But I did save that strip. I hope it was 1-1/4".  I thought 1-1/2" looked too wide.

So then you will need a 7" x 4" piece of Poppy Parade card stock and fold it in half at 3-1/2". You take this piece and you fold it in half. You tape it to the inside of the card but you want this piece to have it's opening on the left and the fold on the right.  Opposite of what a regular card would be.  Then you tape it to the inside of the cut card from the kit. I did this before I added the heart piece, just in case I taped it on the normal way. Easy to do when you make a card every day. But I got it right.

Next I stamped the heart inside the gold foil heart using Poppy Parade ink. The ink cube came in the kit. I set it up in my Stamparatus so I could make sure I got a nice solid image. I was glad I set it up in there because my ink pad was a bit dry.  I got a solid image and I then taped the black scalloped edging to the back of the piece. The edging is part of the kit too.

The piece was then taped to the front of the Poppy Parade piece.

The "Love" from the kit was added with Dimenisonals (included in the kit) and the card was done.

So darn cute!!  Easy to make too!

Thank you SO very much for taking your time today to stop by and have a look,                                    Wanda

Monday, November 09, 2020

Wedding Card, Sending Love, October 2020 Paper Pumpkin Alternative Card

This card is SO totally different from the other cards I've seen using the October 2020 Paper Pumpkin kit. Most of them were Christmas cards but this one is more of a wedding, anniversary or even a Valentine's Day card. I found the card here, it's about 20.5 minutes into the video.  You can see that video here.

The base of the card is a folded half-sheet of Whisper White card stock. On top of that is a 4" x 5-1/4" piece of Blushing Bride card stock.  The card stock was stamped using Calypso Coral ink and the flower stamp from the October 2020 Paper Pumpkin kit. You don't need to stamp the flowers all the way to the top, though I don't think it would matter if you did.

The Calypso Coral strip of card stock was cut 4-`/4" x 1-1/2".  Before you tape the strip in place, set the "love" words on the right so you can see where you need to stamp the "sending" words. They were stamped using Calypso Coral ink.

The flower was stamped on a piece of Whisper White card stock  using Calypso Coral ink and then fussy cut. I used my Wink of Stella pen to color in the flower. It picks up a bit of the ink too and gives it a soft colored look.

The "love" is from the Paper Pumpkin kit and was set in place using a little bit of glue. Then the panel was set in place on top of the card using double sided tape.

The flower was set in place using a few small Dimensionals.

A 3/8" x 4-1/4" strip of one of the cards from the kit was taped in place just under the Calypso Coral piece and the card was done.

It's a quick, easy and pretty card. I wanted to make this card because I knew I wouldn't be using the "love" from the kit. But when I saw this card I thought it was a perfect opportunity to use "love".  And I have a wedding coming up so it was perfect timing too.

This was a fun card to make and super quick.

Thank you SO much for taking the time to visit today,
Wanda

Wednesday, February 13, 2019

Hey Love, Valentine's Cay Card, 2019 Stampin' Up! Occasions Catalog

I don't often make Valentine's Day card and I didn't think I was going to make any this year because I didn't purchase any of the new sets. But today I had a couple of friends over to stamp and one of them brought their new Valentine's Day set, "Hey Love".  I stamped a few images from it and this one I finished today.

The base of my card is a folded half-sheet of Lovely Lipstick card stock.  On top of that is a 4" x 5-1/4" piece of "All My Love" Designer Series Paper (DSP).  

I stamped the cute gorilla on a 2-1/2" x 2-1/2" piece of Whisper White card stock using black Memento ink.  I colored it in using Blends markers.  I used Light Crumb Cake, Light Cherry Cobbler and Dark Petal Pink.  I layered the piece using a 2-3/8" x 2-3/8" piece of Melon Mambo card stock.  

I stamped the words from the "Hey Love" set using black Memento ink.  I punched them out using the 1-1/4" circle punch.  I punched out a 1-3/8" Melon Mambo circle and taped it to the word circle. 

I set the gorilla layered pieces and the word pieces in place using Dimensionals. 

And there you have it a fun, quick and cute Valentine's Day card!!

Thank you SO much for visiting today,
Wanda

Tuesday, July 17, 2018

Animal Outing, Animal Expedition, Children's Birthday Card, 2018 - 2019 Stampin' Up! Catalog

While not being on Pinterest, I was surfing the net and ran across a fun card that I thought I would try to make.  I found the card at Cindy Lee Bee Designs.

I said "try" to make it because all I bought was the "Animal Expedition" Decorative Series Paper (DSP).  I had bought that one set last year, the one with the cake and chef with the matching dies and the DSP that you could die cut images from.  And then it was no longer available. SO that is what I felt was going to happen with this "Animal Outing" bundle. There's lots of fun accessories to this set. The leaf ribbon and wooden frame elements.  It's all a lot of fun but it won't be in the catalog next year so I just couldn't justify buying the stamps and die bundle for $45.00 plus $11.00 for the DSP. So I thought I would just squeak by buying just the DSP and fussing cutting what I needed. There's two sheets full of fun animals to fussy cut.

I used my computer to make the words and I googled the RGB color code for the Cherry Cobbler ink.  The words are not the same font as the ones in the set but like I said, I just couldn't justify buying it.

I do like how it turned out and I think I will have a lot of fun with the other cute animals in the DSP package.  I don't care much for fussy cutting but if I'm only making one every now and then I think I will survive. 

I think this would also make a cute Valentine's Day card.  I may have to save one giraffe with the frog for February!!

Thank you SO much for visiting today,
Wanda

Sunday, February 11, 2018

Sure Do Love You, Valentine's Day Card, January 2018 Paper Pumpkin Alternative Card

I thought I should make a Valentine's Day card since Valentine's Day is coming up.  This was a fun and quick card to make.  I used the new "Sure Do Love You" set to make this card.  

The base of my card is a folded half-sheet of Whisper White card stock.  On top of that is a piece of the "Color Theory" Designer Series Paper (DSP) stack.  I like these stacks because there's so many fun 6" x 6" papers in them.  And just like the 12" x 12" paper pack, I never seem to use them all up!  I cut that piece 4" x 5-1/4" and I taped it to the front of my card.

Next I took a 3-1/4" x 2-1/8" piece of Whisper White and I stamped the heart from the "Sure Do Love You" set using Melon Mambo ink.  

The words are from the same set and I stamped them using black Memento ink.

I cut a 3-1/2" x 2-3/8" piece of Melon Mambo card stock for the layer.  

The black piece with the metallic pink hearts is from the January "Paper Pumpkin" kit.  It was a pocket but I cut it to 3-1/2" x 2-3/8".  I taped it to the bottom left corner.  I set the layered word piece down using Dimenisonals.  And that was it.  A very quick and easy Valentine's Day card.

Thank you SO much for visiting today,
Wanda

Tuesday, January 23, 2018

Party Pandas, Valentine's Day, Love You Card. 2018 Stampin' Up! Occasions Catalog

Isn't this card adorable?  What a fabulous "Love You" or Valentine's Day card.  I found it at Inkspired Treasures.  I didn't have some of the same supplies but I made do with what I had. It's going to be my motto this year.

I didn't have the same embossing folder for the Real Red card stock, so I used the "Falling Snow" embossing folder.  I didn't have the black and white background Decorative Series Paper DSP) so I used some larger dotted paper from the "Whole Lot of Lovely" DSP pack.  

The base of my card is a folded half-sheet of Whisper White.  On top of that is the Real Red embossed piece with the DSP attached at the top.  I added a 1/2" piece of Real Red glitter paper to cover the edge of the DSP. I stamped the panda and used a stitched oval to die cut it. I die cut a heart to cover where the balloon went. I set the balloon in place with a glue dot.  I stamped the words using Real Red ink. I added Dimensionals to the back of the oval and one on the heart and set it in place, centering it on the card front. 

This was a super quick and easy card to make!

Thank you SO much for stopping by today,
Wanda

Saturday, December 30, 2017

Swirly Bird, Bloomin' Love, Valentine's Day Card

See what happens when I leave the stamp sets out from the day before? I end up using them the next day!!  Since I didn't need anymore thank you cards (none that I can think of), I thought I would make a Valentine's Day card since it's only 6 or 7 weeks away.  I was in Wal-Mart yesterday and where all the Christmas stuff was is now filled with Valentine's Day stuff.  They don't take long to move to the next "holiday".  

My card was fun to make, and easy too. The base is a folded half-sheet of Whisper White card stock.  On top of that is a 4" x 5-1/4" piece of Pink Pirouette.  On top of that is a piece of Whisper White that I misted with some Pink Pirouette ink mixed with rubbing alcohol and a few drops from my Wink of Stella pen.  It gave it a nice pink shimmer.  

I die cut the swirl using Whisper White card stock. I also cut 2 large and 2 small flowers from the "Bloomin' Love" bundle dies.  I cut 2 large and 2 small flowers using Pink Pirouette card stock.  And I cut 2 large and 2 small flowers using the Dazzling Diamonds glitter paper.  I set the flowers in place using small glue dots.  I added a pearl to the centers of the flowers. I added them to hid the glue dots that showed through to the center of the flowers.  I added small Dimensionals and a couple of Dimensional pieces to the back of the swirl. 

The words are from the "Bloomin' Love" set and I stamped them using Basic Gray ink.  I thought that Black would be too dark and the Smoky Slate was way too light.  I think it's the perfect tone for the card.  And that was it.  Just layer all the pieces and you're done!

This would also make a great wedding or anniversary card too!

Thank you SO much for visiting today,
Wanda

Tuesday, May 30, 2017

So In Love, So Detailed, Wedding, Anniversary, Valentine's Day Card

Such a pretty and versatile card.  This could be a wedding, anniversary or even a Valentine's Day card.  

It's a very simple and quick card to make.  I used the "So in Love" set and "So Detailed" Thinlits to make this card.  That set/bundle is retiring at the end of this month.  I wished I had played with it a whole lot more than I did.  There's LOTS of samples on the net using it.  But I had so many other sets to play with, so I didn't get to spend much time with it.  Oh well, it is what it is!!

Here's how I made this card.  I used a folded half sheet of Whisper White cardstock.  On top of that I used a piece of Pool Party cardstock cut 5-1/4" x 4".  Next I took a quarter sheet of Whisper White cardstock and used the "Falling Petals" embossing folder.  Then I trimmed that piece to 3-3/4" x 5". I like to emboss first and then cut the paper to the size I need.  Too many times I cut the cardstock first and then found it to be a bit smaller than I wanted due to the embossing.  SO, I now emboss first and then cut.

Next I die cut the lacy piece on the front using the Dazzling Diamonds glitter paper.  I actually glued that in place on the front center and on the sides.  It's wrapped around the Whisper White cardstock.  

I stamped the words from the "So Detailed" set using Basic Black ink.  I die cut them with the smallest circle in the set and then used the smallest scalloped circle for the layer behind it.  Had I been thinking, I would have die cut that scalloped piece from the center of the layer behind the Whisper White piece.  No one would ever know, that circle missing would never show through the cardstock.  But I forgot to do that. But fortunately I had a scrap piece of Pool Party so I used that. I also made two more of these cards using Wisteria Wonder cardstock and I did remember to cut the scallops from it before taping it in place!!

I set the word piece in place using Dimensionals.  And that was it, a super quick, easy and elegant wedding, anniversary or even Valentine's Day card!!!

Thank you SO much for visiting today,
Wanda