Pin It

Saturday, April 30, 2022

Pansy Patch, Color & Contour, Thank You Card, Stampin' Up!

A while back I saw this sweet layout and I drew it up on a piece of scrap paper and of course it got lost in the mess on my worktable. I ran across it the other day and I set it on top of my to do list stack! It was a lot easier than I thought it would be and quick too.

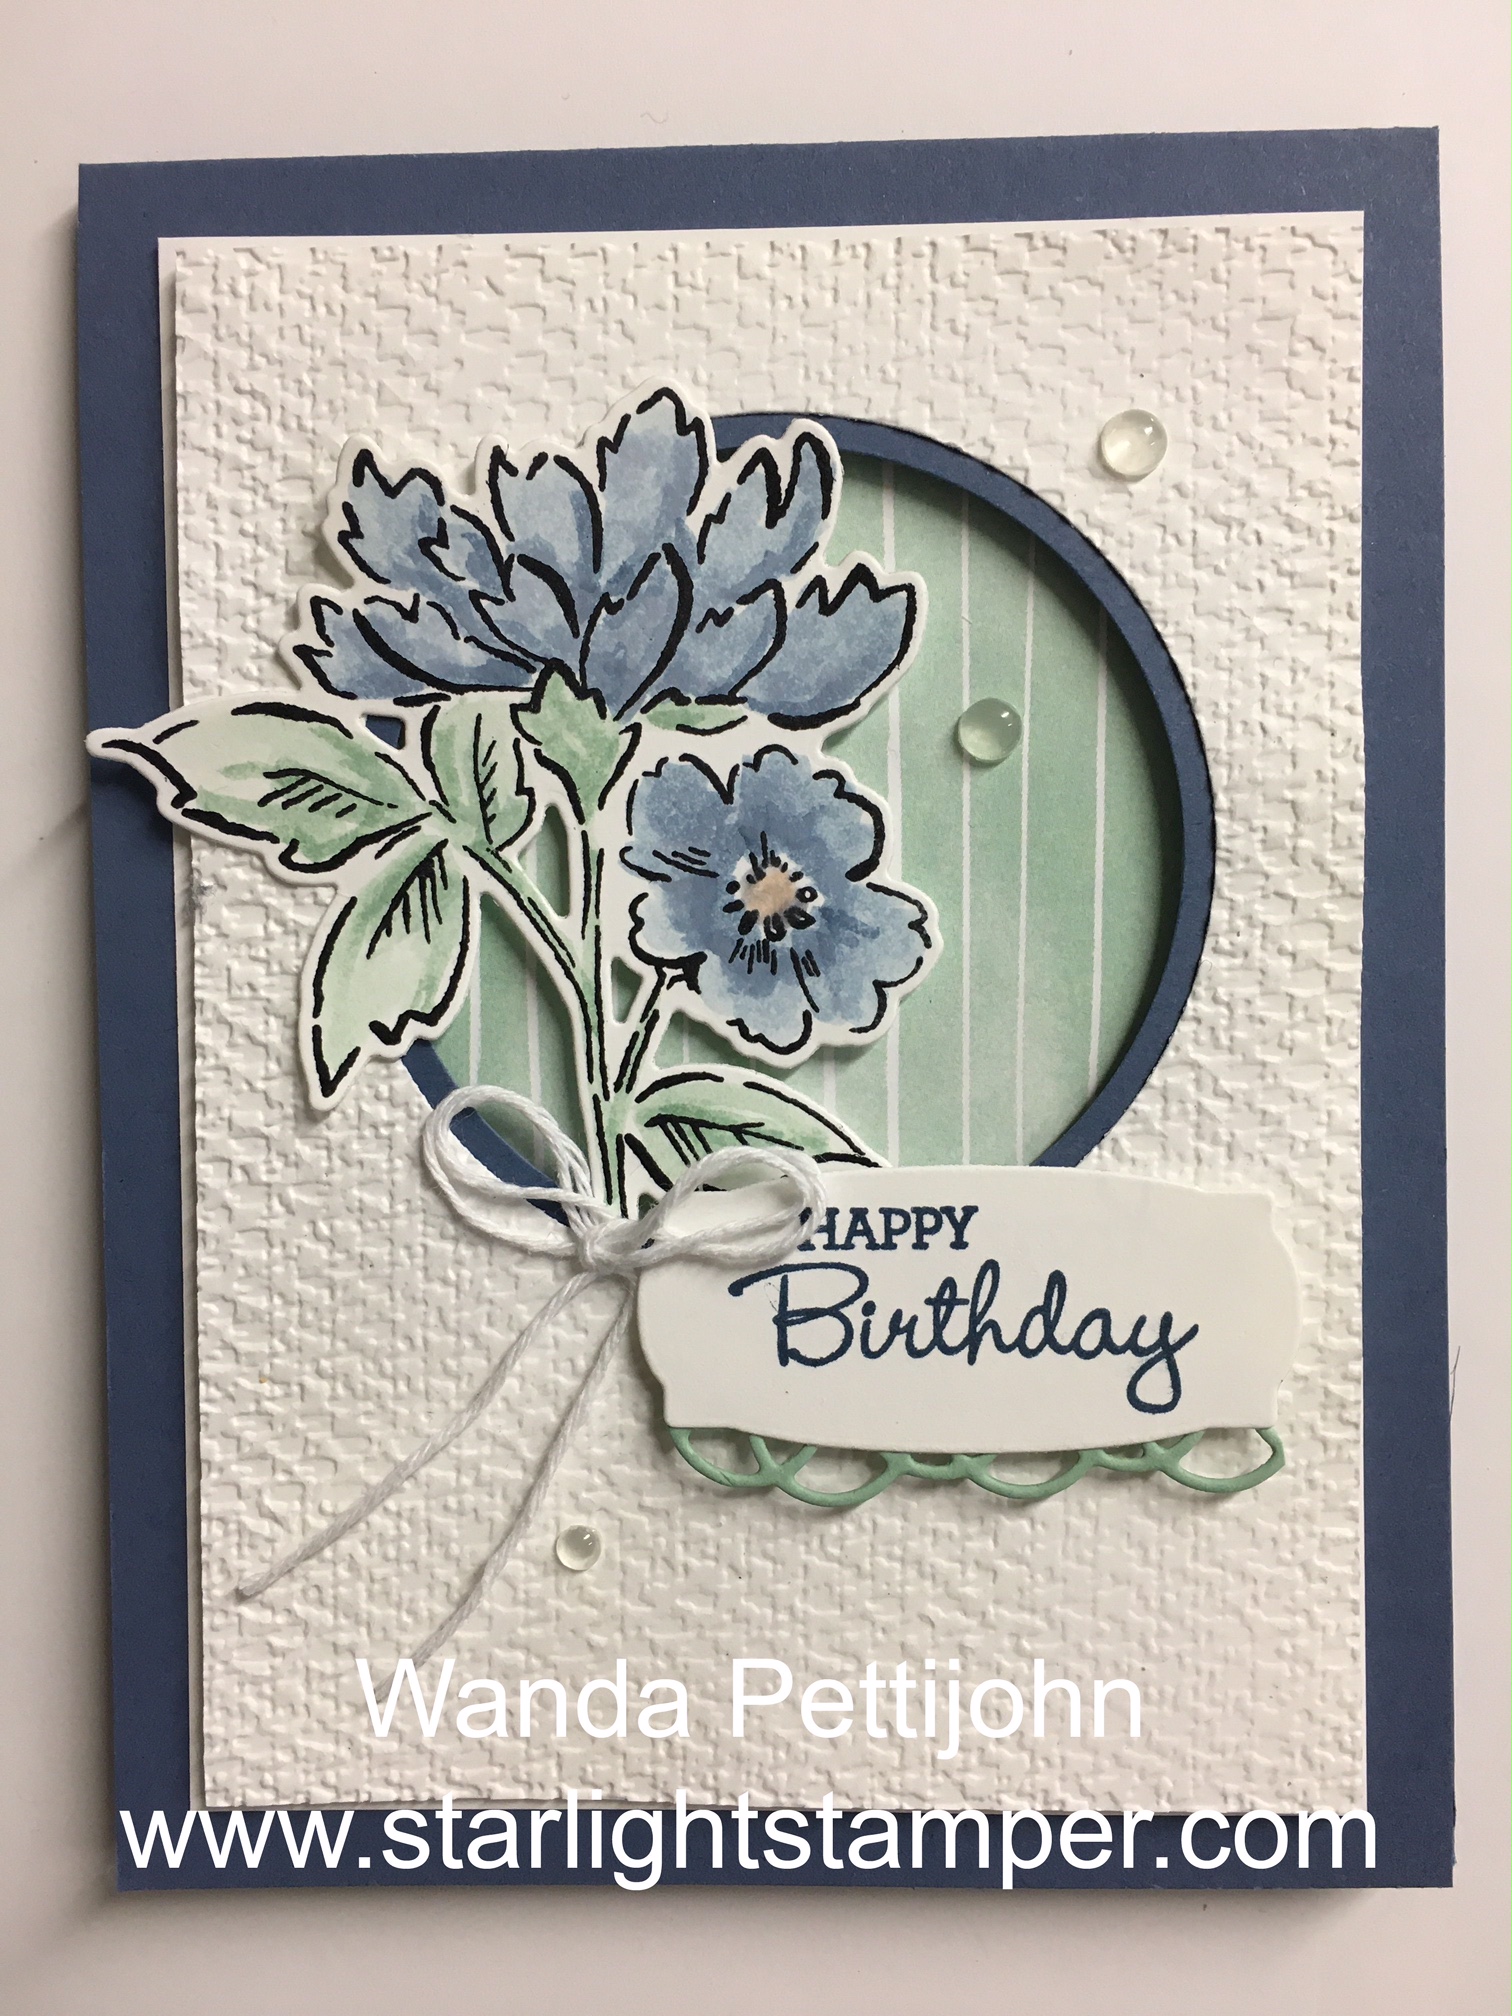
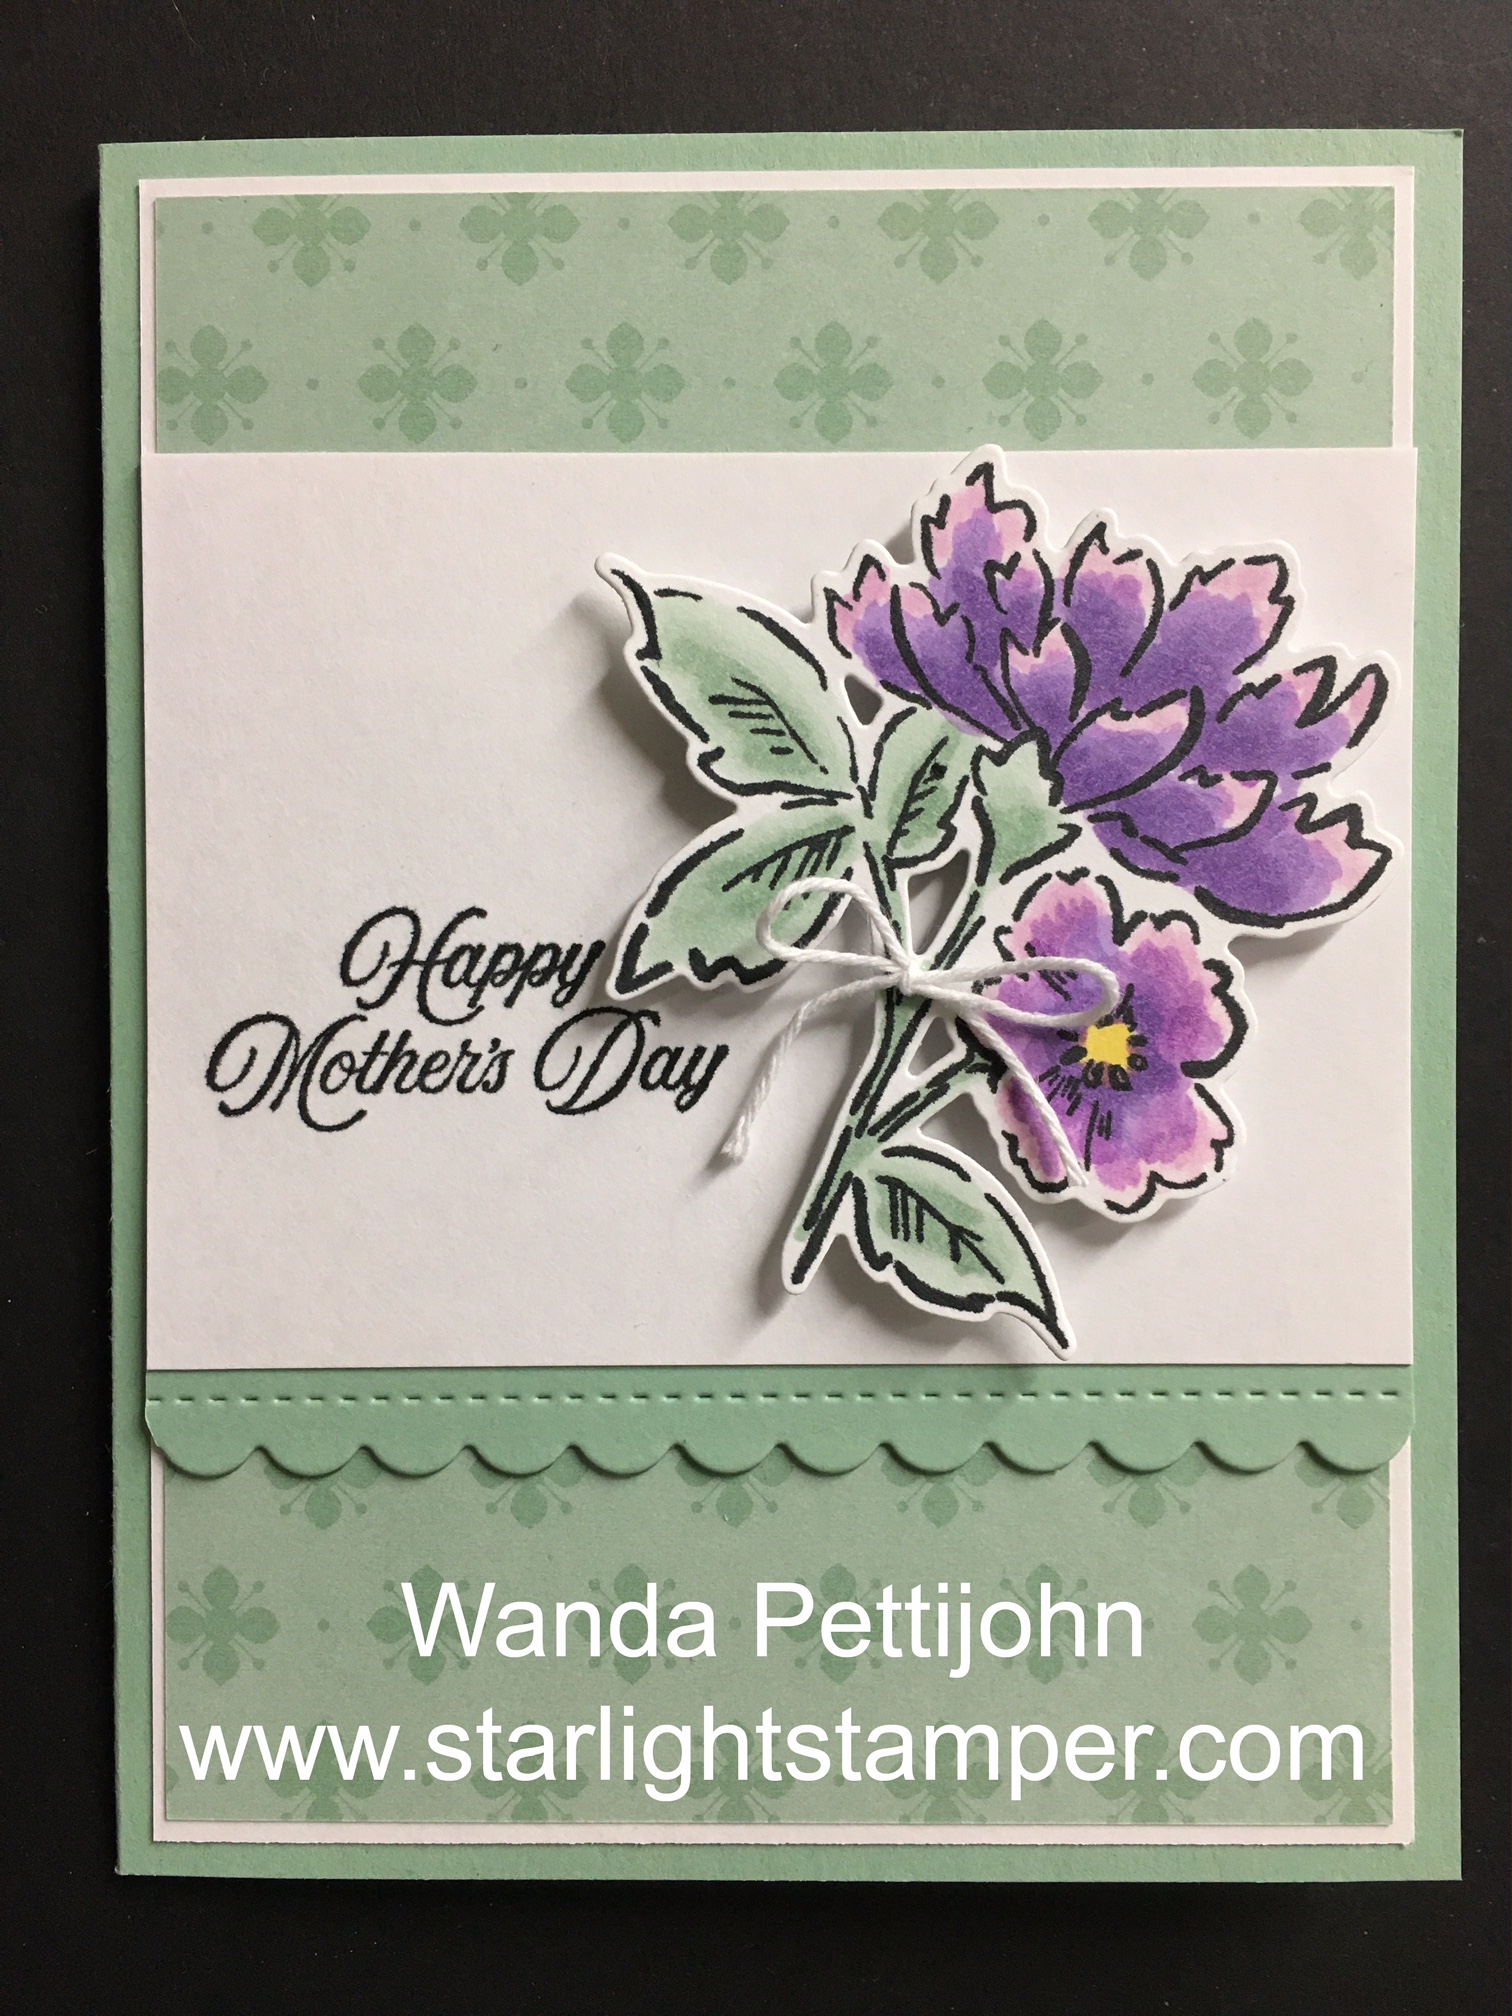
The base of the card is a folded half-sheet of Basic White card stock. I cut a 4-1/8" x 5-3/8" piece of Designer Series Paper (DSP) from the "Pansy Petals" 12" x 12" package.  I taped it to the front of the card base.

Next I die cut the scalloped edge piece using the die from the "Color & Contour" bundle on Basic White card stock. 

The words from the "Pansy Patch" were stamped using black Memento ink. I did use my Stamparatus to hold the card stock in place and get the words straight. Fortunately the ink pad was nice and juicy so I only had to stamp the words once.  But that's the nice thing about the Stamparatus. If my ink is too dry or I don't press down evenly, I can ink up the image again and stamp right over the same exact spot. 

Okay, next I die cut the rectangle using the second largest die from the "Rectangle Stitched Framelets" set. It's from the smaller group of four dies, not the larger group of eight.  I set it about 5/8" from the top, bottom, and side of the light line the scalloped die made. I added Dimensionals to the back and set the piece in place on top of the DSP.

I die cut the flowers and leaves from the DSP. I love it that the dies match the DSP.  The leaves are on the backside of the first piece of DSP that was cut for the background. I have mixed feelings about that, especially if I really like the images. But this time it was okay because the sheet is covered in leaves so there's plenty! Once the flowers and leaves were cut, I used Dimensionals and set the smaller flowers in place inside the rectangle.  

Then I added the larger flower using Dimensionals, making sure I didn't add any that would just hang over the edge.  I added some glue to the bottom end of the leaves and I tucked the two on the left in and I glued the one on the right to behind the flower.  I stacked two Dimensionals together and set them under the leaf on the right. 

I thought the card could use a little bling, so I added some sequins I had and the card was done.

I really like the way the card turned out and I especially like the font.

Thank you SO very much for stopping by and seeing today's thank you card,
Wanda

Friday, April 29, 2022

Pansy Patch, Art Gallery, Birthday Card, Stampin' Up!

Today is my mom's birthday so I wanted to find a pretty card to make her.  This is the one that caught my eye. I saw it on Pinterest and thought it would be perfect for her.  You can see the original card here.  

The base of the card is a folded half-sheet of Basic White card stock. This card opens on the right and the fold is on the left.

I die cut the scalloped Fresh Freesia layer using the die from the "Color & Contour" bundle.  Next a 4-5/8" x 3-1/4" piece of Designer Series Paper (DSP) from the "Pansy Petals" 12" x 12" package and taped to the scalloped layer piece. Dimensionals were added to the back and the piece was set in place on top of the card base.

The top layer is a piece of Basic White that was die cut using the 4th largest "Rectangle Stitched" framelits.  I didn't have any Blackberry Bliss ribbon so I found something in my stash that was close and went with it.  I wrapped it around the front and taped the edges to the backside. Then I tied a bow and set it aside.

The flowers and leaves were die cut from the DSP. There's a couple of sheets in that package lots of leaves and lots of flowers. That sure makes for an easy card.  I die cut two larger flowers. Then I die cut two long leaves and one shorter wider leaf. There's three colors of leaves, I use the lighter ones.

The words are from the "Art Gallery" set and were stamped on a piece of Blackberry Bliss using VersaMark ink.  Then I eat set white embossing powder on it.  I die cut it with the die in the "Art Gallery" bundle. I moved the die far to the right so I could snip the left off.

I taped the larger right flower and then taped a leaf under it on the left.  I added the next large flower using Dimensionals. I slipped a leaf under it before pressing down on it.  Then I added the smaller flower using a Dimensional on the right and tape on the left. I slipped the final leaf under it.

The bow was glued in place and then I set the piece in place on top of the DSP piece. The words were added to the top part with tape. Then I colored a few crystal rhinestones and set them in place in the center of each flower. A few iridescent sequins and the card was done.

It's SO pretty. And I'm sure my mom is going to like it.

Thank you SO very much for taking your time to stop by and see today's birthday card,
Wanda

Thursday, April 28, 2022

Back on Your Feet, Get Well Card, Stampin' Up!

Today's "Get Well" card was fun to make. I'm going to miss this "Back on Your Feet" set. I've made quite a few card with it.  I like it because it's versatile. It can be used for kids or adults. Plus it's easy to color!

The base of my card is a folded half-sheet of Basic White card stock. This card opens on the right and the fold is on the left.

I cut a 4-1/8" x 5-3/8" piece of Pale Papaya card stock for the layer. Don't attach it to the card base yet, you will need to die cut a scalloped layer out of it before you assemble the card.

On top of the Pale Papaya is a piece of Basic White that was cut 4" x 5-1/4" and textured with the "Tasteful Textiles" embossing folder. 

I cut two strips of Pale Papaya card stock that measured 4-1/2" x 1-1/4". And I cut two pieces of Designer Series Paper (DSP) that measured 4-3/8" x 1-1/8".  I taped the DSP strips to the card stock strips. 

Using Basic White card stock, I took the largest narrow stitched rectangle die from the "Rectangle Stitched" die set (it's from the grouping of 4 dies, not the grouping of 8) and cut one for the focal piece. I stamped the giraffe from the "Back on Your Feet" set using black Memento ink. I colored the body of the giraffe in using my light Daffodil Delight Blends pen. The I highlighted some of the areas with my light So Saffron pen. The spots were colored in using the Ivory pen. 

I also cut a layer of Pale Papaya that measured 3-7/8" x 1-7/8".  I taped the focal piece to this piece. 

The words are from the same "Back on Your Feet" set and were stamped on a scrap piece of Basic White card stock using black Memento ink. I die cut them with the smallest circle die. I took the 4-1/2( x 5-3/8" piece of Pale Papaya card stock and die cut a scalloped circle that is larger than the Basic White circle. This was cut from the center of the piece.  I taped the word piece to the scalloped circle piece.

I taped the larger Pale Papaya piece to the front of the card. Then the textured piece was set in place. The strips with the DSP on them were taped in place. Then the focal piece was set in place using Dimensionals. The word piece was added using a Dimensional on the right and a dot of glue on the left. and the card was done.

I do like how it turned out. The Pale Papaya fit well with the giraffe.  Oh, I forgot to mention, the DSP is from the "Expressions in Ink" 12' x 12" package.  I need to use that up in the next few days, it's retiring.  UGH. I never seem to use up all of my DSP before it retires! 

I would like to thank you SO much for taking your time to stop by and see today's get well card,
Wanda

Wednesday, April 27, 2022

Back on Your Feet, Color & Contour, Get Well Card, Stampin' Up!

I was sad to see the "Back on Your Feet" set retiring. It was such a cute set and could be used for both adults and children alike.  So I thought I'd take a moment out and see if I could find a fun card to make using this set and this is what I came up with. You can see the original card here.  I didn't click through to see if there were any instructions, I just went by the photo. 

The base of the card is a folded half-sheet of Basic White card stock. This card opens on the right and the fold is on the left.

I used the "Stitched Rectangles" dies and cut the second largest one for the top layer. 

I used my Blending Brush and Balmy Blue ink and scrubbed on some color towards the center of the piece. Then I stamped the dots from the "Color & Contour" set using Balmy Blue ink.

The turtle is from the "Back on Your Feet" set and was stamped using black Memento ink. I colored it in using my Blends pens. I sued both light and dark Old Olive, light and dark Daffodil Delight and light Soft Suede. I also used the light Balmy Blue for the lines under the shell.  Then I fussy cut the piece out. Dimensionals were added to the back and set aside.  

I set the turtle over the scrubbed color area so I could see where the words would go. The words are from the "Back on Your Feet" set and were stamped using Old Olive ink.  Dimensionals were added to the back of the piece and it was set in place on the front of the card base.

The turtle was added and the card was done.  

This was a super quick and easy card to make. I love the colors but I especially love the look on the little turtles face!!!

Thank you SO very much for taking your time to stop by and see today's card,
Wanda

Tuesday, April 26, 2022

Hand-Penned Petals, Artistically Inked, Color & Contour, Birthday Card, Stampin' Up!

I took yesterday's card and thought I would give it a try using the "Hand-Penned" Designer Series Paper (DSP).  I love the layout and I can see many packages of DSP that could work with it. It worked!!!  

The base of the card is a folded half-sheet of Basic White card stock. This card opens on the right and the fold is on the left. I cut a 4" x 5-1/4" piece of Basic White for the focal piece. I stamped Daffodil Delight dots using the dotted image from the "Color & Contour" set. 

The Mint Macaron striped piece of DSP from the "Hand-Penned" 12" x 12" package was cut at 5-1/4" x 1".  I taped this to the right side of the 4" x 5-1/4" piece of Basic White card stock.

A piece of Mint Macaron card stock was cut at 1" x 5-1/4" and die cut with the scalloped edge die from the "Hand-Penned Petals" bundle. 

Then I cut a 1-1/2" x 5-1/4" piece of DSP from the same "Hand-Penned" package. I taped the scalloped piece to it. Then this was taped to the front of the card, about 3/4" from the edge.  

The flower and leaves are from the "Hand-Penned Petals" bundle using Basic White, Daffodil Delight and Garden Green card stock.

The words are from the "Artistically Inked" set using Garden Green ink. I trimmed it to 2-3/4" x 3/8" and added Dimensionals to the back.

I added some glue to the center of the larger Daffodil Delight flower and set it on the front of the card. Then I gently set the words in place. I glued the pieces in place by tucking them under the larger flower and the words. 

This piece was taped to the front of the card base and the card was done.

I like how it turned out and I still think it's a very fun layout. I can't wait to try this with the DSP from the new catalog. I'm anxious to order and can't wait till I can submit it.  I have my wish list all ready. It's too bad Stampin' Up! doesn't have it set up so you can put everything in the cart and wait until the opening date to press submit. I'd probably end up adding more to my card before that date came!  I know me too well. LOL   Anyway, I did enjoy making this card and I am in need of a birthday card in a few days, so after I post this I will be getting it ready to send.

Thank you SO very much for taking your time to stop by and se today's birthday card,
Wanda

Monday, April 25, 2022

Artistically Inked, Hand-Penned Petals, Color & Contour, Birthday Card, Stampin' Up!

I was looking for a card on Pinterest that used the Designer Series Paper (DSP) from the "You're a Peach" 12" x 12" package. I bought the paper but I didn't buy the set/bundle.  I loved the colors and designs in this pack but I haven't used it much so I was on the hunt for cards that used it but didn't use the stamp set. I actually found one!  And I LOVE the layout too!  So off to work! You can see the original card here

The base of my card is a folded half-sheet of Basic White card stock. This card opens on the right and the fold is on the left.

I cut a 4" x 5-1/4" piece of Basic White card stock for the front of the card base. This is the piece that will be built upon.

I cut the stripped piece of DSP from the "You're a Peach" package to measure 5-1/4" x 1" and taped it to the left side of the 4" x 5-1/4" piece of Basic White card stock.

I took the dotted/splatter image from the "Color & Contour" set using Coral Calypso ink and stamped it on the Basic White piece, making sure I went far enough to the left so it would show.

Then I cut a 1-1/2" x 5-1/4" strip of DSP from the same package. I found the one with small peaches all over it. It was easy to find since both sheets of both designs were not used yet. Yay! Finally getting to use them.

Next I cut a 1" x 5-1/4" piece of Calypso Coral card stock and used the scalloped die from the "Hand-Penned Petals" bundle. I taped this piece to the back of the DSP with the peaches on it.  Then that was taped over the striped DSP piece. It sets about 3/4" in from the right edge.

Then flowers and leaves were die cut from the "Hand-Penned Petals" dies. I used Calypso Coral for the larger flowers, Powder Pink and Basic White for the smaller one, and Pear Pizzazz card stock for the leaves. 

The words are from the "Artistically Inked" set and were stamped on a scrap piece of Basic White card stock using Calypso Coral ink. I trimmed this piece to 3/8" x 2-3/4". I added Dimensionals on the back and set it aside.

To assemble the flowers, I glued the largest one in place. I found glue to be easier to work with since it allows me to slip pieces behind other piece.  So after the larger flower was set in place, I set the words in place but I didn't press down on them yet, I need to be able to slip pieces under it if necessary. I added the flowers and leaves by adding a bit of glue and setting and slipping them in place.  I pressed down on the word piece and the card was done.

Don't you think it's pretty? I LOVE the colors. I LOVE the layout. And I LOVE that I was able to use some DSP that I hadn't used yet.  There was a bit of die cutting but using scraps you can cut a lot of the colors needed at one time. 

Thank you SO very much for taking your time to stop by and see today's birthday card,
Wanda

Sunday, April 24, 2022

Artistically Inked, Friendship or Thinking of You Card, Stampin' Up!

On Friday I had made a card using the "Hand-Penned Petals" set from a video I found on the Internet. You can see the video here or perhaps you watched it on Friday when I posted the card and link.  When I saw the two card I chose the other one because I thought this one was harder to do. I thought there was some watercoloring by hand on it. But I was wrong. I also forgot to add a couple of things to my card but it is still pretty.

The base of the card is a folded half-sheet of Misty Moonlight card stock. This card opens on the bottom and the fold is on the top.

A 5-1/8" x 3-7/8" piece of Basic White card stock was cut for the bottom layer. The next layer is Misty Moonlight and it was cut at 5" x 3-3/4". It's supposed to be textured using the "Tasteful Textile" embossing folder but I forgot. This was then taped to the Basic White layer and then that was taped to the front of the card.

I 1" x 5-1/2" strip of Designer Series Paper (DSP) was cut from the "Hand-Penned" 12" x 12" package and taped to the front of the card. Mine was taped about 7/8" up from the bottom. I should have moved it up at about 1-1/4" from the bottom. 

Next a 4-3/8" x 3-1/8" piece of Mint Macaron card stock was cut. And on top of that is a 4-1/4" x 3" piece of Basic White. 

The Basic White piece was stamped using the stems from the "Artistically Inked" set using Mint Macaron ink.  Then the buds were stamped above the stems using Misty Moonlight ink that was stamped off once. Before I did my stamping there, I stamped the flower image from the "Artistically Inked" bundle and I die cut it. Then I set it on top of the Basic White piece so I could see where to stamp the stems so they would hardly show. I wanted the buds to show more. I think if I were to make another card like this, I would omit the stems and just stamp the buds and then another row of buds below the first one. But I managed to cover the stems enough to just mostly see the buds.

For the coloring, I used my Aqua Painter brush and colored the petals using Misty Moonlight ink and the leaves using Mint Macaron ink. I used my Powder Pink marker for the flower centers. When I stamped the image, I had used Staz On ink. I didn't have any shimmer card stock so I just used Basic White and I made sure not to color for too long in one spot or the paper pills.  If I had to go back over an area, I made sure it was dry first. Then the piece was supposed to be textured using the "Tasteful Textiles" embossing folder, but I forgot! The flower image was set in place on the stamped Basic White piece using Dimensionals. Then this was set in place on the front of the card.

The words are from the same "Artistically Inked" set using Misty Moonlight ink. I die cut them with a die from the "Many Messages" bundle. I used a Dimensional on the right side and a dot of glue on the left.

A bow was tied using white Baker's Twine and set in place with a dot of glue.

I found some black embellishments and I set them in place on the front of the card.

A 4" x 5-1/4" piece of Basic White was added to the inside and the card was done.

This was a fun card to make and even with the things I forgot to do and didn't have, I think it turned out rather well.

Thank you SO much for stopping by to see today's friendship card,
Wanda

Saturday, April 23, 2022

Artistically Inked, Forever Fern, Friendship or Thinking of You Card, Stampin' Up!

The other day I made a card using these same elements. And at that link there was another card featuring the same images but adding a square in the center with the flower coming out. I thought the first card was so pretty and easy that I thought I'd give the second one a try. I am not sure which I like better. This one was a little bit more work but not bad.  You can see the original card here. I didn't have some of the materials, so I made do with what I had. 

The base of the card is a folded half-sheet of Basic White card stock. My card opens on the right and the fold is on the left.

I added a 3-7/8" x 5-1/8" piece of Bermuda Bay card stock for the bottom layer. Then a 3/4" x 5" piece of Coastal Cabana card stock was cut and taped for the next layer.  These were then taped to the front of the card. 

A Basic White layer was cut at 3-5/8" x 4-7/8".  I die cut a 2-1/8" square from the upper part of the piece. I made sure there was equal spacing on the top and sides. U didn't have the new "Stylish Shapes" dies yet so I used what I had. Then the piece was textured using the "Tasteful Textile" embossing folder. 

I also cut a 3-1/4" x 3-1/4" piece of Basic White card stock and I stamped the larger flower on it using Coastal Cabana ink.  I set this piece in place on the textured front piece using Dimensionals. Dimensionals were also added to the rest of the larger white piece. A little glue or tape was added to the back of the 3-1/4" x 3-1/4" piece and the entire piece was placed on the front of the card. 

The flower and leaves were stamped using the "Artistically Inked" set with Bermuda Bay ink and Granny Apple Green ink. They were die cut. The flower was set in place in the middle of the square with Dimensionals and the leaves had a dot of glue added to the bottom tips and slipped under the flower.

The words are from the "Forever Fern" set and were stamped on a scrap of Basic Black card stock with Versa Mark ink. Then heat set with white embossing powder. The piece was trimmed with a scissors and set in place on the front of the card with a dot of clue on each end.

A black and white Baker's Twine bow was tied and set in place with a dot of glue.

I didn't add any embellishments. I forgot but I think I may just leave it as it is and allow the eye to be drawn to the square window of the card.

I almost forgot. I didn't have the Designer Series Paper (DSP) that was used on the original card so I cut a 1/4" strip of DSP from the "Daffodil Afternoon" set. I glued it in place and then trimmed the edges. It ended up being 3-5/8" long.

This was a fun card to make and I am pleased with the way it turned out.

Thank you SO very much for taking your time to stop by and see today's friendship card,
Wanda

Friday, April 22, 2022

Hand-Penned Petals, Pansy Patch, Birthday Card, Stampin' Up!

I saw this pretty card on the internet and I followed the link to a video on how to make this card. I didn't have some of the items used but I made it work. You can see the original card here

The base of the card is a folded half-sheet of Misty Moonlight. That is why I wanted to make this card. I LOVE that color and sad to say, it's retiring soon. And the "Hand-Penned Petals" set is one that I love using. It's fun, easy and SO pretty when you are done. It's one of those that is kind of hard to ruin! After cutting the card stock it measured 4-1/4" x 11".  The fold is on the top and the opening is on the bottom.

I cut a 3-3/4" x 5" piece of Basic White. Then I cut a 3-5/8" x 4-7/8" piece of Basic White for the front of the card.

The video showed the new "Stylish Shapes" dies but I don't have them yet, so I used the 2-5/8" circle die and cut the circle out. The piece was then textured using the "Tasteful Textures" embossing folder.

A 3" x 3" piece of Misty Moonlight card stock was cut and a 2-1/2" punch was used to cut the circle. That piece was then glued to the back of the textured piece.

The Designer Series Paper (DSP) from the "Hand-Penned" 12" x 12" package was cut at 3-1/4" x 3-1/4" and taped it to the upper part of the first Basic White piece that was cut. I made sure it was equal across the top and sides. Then the piece with the holes in it was set on top using Dimensionals.

The flower was stamped using black Staz-On ink and watercolored using Misty Moonlight and Mint Macaron inks. And the center of the flower was colored in using the light Petal Pink Blends pen. It caused my ink to smear so I ended up coloring over it using the Petal Pink marker. The flower was set in place using Dimensionals and a bit of glue on the parts that were sticking up on the upper left side of the circle.  

The words are from the "Pansy Patch" set  using Misty Moonlight ink on a scrap piece of Basic White card stock. I didn't have the same dies that were used in the video so I used one from the "Many Messages" bundle (that is also retiring).   

I didn't have the scallopy thing that was used on the original card so I used and edge one from the "Painted Poppies" bundle with Mint Macaron card stock. I trimmed the sides to fit the word piece and I glued it in place on the back. Dimensionals were added to the back of the word piece and it was set in place on the front of the card. 

A bow was tied using white Baker's Twine. I didn't have the blue that was used on the original card.  I didn't have the same embellishments that were used on the original card so I just added some clear "Polished Dots".  Just using what I have and trying to make it work.

I do like how the card turned out!

Thank you SO very much for taking your time to stop by and see today's birthday Card,
Wanda

Thursday, April 21, 2022

Artistically Inked, Forever Fern, Friendship or Thinking of You Card, Stampin' Up!

When I saw this card on the internet I thought it would be fun to make it. There's two versions of it and I think I'll try the other one tomorrow.  This one has such a clean and simple look to it. I love the colors, it's got a very inviting feel to it. You can see the original card here

I changed the card a little bit not only to save on my colored card stock but I liked the look much better. 

The base of the card is a folded half-sheet of Basic White card stock. This card opens on the right and the fold is on the left.

I cut a 3-3/4" x 5-1/8" piece of Bermuda Bay card stock for the bottom layer. A 3-5/8" x 5" piece of Coastal Cabana card stock was cut for the next layer.  And the focal piece is a 3-1/2" x 4-7/8" piece of Basic White card stock.

I stamped the larger image from the "Artistically Inked" set using Coastal Cabana ink. I textured it using the "Tasteful Textile" embossing folder. The flower was stamped on a scrap piece of card stock using Bermuda Bay ink and the leaves were stamped on a piece of scrap card stock using Granny Apple Green card stock. I die cut the flower and the leaves.

The flower was set in place on the center of the larger flower using Dimensionals. I did not press down on the flower because I needed to add a little tape on the back of the leaves and slip them in under the flower.

The "hello" is from the "Forever Fern" set and was stamped on a scrap piece of Basic Black card stock using Versa Mark ink. I added white embossing powder and heat set it. I trimmed it close to the words and set the piece in place with a piece of Dimensional on the right and a little tape on the left.

I tied a black and white piece of Baker's Twine in a bow and glued it to the flower, just under the corner of the word piece.  And that was it. It's a super quick and easy card to make and it's got such an elegant touch to it.

Thank you SO very much for taking your time to stop by and see today's friendship card,"
Wanda

Wednesday, April 20, 2022

Free As a Bird, Friendship or Thinking of You Card, Stampin' Up!

This card happened by chance. I was picking up the "Hand-Penned" Designer Series Paper (DSP) package and piece of it fell out. I picked it up and thought I should just go ahead and use it so it will never have to fall out of the package again!

The base of my card is a folded half-sheet of Basic White card stock. This card opens on the bottom and the fold is on the top.

I took a 2-3/4" x 4" piece of Cinnamon Cider card stock for my layer.  Then I trimmed up my piece of DSP to 2-5/8" x 3-7/8" and I taped it to the Cinnamon Cider piece. Then I taped that to the front of the card, leaving 1/4" on the top, left side, and bottom.

I die cut two scalloped rectangles from the "Stitched So Sweetly" die set. This set is going to be retired soon and it's one that I have liked a lot and had a lot of fun with.  I will probably keep it a bit longer before I decide to sell it. I'm sure something else will take it's place and I will no longer want it.  I cut a second largest rectangle using Cinnamon Cider card stock. Then I cut the next size smaller piece using Basic White card stock.

I stamped the bird from the "Free as a Bird" set using black Memento ink. And I also stamped the words from the same set using black Memento ink.

I colored the bird using my Blends pens. I used the Ivory one for under the eye area. I also colored the beak with it.

Then I colored the head and back area using my light Soft Suede pen. 

The belly is colored in using the light Pumpkin Pie pen first and then the dark one. I also took the light Pumpkin Pie pen and colored over the Ivory on the beak.

Under the bird's feet I used the light Old Olive pen.

And for the final touch, I colored around the bird using the light Pool Party pen.

I taped the stamped Basic White piece to the Cinnamon Cider piece. Dimensionals were added to the back and the piece was set in place on the front of the card.

This was a very fun and easy card to make. I like how it turned out and it's going to be going out in the mail to a friend of mine.

Thank you SO very much for taking your time to stop by and see today's friendship card,
Wanda

Tuesday, April 19, 2022

Masculine Birthday or Father's Day Card, Stampin' Up!

My card today is probably closer to a masculine birthday card than a Father's Day card but it could work for both.  And it will work for both if you change the wording!! I found this card on Pinterest. You can see the original here. I did not find much info on how to make it, so here's how I did it. 

The base of the card is a folded half-sheet of Mint Macaron card stock. The layer on top of that is a 4" x 5-1/4" piece of Soft Succulent card stock. And the focal piece is a 3-7/8" x 5-1/8" piece of Basic White card stock.

The first thing I did was I stamped the water. I inked up the image using Mint Macaron ink and then I tapped the edges with some Soft Succulent ink but it didn't show up. I probably should have gone further inside the image or maybe used a darker ink. 

Next I stamped the boat from the "Let's Set Sail" set on a separate piece of Basic White card stock using Smoky Slate ink. I punched it out using the matching punch.

Then I stamped one sail using Soft Succulent ink and the other using Mint Macaron ink. I also punched those out. 

I set the boat in place on the "water" and then set the sales in their respective places but I didn't affix them yet. I needed to see where the words would go.

The words are from the same "Let's Set Sail" set and were stamped using black Memento ink.  Then the birds were added.

The sails were set in place.  A 4" x 5-1/4" piece of Basic White card stock was added to the inside and the card was done.

This was a very fun card to make and even though I didn't have the same card size as the original card did, I made it work and it turned out rather well.

Thank you SO very much for taking your time to stop by and see today's masculine card,
Wanda

Monday, April 18, 2022

Let's Set Sail, Father's Day Card, Stampin' Up!

I was thrilled to see that the "Let's Set Sail" set and punch made the cut. This is a fun set to play with and it's always good to have a couple sets that can be used for masculine cards.  I found this card here and made a few little changes.

The base of my card is a folded half-sheet of Basic White card stock. This card opens on the right and the fold is on the left.

I cut a 4" x-5-1/4" piece of Crushed Curry for the layer and then a 3-3/4" x 5" Basic White piece for the next layer. I taped the two layers together and then taped them to the card base.

The Designer Series Paper (DSP) is from the "Ice Cream Corner" 12" x 12" package. I measures 3-3/4" x 1-3/4".  I taped it to the bottom of the Basic White layer.  

I used the 3-5/8" x 2-1/4" Stitched Rectangle die for the Basic White focal piece and I cut the Crushed Curry layer behind it at 3-3/4" x 2-3/8".  
I took the Basic White focal layer and stamped the water using the image in the "Let's Set Sail" set and Pool Party ink. I stamped that image twice, though I could have moved it down a bit more but it still looks nice.

Next I stamped the boat pieces. The one sail is Crushed Curry, the other is Flirty Flamingo, and the boat is Pool Party.  I set the boat piece on top of the focal piece so I could see where to stamp the shadow image. I used Pool Party ink and I stamped that image twice.  Before I assembled the boat on the focal piece, I stamped the birds using black Memento ink and taped it to the Crushed Curry layer. The boat was set in place using Dimensionals and the same for the sails.

I tied a black and white piece of Baker's Twine around the piece and then added Dimensionals to the back and set it in place on the front of the card.

The words are from the "Many Messages" set (which is retiring) and were stamped using black Memento ink on a scrap piece of Basic White card stock.  The "Many Messages" set has a matching die that cuts all the words at one time. I only used the one word and die cut it out. Using scrap card stock works well for that.  Even though it's retiring, I'm not sure I'm ready to give it up. I like having all of those different shaped words and dies that fit each one. After the words were stamped and die cut, I took my Pool Party marker and ran the belly of the nib around the edge of the piece to add a touch of color. I added a Dimensional to the left side and tape to the right side and I set the piece in place on the card.  Under that piece I had taken my blending brush and made a sun but it got covered by the wording.

I colored two pearls black and set them in place on the front of the car and the card was done.

This was a very fun and easy card to make. What I like best about it is how colorful it is.

Thank you SO very much for taking your time to stop by and see today's Father's Day card,
Wanda


Sunday, April 17, 2022

Sweet Strawberry, Friendship Card, Stampin' Up!

I found another fun and easy card to make. This could also make a great birthday card too. There's some fun words in the "Sweet Strawberry" stamp set. You can see the original card here

The base of the card is a folded half-sheet of Basic White card stock. This card opens on the right and the fold is on the left. 

For the layers I cut a 4" x 5-1/4" piece of Granny Apple Green card stock.  A 3-7/8" x 5-1/8" piece of Poppy Parade card stock for the next layer.  And a 3-3/4" x 5" piece of Basic White for the top layer.

Next I cut a 1/2" x 4" strip of Poppy Parade Designer Series Paper (DSP) from the "Brights" 6" x 6" stack. 

The strawberries were stamped next using black Memento ink for the outline and Poppy Parade ink for the solid part. I should have colored them in using the Blends Pens but I forgot. So I took my Wink of Stella pen and colored over the piece and the ink blended in better. 

The leaves and stems were stamped using black Memento ink and were colored in using both light and dark Granny Apple Green Blends pens.  

I assembled the strawberries and added the leaves. I set them on top of the focal piece to see where the stamped flowers with leaves should go. I used my Stamparatus for this. I wanted to make sure I got a nice solid image.  I colored the leaves using both light and dark Granny Apple Green Blends pens.  Balmy Blue was used for the flowers and Daffodil Delight for the flower centers. 

Then I taped the strip in place about 5/8A" from the left edge and 1/2" from the top and bottom. 

The strawberries piece was taped in place and then the words were added. They are from the same "Sweet Strawberries" set and were stamped using black Memento ink.  And that was it.  So quick. So simple.  And so darn cute!!

Thank you SO very much for taking your time to stop by and see today's friendship card,
Wanda

Saturday, April 16, 2022

Sweet Strawberry, Birthday Card, Stampin' Up!

I just love this "Sweet Strawberry" set. It's got a matching punch so it makes for a super quick card. Just stamp, punch, and put together. You can see the original card here

The base of the card is a folded half-sheet of Soft Succulent card stock. The card stock was cut in half on the short side so it measured 4-1/4" x 11" after cutting. It was folded in half and the fold is on the top and it opens on the bottom.

I cut a piece of Designer Series Paper (DSP) from the "Pansy Petals" 12" x 12" package measuring 4-1/4" x 3-1/2".  I taped it to the front of the card, centering it as much as I could.

I cut two Basic White strips of card stock that measure 3/16" wide by 4-1/4" long. I glued them in place because I didn't think I could get the tape on that narrow strip nicely. I left a hair between the DSP and the strips.

I die cut the largest circle from the "Layering Circles" dies. Then I stamped the words from the "Sweet Strawberry" set using Evening Evergreen ink. I taped the circle in place on the front of the card. 

I stamped the strawberries using Cherry Cobbler for the outline image and Poppy Parade for the solid part. The stem and leaves were stamped using Evening Evergreen for the outline image and Soft Succulent for the solid part. I punched the pieces out.

Next I taped the two strawberries together. I did glue the strawberry top in place. Then I taped the leaves together and taped them behind the strawberries. Dimensionals were added to the back and I set them in place on the front of the card. 

A piece of white Baker's Twine was tied around the top of the card. 

I added a few "Genial Gems" to the Basic White circle. 

A 4" x 5-1/4" piece of Basic White card stock was added to the inside of the card and the card was done.

Thank you SO very much for taking your time to stop by and see today's "sweet" birthday card,
Wanda

Friday, April 15, 2022

Hand-Penned Petals, Sweet Strawberry, Friendship Card, Stampin' Up!

From the same grouping of cards I referred to yesterday, I found another one on there that I thought was so pretty.  You can see the original card grouping here.

The base of my card is a folded half-sheet of Basic White card stock. This card opens on the right and the fold is on the left.

I cut a 4-1/8" x 5-3/8" piece of Misty Moonlight card stock.  I taped it to the Basic White card base. 

I cut a 4" x 5-1/4" piece of Designer Series Paper (DSP) from the 12" x 12" "Hand-Penned" package. I taped that to the top of the Misty Moonlight piece.

Next I die cut a scalloped stitched rectangle from the "Color & Contour" bundle. 

The words are from the "Sweet Strawberries" and I stamped them using black Memento ink. I added Dimensionals to the back and I set it in place on the center of the card.

I stamped the flower from the "Hand-Penned Petals" set using black Memento ink. I colored the flowers in using my dark Petal Pink Blends pen. I colored the center of the smaller flower using the dark Daffodil Delight Blends pen.  I added some depth of color using the Blushing Bride ink pad and a Blender Pen. The leaves were colored in using the Garden Green ink pad and a Blender Pen. The piece was die cut using the matching die. I added Dimensionals to the back and I set it in place on top of the scalloped rectangle.

And for the final touch, I added a little vanilla organza bow to the flower stem, plus a dot of Wink of Stella in the center of the smaller flower.  Fun little touches can make a big difference. 

This was a fun, quick, and easy card to make. Plus this card is very versatile too, it can be used for a number of different occasions/events. 

Thank you SO very much for taking your time to stop in and see today's friendship card,
Wanda


Thursday, April 14, 2022

Flowering Flowers, Hand-Penned Petals, Just a Note or Friendship Card, Stampin' Up!

Today I thought I'd make a note card to send to a friend to let her know I've been thinking of her. I thought this card was pretty and I had all the stuff to make it!! You can see the original card here. It's in the mix of the bunch of cards on display there.

The base of my card is a folded half-sheet of Basic White card stock. This card opens on the bottom and the fold is on the top. 

I cut a 4" x 5-1/4" piece of Designer Series Paper (DSP) from the "Hand-Penned" 12" x 12" package.  I taped this to the front of the card.

I die cut the scalloped rectangle from the "Color & Contour" bundle. The words are from the "Flowering Flowers" set and were stamped using black Memento ink.  I taped this on top of the DSP.

The flowers are from the "Flowering Flowers" set and were stamped using black Memento ink. I colored them using my Blender Pen and ink pads. I used Daffodil Delight for the yellow flowers and the center of the larger flowers. I used Blushing Bride ink for the larger flowers and the centers of the smaller flowers.  The leaves were colored in using Garden Green ink.  The piece was die cut using the matching die. Dimensionals were added to the back and set in place on the front of the card. 

I was going to call it done but decided to add a bit of Wink of Stella to the center of the flowers and that was it.  I like the way this card looks and now to write in it and send it off to my friend.

Thank you SO very much for taking your time to stop by and see today's friendship card,
Wanda


Wednesday, April 13, 2022

Flowering Flowers, Color & Contour, Thank You Card, Stampin' Up!

Today's card is a fun and quick card. Plus you get to use up some Designer Series Paper (DSP) too!

The base of my card is a folded half-sheet of Basic White card stock. This card opens on the right and the fold is on the left. 

I cut a 4" x 5-1/4" piece of Fresh Freesia card stock. I stamped the smaller flower from the "Flowering Flowers" using Fresh Freesia ink. 

Then I cut a 4" x 5-1/4" piece of Designer Series Paper (DSP) from the "Hand-Penned" 12" x 12" package. I cut it on the diagonal from the upper left corner to the bottom right corner. I taped it to the stamped Fresh Freesia 4" x 5-1/4" piece. And then that was taped to the card base.

For the focal layers, I cut a 2-1/2" x 4" piece of Basic White card stock. A 2-3/8" x 3-7/8" piece of Mint Macaron was cut and a 2-1/4" x 3-3/4" piece of Basic White was cut for the top layer.

If I were to make another card like this, I would set the ribbon across the card and have a better view of where the words should go. And I would stamp the words first with black Memento ink and the words from the "Color & Contour" set.  Then the flower from the "Flowering Flowers" set would be stamped using Fresh Freesia ink. I stamped the dots from the "Color & Contour" set using Daffodil Delight ink. It's prettier if you stamp off first. 

The ribbon was wrapped around the back of the Basic White piece and taped in place. Then the piece was glued to the Mint Macaron. I prefer ink here because I don't think tape will hold up well with the ribbon on just one layer of card stock. Then this was taped to the larger Basic White piece. Dimensionals were added to the back and set in place on the front of the card.  And the card was done!

This was a very fun and easy card to make. I have always liked this layout. It has some dimension to it plus it's pleasing to the eye. This is a very versatile card. It can be used for a number of other occasions.

Thank you SO very much for taking your time to stop by and see today's thank you card,
Wanda

Tuesday, April 12, 2022

Flowering Flowers. Friendship or Note Card, 2022 Stampin' Up! Spring Catalog

As I was looking on Pinterest for a card I ran across this one and thought I'd give it a try. It's pretty easy too! You can see the original card here

The base of the card is a folded half-sheet of Basic White card stock. The original card was done using Very Vanilla card stock. I didn't pay attention to that until I was done with my card. But Basic White looks just fine too. This card opens on the right and the fold is on the left.

I took a 4" x 5-1/4" piece of Basic White card stock and stamped the flowers from the "Flowering Flowers" set. I used Melon Mambo on the large center flower. Pumpkin Pie ink was used on the second largest flower in the set. That flower also had leaves and dots. The leaves were colored in using Granny Apple Green ink and the dots were done using Daffodil Delight ink. You can sponge these colors on or used your cube ink pads. I used the cubes. That was the part of the card I didn't like. Making sure those three colors didn't mix with each other.  And the other flowers were colored in using Pumpkin Pie and Daffodil Delight ink. 

The words are from the same set and were stamped using black Memento ink. 

I set the piece in place on the card base using Dimensionals. Some "Polished Dots" were added and the card was done.

This was a quick and easy card to make. I love the colors. It's such a bright and cheery card.

Thank you SO very much for taking your time to stop by and see today's friendship card,
Wanda

Monday, April 11, 2022

Sweet Strawberry, Thank You Card, Stampin' Up!

Now I think I read that the "Sweet Strawberry" set and punch are retiring but I don't recall. I saw a lot of sets retiring and sometimes I get confused because I see they are retiring and it ends up being that the bundle is retiring but the set and stamp or dies can be purchased separately.  So I just thought I'd use the set and deal with it retiring later. If it is retiring, I think it's sad because it's a fun set and easy to work with. It's a set that has a thank you, birthday, thinking of you, and hello messages. VERY versatile.  It would be nice if they kept sets more than one year and maybe added new Designer Series Paper (DSP) to go with it. But I'm not in charge and this is what it is!

So to make this card you need a folded half-sheet of Basic White card stock. This card opens on the bottom and the fold is on the top. 

I cut a 4" x 5-1/4" piece of Balmy Blue card stock and a 3-7/8" x 5-1/8" piece of DSP from the "You're a Peach" 12" x 12" package. I taped the DSP to the Balmy Blue piece and then I taped that to the front of the card.

The layer is a piece of Balmy Blue card stock that was cut at 4-1/4" x 3". I took my blending brush and scrubbed on some Balmy Blue ink over the area where the strawberries were going to go.

Next the strawberry pieces were stamped. I punched out the 4 images onto a piece of scrap card stock. I set it in my Stamparatus and then added the strawberry, leaf, strawberry top, and flower stamps in the open areas on that punched piece. Then I closed the cover to the Stamparatus to the pieces were set in place. I removed that punched piece and put a piece of Basic White card stock in it's place, inked up the images using black Memento ink and stamped those images.  Then I put them in the punch and punched them out. I needed three of each image. 

The strawberry was colored using my light and dark Poppy Parade Blends pens. The strawberry top and leaves were colored in using the light and dark Old Olive Blends pens. The flower center was colored in using the light Daffodil Delight Blends pen and the petals were colored in using the light Balmy Blue Blends pen. 

Dimensionals were added to the strawberries, the top one on the right only had Dimensionals added to the right side and glue was used on the left. I didn't want to have it sitting on top of the other strawberries with a Dimensional on that side because it would not look right.

Before the punched items were set in place, I set them on top of the card for placement for the words. The words are from the same "Sweet Strawberry" set and were stamped using black Memento ink. I was going to use the "Hello There" stamp but I had temporarily lost it. I took it out of the case way before I needed it (Note to self:  never do that again). I looked everywhere. It wasn't on my worktable or the floor or the back of the case or on my clothing. I even looked in the recycling basket next to me but you'd think I'd hear it hit the basket. It was not where to be found. But when I took the Dimensionals out of the holder I had them in, it was stuck to the back of it. But it was too late, I had already given up and used a different stamp.  Still "living and learning".  LOL  

So, once the words were stamped I set the strawberries in place but I didn't press them down because I wanted to be able to slip the leaves and flowers in place. I used glue for the leaves in flowers so I could move them around if I had to.  I did glue the left side of the top right strawberry so that edge would stay down.

Dimensionals were added to the focal piece and it was set in place on top of the DSP.  And for the final touch, a few black sequins were added. I had them on hand and am trying to use up some embellishments around here. 

This was a very fun and easy card to make. I think it took me longer to write up this post than it did to make the card!

Thank you SO very much for taking your time to stop by and see today's thank you card,
Wanda

Sunday, April 10, 2022

Sweet Ice Cream, Pansy Patch, Birthday Card

I haven't made a card using the "Sweet Ice Cream" set in a while. I have been too busy with other sets. This is such a fun one and can be used for kids and adults.  I'm not overly thrilled with this card, mostly because of the Designer Series Paper (DSP) that I used.  I couldn't find the ice cream DSP that went with this set. Then I found it after the card was done. The DSP that was showing through the plastic didn't look like it had anything to do with ice cream but had I looked inside I would have seen it.  Oh well.  You can use whatever kind of DSP you'd like at the bottom and make the card even better!

The base of the card is a folded half-sheet of Basic White card stock. This card opens on the right and the fold is on the left.

I cut a 2-1/4" x 4" piece of DSP from the "Abstract Beauty" 4" x 6" stack. You could easily make two cards quickly using this layout with that DSP. I only had to recycle 1" of it. I taped that DSP to the bottom of the card about 1/8" around each side and bottom edge.  

I die cut a scalloped rectangle using the dies from the "Color & Contour" bundle. 

Next the ice cream was stamped using Pool Party ink. I stamped the sprinkles using Early Espresso ink. Then I punched it out using the matching punch.

The bottom of the cone was stamped using Cinnamon Cider ink and the lines on it were also Cinnamon Cider ink.  

Dimensionals were added to the back of the rectangle piece and it was set in place on the front of the card. Then the cone was glued in place. I thought it would be more difficult to press it down if I had used tape. Had I used tape before I added the Dimensionals, tape would have worked just fine.  And then the ice cream was added using Dimensionals.

A few "Genial Gems" were added to the front of the card and the card was done.

This was a very quick and easy card to make. It's such a fun and cute set!

Thank you SO very much for taking your time to stop by and see today's birthday card,
Wanda

Saturday, April 09, 2022

Flowering Flowers, Thank You Card, Stampin' Up! 2022 Spring Catalog

I really like the "Fresh Freesia" color, one of the 2021-2023 in colors. And I had purchased the 6" x 6" in-colors Designer Series Paper (DSP). It added a lot to this card. 

The base of my card is a folded half-sheet of Basic White card stock. I covered the front with a 5-1/2" x 4-1/4" piece of DSP.

Then I took a quarter sheet of Basic White card stock and stamped the flower from the "Flowering Flowers" set. I sponged the colors on. I used Fresh Freesia, Soft Succulent, and Pale Papaya inks. I filled the piece with flowers. I also stamped another flower on a separate piece of card stock for the words. 

I took the 6th stitched rectangle die from the ""Rectangle Stitched" die set and cut two rectangles from the 4-1/4" x 5-1/2" piece of stamped card stock.  I taped them to the front of the card about 1/4" from the left side and top and the other piece from the right side and top.

The words are from the same "Flowering Flowers" set and were stamped using Evening Evergreen ink. I stamped the words close to the flowers.  Then I used the 2-5/8" circle die to cut them out. I used the next size up scalloped circle die and Soft Succulent card stock for the layer.  Dimensionals were added to the back of the circle and it was set in place on the front of the card.

Genial Gems were added around the words and the card was done. 

I think it's a sweet card and I should have used a full sheet of card stock to make a One Sheet Wonder and could have a lot of cards from one sheet.  But it is what it is, right?  LOL I do like how it turned out and I REALLY like the colors. This is a very versatile set and this card could be used for Mother's Day, Thinking of You, Friendship cards, and a get well card too!

Thank you SO very much for taking your time to stop by and see today's thank you card,
Wanda

Friday, April 08, 2022

Grassy Grove, Masculine Birthday, Sympathy or Father's Day Card, Stampin' Up!

When I saw this card on Pinterest, I wanted to make it. I had not played with the "Grassy Gove" bundle in a while. It's such a beautiful set and in a few minutes you can have a beautiful card. I found the original card here

The base of my card is a folded half-sheet of Old Olive card stock. I cut two 4" x 5-1/4" pieces of Basic White card stock. One for the front and one for the inside. I taped one on the inside. And the other I die cut the forest scene using the die from the "Grove Dies" package. 

I took a piece of Designer Series Paper (DSP) from the "New Horizons" 6" x 6" stack and I cut it at 3-7/8" x 5-1/8".  I turned the white piece over and I used my Mono glue to affix the DSP to the card stock. I could have used a sticky sheet to make the whole piece a sticker but I forgot about it at the time. The glue worked well. I just ran it all around the outside edge and then put tiny little dots on the areas I thought would stick up. I set it aside to set up for a minute or two.

Then I taped the layers to the front of the card base and that was it.  I didn't add any words because I wasn't sure what I was going to use it for. But it can be used for a masculine birthday, Father's Day, masculine thinking of you, a sympathy card, or even a masculine get well card.  It's such a pretty scene and a SUPER EASY card to make!

Thank you SO much for taking your time to stop by and see today's masculine orientated card,
Wanda  

Thursday, April 07, 2022

Celebrating You, Hand-Penned Petals, Mother's Day Card, Stampin' Up!

Now I know you are not going to believe me, but I had actually put the "Hand-Penned Petals" stamp set back on my shelf.  REALLY!!!  I had to go get it to make my version of this card I found on Pinterest. You can see the original card here.  I like this card because it's VERY versatile. You can use this card for a number of occasions and not just Mother's Day.

The base of the card is a folded half-sheet of Basic White card stock. 

I cut a 4" x 5-1/4" piece of Soft Succulent card stock and taped it to the front of the card base.

Then I cut a 2" x 3-3/4" piece of Designer Series Paper (DSP) from the in colors 6" x 6" stack. This is the Evening Evergreen color. I taped that in place, making it equal on the top, bottom and left side.

The scalloped rectangle was die cut using Basic White card stock and the largest "Stitched So Sweetly" die. 

The flower is from the "Hand-Penned Petals" set and were stamped on a piece of Basic White card stock using black Memento ink. And then it was die cut using the matching die. I stamped Daffodil Delight for the flowers and then I tapped my Crushed Curry ink cube on the edges and a little bit in the centers of each flower stamp and stamped it on top of the Daffodil Delight flowers. It does show up better in person.

The leaves were stamped using the leaf stamp image in the "Hand-Penned Petals" set and Soft Succulent ink.  I took my Blender pen and Soft Succulent ink to color in the stems.  

The words are from the "Celebrating You" set and were stamped using Evening Evergreen ink. Then the rectangle was taped in place on the front of the card.

The flower was set in place using Dimensionals. I added some "Genial Gems" to the front of the card and I did omit the bow. I didn't think it needed it.  Though the center of the flower does need something and I will probably color it in using the Soft Suede or Crumb Cake marker. I dropped everything and grabbed my markers. I used Soft Suede and it's too dark!!  Note to self, use Crumb Cake next time!  LOL  It still looks nice but it's very dark.

This was a very fun card to make and I do like how it turned out. I opted to use Basic White for the base of my card instead of Soft Succulent because the rectangle was Basic White and I thought that it needed to be tied into the card somehow. So making the base white then the rectangle didn't stand out so much. I like the look.

Thank you SO very much for taking your time to stop by and see today's Mother's Day card,
Wanda


Wednesday, April 06, 2022

Forever Fern, Hand-Penned Petals, Friendship Card, Stampin' Up!

Yes, my "Hand-Penned Petals" set was still sitting out. Though had I put it away I would have gotten back up to get it to make this card. The die cut image caught my eye. It was something different with this set/bundle.  You can see the original card here.

The base of my card is a folded half-sheet of Basic White card stock. I think it would have been prettier had the base of the card been Basic Black with the Basic White on top.  But I didn't see that until after I had finished the card. Anyway, this card opens on the right and the fold is on the left.

I die cut the floral image from the "Hand-Penned Petals" bundle using Basic White card stock. I did use the double-sided sticky sheet to make this into a sticker. I really didn't want to mess with gluing such thin areas.  I set this piece on top of the Designer Series Paper (DSP) from the "Hand-Penned" 12" x 12" package so I could figure out what size to cut this.  My DSP was cut at 2-1/2" x 3-3/4".  When I cut it, I set the edge of the paper on the inside line of the 2-1/2" mark so it was just a hair shy of 2-1/2".  Does that make sense? I did the same for the 3-3/4" size. I wanted this piece just a hair shy of the 2-1/2" x 3-3/4".  Then I took the Basic Black piece and cut it at 2-5/8" x 3-7/8" but I did the opposite here. I cut it on the other side of the line on my cutter. So this piece was just a hair larger than 2-5/8" x 3-7/8".  That way I get a little bit larger border showing on the layer.  Sometimes the layers are just too thin to be effective enough. Measuring the DSP and card stock like that made it look larger on that border/edging. I taped the DSP to the Basic Black piece. 

Next I set the die cut floral piece in place.  I taped the ends of a 3-1/2" piece of ribbon to the back of the layers. I taped it down using scotch tape. Then I stamped the words from the "Forever Fern" set using black Memento ink.

I set my card in my Stamparatus and lined up the image from the "Hand-Penned Petals" set and stamped it on the upper right corner using black Memento ink.  I turned the card 180 degrees and stamped the opposite corner.  

The DSP layer was taped in place and some black dots were added to the center of the flowers. I didn't have any black dots so I had to improvise. I was going to use my sharpie to color in some retired Candy Dots I had but I was too lazy to get up and get it, so I used some black nail polish I had sitting on my worktable.  The end result was to get black dots and that's what I got. Plus I got to use a few of the dots in my stash.  There's SO much "stash" here!

This was a fun, quick and easy card to make. I like how it turned out but I think it could use a Basic Black base instead of Basic White. I could always cut 1/8" off all sides and tape that to the front of the Basic Black base.  But I'm just going to leave it as it is for now!

Thank you SO very much for taking your time to stop by and see today's friendship card,
Wanda

Tuesday, April 05, 2022

Hand-Penned Petals, Celebrating You, Mother's Day Card, Stampin' Up!

I still wanted to play with my "Hand-Penned Petals" set, and no, not because it was still sitting out. Though it was!  I had seen another card that looked like fun. Mostly because it used a nice piece of Designer Series Paper (DSP).  You can see the original card here

The base of the card is a folded half-sheet of Mint Macaron card stock.  I cut two 4" x 5-1/4" piece of Basic White card stock, one for the front and one for the inside.  I taped them both in their respective places.

Then I took a piece of DSP from the 6" x 6" "Subtles" stack. I cut it at 3-7/8" x 5-1/8".  Then I cut a piece of Basic White card stock at 4" x 2-7/8".  It really should have been cut at 3-7/8".  Then the Basic White layer would show better. But it's still okay this way.

I stamped the flower from the "Hand-Penned Petals" set and die cut them with the matching die.  Then I colored them using my Blends pens. I didn't have the Fresh Freesia Blends pen so I used my Blender pen and the Fresh Freesia ink pad.  I colored lightly on the tips.  Then I colored the flowers with the Light Highland Heather pen and then colored closer to the center with the dark Highland Heather pen.  I used Daffodil Delight light in the center of the one flower.  The leaves and stems were colored in using both light and dark Mint Macaroon pens. I added Dimensionals on the backside. 

I took my small Basic White piece and I set it up in my Stamparatus and then set the flowers on top to see where the wording would go. The words are from the "Celebrating You" set and were stamped using black Memento ink. 

I die cut the scalloped edging using the die in the same "Hand-Penned Petals" bundle, using Mint Macaron card stock. I cut that card stock at 1" wide x 5-1/2" long. After I die cut it, I glued the strip to the back of the Basic White piece and then trimmed the edges. I chose glue so I could move it and get it on the Basic White piece evenly.  Once that was done I taped the piece to the front of the card.

The flower was then set in place and a white Baker's Twine bow was added with a dot of glue and the card was done.

This was a very fun and quick card to make and you get to use up a big piece of DSP!

Thank you SO very much for taking your time to stop by and see today's Mother's Day card,
Wanda

Monday, April 04, 2022

Hand-Penned Petals, Blooms in Bloom, Friendship or Thinking of You Card, Stampin' Up!

When I had made yesterday's card there was also another card on the same page I'd found that card. I liked them both and I was only going to pick one but I decided that I'd make the other one since I had thought it was a difficult decision to pick just one.  I found the original card here

The base of the card is a folded half-sheet of Basic White card stock. This card opens on the right and the fold is on the left.

The first think I did was I die cut the Designer Series Paper (DSP) from the "Hand-Penned" 12" x 12" package. I cut the DSP at 4-1/4" x 1-1/2".  I took a quarter sheet of Mint Macaron (wrong color, I should have used Soft Succulent but it was too late at this point) and I used the die from the "Penned Flowers" set that is part of the "Hand-Penned Petals" bundle and I die cut the scalloped piece. I trimmed it to a half inch wide and 4-1/4" long. I taped the DSP to the scalloped strip.  That was then taped to the front of the card about 1/4" from the bottom of the card edge. 

Then I took the rest of the quarter sheet of Mint Macaron and I die cut a 2-11/16" circle from the "Layering Circle" die set. It's the second largest one. I took a piece of Basic White card stock and die cut a scalloped circle from the same set that was just a little larger than the Mint Macaron circle.  I taped the two circles together. Before taping them down, I set the piece where I thought it would be going so I could see where to stamp the flower image on the upper right corner. That image is from the "Hand-Penned Petals" set and was stamped using Mint Macaron ink. 

I die cut the butterfly from the "Butterfly Brilliance" set using Basic White card stock.  I taped the circles in place and then the butterfly on top. 

The words are from the "Blossoms in Bloom" set and were stamped using Evening Evergreen ink. And the card was done.

This is a nice way to use up strips of DSP that are in your stash! It's a quick card and even if you don't have a stamp set to match the image in the upper corner, you could always just add your wording up there.

Thank you SO very much for taking your time to stop by and see today's friendship card,
Wanda

Sunday, April 03, 2022

Hand-Penned Petals, Thank You Card, Stampin' Up!

Today I was looking for a sweet and quick thank you card. I found it on Pinterest. You can see the original card here

The base of the card is a folded half-sheet of Basic White card stock. This card was cut in half on the short (8-1/2") side. After cutting it measured 4-1/4" x 11".

The flower image was stamped on a piece of Basic White card stock from the "Hand-Penned Petals" set using black Memento ink. Then they were die cut using the matching die set.

I stamped the colors on using Mint Macaron on the leaves, Cinnamon Cider on the smaller flowers, and Pool Party on the larger flowers. I took my Crushed Curry marker and colored in the center of the flowers. 

At the bottom I cut a 5/8" x 4-1/4" strip of Designer Series Paper (DSP) from the "Hand-Penned" 12" x 12" package. I taped this to the bottom of the card about 1/8" from the bottom edge.  The flip side of that DSP is the flowered part that was cut at 3/8" x 4-1/4" and taped it about 1/8" above the bottom strip. 

I set the flower piece on top to see where the words could go. I stamped the words from the "Hand-Penned Petals" set using black Memento ink. 

The large die cut flower was set in place using Dimensionals and the card was done!

This was a fun, quick, and easy card to make. I like how it turned out and I also like this layout.

Thank you SO very much for taking your time to stop by and see today's thank you card,
Wanda