Pin It

Showing posts with label Mother's Day. Show all posts

Thursday, March 03, 2022

Wildflower Path, Flowering Field, Birthday Card, Stampin' Up! 2022 Spring Mini Catalog

I think the theme this week is Designer Series Paper (DSP), the quest to use it up!  And then I laugh because the pieces I use are hardly enough to use up a package of DSP!  But it's the effort, right?

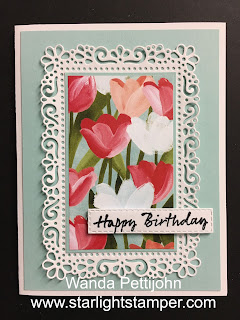
The base of the card is a folded half-sheet of Basic White card stock. The next layer is a 4" x 5-1/4" piece of Pool Party card stock.

I die cut the lacy frame from the "Ornate Layers" die set. I cut it from a piece of Basic White card stock. 

Then I cut a 2-1/4" x 3-5/8" piece of Pool Party card stock. When I cut this piece I had the edge on my card stock on the edge of the line on my cutter so it was a hair short of the actual measurement. I didn't want my card stock to go over the dots.  

I cut the DSP from the "Flowering Field" 12" x 12" package at 2-1/8" x 3-1/2" and I cut it a bit scant too. I taped the DSP to the Pool Party piece and then taped both of those to the lacy piece. Then that was taped to the Pool Party layer and then that was taped to the card base.

The words are from the "Wildflower Path" set and were stamped using black Memento ink on a scrap piece of Basic White card stock. I die cut them using the long thin "Rectangle Stitched Framelet". It's the one in the grouping of 4. I set the words in place using Dimensionals. And the card was done.

I think it tuned out nice, even though I didn't use as much DSP as I was hoping to. I do love those flowers. This would make a great Easter, Mother's Day, Thinking of You, or Get Well card.

Thank you SO very much for taking your time to stop by and see today's Birthday card, 
Wanda

Tuesday, March 04, 2014

My Mother So Very Grateful

Today I played with the "My Mother" set and the "So Very Grateful" set.  The two go so well together.  

I had stamped the flowers from the "So Very Grateful" set and I had colored them with markers and a blender pen.  I used Pumpkin Pie, Wild Wasabi, and Daffodil Delight.  My card stock is Whisper White and Crisp Cantaloupe.  Pumpkin Pie card stock just seemed too dark for the flowers.  The blender pen washed out the color a bit so Crisp Cantaloupe is the better choice!

After I colored the flowers I cut around the image.  UGH!  It's called "fussy cutting" and it sure is fussy! But since I was only making one card it was ok.  I certainly wouldn't do that for a swap!  I don't enjoy cutting out images, that is why I buy sets that have punches or dies that go with them!!!

But all in all it was a fun card to make and the cutting really didn't take that long to do.

Thank you SO much for visiting today,
Wanda

Wednesday, May 01, 2013

Sour Cream Mother's Day Gift Container Weekend Project


Today we are going to make Sour Cream Containers.  These are VERY easy to make and you can make them in lots of different sizes too.  There is a little trick to the size part though.  You need to keep 2" between the sides.  For instance, if you are making one 3" long you need to make the other cut 5".  This only works for odd numbers.  You can't make a nice Sour Cream Container using 2 and 4".  It will work but it won't have that look because it will be too short in the middle. So the smallest you could go is 1" x 3" and the largest you can go will determine the size of paper you have.

Today I'm using decorative paper from the Print Poetry pack.  I usually use Vellum if I'm filling the container with bath salts.  The ingredients in bath salts tends to leach out onto the paper but not onto the vellum.  You can stamp and emboss on the vellum and make it pretty or you can even find printed vellum.  For other items, such as candies or money I will use decorative paper.  

The decorative paper is a bit thick so after cutting my piece I will place it on the edge of my worktable, put my palm over it and pull it downward to curl it a bit.  I want the paper in a circle.  So now that you are aware of this helpful tip I will share with you how I make mine.

I cut my paper 3" x 5".  I roll the piece in a circle, short end to short end, and I glue it together.  Once the glue is set I fold one end in half.  I find the seam I just created from the first gluing and use that as a side. I pinch it on that side and then run my fingers across the top to pinch the other side.  Glue that end together.  Once the glue is set up then insert your goodies in and you will be folding the other end in half but at a quarter turn.  You just line up the center seam to the center on the other side and glue it shut.  By gluing it a quarter turn you get that twist in it like a sour cream container has. It's as simple as that.  

To make the ends prettier you can run them through the crimper just after gluing.  It will give them a nice little bend and a finished look.  You can use the piercing tool and punch holes along the one end and sew it closed with hemp or ribbon.  Use your imagination!

Thank you SO much for visiting today,
Wanda

Sunday, April 22, 2012

Mother's Day Gift Weekend Project

As I was cleaning in my workroom I ran across a can I had saved.  Yup, you will find some interesting and odd things in my workroom!  I don't like to toss things out that I think I can use.  Recycling is always a great thing and I will often use things like cans, jars and containers at least one more time before I put them in the recycling bin.  And yes, I am aware that when I put them in the recycling bin they get made into new stuff.  But I am just prolonging the process for the item I'm keeping!!!  The item I kept this time was a short tin can.  I think it contained water chestnuts.  Those cans are always nice to use because there isn't anything stinky in them.  I do wash them in the dishwasher but sometimes I think some things (especially things with garlic) have smells left behind.

To decorate my can I just wrapped a piece of decorative paper around it to see how long and wide I needed to make it.  I cut the paper to fit and glued it in place.  I don't like to use tape on these because the tape leaves the paper with a texture where it is set.  Glue dries thin, plus I take a bone folder and slide it around the can to spread any thick spots of glue and to just even out everything.  And I set it aside to dry.

I moved on to the lid.  I made a round circle for the top of the can.  I cheated a bit here.  I used a piece of white label and punched out a big circle and stuck it on top of the lid.  Then I made the flower.  I used the Daisies #2 die.  I cut two of each piece and glued them together.  I punched out an Old Olive circle and glued that in the center.  I stuck the flower in place using a pop up glue dot.  Then I used the new blossom punch and the decorative paper matching the paper around the can and cut one flower out to cut up to use as leaves.  I glued them in place. 

To finish up the can I tied a piece of ribbon around it and added a tiny glue dot under the knot of the bow to hold it in place.  That was it.  A very easy and quick gift to make.  This is something even the kids can help with.

A note about the lid of the can.  The can was opened with a European can opener.  They open on the side edge instead of the top.  When you are done with your decorating you can add some candies and then take some crazy glue or Crystal Effects and glue the lid on.   It is now ready for gift giving. 

Thank you for visiting today,
Wanda

Friday, March 18, 2011

Lattice Die and a Rose

Sue had posted a card on her blog using the Lattice Sizzix Die.  I liked how she cut it out in white and one in black.  She set the black one down first and then the white over the top so it looked like it had a shadow. 

That card stuck in my head for a few days and so did this rose!  Then I got the bright idea to combine the two and make a fabulous card.  One that will be almost impossible to mail!! It would have to be either hand delivered or put in a box.  There is no way this thing will go through the mail without being smashed.  I found the tutorial for the rose at Valita's Designs & Fresh Folds blog.  She has a great step by step tutorial and there is even a printable version so you can have it on hand anytime you need it.  I plan on making more of these beauties.  You make them using the Two Step Owl Punch. Yup, the owl punch!!!  You cut off the owls feet and you have nice rounded pieces for the petals.  It was surprisingly easy to make too!  Though I did wind the center of my flower a bit too tight but it still looks pretty. 

Isn't this a pretty combination?  The lattice and the rose!  These roses would make great corsages too.  I have future plans for those roses!  You could use this card for many other occasions.  A wedding card, birthday card, thinking of you, get well and a pretty Mother's Day card too!

Thank you SO much for visiting today,
Wanda

Saturday, March 20, 2010

Quick and Sweet Thank You Card

Not only can you use this as a Thank You card but you can use it for several other occasions too. I love it not only when I find a stamp set that is versatile but when I find a card layout that is too! And when you combine the two of them, well..... need I say more?

This is a card I made at Sue's Card Buffet last month. I never did get through the group of cards I had made. Isn't it just a simply sweet card? And do you see how easy it is to use this card for other occasions too?

I love that decorative paper. It's from the Stampin' Up! "Groom" speciality paper pack. It's not that I'm hoarding that paper, it's just that I have not used it much in my cards. I'm sure I will use it more when I find a card or layout that I think it will go well with. And with a card like this, the piece is so small that you'll still have lots of paper left over for other projects!

I don't know the name of the set used here. I need to start writing that down when I do these cards. SO much time has passed since I did them that I barely remember doing them!!!

You can even change the colors here (using this layout) and make this into a masculine card without the flowers! A quick card all around!

I just love the simplicity of this card and I also love how quick it was to make. If you need a quick birthday card you can whip this one up in no time.

Thanks Sue for the fun card with the fabulously quick layout!

And thank you for visiting my blog today,
Wanda

Saturday, March 06, 2010

Sweet Pea Stitched Felt Flowers Birthday Card

Now I know I saw this layout somewhere but I can't remember. I guess it's all in what you do with it that is important too!

I used Very Vanilla card stock as my base. I ran it through the "Elegant Bouquet" embossing folder. Then I added a piece of Melon Mambo card stock. It measured 2-7/8" x 3-7/8". I cut a scrap piece of paper from the "Cottage Wall" decorative papers pack and a piece of Whisper White. They were both cut 3-7/8" wide. The length is 2-3/4" before it was punched with the "Scallop Trim Border Punch".

I stamped the Happy Birthday from the "Well Scripted" set. Then I taped the white on top of the "Cottage Wall" scrap. I wrapped a piece of Melon Mambo Polka Dot ribbon around it and taped it to the back to secure it. I was thinking of adding a bow but I knew this one had to go through the mail and it would cost 20 cents more to mail it. I know 20 cents isn't much but when you send out cards all the time it adds up. But the card did need something more than just the strip of ribbon. SO I got out my "Sweet Pea" stitched felt flowers. I just LOVE those things. I'm on my second package already! I used one of the larger flowers. I had a lot of them and it's obvious that I didn't use them much so I thought I would work it into this card. It was easy enough to do since the space it was going in was pretty large. I added a felt leaves and put them on the card with glue dots. I wanted something sticky that would hold and those things seem to be the best for it. And surprisingly so that is all there was to making this card.

This card can be used for other occasions too. Like a Thank You cards, Thinking of You card, Mother's Day and Get well.

Now to get it addressed and ready to be mailed. Oh and get this, I will actually be on time with sending this card out! Shocker, huh? LOL

If you're looking for a quick and sweet birthday card, this is the way to go!

Thank you for visiting today,
Wanda

Saturday, February 13, 2010

Fleurette Time!

I bought these white "Fleurettes II" by Stampin' Up! and have yet to use them. Why did I buy them? I remember why! Because they looked so darn cute! They are even cute in the package but cuter when you actually put them on your projects!

I wasn't sure what type of card I was going to be making, birthday, thinking of you, etc. But it didn't matter. By the time I got done with the front of the card there wasn't really any room to add any words. Well, that makes it all the better. Now the card was considered a "versatile" card and I could use it for MANY other occasions!

The base of my card is a half sheet of Chocolate Chip card stock folded in half. On top of that is a piece of the "Sending Love" decorative paper. I then used the oval scallop die cut and cut out a Chocolate Chip oval and another oval from the "Sending Love" package. I used the decorative paper in the middle and the Chocolate Chip scallop part to form my image. I put the two pieces together and I did tape them on the back with regular Scotch tape before using a double-sided tape to affix it to the card front.

The leaf is from the "Little Leaves" Sizzlet. I have used this leaf SO much. It's a "must have" item in my stamping room! I thought I would have to clip off a couple of leaves on the top sprig but the flower covered them so I didn't need to.

I chose the double flower "Fleurette" and added a pink button to the center of it. Before I taped the decorative paper layer down I tied on an Old Olive ribbon bow. That bottom area needed a bit of "something" along with a bit of color! The ribbon did the job!

It's such a sweet looking card too! Oh and it was fun to make! Ok, I do have to confess, getting the sprig taped on was not all that fun. It was a little difficult to get the tape on those tiny stems. But I managed and other than that the card was simple enough to do.

Now you can use those fun flowers you've bought because they were SO darn cute! They are even cuter when you put them on your cards and scrapbook pages!

Thank you SO much for visiting today,
Wanda

Monday, April 06, 2009

Flower Pot Gift Box. Weekend Project!

Here's another weekend project for you. I don't want you to find yourself bored on the weekends!!! I can't remember the last time I was bored. Being bored means you have nothing to do. Nothing to do? That would mean that everything in your home is neat and tidy and in it's place! All of your projects are done and you literally have nothing to do. I'd like that for a day!!! Or even an hour!! But since I have tons to do I don't see myself being bored for at least the next 5 years!!! LOL

Let's move on to the project here. As you can see in the photo the box contains a planter and inside that planter is a dirt pellet and a package of seeds. I got these planters in the dollar bin at Michael's. Last year I had gotten some at Target in their Dollar Spot. I don't know if they carried them this year. I don't shop at Target much but when I do I always make sure I hit the Dollar Spot!!! There might be something in it that I just can't live without!!!

I made the box using the Super Deluxe Tuck Box Template Maker. You can find the link on the side bar of my blog. Just scroll way down, it's just above the "My Mood Is" icon. I entered in the measurements I wanted (which were 2" x 1.75" x 2") and it created a box for me in PDF format. I saved it to my computer and I printed the boxes out later on Lavender Lace card stock.

After I cut them out I used the Stampin' Up! "Doodle" wheel and Lavender Lace ink. I glued the tab on the side of the box and then I glued the bottom of the box. Fold in the side flaps and glue or tape them shut. Then fold the back flap forward and glue or tape it in place. Finally fold the front flap towards the back and glue or tape it in place. You want the last flap to have it's fold in the front of your box. You don't want the raw edge of the flap there because it doesn't give the box a smooth and finished look.

After I got the box all put together I stamped the flower image from the Stampin' Up! "Wagon Full of Fun" set. This set is a brand new one that is now available in the new Occasions Mini Catalog. For me it was a "Must Have" set because it's got so many fun images in it! I'm sure I will get a lot of use out of it. I have used it quite a bit already and still have more plans for it!

I used the cute flower from the set and colored it in with markers. The pot I colored in with Creamy Caramel and then I used a blender pen and Really Rust to give it a bit of shading to create a little dimension. I cut the flower out close to the image lines and taped it on the front of the box.

I put the flower pot, dirt disk and seed packet inside the box along with the directions. I took the directions off the box and typed them up. I didn't want them on the outside of the box because I would have to affix a white piece of label paper to the box and it would stick out like a sore thumb. Plus the instructions were too long to put on the outside unless I used a very tiny font that would be extremely difficult to read. It was easier to add it to the inside.

I then tied a ribbon around the box and it is ready for gift giving!!! This would make a wonderful Mother's Say gift, a fun Make & Take, Hostess Gifts, Customer Appreciation gifts, Craft Fair items, Teacher Gifts, Thank you gifts or just a fun Class Project. Anyone who loves to plant flowers would love to receive something like this!!!

So have some fun making these and don't be bored. If you can't find these pots you can purchase the terra cotta pots and make up your own. Add a bit of potting soil to a small zip baggie and add some flower seeds to another baggie and you're set!!

Thank you for visiting and have a creative day,
Wanda

Friday, June 13, 2008

Dear Dear Ruth!

I cased this card from a fellow demonstrator Ruth B. from California. She is using this card in one of her classes. I changed it just a little. I had added some punches in the corners, I added the bee and I colored the background of the flower. I added the bee because I had never used it in all of the times I've used this set! It's such a cute bee too.

This card can be used for many occasions. Birthday, Sympathy, Mother's Day, Thinking of You or Get Well.

Isn't this such a pretty card? Thanks SO much Ruth for letting me CASE your card. Ruth doesn't have a blog so I can't direct you to it to view her to her other wonderful creations? She is a VERY talented lady!

This card was made entirely of Stampin' Up! products. To view more items made entirely of Stampin' Up! products click here.

Thank you SO much for stopping by,
Wanda

Friday, May 02, 2008

Weekend Project! Flowers for Spring Gift Giving!

Are you ready for this FUN weekend project?? Well, here it is!! I got these REALLY cute flower/seed pots at Target in their Dollar Spot. They aren't very big, they measure 2" wide by 2" tall. Just the perfect size for gift giving!!! Click on the photos to view them close-up.

I saw on someones blog that they removed the packaging and traced it onto decorative paper. (I don't remember who's blog it was so if you know, please let me know so I can give them credit.) Now I couldn't tell if they just used the decorative paper for the new cover of if they attached the paper to the original packaging. That is what I did only because there are instructions on the inside. I didn't want to have to type them up and print them out and try to work them into the design. It was much easier to tape the paper over the original packaging.

I bought Strawberry Seed planters. They caught my eye and I immediately thought of the Stampin' Up! "Tart & Tangy" set for this. Cute, isn't it???

I traced the packaging onto the decorative paper and cut it out. I did use a Craft Knife to cut the holes. Then I taped it back on top of the original packaging and folded it. I then put it back on the planter.

Next I stamped the strawberry image, twice!! One I punched out with the 3/8" circle punch and the other I actually cut out the pieces. I cheated here. I was making more than one so I stamped a few red strawberries, cleaned the stamp and then stamped them in green and then I cut out the parts I need. Now if you were doing just one you can use a marker to color in the areas, huff on it and then stamp. After I got the pieces cut out I used pieces of Dimensionals under it. I set them on top of the strawberry in the punched out circle. I just felt it looked nicer raised. I punched out a round scallop and then taped the strawberry to that. I added that to the top of the planter. Now you can add a little gift tag and it's ready for that special strawberry loving person

Isn't it just cute? I have a few more planters that have flower seeds in them so I'll be trying out some different papers to see which looks the best. I'd better get a move on it or spring may come and I'll miss it. We've got some more cold weather coming for this weekend and possibly snow too!!! Minnesota is such an interesting place on the climatic scale!! We have the four seasons here and sometimes they can all happen in one day!!! LOL The lawns are greening up and the trees are budding but it's still too early to plant or put flowers out. I usually put my flowers in around mid May but at the rate it's going I won't be doing it until the end of the month!!!

Have fun shopping at Target for these cute little planters. You may want to make an extra copy of the packaging so you can go to Michael's and pick up some small planters (they are 39 cents each there) and make your own flower pots. I got some peat disks at the grocery store last week. I didn't even know you could buy those things. So I'm going to have to get some flower posts out and make my own too (after I finish up the ones from Target!!!).

Flower ones would be perfect for Mother's Day!!! For more Weekend Projects please click here.

This item was made entirely of Stampin' Up! products. To view more cards/items made entirely of Stampin' Up! products click here.

Have a great time with this project and thank you SO much for stopping by,
Wanda


Sunday, February 17, 2008

Bloomin' Beautiful!

Oh and it is just that, "Bloomin' Beautiful!!" This card was made using a stamp from the new "Bloomin' Beautiful" set that will be released in the Occasions Mini Collection on March 1st. I didn't preorder this set. My dear friend Gerry came over yesterday to stamp and brought this set with her. I didn't realize how beautiful it was until we were playing with it. I have mixed emotions about it though. I wasn't going to purchase it but now after making this card (SO quick and easy) I decided I'm going to have to buy it!! So much for trying to stay within budget!!! LOL

I used Regal Rose card stock here. I also used the "En François" background stamp. I used Regal Rose ink instead of Versa Mark. I wanted the background words a bit darker than what the Versa Mark would give me. I sponged my edges with the Regal Rose as well.

I always measure the wood of the stamp and cut my card stock to that shape. For most stamps it's pretty accurate but there are some that seem to take up less wood on the sides or top and bottom and some trimming has to be done. For this one I didn't need to trim it at all.

As I finished coloring with the blender pen on the flower I layered it and set it in place. I was looking at the design and layout and realized that this card is VERY versatile. I can use this for many events. Thank you, Birthday, Anniversary, Valentine's Day, Mother's Day, Thinking of You, Get Well and Sympathy just to name a few!! And that's just with only one stamp from the set!!! I did stamp a few images using the other stamps in the set and I'll be sharing them with you too.

This card was made entirely with Stampin' Up! products. Click here to see more Stampin' Up! only cards!

Thank you SO much for stopping by,
Wanda