Pin It

Showing posts with label Easter Cards. Show all posts

Monday, April 14, 2025

Storybook Moments, Storybook Friends, Easter Card, Stampin' Up!

Hello and welcome to my blog. Today I have one more Easter card to share with you. I found it on Pinterest and you can see the original card here.  There were no instructions to follow so please read on to see how it was made. 

The base of the card is a folded half-sheet of Basic White card stock. It opens on the right and the fold is on the left.

I cut a 4-1/8" x 5-3/8" piece of Cajun Craze card stock. On top of that is a 4" x 5-1/4" piece of Designer Series Paper (DSP) from the "Timeless Plaid" 6" x 6" stack. I taped it to the Cajun Craze piece and then that was taped to the front of the card.

Next I cut a piece of DSP from the "Storybook Moments" 12" x 12" package. It measures 3" x 4". The Cajun Craze layer behind it measures 3-1/8" x 4-1/8". I taped the DSP to the card stock layer.

Next I fussy cut the bunnies seen in the center of the card. I fussy cut them out as one piece. 

The fence was glued on over them. It came from the "Storybook Moments" DSP. You get two punch out ones in the package.  It's one of those "use them wisely" things since there's only two. LOL

The little bunny on the right and the flowers on the lower middle part of the fence were fussy cut from the same piece of DSP as the two other rabbits. I taped the little bunny and flowers in place.

The bunny on the left is from the punch out sheet. Dimensionals were added to the back and it was set in place on the left side of the card. 

I stamped the words from the "Storybook Friends" bundle and were stamped using Cajun Craze ink. I cut them out on my paper cutter. It measures 7/8" x 1-5/8" and the Cajun Craze layer behind it measures 1" x 1-3/4".  I taped the two pieces together. Dimensionals were added to the back and it was set in place on the front of the card. And the card was done.

This was a fun card to make. It has lots of fun pieces. I'm not a big fan of fussy cutting but it was SO worth it on this card. I think it's absolutely adorable!

Thank you SO much for taking your time to stop in and see today's Easter card,
Wanda

Sunday, April 13, 2025

Storybook Friends, Storybook Moments, Easter Card, Stampin' Up!

Hello and welcome to my blog. Today I have an Easter card to share with you. I found this card on Pinterest and I changed it a little bit. You can see the original card here. Please read on to see how I put this card together.

The base of the card is a folded half-sheet of Basic White card stock. It opens on the right and the fold is on the left.

I cut a 4-1/8" x 5-3/8" piece of Peach Pie card stock. On top of that is a 3-7/8" x 5-1/8" piece of Designer Series Paper (DSP) from the "Timeless Plaid" 6" x 6" stack. I taped it to the Peach Pie piece and then that was taped to the card base.

Using a die from the "Storybook Friends" bundle I cut the image from a piece of DSP from the "Storybook Moments" 12" x 12" package. I also cut a Basic White piece and glued the cut DSP to it for stability. Dimensionals were added to the back and the piece was set in place on the front of the card about 1/2" from the top edge and about 1-1/8" from each side.

The words are from the "Storybook Friends" and were stamped using Mossy Meadow ink on a scrap piece of Basic White card stock. I cut them out using a die from the "Stylish Shapes" set. Using that same die I cut out a Peach Pie piece. I cut that piece in half and taped it to each end of the word piece. Dimensionals were added to the back and it was set in place on the front of the card about 1/2" from the bottom edge and about 7/8" from each side. I just eye the sides. If it looks center to me, it's centered!

This was a fun and easy card to make. I love how the cottage is highlighted on this card. 

Thank you SO much for taking your time to stop in and see today's Easter card,
Wanda

Saturday, April 12, 2025

Storybook Moments, Storybook Friends, Easter Card, Stampin' Up!

Hello and welcome to my blog. Today I have an Easter card to share with you. I found this on Pinterest but changed it to an Easter card. You can see the original card here. Please read on to see how I made the card since there was no link to any measurements or instructions.

The base of my card is a folded half-sheet of Basic White card stock. It opens on the bottom and the fold is on the top.

I cut a 4-1/8" x 5-3/8" piece of Misty Moonlight card stock for the layer. On top of that is a 4" x 3-1/8" piece of Basic White card stock that I textured using the "Distressed Tile" embossing folder. I textured the piece before cutting it. I glued it to the left side of the Misty Moonlight piece. On the right side is a 4" x 1-1/2" piece of Designer Series Paper (DSP) from the "Timeless Plaid" 6" x 6" stack. I taped it to the left. Then I taped the whole thing to the card base.

Next came the top layers. The pretty floral piece was cut from a sheet in the "Storybook Moments" 12" x 12" package of DSP. There's a full sheet of a fun variety of images, this was one of them and it measures 3" x 4". I cut a 3-1/8" x 4-1/8" piece of Peach Pie card stock for the layer. Behind that layer is a 3-1/4" x 4-1/4" piece of Misty Moonlight. Those layers were taped together.

The little mouse was added next. It's from another sheet in the "Storybook Moments" package. I added Dimensionals to the back and set it in place on the center of the floral piece.

Then I took some ribbon I had and taped the ends to the back. I had cut that piece about 4-1/2". Then I slipped another piece of ribbon under the front piece and tied a knot and trimmed the ends. Dimensionals were added to the back of the piece and it was set in place on the front of the card.

The words were done next. They are from the "Storybook Friends" bundle and were stamped using Misty Moonlight ink. I cut them out using a die from the "Stylish Shapes" set. I taped them in place and the card was done.

This was such a super quick and easy card to make. I like how it turned out using the ribbon (retied) that I had on hand. This would make a great friendship or thinking of you card too. I just love the colors.

Thank you SO much for stopping by to see today's Easter card,
Wanda

Thursday, April 10, 2025

Storybook Moments, Storybook Friends, Spotlight on Nature, Easter Card, Stampin' Up!

Hello and welcome to my blog. Today I have an Easter card using a fun layout. Please read on to see how it was made.

The base of my card is a folded half-sheet of Basic White card stock. It opens on the right and the fold is on the left.

I cut a 3-3/4" x 5" piece of Basic White for the top layer. 

The Designer Series Paper (DSP) is from the "Storybook Moments" 12" x 12" package. I cut the pieces 1-1/8" x 1-1/8".  Using my corner rounder, I rounded the opposite corners. The Pumpkin Pie layer behind them measures 1-1/4" x 1-1/4" and were also rounded on the opposite ends. I taped the DSP to the Pumpkin Pie card stock. Dimensionals were added to the back and I laid them on top of the Basic White layer for placement of the words.

The words are from the "Storybook Friends" bundle and were stamped using Pumpkin Pie ink. 

Now it was time to set the 4 pieces in place. I took a 1/4" strip of card stock to use as a spacer. I located center as much as I could and set the strip down. I set the upper left piece down first about 1-3/4" from the top edge and 1-3/4" from the fold. From there I just added the other pieces using the 1/4" strip as a guide.

Most of the cards I'd seen using this layout just end it right there. I thought it could use a little something more. I cut the circle from the "Spotlight on Nature" bundle and laid it on the center and was liking it so far. But the center needed something. I was going to cut a carrot or a bunch of carrots from the DSP but when I saw this bunny on a piece that had been used for something else I knew just where it would go. And it fit perfectly.

I added a dot of glue to the inside tips of those four pieces and set the circle in place. The bunny has Dimensionals added to the back and it was set in place on the circle and the card was done. 

Isn't that just the cutest little bunny? And wasn't it perfect for that circle?

Thank you SO very much for taking your time to stop in and see today's Easter card,
Wanda

Wednesday, April 09, 2025

Storybook Friends, Storybook Moments, Easter Card, Stampin' Up!

Hello and welcome to my blog. Today I have an Easter card to share with you using the "Storybook Moments" Designer Series Paper (DSP). Please read on to see how it was made. I LOVE using this layout. I used it last month to make a birthday card. You can see that post by clicking here

The base of my card is a folded half-sheet of Basic White card stock. It opens on the bottom and the fold is on the top. I cut a 3-3/4" x 5" piece of Cajun Craze card stock. I cut the framed piece from the center of this piece of card stock. I used the second and third largest dies from the "Nested Essentials" set. I taped the dies so they wouldn't shift. I wanted the frame to be the same on all sides. 

I cut a 4-1/2" c 3-1/4" piece of Basic White for the next layer. And the DSP from the "Storybook Moments" 12" x 12" package was cut at 3" x 4-1/4".  I taped the DSP to the Basic White layer and then that was taped to the Cajun Craze layer and then it was all taped to the front of the card.

When I cut the frame piece I also cut one large Basic White piece and I trimmed off the stitch marks. I needed a white layer behind the frame. I took my Blending Brush and some Soft Sea Foam ink and scrubbed a it on to tone down the white a little and to give it some color.  I glued the frame piece to that Basic White piece. I taped it in place on the front of the card eying it up so it looked equal on the three sides of the DSP.

I also scrubbed on some Soft Sea Foam ink on the scrap piece of Basic White card stock and then I stamped the words from the "Storybook Friends" bundle using Cajun Craze ink. I cut them out using the smallest die from the "Nested Essentials" set. Dimensionals were added to the back and I set it aside.

The duck is from the Storybook Moments" package. There's a page that has pop outs so I popped out this cute duck and thought it would look nice for an Easter card. Dimensionals were added to the back of the duck and it was set in place in the center of the framed piece.

The words were added next to the lower left side and the card was done.

So quick, so simple and so cute!

Thank you SO very much for taking your time to stop in and see today's Easter card,
Wanda


Tuesday, April 08, 2025

Storybook Friends, Storybook Moments, Easter Card, Stampin' Up!

Hello and welcome to my blog. Today I have an Easter card to share with you. I found it on Pinterest but changed it a bit. You can see the original card here. Please read on to see how the card was made.

The base of my card is a folded half-sheet of Basic White card stock, it opens on the right and the fold is on the left.

I cut a 4-1/8" x 5-3/8" piece of Cajun Craze card stock for the layer. And I cut a 3-7/8" x 5-1/8" piece of Soft Sea Foam card stock for the next layer. Before taping the layers together I cut the framed piece from the center of the layer. I used the die from the "Storybook Friends" bundle. After taping the layers together they were taped to the front of the card.

Next came the Designer Series Paper (DSP). It's from the "Storybook Moments" 12" x 12" package. The piece on the right is from there, it measures 4-7/8" x 2-1/4". I taped it about 1/8" from the Soft Sea Foam edges, top, bottom and right side. The other piece of DSP is from the "Timeless Plaid" 6" x 6" stack. It measures 4-7/8" x 1-1/4". I taped it to the left side, lining up the edges to be even with the other strip of DSP. 

Using that same die I cut one of Basic White card stock. I needed it for the center of the framed piece. I scrubbed on a little bit of Cajun Craze ink using my Blending Brush. I glued the framed piece to the front of the card along with the center piece I had cut and colored. It's about 5/8" from the fold and 1-5/7" from the bottom edge of the card base.

The bunny came next, it's from a sheet in the "Storybook Moments" package and you just pop out the image. There's SO many cute images there. I set it in place in the center of the framed piece using Dimensionals.

The words are from the same set and were stamped using Cajun Craze ink on a scrap piece of Basic White card stock. I colored it a little with the ink that was left on my Blending Brush. Dimensionals were added to the back and it was set in place on the lower part of the card.

I tied a bow with some retired ribbon and glued it in place. I had to set a punch on top of it to hold the ribbon down until the glue set up enough. That was one tough bow! And that was it, the card was done.

This was a fun, quick and easy card to make. I still have a few more Easter cards to make and will share them as I make them.

Thank you SO very much for taking your time to stop in and see today's Easter card,
Wanda


Wednesday, April 02, 2025

Storybook Friends, Playing in the Rain, Easter Card, Stampin' Up!

Hello and welcome to my blog. I was looking over the "Last Chance" list today. The "Playing in the Rain" set. I love this little bunny, so I had to play with it today. Bunnies are associated with Easter so I thought I'd make him into an Easter card. Please read on to see how I made today's card.

The base of the card is a folded half-sheet of Basic White card stock. It opens on the right and the fold is on the left.

I cut a 4" x 5-1/4" piece of Daffodil Delight card stock. On top of that is a 3-3/4" x 5" piece of Designer Series Paper (DSP) from the "Floral Delight" 12" x 12" package (which is on the last chance list too). I taped the DSP to the Daffodil Delight piece and then that was taped to the card stock.

The second largest circle in the "Stylish Shapes" set was cut on a piece of Basic White card stock. I scrubbed on some Petal Pink ink using a blending brush. 

The bunny is from the "Playing in the Rain" set and was stamped using black Memento ink. I colored it in using Blends pens. I used Daffodil Delight. Lemon Lolly and Petal Pink. Dimensionals were added to the back and it was set in place on the circle. 

I stamped the words from the "Storybook Friends" bundle and were stamped using black Memento ink. I cut them out using the die from the "Stylish Shapes" set. Dimensionals were added to the back.

I laid the circle and the word piece on the front of the card for placement. I moved them around until I liked where they were and set them in place. I added some flowers from the "Loose Daisy" embellishments container. I still have some left and I'm sure I'll be using them on a few more cards until they are gone. I did a good job using the amount I did!

This was a fun and quick card to make. 

Thank you SO very much for taking your time to stop in and taking a look at today's Easter card,
Wanda

Monday, March 31, 2025

Storybook Moments, Storybook Friends, Easter Card, Stampin' Up!

Hello and welcome to my blog. Today I have an Easter card to share with you. I found it on Pinterest but I did change it a little. I just couldn't see tossing out that piece of Designer Series Paper (DSP) that I cut off. Plus I cut my larger piece smaller than on the original card. I found the card here.  Please read on to see how the card was made.

The base of the card is a folded half-sheet of Basic White card stock. It opens on the bottom and the fold is on the top.

I cut a 4" x 5-1/4" piece of DSP from the "Storybook Memories" 12" x 12" package. I taped it to the card base.

Next I cut a piece of Crumb Cake to measure 3-3/4" x 5". I stamped the bunny on it from the "Storybook Friends" bundle using Crumb Cake ink. Dimensionals were added to the back and it was set in place on top of the DSP.

The smaller pieces of DSP are from the same package. There's a full sheet of different designs to cut out and this was one of them. My pieces measure 1-3/4" x 2-3/4" and 1-1/4' x 2-1/4". I moved them around on the front of the card until I thought they looked the best and then I glued them together at the upper center tips. The circle was cut using the third largest one in the "Stylish Shapes" die set. I cut it out using Basic White card stock and then I scrubbed on some Calypso Coral ink because I thought it was just too bright. I set the circle on top of the cut pieces of DSP and then taped it in place. Dimensionals were added to the three joined pieces and it was set in place on the front of the card.

The adorable bunny is from the "Storybook Moments" 12" x 12" package of DSP. There are two sheets of pop-out pieces. The bunny and the butterfly are from those sheets. I thought the sheets could have used a few more butterflies. They are so cute and fun to use on a lot of my cards but I have to pick and choose because of the limited number of them. On the brighter side, I used them up! Now how often can I say I actually used up something? The bunny and butterfly were set in place using Dimensionals.

The words are from the same "Storybook Friends" bundle and were stamped using black Memento ink on a scrap piece of Basic White card stock. I set them in place on the front of the card using Dimensionals and the card was done.

This was a fun card to make and I like how it turned out even though it wasn't the same as the original card.

Thank you SO very much for taking your time to stop in and see today's Easter card,
Wanda

Thursday, February 13, 2025

Storybook Moments, Storybook Friends, Easter Card, Stampin' Up!

Hello and welcome to my blog. Today I have a pretty card I found on Pinterest. You can see the original card here. I changed a few things because I was using what I had.

The base of my card is a folded half-sheet of Basic White card stock. It opens on the right and the fold is on the left. I cut a 4" x 5-1/4" piece of Lost Lagoon for the largest layer. On top of that is a 3-7/8" x 5-1/8" piece of Pretty Peacock card stock. Before taping the layers together I die cut pieces from the middle. I cut the heart using the die from the "Heart Shaped" bundle and the word piece from the "Stylish Shapes" set using the Lost Lagoon piece. Using the Pretty Peacock piece I cut the little flower from the "Heart Shaped" bundle, the long ribbon behind the word piece using the "Stylish Shapes" set and the smallest "Deckled Circle" die was used for the circle behind the bunny.

With all of the pieces cut then the layers were taped together. On top of them is a 3-3/4" x 5" piece of Designer Series Paper (DSP) from the "Storybook Moments" 12" x 12" package. 

I taped the Lost Lagoon heart with both the outline piece and the center piece. It's taped about 1-1/8" from the top and centered as much as you can by eyeing it. On top of that piece is two heart shaped frame pieces cut using the same die. I used the DSP from the "Timeless Plaid" 6" x 6" stack. One is from the brownish sheet and one from the bluish sheet.  

I taped the circle to the center of the heart. The bunny is from the "Storybook Moments" DSP. It came from a full sheet of punched out images. (SO cute!). I added Dimensionals to the back of the bunny and set it in place on the heart.

Next I stamped the words from the "Storybook Friends" bundle using black Memento ink on the Lost Lagoon ribbon piece and I taped the long Pretty Peacock piece to the back of it. Dimensionals were added to the back and it was set in place on the lower part of the card.

The little flower was glued in place and I used a retired "Candy Dot" in the center of the flower. I'm just trying to use up the embellishments that I have sitting around here. And that was it, the card was done.

As I'm making this card I'm thinking to myself "Valentine's Day is coming soon". I looked at the calendar and up, it's on Sunday. I need to make a card to sent to my mom. UGH!  Nothing like being behind so early in the year! Why am I making an Easter card instead of a Valentine's Day card?  Because I was not paying attention to the days!  So tomorrow I will share the card I made for my mom.

Today's card was fun to make and I just LOVE the rich looking colors.

Thank you SO very much for taking your time to stop in and see today's Easter card,
Wanda


Friday, March 31, 2023

Playing in the Rain, Easter Card, Stampin' Up!

Hello! I'm so happy to share this cute little bunny card with you. I was going to make a "Book" card but it didn't turn out right so I had to chop the piece up and trim it so I could make a card with all of those layers. Click here to see my inspiration for the book card.  I can't find the card I made several years ago that used the book technique. It's a simple technique. You score your card 1" on each side of the middle fold and you glue that area shut. And on that 1" strip you decorate with Designer Series Paper (DSP) or whatever you prefer. And the wider part you decorate a card front as normal. I cut off that 1" part because I just couldn't make it work with my card today. But I did make my card a wobbling card. The little bunny wiggles when you draw his foot down about a 1/4" and let it go.  SO cute.

The base of my card is a folded half-sheet of Mint Macaron (retiring soon) and it opens on the bottom with the fold on the top. I stamped the flower image from the "Playing in the Rain" set using Mint Macaron ink.

The layers are as follows, from the largest (bottom) to the smallest (top).  

Basic White 4" x 3-1/2"
Flirty Flamingo 3-7/8" x 3-3/8"
Mint Macaron DSP from the 6" x 6" Subtles package 3-3/4" x 3-1/4"
Basic White 3-1/8" x 2-5/8"
Flirty Flamingo 3" x 2-1/2"
Mint Macaron card stock 2-7/8" x 2-1/8"
Basic White 2-3/4" x 2".

Before taping the layers together I took the top Basic White layer and scrubbed on some Mint Macaron ink with my Blending Brush. After the layers were all taped together I taped them to the front of the card base lining up the top, left side and bottom equally.

Next I stamped the flowers using black Memento ink, I needed 3 of them and I stamped the bunny at the same time. I fussy cut them all out.

The flowers were colored using Blends pens. I used light Flirty Flamingo, dark Daffodil Delight and light Mint Macaron. I taped them in place on the mid to lower part of the top piece.

The bunny's shirt was colored in using both light and dark Mint Macaron Blends pen. The ears were colored in using the dark Petal Pink pen and the nose was colored in using the light Flirty Flamingo pen.

Now to make the wabbling spring gadget. I took 24 gauge wire and wrapped it 4 times around an ink pen. I left about 3/8" unwrapped on each end. 

Using my 5/8" circle punch, I punched out 4 Basic White circles. Two of them I used a push pin to make a hole before punching. I made the hold a little offset from dead center. Then I took one end of the wire and put it through the hole. I used some Tear and Tape on top of it. I also ran a thin line of Mono glue around the edges and I set a circle on top that does not have a hole in it. I repeated this for the other end.

I glued the circle to the back of the bunny and then I glued the other end onto the front of the card.

The words were done on my computer since I couldn't find any "Happy Easter" words large enough to work in that area. I used "BlacklightD" font. I printed them out on Basic White card stock and then die cut them using the 1-5/8" circle die from the "Layering Circle" die set. Then I die cut a Flirty Flamingo circle using the scalloped circle die from the same set. I taped the two circles together. Dimensionals were added to the back and it was set in place on the front of the card.

A 4" x 5-1/4" piece of Basic White card stock was taped to the inside and the card was done.

I thought it turned out cute. I'm going to be giving it to my mom for Easter. She is now in a nursing home and I think it will be a cheery addition to her card collection. I want to make another one. I hope I can find some time to so that tomorrow.

Thank you SO very much for taking your time to stop in and see today's Easter card,
Wanda 


Thursday, March 23, 2023

Rain or Shine, Dainty Designs, March 2023 Paper Pumpkin, Easter Card, Stampin' Up!

Hello. I'm glad you are here to see today's Easter card. I looked at the calendar and realized Easter is about 2 weeks away.  WOW March is just flying by, isn't it? And with Easter quickly approaching I thought I'd make an Easter card using a bunny from the "Rain or Shine" Designer Series Paper (DSP) package that I had sitting on my worktable. I mean, it was already fussy cut out so why not use it, right?

The base of my card is a folded half-sheet of Basic White card stock. The card opens on the right and the fold is on the left. 

I cut a 4-1/8" x 5-3/8" piece of Rich Razzleberry for the layer.

The DSP was tricky and I failed poorly on the center strip. If you know how to do this layout easier than please share it with me or direct me to a link to learn it myself. I should have cut it from a piece of scrap copier paper first and used it as a pattern/template to get it right. But it is what it is and you know I share them all with you (mostly so you don't make the same mistakes!!).

I cut the top DSP from the "Dainty Flowers" package. The right side measured 2" and the left side measures 3" and the top measures 4".  

Then I cut the bottom piece. It's from the "Dandy Designs" DSP package. It was cut at 2" on the right, 1" on the left and 4" on the bottom.

The center piece is 1" on each side. This is where I had my problem, it just wasn't long enough. I just left it because I struggled with it for quite a few minutes and just decided to ignore the piece being a little off and making sure I point that out to you!  LOL

I taped the DSP to the Rich Razzleberry piece and then taped that to the card base. 

Next I die cut the oval using the die from the "Framed Florets" bundle. I took my Blending Brush and scrubbed on some Rich Razzleberry ink. I set the oval in place using Dimensionals. 

My fussy cut bunny is from the "Rain or Shine" DSP package. I set it in place on the oval using Dimensionals.

The "Happy" is from the March 2023 Paper Pumpkin kit. I stamped it using black Memento ink on a piece of Basic White card stock. I fussy cut it, added Dimensionals to the back and set it in place on the oval.

The words are from the same Paper Pumpkin kit and were stamped using black Memento ink. I die cut it using the smallest die from the "Stylish Shapes" set. I set it in place on the bottom of the oval. I did add a small Dimensional on each end and a dot of glue on the upper part that would be touching the oval.

I also cut two strips for the upper part. One was a piece of Rich Razzleberry and the other was a piece of DSP. I cut them 5/8" wide and whatever length my scrap pieces were. I trimmed them after I taped them in place. 

And that's it. Fortunately the eye is drawn to the bunny and not the short center strip that I didn't get quite right!!  

This bunny is SO cute and perfect for Easter!

Thank you SO very much for taking your time to stop in and see today's Easter card,
Wanda

Saturday, March 19, 2022

Celebrating You, Daffodil Afternoon, Easter Card, 2022 Stampin' Up! Spring Mini Catalog

Today I thought I would try a card using the other tag dies in the set. You can see the corners are rounded and on the white piece you can see how the corner starts to go inward. The ribbon is hiding the rest. 

The base of my card is a folded half-sheet of Basic Black card stock. You can use any color you want that goes with the Designer Series Paper (DSP). This card opens on the right and the fold is on the left.

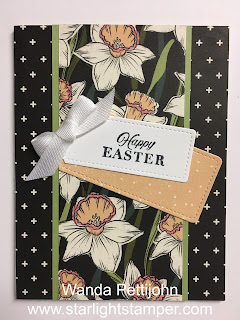
I cut a 5-1/2" x 4-1/4" piece of DSP from the Sale-a-Bration "Daffodil Afternoon" 12" x 12" package. I forgot this was retired but I'm sure you still have some left in your stash!!! I know I do. You know I do!!! LOL  I taped the DSP to the front of the card.

I cut a 5-1/2" x 2-1/2" piece of the DSP for the center panel. Then I cut a 5-1/2" x 2-3/4" piece of Pear Pizzazz card stock for the layer. I taped the DSP to the card stock and then I taped that to the front of the card.

I took a dotted Pale Papaya piece of DSP and die cut the second smallest tag.  The words are from the "Celebrating You" set. I stamped them on a scrap piece of Basic White card stock using black Memento ink. I die cut it with the smallest tag die. I set the tags on top of each other and positioned them to where I liked the look and I lifted one edge and added a little tape and then lifted the opposite edge and added more tape. I turned them over and added tape to the back and set them in place on the front of the card. 

I tied a white bow and glued it to the area on the tags where the holes are.  

A 4" x 5-1/4" piece of Basic White was added to the inside of the card and the card was done.

This was a very fun and easy card to make. I may have to try this with some current DSP. Look how much was used!!! You can use this card for a number of other occasions, it's very versatile. 

Thank you SO very much for taking your time to stop by and see today's Easter Card,
Wanda


Thursday, March 03, 2022

Wildflower Path, Flowering Field, Birthday Card, Stampin' Up! 2022 Spring Mini Catalog

I think the theme this week is Designer Series Paper (DSP), the quest to use it up!  And then I laugh because the pieces I use are hardly enough to use up a package of DSP!  But it's the effort, right?

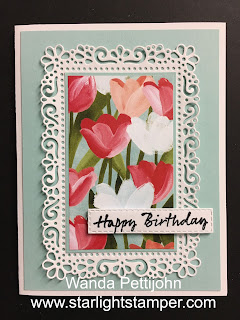
The base of the card is a folded half-sheet of Basic White card stock. The next layer is a 4" x 5-1/4" piece of Pool Party card stock.

I die cut the lacy frame from the "Ornate Layers" die set. I cut it from a piece of Basic White card stock. 

Then I cut a 2-1/4" x 3-5/8" piece of Pool Party card stock. When I cut this piece I had the edge on my card stock on the edge of the line on my cutter so it was a hair short of the actual measurement. I didn't want my card stock to go over the dots.  

I cut the DSP from the "Flowering Field" 12" x 12" package at 2-1/8" x 3-1/2" and I cut it a bit scant too. I taped the DSP to the Pool Party piece and then taped both of those to the lacy piece. Then that was taped to the Pool Party layer and then that was taped to the card base.

The words are from the "Wildflower Path" set and were stamped using black Memento ink on a scrap piece of Basic White card stock. I die cut them using the long thin "Rectangle Stitched Framelet". It's the one in the grouping of 4. I set the words in place using Dimensionals. And the card was done.

I think it tuned out nice, even though I didn't use as much DSP as I was hoping to. I do love those flowers. This would make a great Easter, Mother's Day, Thinking of You, or Get Well card.

Thank you SO very much for taking your time to stop by and see today's Birthday card, 
Wanda

Tuesday, March 01, 2022

Celebrating You, Easter Card, 2022 Stampin' Up! Spring Mini Catalog

Oh, why not get a jump on Easter cards?  When I saw a card with these flowers on it, I immediately thought "Easter".  I saw that card on Pinterest. You can see it by clicking here

The base of the card is a folded half-sheet of Very Vanilla card stock. This card opens on the right and the fold is on the left.

I cut a 4" x 5-1/4" piece of Evening Evergreen card stock for the layer. Then I cut the Designer Series Paper (DSP) from the "Daffodil Afternoon" 12" x 12" package to measure 3-7/8" x 5-1/8". 

Before taping the DSP to the Evening Evergreen, I punched out the scalloped oval using the "Double Oval" punch. I made sure I didn't catch the smooth bottom oval on the edge of the card stock. It's too bad the punches weren't turned 90 degrees that way you could punch each one easier and maybe only punch the one you need. To use the smooth oval you need to punch them both out or punch the bottom one and catch some of the top depending on the size of your card stock. Anyway, I managed to get the scallop punched out without ruining the edge of the Evening Evergreen piece. Once the scalloped oval was punched out, I taped the DSP to the card stock. And then I taped that to the card base.

The words are from the "Celebrating You" set and were stamped using black Memento ink on Very Vanilla card stock. I punched them out using the smooth oval on the same punch. I taped the ovals together. Dimensionals were added to the back and the piece was set in place on the front of the card. And the card was done.

This was a very quick and easy card to make. And I got to use a large piece of DSP!  This would make a pretty Mother's Day card, Thinking of You card, Get Well card, and a pretty Birthday card.

Thank you SO very much for taking your time to stop in and see today's Easter card,
Wanda