Pin It

Showing posts with label Calendars. Show all posts

Thursday, May 01, 2025

May Calendar Page, Layered Florals, Weekend Project, Stampin' Up!

Hello and welcome to my blog. It's the first of the month so that means it's time for the May calendar page. I got the PDF file for these from Lynette's blog. You can get yours by clicking here. It will take you to her blog and just under the title of her blog is the file. 

I decided to go with a flower since last month was April showers it's only fitting that May would have flowers.

I ran across a partially finished quarter sheet. I think the technique is called "Blackout". What you do is take an embossing folder and run it through your machine with Basic White card stock.  Then you turn it over so you have the texture on the bottom. You are going to color in the images with whatever you like to use. I used Blends pens here. Once done you will take your black ink pad and drag it over the backside and the ink will only go on the flat surface, leaving the colored surface to show through. It's a pretty easy technique and SO pretty.  I forgot to add that the embossing folder is called "Layered Florals".  It's retiring soon.

I trimmed mine so it was just 1/8" shorter than the area it was set on. I used Dimensionals to set mine in place because once the month is over I take that image and make a card with it. So in a couple of days or so I'll be making a card with that bunny I used for my April card.

I look forward to making these every month. But sometimes I struggle with what I'm going to put on the upper part. But I manage to come up with something!

Thank you SO much for taking your time to see this month's calendar page,
Wanda

Tuesday, April 01, 2025

Playing in the Rain, Rain or Shine, April Calendar Page, Stampin' Up!

Hello and welcome to my blog. Today I have my April calendar page to share with you. Please read on to see how it was made.

I got my calendars from Lynette's blog. You can find it just below the title of her blog. But don't stop there, take a look at all of her fun cards and different layouts! She is a fellow Minnesotan and I hope to meet her in person someday! Please read on to see how I made my calendar page, it's pretty simple.

After printing the calendar should be cut at 3-1/2" x 5".  Mine is a bit shy of that because my printer didn't print out exactly what I had downloaded. I have no idea why but I had printed all the months and cut them so mine measure 3-3/8" x 4-1/8". 

I had no idea what I was going to put on my calendar. It's spring time so something in that area. April showers came to mind so instead of spring flowers I thought I'd go with something with rain. 

I remembered the "Playing in the Rain" set so I took it off the shelf and what was on the inside? This bunny from a piece of Designer Series Paper (DSP) from the "Rain or Shine" 12" x 12" package (retired). I fussy cut him out and added Dimensionals to the back.

Now for the layer. The last 3 months I had made a layer for the upper part of the calendar. But since the bunny was so large I decided to just take some Balmy Blue ink and scrub it on over the upper area. I set the bunny in place and then using my chalk marker I added some white raindrops. They didn't show up so well so I colored over them a couple more times and then they were more visible. And that was it. Such a super quick and easy calendar page. I'll probably save the flower idea for May because April showers bring May flowers, right?

I'll be cutting the top off March's calendar and using it on a future card! Can't let my work go to waste now can I? There's always a way to use it for a fun card!

Thank you SO much for taking your time to stop in and see today's calendar page,
Wanda

Saturday, March 01, 2025

Wildflower Birthday, Calendar Page, Stampin' Up!

Hello and welcome to my blog. Today, you guessed it, I have the March calendar for you. You can get a PDF of the months by clicking here at Lynette's "My Stamping Addiction" blog. It's right at the top under the title of her blog. You can get there easily by clicking here.  Please read on to see how I made my calendar page.

My measurements are a bit different because, for some reason I had an issue with the printing but they are close enough for my comfort. After cutting March from the sheet of card stock that I ran through my printer, it measured 3-3/8" x 4-7/8". I believe it's supposed to be 3-1/2" x 5".  So it's pretty close.

There's not a whole lot that goes into making the header for the calendar. I took a piece of Designer Series Paper (DPS) from the "Wildflower Birthday" 12" x 12" package. This came from a sheet that has a quite a few different designs on it. I can't tell you how many because I cut up both of my sheets and I've used some on other cards. But there's a lot of fun pieces to play with. This piece had a gold strip across the top on the short side and the corners could be snipped to make a flap. I cut that gold strip off entirely. My piece measures 3-1/8" x 2-1/8" and I taped it to the upper part of the calendar.

Next I took some flowers and leaves from the same package of DSP. These are on a sheet that's full of fun pre-cut images. I added a Dimensional to the center of the pink flower and set it in place in the middle of the piece of DSP. 

Tape was added to the back of the other two flowers and they were slipped under the pink flower. And I did the same with the leaves.

And that was it. Super quick and simple. I look forward to making these calendar pages, they are a nice change of pace and are quick. By the end of the month I'm looking for something that is quick and easy to do. It frees up some time so I can clean up some of the crafting messes I make. I need a month of "end of the months" LOL.

A little tip here, if your printer can handle it, I recommend using the thick card stock. But if your not sure and don't what to chance ruining your printer, print it out on regular card stock and tape or glue another piece behind it when you're done cutting it out. And another option is to print it out on copier paper and glue it to a piece of thick card stock or even shirt board/chipboard  (the stuff that cereal boxes are made of but use the unprinted side). Using a thicker copier paper works well too before gluing it to the card stock or shirt board/chipboard. I use 28#. I make sure that what I print on that paper is worthy of it because anything above 20# is way more expensive. There, it's that enough tips for you to work with?  LOL There's almost always a way to work things out!

How about one more? Once the month is done and you've made a new one, you can cut off the top part of the calendar and use that on a card! Why not, you've already put the work into it! Okay, done giving tips (for now!). 

Thank you SO very much for taking your time to stop in and see today's calendar page,
Wanda

Saturday, February 01, 2025

Bee Mine, Calendar Page, Weekend Project, Stampin' Up!

Hello and welcome to my blog. Today I have the February calendar page to share with you. It's fun making these and they go together so much quicker than a card. I figured I would use the image later on a card. I'm planning on doing that with my January calendar. You can see that one here. I got the template for the calendar months at "My Stamping Addiction". The download for the calendar is just under the title of her blog. She has a lot of beautiful cards there too, so if you stop in have a look a round.  Please read on to see how the card was made. 

I trimmed my piece to 4-7/8" x 3-3/8". The top part measures a hair shy of 2-1/2 from the top of the month to the top edge.  

I cut a piece of Designer Series Paper (DSP) from the "Bee Mine" 12" x 12" package and taped it to the top part of the calendar page. 

Next I cut three bees from another sheet of DSP. I set them in place using Dimensionals. I even cut out a tiny little heart and covered the 14.  And that was it.

This was so quick and simple and yet here I am waiting till the last minute to get it made!

Thank you SO much for taking your time to stop in and see today's calendar page,
Wanda

Wednesday, January 01, 2025

Snowy Wonder, Snowy Scenes, Calendar Page, Stampin' Up!

Hello and welcome to my blog. Happy New Year to you all. Today I have a calendar page to share with you. A blogging friend of mine, Lynette shared her printout with me for the calendar pages. You can hop on over to her blog and get the download for the pages. And while you are there take a look at her wonderful cards too, she's got a lot of great cards for viewing and inspiration. I didn't have excel on my computer, we use Open Office and I did have to move some margins to get it to print right but it's not a big deal. Though I was unable to open the cutting instructions but I figured it out (close enough). My piece measures 4-3/4" x 3-3/8". Please read on to see how I made my calendar page.

After cutting the piece to measure 4-3/4" x 3-3/8" I cut a 3-1/8" x 2-1/4" piece of Designer Series Paper (DSP) from the "Snowy Scenes" 12" x 12" package. I taped it to the upper part of the calendar. 

Using the same package of DSP I fussy cut the penguin and I used a matching die from the "Snowy Wonder" bundle to cut the snowman out. 

Dimensionals were added to the back of both pieces and they were set in place on top of the DSP.  And that was it, a super simple calendar page I can look at all month long. 

Thank you SO very much for taking your time to stop in and see today's fun calendar page,
Wanda

Thursday, December 30, 2021

Forever Fern, 2022 Monthly Calendar, Weekend Project

Just before Christmas I was at the Dollar Tree. Not the one by my house. It's hit or miss if they are open but the one about 6 miles from me. I was there to pick up some things my mom had asked for and while I was looking around I saw this fun notepad with a 2022 calendar on it. I had not made a calendar for my workroom in a long time. Last year I just printed out a 4" x 5" 12 month sheet and stuck it on the wall next to my computer. I did refer to it a lot. I'm used to having a small calendar there. So when I saw this I thought it would be fun to make one, plus I get a note pad to write on too! Such a deal. 

I took the calendar off the backing and when I looked at it I thought it looked rather thick. There were three of each month in it.  So I took it apart and made three piles of calendars. I took one pile and jogged the pieces until they were even on all sides and I took some tacky glue on my finger and ran it across the top edge. My sister works in a print shop and she says that is how they make scratch pads there.  Good to know for future reference. Glad I remembered how it was done. Not like it's hard to do!  Then I took three binder clips and clipped the pieces across the top to hold them while the glue dried. I repeated that for the other two calendars too. Not sure what I'm going to do with them, I only need one calendar.

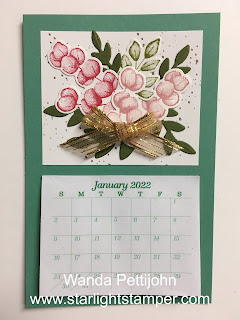
So today I thought I would make the calendar for my wall. I cut a piece of Just Jade at 3-1/2" x 5-1/2".  I chose Just Jade because it seemed to match the calendar the best. 

Then I took a 2-1/2" x 3" piece of Basic White card stock for the top part. I stamped some dots on it using Granit Grey ink, stamping once with full ink and then stamping again before reinking. I covered the piece with dots. The dots are from the "Forever Fern" set.

The leaves were stamped using Old Olive ink and then die cut. I had those on hand in the stamp set. There was a lot of extra pieces in that case. 

The rounded leaves are stamped using Real Red and Blushing Bride ink. They were die cut and set aside. 

There's a bigger leaf die in the set and I had cut it using Mossy Meadow card stock. I clipped off pieces to use on the calendar top.

To assemble, I added some Tombow glue in the middle and started setting pieces on. I lightly set the Real Red and Blushing Bride pieces and then started tucking other pieces in here and there. I tucked them in enough so they got some glue on them so they didn't move.  When I got everything where I thought it looked okay, I glued them down.

The ribbon was left over from a card I made a few days ago. There was a piece of ribbon left and at the time I wondered if it was enough to make a bow. So I made a bow and set it aside for another day. Today was that day!  I used a glue dot to set it in place and all I have to do is punch the hole to hang it.  

As I was looking at the calendar in the photo I realized that I need to glue a piece of thin shirt board behind it. Shirt board is the same stuff that is used on tissue and cereal boxes.  If you don't have any, glue a couple piece of card stock together and then glue the Just Jade piece to that. Use Tombow glue so it doesn't warp.  I'll be hanging mine up tomorrow. I'm going to put the piece under a few punches to weigh it down and in the morning I'll be adding the hole and hanging it up.  

This was fun and I am happy to have a larger calendar on my wall for 2022!  And the price was right too!

Thank you SO very much for taking your time to stop by and see my 2022 calendar,
Wanda

Tuesday, January 29, 2008

Calendar Information

I've been asked by several readers about the calendars and where to find them. If you can't find them at Michael's try calling Oriental Trading. Check with Walter Drake company, Miles Kimball or Lillian Vernon. You may have to call them and ask them. I would think they are willing to part with them since this month is almost over. And as a last resort you can check on SplitCoastStampers in the Forums. There are some free calendars available for download there. The only drawback is you have to cut them out and assemble them yourself.

I hope this helps you out.

Saturday, January 26, 2008

Calendar of Months

I was just finishing up some projects I had started that didn't need to be done right away. I am good at getting a project started but if the deadline is a few weeks away I tend to let it slide until a few days before I need it. I guess I figure the hardest part of it is finding the idea and the layout. After that it's just a matter of time and putting it together.

So I finally finished the calendars. These were actually fun. The part that took the longest time was threading the ribbon through the flower. I made a notebook using that same technique. I don't remember where I saw it but it's not my original idea!

I like the rhinestone brads in the flower centers. It gives the whole calendar a little bit of class.

There is really not much to making these. You cover a 4" x 4" coaster with decorative paper, add the calendar, some ribbon and the flower. See, not much to them but then again it took me 3 weeks to finish them!!! LOL Actually I've got TONS of stuff I'm working on and many of the projects are almost done and it's just a matter of taking the time to finish them.

I got the calendars at Michael's and the coasters were purchased at our last Stamp Share. I was told there is a company on the Internet you can purchase them at but you need to buy a minimum of 1,000 of them. You can just use Google for the information. I did that sometime last year and found that company the others were talking about. I didn't need that many and didn't think I could get rid of the remainder. And I REALLY have enough projects to work on. Including the coaster challenge that I was given at the last Stamp Share!!! I haven't started it but after the next Stamp Share I'll post it here.

Thank you SO much for stopping by,
Wanda

Sunday, December 30, 2007

A Beautiful Thing Calendar

Ok, now this one I like a lot better than the other two cards I made using the "A Beautiful Thing" set. I got the calendar from SplitCoastStampers. I am not sure where on their website I got it, it was a few months back. You can go to their website, at the top click on "Forums." That will take you to a page full of "stuff" that will cause you to spend TONS of hours there. Scroll down to "Stamping Stuff" and in that category you will find downloads. See you in about six hours!!! LOL I could not believe how fast the time went when I was snooping around in that section. Before you get too involved in that area find your calendar. Click on the word search and enter the word "calendar" and a window will open with calendar options. Like I said I'm not sure which one I used but if you would like a copy of the exact one I used please email me and I'll forward it to you. I check email once a day and it's usually in the evenings. I thought I'd let you know that so you don't think I'm ignoring your email.

I printed out the calendar on 28# copier paper. I wanted something thicker than regular copier paper. I buy a ream of the 28# and only use it for special projects so it does last a while. The higher the poundage the more expensive the paper is. After printing the calendars I cut them to the size I wanted them for this card. I used my Crop-a-dial to make the holes. I LOVE this tool, it allows you to punch quite a few pieces of paper with ease and it adjusts so you can cut the same depth each time.

I stamped the row of open flowers in Blue Bayou and cut two of them out. I also punched a hole in the center of them and added a brad and attached them to the calendar. I taped the calendar on a piece of Basic Black card stock that was cut 1/4" bigger than the calendar. I stamped the words in black and cut them out on the paper cutter. I punched a hole in the stamped flower and added a brad there as well. I taped this to a piece of black card stock cut 1/4" bigger. I took the cute larger flower stamp and using the Blue Bayou I randomly stamped the image on the Blue Bayou card stock. I taped it all together for a desktop calendar. I was debating whether or not to tape the card shut to make it more stable and hang it on the wall. I'm still leaving that option open right now. I was just thrilled I finally made something that I didn't dislike with this set. I have one more card idea in mind and I'm going to give it a try tomorrow.

Thank you for stopping by,
Wanda