I took the calendar off the backing and when I looked at it I thought it looked rather thick. There were three of each month in it. So I took it apart and made three piles of calendars. I took one pile and jogged the pieces until they were even on all sides and I took some tacky glue on my finger and ran it across the top edge. My sister works in a print shop and she says that is how they make scratch pads there. Good to know for future reference. Glad I remembered how it was done. Not like it's hard to do! Then I took three binder clips and clipped the pieces across the top to hold them while the glue dried. I repeated that for the other two calendars too. Not sure what I'm going to do with them, I only need one calendar.
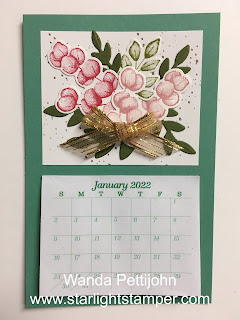
So today I thought I would make the calendar for my wall. I cut a piece of Just Jade at 3-1/2" x 5-1/2". I chose Just Jade because it seemed to match the calendar the best.
Then I took a 2-1/2" x 3" piece of Basic White card stock for the top part. I stamped some dots on it using Granit Grey ink, stamping once with full ink and then stamping again before reinking. I covered the piece with dots. The dots are from the "Forever Fern" set.
The leaves were stamped using Old Olive ink and then die cut. I had those on hand in the stamp set. There was a lot of extra pieces in that case.
The rounded leaves are stamped using Real Red and Blushing Bride ink. They were die cut and set aside.
There's a bigger leaf die in the set and I had cut it using Mossy Meadow card stock. I clipped off pieces to use on the calendar top.
To assemble, I added some Tombow glue in the middle and started setting pieces on. I lightly set the Real Red and Blushing Bride pieces and then started tucking other pieces in here and there. I tucked them in enough so they got some glue on them so they didn't move. When I got everything where I thought it looked okay, I glued them down.
The ribbon was left over from a card I made a few days ago. There was a piece of ribbon left and at the time I wondered if it was enough to make a bow. So I made a bow and set it aside for another day. Today was that day! I used a glue dot to set it in place and all I have to do is punch the hole to hang it.
As I was looking at the calendar in the photo I realized that I need to glue a piece of thin shirt board behind it. Shirt board is the same stuff that is used on tissue and cereal boxes. If you don't have any, glue a couple piece of card stock together and then glue the Just Jade piece to that. Use Tombow glue so it doesn't warp. I'll be hanging mine up tomorrow. I'm going to put the piece under a few punches to weigh it down and in the morning I'll be adding the hole and hanging it up.
This was fun and I am happy to have a larger calendar on my wall for 2022! And the price was right too!
Thank you SO very much for taking your time to stop by and see my 2022 calendar,
Wanda


No comments:
Post a Comment