
I needed to make some thank you cards to send out for some Christmas gifts I had received. SO I opened up Pinterest and there was this pretty snowflake Christmas card and I thought how great that would look for a thank you card. You can see the original card here. I did change it a little.
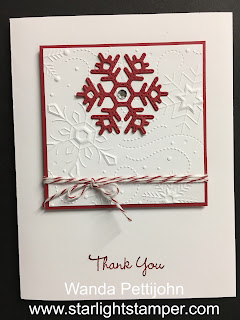
The base of the card is a folded half-sheet of Basic White card stock. Then I cut a 3" x 3" piece of Basic White card stock and textured it using the "Wintry" 3D embossing folder. Then I cut a 3-1/8" x 3-1/8" piece of Real Red card stock for the layer.
Before taping the textured Basic White piece to the Real Red piece, I die cut the snowflake from the "Stitched Snowflake" die set. I added a little Tombow glue to the snowflake and then set it in place on top of the textured piece. While that was drying, I got out some red and white Baker's Twine and wrapped it three times around the piece and tied it in a bow. I added a little dot of glue behind the bow to hold it in place. Then I glued the Basic White piece to the Real Red piece.
Dimensionals were added behind the Real Red piece and set on top of the card for placement for the words.
The words are from the "Pansy Patch" set and were stamped using Real Red card stock. Once the words were stamped, I removed the backing on the Dimensionals and set the piece in place on the front of the card and the card was done. Or so I thought. The center of that snowflake looked like it needed something so I took a 3/8" circle punch and punched out a piece of silver foil card stock. I didn't like the way that looked so I took out the "Subtle Shimmer" sequins and glued on in place in the center of the snowflake and now it was official, the card was done. Now I'm off to make several more. So glad I left the word piece in my Stamparatus. I almost always stamp my words in the Stamparatus. I no longer trust my stamp pads or me to stamp them solidly the first time. Plus when making more than one card, even if it's only two, it's nice to have it set up a head of time. You just ink and stamp and maybe have to repeat but at least it's there waiting for you to make one more or many more impressions! I need to make 3 more so I'm off to do that. It will be quick and easy to do.
Thank you SO very much for taking your time to stop by and see today's holiday thank you card,
Wanda
Wanda

No comments:
Post a Comment