Pin It

Showing posts with label Rub-Ons. Show all posts

Thursday, April 08, 2010

Wall Art! Rub-ons

I just love these Stampin' Up! rub-ons and wish I had more wall space to put more of them up. I did have problems with this one. I had only bought one set. I cut the knife, fork and spoon out separately so I could spread them apart a bit more than they originally were. I did get them on the wall and they were fairly straight but they weren't wide enough for the area. SO I ordered more. Fortunately I was able to remove the ones off the wall cleanly. I set them on the counter to think about how to get them up there evenly. I marked and measured where I wanted the first set to go and I got them in place. Then it dawned on me to use the backing to put the ones on that I had just removed. And I took the next one that was to go up and laid it under the backing so I had a "template" to put them back where they needed to be to be straight and even with the other ones. I rescued my images and was a happy camper. I got the other two sets up on the wall and was much happier with it like that than just the single set. It filled up that area of the wall and it looks nice up there. It's such a fun way to decorate without any mess.

I bought hubby a guitar one and we have yet to get it put up in his office. I am hoping to get to that by the end of the month and I'll be sure to take pictures to show you!

Click on the labels below to see my other rub-on. I had put the big tree up in my workroom. It's SO cool to have it on the wall. Last year I put blue birds on some of the leaves. I was going to put a red cardinal in the tree this past winter but I forgot. And I wanted to add snowflakes but I didn't have time to do that either.

Every time Stampin' Up! comes up with a new bunch of rub-ons I always find something I like. I have a bedroom I need to get painted and maybe by the time it's done I will have a wall I can put up a new one on! They are just so fun and easy to put on and take off!

Isn't the wall pretty? The plaque thing in the "before" photo was a kitchen measurements "thing" that I had gotten for a gift many years ago and I had put it up there. It was so high up that you couldn't read the measurements or conversions! Nice place for that, huh? LOL

Anyway I LOVE the knife, fork and spoon rub-ons SO much better!

Thank you SO much for visiting today,
Wanda


Sunday, February 03, 2008

No Fire!

Good news on the candle lamp with the rub ons!!! The candle burned for around 2 hours and no fire!!! The glass got warm but the rub-ons did not catch fire or melt or even change color from the heat. This candle with the lamp and metal frame lamp holder seem to be user friendly with the rub ons!! And this candle was wonderful. It smelled SO nice before I lit it and the smell was just as wonderful when lit. The whole room smelled SO good!!!

And thank you Alexandra for your comment and concern!!! Nope, no fire!!! I have a fire extinguisher in my workroom. You just never know. I work with some interesting "stuff" down here. I do polymer clay and I bake most of it in a toaster oven. You NEVER want that stuff to catch fire. Well, you never want any of your "stuff" to catch fire!!! LOL I am just prepared in my workroom. Plus it gets cold down here and I will sometimes run a space heater. It's nice and I usually don't worry about it until Boo comes down here. She likes to stand right in front of it and I swear I smell hair burning. I have to pick her up and move her and her hair is SO hot. I'm really surprised she doesn't catch fire!!! I keep an eye on her more than I do on the other stuff down here!!! Crazy cat!! LOL
I have a fun Valentine's Day project coming up here in a couple of hours. I have go to make dinner. UGH!!!

Thursday, January 31, 2008

Rubbed the Wrong Way!

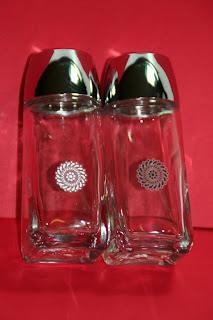
This just cracks me up. I bought these salt and pepper shakers a few weeks back with the intent to use the rub-ons using one of the flower type pieces and then rubbing an "S" on one and a "P" on the other. Well, let me tell you how humorous this is. I wiped the glass off with rubbing alcohol and instead of waiting for it to dry or even getting up to get a paper towel I used the side and palm of my hand to wipe it off. Nothing really wrong with that. Except I had just put on some really greasy hand lotion. SO I take more rubbing alcohol and wipe the glass off again. I actually got up and got a paper towel this time. It really wasn't that hard to do either!!! LOL

Then I rubbed on the white flowery circle. I didn't get it on exactly centered but it was ok, it wasn't that bad. Then I cut out a black "P" and rubbed it on top of the flowery circle. The typical black for pepper and white for salt. It didn't like the way it turned out. You could hardly see the "P". SO I took my kraft knife and scrapped off the rub on and removed the rest of it with more rubbing alcohol. Drying it off with the paper towel that was still sitting on my worktable (not a surprise since I rarely clean it off when I'm working - I allow myself a placemat size area to work!!!) Then I cut out a cute flower and started to rub it on and I wasn't holding it firm enough and it slipped and ripped and I couldn't match it up. So once again out came the rubbing alcohol!!! See where I'm going with this??? LOL Well at this point I decided to go with the original flowery circle so I cut out another one of those and rubbed it on. I decided I was not going to put the "S" and "P" on because it has just (yes just at that very moment, not the day I bought the shakers but about 20 minutes ago) dawned on me that the glass is clear and if you put salt in one of them you will be able to see it's salt in the container and if you put pepper in the other one you can clearly (literally) see it's pepper!!! Doesn't take a rocket scientist to figure out that one!!! So I left them with the simple yet elegant flowery circles. So much for trying to be too creative. Sometimes it's best to keep things simple!!!

So here's your tip. Make sure you clean the surface from any finger oils which also include greasy hand lotion. Rubbing alcohol works best to do this and it's cheap. And if you can't wait for it to evaporate (it takes a whole 30 seconds) you can wipe it off with a paper towel!!! Not your hands, even without greasy lotion on there are skin oils that could cause the rub on not to stay put.

I have these sitting in front of me and I still chuckle at the thought of labeling the obvious!!! LOL

This is a very simple project and you can make it as simple or as complex as you wish. I think I would save the complex for something larger.

Thank you SO much for stopping by,
Wanda

Tuesday, December 11, 2007

Socks for Christmas??

Yup, that's right. Someone is getting socks for Christmas. But presented in a way I bet you never though of!!!


I turned the sock half way inside out (the toe part). It's the ribbing that is part of the hat. I just didn't have the heart to cut off the sock and just make a hat out of it. I mean, after all it does have snowflakes all over it. Sheeesh!!! SO I turned the toe part inside and then wrapped the other sock around that and wadded it up. I then slid it over the lid of the jar. This jar lid is around 2-1/2" in diameter. I did not glue the sock in place. Remember, it's got snowflakes on it!!!! That would be a crime!!! LOL The ribbing was tight enough to hold it in place. I gathered a little of the sock at the top and tied a bow on.

Now what does this have to do with stamping??? Well . . . it's the rub ons!!! They work SO well on glass and when I saw this snowman face at Michael's I just had to have it and I knew just what I wanted to do with it. I was there on Monday and saw that they have a snowman and snow woman rub ons too. But alas, I didn't purchase them. DH will be glad to hear that!!! LOL But her face was just TOO cute!!! Anyway, after getting the face on the jar I filled it with bath salts. The recipe can be found here. Oh and I did rip the rub on a little but I stopped peeling the paper back and rubbed some more and it all came off and you can't see the rip. Then I added the hat and tied the bow. I still need to add an ingredients label and the use label and it's ready to go!!

The jar was from some of those tiny corn on the cob things for stir fry. Baby corns?? I'm not really sure what they are called. I got them at Aldi's. I pretty much save every jar that doesn't come with the company's imprinted name on the glass. You never know when you're going to need one or ten!!!


This is a very easy and inexpensive gift to make and give. The socks were from that dreaded Dollar Tree and bath salts go a long way so I'd have to say this gift was around $2.00. I wonder if they'd sell well at craft fairs?? Then again if you're in it for the money part of it you may want to just cut that sock off (wow, I almost passed out there from those shocking words!!! LOL) and you will get two caps out of it. If you're REALLY good at sewing you could sew the remainder of the sock and use it like Peds!!! Personally I just couldn't bear seeing them cut up so I'd have to just toss that part. LOL Have fun making these!!

Thank you SO much for stopping by!
Wanda