Pin It

Showing posts with label Thank you card. Show all posts

Sunday, April 23, 2023

Petal Park, Go To Greetings, Thank You Card, Stampin' Up!

Hello! Today I am going to share with you a quick card (quicker if you have the dies). It's an easy one to make. Please read on to see how you can make it yourself.

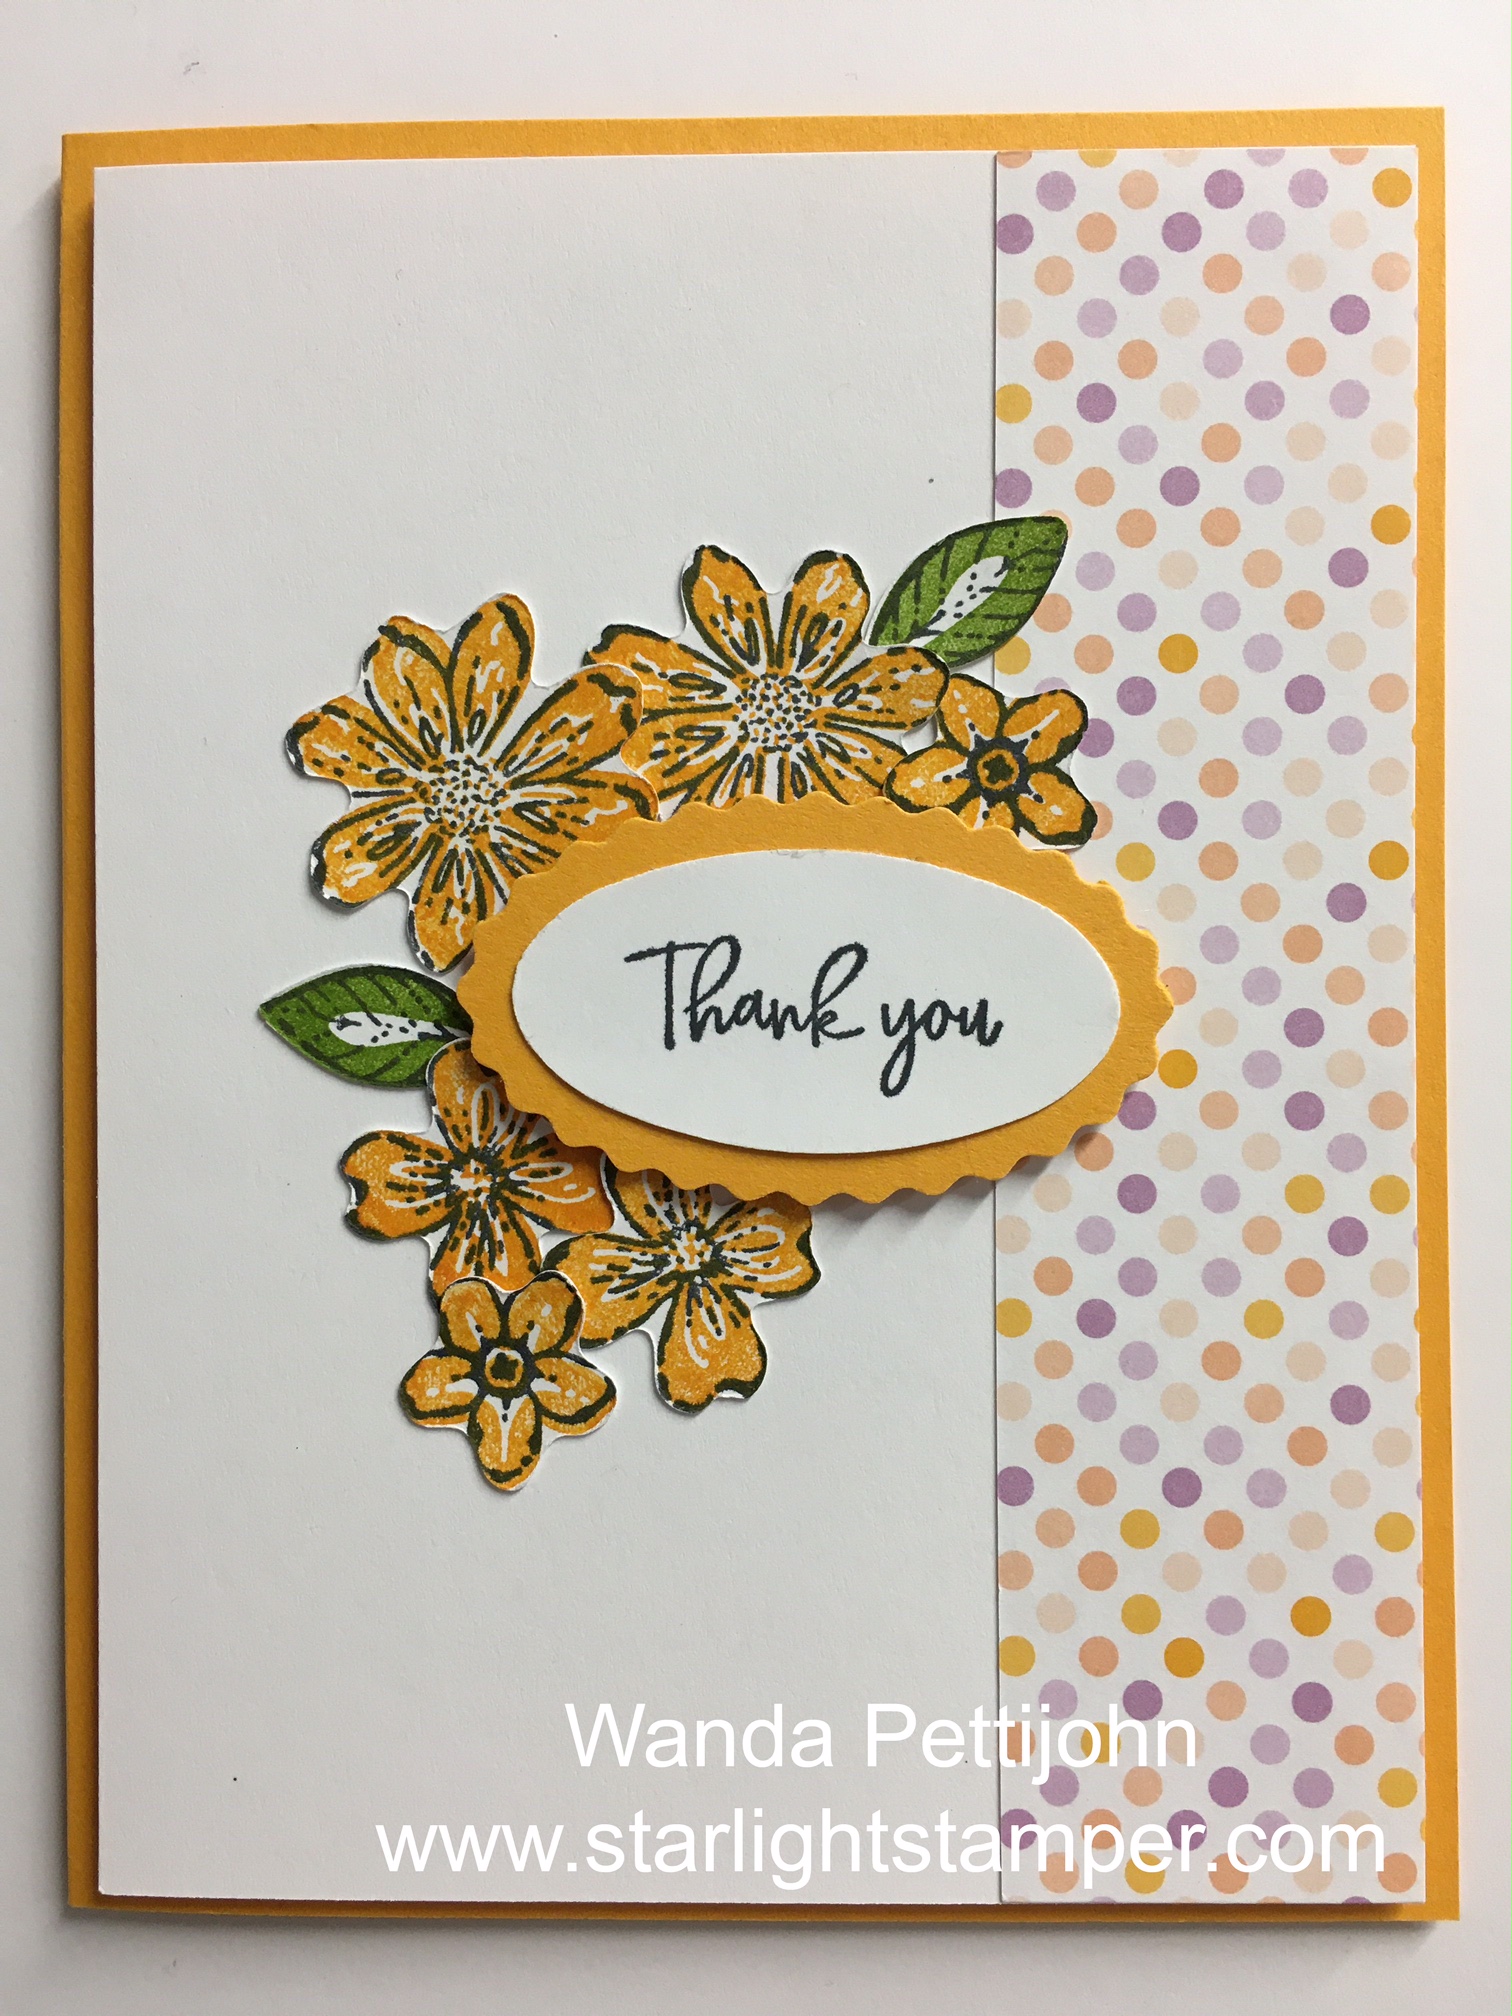
The base of the card is a folded half-sheet of Mango Melody card stock. This card stock will be retiring soon. I did like the color but my ink pad kept getting thick and had a funny color on top of the crust it formed. Same with my Rich Razzleberry, maybe that's why they are retiring that color too.  Anyway, I have lots of card stock to use up but this layout will work with any of your Designer Series Paper (DSP) and matching inks, so what's stopping you from making it?  The "Petal Park" stamp set?  Well, there's lots of other flowered sets you could use. You must have one in your inventory!! Anyway, my card opens on the right and the fold is on the left.

Two pieces of Basic White card stock were cut at 4" x 5-1/4", one for the front and one for the inside.  I taped the inside piece in place. I like to do that right away so when I'm done with the front I'm done with the card. Not that it's a lot of effort to tape the piece to the inside after working on the front, it's just nice to have it done when you're done with the front.

I took a 1-1/4" x 5-1/4" piece of DSP from the "Dandy Designs" package I got during this year's Sale-a-Brations and I taped it to the other piece of Basic White card stock.

I took a scrap piece of Basic White card stock and I stamped the flowers using Mango Melody ink. Then I used black Memento ink and stamped the detailed images. I made two sets of flowers. The flowers come with three of them on one stamp, which is kind of nice, though it does go with the big leaf background image in the set. Then I fussy cut the flowers. The leaves were stamped using Granny Apple Green ink and black Memento for the details. I fussy cut them too. 

Next I punched out the scalloped oval using a scrap piece of Mango Melody and the "Double Oval" punch.

The words are from the "Go to Greetings" set and were stamped on a scrap piece of Basic White card stock using black Memento ink. I punched them out with the same punch. It's a "double" punch so you get both ovals.  Nice, huh? I taped the ovals together, Dimensionals were added to the back and the piece was set in place on the Basic White piece with the DSP on the right.  I didn't press down on the Dimensionals, I needed to have them loose for when I slipped the flowers under, I wanted to make sure they would go under.  Then I added the two leaves. After the leaves were added I pressed down on the oval to make sure it was set in place.

Dimensionals were added to the Basic White piece and it was set in place on the top of the card base and the card was done.

As I look at it, I think the center of the flowers could use something, so I may add some pearls or other embellishments I find. I was trying to keep it simple and mailable with a single stamp. Adding firm embellishments will cause the card to be non-machinable and cost more to send. So I will be searching for something that is not thick or higher than the word piece.

This was a fun card to make and I think it could be used for a number of occasions.

Thank you SO very much for taking your time to stop in and see today's thank you card,
Wanda

I took the flowers and added a bit of tape to the back and slipped them under the oval. 

Wednesday, June 15, 2022

A Million Thanks, True Beauty, Awash in Beauty, Thank You Card, Stampin' Up!

 I was at my worktable today wondering what I could do with no electricity and no internet.  Oh my how spoiled I realized I am.  I was lost without both of those luxuries.  I ended up grabbing the box that has the "A Million Thanks" kit in it and decided to make up the remaining 8 cards.  This kit is like a Paper Pumpkin kit.  Everything you need is in the kit.

Today's card is an alternative card from the kit. I didn't like the way the one in the kit was laid out so I decided to be creative with it.  This card opens on the right and the fold is on the left. The original card had the fold on the top and the opening on the bottom.  

It doesn't show up in the photo but the card front area where it's darker is actually clear embossed. It's very pretty.  

The black ribbon looking piece is actually paper that was in the kit. I taped it down on the center of the card.

The word piece and words came with the kit too. It already had the flowers stamped on it.  I just stamped the words using the Evening Evergreen ink that came with the kit in the form of a little ink spot.  Those are always fun to have. I set the words piece in place using the Dimensionals that also came with the kit.

The blue flowers, pink flower, and leaf are from the "Awash in Beauty" 12" x 12" Designer Series Paper (DSP) package. I die cut them with the matching dies from the "True Beauty" bundle.  I slipped the blue piece under the words. It went between the Dimensionals so I added a couple glue dots that came with the kit to hold it down.

The pink flower was set in place with a Dimensional and a leaf was set in place under it using a Dimensional. 

The dark dots came with the kit. I think they are Evening Evergreen color. They are very dark and could pass for black, it's difficult to tell. I set them in place on the front of the card but I thought the card could use something more. SO I added some crystal rhinestones where the dots are on the word piece. Except for the dot between "is" because it wouldn't fit and I thought it would look funny there.  And that was it. The original card was kind of plain but I dressed it up with a few images from the DSP and now I REALLY like it!!!  I think I'm going to try this layout with some other word sets and the same DSP in a day or two.  I hope our internet is working by then. I'm using my cell phone as a hot spot and burning through our data so I must stop and post this.  Hope things get back to what they were soon (I'd say "normal" but I don't know what normal is anymore!)  LOL

Thank you SO very much for taking your time to stop by and see today's card,
Wanda

Sunday, February 21, 2021

Darling Donkeys, Thank You Card, Friendship Card, 2021 Stampin' Up! Sale-a-Bration

I still had my "Darling Donkeys" set out when I ran across this card on Pinterest. Once again it involved some fussy cutting but I was up for the task! There is very little info at the link for this card. 

The base of the card is a folded half-sheet of Basic White card stock. 

A 3-7/8" x 5-1/8" piece of Basic White card stock was cut and then sponged with Granny Apple Green for the grass and Bermuda Bay for the sky. You want to do this part of the card first because you need to mist it a little to give it those fun dots in the background. And you need to give it time to dry.  

While the card was drying I stamped the donkey from the "Darling Donkeys" set and then I fussy cut it out. Normally I would color first and then cut out, just in case I mess up the coloring then I wouldn't have wasted all that time cutting.  But with the Blends pens I like to cut first because I don't want to pick up ink on my fingers and transfer it to other parts of the image. Not sure it could happen but I don't want to take any chances. I know it can happen with markers. I read a comment on the original card and found that the donkey was colored in using Seaside Spray and Petal Pink Blends pens. I used both light and dark Seaside Spray and light Petal Pink. Once I was done coloring him, I added Dimensionals to the back.

I set the donkey on top of my sponged card stock to see where the words would go. The words are also in the set. I stamped them with black Memento ink.

The donkey was set in place and the card was done.  Even with the fussy cutting, this card was quick to make.  The misted piece didn't take long to dry either.  I did turn it upside down and put a book on top of it to keep it flat.  This was a fun card to make. I did learn something. I learned that Seaside Spray is a perfect  color for the donkey!!

Thank you SO very much for taking your time to stop by today and have a look,                                    Wanda

Thursday, August 02, 2018

Itty Bitty Greetings, Petal Palette, Get Well Card, 2018-2019 Stampin' Up! Catalog

WOW, if you want quick, clean and simple, this is the card for you!!! Can you believe that this card was so quick and simple to make that I actually thought of fussy cutting more flowers to pop these up??   Yes, me fussy cutting!!! LOL

This really is a very quick and simple card to make. If you are in a rush for a card, this is the one to make.  Plus it's not just for sending prayers, it could be a birthday card, a thinking of you card, a congratulations card, a wedding card, anniversary card or a Mother's Day card.  It's extremely versatile.

The base of the card is a folded half-sheet of Whisper White card stock. On top of that is a 3-7/8" x 5-1/8" piece of Highland Heather.  On top of that is the focal piece, it's Whisper White and cut 3-3/4" x 5".  And that's it for your cutting.

The flower is from the "Petal Palette" set. A set I LOVE to play with but have not for a little while because there's new stuff to play with. It kind of reminds me of Toy Story and all the other toys are concerned that they might not get played with when new toys come into Andy's bedroom.  LOL  I try to be fair and play with them all, but not necessarily equally!!!

I colored the flower in using Highland Heather Blends pens. I also colored the leaves in using the Mint Macaron Blends pens.  Color the lightest color first and then add some highlights with the darker color.  So quick and easy to color with these and it make it look like you are REALLY good at coloring!!!

The words are from the "Itty Bitty Greetings" set. I stamped them using black Memento.  Then I taped the layers together and that was it.  Super quick and easy!!

Thank you SO much for visiting today,
Wanda

Tuesday, July 03, 2018

Love What You Do, Share What You Love, Lovely Floral Embossing Folder, Thank You Card

If you are in need of a pretty, fun and quick card, this is the one for you.  The "Lovely Floral" embossing folder flower takes up a lot of real estate on the Whisper White piece. I cut a 1-1/8" x 3-3/4" strip of the "Share What You Love" Specialty Designer Series Paper (SDSP).  And the words are from the "Love What You Do" set. I found this card on Pinterest and made some minor changes but for the most part it's copied!!!

The base of the card is a folded half-sheet of Pear Pizzazz. On top of that is a 4" x 5-1/4" piece of Basic Black card stock.  And the Whisper White focal piece is cut 3-3/4" x 5".

I embossed the Whisper White piece and then taped the SDSP strip to the bottom.  I tied a ribbon around it. I used some old Certainly Celery ribbon that I had in my stash. It's in the same color group so it went well with the card. I didn't have any current greens to go with the card, so I just made do with what I had.

I taped the focal piece to the Basic Black piece and I taped those layers to the card base.

I stamped the words on a scrap piece of Whisper White card stock. I die cut them with the oval die and then I die cut a black scalloped oval from a scrap piece of Basic Black. Now once again, had I been paying attention, I would have die cut the scalloped oval from the center of the Basic Black piece I used as a layer.  But I wasn't thinking!!!  And again, I did have a scrap piece to use up, so either way it's okay.  I taped the words to the scalloped oval. I set them in place with Dimensionals.  I fussy cut a flower from the SDSP pack and taped the bottom two petals and used a dimensional on the petal that is about at the 1 o'clock position.  And that was it.  Super quick, easy and very pretty.  This card caught my eye on Pinterest and I just had to make it. 

I just love that embossing folder. The flower is SO pretty. I sure do have some plans for it. I hope it turns out on paper as good as it looks in my head!!! We have all seen what could happen there!!! LOL

It would make a lovely get well card, thinking of you card, birthday card and Mother's Day card.

Thank you SO much for visiting today,
Wanda

Sunday, May 07, 2017

Special Reason, Thank You Card

I'm still having some fun with the "Special Reason" stamp set and dies before they retire at the end of the month.  I have found so many cute cards to make and it makes me sad that it's retiring.  So I plan to make a few more cards using the set before I move onto something else.

This was a super easy, quick and adorable card to make.  I found it on Pinterest.  You can see the original card here.  

After finishing the card I noticed that I used Old Olive for my green instead of Pear Pizzazz.  I also used Old Olive for my words (on purpose) instead of Tempting Turquoise.  I thought the green should be tied in with the leaves.  

I can't believe how simple this card was to make.  The base is a folded half sheet of Whisper White cardstock.  Then I cut a 3-1/2" x 3-1/2" piece of Tempting Turquoise cardstock.  On top of that is a 3-1/4" x 3-1/4" piece of Whisper White cardstock.  Next I stamped the veins of the leaves on a scrap piece of Old Olive cardstock.  I die cut them out.  I also die cut the flower on the Whisper White panel piece.  Once the die cutting was done I taped the flower to the Tempting Turquoise piece and then added the two leaves.  I wrapped and then tied a piece of white Baker's Twine around the layered panel.  I taped that panel in place.

I inked up the words from the "Flourishing Phrases" set.  I did like the words used in the original card but I didn't have them, plus I needed a thank you card.  I still need a few more thank you cards, so I'd better get moving on it!!!

This was a very fun card to make. I couldn't believe how quick and simple it was.  I think it would make an excellent get well, birthday, thinking of you, Mother's Day, and even a sympathy card.  A VERY versatile set!  I LOVE that!!!

Thank you SO much for visiting today,
Wanda

Monday, January 18, 2016

A Botanical Blossom and Rose Wonder Thank You Card

I am loving this new "Botanical Blossom" stamp set with the matching die. You have to love a set when it has matching dies.  It sure beats cutting out pieces.  Plus I tend to use the set a lot more if I don't have to cut out the pieces myself!  

Yesterday I posted a "Botanical Blossom" Birthday card.  I had still had the set out (surprise, surprise!!!) and I had a couple of extra flowers too.  When I run the flower dies through, I tend to add more dies to the same and or other colored cardstock so I have pieces on hand.  You're running the cardstock through anyway, why not load it up with dies?  

For this card I used Daffodil Delight for the flowers.  For the next layer I used Hello Honey and for the center I used Calypso Coral. When I got the pieces all glued together I added a pearl to the center.

I stamped some leaf veins and then the leaves.  I ended up making an extra leaf.  You might see that show up in a few days!!

The decorative paper is the Botanical Gardens pack.

For the words I used the "Rose Wonder" set.  That's another set I am anxious to play with, but I'm kind of stuck on this set right now!

The base of my card is Mossy Meadow and I also used it on the layers.

Thank you SO much for visiting today,
Wanda

Saturday, September 26, 2015

A Flower Patch and Another Thank You Card

No, it's not "another" thank you card as it stated in the title of this post.  That is the name of the set where the "thanks" came from. I have not made a thank you card in a while so the "another" doesn't quite fit!!! LOL  

I was in need of a thank you card so I thought I would play around with some colors, textures and accessories today.  I used Crumb Cake for the base of my card and for the top layer. Under that top layer is a piece of Whisper White card stock.  I used a piece of Wild Wasabi decorative paper.  I liked the design with all the words on it.  It seemed to blend well with the design and theme of my card.  I saw the word "thankful" in it somewhere. The polka dots might have worked but I thought it was a little too busy. I needed something like lines or strips.  The words are in lines, so I ran with it and it worked!

I used the punch that make the three different size ribbons.  My ribbon is 2" wide.  I taped it in place and then added a half a paper doily on top.  I used a half doily because that is what I fell out of the pack when I grabbed it.  I thought I would try to make it work.  I originally had the orientation of the card going landscape instead of portrait.  

Next I stamped 3 leaves and I cut them out with a scissor.  I drew in some veins using Wild Wasabi ink and a blender pen.  They faded a  lot, which is fine, I didn't want them to be real dark.

The larger flower piece was stamped using Tangelo Twist.  The top flower was stamped using Pumpkin Pie and the petals inside that flower were stamped using Tangerine Twist.  I set the flower in place on the card using Dimensionals.  And for the final touch, I added a Candy Dot in the middle of the flower for some contract and texture.

The words were stamped using Memento ink.  I was going to use some other words from that set and punch them out using the oval punch and added a Pumpkin Pie oval scallop but that took up a lot of the space on the bottom left and it covered the ribbon so it would look like just a piece of decorative paper instead of a trimmed piece.  Fortunately for me there were small words in that set and also fortunately for me, there was just enough space in that bottom corner for the word!!!  I must be livin' right today!!! LOL

This was a fun card to make and I like the colors.  Fallish looking but yet a bit of summer still hanging in there with the greens!!

Thank you SO much for visiting today,
Wanda

Monday, June 29, 2015

A Thanks Camouflaging Die Cuts Technique Card

Today I played with the new "Camouflaging Die Cuts technique at Split Coast Stampers.  It's a fun technique.  Though I did change it up a little.  I used decorative paper instead of using ink and a brayer. This is a pretty fun technique.  Though I have to tell you, I did not like sticking the words together on top of each other that many times!!!  But I did like the end results!

I think it would be fun to do this with a flower die or something other than numbers or letters.  

My paper used here is from the "Pretty Petals" paper stack!  Two days in a row of using paper from that pack!  I'm on a roll!!!  I do love this black and white look!  The words are from the "Hello You" thinlits dies.  Basic Black and Very Vanilla card stock were also used here.  It's easy enough to do, just a little bit fussy having to stick the words on top of each other.

Give this technique a try!  

Thank you SO much for visiting today,
Wanda

Tuesday, March 03, 2015

A Mother's Love Card

This card can be used for several occasions to give to mom.  You could give it to her for a birthday, a thinking of you, Mother's Day, or as a thank you card.

I will probably be using this one for a Mother's Day card.  I had no idea where I was going when I started this card.  All I knew was that I wanted to use the "Nobody loves like a Mom" image from the "Mother's Love" set.  As I was getting my worktable set up (meaning clearing a spot to stamp) I ran across a stamped and punched flower.  So I thought I would incorporate it into this card.  

I used a strip of Rose Red decorative paper for a punch of color.  
The card worked out.  It's a quick and simple one and yet it was fun to make!  Plus I got to use up a few scrap items sitting around!!!

Thank you SO much for visiting today,
Wanda

Tuesday, December 23, 2014

A Flower Patch Thank You!

I do SO love playing with stamp sets that have matching dies and punches.  I do prefer a punch over a die because I am a bit too lazy to walk over to the Big Shot!!! LOL  But I do know I can cut more than one piece using a die.  And I can cut fabric and felt with the dies, something you can't do with a punch!

Okay, onto this pretty card.  I found this card at Julia's "Paper into Love" blog.  I thought it was a very fun and pretty card to make.  I did have the correct ink pad and color, Lost Lagoon, but the ink in the photo doesn't look like it matches the decorative paper. But in real life it does match. It must be the lighting.  

This was a very easy card to make too.  The base of the card is a folded half sheet of Lost Lagoon card stock.  I cut the full sheet on the short side so my card opens from the bottom.  The next piece to add is the Whisper White, and that was cut 4" x 5-1/4".  Then I added the Lost Lagoon decorative piece of paper.  That piece measures 2-1/2" x 4".  The Crumb Cake piece measures 4" x 2-1/2".  The Whisper White piece on top of that measures 2-3/8" x 3-7/8".  

I stamped and cut out the larger flower and I also cut the smaller flower at the same time.  I stamped the flower stem on. But before I did, I had set a cut out flower on top to see about where the stem should go.  the center of the flower is from a tiny 1/8" paper or circle punch.

When assembling the card, I did set the Crumb Cake piece on using Dimensionals.  And that was it.  It's a super easy card to make.   

Thank you SO much for visiting today,
Wanda

Monday, September 22, 2014

Mixed Bunch

Today I found a fun card made by Mary at Stamp Pretty.  I thought it looked like a fun card to make, and it was.  I stamped the background using the black Memento ink.  I also stamped the larger flower and the flower center with the same ink.  I punched both the flower and the flower center out.  LOVE doing that, no fussy cutting!!!

I did not add any words because I was not sure what I was going to use this card for.  I wanted to make it with no idea for what occasion.  So I will be setting it aside until an occasion arises.  

I LOVE quick cards lately and this one was extremely quick!

Thank you SO much for visiting today,
Wanda

Sunday, September 21, 2014

A Flower Shop Feel for Fall


I wasn't happy with the thank you card I made yesterday so I thought I would try a new one.  I do like this one much better.  I found this fun layout by Shauna at a Card a Day.  I thought I would change the colors up for more of a fall look and go from there.  

I also liked the torn edge paper too.  I use a little trick to get my layers to look good torn.  I make the back layer longer, I usually don't cut the back layer until I'm done with the tearing part.  I even up the bottom edges on both layers and then I rip my card stock.  Then I slide the top layer up a little so it shows the layer and I mark the top of the back layer to where I need to trim it up to look like an even layer on all edges.  Now for this one, my back layer strip wasn't very long to begin with so what I ended up doing was trimming the top layer just a little to make it all look even.  You do whatever it takes to make it look good!!!  


I used the "thank you" from the "An Open Heart" set.  

The base of my card is Whisper White.  The decorative paper is the new Tangelo Twist color and the torn card stock panel is Pumpkin Pie.  I stamped the "Flower Shop" flower using Tangelo Twist.  I also stamped it again using the black Memento ink pad.  I punched out the center using the 3/4" circle punch.  I set the center and the flower on Dimensionals.  


I tied the ribbon in a knot and then I cut it off the spool.  I taped the raw ends on the back of the panel and then taped the panel in place.  


This was a super fun and easy card to make!

Thank you SO much for visiting today,
Wanda

Saturday, September 20, 2014

An Open Heart Thank You Card

Tonight I needed to make a thank you card.  I thought I would play with the "An Open Heart" stamp set.  I am not thrilled with this "Lullaby" decorative paper I chose.  I am not sure why I went with it.  I should have picked one or the other.  Since it's so late I think I am going to file this card away and make a different one tomorrow.

They all can't be winners!!!

Thank you SO much for stopping by today,
Wanda
 

Friday, September 19, 2014

World of Dreams General Card

I saw this fun layout by Sandi on Pinterest.  There was no link attached to the card and the photo didn't have a link with it.  I thought it was such a pretty card.  I didn't want to add the wording because I wasn't sure what I wanted to use the card for.  In leaving it blank I can use it for quite a number of occasions.  I also changed the colors. I wanted to make more of a fall looking card.  

The flowery part is from the "World of Dreams" set and the butterfly is from the "Pappillon Potpourri" set.  I stamped the whole flower image using Wild Wasabi.  I took my blender pen and removed the ink from the flower part.  Then I took the Mossy Meadow ink and touched the ink pad lightly to the greens.  Next I took the Tangelo Twist marker and colored in the flowers.  

The butterfly was stamped using the black Memento ink pad and colored in with the Tangelo Twist and Crumb Cake markers.  I set the butterfly in place using Dimensionals. 

The side panel was embossed using the Beautifully Baroque folder.  I cut the piece in half on the short side and glued it in place.  I don't have a lot of luck with the tape holding and I think it's a waste to use the Sticky Strip to hold it down.  I added a ribbon down the middle to hide the seam.

I layered the piece on a piece of Tangelo Twist card stock and that was set in place on top of a piece of white card stock as the base.  And that was it. Pretty and fun too!!!

Thank you SO much for visiting today,
Wanda 

Sunday, December 29, 2013

Gift of Kindness Masking Tape Technique

This is a card made by Shelly from Terri's down line.  I had gotten in on the "Masking Tape Technique" swap and had a great time doing it.  You can see the card I made for the swap here.   I love it when I have time to get in on these swaps.  There is a multitude of talents in that group!  And a very friendly group too!  I love going there!

Ok, today's card is made by using the "Gift of Kindness" set.  This set was on my wishlist but only because I LOVED all the words that went with it, not so much the flower.  

The base of the card is made using Old Olive.  The decorative paper is from the "Season of Style" Designer Series Paper Stack. Cherry Cobbler was used for the Framelit part and Whisper White was used for the focal piece.  

My photo didn't turn out so well, the bottom masking tape color is Soft Suede, here it looks like a dirty olive color.  Then Old Olive was used and the top strip it looks like it's Crumb Cake.  Though I think you could get by "stamping off" using the Soft Suede strip again.  


It's such a pretty and cheery looking card!  

Now I'm off to warm my hands up and do some of my own stamping!  It's -7 here in Minnesota and I'm freezing!!!


Thank you SO much for visiting today,
Wanda

Wednesday, November 13, 2013

Blooming With Kindness

While looking for a different image I ran across this one and had to make it.  I don't remember where I saw it.  I'm usually pretty good at keeping track of my footprints on the net but sometimes I just get lost!  So if you know the original designer of this card, please let me know so I can give the person the credit they are due.  Note: edited 11-13-13 The original card can be found here at Sleepy in Seattle.  

This is a super simple card.  It takes one sheet of Whisper White card stock and a piece of colored card stock.  On mine I used Coastal Cabana and Coastal Cabana ink.  

I cut my card stock in half and folded one of the pieces in half.  Then I cut the other piece in half and embossed it using the "Framed Tulips" folder.  Then I trimmed the paper close to the outer embossed frame on it.  


I cut my Coastal Cabana piece 3-1/8" x 4-3/8".  I cut my white piece 3" x 4-1/4".  I stamped the image and then the words.  And that was it.  Extremely simple and ever so quick!!!  I am thinking about making some gift packs of birthday cards using this image.  It's perfect for that and pretty too!

Thank you SO much for visiting today,
Wanda

Friday, November 09, 2012

Just Believe

This is one of the cards that my sister and I made at Terri's Stamp-A-Stack.  It's such a quick, clean, and simple card to make.  Stamp-A-Stacks are so much fun because you don't have to do any cutting.  As much as I love going to these, my sister loves them even more.  She hates to do any part of that at all.  She likes it when she can just sit down and make a card with everything all done for her. Well, who doesn't?  LOL  Sometimes I have leftover parts to cards and she loves to take them to make cards.  Anything that makes it easy is what she loves.


Well, this card was easy and it's SO pretty.  


Thank you SO much for visiting today,
Wanda

Thursday, October 18, 2012

Fabulous Florets


Today I thought I would continue with the fall theme in my cards.  I used the Fabulous Florets set and used some fall colors.  This is among one of my favorite sets.  

The stem is done in Old Olive.  The flower is done in More Mustard and then the edges were rolled on the Pumpkin Pie stamp pad.  Then the flower was cut out and set in place over the stem using Dimensionals.  The words were stamped using Pumpkin Pie.  The words came from the Blooming with Kindness set.  


The card stock colors are Whisper White and Old Olive.  This card has several layers to it but they go on quickly so it's not so bad.  I am one who LOVES lots of layers on my cards.  The top two layers were set on using Dimensionals.  


This is a very easy and quick card to make and put together in spite of all the layers!  


Thank you SO much for visiting today,
Wanda

Thursday, September 20, 2012

Love & Sympathy Thank You Card

I wanted to make a quick thank you card so of course I went on the Internet for some inspiration.  I found one something like this by simply entering "Love & Sympathy" at Pinterest.  Pinterest seems to be my home away from home lately.  It's my go to place for inspiration and information.  What a fabulous site and such a time consumer it is too!  Well, it was at first but now it's not so bad.  It could be bad if I let it but I do limit myself on there now.  I have repined so many things on my boards and I am now to the point to where I need to start doing more with those pins.  If you have not been there I suggest you set a timer when you do!


So now lets talk about my card because we know this whole thing  here is ALL ABOUT ME!  LOL  I wanted to make a thank you card for a friend I was seeing in a half hour and I needed something quick and easy.  And this is what I came up with.

The Love & Sympathy set was just made more versatile.  The flower is pretty enough to use for other occasions.

This is one of those kind of cards you can use for Stamp-a-Stacks because you know people will love it.  The decorative paper strip on the side adds a lot to the card, a ribbon and the image and you are done.  It's quick enough and simple enough but yet it has a really nice look to it!


It was a very fun card to make and I think I will be making more with this layout in the future.  It's a great way to use up some decorative papers too!

Thank you SO much for visiting today,
Wanda