Pin It

Showing posts with label Stamp A Stack. Show all posts

Sunday, April 16, 2023

Days to Remember, Awash in Beauty, Birthday Card, Stampin' Up!

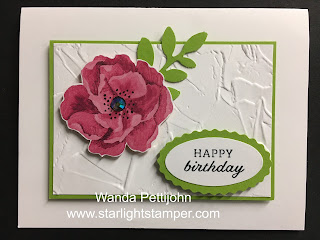
Hello! I'm so happy to share this card with you today. I had gotten a packet from Terri at one of her Stamp a Stacks and I had set it aside to put together at a later time. Well, it's a later time and here's the finished card (finally!). 

The base of the card is a folded half-sheet of Basic White card stock. On top of that is a 4-1/4" x 3" piece of Granny Apple Green card stock and Basic White layer. The Basic White piece measures 4-1/8" x 2-7/8".  The piece was textured using the "Painted Texture" embossing folder. Terri had already textured, nice, huh? The piece was centered on the card base and set in place using Dimensionals.

The flower is from the "Days to Remember" 12" x 12" package of Designer Series Paper (DSP). I did have to fussy cut that myself. Dimensionals were added to the back. 

The leaves were punched using the "Bough" punch and Granny Apple Green card stock. I set the leaves on the textured piece and then set the flower on top. The Dimensionals on the flower will hold the leaf piece in place. 

The words are from the "Days to Remember" set and were stamped using black Memento ink. And then they were punched out using the "Dual Oval" punch. The scalloped oval was also punched from the same punch and a scrap of Granny Apple Green card stock. I taped the ovals together, added Dimensionals on the back and the piece was set in place on the front of the card. 

A fun gem cut embellishment was added to the center of the flower and the card was done.

This was a fun card to make and a super easy layout. I can see myself using this layout for other cards. Can you see the cute little turtle or bunny from the "Playing in the Rain" set in place of the flower and leaves?  Lots of options for that space!

Thank you SO very much for taking your time to stop in and see today's birthday card,
Wanda

Saturday, July 07, 2018

Wonderful Moments, Lovely Floral, Birthday Card, 2018-2019 Stampin' Up! Catalog

Some people save the tiniest pieces of scrap paper!!  Yup, that would be me, but only when it comes to the Decorative Series Paper (DSP) or the Specialty Decorative Series Paper (SDSP). Some of that stuff is pretty expensive. Actually, I don't  usually save pieces that small but it was in with a stack of other pieces and I had just grabbed them all and slid them in the wrapper with the rest of the SDSP.  Kind of glad I did, it came in handy for this card.  I wanted a small piece of SDSP for the bottom part of the card. I didn't want a bigger piece because of the "Lovely Floral" embossing on the 4" x 5-1/4" Mint Macaron piece. Plus I wanted to use a half of a pearlized doily on the card. So with all of the things I wanted on the card, I needed to work small.

The base of this card is a folded half-sheet of Whisper White card stock.  On top of that is the embossed Mint Macaron piece.  I taped that piece to the card base.

I cut a 1-1/8" x 4" piece of Whisper White card stock and the SDSP was cut 7/8" x 4". I taped those two pieces together.  I tied a ribbon around the left side of the taped strips.  I added some tape to the back at the bottom center so I could add the pearlized doily.  Then I taped all of that to the card front.

Next I stamped the words from the "Wonderful Moments" set using black Memento ink.  I punched them out using the "Classic Label" punch.  I set that piece in piece in place using Dimenisonals. I centered it as well as I could.

This was a fun and quick card to make and a great way to stretch a sheet of the "Share What You Love" SDSP if you are going to demo it or use it at a Stamp A Stack.

Thank you SO much for visiting today,
Wanda

Sunday, May 20, 2018

Truly Tailored, Masculine Card

Today I attended a very fun "Card  Buffet".  For those of you who do not know what that is, well... it's kind of like a Stamp a Stack but different!  There, doesn't that explain it well?  LOL  With a card buffet you have boxes or totes with all the supplies to make the card that is featured in that container.  You pick what container (card) you'd like and go to your spot and put the card together.  You can make more than one if you like.  Then you put the container back when you are done and move onto another container and make that card.  It's fun because you get to pick what you want to make. You get to set at the same spot for the entire card-making time.  I had such a fun time and I'm going to share with you one of the cards I made.

This is from the "Truly Tailored" set.  I stamped the words from the set using Chocolate Chip. Then I punched it out with the "Tailored Tag" punch. I also punched out a Tranquil Tide, Night of Navy and Crumb Cake pieces.  They were cut in half and taped to the back each other and then set in place with the words using Dimensionals.  

The base of the card is a folded half-sheet of Night of Navy card stock. The top layer is a 4" x 5-1/4" piece of Night of Navy that was textured with the Wood texture embossing folder.  Then a piece of the corduroy ribbon was taped to the back of it.  On top of that is a 1-1/4" x 4" piece of the "True Gentleman" Decorative Series Paper (DSP).  The DSP was taped on top of the ribbon.  Then the layered punched piece was set in place with Dimensionals. And for the final touch, the buttons were added using glue dots.

Such a fun and great masculine card!

Thank you SO much for visiting today,
Wanda

Wednesday, December 27, 2017

Better Together Wedding Card

It seems so strange to not be making Christmas cards when the tree is still up and it's cold outside.  Well, here in Minnesota it's cold, VERY cold today.  We did venture out and it was okay as long as you had a winter coat on, warm boots and gloves.  There was no wind so it didn't feel too bad, but I wouldn't want to stand out there too long though!

So for today's non-Christmas card, I thought I would make a wedding card.  I had gotten a few cut pieces of the "Year of Cheer" Specialty Designer Paper (DSP) from a Stamping Extravaganza I went to a couple of months ago.  I hadn't used it all and I ran across it today wondering what I should do with it.  A wedding card came to mind, so here it is.  It's a very quick and simple card to make too.  It would be a great Stamp-a-Stack card!

The words are from the "Better Together" set and I stamped them using Smoky Slate ink.  I die cut them out using the stitched oval die.  I also die cut the scalloped oval at the same time using Smoky Slate card stock.  I don't know why it looks darker in the photo.  Mystery lighting!!

The base of the card is a 1/4 sheet of Smoky Slate card stock.  On top of that is a piece of Whisper White that was cut 8" x 5-1/4" folded in half.  Next I cut the 4" x 5" piece of the DSP in half, so it was 2" wide.  I taped it in place on the Whisper White piece and then used Dimensionals to set the words in place.  I added some rhinestones and the card was done!  Super simple, quick and pretty too!

Thank you SO much for visiting today,
Wanda

Tuesday, September 05, 2017

Beautiful Bouquet, Wedding Card

Today I'm going to share with you a card I made at Terri's FABULOUS Stamp a Stack last month.  This decorative paper is perfect for wedding and anniversary cards.  I opted for the wedding card.    

The base of the card is a folded half sheet of Very Vanilla card stock.  Then on top of that is a 4" x 5-1/4"  piece of the "Bundle of Love" Specialty Paper.  A gold ribbon was tied around it and then a piece of gold metallic paper was punched using the Pretty Label Punch.  The words were stamped using Soft Suede ink and they are from the "Beautiful Bouquet" set. I may have to look into buying that set just for the wording. There's lots of fun words in that set.

This was a very fun and easy card to make.

Thank you SO much for visiting today,
Wanda

Monday, August 28, 2017

Rose Wonder, Butterflies Thinlets, Thinking of You Card

Today I'm sharing with you a set of 3 cards that I made at Terri's latest Stamp a Stack.  These were fun, quick and easy to make. 

The base of the card is a folded half sheet of Night of Navy card stock.  On top of that to the left you see pieces of "Naturally Eclectic Designer Series Paper (DSP).  The DSP was cut 5-1/4" x 2".

Next we took a 4-1/4" x 2" piece of Whisper White card stock and punched the end.  We stamped our wording on it. The wording here is from the "Rose Wonder" set.  Then we tied a piece of Peekaboo Peach 5/8" crinkled ribbon to the top.  That panes was set in place using Dimensionals.

The butterfly was die cut using Lemon Lime Twist card stock.  It was set in place on top of the tag. And that was it.  Pretty simple, quick, fun and cute!!

Thank you SO much for visiting today,
Wanda

Thursday, August 24, 2017

Special Celebrations, Birthday Card, Stamp a Stack

Today I'm going to share with you a very fun and easy card I made at Terri's latest Stamp a Stack. I had such a great time there.  Lots of fun cards to make and great people to stamp with!  

This card was made using a folded half-sheet of Berry Burst card stock.  The Whisper White layer is cut 5-1/4" x 2-1/4".  The Berry Burst colored paper is from the "Color Theory" Designer Series Paper (DSP) pack.  It's cut 5" x 2".  The layers were taped together and then taped on the front of the card base.

The words are from the "Special Celebrations" set and were stamped using Berry Burst ink. The card stock was die cut for us so we didn't have to do that.  Another reason I LOVE Stamp a Stacks. No cutting or measuring or thinking of what to make.  It's all done for you and put in a packet!!  All I have to do is stamp, assemble and have fun!  Anyway, those words were set in place with Dimensionals.

The flower was punched out twice and taped together and set in place with a Dimensional.  The pearl was added to the center and the card was complete.  I LOVE those pearls, now I'm going to have to get some!!!!  That's the bad thing about Stamp a Stacks, you get to see, feel and use the things first hand and the next thing you know is you just have to have the stuff!!! LOL

Thank you SO much for visiting today,
Wanda

Saturday, August 12, 2017

Lovely as Tree, Tree Rings, Masculine Card, Stamp a Stack

Here is a VERY fun card I made at Terri's Stamp-a-Stack on Thursday night.  What a fun time that was.  Stamping with some great gals, lots of fun cards to make all rolled up in an evening out away from home and dishes!!! LOL

This card was made using a folded half-sheet of Crumb Cake card stock.  Next we inked up the "Tree Rings" background image and stamped it on the card stock.  I prefer to fold my card stock first, some people fold it when they are done stamping.  Whatever works best for you.  

The strip was cut 1" x 5-1/2".  It was taped in place. On top of that is a 4" piece of burlap ribbon.  

The tree was stamped on a piece of Crumb Cake card stock using the "Lovely as a Tree" set.  It was punched out using the 1-3/4" circle punch.  The layer behind it was made using the new "Starburst" punch.  The layers were taped together and then set in place using Dimensionals.  And that was it.

Super fun and easy to make.  It's a wonderful masculine card!

Thank you SO much for visiting today,
Wanda

Saturday, July 15, 2017

Sheltering Tree, Delightful Daisy, Thinking of You Card

I found this fun card on Pinterest (where else lately???  LOL) and I just had to copy it.  I loved the softness of this card. It's feminine in every way!  I found the card here.  The words are in German and they translate to "How beautiful, that you are here". That's a sweet saying.  The link to the card doesn't go anywhere beyond viewing the card, unless you are a demonstrator and can sign in to their website.  

To make this card I used a folded half-sheet of Whisper White card stock.  The layers are 3-1/2" x 3-1/2" of Wisteria Wonder.  On top of that is a 3-3/8" x 3-3/8" piece of Whisper White and on top of that is a piece of 3-1/4" x 3-1/4" of Delightful Daisy Decorative Series Paper (DSP).

There is a 3-3/4" x 3/8" strip of Wisteria Wonder with a piece of white Baker's Twine tied around it.  That strip was taped on with just about 1/4" of the DSP showing.

The flower was punched twice and taped together in the center.  It was set in place with a Dimensional.  The flower center is a "Clear Faceted Gem" that was colored with a yellow Sharpie marker.

The words are from the "Sheltering Tree" set and were stamped using Wisteria Wonder ink.

This was a super quick and easy card to make.  I love how elegant it looks.

Thank you SO much for visiting today,
Wanda
                       

Saturday, June 17, 2017

Going Far, Colorful Seasons, Birthday Card, 2017-2018 Stampin' Up! Catalog

Today I'm going to share with you another set of cards I made at Terri's fun Stamp-a-Stack last week.  This was super easy with a very fun fold!!  

You will need a piece of cardstock cut 6-1/2" x 5-1/2" and score it at 2-1/8".  Fold it inward on the score line.  A piece of decorative paper from the "Color Theory" Designer Series Paper (DSP) was cut 2" x 5-1/8" and taped in place on the front of the card. 

Next you will need a piece of Whisper White cut 3" x 6" and folded it in half.  Stamp your words on it and tape it in place, centering it on the inside of the card.  Now you have to remember to stamp it with the folded edge on the outside. My first one I stamped like I would normally stamp a card and when I went to tape it in place I remembered the instructions I was given at the door when I received my packet of card supplies.  So much for having a good memory anymore!!! LOL  But I know the measurements and I have that same stamp, so I planned to make myself a new piece when I got home.  But I haven't done that yet.  I'm sure I will be getting at that tomorrow so I can clear those cards off my worktable. I'm trying REALLY hard to keep it clean. So far so good!

I do like this layout and I plan on using it again with other images.

Thank you SO much for visiting today,
Wanda

Saturday, June 10, 2017

Rose Wonder, Whole Lot of Lovely, Birthday Card

Today I'm going to share another fun card that I made at Terri's Stamp-a-Stack.  I LOVE this layout too.  I left the card on the bottom of the small stack open so you could see how it opened.  Isn't that fun and different?  If you don't care for that type of card layout, you can just use a folded half-sheet of Basic Black card stock and decorate the front as shown and then use a piece of Whisper White cardstock for the inside so you can write your sentiment.  

For this card we used a quarter sheet of Basic Black cardstock.  The Whisper White piece was cut 8-1/2" x 3-1/4" and folded in half. A piece of the new "Whole Lot of Lovely" that was cut 3" x 4" and taped on top.

The words were stamped on a piece of Whisper White cardstock using Old Olive ink. They were punched out using the 2" circle punch.  Then the Basic Black circle was punched out using the 2-1/4" circle punch and the Pool Party scalloped circle was done using the Layering Circles Framelits.  One of the enamel dots were added to the Whisper White circle. And that was it.  I am really liking this layout!  My favorite is the decorative paper.  I hope I remembered to order it!!  

Thank you SO much for visiting today,
Wanda

Friday, June 09, 2017

Ribbon of Courage, Birthday Card

Last night I attended Terri's FABULOUS Stamp-a-Stack. This was one of the cards I had made.  I LOVE the simplicity of this card and not to mention the new decorative paper!!!

The base of this card is a folded half sheet of Calypso Coral. It's a color I don't use very often but now with this new decorative paper, I may be finding myself using it a bit more!

The decorative paper was cut 2" x 6" and we punched the end to form the ribbon.  What I did was I taped the back of the decorative paper piece and then added the half doily.  Then I added a bit more tape to the back plus a little on the center of the doily.  

The words were stamped, punched and then the edges were sponged.  Then it was set in place on top of the doily.  As simple as that and SO elegant too!  Please don't look to closely at the flowers, I punched the wrong end of the decorative paper!!!  You probably didn't notice that until I pointed it out to you now did you?  LOL  I was stamping with a friend and we were doing a lot of chatting and not paying attention.  Well, I wasn't paying attention that is.  No, wait.  She wasn't either because when she went to sit down she had my strips of the decorative paper and thought she had too many!!! LOL  

The fun decorative paper used here is called "Delightful Daisy" and I definitely want it!!  And the words are from the "Ribbon of Courage" set.  I want that too!

Thank you SO much for visiting today,
Wanda

Sunday, April 16, 2017

Beautiful You, Birthday Card, 2017 Occasions Catalog

Here is a fun and beautiful card I made at Terri's last Stamp a Stack. All of the cards were fabulous and it's so difficult to pick a favorite. There are times when I can pick one out as my most favorite but this time I just couldn't.  They were all wonderful!

The base of this card is Whisper White.  Then a layer of Flirty Flamingo was used for the background layer. It was cut 1/4" x 4".  

Then the Basic Black layer was added. It was cut 3-1/4" x 4-1/4".

The lady was stamped on a 3" x 3" piece of Whisper White card stock and colored in using a Blender Pen and Flirty Flamingo inker.  A dot was put in the cover of a button container and we just touch the pen to the ink and color. Pretty simple!

The words were stamped and then punched out.  A Flirty Flamingo Touched Ribbon bow was added with a Glue Dot.  Pretty simple but yet so elegant looking!

Thank you SO much for visiting today,
Wanda
 

Wednesday, April 12, 2017

Lovely as a Tree, Sympathy Card, Stamp a Stack

You can never go wrong with the "Lovely as a Tree" set.  It can be used for a number of occasions.  I mostly used it for masculine cards.  

I really liked the use of the "Falling in Love" Decorative Series Paper (DSP) here.  It gives it a nice background that could be masculine or feminine.

This is another card from Terri's Stamp a Stack. We stamped the tree onto the pre-cut oval. There were other options for images, but I chose the tree.  

Then we folded the base of the card, which was a half sheet of Very Vanilla cardstock.  The DSP was added and then the metallic gold cardstock band was taped in place.  It's cut 4" x 3/4".  The tree piece was set in place using Dimensionals.

I stamped the words on at home.  I liked the font on these words.  They are from the "Rose Wonder" set.  I stamped them using Soft Suede ink. I thought black would be too dark against the pretty background.  And that was it.  Super easy and super fun!

Thank you SO much for visiting today,
Wanda

Tuesday, April 11, 2017

Nailed It, Masculine Card, Stamp a Stack, 2017 Occasions Catalog

Today I'm going to share with you three masculine cards I made at Terri's FABULOUS Stamp a Stack.  

This is from the "Nailed It" set.  I love it and look forward to it when Stampin' Up! comes out with new masculine sets. They are in demand!!!  This is a fun set.  It has a saw, hammer, screwdriver, and wrench.  Plus there's smaller images such as nails, screws, bolts, and a screw head.  Plus there's a fun pack of Decorative Series Paper (DSP) called "Urban Underground" and there's matching framelit dies called "Build It".  Now you know how much I LOVE it when a set comes with dies.  NO fussy cutting.  These cards did not require the dies, just the images, plus the embellishments I forgot to tell you about.  There's a container that has metal screw heads, bolt heads and stars in it.  How fun!!!  You can see those in the photo.

The words are from the "Suite Sentiments" set in the 2017 Occasions Catalog.

These were very fun to make and I REALLY love having yet another masculine set to play with.  

These cards can be used for birthdays or Father's Day.  Though I think I would like it to say "Happy Father's Day" on the front if that was the occasion I was going to be using it for.

Thank you SO much for visiting today,
Wanda

Monday, April 10, 2017

Gorgeous Grunge, Dragonfly Dreams, Rose Wonder, Stamp a Stack, 2017 Occasions Catalog

Here's a card I made at Terri's FABULOUS Stamp a Stack.  I LOVE this dragonfly die but I did not buy the set. I had too many others on my wishlist and my budget didn't even allow me to get all of the ones I wanted.  But one of the nice things about a Stamp a Stack is, many times you get to play with stamp sets that you don't own!! So at least I got to play with the dragonfly.  

To make this card, we took a folded half sheet of Whisper White and stamped the dots from the "Gorgeous Grunge" set on using Smoky Slate ink.  Then the strip of Copper Foil Paper was added.  It measured 5" x 3/4".  The dragonfly was set in place with a Dimensional and 3 rhinestones were added down the center of it, just below the head.

Then a few rhinestones were added to the background. I took mine home with me to stamp the words because I wanted to use the "Happy Birthday" from the "Rose Wonder" set.  They are such pretty fonts.

This was a very fun card to make and super quick too!  And it can be either a masculine or feminine birthday card!

Thank you SO much for visiting today,
Wanda

Thursday, February 02, 2017

Rose Wonder, Wedding Card, 2017 Occasions Catalog

Here are two beautiful cards I made at Terri's last Stamp a Stack.  I saved these for last because they were my most favorite of all of the cards we made that night.  All of the cards were wonderful and it's SO hard to pick favorites but I chose this as my most favorite.  I'm not sure if it was because of the soft look to the card or if it was the ease of making it. Perhaps both. It was fun to make.  We make three.  I don't have the third one on here because sometimes I tend to put one or two together and move on to the next table to make the next card.  This is one that I put 2 together and forgot about the 3rd one.  I'll be taping that one later today!

For this card we used Sahara Sand for the base of it.  That's a color I don't use often enough.  Then we added a 4" x 5-1/4" piece of  "Falling for You" Designer Series Paper (DSP).  We added a half a doily.  It's one of the new ones in the 2017 Occasions catalog.  One side is white and the other side is vanilla.  Here we were working with vanilla.

The words are from the "Rose Wonder" set.  That set has some lovely fonts!   We tied a piece of ribbon around the 3-3/4" x 1" piece of Very Vanilla cardstock.  The words were set in place over the doily using Dimensionals.

SO simple. SO quick. And SO lovely!!

Thank you SO much for visiting today,
Wanda

Wednesday, February 01, 2017

Sending Thoughts, Suite Sentiments, Birthday Cards, Stamp A Stack

Last week I posted a card that I made at Terri's Stamp a Stack. These two cards were from that Stamp a Stack.  I wanted to make birthday cards and the wording that I liked was a bit small for the circles and punches provided, so I thought I would stamp the words I liked and punch them closer to the bottom of the circle.  That way I could punch out a flower at home and add it to the top.  So last night I finally got around to punching out those flowers.  I hope I can keep that tip in mind the next time I want to use a larger circle and smaller wording!!  I LOVED making these cards. You can see the measurements for these cards on my post from last week. Just click here.

Thank you so much for stopping by today,
Wanda

Sunday, January 29, 2017

Sending Thoughts, Suite Sentiments, Get Well Card, Stamp A Stack

Today I'm going to show you one of the cards I made at Terri's wonderful Stamp a Stack.  These are such pretty cards and no, I didn't order this paper.  I wasn't thrilled with the set that goes with it so I passed on the paper.  Now that I see it used in a card like this, I do have some regrets.  Oh well, I do have MORE than enough stuff to keep me busy.  

This was a simple card to make.  The base of the card is a folded half sheet of Whisper White card stock.  Then we added the Mint Macaron layer that was cut 2-1/4" x 5-1/4". The decorative paper is from the "Succulent Garden" Designer Series Paper (DSP) pack that was cut 2" x 5".  The words were stamped and then die cut out and set in place using Dimensionals. 

The bow was tied on before the layers were set in place.  The bow was just suppose to be a knot but somehow I managed to make a bow out of the pre-cut piece of ribbon!!!  

This was a very quick, simple, easy and super fun card to make. I REALLY do like this layout.  I am looking at the stacks of DSP in other styles that I have (most of them are retired) and I'm thinking of all of the fun and easy cards I could be making to use up some of this vast inventory that I have!!  A new goal for next month.  No, not to use it all, that would be impossible, but to at least put a dent in it!! Okay, at least a nick in it would be more like it!

Thank you SO much for visiting today,
Wanda

Friday, January 13, 2017

Cool Treats, Birthday Card, 2017 Occasions Catalog

Today I'm going to share with you one of the cards I made last night at Terri's FABULOUS Stamp a Stack.  

I LOVE the Watermelon Wonder and Peekaboo Peach together.  The decorative paper is from the "Tasty Treats" Designer Series Paper (DSP).  I don't have that paper so I won't be making any more cards like that but I have other retired papers that I can use to make cards similar to this and use up some of that stash I have.  UGH!!  I need to get cracking and us the papers instead of hoarding them.  Plus, when you use DSP, you cover a lot of the card with a printed design so you don't have to stamp as much!!!  A big DUH there!! Think of the time I would save doing that!!!

This was a fun card to make.  We used the "Banner Triple" Punch.  We punched first and then stamped our words.  How smart is that??  I usually stamp and then punch and then punch off my wording!  The words were set in place using Dimensionals.  Three rhinestones were added under the words for a little bling!  I LOVE it!  Such a fun card!!!  It's great for any age too!

Thank you ever so much for stopping by today, it's much appreciated!
Wanda