Pin It

Thursday, July 31, 2014

A Petite Petals Birthday

Today I have for you a super quick card to make.  Washi tape not only adds a lot of color but it sure shaves some time off your card making!!!

I used the new "Sweet Sadie" tapes.  I like the brightness of them and the three colors together just produce a happy feeling for me. 

I used the "Petite Petals" set for the flowers and the owl punch for the leaf.

The base of this card is a half-sheet of Crisp Cantaloupe, folded in half.  I did stamp the flowers using the Petite Petals on matching card stock.  Once they were punched out I set them in place using Dimensionals.  I added a pearl to the center of each one and that was it.  So quick and SO simple!!

The words are from the "Wetlands" set.

If  you want a quick and easy card to make, this is the way to go!

Thank you SO much for visiting today,
Wanda
 

Wednesday, July 30, 2014

Petite Petals Punch Birthday Card

I found this fun card on Split Coast Stampers.  It was made by "StampingwithMarsha".  You can see the original card here.  I didn't deviate much from it.  My words are a from a different set and I didn't have any Strawberry Slush Baker's Twine so I had to make my own.  I had read on the net how to do it a while ago and I didn't save it and I didn't remember it completely!!!  

To color your own you wrap the Baker's Twine around something round.  I used a chop stick.  Then you take the color marker you want and draw several lines down the twine.  I drew too many.  I drew too fast because the ink did not bleed through to the back side of the twine.  Oh and I didn't do it first.  I did it after I finished making my card thus resulting in the twine being wet and I got ink on my card!!!  So there you have it, some tips to use when making your own colored twine!!!  Do it first, unwind it and set it aside to dry while you work on your card.  I suppose the heat tool would have dried it some too.  Anyway, this is what I got and you know I share it with you whether it's pretty or ugly!!!  

It was a very fun and simple card to make.  Oh and it was super quick too!!!  In the future I will color my twine first!!  

Thank you SO much for visiting today,
Wanda

Tuesday, July 29, 2014

Teeny Tiny Wishes Birthday Card

I found this fun card at Split Coast Stampers.  It was made by poster cpyrch. You can see the original card here.  I did change it up a little bit but it was the simplicity of this card that I liked the most.  

I used the 1-3/4" circle cutter and the Pool Party decorative paper.  I punched a butterfly using Pool Party card stock.  Then I punched a butterfly using vellum.  I glued the two butterflies in the center and glued it to the circle.  I added the rhinestones.

The words are from the "Teeny Tiny Wishes" set.  I set them in place with removable tape.  I was originally going to take the photo with no words on the card at all.  I wasn't sure where I was going with it.  I do need a sympathy card.  Though now I am thinking of making several of these cards in different colors for various occasions.  It's such a simple card to do and it went together so quickly too!

Thank you SO much for visiting today,
Wanda

Monday, July 28, 2014

A Flower Shop and Gorgeous Grunge Birthday

I found this fun card made by Louise at Stampin Delight.  I thought it looked like a fun card to make.  And it was!!!  It was extremely easy to make and it went together so quickly.

I used the "Flower Shop" set and the matching punch.  You know nothing beads a stamp set that has a punch with it so you don't have to do any cutting.  

To make this card I used Old Olive for the background splatters that were done using one of the images from the "Gorgeous Grunge" stamp set.  

I colored in the yellow flowers using the new Blendability markers.  I didn't have the Rich Razzsleberry Blendability marker so I used the regular marker and a blender pen to color it in.  Then I punched the flowers out and set them in place on the card.  The Razzleberry flower is set in place using Dimensionals.  The yellow flowers are taped directly to the background piece.  

The words are from the "Wetlands" set.  That is the part of the card I changed.  It's such a pretty card and I did have a lot of fun making it.

Thank you SO much for visiting today,
Wanda

Sunday, July 27, 2014

Envelope Punch Board File Folder Album Weekend Project

 This project was a labor of love, to say the least.  When I found it on the internet. It was made by Cyndi at Cyndi's Blog of Stamping.  I thought it looked like a great project to try.  Be sure to check Cyndi's website for the instructions and photos. 

It appears that the info on this project has been removed by the one who posted it and by the one who designed it. This project was made 5 years ago and I don't remember much about it anymore. I followed along with the instructions on the other blog.  Sorry. Edited on 7-9-2019.


I did read the instructions before I started.  Something I rarely ever do.  LOL  I did get a little confused on the part where you are to add the "hinges".  It turns out you just cut those hinge strips out of some scrap laying around from your project (don't toss out anything until you are all done) and you cut pieces off those "hinges" to add to the flap on 3 sides.  It was the 3 sides that I wasn't clear on right away. Other than that I was able to follow the instructions without any questions.  I tried the links that were listed in the post but they didn't work.  But like I said, I was able to figure things out and get the project done.  I also didn't have the Zutter binder.  I have a Rubi Coil that does the spiral punch.  Either way it got bound and turned out just fine.  Though I do have to say that I like the Rubi Coil punch better because it punched the piece from the top to the bottom, not just in the middle.  The Rubi Coil one is more stable than the Zutter would be.  The instructions on the web site are very detailed and easy to follow (except for my hinge misunderstanding) 

I would have to say that this project took over 4+ hours to complete.  I didn't do it all in one day.  I started it one day last week and I finished it to day.   I was thrilled with how it turned out but I don't think I will ever make another one!  It did state at the end of the instructions that you should be careful when you make your first one because they are addictive.  I was excited to get addicted but I didn't get the addiction part!!!  I don't think I want to spend another 4+ hours of my life making another one, even though they are very fun and amazing looking! One is enough for me! Not to say that I don't love the outcome, I do!  It's fabulous!


I decorated the cover with an image I used to make not only a card a few weeks back but also a notebook last week.  I just love that image and the color too.

For my envelope punch board file folder album I used Perfect Plum for the base color, only because it was one of the few colors that I had in 12" x 12".  And for my pages, folders and flaps I used the "Sweet Taffy" designer series paper.  I did not tape my project together. I used liquid glue.  I used Tacky to be exact.  I find that it gives the project a much firmer feel.  The flaps are nice and firm.  The whole thing has a feel of quality to it because it's not flimsy at all.

I made this for a friend and I will be giving it to her next month.  I did not tie the bow on it. I thought I would let my friend do it after she sees it.  Sometimes it's difficult to retie it after you open it. It seems like you never get the bow right.  

Like I said, this was a fun project but I do not see myself making another one.  You will have fun making one.  Will you get addicted???

Thank you SO much fro visiting today,
Wanda

Saturday, July 26, 2014

Petite Petals meets Gorgeous Grunge Birthday Card

I found this cute an simple card by Margaret at MaKing Papercrafts.  What attracted me to the card, or I should say her card was the "Gorgeous Grunge" lines and the "Petite Petals" flowers.  It was the simplicity of the card.  My card did not turn out as nice as hers. I got carried away with the splatter dots stamp and my flowers are up on top instead of towards the bottom.  And that is because I screwed up the first time so I flipped the cardstock over and stamped the other side.  I had to do it up higher because the lines showed through the cardstock.  UGH!  So I ended up with a hot mess.  And I always share my cards with you, the good, the bad and the ugly!!! LOL

I will carry on like this card is an acceptable card.  Just in case you want to make one the way Margaret did. I used Whisper White card stock for the focal piece and for the base.  I stamped the "Gorgeous Grunge" lines using Pear Pizzazz ink.  I stamped the "Petite Petals" flowers using Elegant Eggplant ink.  I punched them out and set them in place using Dimensionals.  The words are from the "Bloom with Hope" set.  It was a simple card to do but I made it look too busy!  Oh well, I had to cover my mistake and then I just made another one with the splatter image!!!

Thank you SO much for visiting today,
Wanda

Friday, July 25, 2014

Blooming with Hope Thinking of You Card

I was informed that a childhood neighbor was diagnosed with pancriatic cancer and was told she had a few months to live.  I just got an email from her brother telling me today that she is worse off than they thought.  Hospice has been called in and she only has a couple of weeks left at best.  

I was going to send a card off to her last week but I got busy and forgot.  So today I thought I would make a card and get it out in the mail tomorrow.  I just want to let her know that we are thinking of her.

This was a quick card to make.  I used Tempting Turquoise, and Whisper White card stock.  The decorative paper is from the Sweet Taffy pack.  I used the "Blooming with Hope" stamp set and for the words I used the "Wetlands" set.

I colored in the flowers with the new Blendabilities markers.  They sure do make the coloring easy, plus it looks like you know what you are doing with the markers!!! They are SUPER easy to work with.

I need to write a few lines in this card and get this card ready to mail in the morning.

Thank you SO much for visiting today,
Wanda


Thursday, July 24, 2014

A Bloom with Hope Birthday

I am SO loving this Blackberry Bliss color.  It's SO rich looking.  I used it on today's card.  I thought I would play with yet another image from the "Bloom with Hope" stamp set.  I really like this image, a lot better than the image I used yesterday.  I think it's because it's got 3 flower parts instead of two.  I'm an odd number person!

I colored the flower and the stems in using a blender pen and markers.  I don't have the Blendabilities in the darker colors yet and I felt I just HAD to use the Blackberry Bliss card stock and matching ribbon.  Oh and I SO love this stitched satin ribbon. The feel of it is fabulous, it screams of quality!!!  It wrapped nicely around the card too.  

The words are also from the "Bloom with Hope" set.  It's not just a sympathy set.  And I used the "Decorative Dots" background again.  It just seemed to go well with this image/theme.  


This was a super quick card to make and assemble!


Thank you every so much for stopping by today,
Wanda

Wednesday, July 23, 2014

Bloom with Hope Birthday Card

This image from the "Bloom with Hope" stamp set could be used for a number of occasions.  It would not only make a pretty birthday card, but a very cheery get well card, a wonderful thank you card, a sweet Mother's Day card, and possibly a sympathy card, though I do feel it's a bit to bright for that.  

I opted for the Birthday card.  I used the new "Sweet Taffy" decorative paper along with the "Decorative Dots" embossing folder for the white background.

I colored in the flowers with the new Blendabilitie's markers.  They are fun to work with but a word to the wise, make sure you are coloring on top of scrap paper.  The markers will bleed through.  I think it's a good thing if you are making something like a stained glass card!!! Hmmm, I feel project coming up!!!

The words were done on my computer.  And I think that about covers the elements of this card.  It has several layers, which is what took up most of the time in making this card, and it really didn't take a lot of time.  You can make this card in under 20 minutes from start to finish.

It's a fun card.  I really like this layout!

Thank you SO much for visiting today,
Wanda

Tuesday, July 22, 2014

Flowering Flourishes and Work of Art Notebook Weekend Project

Today I was thinking about whipping up some notebooks for the fall craft fair but I was not sure what to put on the cover.  Then I remembered this card I made a couple of weeks back.  You can see it here

I just redid as a card front.  My notebook actually measures 5-1/2" x 4-1/4".  I have a Rubi Coil punch machine, and I have a bunch of coils.  I don't have the coiling machine.  The last time I checked (a few years ago) it was around $500. I figured for that much money I can just rent a movie and coil them by hand and come out ahead!!!  Plus it's electric so it would also cost money for the electricity.  I'd rather spend the electricity on a movie!!!  Anyway, with all of that sane math aside, I just put the coils on by hand.  It goes quick and I have yet to complain about it, so it must be an ok thing to do!!!  LOL

I have a few more to make but I think I will trim the left side of the white a little so the white doesn't get punched when I do the front and back covers together.  It looks ok, but I think it would look better if the white didn't get punched.  

I have been making notebooks for years and LOVE it!  I use to sell the blanks but I didn't always have enough card stock on hand to fill all of the orders.  Plus now with postage/shipping being so much higher, it would cost a lot to ship all of that heavy paper.  But it was a fun little business while it lasted.

I need to finish up the remaining notebooks and get them bagged up for the craft fair.

Thank you SO much for visiting today,
Wanda

Monday, July 21, 2014

Bloom with Hope Birthday Card

Today I thought I would play with the "Bloom with Hope" stamp set.  There's a lot of fun stamps in that set and I've only used two of them!!  I think I need to venture out of the box a little more with that set!  Maybe later in the week.

I thought it would also be fun to play with the Blendabilities markers today too. I used the Pumpkin Pie colored ones.  I don't remember what the name of the set of markers are, sorry.  I'm not near my catalog right now.  I'll add it later if I remember!  I have a million things going on right now, UGH!!!

The base of my card is Old Olive.  I added a 4" x 5-1/4" piece of decorative paper from the "Lullaby" package.  It looked like a fun piece of paper to play with!  To tie in the Pumpkin Pie color I used Pumpkin Pie card stock behind the Old Olive layer.

The words are from my computer.  I print out a whole sheet of them and punch from it as I need to.  I like to have them on hand.  They fit perfectly with the 1-1/4" circle punch.  I use that punch, the 1-3/8" punch, and the scalloped circle punch a lot on my cards, so I like to have words that fit those punched layers.  They're not always easy to find in the stamp sets so I decided to make up my own. You can find them for sale in my store.  There's 10 different greetings and 24 greetings per page. You will get a PDF download and you can print out as many as you like to use on the cards you make to give away or to sell.  

Ok, back to my card.  It was very fun to make, and SUPER fun to color.  I SO love those Blendabilities.  They are easy to work with and they don't stink like Sharpies do.  But the will bleed through the card stock so make sure whatever is under your paper is not anything important or it could be ruined.  Been there, done that!!!  And I did learn from it and have not done it since!!! LOL  

Thank you SO much for visiting today,
Wanda

Sunday, July 20, 2014

Flower Shop with Petite Petals Negative Space Technique Birthday Card

I must say, this was not only a quick card to make but a very fun one too.  There's a lot of things going on in this card but yet it was quick to create.  I do not know who the original designer of this card is but you can see the original card here.  

I did not add the bow on the ribbon.  I was going to but forgot and I kind of like it without the bow.  I may add it later but I doubt it.

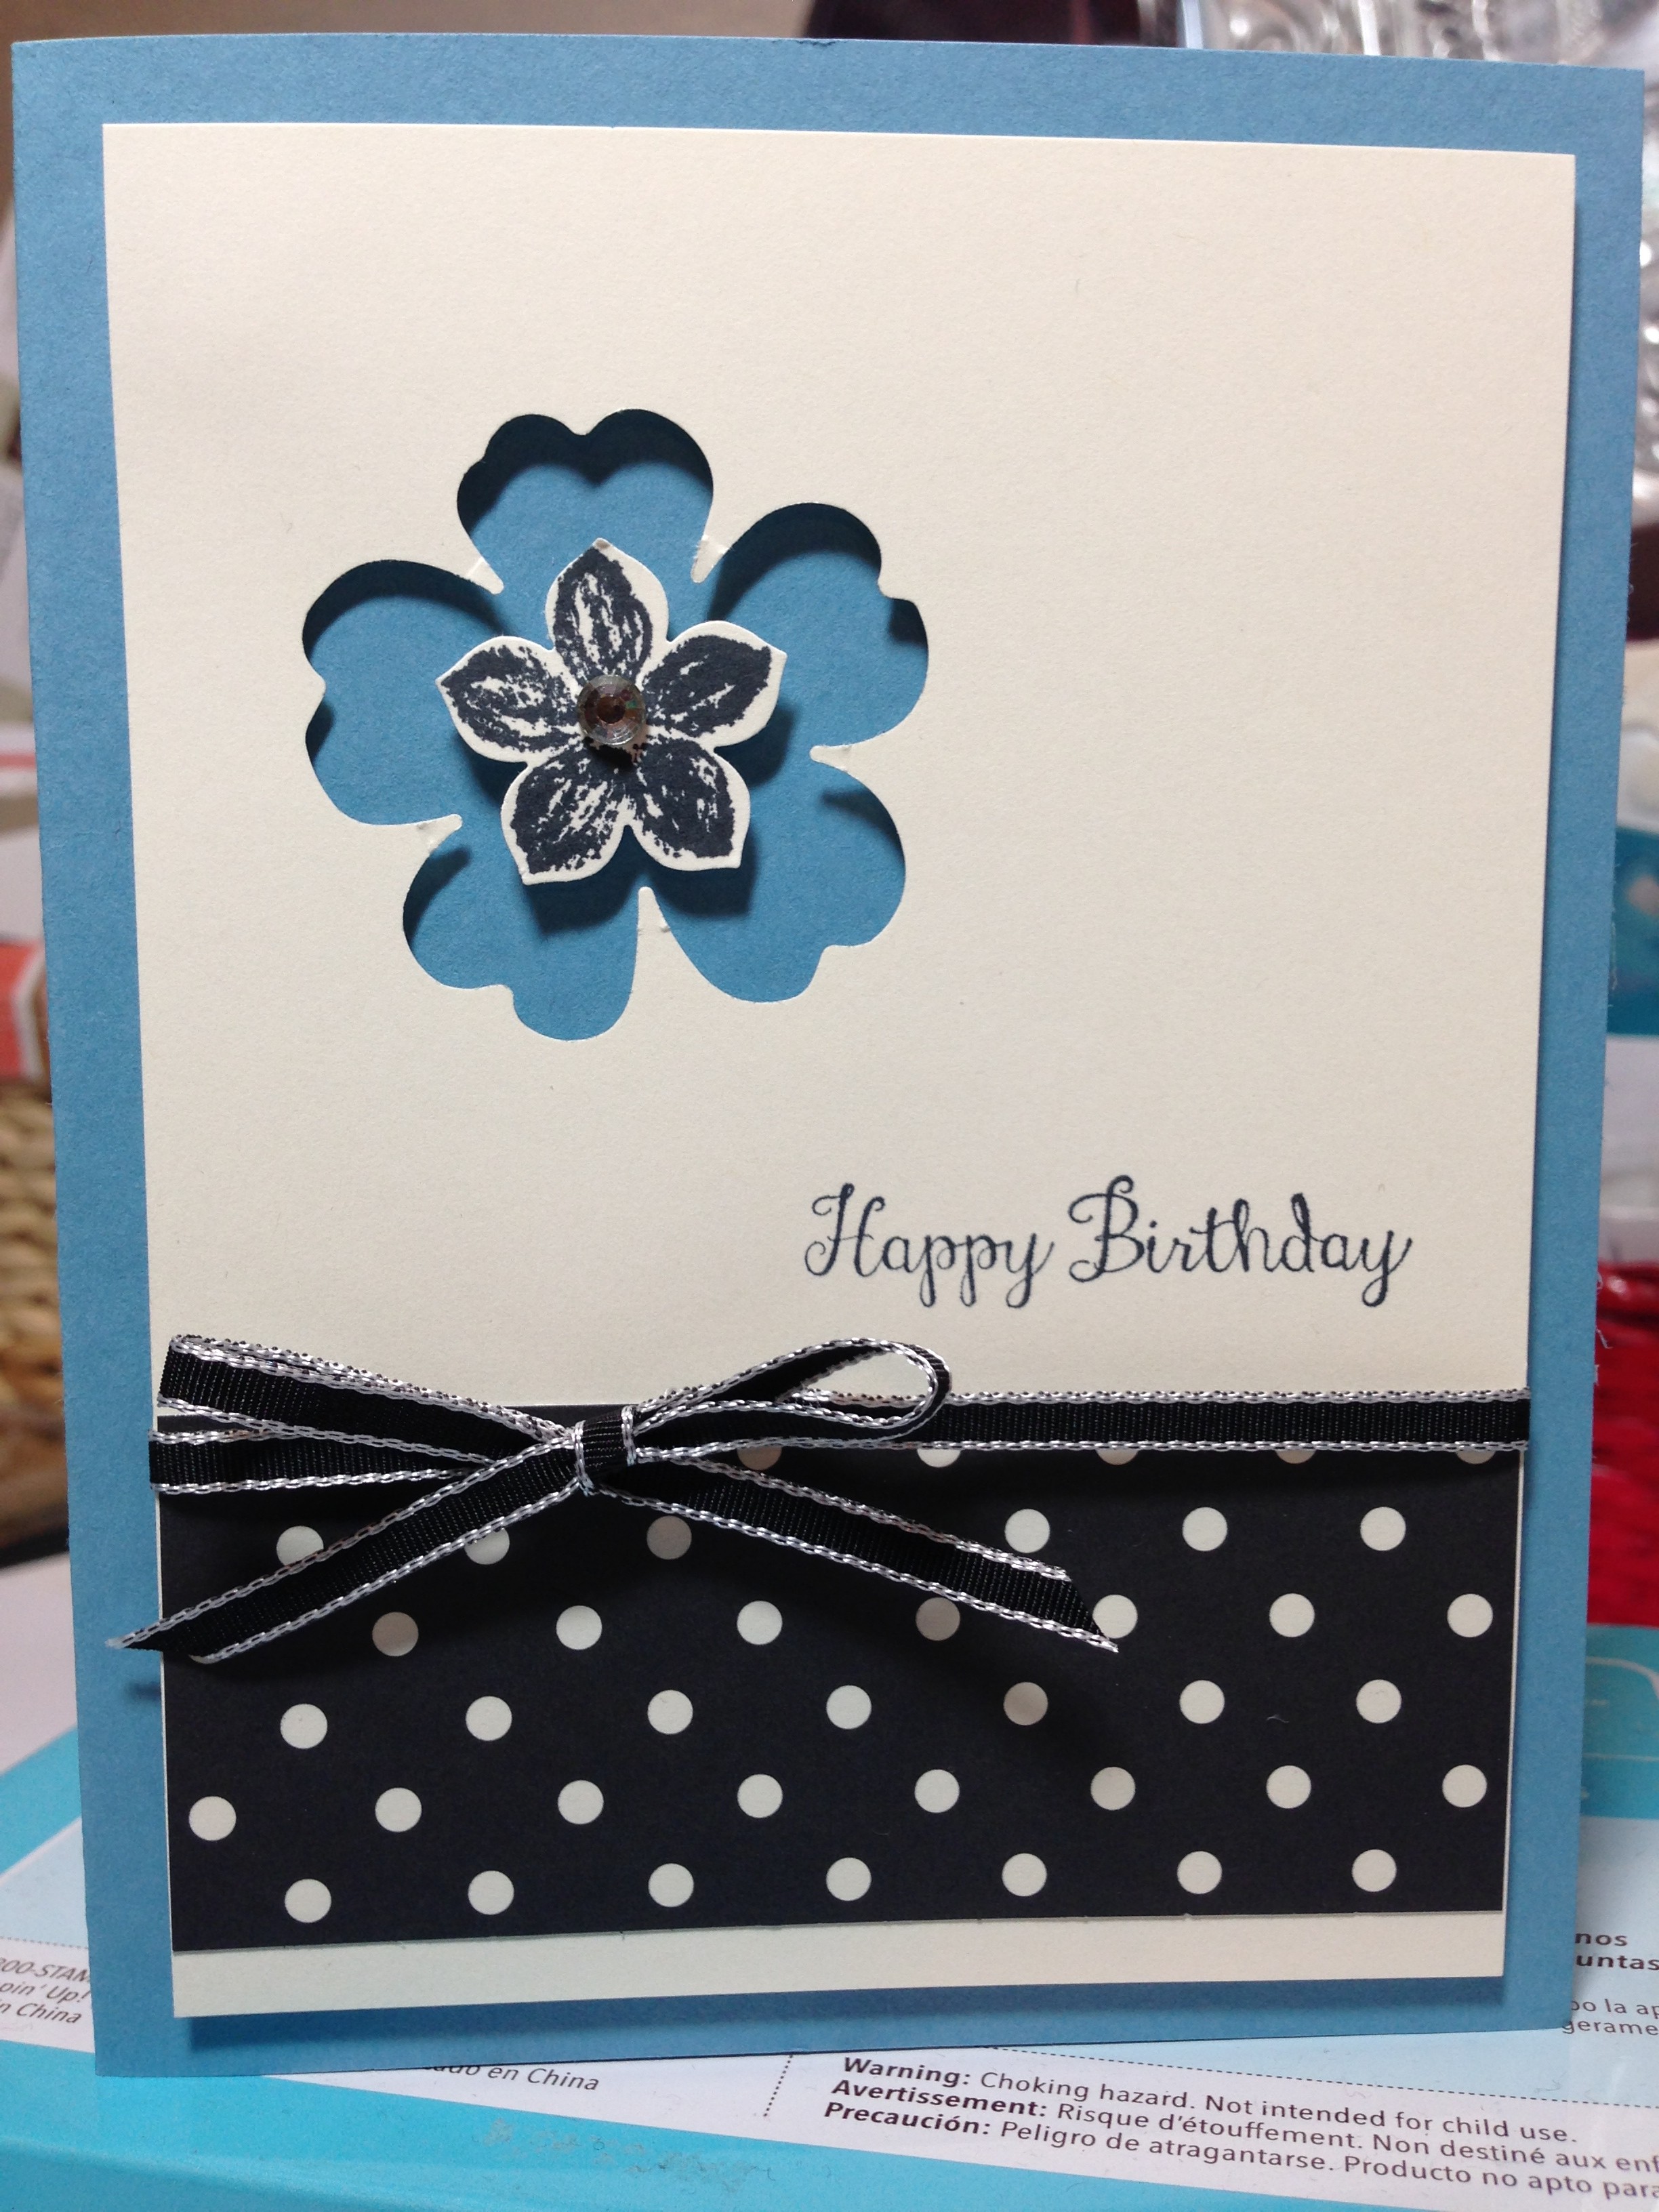
I used the Flower Shop punch on the Whisper White card stock.  I stamped the words on.  I used the retired "Bring On the Cake" set.  I stamped the "Petite Petals" image using black StazOn.  

The decorative paper is from the "Back to Black" pack.  I added the ribbon strip and taped it onto the back.  I like doing my ribbon that way.  It makes it easy to add a knot that looks like a bow.  Plus you can slide that knot where you want it and have your card look perfect!!!

I set the Whisper White layer on a folded half sheet of Marina Mist, using Dimensionals.  Once it was in place I then added the "Petite Petals" flower to the center, again using a Dimensional.  I added a half pearl to the center and  it was done.  I told you it was quick!!!  And fun too!!!

Thank you SO much for visiting today,
Wanda

Saturday, July 19, 2014

The Open Sea Masculine Card

I found this card made by Mel at "A Stamp Addiction".  I did have to change a few little things because I did not have the same exact products as Mel did but it still worked out just fine.  I'm happy with how it turned out.  It's a great masculine card.

This is a very quick card to make too!  I used the "The Open Sea" set to do the ship, and I used the "Decorative Dots" embossing folder.  Oh and the words are from the "Teeny Tiny Wishes" set.

The ship was stamped using black StazOn ink.  I used Cherry Cobbler card stock for the Modern Label and the larger 2-1/2" circle punch.  And I used some Soft Suede taffeta ribbon.  It was what I had on hand that matched the Crumb Cake card stock the best.

There's not a whole lot to say about this card. It's quick and easy to do and it's a wonderful masculine card. I need to make a few masculine cards.  I'm sending cards to my nephew who enlisted in the Army in May.  I figured it must be lonely for him so I thought I would send cards when I can.  I sent one a week and a half ago and I got a letter from him in the mail today.  I thought it was sweet of him to write even though I told him to save his writing time to write to his mom and dad.  He's a great guy!

Anyway, back to this card.  It's a fun card to make and I would love to make a bunch of them to sell for Father's Day next year!

Thank you SO much for visiting today,
Wanda

Friday, July 18, 2014

Flower Shop with Petite Flowers with Work of Art and Gorgeous Grunge

Well, instead of just saying "maybe I'll make that card another day", I actually did make that card today!!!  I often say that in my posts that I want to redo a card or make one a little different and I rarely do.  Yesterday I said I may give the regular size card a try and I did!  Fortunately for me I had stamped and punched out all the flowers.  I just had to stamp the background.  I did manage to get 4 images off one inking.  It ran with it!!!  

This card was done much like yesterday's card.  Stamping with the Gorgeous Grunge and Cherry Cobbler ink.  You can look at yesterday's card for more details.  This card was also made by Dorte.  Check out her blog to see the original card.  

This card went together very quickly.  Perhaps it was because all the flowers were cut out already but then again, it wouldn't take long to stamp and punch the images.

I did get the wording a bit crooked and I'm going to have to figure out some type of layering to get the wording covered.

Thank you SO much for visiting today,
Wanda