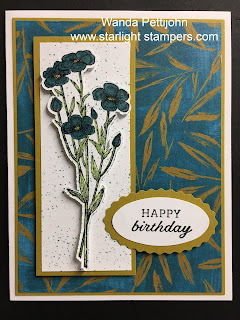
The base of the card is a folded half-sheet of Basic White card stock.
I cut a 4" x 5-1/4" piece of Wild Wheat card stock for the layer. I taped the two pieces together and then taped them to the card base.
Next I stamped the flower from the "Quiet Meadow" set and fussy cut it out. Usually I color first and then fussy cut in case I make a mess of it I wouldn't have wasted any time fussy cutting. But I took a chance and lucked out. I colored the flowers in using the light Lost Lagoon Blends pen. The center of the flowers was colored in using the dark Daffodil Delight Blends pen. And the leaves and stems were colored in using the light Granny Apple Green Blends pen. I took my Wink of Stella pen and colored over the flowers to give them a little sparkle. I added Dimensionals to the back and set the piece aside.
Then I proceeded to make the two layers that the flower piece will sit on. The Wild Wheat piece measures 1-7/8" x 4-1/2" and the Basic White piece measures 1-3/4" x 4-3/8". Before taping the two layers together, I took the Basic White piece and added some color to it. I took a sponge and my Lost Lagoon ink pad and lightly tapped on some color. I wanted the spotted look and that's what I got. Dimensionals were added to the back of the layered piece and it was set in place on the front of the card. By eyeing it, I tried to make it equal on the bottom, left, and the top.
The flowers were then set in place and then the words. The words are from the "Days to Remember" set and were stamped using black Memento ink on a scrap piece of Basic White card stock. They were punched out using the "Double Oval" punch. And on a scrap piece of the Wild Wheat card stock I punched out the scalloped oval. I taped the two ovals together. Dimensionals were added to the right side of the oval and a little bit of snail tape to the left side and the words were set in place. And the card was done.
I think this layout and colors toned down the business of that DSP. Mission accomplished. But wait, there's more. There's one more piece of this DSP in the package!!! Yikes!! Do I just bow out and make another card like this one or to I challenge myself to come up with something else? Maybe even something better? Hmmm. I guess we will both have to wait and see! LOL
Thank you SO very much for taking your time to stop in and see today's birthday card,
Wanda


3 comments:
Such a RICH looking card. Thanks for sharing!
I really like how you used that piece of the dsp! I've had trouble trying to think of how I want to use it too, but you made a winner! TFS
I like the contrast from the different colors. Great card
Post a Comment