
The base of the card is a folded half-sheet of Basic Black card stock. This card opens on the bottom and the fold is on the top.
I cut a 4-1/8 x 5-3/8" piece of Real Red card stock for the layer and I set it aside.
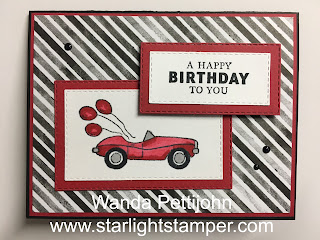
The striped Designer Series Paper (DSP) is from the "Abstract Beauty" 4" x 6" stack. I cut it at 4" x 5-1/4" and I set it aside.
The car is from the "Driving By" Sale-a-Bration set and was stamped using black Memento ink on a piece of Basic White card stock. I die cut it using the "Rectangle Stitched" dies. In the package of dies, this one was the third smallest in the grouping of 8. The Real Red layer behind it was cut with the next larger die and I used the Real Red layer piece. Plus I cut the second smallest die at the same time. I kept them close to the center of the Real Red piece so no one would know there's card stock missing in the middle! I colored the car using my light and dark Real Red Blends pens and my light Smoky Slate Blends pen. and light Basic Black Blends pen. I found that my light Basic Black pen is darker than my dark one. SO odd. And now I have to remember that because I usually start out with the lighter color and then go darker. I see future mistakes happening!!! Anyway, once the coloring was done, I taped the Basic White piece to the Real Red piece.
The words are from the "Handsomely Suited" set and were stamped using back Memento ink. I die cut them using the smallest "Stitched Rectangle" die. Then I taped them to the next largest Real Red piece that I had cut out when I cut out the layer for the car.
And I was now ready to assemble. I taped the largest Real Red piece to the Basic Black card base. Then the DSP was taped on top of that.
The card layers were taped to the bottom left of the front of the card and the words were set in place using Dimensionals. I added a few enamel dots that I colored with my Basic Black Blends pen (I used my light one that colored dark!). A 4" x 5-1/4" piece of Basic White was added to the inside of the card and the card was done.
This was a fun and quick card to make. And it's a super nice masculine card too!
Thank you SO very much for taking your time to stop in and see today's masculine birthday card,
Wanda

1 comment:
Great layout Wanda......And that little red car is FANTASTIC.
Post a Comment