
This beautiful card was a little more challenging than I thought it would be though.
First I made the card base which was a folded half-sheet of Basic White card stock. Then I cut a 4-1/8" x 5-3/8" piece of Crumb Cake card stock. And the top piece is a 4" x 5-1/4" piece of Basic White card stock.
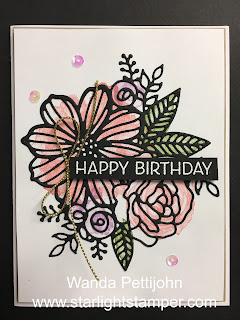
I die cut the open flower from the "Artistic" die set using Basic Black card stock. I uses a double sided sticky sheet to make it into a sticker. That was awful. Those little pieces were sticking to the backing which had somehow come off. What a sticky mess. But I managed to remove them all.
I also die cut another open flower image using a scrap piece of Basic White card stock. I set it on top of the 4" x 5-1/4" piece of Basic White card stock which I had set up in my Stamparatus. I did this so I could just lay the rubber images on top and close the lid. It was the easies way to stamp them where they needed to go.
The larger flowers were stamped using Flirty Flamingo ink and the smaller ones were stamped using Fresh Freesia ink. The leaves were stamped using Granny Apple Green ink. It worked out nicely and I was glad because this started out on a bad note with the sticky piece!!
Next I stamped the words on a 1/2" x 2-7/8" piece of Basic Black card stock. I did trim it up a little because I thought it was too wide. Mostly because I didn't get the words even on each end. Perhaps if I make another one I would stamp the words first and then take them to the cutter to cut them evenly. I used Versa Mark to stamp them and I heat set white embossing powder. Then I set the words in place using Dimensionals.
I tied a gold cord bow and I glued it in place.
A few sequins were added and the card was done.
I do like how it turned out. It was easy enough to make if you don't consider the issue with the sticky side! LOL I am going to put this set away and find something else to play with tomorrow! I promise!
Thank you SO very much for taking your time to see today's birthday card,
Wanda

1 comment:
STUNNING Wanda!
Post a Comment