Pin It

Tuesday, September 16, 2008

Frosted Flakes

I bet you thought I was going to talk about cereal!!! LOL I haven't had Frosted Flakes in years!!! Well, not the cereal kind that is!!

This type of "frosted flake" is made using a piece of white Fun Foam, some white card stock, a bit of glue, a scrap piece of acetate, a snowflake die and some micro beads.

First you take the Fun Foam and cut out your snowflake. Then you cut out two more snowflakes from white card stock. Set your snowflake down on your work surface. Set a piece of acetate on top of it and mark the area you want to put the micro beads. For this one pictured here I put the beads in the middle so I cut the acetate to fit in the middle.

Once the acetate is cut (cut two) take a tooth pick and dip it in the glue and "draw" thin lines of glue on the foam. Affix the acetate. Now glue on one of the white snowflakes. You may need to line up the snowflake first to make sure it fits properly. Glue it in place just like you did with the acetate.

Turn the piece over. Add some beads inside the holes of the snowflake where the acetate is. Make sure there are no beads sitting on top of the foam. Now glue on the other piece of acetate and then glue on the white card stock.

You can sponge the edges with a light blue or add some Dazzling Diamonds for a bit of sparkle. Use them in garland or on packages. There is an endless limit to what you can do with these little gems!! I took the photo before the glue was dry but once it dries it will not show.

Thank you SO much for stopping by today,
Wanda

Monday, September 15, 2008

Things Are Not Always What They Appear to Be!

Now I do have to admit, this little guy is SO cute. I saw these floating around the Internet last year and again this year. I didn't have any time to play with it last year so I tucked the idea away in hopes that I would have time next year. Well, it's "next year" and I found some time so I gathered my supplies and off I went to create.

As I looked at the samples I've seen last year and this year I thought I would change it up just a bit. I thought it would be fun to use the design with a milk carton. Here is the link to the PDF file for the milk carton you can just print directly onto your card stock.

After I printed the carton I cut where it needed to be cut and scored where it needed to be scored. Please note, dotted lines are for scoring and solid are for cutting, except at the top, there's a couple of small lines, DON'T cut them.

I traced the pattern onto some black card stock for the hair. I didn't know any other way to do it. I did print it out but the ink on black card stock just didn't work. SO as I was scoring the Olive Green I scored the black under it. Then I cut the green off at the score before the carton folds at the top. I cut the black off in the other direction, leaving enough black hanging for the hair.

I assembled the green part. Then I cut the hair and assembled that part around the green piece. I used a clip at the top to hold the carton shut while the glue dried. I used Aleen's Tacky Glue. I cut the eyes using a 1" and 1/2" punch. The eye lids are 1" circles cut in half and so is the nose. Sponge around them to give them some depth.

I used a black fine point Sharpie marker for the stitches and the mouth. And I used a white gel pen for the eyes. I didn't seal mine up entirely. I want to pour some candies in there before I do that.

Isn't it just adorable. I was glad I was able to make one of these this year!! I hope you can find some time to make one too!

Thanks SO much for visiting,
Wanda

Blog Candy Winner!!

It's time to announce the winner of the "Chatty Cathy" blog candy.

It's interesting to see all the other hobbies we have. It's what keeps life interesting. There's always something to do and hobbies are a nice escape!!

SO the luck winner can escape into some wedding or shower cards with this set. And that lucky winner is:

reeree62 said...
I love to quilt, scrapbook, and read. This set is so cute!

Please email me with your snail mail address and I will get your package out in the mail to you.

Thank you all for leaving a comment and playing a long. I will have more blog candy coming up soon.

Have a Stampin' FUN day!
Wanda

Sunday, September 14, 2008

Tinted Opaque Technique Page

Here's a technique I'd never heard of before. I was on SplitCoastStampers last night and I saw this technique page done by user name reccabecca. It looked simple enough to figure out and the instructions were in focus enough to read. I read the instructions and then headed to my workroom to play it from memory and this is what I came up with!

Stamp your image on the dark colored card stock with white craft ink or Versa Mark. Cover with white embossing powder and heat it. The embossing powder will not be totally smooth. It will have dimples in it exposing the card stock. This is what you want. Color on the image areas with desired colors of markers (NOT permanent markers). Wipe off color on embossing, it will bead up. Heat set color, if color fades reapply color and reheat.

I like to emboss and I LOVE to sit down and just color so this technique brought to me two of the things I enjoy when stamping. I think this would make a very fun background and also cut up in pieces for layering!!! There's LOTS you can do with this technique!

This one goes in the new set of 20 technique pages and one set will be offered here as blog candy when the pack of 20 is finished. I believe this one is #4 out of 20. But it won't take long to get to 20 so hang in there!

To check out my other technique pages just click here.

Thank you SO much for stopping by today,
Wanda

Saturday, September 13, 2008

It's SO clear! Weekend Project!

I was playing around with the Sizzix Pillow Box die. Card stock seems to be the best medium, it's firm enough to work with. Decorative paper is fun because of the colors but it's a bit flimsy. The doublesided works better for that. And acetate, well it needs a bit of help. It didn't leave the fold lines deep enough. SO I tried it again with a piece of card stock on top and it was much better. I also tried it with a piece of chipboard under the die and it worked even better. Will this wear down the rubber on the die? I don't know. Will it cause the die not to cut card stock as well? I don't know. I guess if I keep cutting acetate this way I will find out, won't I? SO with those concerns aside I will show you what I did with the acetate.

First you want to crease all seams. This is something you don't want to do once you got the tape on. Nothing like fighting with acetate that is sticky!!!

I used the Sticky Strip tape by Stampin' Up! to tape the seam shut. Regular double-sided tape will work but not for very long!!! I laid the tape on close to the inside edge. Then I folded up one end and added the candy. I tucked in the other end and tied it with the ribbon.

Then I cut a piece of stamped card stock and wrapped it around the pillow. I added the cat on a scalloped layer. These are VERY easy to make and a lot of fun. Can you imagine how fun they are going to be to give away???

These would make great Halloween gifts, Hostess gifts, Customer Appreciation gifts, Make n Takes and I think they would be a fun thing to have at a Craft Fair or Stamp Camp!

Thank you SO much for stopping by today,
Wanda

Friday, September 12, 2008

It's Blog Candy Time!

Yup, it's that time again. I know I was suppose to be writing up a post when I was ready to sell the extra Technique Book pages I made in the round 1 of 20 pages. I will do that next week. I know some of you are sitting on pins and needles waiting for that post to go out. Check back next week, I promise I will have it on there then. But today I'm posting my "Chatty Cathy" Blog Candy. I've had 900 posts since the blog was started. Shocker, huh?? LOL

To celebrate the 900 posts I'm offering this "Wedding Bliss" clear stamp set by Scraptrends. This is one of those sets that you cut off the header and the pouch goes in some type of binder or notebook. Nice way to keep your clear stamps organized!!! And what a cool way to store them!

This set is new, unused. It's still sealed with that little plastic "thingy" near the zipper and until it is cut off you can't open it. I took a photo of the back because it showed the designs better. It looks like a fun wedding/bridal shower set. I think the towels hanging are adorable!!!

What do you need to do to be entered in the random drawing for this fun blog candy??? Well, tradition tells that you must answer a question! Ok, the question of the day . . . . Other than stamping what other hobby do you have/do? For me, when I am not stamping you can find me either playing with beads or polymer clay and sometimes even playing with polymer clay beads!!! LOL

Please leave your comment to this post only and on Monday September 15th I will use the random generator to pick a winner. Please do NOT leave your email address in your comment. Spammers LOVE that and I don't contact anyone via email. I post the winner on my blog.

Thanks for playing and good luck to you,
Wanda

Thursday, September 11, 2008

Lip Balm Gift! Weekend Project

I had never made my own lip balm before. I was at Sara's blog Sara's Creative Adventures earlier this week and saw her post and a recipe for it so when I was at Joann's I thought I'd use some of my coupons on a package or two of pot jars. They weren't on sale so I was able to use my coupon!! It was a good day!!! LOL Thanks Sara for enabling me!!! LOL

This morning I found some time to make the lip balm. You can check out the recipe on Sara's blog. It was easy enough to do though I did make sure I had the fire extinguisher at hand. Somehow heating up petroleum jelly made me think of flames. SO I thought I should at least be prepared!!

After I got the lip balm in the pot jars and my mess cleaned up. I ALWAYS make a mess when I do things! Never fails!!! LOL

Sara also has a link to the little box she put her lip balm in. My lip balm containers were smaller than hers so I had to design my own box.

SO if you are using the lip balm pot containers from Joann's and you want to put them in a little box, you will want these measurements. For the bottom part of the box I cut my piece of white card stock 4" x 4" and I scored it all the way around at 1-1/2". For the lid I used decorative paper and I cut it at 2-1/2" x 2-1/2" and I scored it at 1/2" all the way around. I held the paper to be scored at the 2" mark and scored that way. It was too hard to hold the piece so I only scored a half inch. If that makes sense. What I'm trying to say is that it was too hard to put the paper in to be scored at 1/2" so I put it in at 2" and the part hanging over is 1/2" and I scored there. It's the same difference just easier to hold on to! For both top and bottom you will snip one score line on each side. Tape the sides together. I suggest you put it together first so you can see which pieces need to be taped or glued. Before I taped the lid I punched a hole in it and added a piece of acetate for a window. The best way to make sure it's centred is to punch a piece of copier paper first and use that as your pattern. That way you have a better shot at getting it straighter!

I put the lip balm in the box and I tied a red grossgrain ribbon around it. I REALLY wanted to show that it was strawberry but the box was too little to decorate with strawberries so I came up with another container for it. I thought I would play with the new Sizzix die cut and made this little basket. Actually I made 3 of them. I kept gluing them together before I stamped them. UGH!!! Two times, can you believe it?? LOL

I glued the basket all up AFTER stamping on it. I wanted to add some crimps to the inside but I couldn't find any so I had to wad up a bit of tissue paper. It worked. I added the little box and tied it shut with more red ribbon.

It was a fun project. These would be great Stamp Cramp items, fun Hostess or Customer Appreciation gifts. As far as a Make n Take, I think they take a lot of time, even if you provided the lip balm already made. I think these would be great for Craft Fairs too!!

Be sure to check out Sara's blog for the recipe!!

Thanks SO much for stopping by,
Wanda

Wednesday, September 10, 2008

Wednesday Sketch Challenge at SplitCoastStampers

WOW, this Wednesday just snuck up on me. I'm on my computer and there is that little noise that lets you know you got a new email. I look and it's the Sketch Challenge from SplitCoastStampers. Of course I had to go look and print out the layout. But I was just too tired to work on it. SO this morning I decided I would play first and then do my work. But sometimes when I do that the work never gets done!!! Once I get in the stamping mode, well it's just best not to talk about it!! LOL

Today's sketch at SplitCoast was a very fun one. LOTS of pieces to it. For me those are quite a challenge. I have this tote of stamps from various companies and I could see this snowman through the plastic and I knew this was the one I wanted to use for the sketch. Then it was just a matter of adding the background.

Well, you can't have a snowman without snowflakes now can you??? SO I used the snowflake Cuddlebug folder and did my white background with that. I was struggling a bit with the Brocade Blue piece. I was going to use some decorative paper there but I was having trouble matching the color so I decided I would just run that through the Cuddlebug too and it did the trick!!!

I added ribbons on a black layer for the 3 strips under the main image but I felt they needed something more. I found some snowflake buttons and set them in place but they were too white so I sponged on a little blue Staz-On and they stood out better. I added a white button in the top left corner of the main image. It just needed a little something up there too. And the bottom snowflake was an option "thing" on the sketch. I had attached it with Crystal Effects and after I had it on there and had the picture taken I thought I should have sponged the edges with blue Staz-On. Not much I can do about it now. But if I make another one I'll remember to do that!!! Me remember, that is SO funny!!! LOL

So here you have it, my card for the sketch challenge! If you have the time I highly recommend you give it a try. It's always fun to learn and try new layouts. That is how I found a layout for my Christmas cards last year. This year the layout will be simpler so it won't cost me the extra 17 cents to mail them out!!!

Thank you SO much for stopping by today,
Wanda

Tuesday, September 09, 2008

Rolling Marbles Technique Page

I thought it was time for another technique page. It's been a week since I've posted one. Can you believe that??? LOL

Many of these techniques are being done by me for the very first time. I've heard of many of them and even seen a lot of them done but not many of them have been done personaly by me, until now! I like to write up the instructions as clear and simply as possible.

This technique is very easy to do and is a lot of fun too! There is a lot of background themes you can use with this technique. Halloween comes to mind here with the purples and oranges!!

Place your marbles in the container. Add 3 or 4 drops of desired colors of ink in the bottom of the container. Roll the marbles back and forth several times. Attach the card stock to the inside of the lid with temporary mono. Close the lid. Turn it over so the marbles will be on the card stock. Roll the marbles around and the colors will be on the card stock. SO fun and pretty!

Thank you SO much for stopping by today,
Wanda

Monday, September 08, 2008

You Can Do It, I KNOW You Can!! Step by Step Tutorial

A couple of comments were left on my "Wintery Sky" post yesterday, a couple of wishes!! Wishing they could sponge like that. Well, you can!! It's REALLY not hard at all. I will walk you through it step by step and the next thing you know you will be able to do it too!!

You will need a few things first. A piece of glossy card stock cut 5-1/2" x 4-1/4". For this picture I used Pretty in Pink, Apricot Appeal, Bashful Blue, Brocade Blue and Night of Navy ink pads. You will need a sponge for each of those ink pads. You will also need an image to stamp with Staz-on ink

Stamp your image on the glossy card stock. Stamp another image on some scrap copier paper. While the Staz-on is trying cut out the image stamped on the copier paper. You don't need to go around each branch of the trees. Click on the photo and you will be able to see how my masking was done. If you look close at the little tree on the right side you will see LOTS of sky area still exposed. It will be taken care of later. I should have trimmed the copier paper just a bit more. But it's no big deal and is easily fixable.


Now set the mask in place over your image and fold it around the edges of your card stock. You can tape it on the back if you like or just hold it in place as you sponge.


First I took the Pretty in Pink ink and get the sponge inked up. Now just drag the ink on the card stock. You're really not sponging or dabbing like you would do for the edges or on regular white card stock. Just drag the ink up towards the sky. Ink up the sponge again and repeat until you have a "halo" around the image.

Then I took the Bashful Blue and did the same thing but I forgot to take a photo of it. I did sponge a little on the pink. You want to do that so the colors blend together


After the Bashful Blue I took the Brocade Blue and sponged into the Bashful Blue and again pulled the colors up towards the sky. You want to make sure you are not covering all of the Bashful Blue. You want to be able to see each color you add.

And for the final blue I used the Bight of Navy and kept dragging it towards the top of the card. It wasn't as dark as I wanted it to be but it worked.


Then I took the Apricot Appeal and dragged some up into the pink to give it the look of a sun setting in the background. Now to have a truer looking "sunset" you can add the Apricot Appeal to the window of the church when you are done. I used Yo Yo Yellow and it's too "yellow." It didn't give a "true" look of the setting sun shining through the window. But no one left me a comment telling me they noticed it!!! LOL

Remove your mask and you can see the image with the beautiful sky behind it. I know you can do it!! Now it's ready to color. When I did mine I had colored in the church and trees first and then did the sky. Either way works, there is no right or wrong way to do it.

To fix the sky on the right side of the trees and there is other bits of sky showing just take a Q-tip and push it into the ink pad and rub the color in.

Now would be a good time to add some white crayon on the branches of the trees if you want the snow to show. I did it but it was after I had begun coloring the tree in so it didn't work. But now I have a second image ready to color in!!!

Ok now it's your turn!! And I KNOW you can do it!!

Thank you SO much for stopping by,
Wanda

Sunday, September 07, 2008

Wintry Sky

Today I thought I would play with one of the newer sets in the Stampin' Up! 2008 Fall-Winter Idea Book & Catalog. This set is called "A Wish for Peace." It also includes a word stamp and a dove. I LOVED the church and trees!!!

I stamped the image on glossy card stock using Black Staz-on. Then I used Q-tips to color in the detailed areas. I sponged in the sky beginning with the Apricot Appeal and ending with the Bordering Blue.

I used the "Merry Christmas" word from the "All Holidays" set. I used the Designer Label punch and behind it I layered the new Wide Oval punch. I taped them together and along the edge of the Designer Label piece I poked a hole so I could insert the brads. I did it right along the edge so part of the brad would hang over on top of the label. It gave it more of a bookplate look. I wanted a little bling on the card but not too much. The church and sunset part of the card are meant to be the focal point of the card.

There wasn't a lot to this card. Sometimes I find images like this hard to work with. You usually have two choices here. One you spend some time coloring in the areas or two you stamp the image in one color of ink and accent with colored layers. These types of designs are very easy to work with using a single color to a more elaborate card if you color in the details. It's all in what look you are trying to achieve. I thought it was a fun card. I was in the mood to color today!!

Thank you SO much for stopping by today,
Wanda

Saturday, September 06, 2008

A Birthday Cupcake Quick Card

I needed to make a birthday card and I needed to make it quick. SO nothing makes a card quick than decorative paper. And I added a die cut to the card and it maked an even quicker card. I didn't think it could get any quicker than that but the die cut really "cut a few corners!" To pop a piece of card stock in the Big Shot and out comes all your edges cut perfectly and even some perforation to it, well what more can you ask??

I used the Stampin' Up! "Crazy for Cupcakes" set. I am anxious to play with this set some more and make some not so quick cards. I want to play with Crystal Effects with it and do more shadowing. And there is another adorable stamp in the set that I have some plans for too!!!

But for a quick card this one did the trick. I think it could use a bit more bling but then it wouldn't have been "quick!" SO it is getting sent off as it is!!

I hope you're enjoying the weekend, it's nice and cool here. I think fall is in the air!!!

To view more quick cards click here.

This item was made using Stampin' Up! products. To view more items made using Stampin' Up! products click here.

Thank you SO much for stopping by today,
Wanda

Friday, September 05, 2008

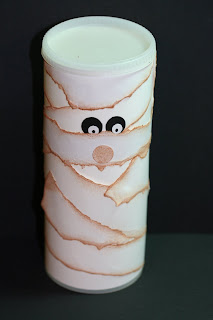
Is That My Mummy???

No, it's suppose to be Sue's mummy!!! She sent out her mailer and I deleted it. But then I figured I could do her little project by memory. I have to laugh at myself there. Memory??? It's fading fast!!! LOL

Fortunately I did read her tutorial on how to make it. There really isn't much to these. You just rip some card stock, sponge the edges and wrap it around the Crystal Light container or you can use a Pringles can. I had just emptied a Crystal Light container out and it hadn't made it to the laundry room yet! I use them in there to put lint in and we use that lint to light our camp fires! No need for anything but a match and the lint!! It burns hot and gets the kindling going!!

Anyway, back to the container. After I got done wrapping I had to patch a few open spots. But hey, no mummy is perfect!!! I used small circle punches for the eyes and nose. Though I'm not too sure Sue's had a nose!!

Isn't he cute??? It was fun and I'm thinking that this would be a pretty easy project for kids to do.

Have fun with this project. I hope I did it justice Sue!!!

Thanks SO much for stopping by today,
Wanda

Thursday, September 04, 2008

Bath Salts Gift Pack Weekend Project!

I haven't done a weekend project in a while so I thought I'd post one tonight. I've been so busy with those technique pages that I forgot about doing a weekend project until I ran across some bath salt I had made a while ago. It keeps as long as it's in an air tight container. And I ALWAYS keep mine in an airtight container. Not because it's best for the bath salts but because I would bump it and spill it!!! LOL

Let's start out with the bath salt recipe. It can be found here. It's a very simple recipe with only a few ingredients. It's best if the bath salts are not "today" fresh. Putting bath salts in plastic is not always a good idea. In time the fragrance oils will eat away at the plastic. I weigh my bath salts and 50 grams fits just right in the 3" x 3" zip bag.

SO to make the container/box you can print right on the card stock. I would use copier paper first to see if the measurements are close enough. Each printer is different. I saved the pattern in a PDF file so anyone can open it (as long as you have the program on your computer that opens these, usually the Adobe Reader). From side to side on the inside part should measure 3-3/16". Your bag of bath salts measures 3" x 3" so if the inside of the box is larger than 3" x 3" it should work. The pattern for this project can be found here.

Decorate the container/box as you wish. Here I used the Stampin' Up! "Sprinkles" little back ground stamps. I thought flowers sounded good on a relaxing bath product! I used glossy card stock and stamped in Versa Mark. I embossed with clear embossing powder. I then sponged in the colors. I used Certainly Celery, Pretty in Pink and Yo Yo Yellow.

Once the container was colored the way I wanted I set it aside to dry. I took a mailing label and put it in my Big Kick using the new Baskets & Blooms die cut. There is a cute little flower on there and the label fit perfectly on it. So I cut out the flower only. I sponged on the color.

Remove the backing from the label and have it ready to go. Lay the bath salts inside the box. Fold over the side flaps then the bottom flap. Holding it securely fold over the top flap. Take the flower label and "tape" the container shut. I wrapped some Certainly Celery ribbon around the box. Not because I wanted it to stay shut, the flower will do just fine on it's own for that, I just wanted to add a bit more color to the container. I punched out a couple of circles to fit in the scallop. For the white circle that reads "Bath Salts" I made that on the computer. I printed out a full sheet of them as I plan to make a lot more of these for gifts and to sell.

I did type up the instructions on copier paper and I taped them to the inside of the container, it also includes the "warning" for children under three, etc.

Here are those instructions:

Sprinkle a desired amount of the bath salts into warm running bath to allow them to disperse. Get in the bath, relax and enjoy. Warning: For external use only, adult supervision required. Not intended for children under 3 years of age.
As with all of the photos on my blog, if you click on them you can view the items closer. Don't look too close though, many of them have imperfections!!!

More weekend projects can be found here.

Thank you SO much for stopping by today,
Wanda