Pin It

Saturday, October 31, 2009

Sweet Treats Flower

Isn't this absolutely adorable? I got this from the ever so talented Terri!!! She gave this to me at the Stamp Share.

The flower petals are made using an oval punch. They are attached to a couple of pieced of large round scallop piece of card stock. If you click on the photo you can see the scallops between the petals.

The back scallop circle is folded in half and is held shut with the paperclip. Removing the paperclip is how you get access to the Skittles inside!

The glass is filled with Skittles and a craft stick is attached to the flower and then placed in the glass. It's just such an adorable flower. This is something I'm going to save for a spring project! Do you think the Skittles will be any good by then??? I have SO many projects with "old" candy in them!!! And when I need a some for a new project I just take the old stuff and recycle it!! That way I don't have to keep buying candy (especially chocolate) that I don't like to eat! Now Skittles on the other hand..... YUM!!

I just LOVE this flower and I'm keeping it on the shelf in my workroom FOREVER!!! Just TOO adorable, isn't it??? These would be great for Hostess gifts, Customer Appreciation, Make N Takes, Craft Fairs, Get well gifts (instead of real flowers) Birthdays and such a FUN Stamp Camp item!!!

Thank you SO much for visiting today,
Wanda


Thursday, October 29, 2009

Halloween Coffin! Weekend Project

I'm posting a bit late today. It was such a busy day and I had so much to do that the day got away from me. But finally I got down in my workroom and got to play!!! That's the best part of my day! I LOVE being in my workroom and there is always something to do in here (including cleaning!!! UGH!!).

Today I thought I would finish up the coffin I started yesterday. I had some fun Halloween decorative paper. This one has bats on the other side so I made a bat lined coffin. The bat on the top is from a die cut I have. I filled it with vanilla Tootsie Rolls to show the size of this thing. It's a fun size to work with! And it's just TOO cute. It looks a lot better in real life than it does in the photo.

I had seen these around the net last year and saved the link so I could make one but never got around to it. And this year I just barely got it done in time! But at least I got it done this year!

All you do is go to Martha Stewart's website and download the PDF files for the base and the lid. Actually you don't even need to download them. Just put your paper in the printer and hit "print." Make sure the color you want on the outside of the box is the side you don't print on. This prints out with cutting and scoring lines along with a line or two of wording I wish wouldn't have printed out. But it's on the inside so it's ok, I guess! Here is the link to the coffin!

These are VERY easy and SO fun to make. Even the kids will like making these! I think they would make cute centerpieces. Because of their size I think they are a bit too big for party favors. But that depends on how much "stuff" you want to fill them with too!

Have some fun this Halloween! Don't wait a year to make them like I did. They are quick to make. I think it took me longer to pick out the paper I wanted to use than it did to put the thing together!

Thank you SO much for visiting today,
Wanda

Wednesday, October 28, 2009

Wednesday Sketch Challenge

This is my card for the Wednesday Sketch Challenge over at SplitCoastStampers. I LOVED it. It has lots of pieces to it and layers and you all know how much I LOVE layers!!! I use to be intimidated by them but after playing a lot with decorative papers I found that layering is the best with them!!! It goes on really fast and your card can be put together in no time at all.

This card was a lot of fun not only because of the layers but the leaves too. I have a couple of tiny leaf punches I had gotten a long time ago and they seem to only come out in the fall. One is by EK and the other is by All Night Media. I like the EK one better, it's a small whale punch and easier to work with.

After I punched out the leaves I sponged the edges being careful not to get the color on the entire leaf. I put my thumbnail in the middle of the leaf and got a lot of ink on my nail but it washes off (eventually!!!).

I stamped my image using Black StazOn. Why Black StazOn I don't know. I thought it may give a more vivid image. I taped the leaves over the ones that were on the image. I just liked the look of these punched ones better. PLUS I didn't have to color each leaf on the rubber stamp!!!

I added a bow in the upper left corner. It as a bit bare and needed a little something. I wanted to keep the card simple and clean looking.

If you have time play with these sketches. There's now 252 of them for you to pick from. I started playing along at #126. I have not gone back and played with 1 - 125 but one of these days I will give them a try too!

Thank you SO much for visiting today,
Wanda

Tuesday, October 27, 2009

Halloween Header

I needed a quick gift and I only had a few minutes to make it. I do my grocery shopping every Tuesday. When I am headed out to my car with my cart there is an employee at the store that comes running up to me and helps me unload my cart. He is usually found in the store sweeping the floors or outside gathering the carts. He's such a sweet guy and I thought I should give him a little treat for Halloween. I am hoping that I will remember and find everything on my grocery list so I won't have to make another trip to the store this week. And in doing so would mean that I need to get this little gift done right away!!! SO off to my workroom I headed.

I took out a baggie and filled it with some fun size candy bars. Then I opened up a package of "Recollections" card stock that I had just got for half off at Michael's today!! Such a deal!!! There are SO many cute sheets in it and it was difficult to decide which one I wanted to use. The nice thing abut it is that there were two sheets of each design so it was a bit easier to choose! I picked out this cure orange paper. Well, it was all orange on one side and full of little characters and words on the other side. With what was left after I cut what I needed for the header, I cut pieces off for the remainder of the header. I was going to use the words "Happy Halloween" but I had cut through it making the header. But there was still "Trick or Treat" and that was what I went with. The spiders were on a strip on the backside so I cut a piece of them to use on the front. I layered the pieces onto black card stock and put it all together. I didn't want to add any embellishments. I thought the guy I was giving it to wouldn't really care and they might get hung up on "stuff" so it was best to leave them off and just pick parts of the paper that would be eye catching enough without adding other "stuff" to it!!! And this is what I came up with!

I'm sure he will like it. I KNOW he'll like the candy!!! LOL And this was VERY quick to make too.

Thank you SO much for visiting today,
Wanda

Monday, October 26, 2009

I Want My Mummy!

Sometime in September I saw someone had made an adorable card using this mummy. They said they got it at Michael's. Well, I stopped at my local Michael's stores and didn't find this mummy. Earlier this month we were up in Duluth, MN and I begged hubby to stop at the Michael's store near the Miller Hill Mall. He's such a nice guy and it really didn't take much begging at all. I was looking around and found their bin with the wood mount dollar stamps. I told him I was looking for a mummy one and if he finds it to let me know. He was looking through the stamps there with me and he found it!!! I was SO thrilled! I told him it was the exact one I was looking for and I told him I HAD to get it!

Now I've had this stamp for over 3 weeks now and had not used it yet. See how bad I HAD to have it? LOL SO Friday night I was playing with it and this is the card I came up with. I used one of the SplitCoastStampers Sketch Challenge layouts for it. I have an album with ALL of them in it and I just open it up and find a layout that has the focal part of the card the size of the stamp I'm going to be using and I just go from there. I am SO glad I printed them out and put them in the album. It makes finding a layout so much easier.

I had some retired Stampin' Up! decorative paper that I was glad I could use on here. It was just what the card needed! And the little bat was an added extra. It is a die cut that I got a while back. I set it on the corner and I saw that you could see the yellow through one eye so I placed the bat just right on the corner so both eyes looked yellow. It saved me from having to put a piece of card stock behind the eyes to give them some color! I added the ribbon to the left side. It was open and in great need of "something" and that piece of ribbon was just that "something" the area needed. It's a simple enough of a card too! Gotta LOVE that!

Thank you SO much for visiting today,
Wanda

Sunday, October 25, 2009

Witchy Woman!

Ok, now you just have to admit this little witch is adorable!!! As I was checking out at Michael's I saw her sitting on a shelf along with the Count and Frankie! There was no small ghost. They had all of these characters in the larger size but only these three in the smaller size. I'm not sure if the larger ones are cookie jar type holders or candy holders too. Anyway, I debated whether or not to get one and then it took me a while to decide on the witch. It was a tough choice between her and the Count! I REALLY liked them both. I didn't buy both, I had great restraint that day. Shocker, huh??? LOL

I filled her with peanut M & M's and thought her belly area needed something more. I had these cute clear stamps and thought I should play with them since there isn't many days left to be playing with Halloween stuff. Once again I find myself with SO many Halloween ideas and so little time to play with them.

Anyway, I colored the pumpkin in with chalks and a blender pen. I punched it out and layered it on a circle and a scallop of card stock. I stuck it on her belly area with a glue stick and it really completed her. After it dried I began to think that maybe a cat image would have looked better. But too late!!! It's ok, though I like the look of the pumpkin there!!!

Isn't she just adorable??

Thanks SO much for visiting today,
Wanda

Saturday, October 24, 2009

Sweet Treats Halloween Cup Card

This is a card I made at the last Stamp Share I attended. It was our Make N Take. Isn't it adorable? It's a little 3" x 3" gift candy card!

The paper was actually cut 3" x 6" and folded in half. The paper clip on the top holds the folded piece shut. When removed you can get to the candy.

The set used here is the Stampin' Up! "Sweet Centers." There are other stamps in that set and I REALLY do need to play with them one of these days. BUT!!!! Christmas stuff is lined up for after Halloween!!!! I NEED to play with that stuff too!! SO many toys SO little time!! LOL

Terri is the fabulous creator of this adorable little card. She is such a talented person! I am always amazed at what she comes up with! She is a great inspiration too!

Thank you SO much for visiting today,
Wanda

Friday, October 23, 2009

Havin' Fun With My Sizzix Dies! Weekend Project

I used the Stampin' Up! "Fancy Favor" box die cut. Lately when I've been creating "things" with this die cut I've been cutting off the scallop on the top. I don't really need it on there and for my projects it just doesn't look right with it there. Cutting the scallop off the top doesn't take away from the surface area you are working on, you are only cutting off the scallop. Click here to see the latest things I made with this die cut. And you can click here to see other Sizzix die projects.

This is a great project for kids to help with too. You can assemble the box for them and let them have fun decorating it up the way they would like!

This would also make a great Stamp Camp item, a fun Hostess gift or Customer Appreciation gift. And possibly a salable item at Craft Fairs.

I got my pencils at the dollar store and that little witch head is actually a Halloween them eraser. There were a dozen of them in the package for a dollar!! Such a deal. I stuck her on a wooden BBQ skewer and cut it to the length I needed for the box. SO quick and simple!! Isn't she adorable in an ugly sort of way!!! LOL

I cut my box out of black card stock. I used some retired decorative papers that I had! Yup, I still have some of those left too but the stash is slowly going down. I stamped the cat image on it before I affixed it to the box front. The cat is from the "Stampin' Up! "Halloween Frights" set. I added my own scallop to the top. It has a flat edge on the upper part and the scallop is laid over the layered decorative paper.

This is a pretty easy project to do and an extremely fun one to decorate! You can decorate these up for any occasion, event or holiday!

Thank you SO much for visiting today,
Wanda

Thursday, October 22, 2009

Stamp Camp Candy Jar

Gosh, with all the fun Halloween "stuff" going on here I almost forgot to post the last adorable item I made at Stamp Camp last month. I saved the best for last!!! I just love this little jar!

We used the Stampin' Up! Bella Blue decorative paper and the "Flower Daisies 2" die cut. The flowers were layered on top of a circle cut and set inside the lid. The brad was added and then it was all affixed to the circle with a pop up glue dot.

There was ribbon cut and a strip of decorative paper for the band around the ring. I opted for the decorative paper. I just thought it looked prettier on the jar. The jar had life savers inside but it can be filled with anything you wish. Use your imagination there!

Isn't it just adorable? I ran across a box of jars while I was straightening out our HUGE walk-in closet in the foyer and thought I would make some of these for gifts! (oh and by the way, once I found the jars I was so excited and wanted to play thatI abandoned the idea of straightening out the closet!!! LOL).

These were very easy and very fun to make and they didn't take much time at all to put together!

Terri is SO creative, I have just loved everything she makes!

Thank you SO much for visiting today,
Wanda

Wednesday, October 21, 2009

Wednesday Sketch Challenge

This weeks Sketch Challenge over at SplitCoastStampers was a lot of fun! I got to use my new Stampin' Up! "Wandering Words" set. I just love the Santa in this set and now I can't wait to play with the other two images!

For my card I punched out a 1" circle and stuck it to the white card stock with removable tape. Then I sponged in some Brocade Blue, then some Brilliant Blue and finally some Night of Navy. I used a tree from the "Lovely as a Tree" set and stamped it in with Handsome Hunter ink. I layered that on top of a piece of decorative paper I had gotten in a pack of winter papers from Wal-Mart. I layered that on top of a piece of Handsome Hunter card stock and then I taped those layers to a piece of white card stock I ran through the "Snowflakes" image Cuttlebug folder.

I added a snowflake brad on the bottom and I punched out a snowflake using a Martha Stewart punch. In the center of that punch I added a clear rhinestone.

I had fun with this sketch. I SO look forward to these sketches every week and I am thrilled when I actually have some time to play along! Play with the sketch if you have time, it's fun to play with different layouts!

Thanks SO much for visiting today,
Wanda

Tuesday, October 20, 2009

Monster Candy!

While I was at Carol's Koogle Notes blog I saw this cute monster card she made. The moment I saw it I thought it would look great as a candy bar holder. So I bought a candy bar when I was grocery shopping and proceeded to make the box.

To make this candy bar box cut your card stock 6-1/8" x 7-1/4".
On the 6-1/8" side score at 3/8", 2-7/8", 3-1/4" and 5-3/4"

On the 7-1/4" side score at 3/8" and 6-7/8"

On the 6-1/8" side clip the score marks in 3/8". These little flaps will be taped or glued in place to the inside of the lid and box bottom. Before you glue them decide which part of the box is your front and make the "teeth." I used a pinking sheers to do mine. You can do this by hand or use punches or whatever works best for you.

Decorate the top as you like. I used some scraps of Old Olive and sponged them with Always Artichoke. The eyes were punched out using white, black and Ruby Red card stock. I used a red marker and drew in the bloodshot lines in the eyes. Then I taped it all together. The more you tilt the eyes in the angrier they look. I had mine set off to the sides but it looked too sweet so I moved them inward and got a pretty angry looking candy box!!

Isn't it adorable? Carol is SO creative!!

Thank you SO much for visiting my blog today,
Wanda


Monday, October 19, 2009

Leftover Frog Eyes!!!

What do you do with your leftover frog eyes? LOL I had plenty of frog eyes left and thought I would bag them up for my stamping gals. I had some leftover decorative paper that sure did come in handy. Especially those little strips. Now that is why I just save it all!!! One never knows when it will come in handy! It was perfect for the these little bag toppers.

These frog eyes are so cute and bagging them up like this makes a great little gift too. Something special for a neighbor, friend and co-worker that doesn't cost a lot to make. Oh and not to mention that they were fun to make too!

Thank you SO much for visiting today,
Wanda

Sunday, October 18, 2009

Frog Eyes! EWWWW!

These are the easiest Halloween eyeballs I've ever made. No, I didn't come up with this idea on my now. Carol at Koogle Notes had them posted on her blog and I thought they were just TOO darn cute to pass up on making this year. SO when I was getting my weekly groceries a couple of weeks back I picked up a package of Rolos. Now I am not saying a bag of them I picked up a "tube" of them not knowing that inside that "tube" they are not individually wrapped. UGH!! I didn't feel like going back to the store just for a package of Rolos so I waited until this week when I went grocery shopping again. I got the right ones this time!!

These were very fun to make. It's just a matter of punching out some circles, a snip here and a bit of sponging there and they were done!!! I did up the whole package. You only need a 1/2" punch and a 3/4" circle punch to do these, a scissors, a sponge, some ink and tape! I used Certainly Celery, Basic Black and Whisper White card stock along with Always Artichoke ink for sponging. Oh and a white gel pen to add some sparkle to the eyes! Don't you just LOVE um?

I had gotten the wine glass at the local dollar store. It was perfect for the "frog eyes!" I had some fun Halloween ribbon so I tied it to the stem of the glass and it was just enough to finish it off. Wouldn't these make great centerpieces for you next Halloween party or dinner?

I hope you have as much fun making these as I did!!

Thank you SO much for visiting today,
Wanda


Saturday, October 17, 2009

Trendy Fall Trees

I got this fun tree paper at Archiver's and thought the Stampin' Up! "Trendy Trees" set would go with it. And it sure did!!! What a fun set to go with this paper! I have had a lot of fun with this set.

To make this card I used More Mustard on the first tree, Old Olive on the second and Pumpkin Pie on the third. The tree trunks were made using Chocolate Chip. I did have to use the Stamp-a-ma-jig to get the tree trunks in the right spots. It's SO worth it though!

I stamped the tree trunks on a piece of white card stock and then stamped them again on another piece that I used to do the colored parts. I cut out the colored trees and I used Dimensionals to mount the tops only on the three trunks I stamped on the white card stock.

For the base of the card I used Chocolate Chip card stock and layered a piece of Pumpkin Pie card stock on top of that.

This was a pretty quick card to make too! I needed a "thank you" card for a friend and this is perfect for this time of year, isn't it?

Thank you SO much for visiting today,
Wanda

Friday, October 16, 2009

It's Still Snowing! Weekend Project

Yup, it's still snowing aluminum snowflakes here! I cut out two more snowflakes and wanted to make an ornament. I set one on top of the other and thought it was ok but wondered if I could make it more of a 3-D ornament. Well, I didn't quite know how to do that. SO I cut two more snowflakes out of card stock so I could play around.

I cut a notch up to the center of one flake and did the same for the other. I put the notches together and I had a 3-D snowflake.

I wanted to make the snowflake a bit frostier looking so I added some Crystal Effects on the ends and dipped them in some clear micro beads. It looked ok but needed a bit more so when that was dry I added a bit more Crystal Effects and sprinkled on some Dazzling Diamonds glitter. Now that was just what the snowflake needed.

I used Crystal Effects to "glue" the snowflake together. Once it was set I added a bit more to the outsides where the notches were just to be sure. This snowflake is very solid and SO pretty!

These were VERY easy to make and not to mention how fun it was too!

It's amazing that once you cut the aluminum with the die cut it's not sharp on the edges anymore. I'm sure it's sharp to a degree but not like it is before you put it on the die cut. I use gloves when working with any metals. A cut hand sets my work back for several days, it's best to be safe than sorry!

Have fun making these. They would look great sitting on the dinner table or around the house! And not to mention how pretty they would look on the tree, indoors or out. Though I don't know how well the beads and the glitter would last, I never tested it out. I made mine for indoor use.

Thank you SO much for visiting my blog today,
Wanda

Thursday, October 15, 2009

Let it Snow! Let it Snow! Let it Snow! Weekend Project

What fun you can have with some scrap aluminum and a die cut!!! This is such an odd thing. I had this roll of aluminum that I ran across in the garage last spring and we put it in the garage sale for free!! And no one took it! Imagine that!! SO I figured that this project was one of those "meant to be" ones! I don't know how the idea came to me but it did. I think I was going to make just one snowflake or see how it would cut. It was on a week that Michael's had a 50% off coupon and I saw that they had the snowflake die cut in stock so if I ruined mine I could get another one pretty inexpensive. I ran a piece of aluminum through the Sizzix and liked what I saw. But it didn't look like a very full snowflake so I made another one. I set one on top of the other and thought it looked cute. It didn't lay flat and as I was trying to straighten it out I bent up the ends of the snowflakes on the top snowflake. Then the idea of a candle in the middle came to mind. But how was I going to make it stay in the middle? I couldn't glue it. I had to make it so it could be refilled or replaced. And with the battery operated ones you had to be able to turn it on and replace batteries. It needed a separate holder.

What to do? What to do? I didn't want to abandon the idea, I liked where it was going. Then it came to me. Use the center flower part from the Stampin' Up! "Flower Daisies #2" die. SO I took a smaller piece of aluminum and cut one of those out. I centered the candle on it and bent the petals up around the candle. I did turn the flower over so the back side was on top. I wanted the smoother looking side to show around the candle. When I finished doing that I liked what I saw.

But now, what to use to stick it all together? Would something as simple as glue dots work? Why yes they did!!! I added several of them around the areas that were in contact with each other. And trust me those little buggers hold pretty tight. I tried to reposition my candle and it was very difficult to remove them. It does bend the aluminum when you do that so be sure you know exactly where you want to stick the candle before you commit to it!

Now you can decorate it as you will or leave it as it is, either way it's a very pretty centerpiece.

It's amazing that once you cut the aluminum with the die cut it's not sharp on the edges anymore. I'm sure it's sharp to a degree but not like it is before you put it on the die cut. I use gloves when working with any metals. A cut hand sets my work back for several days, it's best to be safe than sorry!

Have fun making them!

Thank you SO much for visiting today,
Wanda

Wednesday, October 14, 2009

Wednesday Sketch Challenge

Here is the card I made for this weeks Sketch Challenge over at SplitCoastStampers. Each week there is such a fun and new challenge awaiting! I was thrilled I had time to play along again! I SO look forward to these sketches each week.

After seeing my card on the computer I feel it needs a bit more finesse. Not sure what but it's kind of blah. Oh well, they all can't be winners now can they?

The pumpkins came from the Stampin' Up! "Holiday Blitz" set. I use that set a LOT! I stamped them in Dusty Durango. The leaves were from a little leaf punch I've had for many years. I don't remember where I got it, that's how long I've had it. The decorative paper is from Archivers. And the base of the card is Chocolate Chip and the layer behind the leaf paper is Dusty Durango. I added a piece of ribbon behind the three squares in the front but you can hardly see it.

I'm not thrilled with my card and I may play with this sketch later in the week. I have some fun weekend projects for you starting tomorrow so be sure to check back!!

Thank you SO much for visiting today,
Wanda

Tuesday, October 13, 2009

Lizard Legs! EEEEK!!!

I never throw anything away before it's time. Well, things I think I can make something out of or use them somehow that is!! This jar had some pretty expensive pure maple syrup in it. I remember buying it. I needed to buy pure maple syrup and for a few cents more this one came in this adorable jar!!! SO we all know which one I purchased!

I must have had this bottle saved for over a year. And then while trying to clean up my messy workroom I ran across some Halloween Rub-ons. Now this rub-on does say "Lizard Legs Liquid Essence" and probably some type of green liquid would look better in the bottle. But what green liquid would you put in a bottle that could be consumed by children should this happen to fall into their hands? SO I went with the candy, "Sixlets." Now why do they call them "Sixlets" if there are 8 pieces in a package??? Something to ponder another day!!!

Anyway, I just filled the jar with the "Sixlets" and tied a ribbon around the little handle thing on the side. Not much to this jar but the rub-on pretty much takes care of the theme here!

Just some fun things you can do with the stuff you might toss out!!! It's a form of recycling. I like to try to use things at least one more time before they are tossed out.

Be sure to stop back later this week. I have some fun weekend projects lined up for you!!! You don't want to miss them!

Thank you SO much for visiting today,
Wanda

Monday, October 12, 2009

Altered Notebook - Weekend Project

Here is a fun and quick "Weekend Project" for you. I covered some small 3" x 4" mini notebooks with decorative paper. Normally I stamp on the paper first but this time I waited until I was done so I knew exactly where the image was going to go on the notebook. Plus the notebook had a little cushy give to it and made the image copy better onto the paper.

The word "notes" is from the Stampin' Up! "Note to Self" set. You remember, the one I bought just because of the "note" stamp!!!

For the spine you can leave the original one as it is and try to butt up the decorative paper as close to it as possible or you can cover it like I did with Duck Tape. Yup, it's actually called Duck Tape! There's even a duck on the inside of the roll!! This stuff comes in LOTS of fun colors. A while back I bought black and white. I didn't see much use for the other colors. And I know at the rate I use this stuff it will take me a LONG time to use it up. I had gotten mine at Menards. I like to use it because it not only hides the dull black stuff that is originally on there but it also helps keep the decorative paper held down and I know that in my purse this notebook is not going to catch on anything by the spine. Now the layered wording is another story. I don't think it will fair well in a purse for very long, no matter how well you tape or glue it down. For purse notebooks I usually stamp directly onto the decorative paper or card stock and have no layers. There are several techniques out there that can give the illusion of layers if you want them.

Here I used the decorative paper from the "Razzleberry Lemonade" set and stamped right on top of it. It created it's own dimension. But I did layer the word which means this is probably not going to be going in my purse!

It's fun to alter note books and the possibilities with them is endless! These little notebooks are great because they have 60 pages to them so they look like they are worth more than what you pay for them. And of course after you beautify them they will be worth more!! They'll be priceless!

You can take a pretty plain or ugly notebook and make it a work of art!! And even though it's called a "weekend project" it doesn't take the whole weekend to do it!!! For more Weekend Projects click here. And for more altered notebooks just click here.

These are great for a Make N Take, Stamp Camp, Hostess gifts, Customer appreciation gifts, Craft Fairs or just giving out to your friends. Keeping one for yourself of course!!!

Have fun altering your notebooks!

Thank you SO much for visiting today,
Wanda

Sunday, October 11, 2009

A Beautiful Card is Just a Click Away!

You can incorporate your wonderful photographs into greeting cards! It's like scrapbooking on a smaller scale!

For this card I had taken a photo of some hybrid daisies after it had rained. I LOVE the rain drops on the petals. I suppose you could achieve that look with a water mister too but this one was all natural! I took the picture offset on purpose. I wanted to add words to the dark area. I wasn't sure what words I was going to use at the time I took the photo but once I got it printed out I thought it would make a FABULOUS birthday card.

I use a program called "Print Artist." You can get it at Best Buy. It's a fun program that does LOTS of things from greeting cards to scrapbook pages. It does business cards, fliers, mailing labels and more. I have used "Print Artist" for years. I believe the latest version of it that I have is v22. I started out with v2 well over 15 years ago! It's a fun, versatile and inexpensive program. If you have your heart set on a photo editing program like Photo Shop, save your money and download Gimp. It's an open source program that is free and it's full of all the things you want in a photo editing program!

Anyway, back to my card. I imported the photo into my program and went into the text part and added the words. I picked out my font style. I have this thing for fonts and it takes me a while to find the right font I want because I have to go through them all and believe me there is a LOT of them on my computer. I seem to collect those too!

Once I got the words where I wanted them I saved the settings. I also saved the photo to a file which I downloaded to Shutterfly (they seem to have the best prices on the Internet for prints) and waited a few days for it to arrive. I was in no hurry for them. When I'm in a hurry I check the local stores for the best prices. Usually I am not in a rush for my pictures. I don't even get prints of our outings or vacations right away, I wait for the best price on printing because I have an itchy camera finger when I'm out and about and it can cost quite a bit to have all of my photos printed. I do need to get into scrapbooking more. I need a bit more motivation in that area and then there won't be any stopping me!!! LOL

I layered this photo onto a piece of Night of Navy card stock. After seeing it on the card stock I wished I would have put a piece of white behind it so about a 1/16" of it showed. It just needs a little thin border around the photo. But fortunately I ordered a lot of them and I can experiment.

Have fun with your photos! They're not just for scrapbooking!

Thank you SO much for visiting today,
Wanda

Saturday, October 10, 2009

Gift Card Holder

Isn't this a fun gift card holder? It was from a Make N Take I did at the Stamp Share last month. The decorative paper is from the new mini catalog. It's so pretty.

The snowflake was punched out and it's attached to a belly band that holds the card shut. It's such a sweet touch to the gift card holder, isn't it?

And on the inside you can see the tab marks were the gift card will slip in to be displayed when the card is opened. The brads hold the gift holder part onto the decorative paper and that is taped to the card stock. I just LOVE the whole look and layout of this card. Terri is known for her fun card layouts. It's fun to play with different layouts and folds. I LOVE to play with the SplitCoastStampers Wednesday Card Sketch layouts. Maybe they should have a weekly challenge for different card folds!!! That would be fun too!

I am going to be using the gift card holder this coming Christmas. I may have to make more and make my Christmas shopping less stressful!! Thanks Terri for a very fun Make N Take! See, even her Make N Takes are FABULOUS!!! She's SO creative!

Thank you all SO much for visiting today,
Wanda

Friday, October 09, 2009

Stamp Camp Note Card Holder

Here is a fun note card holder I made at Terri's FABULOUS stamp camp last month. Isn't it just wonderful? I LOVE the layout and the colors. The decorative paper is from the Stampin' Up! "Bella Blue" package. Of course I had to order some. Isn't it funny how things look not so interesting to you in the catalog but once you see something done with them it becomes a "must have?" Why is that?

These are SO much prettier in real life. They do look nice here but trust me they are gorgeous. The note card holder is held shut by the ribbon and bow tied around it. On the inside is taped two cello bags and the note cards are slipped into one side and the envelopes were slipped into the other side. Won't this make a great gift? I think so too but I'm keeping mine for myself!!! I might even use them!!

Terri has such a wonderful creative mind. She's going to be holding another Stamp Camp in January and I can't wait to attend that one! I'm excited to see what projects she comes up with. I know they will be FABULOUS!

Thank you SO much for visiting today,
Wanda


Thursday, October 08, 2009

Pocket Silhouettes Buffet Style

This is my most favorite card I made at the Card Buffet. It's the Stampin' Up! "Pocket Silhouettes"Justify Fullset. I LOVE this little stamp set and adding it with the Soft Suede really made it a fabulous card. For more information on what a Card Buffet is just click here.

I had a great time at the Card Buffet and can't wait to go to the next one!

Isn't it just the sweetest card? I love the simplicity of it. It's got such a clean crisp look to it. I think it would not only make a "thank you card" as I did here but it would work well for other occasions as well. Like Birthday, Thinking of You and even a Sympathy card. Don't you agree?

Thank you SO much for visiting today,
Wanda


Wednesday, October 07, 2009

Wednesday Sketch Challenge

It's the Wednesday Sketch Challenge again!!! I was thrilled that I had some time to play with the sketch. It was a pretty easy one and a VERY fun one! I chose the Stampin' Up! "The More the Merrier" set for my card. I am such a snowman person. I heard we were going to be getting snow by the end of the week and it just brightened my day. Though the weather here isn't cold enough for the snow to last but it's still snow!!! I am looking forward to it. A true Minnesotan!!

Ok, back to my card. I found some retired decorative paper for the background part of the card. I was saving it. It has to be one of the prettiest snowflake papers and I just wanted to keep a piece of it. But for what??? I have another full sheet and I am going to find something to use it on. You can't keep them forever! I just realize that this week!! LOL Not really. I have been using my decorative papers a lot lately, even the newest ones! Shocker, huh?? But like I said, you can't keep them forever! Like with everything else in life, enjoy it now!

This card was easy enough to make too. There weren't that many layers to the card so it went together rather quickly. I added ribbon on the 2-a spot and it didn't show up very well so I layered it behind a piece of black card stock. I added some acrylic snowflakes I found in a drawer. I must have been saving them for some reason too!!! Now they are used up. Not that it makes a lot of space in that drawer but the more things I use up the more space I will have. Oh come on, who am I kidding? I'll just buy more stuff to fill that space!!!

It's such a fun card to look at. Perhaps it's because of the snow coming in a few days??? LOL
If you have time play with this sketch and have some fun!

Be sure to check back in the next few days. I have several "Weekend Projects" for you!! I've been having fun with my Sizzix machine and dies. I've been playing with recycled items and just plain old creating!! You won't be disappointed!

Thank you SO much for visiting today,
Wanda

Tuesday, October 06, 2009

Sweet Treat Cups Halloween Card

Here is a very fun card we did at Stamp Camp a couple of weeks ago. I have so many things to put on my blog lately that I am not keeping them in the order in which they happened! But they are finally getting posted on here!

This card was so fun to make. The outside is done using the Stampin' Up! "Sweet Centers" set. On the inside we punched a 3" x 3" envelope and affixed it to the opening. Then we slid a piece of card stock inside attached with a piece of ribbon at the top to grab it. You slide the card stock up and it makes for easy access to the candy inside. Nothing like making a candy gift and not being able to get at the candy without ruining the item. Well, this one you don't have to ruin it to get the candy out. The only thing to remember with this one is to have the card laying flat when you open it or you have candy going everywhere. Probably not a good thing to give to little kids. You will have candy all over for sure then!!! But then again I know an adult who would open it when it's upright!! *glances in hubby's direction and waves!* LOL I guess the hard candy shell serves more than one purpose. It acts as a dirt barrier so when they fall on the floor the fuzz and dust (like you'd find that in MY house!!!!) won't stick to it like it would with other candies.

If you click on the photo you can see the cool stamping technique at the top. I will share with you next week how that is done. You will be SO amazed. It's a rather old technique that we tend to set aside and when we dig them out it's like "everything old is new again!!"

Thanks Terri for such a fun card!!!

Thank you all SO much for visiting today,
Wanda

Monday, October 05, 2009

Boxes, Boxes, Boxes!

Here are some of the boxes I demoed last month. I used the Fancy Bag die cut. Instead of making it into a bag I decided to try to make a box with it. It makes the die cut a more versatile piece of equipment when you can do more than what it was designed to do. To make a box you just don't fold the side score lines and you fold it inside out, meaning you fold it so the deeper score lines are on the inside.

Here's the instructions for making the notepad holder box:

1. On your Fancy Favor Die cut piece cut off the top edge.

2. If you want the box stamped, now is the time to do it. This one is stamped using the “Sparkle” jumbo wheel. Stamp on the side that has lighter score marks.

3. Fold on the score lines except for the side ones that form a bag. You want to keep this a box. Tape the box together. Cut a piece of card stock to drop in the inside bottom. You need a little more stability on the bottom of the box. Measure the bottom of the box to get the size.

4. Using the “Eyelet Border” punch, punch out an 11" piece. Cut it to 3/4" wide when done. Set in place on top of the box and begin wrapping it around the box. Pinch the fold lines and then tape in place.

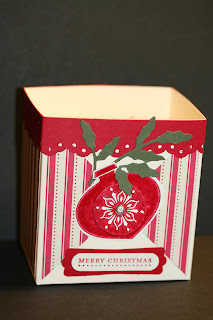
5. Stamp the words and punch them out using the “Word Window” punch. The words here are from the “Teeny Tiny Wishes” set. Punch out the “Modern Label” piece in Real Red card stock. Tape the words on top.

6. For the bulbs, ink the image with Real Red craft ink and emboss with clear embossing powder. Punch out with the “Ornament” punch.

7. Stamp the word “notes” using the “Note to Self” set. Punch it out with a 3/4" circle punch. Add “notes” to the bulb using a Dimensional. Offset the words so the bulb can be placed at a slight angle on the box. Set all the pieces on the box for placement, when you are satisfied where you set them, tape them in place. Do not tape the top of the bulb, you will need to slip the holly under it.

8. For the holly use the Sizzix “Little Leaves” die cut. Clip the leaf edges to form the holly. Tape in place under the bulb.


For the scratch pad holder you will need a sheet of card stock. On the 8-1/2" side score it at 5-1/4" and then again at 5-3/4". On the 11" side score at 2-3/4" and at 5-7/8". There are now 6 rectangles on your card stock. 4 large ones and two small thin ones. On one end cut away two large rectangles on each side and two small rectangles. When cutting the 2 smaller ones cut a little bit into the next rectangle. You will be doing this so the notebook lays flat in the holder. When you are done cutting you will have the center rectangles (three of them, one on each end and a thin one in the middle). And you will have on one end three rectangles. The side ones are the flaps. Fold all score lines. Fold one flap down and tape the other flap on top of it. Slide your scratch pad inside. Decorate the front as desired.

The second photo here is another box front I made using decorative paper on the front and sides. And you can make the notebooks accordingly.

And lastly there is the Santa box. I used punches for the feet, "fur" and buckle. I wanted to use brushed gold card stock but I was out of it so I had to use More Mustard. It worked out but not how I wanted it to be! SO guess what I ordered??? You guessed it, brushed gold card stock!! This can be used as a party favor and you can even decorate notepads for the inside of this one too! You can really have a lot of fun with this die cut! I have a few more ideas I'm going to be putting down on paper soon and they will be appearing on the blog shortly! To see other items using Sizzix Die Cuts just click here.

Thank you SO much for visiting today,
Wanda

Sunday, October 04, 2009

The Littlest Notebook

I made this adorable notebook using the Stampin' Up! "Lots of Tags" die cut. I filled the inside with copier paper and the outside is the Rich Razzleberry card stock. I used a scrap piece of Razzleberry Lemonade decorative paper. Now let me tell you, that little notebook was the perfect thing to use up the tiny pieces of that decorative paper that I have left. I believe this is the first time I've almost used up a full package of decorative paper. I LOVED every design in that pack!!!

The little "notes" came from the set "Note to Self." I bought that set just because of the "note" stamp. I'm sure I will eventually use the other images but for now I'm using this one!! I'll probably use it so much I'll wear the rubber down! Is that possible????

To put the notebook together I just stacked all the papers together and at the little perforated like I used the Crop-a-dial and punched two holes in it. That punch through all that paper was a breeze. It was like cutting butter!! I use mine a lot and it's still sharp!

I took a piece of white grosgrain ribbon and ran it thought the newly punched holes and tied a bow on the front. It was very quick and simple to make!!! And it's great if you want just a little notebook to carry around in your purse or pocket! I have more notebooks for you to see on my blog, just click here.

Thank you SO much for visiting today,
Wanda

Saturday, October 03, 2009

Stamp Camp Photo Cube

This is one of the items I made at Terri's Stamp Camp. This photo cube was made using the new Stampin' Up blocks. You can do so many things with these blocks. They are light weight yet are heavy enough that they don't topple over very easy. They are smooth and nice to work with.

We stamped the leaves from the "Autumn Splendor" set and then cut each one of them out. My finger actually had a dent in it from cutting all those leaves. Each side of the cube had a leaf and then the three on the top. After they were cut out the edges were curled using the bone folder and they I lightly taped mine in place. I need to remove them to add the photos and I didn't want them stuck tight on there and ruin the card stock. I usually don't think ahead like that. I am one who normally just cuts things out and tapes or glues them in place without thinking of adding the details later!!! But this time I was smart and lightly taped them!!! Shocker, huh???

Each side of the cube has a piece of decorative paper. The paper was pre-cut for us and was cut to the exact size of the cube. Those were glued on using the Anywhere Glue Stick. I have to say, that is one of the better glue sticks on the market. And then 4 pieces of pre-cut card stock were added to the top of the decorative paper. The leaves were added but "normally" you would add your photos and then the leaves. And don't those leaves look real?

This was a SUPER adorable cube. Very fun to make thought the leaves did take a little time to cut out. I was at a table with 5 other gals and cutting those leaves out gave us time to chat with each other. It's always nice to meet and chat with new people. It made cutting the leaves out a fun time too! I would do it again (if I had that set!!!).

Isn't this just the cutest cube? I am not sure what photos I'm going to put in it yet but I do have it on display in my workroom! Terri is such a creative and talented person!

Thank you SO much for visiting to day,
Wanda

Friday, October 02, 2009

Switching Gears!

I just had to show you the fun bracelet I designed. I even taught classes on how to make it at the local bead shop. The gals who have taken the class were surprised at how quickly it goes together! The first time I laid my eyes on Rose Montees I fell in LOVE with them. I had to design a bracelet FULL of them and that was exactly what I did over a year ago. Check here to see that bracelet.

Once in a while I like to take a break from stamping to bead. And when I'm not doing either one of them I am playing with polymer clay, usually Sculpy or Fimo. I stock up on it when Michael's or Joann's has it on sale! Now I have not played with clay for about a year or close to it!!! It is something I enjoy the most of all of my crafting. I want to get back into doing that more too!

Anyway, back to the bracelet. It is a very fun, quick and pretty one to make. Between the Rose Montees and the Swarovski bicones in it, I don't know which make it sparkle more! I also made one in Sapphire and it's SO pretty too. I'm hoping to make one in Amber the next time I teach the class. I would think that would have a nice rich look to it!!

The pattern for this bracelet will be available in my store in a day or two and so will the other one (Touch of Elegance).

Thank you SO much for visiting today,
Wanda


Thursday, October 01, 2009

Thoughts & Prayers Buffet Style

Here is another card we made at Sue's Card Buffet. More info on the card buffet can be found here. I really do like this Stampin' Up! "Thoughts & Prayers" set. Not so fond of double mounted stamps though, I tend to use both sides and wear a lot of ink. Plus I get ink on my stamped card stock. A bit too frustrating for me. SO I try to keep it to stamping on one side only, clean and dry it before I use the other side. But that doesn't always work and I end up inked!!!

This was a very simple and quick card to make. I like the little brads at the bottom left.

And again I didn't add any words to my card so I could add it later when I needed it. This would make a great Stamp-A-Stack card too. It's a lovely card for a number of occasions! I just LOVE those versatile stamp sets.

Thank you SO much for visiting today,
Wanda