Pin It

Saturday, May 31, 2008

A Simple Wedding

A simple card for a simple wedding. Is there really such a thing as a simple wedding anymore? There's SO much planning and work to do for a wedding (right Katie & Sandi???). But it all manages to get done and the couple gets married (though I think they would even if every little detail didn't get tended to!).

I wanted just a simple wedding card. So for this card I used to basic colors. Basic Black and Very Vanilla. On the left panel I stamped the little 3 flower stamp from the Stampin' Up! set "Polka Dots & Petals" with Versa Mark and used white embossing powder. I did the same for the dress too. Click on the photo to see the embossing close up. I used black StazOn ink and just one little black brad in the bottom corner. It doesn't get much simpler than that. It's a quick and easy card to make and for those of you who don't have any embossing powder I think you can pull off this design/layout without it and still get an elegant looking card.

The wedding stamp set used here is "To Have and to Hold" from Stampin' UP!

For more wedding cards click here.

This card was made entirely of Stampin' Up! products. To view more items made entirely of Stampin' Up! products click here.

Thank you SO much for stopping by,
Wanda

Friday, May 30, 2008

Step By Step! Weekend Project!

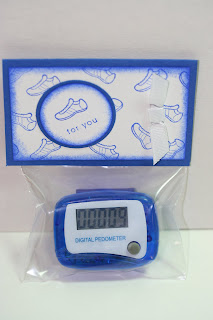
Here's a fun Weekend Project that would also be a great gift for birthday parties as a party favor. Who wouldn't like a pedometer? I think it would be a great item for craft fairs too!

I got this cute little pedometer at Target in their Dollar Spot. I actually got it today!!! It's not one of those things I got there months ago and put it aside until now. I actually bought it today and made something with it today. Shocker, I know!!! LOL

They measure 1-3/4" x 1-1/4" and are around 3/8" thick. Aren't they cute? They come in red, green, yellow and blue. They look like the Bold Brights colors!! Luck me!!

I used the shoe set from the Stampin' Up! "ABC Images" set and the words came from the "Tagger's Dozen" set. I used Brilliant Blue ink, the 1-1/4", 1-3/8", and the Double Rectangles punch. I added a bit of white grosgrain ribbon and assembled it.

The header is made using Brilliant Blue card stock that measures 3-1/4" x 4-1/4". Folded in half to measure 3-1/4" x 2-1/8". The white piece of card stock is cut 1-7/8" x 3". I stamped the tennis shoe all over the white and then sponged the edges. For the circle, I taped off the flower on the stamp so I would only get the wording. Remember to remove the tape before you stamp the image on your paper. Every now and then I forget to do that. But I have learned to stamp the image on a piece of scrap paper first to see if it inks up well with the tape there. Seeing that fuzzy taped out image on the paper reminds me the tape is there and to remove it. It works MOST of the time!!! LOL

When assembling it I always make sure that the prong part of my staples are on the front of the header. I will be covering them up with the rest of the layers. Now the back of my header has nice smooth staples on it. It looks VERY professional!!!

For more Weekend Projects, click here.

This project was made entirely of Stampin' Up! products. To view more items made entirely of Stampin' Up! products click here.

Thank you SO much for stopping by,
Wanda

Thursday, May 29, 2008

Rocket to the Stars!

Next month at the Stamp Share one of the swaps is to make a card using punches from the list emailed to us. This is one of my rejects. I cased most of this card from 2dee at SplitCoastStampers. I changed the colors and added the larger star and moved things around a bit. I do like the wheel "See You Around." It reminds me of asteroids when using it with the rocket stamp.

It's a cute child's birthday card but not what I want for the swap. SO I've been working on something else. I started it last week but have not finished it. And I'm NOT going to show you until after the Stamp Share!!! I know, SO mean!!! LOL

This is a very fun and easy card to make. I LOVE using punches. They add so much to a card, don't they?

For the rocket I used watercolor paper and black Staz-on ink. I chose watercolor paper so I could color the rocket in with markers. When using watercolor paper and markers you can color directly onto the paper and in any direction you want, it doesn't show. Isn't that just the best???? It's not like regular card stock where it shows every mark you make with the markers. On this one I even colored over the same spot a couple of times and it doesn't show. Such a deal, huh???

For more quick cards, click here.

This project was made entirely of Stampin' Up! products. To view more items made entirely of Stampin' Up! products click here.

Thank you SO much for stopping by,
Wanda

Wednesday, May 28, 2008

It's A Boy!

I needed a baby card and I saw one on SplitCoastStampers a week or so ago that I downloaded. I thought it was SO cute but I know I didn't have the ducky stamp. But that was ok, I knew I'd find another stamp that would work. The card was done by the user stinkincute. Just click on her name and you can view her adorable card. I did change it a bit due to different stamps available to me.

I didn't use an "it's a boy" stamp, I figured the blue would say it all!!! LOL

I used the baby buggy stamp from the Stampin' Up! "Fun and Fast Notes" set. I added a few brads to the buggy too.

For the dots I used a toothpick and some white acrylic paint. I wanted to use my gel pen but it wasn't being user friendly. It's been writing off and on. I think I need to order a new one!!!

I used the 3/4" circle punch for the Ballet Blue circle and the 1/2" circle punch for the Whisper White circles. And the dots on the circles were done using the Ballet Blue marker. I did add the "Many Dots" wheel background using Ballet Blue ink. It was a fun card to make and I think my girlfriend will like it. I'm not sure I would like knowing what I was going to have. I liked that element of surprise. But then again it does have it's advantages. You know what color to paint the room and what color sleepers and blankets to buy!!!

Well, I'm off to clean off my worktable now. I've made a mess on it for the last few days and now my workspace is about the size of a dinner plate and I really do need more space than that to create!!! I'm such a slob when I work!!

Thank you SO much for stopping by,
Wanda

Tuesday, May 27, 2008

Forever!!!

My, "Forever" is such a LONG time, isn't it?? LOL

This is a card I made for an upcoming wedding. I used the Purely Pomegranate card stock and ink along with Basic Black, Basic Gray and Whisper White card stock. I did use Black Staz-on ink for the wording only because the stamp pad was still sitting on my worktable. Though I do think it stamps crisper than the Basic Black does. And I did use a black marker. I had stamped the flower image with Purely Pomegranate and then colored over the stems with a black marker.

I added a piece of 1/4" white grosgrain ribbon and 3 white brads. If you don't have any white brads you can always make your own by using a pinch clothespin to hold the brad, heat it with the embossing tool and dip it in white embossing powder. The brad may be hot enough to melt the embossing powder with the first dip, if not just repeat until you have the coverage you are looking for. Allow to cool before handling.

For the background on the larger Purely Pomegranate card stock I used the same flower image and the Purely Pomegranate ink pad. I felt the background needed something.

This was a pretty quick card to make too! Click here for more quick cards.

Thanks SO much for stopping by,
Wanda

Monday, May 26, 2008

A VERY Pink Birthday Case!

My card was came from being SO inspired by a card that I found by Nancy Riley at iStamp. Her card is a blue baby card and she also used rub-ons on her card. Mine is a soft pink Birthday card and I added a few different things to mine. I didn't want to copy exactly but I did like the layout and how I could use more of my decorative papers. I REALLY need to use those papers more. I know there is no contest to see who has the most decorative papers. I have TONS but I'm sure I don't have the most. Yet!!! LOL

I did like the layout of Nancy's card too. And adding the striped paper with the flowers was different for me. Do you think the vertical strips makes my card look thinner? LOL I know, bad joke!!! LOL

This was a very fun card to make. Nancy has a several cards on her blog that have inspired me and I hope to find time to make them too.

Thanks SO much for stopping by,
Wanda

Sunday, May 25, 2008

Weekend Project! Card Holder and Matching Cards!

I have seen these card holders around for a while now and have always wanted to make one. The tutorial I used was found at Rochelle's Blog "Impressions." Though I have seen it on other blogs I found her tutorial to be the easiest to follow (and get it right the first time too!) And she also has instructions for using the Fiskars to score your lines. She's the best!

I was SO excited to make this holder, I had wanted to make one for a long time and I liked the Stampin' Up! "Tart & Tangy" set. SO I was ready to play. Oh and PLUS I was using more decorative paper!!!

After making the box using Real Red card stock I set some decorative paper on top and marked it lightly with a pencil and cut it to fit. For the top flap I used the corner rounder and liked the outcome.

I used the apple from the "Tart & Tangy" set. I stamped two on the flap and one on a separate piece of card stock and punched it out. I layered it on top of a 1-3/8" circle of Old Olive and set that on top of a Real Red scallop.

The cards were made using the scallop and circle punches. Pretty much the same way as the holder was made but with only one apple. The cards were much quicker to do than the cover of the holder. It seems that coloring on rubber with markers seems to slow up stamping for me!!! I try to get it covered SO solidly and it doesn't always work. Then I have to just step back and remember that it is a handmade card.

I made 4 cards. 4 cards and 4 envelopes fit perfectly in this holder. It is just slightly lumpy because of the bows but I did face 2 towards the front and two towards the back to offset the bulk of the cards.

I made this for a gift of appreciation for someone but I can not say who. If they read my blog they will know and it will ruin the surprise.

Well, now I need to work on the challenge that Terri gave us for next month. We are to decorate a white Stampin' Up! bag. I know what I want mine to look like, lets just hope it works out that way!!! Sometimes what goes on in my mind doesn't always come out that way on paper!!! We'll see. I'll post it after the Stamp Share so you'll just have to sit on pins and needles until then. If you're anything like me you'll forget about it before then!!! LOL

I hope you are enjoying your weekend. Be sure to stop by Rochelle's blog and check out her tutorial on the card holder. Take some time to make one, or several. They make wonderful gifts!! Plus they are SO impressive looking when you are all done with them.

This project was made entirely of Stampin' Up! products. To view more items made entirely of Stampin' Up! products click here.

Thanks SO much for stopping by,
Wanda

Saturday, May 24, 2008

Apple Cider Birthday!

I'm trying to challenge myself to start using and using up my decorative papers. I have SO many of them and I'd bet half of the ones I have that are from Stampin' Up! are retired. I thought I'd try to make some cards using my decorative papers and try to use the papers up before they retire. That would be a first for me!!! LOL

For this card I used some unusual colors as well. The paper on the bottom is from the "Apple Cider" designer series. I used River Rock card stock above it and used the "Lots of Dots" jumbo wheel and River Rock ink. I didn't get it straight the first time so I flipped the piece of card stock over and gave it another try. If that wouldn't have worked I was going to take a 1/4" of card stock and roll the dots on and then take it to the paper cutter to even it all out!!

I taped those two pieces on top of a piece of Bravo Burgundy card stock. I added 3 copper brads using the dots already on the paper!!! Nothing to line up there! And I did use the Mat Pack to make the holes in the corners on the right side of the card. I added the River Rock stitched ribbon and affixed the layers to a piece of folded Chocolate Chip card stock.

I punched out the Scallop in Bravo Burgundy, the 1-3/8" circle in Chocolate Chip and the Birthday greetings using the 1-1/4" punch. I did the "Happy Birthday" on the computer using the SchneidlerAmaTBla font. I have no idea what that means but it was in the list of fonts on my computer and I liked the look of it. If you don't have it on your computer I'm sure you can get it if you Google it. Someone out there has probably posted it for downloading.

Before I taped the scallop part together I added a brad from the Earth Elements group. I taped it all together and now it's ready to send off. Though it should REALLY read "Belated Birthday." I don't think I've gotten more than 3 cards out on time this year!!! I need to challenge myself to try harder to get my cards out on time too. It's not like I don't have any extra ones here or that I can't make one up!!! I have no idea what my problem is and if there is a name for it I'm sure it's very difficult to pronounce!!! LOL

This card was made entirely of Stampin' Up! products. To view more items made entirely of Stampin' Up! products click here.

Thank you SO much for stopping by,
Wanda

Friday, May 23, 2008

Blooming With Love Thank You

This is a very fun and easy card to make. Not quite as easy as the "Touch of Nature" get well card that Melissa made but still easy enough. This one has a few layers and some brads. It probably took twice as long as the "Touch of Nature" card did, which was all of 5 minutes!!! Once again I think it took me longer to pick and cut the card stock than it did to actually make the card. Ok, the coloring did take a little bit of time but not much.

For this card I used the Stampin' Up! set "Blooming With Love." There's a lot of things you can do with this stamp set. I tried to keep the card a Stampin' Up! products only but I just couldn't leave out the white brads. Stampin' Up! NEEDS to carry white brads. Hopefully there will be lots of requests to them for it and they will carry them someday!!

Here are the measurements for this card. The image was stamped on a 2-1/4" x 2-1/2" piece of Whisper White card stock. The Bashful Blue layer is 2-3/8" x 2-5/8". The Basic Black layer is 2-7/8" x 2-5/8"

The blue decorative paper is from the "Picnic" pack and is cut 3-7/8" x 5-1/8". And the Basic Black layer is cut 5-1/4" x 4". I sponged the decorative paper and the Whisper White card stock. I used a blender pen to do the flower pots and the rest of the coloring was done directly from the markers. I used Pretty in Pink, Mellow Moss, Brocade Blue, Apricot Appeal, Really Rust and Bashful Blue. The sentiment is from the "Sincere Salutations" set. And I did use the Mat Pack to line up the holes for the brads.

All in all it was a pretty simple card. At first I didn't like the colors I chose for the images but once I got it layered on the card stock and decorative paper it kind of grew on me.

I hope you are all enjoying your holiday weekend. My plans tomorrow consist of the endless task of picking dandelions (every morning I do this ritual!!!). Then I will be giving the buffet a final sanding and final coat of polyurethane and it will be done. The doors and drawers will be a couple more days since there are two sides to those and only one can be done at a time. But I should be done with them by Monday! My hopes are to have the entire thing done and in the dining room by late Monday afternoon. And then just wait for Lowes to get the top to me. They take SO long it's unreal. I was told it would be done in 2 weeks, it's now deep into the 4th week. They did the same thing with our bathroom vanity top and the kitchen counter too!!! Then DH and I will move on to the list of things I wrote down that need to be finished inside. I'm hoping to get a couple of those done tomorrow and then I'm spending the rest of the day in my workroom. It needs to be cleaned up plus I want to play with some stamps that I finally got put together. A busy day indeed!!! And if I have any energy left after 9 pm I am hoping to work on a beaded bracelet!!! I have a trillion beads and want to play with them too!!! Why do we have to sleep??? LOL Do you know how much more stuff I could do if I didn't have to sleep??? And do you know how crabby I'd be if I didn't get any sleep?? NOT a pretty picture!!! LOL If I get a chance to make a bracelet I'll post it on here so you all can see it!

Thank you SO much for stopping by,
Wanda

Pick A Petal Card Designer's Name

The "Pick a Petal" card I posted earlier this week was found on the Stampin' Up! demo website showcase about a week ago. The original creator was Karin Miller.

Thank you Autumn for letting me know who the original designer is. Fabulous card, isn't it?

Thanks SO much,
Wanda

Thursday, May 22, 2008

SUPER Quick Card!!! NO Kidding!!!

You are just NOT going to believe this. I waned to make a quick card and I remember seeing some cards on Melissa's blog "Simply Pink" that looked like they would be quick to make. I think it took me longer to get the materials and cut the card stock than it did to stamp the two images and tape it all together.

Isn't it just a simply sweet Get Well card? The cards I make usually have a bit more detail to them but now and then I love it when I can make a quick card that is SO cute and sweet!!!

For this card I used Bashful Blue, Basic Black and Whisper White card stock. I used Bashful Blue and Basic Black ink. I cut the card stock, stamped the images on and taped it all together in less than 10 minutes. Shocker, huh??? I'd have to say that is the quickest card I have ever made. This flower is from the Stampin' Up! "Touch of Nature" set and the wording is from the "Sincere Salutations" set. Both among my favorite sets. I LOVE it when I can use these sets.

The holiday weekend is upon us. I do plan on posting this weekend. I will be home. We are having some automotive issues (no, not the price of gas!!! Which by the way is $3.85 a gallon today) but the issues with the vehicle prevents me from going anywhere. Which I can deal with since there is SO much to do around the house. There's TONS of things left to put away from having the kitchen remodeled. It's great to see it all done but such a nightmare to live through. And there's lots of those unfinished projects around here that take less than an hour each to do but it's a matter of deciding to devote that time to those projects. SO staying at home will be just the thing I need to get these items done along with DH. I wonder if he knows what he's in for this weekend?? LOL He'll wish I would have left for the weekend!!! LOL And for those of you leaving, I hope you have a very fun, memorable and safe time. Please be sure to come back and check out all my posts you missed while you were gone!!!

To view more "Quick Cards" click here.

This card was made entirely of Stampin' Up! products. To view more cards made entirely of Stampin' Up! products click here.

Thank you all SO much for stopping by,
Wanda

Wednesday, May 21, 2008

Casing the Pick a Petal!

I had the wonderful opportunity to stamp with Sue last night. I mostly worked on my card for an upcoming swap but I did make a card that Autumn (hi Autumn!!!) had shown Sue and I just LOVED it. I LOVE to case cards whenever I can but don't do it too often. I try to be creative and make up my own but every now and then there's some cards that pop up that I just have to have and once again it happened. Isn't it just adorable???

Sue cut my card stock for me but she wouldn't stamp the images. Coward!!! LOL SO I had to drop what I was doing and make those cards!! She cut the card stock for me to make two. Wasn't that sweet of her? She is the best upline!!! She is very talented, creative, kind, generous and is a VERY good friend. Oh and she's a wonderful manager too!! I LOVE going to her place to stamp. I did get a lot done on my card but I didn't finish it. It's got a few more hours to it. Oh, it's not just one card, it's 16 of the same design. It's got a few pieces to it and that's why it's taking a while to make. But it's fun so I don't mind.

Here is the card I made at Sue's last night. The Stampin' Up! set used is "Pick A Petal." I have hardly used that set. I need to play with it more. There is SO Much that can be done using that set. The petals were colored in using a dauber and the Yo Yo Yellow ink pad. The center of the flower was colored in using Close to Cocoa ink and a blender pen. The words are from the "All Holidays" set. A very quick and simple card to make. I may have to make more of these cards in different colors! These would make a great gift assortment, wouldn't they?

This card was made entirely of Stampin' Up! products. To view more items made entirely of Stampin' Up! products click here.

I don't know the original designer of this card. It's a case of casing a case!!! So if you know who is the original designer, please let me know so I may give them credit where credit is due.

Thank you SO much for stopping by,
Wanda

Oops, Forgot to Post the Blog Candy Winners!

Sorry, in my haste to leave here yesterday I totally forgot about posting the Blog Candy winners.

I will do the "Very Special" Blog Candy winner first and then the Blog Candy to celebrate my 400,000 hits. That was the one where you left your comment about the strangest things you've seen at garage sales. LOL

Ok, first the winner of the "Very Special" Blog Candy is #9 Sara. Here is Sara's comment:
Sara Paschal said...
Wanda, this is such a cool set thanks for offering us the chance. Keep up the great work!

400,000 Hits Winner

And the winner of the 400,000 hits Blog Candy is #26, Sheila D and here is her comment.

Sheila D said...
You are not going to believe this but about ten years ago I popped into a "tag sale" (as we call it) and lo & behold on a table with other junk was a jar filled with water with false teeth in it. I seen that and walked directly to my car and left. Gave me the creeps. Who knows, maybe they were a famous persons dentures? It's funny now but gross then!

There were a lot of comments left about finding false teeth at a garage sale. I'd have to say I have not run into that yet. I don't go to very many garage sales, probably about a dozen a year only because 8 to 10 of them are on my street the day before Mother's Day when there are over 200 homes having sales. It's a zoo here but you can really sell your junk!! I'm sure my day is coming when I find that elusive set of choppers!!! LOL I REALLY REALLY hope I don't! LOL


Ok now here's what you two winners need to do. Just email me with your snail mail address and I will get your items out in the mail to you. Yes, I wrote "items" because I usually add some more fun things to the original post!! Lucky You!!!

If I don't hear from you by Monday Night May 26th I will hold a second chance drawing. SO be sure to email me ASAP!!!


Thank you all for playing. There will be more Blog Candy!!!!

Thanks SO much,
Wanda


Tuesday, May 20, 2008

The Case of the Whale!

I saw this card by ncmorgan on SplitCoastStampers and I just HAD to copy it. Mine is not exactly like the one there but it's close enough. I just thought this whale was SO cute and the waves were what really caught my eye!

I didn't have the same decorative paper so I used the light blue from the Stampin' Up! "Picnic" package. For card stock I used Ballet Blue for the main card and accents, Bordering Blue (which when mixed with these blues looks gray) and the whale was done on watercolor paper.

The waves were made using the slit punch. The rounded part that was on the other end of the wave piece I kept for use for a different card for some other time.

I also changed the word part. I didn't have the set that was used in the original one so I printed out the "Happy Birthday" on the computer and punched it out. I layered it on top of a Ballet Blue circle and a Bordering Blue Scallop. It was a very fun card to make. And I think it is SO adorable!!! Now and then it's fun to copy and share someone elses work! I'm kind of possessive when it comes to a card I REALLY like that someone else has made. I just HAVE to have it! I suppose I could email them and ask them to send me the card. SO rude!!! LOL SO the next best thing is to just make it myself. And of course give credit where credit is due. Be sure to check out ncmorgan's card and if you have time look at her gallery too!!

Thank you SO much for stopping by,
Wanda

Monday, May 19, 2008

Lemon Water!

In my early days of blogging I had posted a Winter Water Bottle we had made up for one of our Stamp Camp items. It was a lot of fun. And seeing the lemon iced tea in the single serving packets I thought it would be fun to introduce it to the "Tart & Tangy" stamp!!!

The color makes this mixture look even more refreshing, doesn't it???

The size of this one is different than the winter one.

For the pocket part of this I cut the card stock 9" x 2-1/2". I scored one end at 2" and the other end (the pocket) at 2-1/4". I stamped that piece with the citrus image and Yo Yo Yellow ink. I used the regular water-based dye ink, not the craft ink. Then I folded the scores. Now you will notice that the top 2" score folds away from you and the bottom 2-1/4" score folds towards you. This means that you will need to do just a little more stamping! Once the images are all stamped set it aside and take a piece of YoYo Yellow card stock and cut it 2-1/2" by 1-1/2". This is for the brim of the pocket. For mine I used the new corner punch and made my own scallop. I attached it with some Snail tape and then punched the holes for the gold brads. I added the brads and set it aside.

I punched out a 1-1/4" hole in a piece of YoYo Yellow card stock and then lined up the center of it in the Scallop punch and punched it out. Again taking your pocket piece punch a hole at the top 2" scored piece for the bottle top. Attach the scallop piece.

Next you will be making your lemon like I explained in the "Suckered In" post. You stamp the lemon using the YoYo Yellow craft ink pad and then emboss it in clear embossing powder. Line it up so it's pretty centered in the 1-1/4" punch and punch it out. Then punch out a piece of 1-3/8" black card stock for the layer behind it. Then add a YoYo Yellow Scallop to the back of that. Attach that to the front of the pocket. Set the whole thing on your bottle and it's finished. This is a VERY fun, quick, easy and inexpensive Stamp Camp project. It also makes a perfect Make N Take too!

This item was made entirely of Stampin' Up! products. To view more items made entirely of Stampin' Up! products click here.

Thank you SO much for stopping by,
Wanda

Yes, It Does!

In the last post "Suckered In," MJ asked if the Scallop would fit behind the sucker. I checked and it sure does! It would be SO cute with scallop behind the sucker. SO I thought I would give it a try and show you. Pretty cute, huh?

Thanks MJ for sparking my interest in this!!! Who enables who??? LOL
I used YoYo Yellow card stock in the Scallop punch. Just TOO cute!!!

Sunday, May 18, 2008

Suckered In!

I was at this dreadful store "Michael's" shopping for more stuff I don't need!!! I mean, how much more stuff can I fit in my workroom??? The cupboards are full, the drawers are full, the stairwell closet is full and the ledges that go around my workroom are full. I think I just may have "stuff" to open my own craft store!!! I was going to add a "LOL" but it's really not so funny when you stop and think about it. Ok, maybe it is in a strange sort of way!!! Strange?? That would be me!!! LOL

Anyway, I'm picking up what I went in there to get (can't let that coupon expire now, it's like wasting money!!!) and as I was checking out they had these adorable suckers in the impulse section. That store can just see me coming, can't they? LOL Anyway I had to buy one. Yes, I said one!!! I may have to go back and buy more. I only bought one because when I buy things like this I usually don't get to them for a while and sometimes even a LONG while. Some things get old while others get out dated. But this time I worked on it in less than 5 days after I bought it!! Shocker, I know!!! LOL I was surprised myself. I think it may have been that I didn't stuff it somewhere and then run across it many moons later!

And since the Stampin' Up! "Tart & Tangy" set is still available I thought I'd play with it again. I stamped the lemon using the YoYo Yellow craft ink pad. These craft ink pads have thicker ink and they take longer to dry. They are nice for using on fabric and heat setting the color in! Plus the fact that they don't dry right away so you can put embossing powder on them. I highly recommend these ink pads though I would recommend buying them in the small ink spot size. That way you can get all the colors at a reasonable price. I'm sure there are some colors you may never use but it's better to have them in a small form than a large one!!! Plus the small ones are easy to store too. They come in a nice boxes (4 - one for each color group) that stack well. Now when I use them with clear embossing powder I have EVERY color of embossing powder!!! Just use the ink you want, clear embossing powder and you now have that color embossed and it looks like you embossed with that color!!!! How great is that???

These suckers would make fun Hostess Gifts, Customer Appreciation Gifts or a little gift for those who bring their children with. These were VERY simple to do too. The sucker comes with a small tag on it. I just sandwiched it between 2 YoYo Yellow scallops. On the back I did stamp "You're the Best!" But you could stamp any wording on it that would fit your occasion. And if there is no stamp for what you want to say, you can always use your computer

Oh and I should tell you, these suckers come on an EXTREMELY long plastic stick. The sucker is over 12" long when you buy them. I thought it was a bit long but if you were to do a bunch of these and put them in a vase (WAY TOO CUTE!!!) you would probably want them long.

Thanks SO much for stopping by,
Wanda

Saturday, May 17, 2008

Father's Day Wannabe!!

I was planning on making a Father's Day card but got going on some copying and made this card. I didn't leave much room for a "Happy Father's Day" now did I? LOL

I was inspired by a card that automicbutterfly did on SplitCoastStampers. Mine is a little different but you can clearly see where the inspiration came from!!!

The card stock I used is Bordering Blue, Not Quite Navy, Old Olive and Watercolor paper. I used a couple of brads on my card and some Chocolate Chip 5/8" wide grosgrain ribbon. I used Dimensionals under the bird layers. It needed to be raised up enough so the layer would lay flat across the ribbon under it. I sponged all of the edges. The bird was done using the Not Quite Navy ink pad and an Aqua Painter.

I did make a mask of the bird on copier paper and taped it over the bird and then I sponged on some Creamy Caramel because I felt the background there needed a little something. That seemed to be just the right thing it needed. I used the fern stamp from the "Touch of Nature" set for the Old Olive piece behind the bird. I used the "Flannel Plaid" background stamp on the Not Quite Navy piece. I used the Ticket Punch on the corners. I felt they needed a little rounding off.

It was a pretty fun card to make though I didn't leave any room to add "Happy Father's Day" now did I? I can always add it to the inside of the card. This card has some very masculine undertones to it. It could be used as a get well card, birthday card and thinking of you card too!!! I did like how it turned out. Shocker, huh?? LOL

This item was made entirely of Stampin' Up! products. To view more cards made entirely of Stampin' Up! products click here.

Don't forget the Blog Candy. The randome drawing will be held on Tuesday the 20th.

Thank you SO much for stopping by,
Wanda

Friday, May 16, 2008

Weekend Project! Altered Post-it Note Holder

I got a GREAT deal on this Post-it note holder. It even has this rubber "thing" on the bottom of it that suctions to the table so it doesn't slip when you go to remove a Post-it. My worktable is textured and it even suctioned to that!!!! Pretty cool. Anyway I thought I would alter it and pretty it up for someone's desk.

I took the box apart so I could lay it on top of some decorative paper. Did you know there is a spring inside there? I often wondered where those old bedsprings went!!! LOL You know, that would really be an excellent way to recycle them!!! Maybe they do??? It's obviously a trade secret and no one will ever know!!!LOL

I used the decorative paper from teh "Afternoon Tea" package. This paper reminds me of "grandma's" wallpaper. My grandma didn't have wallpaper but if she did it would look just like that!! It's got a Victorian/Vintage look to it. Doesn't it?

I added the paper using double sided tape and tied Groovy Guava stitched ribbon around the box. I did add a bit of tape under the ribbon on all sides to hold it in place. It just didn't look quite right yet so I added the "Daily Notes" words from the "Office Acoutrements" set. It just seemed to fit with the "theme" of the project. Very appropriate, don't you think?

But it just wasn't enough. The box needed a little something more. What could I add to it to give it that finished but not gaudy look??? Buttons!!! Yup, buttons it is!! I found some buttons in the Soft Subtles buttons container that were close to the Soft Sky color and I think they blended in just fine. And I felt the box was complete. Ready for that special desk!!

I was surprised at how nice this paper dressed up that box. Such a fun project, isn't it? No box, bag or container in my house is free from being altered!!!

This item was made entirely of Stampin' Up! products. To view more cards made entirely of Stampin' Up! products click here.

For more altered items click here.

Thank you SO much for stopping by,
Wanda

VERY Special Blog Candy!!!

I'm posting some more Blog Candy for some VERY special people. If you have left a comment on any of my posts (cards or altered items) in the past 10 days you may enter the drawing to win this blog candy!!! I will do a random drawing on the evening of Tuesday May 20th.

You don't need to answer any questions. I have appreciated your loyality and have enjoyed reading your comments.

Good luck to you faithful fans!!
Wanda

400,000 Hits Blog Candy!

Can you believe it. My blog has received over 400,000 hits!!! I have a fun rubber stamp set + to give out to celebrate this SO exciting occasion. I added the "+" because by the time the blog candy goes out I've added many other items to the package. SO the lucky winner gets the set plus several other fun items in the mail too!!!

I know you are asking "How can I win this Blog Candy?" Well, it's SO simple. Because it's "garage sale" season I'll ask a related question. Most of us have been to or had a garage sale at one time in our lives. Tell me what's the strangest thing you saw for sale at a garage sale. Your comments will be posted and I will hold a random drawing for it. Please don't leave your email address, spammers LOVE to see those. Plus I don't email the winner, you much check back to see if you're the lucky winner.

I can't wait to hear about your garage sale finds!!!!!

I will post the winner on Tuesday May 20th. So be sure to check back.

Thanks SO much and have fun!
Wanda

Thursday, May 15, 2008

Thank Ewe!

For those of you who REALLY know me you know how much I DON'T like puns!!! So for me purchasing this set was very difficult. I LOVED the adorable little critters on the stamps but the wording . . . . well . . . . . I thought I would buy the set and just mask of the words and still enjoy the set. SO I'm playing with the set today and I actually decided to leave the wording with the image. I have TONS of word stamps and I have the computer. I could have gone with something else but I didn't! Shocker, huh?? LOL This little lamb (ewe) is SO cute!!! And I believe it is one of the few in the set I haven't played with yet. The skunk is next!!!

I used the Purely Pomegranate decorative paper for the background. The stripes at the bottom is what is on the backside of this paper. Fun, huh??? And as you can see I got it a little crooked. Once your tape touches the decorative paper you are pretty much stuck with it as it lays. SO I just say, "well after all it IS a handmade card!" Plus have you ever looked REALLY close at some of those manufactured cards???? Not so perfect either, are they? And people pay LOTS of money for that imperfection!!!

The black strip on here is just a half inch piece of card stock. I added 3 white brads. I did stamp the wording separate and I used the Word Window punch to punch it out. I made sure I got close to the words on one end with the punch. Then I added a little tape to the words an attached it to a piece of copier paper. Then I put it back in the punch and punched the other end close to the words so it matched the first punch. I now had a smaller punched area. I didn't want the words to get lost in that long window and this was the easiest way to make it work.

I did punch the corners with the Ticket Corner punch before I taped them in place.

A pretty quick and easy card and not to mention that little lamb is cute!!!

I will be posting Blog Candy tomorrow to celebrate my blog reaching 400,000+ hits!!! SO fun!

Thank you SO much for stopping by,
Wanda

Wednesday, May 14, 2008

Wednesday Sketch Challenge at SplitCoastStampers

Another Wednesday has snuck up on me!!! I just can't believe how fast time is flying. We are almost to the middle of this month!!! Summer will be over sooner than we think. Actually summer has not come to Minnesota yet. It's still spring weather here. I looked out my window today and thought that it would be a couple more weeks before the maple tree leaves will all be open and I won't be able to see the neighbors house for about four months or so!!! It's kind of nice to have the backyard feel "private" if only for a few months!

Onto the sketch. This one was VERY different, a bit challenging but definitely FUN!

I used some "map" paper I had gotten at Michael's. I had it sitting around and thought it would be perfect for what I had in mind. I dug out my old (and most LOVED) masculine "Classic Pickups" set by Stampin' Up! It has always been a fun set and I miss it not being in the catalog. Hopefully in the next catalog there will be some more vehicle stamps!! I did do the wording on the computer because I wanted it to fit in the area of the sketch. Once I got everything on the card it looked like it needed just a little something. "Buttons!!!" I thought and then as quick as that thought came the word "masculine" came to mind and that means leave off pretty buttons and bows and ribbons!!!! LOL Brads!! Yes, brads. They are masculine, especially black ones. The can look like rivets or nails. They will do for a "masculine" touch!! And I think it was just what the card needed!

I didn't have to color a thing on this card. The Ballet Blue on the car image was enough to allow the image to stand out and yet not have to color in anything!!! Talk about simple!!! The map was easy because it was already colored. And typing up a few words on the computer went quickly too! Such an easy card to do!! And a VERY fun sketch. If you have time, play with this sketch. Then head on over to SplitCoastStampers and submit your card!!! It's a lot of fun!
For more quick cards to make click here. And you can find a couple more Father's Day cards here.

Thank you SO much for stopping by,
Wanda


Blog Candy Coming!

It looks like my blog will be hitting a HUGE milestone this week so I will be posting some very fun blog candy for you! Stop back soon and check it out!!

Thank you all for visiting my blog and making this possible!
Wanda

Nessie Wanted to Know!

Nessie had a question for me in her comment. I am not able to reply to the comments. All Blogger allows me to do is to publish them or reject them. SO I will try to answer the question here. She wanted to know why the card stock for the Tic Tac Holder has to fold up on the card stock on the long side. And asking why the card stock can't be cut in half and get 2 holders out of one sheet of card stock.

The card stock is not doubled, it is just a single piece. The card stock measures 3-7/8" x 2 3/4" so you will or should be able to get anywhere from 6 to 8 out of one sheet of card stock, depending on how you lay out your pattern. I would make one out of copier paper first and you'll be able to tell how many will fit on the card stock. Once you cut one out of copier paper you will see why it's scored on the long end. If you're looking to make these to sell, the card stock will probably be the cheapest part of the card.

I hope I was able to answer your question. Have fun making them. If you'd like me to post your finished one on my blog for all of your friends to see, just email it to me and I'll do just that!!!

Thanks SO much,
Wanda

Tuesday, May 13, 2008

Tic Tac Tutorial!

Tic Tac anyone? Now what is the proper response when someone offers you a breath mint???? I read somewhere that most people are having one themselves and you just happen to be sitting near enough that they feel they should offer you one. They really have no idea if you truly need one or not. Reading further the proper response is, "yes, thank you." Everyone can use a little fresh breath now and then, can't they???

So on to the tutorial.


Cut your card stock 3-7/8" x 2-3/4". Score on the long side at 1-5/8" x 1-5/8". Fold on the score lines. Set your Tic Tac container on the inside to see how well it fits. I know you what to!!! LOL I always do!! You will want to add a little piece of tape to hold the Tic Tac container in place or it will slide right out when you are done!

Attach about 12" of ribbon to the card stock, preferably in the center and you are ready to decorate as you like.


Cut card stock as follows:
Cut black piece 1-1/2" x 2-5/8"
Cut red piece 1-3/8" x 2-1/2"
Cut vanilla piece 1-1/4" x 2-3/8"


When you are done decorating it, tie your bow off to the side. Fun, cute and quick to make!!

This item was made entirely of Stampin' Up! products. To view more cards/items made entirely of Stampin' Up! products click here.

For more tutorials just click here.
These would be a fun Stamp Camp project, more can be found here.

Thank you for stopping by,
Wanda

Monday, May 12, 2008

Well Wishes and a Challenge for Me!

I needed to make a get well card for my aunt. She had to have her total hip replacement redone. OUCH!!! She's such a tiny petite lady that they had to use a child-size artificial hip on her. Hopefully this time the surgery will work.

My challenge was to use the Always Amethyst decorative paper. I have a lot of time working with this paper. I did find that if I put the black next to the decorative paper instead of the colored card stock it looks better. But wen you put the colored card stock next to the decorative paper it's not as vivid.

So I'd have to say that this time it worked out and I like the colors. And there was another challenge here too. I needed to incorporate some Hodgepodge Hardware on the card too. I buy this stuff and rarely use it.

Now my card is ready to go out in the mail tomorrow!

This card was made entirely of Stampin' Up! products. To view more cards made entirely of Stampin' Up! products click here.

Thank you SO much for stopping by,
Wanda

Sunday, May 11, 2008

Weekend Project! Cheery Cherry Notes!!

I hope you all had a wonderful Mother's Day. Here in Minnesota it was a fabulous day weather-wise too! I woke up to a clear blue sky and sunshine. Would be odd to have a clear blue sky without any sunshine now wouldn't it. I guess that part could have gone without saying!!! There is a bit of a wind and that is a bit cool so it would be called "sweater weather" but to me it was perfect. I got home just a little while ago from my mom's. Did the lunch and gift thing there and in about an hour or so I'm off to see our son and go out to dinner!!! So with all that going on I thought I should do my post before I forget and get it in too late for Feedblitz to send out.

Onto the project "Cheery Cherry Notes!" Say that one 3 times real fast!!! lol Ok, I had purchased this notepad at Michael's. I picked it up because of the cherries on it and having in mind the "Tart & Tangy" set. Though I didn't use that set with this, I used the Stampin' Up! "Office Accoutrement" set. I did try to do cherries on the front but with all the cherries in the decorative paper it was just too busy and no matter what colors I tried to use for layering it was just TOO busy. SO I settled for the "Daily Notes" stamp and went with something different with the ribbon. I didn't say something fancy, just different. I just laced it like you would your shoes and tied an knot in the middle. I did have to use two thicknesses of Dimensionals because of the knot though. I tried one and the scallop bulged out in the middle. And the only way around that was to tie the knot in the back of the notepad. But then it wouldn't lay nice to write on the notes!!! Such a dilemma!! LOL

For starters here I had to divide this pad up into 3. I needed it and the layers I was creating to fit in the Crop-a-Dile. I took a piece of cardboard that came with the 12" x 12" decorative papers and cut it for the back. The back of the pad needed some stability. Then I cut a piece of Bashful Blue for the front, then a smaller black piece for on top of that and then the decorative paper. The top band is that wide because of the design on the paper. I didn't want it to show when the notebook was open. I just wanted the cherries in the corner to be the focal point of the page. After I got the layers taped in place I punched the holes with the Crop-a-Dile and laced them with white grosgrain ribbon. This was a pretty quick and simple project to do. Plus one pad will make 3 altered ones!! If you're making them to sell, think of the profit margin there! These would also make great Hostess Gifts or Customer Appreciation Gifts as well. And I think they'd sell well at craft fairs too. Plus it would be a VERY fun project at Stamp Camp!!! There's lots of thing you could use these for!!

This was made entirely of Stampin' Up! products. To view more items and cards made entirely of Stampin' Up! products click here.

Thank you SO much for stopping by,
Wanda

Saturday, May 10, 2008

Gratitude!

Those of you who have subscribed to my blog using Feedblitz will get this post tomorrow morning, I believe the "mail" goes out around 1 am Central time. And for those of you who use the Google Reader the post goes into your Reader the minute I hit "publish." So this wish may be a little early for some of you but that's OK, it doesn't change the sincerity in it. I'd like to wish everyone a very Happy Mother's Day. I hope your day is filled with many fond memories (ones you'll even scrapbook!!!).

My card for today is a little different. I decided to combine a couple of colors I rarely use together, red and orange. Right from the Bold Brights group. Don't you just LOVE those colors Cyndi???? LOL (Cyndi is one of my fellow DIVA's and Bod Brights is not one of her favorite color groups. But I will work on her and get her to like it one of these days!!! LOL). And I also combined that with a set I have hardly used. The Stampin' Up! "Defining Alphabets" set, I even had to cut out the "G" to use it!!! And the "Define Your Life" set. I like them both but have not played with them much at all. I had opened up my catalog and I saw on page 156 the little red card made using this set. I decided I was going to copy something out of the catalog. I'd never done that before. I didn't have that little flower they had and that's what started the whole thing of deviating away from the copying. And this is what I came up with. I used decorative paper from the "Picnic" pack. The flower is from the "One of a Kind" set along with the Boho Flowers punch. I added some ribbon and brads and I actually liked how it came out!! Shocker, huh?? Especially after the last one. UGH!!!

This is a very quick card to make too!!! To view more quick cards please click here.

This card was made entirely of Stampin' Up! products. To view more cards made entirely of Stampin' Up! products click here.

Thank you SO much for stopping by,
Wanda

Friday, May 09, 2008

"Thanks So Much" Strawberry!

Sue (my manager) sent me a card with this curious edging. She had used 3/4" half circles along an edge and it REALLY dressed up the card. I kept looking at that edge and finally I broke down and asked her if I could copy her card and put it on my blog. And being the gracious person she is she said I could. Well Sue, sorry. This looks nothing like the card you sent me.

I just started with the half circles and thought I'd try the smaller 1/2" circle and somehow the peanut butter got in my chocolate and I ended up with both of them on my card!!! I liked it so I went on with the card and this is the end result. It's a very simple card and I like that way of doing a faux scallop edge. Pretty fun, huh? What else do you have for me Sue? LOL

This card was made entirely of Stampin' Up! products. To view more cards/items made entirely of Stampin' Up! products click here.

Thank you SO much for stopping by,
Wanda

Thursday, May 08, 2008

Now For Something REALLY Ugly!

They all can't be winners you know!!! I have made my share of UGLY cards and this one goes in that pile!

I REALLY liked this layout and wanted to run with it. SO I made some background paper to go with the pink and chocolate. So far so good. I was liking what I saw. Then all of a sudden I didn't see ANYTHING anymore. I hit a brick wall with this one. I had no idea where I was going with it. I just sat here and stared at it. I ended up cutting out some flower images from the Stampin' Up! "One of a Kind" set. I was leaning towards that type of stamp since the background was Boho. I am SO not happy with this but I thought I'd share my failures with you too.

I will have a much prettier card tomorrow!!! LOL I PROMISE!!!

This card was made entirely of Stampin' Up! products. To view more cards/items made entirely of Stampin' Up! products click here.

Thank you SO much for stopping by,
Wanda

Wednesday, May 07, 2008

Wednesday Sketch Challenge at SplitCoastStampers

Here is my submission for the Wednesday Sketch Challenge at SplitCoastStampers.

This one was SO different than all the others. It was quite a challenge but I LOVED it!!!

I used Really Rust, Old Olive, Basic Black and Whisper White for my colors. I added a few brads and some ribbon to the Stampin' Up! "True Friend" set. Plus I used the "En Francais" background stamp and the "Itty Bitty Backgrounds" set too.

There's not a whole lot to this card. You don't really need measurements because the sketch at SplitCoast prints out exact size. I just used that for my measurements. This is one sketch I am pretty sure I'll be using again!


If you have time go to SplitCoastStampers and give their Sketch Challenge a try. It's a lot of fun!!

This card was made entirely of Stampin' Up! products. To view more cards/items made entirely of Stampin' Up! products click here.

Thank you SO much for stopping by,
Wanda

Tuesday, May 06, 2008

Strawberry Fruit Dip 6 x 6 Recipe Page

I have a wonderful 6" x 6" album going with recipe pages in it. These pages are SO fun and such a cute way to display some of your favorite recipes.

I saw this recipe on Melissa's blog, Simply Pink. Check out her blog, she has some wonderful cards and other items there as well.

I copied the recipe and did my layout a little different. I have SO many fruit recipes that I could use this stamp set for a month and still have recipes left. And guess what? Stampin' Up! has extended the mini catalog for another month!!! SO I just may be doing more fruit recipe pages!!!

Last month I had gotten the "Viola to Go" set so I can use that for some pages too. Not all of my recipes involve fruit!!! LOL

If you're going to start making an album you will want to type up your recipe on your word processor and print it out. I like to try to keep my recipe in a 4-1/2" to 4-3/4" by 4-1/2" to 4-3/4" square. You want to have room to stamp, color or add embellishments or even all of the above!!! LOL I usually like to stamp some soft image on the background but this page I didn't. I just left it at the sponging. I don't think adding an image in the background was going to do much for this page since the red card stock was going to be drawing your attention. After you print out a few copies and measuring to get the words where you want them then print it out on your background card stock. Here I used Whisper White. I like to keep a copier paper printed one cut at 5-3/4" x 5-3/4" on hand for lining up my next recipe. I don't like to measure things if I don't have to!!! I just set the copier paper copy on the card stock printed one and lightly add some pencil lines for cutting. If I after working with it and adding layers I find I need to trim it back more I still have that option, that is why I only cut 1/4" off to begin with. I never just cut it 6" x 6" because I want to (and need to) add layers.

Ok, once you get your piece cut and know what you want on it just have fun adding your items. I don't tape anything in place until I have all the pieces assembled and sitting on the page. I sometimes move things around a few times before I find them pleasing to my eye. Then I tape it all up and put it in the 6" x 6" album sleeves. Now it's protected forever and is ready for your VERY fun and VERY cool recipe album!!!

Aren't they a fun thing to have???

This item was made entirely of Stampin' Up! products. To view more cards/items made entirely of Stampin' Up! products click here.

Thank you SO much for stopping by,
Wanda

Monday, May 05, 2008

True Friend! Mother's Day Card #7

Ok, here is the final Mother's Day card I'm going to show you (this year!!!). I made so many because I need 4 of them for myself plus I wanted to have some on hand for display. Some of them I like to keep because of the layout.

For this card I used the new Stampin' Up! "Boho Friend" wheel, the "True Friend" stamp set and the "Boho Backgrounds" set. The "True Friend" and "Boho Backgrounds" have to be my favorite sets. Well, lately they are and will be until I run across another one I just can't put down. I've had a lot of fun with these two sets and there's still more "stuff" coming using these sets!! Especially the background set!!!

The Mother's Day sentiment was done on the computer, punched out with the 1-1/4" punch, then the Bayou Blue card stock was punched out using the 1-3/8" punch and the Scallop punch for the black.

On the Soft Sky background I used the little flowers in the "Boho Backgrounds" set. I used the Bayou Blue stamped off once for the background. I wanted a little bit of color but yet I wanted it visible enough to know there's something there.


For the flower I stamped the image in Soft Skey. I used my blender pen and removed the Soft Sky from the stem. I took the Bayou Blue ink pad and touched around the edges of the flower. Sort of like the rock and roll but the ink pad was in my hands so I could see where I was going. And get this. I did it that way too so I wouldn't hit the stem. Like I couldn't remove the ink with the blender pen!!! LOL A big DUH there!!! I colored in the stem and leaves with Mellow Moss and then added a touch of Always Artichoke on the dots and top edge of the leaves. I huffed on it to remoisten the ink and stamped the image on a pre-cut piece of Whisper White card stock. I sponged the edges, added a rhinestone brad and it was ready for layering. Another fun card to make. This one really didn't take very long to make at all. The time I spent on this card is about how much time I like to devote to a card. It wasn't a super quick card but it wasn't an all day one either. It was just right!!

To view other Mother's Day cards click here.

This card was made entirely of Stampin' Up! products. To view more cards/items made entirely of Stampin' Up! products click here.

Thank you SO much for stopping by,
Wanda

Sunday, May 04, 2008

Very Bright Mother's Day Card

I thought I'd make a Mother's Day card catered to the younger ones giving the card!!!

The colors in the Bold Brights group seem to represent a kids card the best. Do you think it's because of those basic 8 crayons we got as kids??? And those GIANT ones at that!!! I don't think I recall my son ever using up those giant ones before he got a new pack of the thinner ones. And I don't even recall him ever breaking a giant one either. Maybe they were TOO big to break!!! LOL I know they were the last ones to melt down. I would melt all the old crayons (similar colors) and pour it in candy molds. We'd have NEW dinosaur or car crayons!! LOTS of fun and you get to recycle too!!!

Anyway, back to the cards. I used the Stampin' Up! "All in the Family" set and the "Sprinkles" mini background stamp set. I colored directly from the marker. No blender pen or water coloring. I did sponge the edges on the white card stock and I used Summer Sun ink on the Yoyo Yellow card stock.

I was a bit disappointed in the ribbon I tied on under the girls feet. It was much darker than I wanted and it showed up even darker in the photo!!!

The words were done on the computer. It's a pretty simple basic looking card. Not a whole lot to it. And doing the words like that on the computer will allow you to change them to "Grandma, Nana" or whatever fond name you use to refer to grandma.

It's a fun card for Mother's Day! To view it closer just click on the photo.

To view other Mother's Day cards click here.

This card was made entirely of Stampin' Up! products. To view more cards/items made entirely of Stampin' Up! products click here.

Thank you SO much for stopping by,
Wanda

Saturday, May 03, 2008

Mother's Day Card #5

Actually the Mother's Day card in the previous post was #4. For #3 I had given it a regular title and not a numbered title. SO this is the 5th Mother's Day card!!! Click on the photo to see a REALLY close view. You can also see my errors at that size!!! LOL

For this card I used the Stampin' Up! "Blooming Beautiful" set from the mini catalog. I hadn't used this stamp in the set yet and wanted to play with it and with water coloring. I LOVE to use the blender pen and rarely use the Aqua Painters. SO I thought it was time to play with them too!!! I colored with a marker on a piece of plastic and picked up the color with the Aqua Painter. I didn't want to color directly onto the watercolor paper because I wasn't sure I would be able to wash it all out if it were too dark. SO I played it safe!!!

I colored all the flowers in with Bashful Blue and then came back with the marker and lightly touches areas that looked like it should be darker there. Then I came in with a little bit of Lovely Lilac. Again I scribbled the marker on a piece of plastic first and took my color from there. I used Apricot Appeal directly from the marker on the center of the flowers.

I scribbled some Apricot Appeal on a piece of plastic and picked up the color and added it around the flowers and vase. The vase was colored in using in using Creamy Caramel and then adding Close to Cocoa for the darker areas. I used Bordering Blue on the area under the vase. And Old olive was used for the leaf.

I sponged the edges on the larger white background piece and on the punched circle. I layered the circle with Basic Black and a Ballet Blue scallop circle. I added 5 brads to the bottom of the card and a bit of 5/8" ribbon. Those few embellishments seemed to be just enough to add to the card but didn't make it look overly accessorized!!

This card was made entirely of Stampin' Up! products. To view more cards/items made entirely of Stampin' Up! products click here

Thank you SO much for stopping by,
Wanda

Friday, May 02, 2008

Weekend Project! Flowers for Spring Gift Giving!

Are you ready for this FUN weekend project?? Well, here it is!! I got these REALLY cute flower/seed pots at Target in their Dollar Spot. They aren't very big, they measure 2" wide by 2" tall. Just the perfect size for gift giving!!! Click on the photos to view them close-up.

I saw on someones blog that they removed the packaging and traced it onto decorative paper. (I don't remember who's blog it was so if you know, please let me know so I can give them credit.) Now I couldn't tell if they just used the decorative paper for the new cover of if they attached the paper to the original packaging. That is what I did only because there are instructions on the inside. I didn't want to have to type them up and print them out and try to work them into the design. It was much easier to tape the paper over the original packaging.

I bought Strawberry Seed planters. They caught my eye and I immediately thought of the Stampin' Up! "Tart & Tangy" set for this. Cute, isn't it???

I traced the packaging onto the decorative paper and cut it out. I did use a Craft Knife to cut the holes. Then I taped it back on top of the original packaging and folded it. I then put it back on the planter.

Next I stamped the strawberry image, twice!! One I punched out with the 3/8" circle punch and the other I actually cut out the pieces. I cheated here. I was making more than one so I stamped a few red strawberries, cleaned the stamp and then stamped them in green and then I cut out the parts I need. Now if you were doing just one you can use a marker to color in the areas, huff on it and then stamp. After I got the pieces cut out I used pieces of Dimensionals under it. I set them on top of the strawberry in the punched out circle. I just felt it looked nicer raised. I punched out a round scallop and then taped the strawberry to that. I added that to the top of the planter. Now you can add a little gift tag and it's ready for that special strawberry loving person

Isn't it just cute? I have a few more planters that have flower seeds in them so I'll be trying out some different papers to see which looks the best. I'd better get a move on it or spring may come and I'll miss it. We've got some more cold weather coming for this weekend and possibly snow too!!! Minnesota is such an interesting place on the climatic scale!! We have the four seasons here and sometimes they can all happen in one day!!! LOL The lawns are greening up and the trees are budding but it's still too early to plant or put flowers out. I usually put my flowers in around mid May but at the rate it's going I won't be doing it until the end of the month!!!

Have fun shopping at Target for these cute little planters. You may want to make an extra copy of the packaging so you can go to Michael's and pick up some small planters (they are 39 cents each there) and make your own flower pots. I got some peat disks at the grocery store last week. I didn't even know you could buy those things. So I'm going to have to get some flower posts out and make my own too (after I finish up the ones from Target!!!).

Flower ones would be perfect for Mother's Day!!! For more Weekend Projects please click here.

This item was made entirely of Stampin' Up! products. To view more cards/items made entirely of Stampin' Up! products click here.

Have a great time with this project and thank you SO much for stopping by,
Wanda