Pin It

Showing posts with label ~Stampin Up Product Entirely Used Here. Show all posts

Monday, August 10, 2026

Pretty Poinsettia, Scalloped Wishes, Christmas Card, Stampin' Up!

Hello and welcome to my blog. I fund a super pretty Christmas card on Pinterest and I just had to make it. You can see the original card by clicking here. I love it when friends have different stamp sets then you do. You get to play with more of the ones you wanted but had to draw the line when purchasing. And I love it even more when they go on vacation and leave the stamp sets with you! LOL Please read on to see how this card was made.

The base of the card is a folded half-sheet of Basic White card stock. It opens on the right and the fold is on the left.

I cut a 4" x 5-1/4" piece of Barely Blush card stock. In the center of that piece I cut the scalloped oval from the "Scalloped Wishes" bundle. Then I taped the Barely Blush layer on the card base. Then I took a 3-3/4" x 5" piece of Basic White card stock and textured it using the "Swirls of Magic" embossing folder. I think it's a versatile folder, it can be used for Halloween and Christmas! I glued this piece on top of the Barely Blush layer. 

The poinsettia petals were cut next from Barley Blush card stock. The centers were colored in with a blending brush and Strawberry Slush ink. I ended up cutting and extra set of petals, the large back one. 

The center was stamped using Golden Glow ink and was cut out using the matching die from the "Pretty Poinsettia" bundle. 

Peaceful Pine card stock was used for the leaves. 

The words are from the same "Pretty Poinsettias" bundle using Basic Black ink on Basic White card stock. I cut them out using the same die I used for the scalloped oval. I set the word piece back in the oval and turned it over. I added Dimensionals and made sure they touched where the two colors meet to hold them both in place. I set it in place on the lower right of the card. The scalloped bumps, bottom and right are just a hair inside the line of the textured piece. 

I had a bit of an issue getting the petals put together. I just couldn't get it to look rounded so I ended up cutting that extra back set of leaves. I used a little bit of glue to hold them together. The center of the flower was also glued in place.

The leaves were added to the back. I couldn't get the stem to stick out with flowers on it so I ended up cutting off the stem. I just didn't think it looked good with just a stem sticking out. I also cut a few leaves off and place them around the flower.  Dimensionals were added to the back and it was set in place on the front of the card.

I had some retired "Candy Dots" in Pretty in Pink so I added them to the front of the card and the card was done.

I just thought this card was so pretty that I had to make one. I do like how it turned out, even with my subtle changes.

Thank you SO very much for taking your time to stop in and see today's Christmas card,
Wanda

Monday, February 23, 2026

Cute as a Bug, Simply Said, Sweet Bugs, Birthday Card, Stampin' Up!

Hello and welcome to my blog. Today I have a pretty card that I found on Pinterest. I just loved the colors SO much that I had to make this card. It required a bit of fussy cutting but it was worth it. You can see the original card by clicking here. Please read on to see how it was made.

The base of my card is a folded half-sheet of Basic White card stock. It opens on the right and the fold is on the left. I cut a 4-1/4" x 5-1/2" piece of Mossy Meadow card stock and textured it with "Lovely Stripes" embossing folder. I glued it to the front of the card.

Then I took another 4-1/4" x 5-1/2" piece of Mossy Meadow card stock and cut an arched opening in the middle. I used the 4th largest die in the "Arched Dies" set.  I set it aside.

The "Arched Dies" were used to make the Blackberry Bliss frame. I used the 3rd and 4th largest dies. I glued that piece in place around the arched opening on the previous piece. I set it aside to set up.

The images are from the "Cute as a Bug" Designer Series Paper (DSP).  I die cut the worm, tall center flower and the lily of the valley looking flower using the matching dies in the "Sweet Bugs" bundle.

The remaining two sets of flowers with grass, cute little bug and the berries and leaves cluster in the upper left corner were all fussy cut.  

The opened framed piece was set in place on the front of the card using Dimensionals.

The tallest flower has a little Dimensional added to the back and the other two flowers with grass were glued in place.

Next I added the large worm using Dimensionals. The lily of the valley was added next. Dimensionals were added to the flowers and glue to where it would be touching the frame.

Two small Dimensionals were added to the back of the little bug and it was set in place so it would look like it was standing on the lily of the valley piece,

The berries and leaves were added next, again I used Dimensionals on the center areas and glue where it would be sitting on the frame.

Using the "Simply Said" set I stamped the words using Versa Mark ink and embossed them with white embossing powder. The words were on one stamp so I cut them apart so I could out the one on top of the other. I didn't have the words using on the original card, mine are a little bigger but it still worked.  I set them in pace using Dimensionals.  

I also did not have the embellishments used on the original card so I used a couple of retired "Candy Dots" and the card was done. 

This card sure used a lot of Dimensionals but like with the fussy cutting, it was SO worth it.

Thank you SO very much for taking your time to stop in and see today's birthday card,
Wanda

Thursday, December 18, 2025

Petals of Beauty, Simply Said, Note Card, Stampin' Up!

Hello and welcome to my blog.  Today I do NOT have a Christmas card to share with you!  Though there is one more that I REALLY want to make and then I'll be moving on. It's almost Christmas so it's about time to wrap up the Christmas cards. Though I like to send out a lot and can never seem to have enough Christmas cards.  Anyway, let's move on to today's card.  It's a very fun fold and I spent a LOT of time trying to figure out the template.  Fortunately for you I am adding that template so you can make it.  So, please read on to see how I made my card.

The base of my card is a folded half-sheet of Crumb Cake card stock. It opens on the right and the fold is on the left.

I cut a 4-1/8" x 5-13/8" piece of Very Vanilla card stock for the largest layer.  On top of that is a 4" x 5-1/4" piece of Designer Series Paper (DSP) from the "Brushed with Beauty" 12" x 12" package.  I taped it to the Very Vanilla piece and then taped that to the card base. Before I moved on I cut a 4" x 5-1/4" piece of Very Vanilla card stock and taped it to the inside.

For the fan or arrow (which is it?) type fold I worked for about an hour trying to get it the right size and get the scoring right. Several times I didn't mark the right spot and messed it up. Fortunately I was working with scrap copier paper and didn't feel bad about having to put it in recycling but I did get frustrated with the mistakes.  Anyway, after all is said and one I now have a template and I also made my copier paper 3D card so I can add it to my layouts.  I do plan to make another card using this layout (now that I have it simplified).  

I cut my DSP for the fan/arrow piece at 4-3/4" x 2-1/2".  I marked the lower sides at 1/4". This is a cut line, not a fold line.  The next 4 lines are score lines. Measure from the upper corner to 1-1/4" on both corners.  Mark the bottom center edge of the piece. You will be scoring to this mark on all for lines.

Now to score from the corners to the center and then from the 1-1/4" mark to the center.  Cut away the bottom 1/4" to the center on each side.

To fold the pieces, do one side at a time. Fold the score line that was marked at 1-1/4", folding the rest of the card stock to the back.  Then score the corner to center line towards the front and repeat for the other side.  You will need to snip off those triangles (as seen in the pic - with a paper clip to hold it for the pic).  Don't worry about the tips not being sharp, they will be hidden. But you do want sharp edges on the folds. 

The pieces needed to be glued together so it stays closed.  You are going to have to make two of these. 

The snipped end will be lined up at the bottom and the top of the card front and taped or glued in place.  

I cut two open leaves from the "Petals of Beauty" bundle, one is Very Vanilla and the other is Mossy Meadow. It's a long die and I needed to clip off the last two leaves. I did use a Very Vanilla one on the top and I added the other piece (Mossy Meadow) to the bottom area.  I had trimmed the edges of the leaf where the longer piece was cut from. I taped the ends of these pieces in place. 

The words are from the "Simply Said" set and were stamped using Mossy Meadow ink on a piece of Very Vanilla card stock.  I cut it out using the 4th square die in the "Stylish Shapes" set.  If you don't have the set you can cut the card stock at 1-1/2" x 1-1/2" and then cut the Mossy Meadow layer at 1-5/8" x 1-5/8".  Dimensionals were added to the back and it was set in place on the center of the card. 

I added a few crystal rhinestones to the front and the card was done.  

I hope you have fun playing with this layout! 

Thank you SO very much for taking your time to stop in and see today's note card,
Wanda

Tuesday, July 29, 2025

The Right Words, Beautiful Gallery, Sympathy Card, Stampin' Up!

Hello and welcome to my blog. Today I have a sympathy card to share with you. I found it on Pinterest. You can see the original card by clicking here. There weren't any instructions so please read on to see how I put it together. 

The base of the card is a folded half-sheet of Basic White card stock. It opens on the right and the fold is on the left.

Using the flowered piece of Designer Series Paper (DSP) from the "Beautiful Gallery" 6" x 6" stack, I cut the piece to measure 3" x 5-1/2". On the flip side of that image is the piece that is on the left. It's cut at 1-1/4" x 5-1/2".  I taped both pieces to the front of the card.

The strip on the left was made using a piece of Cloud Cover card stock that I textured using the "Damask Designs" embossing folder. I trimmed it to measure 1" x 5-1/4".  I glued that to the left side.

The words are from "The Right Words" set and were stamped using black Memento ink. I punched them out using the "Labeled With Love" punch. I also punched out a Secret Sea" piece too. I cut the Secret Sea piece in half and taped each half to the back of the word piece. Dimensionals were added to the back and it was set in place on the front of the card and the card was done.

This is such a quick and easy way to use up DSP! And I have LOTS!  I love that I could use Basic White card stock for the card base and add the DSP to the front. I'm going to have to use this layout again!

Thank you SO very much for taking your time to stop in and see today's sympathy card,
Wanda

Monday, July 28, 2025

Sunrise Sailing, Beautiful Gallery, Masculine Sympathy Card, Stampin' Up!

Hello and welcome to my blog. Today I have a card to share with you that I found on Pinterest. You can see the original card by clicking here. It will open to a new window so you can easily find your way back here. I made a few small changes. There were no instructions, so please read on to see how I put the card together.

As usual, I make my card bases using Basic White card stock. It's rare that I make them with colored card stock. So, the base of my card is a folded half-sheet of Basic White card stock. It opens on the right and the fold is on the left.

I cut a 4-1/8" piece of Balmy Blue card stock for the largest layer. Before taping it down I used the 5th die in the "Everyday Arches" die set. They are still available in the catalog. I cut it from the center of the piece of card stock.

Next I cut a 4" x 5-1/4" piece of Night of Navy card stock and textured it using the embossing folder in the "Sunrise Sailing" bundle. I taped it to the Balmy Blue layer and then that was taped to the front of the card.

The Designer Series Paper (DSP) is from the "Beautiful Gallery" 6" x 6" stack. I cut the image out using the 6th die in the "Everyday Arches" die set. I taped that to the Balmy Blue arched piece and set it in place on the front of the card using Dimensionals.

The sail boat is from the "Sunrise Sailing" bundle. I cut the boat part out using Pecan Pie card stock. The sails were cut using both Balmy Blue and Night of Navy card stock. I taped the Balmy Blue piece to the Pecan Pie sail and then the Night of Navy piece on top of that. I taped the piece to the front of the card.

I die cut the birds from the same bundle using Basic Black card stock. I glued them in place.

The words were done on my computer. I couldn't find any that were the right size for this so I had to resort to typing them out. I used the die from the "Heart Shaped" bundle to cut them out. Dimensionals were added to the back and it was set in place on the front of the card and the card was done.

This was a very easy card to make and it really didn't take much time at all. I like how it turned out and I have a few more sheets of that DSP and I think I'm going to make a couple more before I leave my workroom.

Thank you SO very much for taking your time to stop in and see today's sympathy card,
Wanda

Tuesday, April 01, 2025

Playing in the Rain, Rain or Shine, April Calendar Page, Stampin' Up!

Hello and welcome to my blog. Today I have my April calendar page to share with you. Please read on to see how it was made.

I got my calendars from Lynette's blog. You can find it just below the title of her blog. But don't stop there, take a look at all of her fun cards and different layouts! She is a fellow Minnesotan and I hope to meet her in person someday! Please read on to see how I made my calendar page, it's pretty simple.

After printing the calendar should be cut at 3-1/2" x 5".  Mine is a bit shy of that because my printer didn't print out exactly what I had downloaded. I have no idea why but I had printed all the months and cut them so mine measure 3-3/8" x 4-1/8". 

I had no idea what I was going to put on my calendar. It's spring time so something in that area. April showers came to mind so instead of spring flowers I thought I'd go with something with rain. 

I remembered the "Playing in the Rain" set so I took it off the shelf and what was on the inside? This bunny from a piece of Designer Series Paper (DSP) from the "Rain or Shine" 12" x 12" package (retired). I fussy cut him out and added Dimensionals to the back.

Now for the layer. The last 3 months I had made a layer for the upper part of the calendar. But since the bunny was so large I decided to just take some Balmy Blue ink and scrub it on over the upper area. I set the bunny in place and then using my chalk marker I added some white raindrops. They didn't show up so well so I colored over them a couple more times and then they were more visible. And that was it. Such a super quick and easy calendar page. I'll probably save the flower idea for May because April showers bring May flowers, right?

I'll be cutting the top off March's calendar and using it on a future card! Can't let my work go to waste now can I? There's always a way to use it for a fun card!

Thank you SO much for taking your time to stop in and see today's calendar page,
Wanda

Saturday, February 01, 2025

Bee Mine, Calendar Page, Weekend Project, Stampin' Up!

Hello and welcome to my blog. Today I have the February calendar page to share with you. It's fun making these and they go together so much quicker than a card. I figured I would use the image later on a card. I'm planning on doing that with my January calendar. You can see that one here. I got the template for the calendar months at "My Stamping Addiction". The download for the calendar is just under the title of her blog. She has a lot of beautiful cards there too, so if you stop in have a look a round.  Please read on to see how the card was made. 

I trimmed my piece to 4-7/8" x 3-3/8". The top part measures a hair shy of 2-1/2 from the top of the month to the top edge.  

I cut a piece of Designer Series Paper (DSP) from the "Bee Mine" 12" x 12" package and taped it to the top part of the calendar page. 

Next I cut three bees from another sheet of DSP. I set them in place using Dimensionals. I even cut out a tiny little heart and covered the 14.  And that was it.

This was so quick and simple and yet here I am waiting till the last minute to get it made!

Thank you SO much for taking your time to stop in and see today's calendar page,
Wanda

Wednesday, January 01, 2025

Snowy Wonder, Snowy Scenes, Calendar Page, Stampin' Up!

Hello and welcome to my blog. Happy New Year to you all. Today I have a calendar page to share with you. A blogging friend of mine, Lynette shared her printout with me for the calendar pages. You can hop on over to her blog and get the download for the pages. And while you are there take a look at her wonderful cards too, she's got a lot of great cards for viewing and inspiration. I didn't have excel on my computer, we use Open Office and I did have to move some margins to get it to print right but it's not a big deal. Though I was unable to open the cutting instructions but I figured it out (close enough). My piece measures 4-3/4" x 3-3/8". Please read on to see how I made my calendar page.

After cutting the piece to measure 4-3/4" x 3-3/8" I cut a 3-1/8" x 2-1/4" piece of Designer Series Paper (DSP) from the "Snowy Scenes" 12" x 12" package. I taped it to the upper part of the calendar. 

Using the same package of DSP I fussy cut the penguin and I used a matching die from the "Snowy Wonder" bundle to cut the snowman out. 

Dimensionals were added to the back of both pieces and they were set in place on top of the DSP.  And that was it, a super simple calendar page I can look at all month long. 

Thank you SO very much for taking your time to stop in and see today's fun calendar page,
Wanda

Sunday, May 26, 2024

Simply Zinnia, Submarine Life, Birthday Card, Stampin' Up!

Hello and welcome to my blog. I found a super beautiful card on the internet that I just had to give a try to. I found the card here and of course, I did change it a bit. There were no measurements so I winged it. Please read on to see how the card was made.

The base of the card is a folded half-sheet of Basic White card stock. It opens on the right and the fold was on the left. 

I cut a 4" x 5-/4" piece of Basic White card stock for the layer. On top of that is a 3-3/4" x 5" piece Pretty Peacock card stock and on top of that is a 3-5/8" x 4-7/8" piece of Basic White card stock that was colored using my brayer and Pretty Peacock ink. I sprayed it with water several times and used my heat tool to dry it between sprayings. 

Next I die cut the postage pieces using the largest square die in the "Perennial Postage" set. I cut three. Then I cut three squares using my paper cutter that measured 2" x 2". I taped the postage cut one to the 2' x 2" pieces. On top of that I cut some Designer Series Paper (DSP) from the "Unbound Beauty" 12" x 12" package. These measured 1-5/8" x 1-5/8" each. I taped this in place. 

Then I die cut the flowers from the "Simply Zinnia" bundle. Pretty in Pink card stock was used and then the tips were sponged with a little Pretty in Pink ink. The flower centers are Lemon Lolly, the ring around the flower center is Daffodil Delight and the leaves are Granny Apple Green. The flower has two dies so I cut three of each and glued them together at their centers. Then the center of the flower was glued on and the Daffodil Delight ring was glued in place. I set it aside for few minutes to set up.

In the meantime I took some linen thread and wrapped it around my fingers to form three sort of circles. The less the are perfect the better. Some tape was added to the top of the DSP and the thread was stuck in place. 

Dimensionals were added behind the flowers and the leaves were stuck to them. Then the piece was glued in place on top of the square.

The words are from the "Submarine Life" set, only because I didn't have any that fit that small space. I sued the die from the "Stylish Shapes" set to cut them out. I trimmed it on the left side. Dimensionals were added to the back and the piece was set aside.

I took the flower squares and set the top one in place first, then the bottom one and the middle one was added last. You may want to practice where these pieces are going to go before taping them down just to make sure you can fit them all on the brayered piece. 

Once the flower pieces are in place on the front of the card, the words were added. 

I colored some pearls using my light Flirty Flamingo Blends pen. I didn't have any of the embellishments that were used on the original card. I have a ton of pearls and I believe they are retired now but I'll continue to use them because I have to! Once the pearls were set in place the card was done. 

Isn't this a pretty card? Can you see why I just had to make it? I thought it took a while because of all of the cutting and layers but it was SO worth it. I'm pleased with the way it turned out.

Thank you SO very much for taking your time to stop in and see today's birthday card,
Wanda

Tuesday, March 19, 2024

Simply Zinnia, Days to Remember, Birthday Card, Stampin' Up!

Hello and welcome to my blog. Today I have a quick card to share with you. Yesterday when I stamped the flower image I also stamped and die cut out a few more and put them in the stamp case for future use. I didn't think it would be this soon into the future but the set was still sitting on my worktable, no surprise there! LOL Please read on to see how I made today's card.

The base of my card is a folded half-sheet of Basic White card stock. I cut a 4" x 5-1/4" piece of Highland Heather card stock and textured it using the "Exposed Brick" embossing folder. I glued that in place on the front of the card.

Then I cut a 3-1/4" x 4-1/4" piece of Gorgeous Grape card stock. On top of that is a 3" x 4" piece of Basic White card stock that was textured using the splatter folder from the "Stipes & Splatters" embossing folder set. I glued that to the Gorgeous Grape piece and then that was glued to the Highland Heather piece.

The flowers were stamped using black Memento ink and die cut using the matching die from the "Simply Zinnia" bundle.

I colored the flowers using both light and dark Highland Heather, Bubble Bath and Flirty Flamingo Blends pens. Both light and dark Granny Apple Green on the stems and leaves. And the light Daffodil Delight on the centers of the flowers. Dimensionals were added to the back and the flowers were set in place on the front of the card.

The words are from the "Days to Remember" set and were stamped using black Memento ink. They were punched out using the oval in the "Double Oval" punch and the scalloped oval was punched out using the same punch on a scrap piece of Gorgeous Grape card stock. I taped them together. Dimensionals were added to the back and the piece was set in place on the front of the card.  And the card was done.

I'm very pleased with how this card turned out. It was fun and easy to make too.

Thank you SO very much for taking your time to stop in and see today's birthday card,
Wanda

Wednesday, March 13, 2024

Simply Zinnia, Flowering Zinnia, Thank You Card, Stampin' Up!

Hello and welcome to my blog. Today my "Simply Zinnia" bundle was delivered.  YAY.  So of course I had to open the stamp set and create a card to share with you today. Please read on to see how I made today's card.

The base of my card is a folded half-sheet of Basic White card stock. I cut a 4" x 5-1/4" piece of Blackberry Bliss card stock for the layer.

A 3-3/4" x 5" piece of Basic White card stock was cut for the top layer and it was textured using the "Exposed Brick" embossing folder. I glued this piece to the Blackberry Bliss piece and then that was taped to the card base.

I cut a 3" x 2-3/4" piece of Designer Series Paper (DSP) from the "Flowering Zinnia" 12" x 12" package. I taped that to a 3-1/4" x 3" piece of Blackberry Bliss card stock and then I glued that to the front of the card. I use glue because I find that tape does not make 100% contact with the textured pieces and therefor will not hold as well and I know glue will hold.

The words are from the "Simply Zinnia" set and were stamped using BlackBerry Bliss ink on a scrap piece of Basic White card stock. I die cut them using the smallest die in the "Everyday Details" set.  I taped them to a piece of Blackberry Bliss card stock that I die cut with the next largest die in that set. Dimensionals were added to the back and the card was done.

This was a fun, quick and easy card to make. I like the look of the flowers with the Blackberry Bliss card stock, it's a nice contrast.

Thank you SO very much for taking your time to stop in and see today's thank you card,
Wanda

Friday, July 07, 2023

Zoo Crew, Days To Remember, Children's Birthday Card, Stampin' Up!

Hello and welcome to my blog. Today I have a fun, quick, and easy children's card to share with you. Please read on to see how this card was made.

The base of the card is a folded half-sheet of Basic White card stock. I cut a 4" x 5-1/4" piece of Pool Party card stock. Then a 3-7/8" x 5-1/8" piece of Basic Black card stock was cut, and the top layer is a 3-3/4" x 5" piece of Basic White card stock was cut.

I took the top Basic White layer and textured it using the "Painted Texture" embossing folder.  A 1-1/4" x 5" strip of Designer Series Paper (DSP) was cut from a sheet in the "Zoo Crew" 12" x 12" package. I glued that to the bottom of the Basic White piece. Then that piece was glued to the Basic Black piece. I took some Basic Black (retired) ribbon and taped the ends onto the back of the piece.

Before attaching the Basic Black layered piece to the Pool Party piece, I die cut the stitched circle from the center of it. I used the 3rd largest one. Once the Basic Black piece was attached to the Pool Party piece, I taped it all to the Basic White card base.

The cute little koala bear was fussy cut from a different sheet in the "Zoo Crew" package.  I had a cupcake that was chopped off from the factory cutting so I fussy cut it out and used a piece of Dimensional and attached it to the cupcake and matched it up with one in the juggling circle! It's too bad there was only one, it would have been fun if all of them could have had one pop up.  But I'll take the one because I had already cut it and it was fun!  The koala bear was set in place on the Pool Party circle using Dimensionals and the circle was set in place on the front of the card using Dimensionals.

The words are from the "Days to Remember" set and were stamped using black Memento ink on a scrap piece of Basic White card stock. I punched them out using the "Double Oval" punch. I also punched out a scalloped Basic Black circle using the same punch. I taped the words to the scalloped oval and added Dimensionals to the back and the piece was set in place on the upper right of the card and the card was done.

This was a quick and fun card to make. Such a cute koala bear, huh?

Thank you SO much for taking your time to stop in and see today's children's birthday card,
Wanda

Tuesday, February 28, 2023

Amazing Owls, Artistically Inked, Friendship Card, Stampin' Up!

Hello. I am glad you're here to see today's fun card. I found it on Pinterest and thought I'd make one. I am going to miss this set. The three owls in it were SO darn cute! I have made quite a few cards using the set so I have to look at it as I did get plenty of use out of it. So here's where you can see the original card and you can see how I made it. 

The base of the card is a folded half-sheet of Basic White card stock. This card opens on the right and the fold is on the left.

The panel on the left was cut as follows. The Balmy Blue piece measures 5-1/2" x 2-1/4" and the Basic White card stock was cut at 5-1/4" x 2" and textures using the "Painted Texture" embossing folder. I glued the textured piece to the Balmy Blue piece and then I taped the two layers in place on the front of the card. I lined up the top, bottom and left side as equally as possible.

Next I cut the square pieces at 3-1/2" x 3-1/2" for the Balmy Blue piece and 3-1/4" x 3-1/4" for the Designer Series Paper (DSP). The DSP is from the "Dandy Designs" 12" x 12" package. I taped the two squares together. Dimensionals were added to the back and the piece was set in place on the front of the card. The right edge of the square piece is about 1/4" from the edge of the card base and about 1/2" down from the top.

The owl from the "Amazing Owls" set was stamped on a piece of Basic White card stock and die cut using the 2-1/8" circle die from the "Layering Circles" die set. And a Balmy Blue scalloped circle was die cut using the 2-9/16" circle die from the same set. 

Blends pens were used to color in the owl. I used the light Crumb Cake for the body. I was going to use the dark one for the highlights but chose to use the other end of the pen. I have found that the writing side seems to color a bit darker. The beak and feet are colored in using the dark Petal Pink pen and the eyes are the light Balmy Blue pen. I added Dimensionals to the back of the own instead of the back of the Balmy Blue piece. Either way looks fine but I think the Dimensionals on the back of the Balmy Blue piece would look a bit better.

The words are from the "Artistically Inked" set using black Memento ink on a scrap piece of Basic White card stock. I die cut it using the second to the smallest stitched circle die from the "Stylish Shapes" die set. I set the piece in pace with a Dimensional at the bottom and a bit of mono glue on the top.  And that was it, the card was done.

Isn't it cute? I love the DSP, the colors in it are so pleasing to the eye. I have SO much of that paper left and it expires at the end of the month too. It was a Sale-a-Bration item. It's heading off to the mail box in a couple of days. Every month I send a card to a friend and I think she would really like to receive this one. So I'll be setting it aside for her.

Thank you SO much for taking your time to stop in and see today's friendship card,
Wanda

Monday, April 18, 2022

Let's Set Sail, Father's Day Card, Stampin' Up!

I was thrilled to see that the "Let's Set Sail" set and punch made the cut. This is a fun set to play with and it's always good to have a couple sets that can be used for masculine cards.  I found this card here and made a few little changes.

The base of my card is a folded half-sheet of Basic White card stock. This card opens on the right and the fold is on the left.

I cut a 4" x-5-1/4" piece of Crushed Curry for the layer and then a 3-3/4" x 5" Basic White piece for the next layer. I taped the two layers together and then taped them to the card base.

The Designer Series Paper (DSP) is from the "Ice Cream Corner" 12" x 12" package. I measures 3-3/4" x 1-3/4".  I taped it to the bottom of the Basic White layer.  

I used the 3-5/8" x 2-1/4" Stitched Rectangle die for the Basic White focal piece and I cut the Crushed Curry layer behind it at 3-3/4" x 2-3/8".  
I took the Basic White focal layer and stamped the water using the image in the "Let's Set Sail" set and Pool Party ink. I stamped that image twice, though I could have moved it down a bit more but it still looks nice.

Next I stamped the boat pieces. The one sail is Crushed Curry, the other is Flirty Flamingo, and the boat is Pool Party.  I set the boat piece on top of the focal piece so I could see where to stamp the shadow image. I used Pool Party ink and I stamped that image twice.  Before I assembled the boat on the focal piece, I stamped the birds using black Memento ink and taped it to the Crushed Curry layer. The boat was set in place using Dimensionals and the same for the sails.

I tied a black and white piece of Baker's Twine around the piece and then added Dimensionals to the back and set it in place on the front of the card.

The words are from the "Many Messages" set (which is retiring) and were stamped using black Memento ink on a scrap piece of Basic White card stock.  The "Many Messages" set has a matching die that cuts all the words at one time. I only used the one word and die cut it out. Using scrap card stock works well for that.  Even though it's retiring, I'm not sure I'm ready to give it up. I like having all of those different shaped words and dies that fit each one. After the words were stamped and die cut, I took my Pool Party marker and ran the belly of the nib around the edge of the piece to add a touch of color. I added a Dimensional to the left side and tape to the right side and I set the piece in place on the card.  Under that piece I had taken my blending brush and made a sun but it got covered by the wording.

I colored two pearls black and set them in place on the front of the car and the card was done.

This was a very fun and easy card to make. What I like best about it is how colorful it is.

Thank you SO very much for taking your time to stop by and see today's Father's Day card,
Wanda


Saturday, March 19, 2022

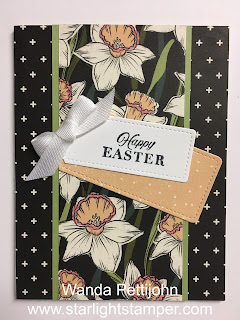
Celebrating You, Daffodil Afternoon, Easter Card, 2022 Stampin' Up! Spring Mini Catalog

Today I thought I would try a card using the other tag dies in the set. You can see the corners are rounded and on the white piece you can see how the corner starts to go inward. The ribbon is hiding the rest. 

The base of my card is a folded half-sheet of Basic Black card stock. You can use any color you want that goes with the Designer Series Paper (DSP). This card opens on the right and the fold is on the left.

I cut a 5-1/2" x 4-1/4" piece of DSP from the Sale-a-Bration "Daffodil Afternoon" 12" x 12" package. I forgot this was retired but I'm sure you still have some left in your stash!!! I know I do. You know I do!!! LOL  I taped the DSP to the front of the card.

I cut a 5-1/2" x 2-1/2" piece of the DSP for the center panel. Then I cut a 5-1/2" x 2-3/4" piece of Pear Pizzazz card stock for the layer. I taped the DSP to the card stock and then I taped that to the front of the card.

I took a dotted Pale Papaya piece of DSP and die cut the second smallest tag.  The words are from the "Celebrating You" set. I stamped them on a scrap piece of Basic White card stock using black Memento ink. I die cut it with the smallest tag die. I set the tags on top of each other and positioned them to where I liked the look and I lifted one edge and added a little tape and then lifted the opposite edge and added more tape. I turned them over and added tape to the back and set them in place on the front of the card. 

I tied a white bow and glued it to the area on the tags where the holes are.  

A 4" x 5-1/4" piece of Basic White was added to the inside of the card and the card was done.

This was a very fun and easy card to make. I may have to try this with some current DSP. Look how much was used!!! You can use this card for a number of other occasions, it's very versatile. 

Thank you SO very much for taking your time to stop by and see today's Easter Card,
Wanda


Wednesday, February 02, 2022

Wildflower Path, Birthday Card, 2022 Stampin' Up! Spring Mini Catalog

I found this fun layout on Pinterest. I clicked through and got no measurements or instructions so I had to go it on my own.  You can see the original card here. 

The base of my card is a folded half-sheet of Basic White card stock. This card opens on the right and the fold is on the left.

I cut a 4" x 5-1/4" piece of Designer Series Paper (DSP) from the "Flowering Field" 12" x 12" package. I taped it to the front of the card.

Then an open scalloped piece was cut using the die from the "Scalloped Contours" die set an a piece of Basic White card stock. This piece was taped on top of the DSP.

The next layer was die cut from the same set using the second largest scalloped die in that set. Dimensionals were added to the back of that piece.

I cut a 2" x 3" piece of DSP from the same "Flowering Fields" package. It's actually the backside of the first piece that was cut and taped down. A 2-1/4" x 3-1/4" piece of Highland Heather card stock was cut for the layer. I taped those two pieces together and then they were taped to the dotted scalloped Basic White piece. The backing on the Dimensionals was removed and the piece was set in place on the front of the card.

I die cut a Basic White butterfly using the "Brilliant Wings" die set. And I die cut the leaves using the "Forever Flourishing" dies. I just used what I had and made it work. I glued the butterfly in the middle and set it in place on the bottom left side of the card.

I did clip off a part of the leaves on the left side. I added a dot of glue to each leaf that touched a surface. The piece I cut off was slipped under a leaf in the middle and set in place. 

The words are from the "Wildflower Path" set and were stamped using black Memento ink. I cut them at 1/2" x 2-1/4". Dimensionals were added to the back and set in place on the front of the card.  And that was it. The card was done. I'm pleased with the way it turned out using what I had on hand.

Thank you SO very much for taking your time to stop by and see today's birthday card,
Wanda

Sunday, January 30, 2022

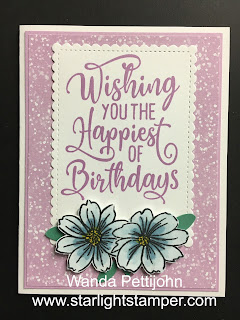
Friendly Hello, Happiest of Birthdays, Birthday Card, 2022 Stampin' Up! Sale-A-Bration

I really liked yesterday's card layout so I thought I'd try it again with a more feminine spin on it. So here's what I came up with.

The base of my card is a folded half-sheet of Basic White card stock. This card opens on the right and the fold is on the left. 

I cut a 4" x 5-1/4" piece of Fresh Freesia card stock and taped it to the front of the card base.

The Designer Series Paper (DSP) from the "Friendly Hello" 12" x 12" package was cut at 3-7/8" x 5-1/8". The DSP is from the Sale-A-Bration book.  I taped it to the Fresh Freesia piece.

The words are from the "Happiest of Birthdays" set and were stamped using Fresh Freesia ink. I cut it out using the largest "Stitched So Sweetly" die set.  I taped this piece in place on top of the DSP.

The flowers are from the "Friendly Hello" set that was in the 2022 Stampin' Up! Sale-a-Bration book. I stamped them using black Memento ink and then fussy cut them.  Next I colored the centers with my dark Daffodil Delight Blends pen. The petals were colored in using the light Balmy Blue Blends pen. Then the dark Balmy Blue Blends pen was used to add some detail. I colored the center area of the flowers in using my Wink of Stella pen. I added Dimensionals, removed the backing and set it aside.

The leaves are from the "Bough" punch that I got in the 2022 Spring catalog.  I love having a leaf punch to add little leaves to my flowers. This was a perfect touch. I used Just Jade card stock for the leaves. I cut it into pieces and added the leaves to the back of the flower, making sure the leaves touched the Dimensional so it would stick. Then I set the flower in place on the front of the card. And the card was done.

This was a very fun, quick and easy card to make. I love the blue flowers at the bottom. 

Thank you SO very much for taking your time to stop in and see today's birthday card,
Wanda

Sunday, January 23, 2022

Friendly Hello, Special Moments, Thank You Card, 2022 Stampin' Up! Spring Mini Catalog

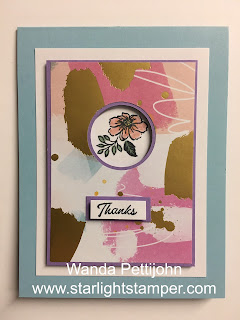
I had my "Abstract Beauty" 4" x 6" Designer Series Paper (DSP) stack still sitting out.  If you know me, you'd have been surprised if the DSP had been put away!!! LOL Anyway, I thought I'd challenge myself today and see if I could use a piece of one of the more difficult looking designs.  I thought the one I had chosen would be a really good test! So here's what I came up with. 

This is one of my favorite layouts because it allows you to really highlight and focus on smaller images in stamp sets. This card is much prettier in real life, the gold that looks like dark mustard here is a gold foil and the light catches it so nicely.  But in the pic it looks like blah splotches.  If you have this DSP you'll see how pretty the gold is.

The base of my card is a half-sheet of Balmy Blue card stock. The full sheet was cut on the 8-1/2" side so after it was cut the piece measured 4-1/4" x 11". I scored it at 5-1/2" and folded it. I used my bone folder to make a nice sharp fold.

Next I cut a Basic White piece that measured 3-1/2" x 4-5/8".

I cut a piece of Highland Heather card stock to measure 3" x 4-1/8" and I cut the DSP to measure 2-7/8" x 4".

I added a little bit of tape on the area where I thought the hole would be punched out. I set the DSP and the Highland Heather pieces together, making sure they lined up nicely.  I took my 1-1/4" circle punch and punched the two pieces together.

Next I took the DSP piece and my 1-3/8" circle punch and with a piece of scrap card stock behind the DSP, I punched out a small thin ring. I tried to line the piece up so the ring was equal on all sides. Then I taped the DSP to the Highland Heather piece. 

I stamped the flower image from the "Friendly Hello" set using black Memento ink on a scrap piece of Basic White card stock. I colored in the leaves using my dark Mint Macaron Blends pen. The flower center was colored in using the light Daffodil Delight blends pen and the flower was colored in using my Blushing Bride marker. I could have used markers for all of them but as I was coloring I didn't pay attention that I didn't have a Blushing Bride Blends pen. I don't think Stampin' Up! makes one.  And if they do, I will need to order them!  Anyway, after I was done coloring I added some Dimensionals around the circle on the backside, centered the flower and set it in place. Then I added more Dimensionals around the rest of the piece and some double-sided tape to the backside of the Basic White stamped piece. If you add Dimensionals there your card will have a big bulge in the center.  And no, I have not done that (yet) to speak from experience.  I'm sure a day will come when I do make that mistake. But at least it will be on the back so when the unnecessary Dimensionals are removed it won't show.  So, I set this piece in place on top of the 3-1/2" x 4-5/8" piece of Basic White.  Tape was added to the back of the Basic White piece and I taped that in place on the front of the card. 

The words are from the "Special Moments" set and were stamped on a 3/8" x 1-1/8" piece of Basic White card stock. I am not really fond of the word "thanks". It doesn't sound as sincere as the full "thank you" does. But I needed something small and this is what I could find.  I think something better could have been used there. Something wider maybe? But this is what was in my head and this is what it looks like on paper!  Not exactly what I was thinking but it's close!  

I cut a 4" x 5-1/4" piece of Basic White card stock for the inside and the card was done. On other cards I've made using this layout,  I had wrapped a ribbon around the word area and tied a knot. I mostly do that when there are words inside the circle.  I've never done both, but I'm sure that would work if you place the ribbon a bit higher and the words right under it.  I'll have to give that a try sometime. 

So that is it. This card didn't take long at all to make and I was able to use a piece of DSP that I thought was rather challenging. 

Thank you SO very much for taking your time to see today's thank you card,
Wanda


Monday, January 17, 2022

Catch You Later, Friendship Card, 2022 Stampin' Up! Spring Mini Catalog

I had to make one more cat image before I put the set aside to play with something else.  I have too many sets sitting in front of me!!!  Why do I do that?  UGH!!!  

The base of my card is a folded half-sheet of Basic White card stock. This card opens on the right and the fold is on the left.

I cut a 4" x 5-1/4" piece of Misty Moonlight card stock for the layer.  The DSP is from the "Simply Marbelous" 6" x 6" stack. I thought this piece had a nice movement and flow to it. It kind of looks like water.

I cut a 2-3/4" x 1-3/4" piece of Basic White card stock for the cat and fish image from the "Catch You Later" set. I stamped it using black Memento ink.  And I cut a 2-7/8" x 1-7/8" piece of Misty Moonlight card stock for the layer behind it.  I colored the image pretty much the same way I did with yesterday's card. I used my watercolor pencils and a Blender pen. Click here to see the card and how it was colored. I did a much better job coloring yesterday than I did today! I don't know why!!!

Then I cut a 2-1/4" x 1-5/8" piece of Basic White card stock for the words, they are from the same "Catch You Later" set. I cut a 2-3/8" x 1-3/4" piece of Misty Moonlight card stock for the layer behind it.

I taped the words behind the cat and fish image and then I added Dimensionals.  I set the piece in place on top of the DSP and the card was done!

This was a very fun and easy card to make.  I just love that cat and fish image. I will play with it again sometime in the future, but for now I'm off to play with the other new stuff!

Thank you SO very much for taking your time to stop by and see today's friendship card,
Wanda


Saturday, January 15, 2022

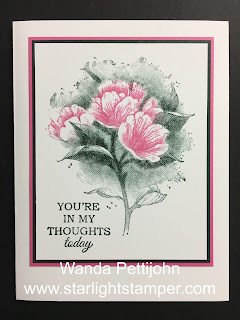
Calming Camellia, Thinking of You Card, Stampin' Up! 2022 Host Set

I'm having fun playing with the new stuff.  I found this card on Pinterest and I struggled a it with the sponging and this is what I ended up with.  You can see the original card here. 

The base of the card is a folded half-sheet of Basic White card stock. This card opens on the right and the fold is on the left. 

First I set up the image from the "Calming Camellia" set on my Stamparatus. I stamped the image on a piece of Basic White card stock that measured 3-3/8" x 4-1/4". I sponged on Polished Pink, Soft Succulent, and Evening Evergreen ink.  I used my sponge daubers to put the ink on the image but I struggled with this.  I had to redo it because the first one was just not looking quite right.  So when I redid it, I inked up the flower area and I made sure I didn't get any Polished pink on the leaves.  I stamped the image onto my card stock. I re-sponged and tried it again because I didn't think it was dark enough.

For the greens, I cleaned off the stamp but didn't remove it from the Stamparatus. I sponged on Soft Succulent ink and then I sponged over it in some areas with Evening Evergreen and then I stamped it on the card stock. Again I didn't think it was dark enough so I sponged on some more Evening Evergreen. I ended up using a Q-tip swab to tap on some Evening Evergreen in some areas that I thought should be darker and after stamping it on the card stock I liked it better.  But there were still areas around the top of the flower that I didn't like, so I took the swab and added some more Evening Evergreen and then I took my blending brush and pulled some of the ink outwards and that did the trick!  I was more pleasing to my eye and I stopped before I added too much.

The words are from the same set and I have this card in mind for a friend, I stamped them using Evening Evergreen ink and I was done with the stamping.

The layers were then cut. The Evening Evergreen piece measures 3-1/2" x 4-3/8" and the Polished Pink layer measures 3-5/8" x 4-1/2".  I taped the layers together and then the focal piece on top. Then all three were taped to the card base and the card was done.

Isn't it pretty?  What a fun set.  There's a pretty leaf in the set plus lots of words. I can't wait to play with this one again but I think I'll just stamp regular like without the sponging!! LOL

Thank you SO very much for taking your time to stop by and see today's "thinking of you" card,
Wanda