Pin It

Showing posts with label Masculine Thank you Cards. Show all posts

Saturday, September 23, 2023

Autumn Leaves, Thanksgiving or Thank You Card, Stampin' Up! 2023

Hello and welcome to my blog. Today I have a card to share with you using the "Autumn Leaves" bundle. Please read on to see how I made the card.

The base of the card is a folded half-sheet of Basic White card stock. This card opens on the right and the fold is on the left.

I cut a 4" x 5-1/4" piece of Basic White and textured it using the "Exposed Brick" embossing folder. I glued this piece to the front of the card.

Next, using the 9th circle in the "Deckled Circles" die set I cut a Basic White circle. I added Dimensionals to the back and centered the piece as best as I could by eyeing it.

The leaf from the "Autumn Leaves" set was stamped next using Crushed Curry ink. I took my Cajun Craze in spot and touched around the edges to give them a bit more texture. Then I stamped the leaf veins using Pecan Pie ink. I die cut the leaf using the matching die in the bundle. 

I also die cut two Basic White veins from the die set, they were the smallest veins in the set and I cut three little Basic White leaves.

The words are from the same set and were stamped using Pecan Pie ink on a scrap piece of Basic White card stock. I die cut them with the matching die from the bundle.

To assemble the rest of the card I set the leaf in place using Dimensionals. Then I set the word piece in place by adding two Dimensionals on the right side and glue on the left side. I added glue to the Basic White pieces and tucked them in one at a time under the word piece.

And for a final touch I added three of the green "Blooming Pearls" pearls. And the card was done.

This was a fun card and would also make a great fall masculine birthday card.

Thank you SO very much for taking your time to stop in and see today's Thanksgiving/Thank You card,
Wanda

Monday, July 04, 2022

Happiness Abounds, Stylish Shapes, Thank You Card, Stampin' Up!

Once again I found another card that uses the busy Designer Series Paper (DSP) that I have such a difficult problem with. I found this card here but I did change it a bit. 

The base of my card is a folded half-sheet of Basic Black card stock.  Normally I grab for the white but this time I thought I'd go with the black and it worked!! This card opens on the right and the fold is on the left. I added a 4" x 5-1/4" piece of Basic White card stock to the inside.

I cut a 4" x 5-1/4" piece of Fresh freesia card stock for the front. I stamped the flower image from the "Happiness Abounds" set using Fresh Freesia ink. The edges were sponged using the blending brush and Fresh Freesia ink. I also scrubbed a little Fresh Freesia ink to the center of the flowers. I forgot that stamping your own background was fun and effective. I hadn't done it much since DSP and embossing folders came out! Once the piece was done I taped it to the front of the card base.

Next I cut a 2" x 4" piece of DSP for the focal point. The DSP is from the "Hues of Happiness" 12" x 12" package and this piece is very busy and I was SO thrilled to be able to use it. I also cut a 2-1/4" x 4-1/4" Basic Black layer for the DSP. I taped that in place on the front of the card. I centered the top and bottom but didn't on the side by the fold. I should have but I wasn't thinking at the time! 

The words are from the same "Happiness Abounds" set and were stamped using Black Memento ink on a scrap piece of Pool Party card stock. I die cut it with a die from the "Stylish Shapes" set. I set the words in place using Dimensionals. And the card was done.

Super quick, extremely easy, and very fun!

Thank you ever SO much for taking your time to stop by and see today's thank you card,
Wanda

Friday, April 08, 2022

Grassy Grove, Masculine Birthday, Sympathy or Father's Day Card, Stampin' Up!

When I saw this card on Pinterest, I wanted to make it. I had not played with the "Grassy Gove" bundle in a while. It's such a beautiful set and in a few minutes you can have a beautiful card. I found the original card here

The base of my card is a folded half-sheet of Old Olive card stock. I cut two 4" x 5-1/4" pieces of Basic White card stock. One for the front and one for the inside. I taped one on the inside. And the other I die cut the forest scene using the die from the "Grove Dies" package. 

I took a piece of Designer Series Paper (DSP) from the "New Horizons" 6" x 6" stack and I cut it at 3-7/8" x 5-1/8".  I turned the white piece over and I used my Mono glue to affix the DSP to the card stock. I could have used a sticky sheet to make the whole piece a sticker but I forgot about it at the time. The glue worked well. I just ran it all around the outside edge and then put tiny little dots on the areas I thought would stick up. I set it aside to set up for a minute or two.

Then I taped the layers to the front of the card base and that was it.  I didn't add any words because I wasn't sure what I was going to use it for. But it can be used for a masculine birthday, Father's Day, masculine thinking of you, a sympathy card, or even a masculine get well card.  It's such a pretty scene and a SUPER EASY card to make!

Thank you SO much for taking your time to stop by and see today's masculine orientated card,
Wanda  

Monday, March 07, 2022

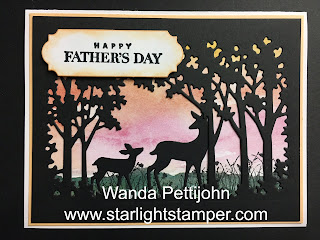
Celebrating You, Grassy Grove, Father's Day Card, 2022 Stampin' Up! Spring Mini Catalog

What I really like about this "Grassy Grove" set is that it's a perfect masculine set. It's great to use for a masculine birthday, Father's Day, get well, thinking of you, and even a sympathy card. My set was still sitting out (no surprise there, right?  LOL) so I thought I'd make another card with this set. It's super easy and quick too!

The base of my card is a folded half-sheet of Basic White card stock. The layer on top of it is a 4-1/8" x 5-3/8" piece of Pale Papaya card stock. You could make the card base a half-sheet of the Pale Papaya card stock if you want. I didn't because I was trying to save on my colored card stock. 

I took a piece of Basic Black card stock and cut it to 4" x 5-1/4".  I die cut the tree image using the die from the "Grove" die set that came with my "Grassy Gove" bundle. Then I cut a piece of Designer Series Paper (DSP) from the "New Horizons" 6" x 6" stack.  I cut it just a hair shy of the 4" x 5-1/4" size the Basic Black die cut piece is.   

Then I took some Basic Black card stock that I had sitting around with the double sided sticky sheet on it and die cut the two deers in the "Grove" set. 

I set the die cut tree piece on top of the DSP to see where I needed to stamp the grass from the "Grassy Grove" set. I used black Memento ink to stamp the grass in two places.  

Next I set the DSP down and put the Basic Black die cut tree on top to see where I wanted the deers to go. I removed the backing on the deers and set them in place. Then I glued the die cut tree image to the DSP. That piece was then glued or taped to the Pale Papaya piece. And then that was affixed to the card base. 

The words are from the "Celebrating You" set and were stamped on a scrap piece of Basic White card stock using black Memento ink. I die cut them with the die from the "Ornate Frames" die set. I took my blending brush and brushed the edges with Pale Papaya ink. I set the piece in place with Dimensionals and the card was done.

I think it turned out well. I LOVE the background. It's like a pretty sunset. I can seem making more of these for a masculine birthday, thinking of you and get well. They are quick, easy, and fun to make too.

Thank you SO very much for taking your time to stop by and see today's masculine card,
Wanda


Sunday, March 06, 2022

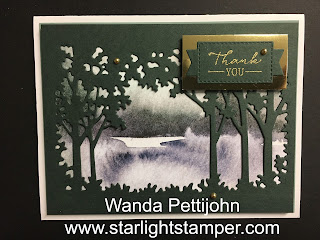
Grassy Grove, Many Messages, Thank You Card, 2022 Stampin' Up! Spring Mini Catalog

I found today's card on Pinterest. I was looking for a sample card using the "Grassy Grove" set. I wanted to keep it simple and quick. Plus I wanted to use some Designer Series Paper (DSP). I found the card here

The base of the card is a folded half-sheet of Basic White card stock. This card opens on the bottom and the fold is on the top.

I cut a 4" x 5-1/4" piece of Soft Succulent card stock for the layer.

A 3-7/8" x 5-1/8" piece of Evening Evergreen card stock was cut for the layer the trees were cut from. 
The trees are die cut using the "Grove" dies. 

A piece of DSP from the "New Horizons" 6" x 6" stack was cut just under 3-7/8" x 5-1/8".  I glued around the edges of the Evening Evergreen piece and set it on top of the DSP. I got mine a bit off and trimmed it with my scissors.  I added Dimensionals behind it and set it on top of the Soft Succulent piece. 

The words are from the same "Grassy Grove" set and were stamped on a scrap piece of Evening Evergreen using Versa Mark. Then heat embossed with gold embossing powder. I die cut them using the "Message" dies from the "Many Messages" bundle. There's a lot of fun dies in that set. It's fun because the words are all on one stamp and the dies are all on one piece of metal. So you can cut 20 words at one time. I only cut the one I needed. I was glad those words fit into that space because I really liked the ribbon look. I glued the word piece to a 2-1/16" x 1-1/16" piece of gold foil card stock. Dimensionals were added to the back of it and it was set in place on the front of the card.

I added a few gold "Metallic Pearls" to the front of the card and the card was done.

I want to play with this set some more. There's a LOT of DSP in that stack and there's some fun deers in the die set.  This would make a great Father's Day card, Masculine Sympathy card or Masculine get well card. Another versatile set!  I think I'll try another card without the DSP for those of you who didn't purchase the "New Horizons" package.

Thank you SO very much for taking your time to stop by and see todays' masculine card,
Wanda