Pin It

Tuesday, May 31, 2022

Wildflower Path, Awash in Beauty, Friendship Card, Stampin' Up!

I'm not sure whether you'd consider the words on here a friendship card or an inspirational card. But you can always find your own wording for your card.  I have not made a card with this layout in a while. I've always like it. It's a great way to use up smaller piece of Designer Series Paper (DSP).

The base of the card is a folded half-sheet of Merry Merlot card stock. This card opens on the bottom and the fold is on the top. I cut two 4" x 5-1/4" pieces of Basic White card stock.  One for the inside and one for the front. I taped one of the pieces to the inside.

Next I cut a piece of DSP from the "Awash in Beauty" 12" x 12" package. Then I cut it in half along the diagonal. Not thinking I flipped the one side and it didn't line up. SO I had to cut another piece and flip it before I cut along the diagonal.  I am going to end up with two cards or two pieces of triangle scrap. I opted for the two cards. I took my diagonal pieces and flipped them over and added two tiny pieces of scotch tape to hold them together. Then I added double sided tape to the back and set it in place on the Basic White piece.

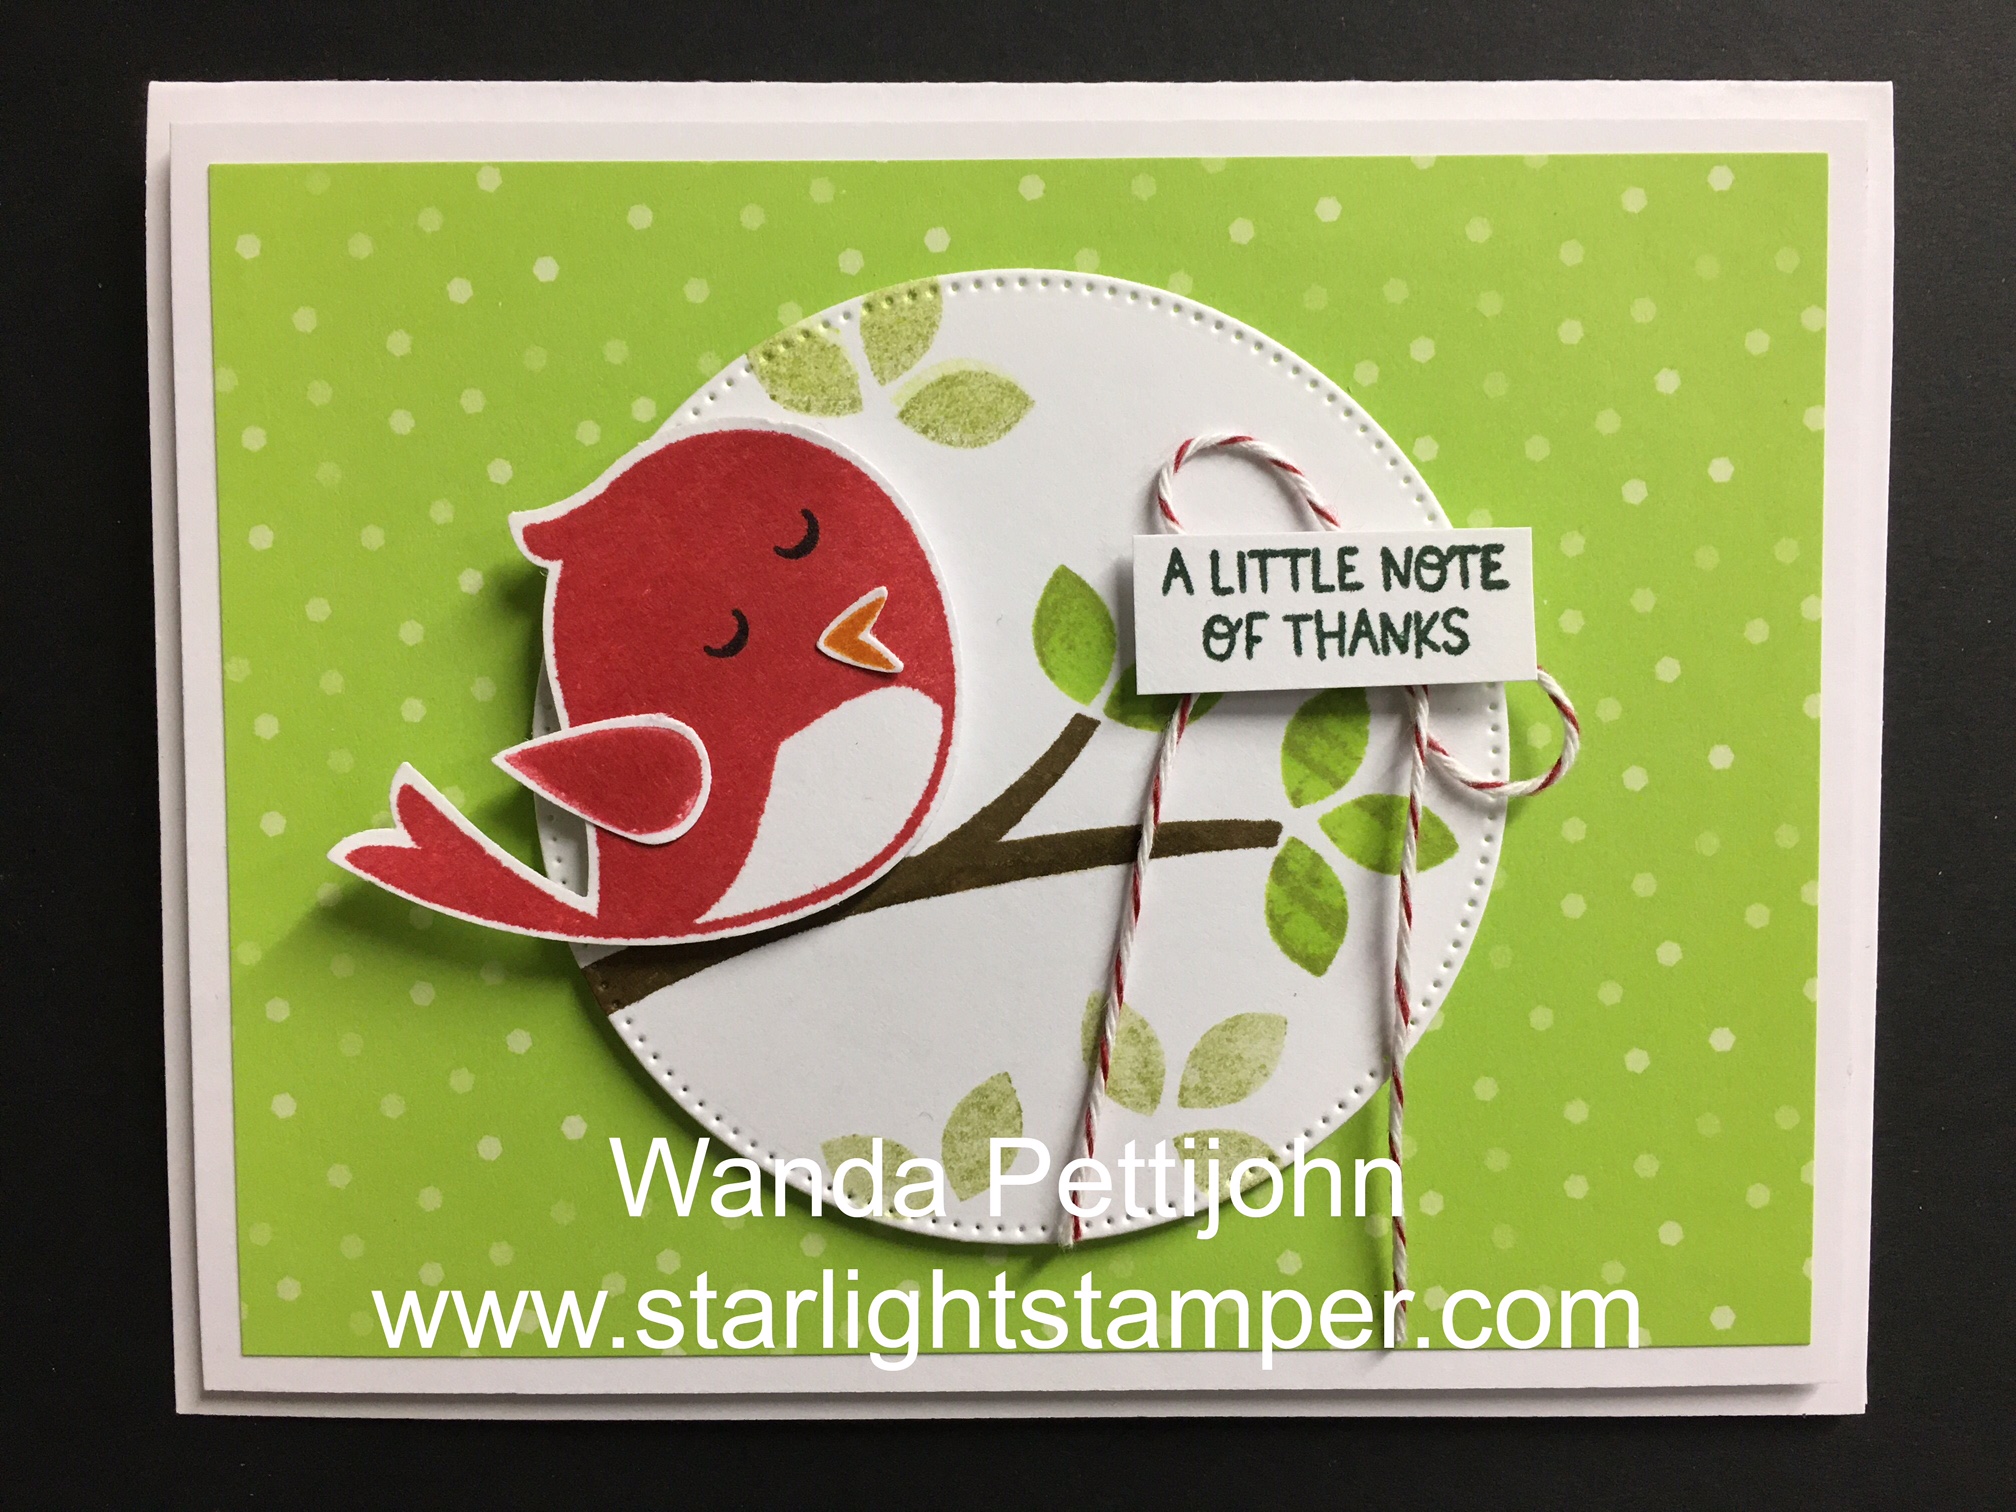
The words are from the "Wildflower Path" set and were stamped using Mossy Meadow ink. Then I taped the piece to the front of the card.

I fussy cut a few flowers from the DSP and set them in place in the center of the DSP rectangle piece. I added a Dimensional behind the peach colored flower. I tucked a leaf behind it and I taped a circle to the center area of the flower. I added Wink of Stella to the center of the flower and any other round image on the DSP.  And that was it. The card was done.

This was a very quick and easy card to make. I should say cards. Why not make two when you've got all the stuff out for one?

Thank you SO much for taking your time to stop by and see today's card,
Wanda

Monday, May 30, 2022

Lovely & Lasting, Hues of Happiness, Thinking of You Card, Stampin' Up!

I had a scrap piece of Designer Series Paper (DSP) from the "Hues of Happiness" 12" x 12" package.  I tend to have lots of scraps and I tend to not use them. This one fell out of the package when I was pulling out a different sheet. So I took it as an omen and thought I should make it into a card. I like this particular strip because it's so colorful, so bright and cheery.

The base of my card is a folded half-sheet of Basic White card stock. This card opens on the right and the fold is on the left.

I cut a 4" x 5-1/4" piece of Basic White card stock and textured it using the "Pretty Flowers" embossing folder. I glued this to the front of the card base.

The DSP measured 4-3/4" x 2" and the Basic White layer behind it measures 5" x 2-1/4". I taped the two pieces together and then set it on the left side of the card using Dimensionals.

The words are from the "Lovely & Lasting" set and were stamped using Mossy Meadow ink. They were punched out using the "Lasting Label" punch. I put tape on the left side and Dimensionals on the right side and I set it in place on the card.  And that was it.  Super easy. Super quick. And super cheery!!

Thank you SO very much for taking your time to stop by and see today's Thinking of You card,
Wanda

Sunday, May 29, 2022

Hues of Happiness, Lovely & Lasting, Thinking of You Card, Stampin' Up!

I am still trying to challenge myself to work on the panel cards more. I found this one on Pinterest and thought I would give it a try. You can see the original card here. The link takes you to Instagram but from there it's a dead end. No way to find out how this card was made.  So here's how I made it and I think I'm getting better at it! 

The base of the card is a folded half-sheet of Night of Navy card stock. This card opens on the right and the fold is on the left.

I cut a 3-1/4" x 4-3/8" piece of Basic White card stock.  On top of that I had cut three strips of "Hues of Happiness" Designer Series Paper (DSP).  I cut all three at 4-1/4" x 1".  Try to keep the pieces in order, it makes it easier and quicker to assemble them. I messed mine up and it took me a minute to figure out which strip went where!  I taped the DSP strips on top of the Basic White piece.

I took some retired Night of Navy ribbon and wrapped a 5" piece around the Basic White piece. I taped the ends on the back using scotch tape. 

Next I stamped the words from the "Lovely & Lasting" set using Night of Navy ink. Then I die cut them using a die from the "Painted Labels" die set. I taped the word piece to the front of the card, across the ribbon.  Then I tied a bow and glued it in place on the front of the card.

Dimensionals were added to the back of the Basic White piece and it was set in place on the front of the card.

A 4" x 5-1/4" piece of Basic White card stock was added to the inside of the card and the card was done.

This was a very fun and easy card to make. If you know who is the original designer of this card, please let me know so I can give them credit and a link back.

Thank you SO very much for taking your time to stop by and see today's Thinking of You card,
Wanda

Saturday, May 28, 2022

Happiness Abounds, Hues of Happiness, Friendship Card, Stampin' Up! Catalog

The "Happiness Abounds" set seems to be one of my go to sets lately. I LOVE the matching "Hues of Happiness" Designer Series Paper (DSP) especially the sheets that have the images that fit with the dies. You can't go wrong there.

Today's card was found on the internet. You can see the original here, it will take you to the Instagram site. There's several of them. Mine is a bit different as I left more space between the two panels.

The base of the card is a folded half-sheet of Basic White card stock. I cut two strips of Basic White that measured 1-1/2" x 5-1/4".  I cut the DSP at 1-1/4" x 5". And another piece of Basic White at 1-1/4" x 5". I textured that piece using the "Pretty Flowers" embossing folder. I glued that piece to one of the Basic White strips and I taped the DSP to the other. Then those two strips were taped to the front of the card. The one with the DSP to the upper part and the one with the embossed piece to the lower part.

The words are from the "Happiness Abounds set and were stamped using the Sweet Sorbet ink pad. I die cut it with the stitched ribbon die from the "Stylish Dies" set. I glued that piece to the embossed piece about 5/8" from the left edge of the card and centering it on the textured piece.

I die cut the two flowers from the "Hues of Happiness" DSP and I fussy cut the leaves. I added Dimensionals behind the larger flower and set it on top of the card for placement. I slipped the yellow flower under and then turned them over to add a few Dimensionals to the back of it. Then I removed the backing from the Dimensionals and set the flowers in place. I added a little bit of glue to the fussy cut leaves and set it in place under the flowers.  And that was it, the card was done. The original card had some embellishments but I forgot to add them. I may just leave the card the way it is. I like the looks of it.

This was a very fun, easy, and quick card to make. I could see myself making more of this one. With our without the embellishments.

Thank you SO very much for taking your time to stop by and see today's friendship card,
Wanda

Friday, May 27, 2022

Sweet Songbirds, Birthday Card, Stampin' Up!

I ran across another fun card on Pinterest and I thought I would give it a try. You can see the original card here.

The base of my card is a folded half-sheet of Basic White card stock.  This card opens on the bottom and the fold is on the top.

I didn't have the music embossing folder so I used the brick one instead. I cut this piece 4" x 5-1/4" before I embossed it. I glued it to the front of the card.

I cut a 1" x 5-1/4" piece of Designer Series Paper (DSP) from the in colors 6" x 6" stack. Then I cut a 1-1/4" x 5-1/4" piece of Basic White card stock for the layer behind the DSP. I taped the DSP to the strip and then I glued that strip to the front of the card, centering it as much as I could.

The words are from the "Sweet Songbirds" set and were stamped using black Memento ink on a scrap piece of Basic White card stock. I die cut them with the ribbon die in the "Stylish Shapes" die set. I cut off the end about 1/8" from the edge of the "D" in bird. I set it in place with Dimensionals. The cut edge lined up with the DSP edge and the piece was centered on the DSP.

Next I took a 1/4 piece of Basic White card stock and stamped the branch image using Soft Suede ink. I stamped the leaves using Garden Green ink. Then I added the birds feet using Crushed Curry ink. I die cut the piece using the largest circle die in the "Stylish Shapes" set.

The bird was stamped separately on a piece of Basic White card stock. I stamped it using Tahitian Tide ink. I also stamped the wing in the same color. I punched those pieces out. I set the wing in place with a small Dimensional and I added Dimensionals to the back of the bird.  I set the bird on top of the circle to see where the musical notes were going to go. Those were stamped using black Memento ink.

The bird was added to the circle. Then the circle was added to the front of the card.

I stamped "It's your special day" on the inside and the card was done.

This was a fun and quick card to make. I LOVE the colors.

Thank you SO very much for taking your time to stop by and see today's birthday card,
Wanda

Thursday, May 26, 2022

Sweet Songbirds, Thank You Card, Stampin' Up! Catalog

Today I found this cutie on Pinterest and got out all the stuff to make it. I did have "all the stuff".  It's a pretty quick card to make. You can see the original card here and there's also a how to tutorial there too.

The base of the card is a folded half-sheet of Basic White card stock. This card opens on the right and the fold is on the left. 

A 4-1/4" x 5-1/2" piece of Tahitian Tide Designer Series Paper (DSP) was cut from the in color 6" x 6" stack. Those stacks are fun to have because you get a variety of designs in all the colors. Here I bought the in colors for 2022-2024.  The collections are also available. I didn't buy them this time around. I noticed that I hardly used any of them from the previous designs so I thought I'd just stick with the in colors for now. I taped the DSP to the front of the card.

Next I die cut the Basic White rectangle using the second largest stitched rectangle. I took the piece over to my paper cutter and cut a Tahitian Tide piece of card stock for the layer. It measured 3-1/2" x 4-7/8". I set it aside.

On the Basic White piece I stamped the branches using Soft Suede. I wasn't paying attention to the video because Crumb Cake was used for those. Oops!  But it still looks like a brown tree branch. 

The leaves were stamped next using Parakeet Party ink. Then the flowers were added using Tahitian Tide ink

The bird was stamped on a scrap piece of card stock using Sweet Sorbet ink. I also stamped the wing with the same color. I used the matching punch and punched the bird and wing out separately.

I set the bird above the bottom branch to see where the legs would go. I stamped them using Mango Melody ink. Then I took another scrap piece of card stock and stamped the beak using Mango Melody.  I punched the beak out and glued it to the bird. And I glued the wing on as well.

The eyes were stamped using black Memento ink. I also stamped the musical notes using black Memento ink. The Basic White piece was taped to the Tahitian Tide card stock piece.

The word piece was stamped by using the wood grain rectangle in the set on a piece of Crumb Cake card stock and Crumb Cake ink. I fussy cut it out. I set it on top of the piece to see where I needed to stamp the lines that will make it look like it's hanging.  Dimensionals were added to the back of the word piece and it was set in place on the front of the card.

The bird was then set in place. Dimensionals were added to the back of the Tahitian Tide layered piece and it was set in place on the front of the card.  And the card was done.  I only changed the words to mine.  

If I were to make another one, I would make the bird first.  Then I could see where the branches would be going so I didn't end up cutting off one of the flowers.  But it's still cute just as it is.

Thank you SO very much for taking your time to stop by and see today's thank you card,
Wanda

Wednesday, May 25, 2022

Hues of Happiness, Pansy Patch, Birthday Card, 2022-2023 Stampin' Up! Catalog

I found today's card on Pinterest. I thought it was so pretty and Pool Party has such a spring feel to it. You can see the original card here.

The base of my card is a folded half-sheet of Pool Party card stock. The sheet was cut on the 8-1/2" side so after it was cut the piece measured 4-1/4" x 11".  This card opens on the bottom and the fold is on the top.

I cut two 4" x 5-1/4" pieces of Basic White card stock. One for the inside and one on the outside. I taped the one to the inside and I textured the other one using the "Painted Texture" embossing folder. I glued it to the front of the card base. I prefer glue because using tape on a textured piece doesn't guarantee that tape will get in enough areas to make it stick. Glue will hold it in place. 

I cut a 1-3/4" x 5-1/4" piece of Designer Series Paper (DSP) from the "Hues of Happiness" 12" x 12" package. I glued it to the front of the card.

I die cut a Pool Party scalloped circle. I used the largest one in the set. Then I die cut a Basic White circle using the second largest circle in the set. 

The words on the Basic White circle are from the "Pansy Patch" and were stamped using Pool Party ink. I taped the piece to the scalloped circle. Dimensionals were added behind it and it was set on the front of the card.

I die cut the flowers from the "Hues of Happiness" package and set them in place on the card. I glued the left one on and set the other one on using Dimensionals.  I also fussy cut the leaves and glued them in place around the flowers.

I had some enamel dots and I added them to the front of the card. I also added some Wink of Stella to the center of the two large flowers.  And the card was done.

This was a very fun, quick, and easy card to make. I am REALLY liking this DSP!!!  A LOT!

Thank you SO very much for taking your time to stop by and see today's birthday card,
Wanda

Tuesday, May 24, 2022

Happiness Abounds, Wedding or Anniversary Card, 2022-2023 Stampin' Up! Catalog

Today's card was from Pinterest. You can see the original here.  I did make some changes.  Here's how I made mine. 

The base of the card is a folded half-sheet of Pool Party card stock. I cut the sheet in half on the 8-1/2" side so when I was done cutting it measured 4-1/4" x 11".  I scored it at 5-1/2" and folded it in half.

I cut two 4" x 5-1/4" pieces of Basic White card stock. I taped one to the inside and the other on the outside.

I cut a 5-1/4" x 2-1/4" piece of Pool Party for the strip. I took the lacy die from the "Blossoming Happiness" die set and ran it through my Big Shot.  I taped the piece to the front of the card, centering it as best as I could without measuring. I saved a few of the hearts.  Actually I didn't save them, they were still on my worktable while I was making the card.

I die cut three flowers from the "Hues of Happiness" 12" x 12" Designer Series Paper (DSP) package. I taped the large flower off to the left. The flower in the front was set in place using Dimensionals and the flower in the back is actually a half flower that was on the edge of the sheet. It was a nice way to use partial pieces. 

I fussy cut some leaves, added tape and tucked them under the flowers.

The words are from the "Happiness Abounds" set using Bermuda Bay ink on a 2-1/2" x 1/2" piece of Basic White card stock. I set it in place on the front of the card using Dimensionals.

I used a little dot of glue and added some of those heart-shaped scraps from the die cutting. I thought they were a nice touch to the card.  

I took my Wink of Stella pen and colored the center of the flower and each one of those little hearts.  It's hit or miss when it comes to the camera picking up the sparkle.  Trust me, it's there and it's pretty. And then the card was done.

Thank you SO very much for taking your time to stop by and see today's Wedding/Anniversary card,
Wanda

Monday, May 23, 2022

Happiness Abounds, Hues of Happiness, Birthday Card, 2022-2023 Stampin' Up! Catalog

I was going to make another "Sweet Songbirds" card but I ran across this one on Pinterest and thought I'd switch gears for today. You can see the original card here. This is a very easy card to make and a perfect way to use "busy" Designer Series Paper (DSP).

The base of the card is a folded half-sheet of Basic White card stock. This card opens on the bottom and the fold is on the top.

I cut two strips of Basic White card stock at 1-1/2" x 4".  One is for the bottom and one is for the bottom.

I die cut the flower from a sheet of DSP from the "Hues of Happiness" 12" x 12" package and I fussy cut the leaves.

I set a little bit of the flower on the bottom strip to see where I was going to add the words. 

The words are from the "Happiness Abounds" set and were stamped using black Memento ink. I added Dimensionals behind this piece plus the other Basic White strip.

I taped a piece of DSP from the "Hues of Happiness" set on the center of the card front. I didn't have to get it exactly centered but I did try to make sure the sides were even.

I set the Basic White strips in place, leaving a little space at the top and bottom, trying to keep with the 4" x 5-1/4" size. And again, here you don't have to be so exact at the top and bottom as much as you need to watch the sides.

Once the strips were in place, I glued the flower to the front. You only need a little bit of glue but you do need to make sure you only get the glue on the strips. 

I had fussy cut the leaves and I added a little bit of glue and slipped them under the flower.

I had some enamel dots from some other project and I set them in place on the front of the card and the card was done.

The best part of this card was that I was able to use some busy DSP. There's almost always some DSP in the package that is just too difficult to work with. I'm going to have to try to remember that in the future when I run across busy DSP.  I'll forget until I see a card on Pinterest!! LOL

Thank you SO very much for taking your time to stop by and see today's birthday card,
Wanda

Sunday, May 22, 2022

Sweet Songbirds, Thank You Card, 2022-2023 Stampin' Up! Catalog

So after yesterday's horrible card I found one I thought was very pleasing to the eye. The blue is a welcome color!!! I found the card here on Pinterest. 

The base of the card is a 1/4 sheet of Tahitian Tide card stock. This piece measures 5-1/2" x 4-1/4".  

A 4" x 5-1/4" piece of Basic White was cut for the layer on top of the Tahitian Tide card stock piece. 

Next I cut a 2-1/2" x 4" piece of Tahitian Tide for the panel. I scored the piece at 4. Actually just a little past 4" or the white will show at the bottom. 

The Designer Series Paper (DSP) is from the 6" x 6" in color package. I cut that piece 3-3/4" x 2".  I taped the DSP onto the strip I just cut and scored. 

Next I took the largest circle from the "Stylish Shapes" die set and I traced the outside of it on a piece of Basic White card stock.  Then I stamped the branch from the "Sweet Songbirds" set using Soft Suede ink.

The leaves were stamped next using Parakeet Party ink. I also stamped the leaves again on a piece of scrap card stock. I fussy cut the set of three leaves. 

The flowers were stamped using Sweet Sorbet ink on a scrap piece of card stock. I fussy cut them. I didn't have the flower embellishments so fussy cutting those flowers was the next best thing.

I stamped the bird using Tahitian Tide ink and then I punched it out. I took a scrap piece of Daffodil Delight card stock and punched out the beak.  I set the bird on the circle so I could see where the words would go. Then I stamped the words using black Memento ink.

I die cut the circle. I set the bird in place using Dimensionals. Then I stamped the musical notes on the circle and then on the 4" x 5-1/4" piece of Basic White.

I am not ready to assemble the card.  I took the strip and taped the flap to the backside of the Basic White piece and then I taped the other side of the flap to the Tahitian Tide piece. 

The circle was then taped in place, but make sure you don't tape over the edge or you will not be able to open that flap. 

I'm not a bit fan of these types of folds. I'm to traditionally minded when it comes to my cards.  But now and then you need to step outside the box!

It was a fun card to make. I was happier with this bird than yesterday's bird.  I have two pics here because I thought I was done when I posted the one pic. It's below the better one. I had lost the wing (which was punched using a piece of Basic White and Tahitian Tide DSP) and totally forgot I had. And I forgot to put the rhinestones in the center of the two flowers.  It's kind of like the "what's wrong with this picture" type thing!!! LOL  Did you notice the wing missing or the rhinestones not in the center of the flowers?  And another reason you're seeing the bottom photo is, I had no idea how to remove it. I tried several times and gave up. I didn't want to redo the whole post so I just left it.

Thank you SO very much for taking your time to stop by and see today's thank you card,
Wanda


Saturday, May 21, 2022

Sweet Songbirds, Birthday Card, 2022-2023 Stampin' Up! Catalog

I was looking for another card using the "Sweet Songbirds" set. I am not happy with the way mine turned out. You can see the original card here. My choice of bird color is not good.  I may make another one sometime using a different color for the bird. But as I always do, I share with you the good, the bad, and the ugly!!!!

I really like this layout. I can see myself using it on a future card. The base of the card is a folded half-sheet of Basic White card stock. This card was cut in half on the 8-1/2" side of the sheet. Once cut it measured 4-1/4" x 11". I folded it in half and set it aside.

I cut a 4-1/8" x 5-3/8" piece of Flirty Flamingo card stock for the layer.

The next piece is the Designer Series Paper (DSP). I cut it from the "Awash in Beauty" 12" x 12" package. It measures 2-3/4" x 5-3/8".  I taped it to the Flirty Flamingo piece and then I taped that to the front of the card base. I didn't have the same DSP as is on the original card and that's where my color problem started. 

The focal piece measures 3-1/2" x 4" and was cut from a piece of Basic White card stock. The layer behind it is a 3-3/4" x 4-1/4" piece of Merry Merlot card stock. Now, if I were to redo this card, I think I would make that layer Balmy Blue.

I stamped the branch first using Early Espresso ink. The leaves were stamped using Granny Apple Green ink. 

The birds were added. I used Merry Merlot but next time I would go with the Balmy Blue. This color is WAY too dark. Before I stamped the birds, I did set the feet in place to see how I was going to get both birds on the piece. I removed the feet and stamped the birds. Then I stamped the feet using Soft Suede ink. The wings were stamped next.

The musical notes, words, and eyes were stamped next. Oh, I forgot to mention, I used my Stamparatus for this card. I don't like ruining my card stock because of faulty ink. Plus when using new stamp sets it's like they need to be broken in before they stamp nicely in the future. I used black Memento ink for those. 

I took the focal piece and the layer and taped them together. I added Dimensionals to the back and set it on the front of the card.  

And on the inside I stamped the words "it's your special day!".  I don't usually stamp words on the inside. But here I had to because of the words on the front. 

This was a fun card to make but the color of the birds is SO bad. Every time I look at the card I just want to look away really fast!!! LOL Close your eyes and imagine the bird in Balmy Blue or even Flirty Flamingo. Look the other way and open your eyes!!!

Thank you SO much for looking at today's REALLY bad and ugly card,
Wanda 


Friday, May 20, 2022

Sweet Songbirds, Thank You Card, 2022-2023 Stampin' Up! Catalog

Today I thought I'd find a card on Pinterest to get me started with the new "Sweet Songbirds" set/bundle. I found this card here. This is a very fun and easy card to make. I think the bird is just adorable and I hope to make several more cards in the upcoming days.

The base of my card is a folded half-sheet of Basic White card stock. I cut a 4" x 5-1/4" piece of Basic White for the layer. On top of that is a 3-3/4" x 5" piece of Designer Series Paper (DSP) from the 6" x 6" in color stack. I used the Parakeet Party color. I taped the DSP to the Basic White piece. Dimensionals were added to the back and it was set in place on the card base.

Next I took the largest stitched die in the "Stylish Shapes" die set and traced around the outside of it so I could see where I was going to stamp the branch and leaves.

The branch was stamped first. I used Soft Suede ink for that.  The leaves were stamped using Parakeet Party ink on the middle leaves. Then I took my Pear Pizzazz ink pad and touched the edges of it on the stamp and I stamped over the Parakeet Party inked leaves. I did set this up in my Stamparatus so I could stamp the same spot each time. Then I stamped over the leaves one more time using Parakeet Party ink. The other leaves were stamped using Pear Pizzazz ink that was stamped off once. I did not use the Stamparatus for that. Then I die cut the piece using the largest circle die. The pencil marks didn't show because they were way on the outside of the die cut area.

The bird was stamped next. I stamped it using the new Sweet Sorbet color. I stamped the little wing in the same color too. Then I used the matching punch to punch them out. I stamped the beak using Pumpkin Pie ink and I also punched that piece out. I set the bird in place on top of the circle using Dimensionals. I added the wing and the beak using a dot of glue.

The words are from the same set and I stamped them using Evening Evergreen ink on a scrap piece of card stock. I trimmed that piece to measure 1-1/4" x 3/8".  

I didn't have any current Baker's Twine so I took some Cherry Cobbler retired twine and made a bow. The color matched close enough that you couldn't tell.  Works for me!! I glued the bow in place. Two Dimensionals were added to the word piece and it was set in place over the bow.

Dimensionals were added to the back of the circle and it was set in place on the front of the card and the card was done.

I thought this was an adorable card and it was fun to get my feet wet using this set. I hope to come up with some ideas of my own!

Thank you SO very much for taking your time to stop by and see today's thank you card,
Wanda


Thursday, May 19, 2022

True Beauty, Awash in Beauty, Friendship or Sympathy Card, 2022-2023 Stampin' Up! Catalog

When I finished making this card and took a look at it the first thing out of my mouth was "meh".  I wasn't all that thrilled with how it turned out. Maybe if the printed panel was on the bottom and the white one on the top?  I don't know.  It just isn't appealing to my eye!

I made this card by taking a half-sheet of Basic White card stock and folding it in half. This card opens on the bottom and the fold is on the top. 

I cut a 4-1/8" x 5-3/8" piece of Balmy Blue and taped it to the card base.

The Basic White piece was cut at 3-3/4" x 5".  I taped this on top of the Balmy Blue piece.

Next I cut the Designer Series Paper (DSP) from the "Awash in Beauty" 12" x 12" package. It measured 1-1/2" x 3".  I also cut a Basic White piece the same size. The Balmy Blue layers behind them were cut at 1-3/4" x 3-1/4".  I taped the DSP to one of the Balmy Blue layers.  The other strip was stamped using the words from the "True Beauty" set  and Night of Navy ink.  If you are going to use other wording you may want to wait until you have all the pieces of your card cut so you can see how much room you have to stamp them.

The Basic White square in the middle was cut at 1-1/2" x 1-1/2" and the Balmy Blue layer behind it was cut at 1-3/4" x 1-3/4".  I taped the two pieces together.

The flower is from the "Hues of Happiness" 12" x 12" package. I used the matching die to cut it out.  I added Dimensionals to the back and set it in place on top of the square.  Then Dimensionals were added to the back of that square and it was set in place on the front of the card.  And the card was done.  Or so I thought.  I ended up coloring the flower in using Wink of Stella and now it was done.  

It still needs something. Perhaps some rhinestones or pearls.  Some type of embellishments. Or maybe I should have textured the Basic White layer. I think that's it, that's what it needed.  So for now it's just "meh"!

Thank you SO much for taking your time to stop by and see today's Friendship/Sympathy card,
Wanda

Wednesday, May 18, 2022

Happiness Abounds, Friendship Card, 2022-2023 Stampin' Up! Catalog

Today's card is a copied one. I found it here.  I thought it was pretty and also quick. Not that I was looking for a quick card, it just happened to be a quick one! Oh, and it was fun!

The base of my card is a folded half-sheet of Fresh Freesia card stock. This card opens on the bottom and the fold is on the top. 

I cut a 4" x 5-1/4" piece of Basic White for the inside and I taped it down.

Then I cut a 3-3/4" x 5" piece of Basic White for the top layer. 

Next I cut a 3-3/4" x 2" piece of Designer Series Paper (DSP) from the "Hues of Happiness" 12" x 12" package. I taped that piece to the left side of the Basic White piece.

The words are from the "Happiness Abounds" set and were stamped using Gorgeous Grape ink.  After stamping I taped that down on the front of the card.

The flower is from the same package of DSP. I used the matching die to cut it out.  If you don't have the dies, it's pretty easy to fussy cut, there's not a lot of deep crevices to try to cut nicely.  It's mostly smooth cutting.  But I have the die, so I used it.  I added Dimensionals to the back of the flower and I set it in place on the front of the card.  I added some Wink of Stella to the center of the flower and also to the center of all of the flowers on the left panel. 

And for the final touch a crystal rhinestone was added and the card was done.  This is why I like to add the piece on the inside first because when I add the last item on the front, the card is done!

Thank you SO very much for taking your time to stop by and see today's friendship card,
Wanda

Tuesday, May 17, 2022

Lovely & Lasting, Hues of Happiness, Thinking of You Card, 2022-2023 Stampin' Up! Catalog

I have always like the panel layout cards but I find them a bit frustrating and difficult. I have trouble lining them up so they look even.  But I keep trying and one of these day's I will be able to make one without whining!!! LOL

The base of my card is a folded half-sheet of Basic White card stock.

I cut a 4" x 5-1/4" piece of Highland Heather for the layer. And on top of that is a 3-7/8" x 5-1/8" piece of Gorgeous Grape card stock.

The Designer Series Paper (DSP) is from the "Hues of Happiness" set. I cut three of them at 1" x 4".  I taped them to the front of the card. The left panel and right panel are set in place about 1/4" from the Gorgeous Grape edge.  And the top and bottom ends of the DSP are about 3/8" from the top and bottom edge of the Gorgeous Grape edges.  I did set all the piece on top of the piece first and lined them up. I taped the right and left piece and the center one was added last.

The words are from the "Lovely & Lasting" set and were stamped on a piece of Basic White card stock using Gorgeous Grape ink. I die cut them with the third stitched circle from the "Stylish Shapes" die set. Then I die cut a Gorgeous Grape scalloped circle using the die from the "Layering Circles" die set. 

I didn't have any current ribbon so I just used what I had and added a bow to the circle. I was going to color some rhinestones and use them but the ribbon seemed to be enough. I taped the circles together, added Dimensionals to the back and set the piece in place on the front of the card.  And the card was done.

I did find it easier this time to make the panel card. I think adding the right and left panels first made it a bit easier. If you have any tips for making these panel cards easier, please share.

Thank you SO much for taking your time to stop by and see today's Thinking of You card,
Wanda

Monday, May 16, 2022

Lovely & Lasting, Hues of Happiness, Thinking of You Card, Stampin' Up! 2022-2023

While looking through the "Hues of Happiness" 12" x 12" Designer Series Paper (DSP) I found this pretty busy sheet that I thought might be difficult to work with. I didn't care for what was on the backside so I knew I'd have to figure out something using this side. SO here's what I came up with.

The base of my card is a folded half-sheet of Basic White card stock. I cut a piece of Night of Navy at 4" x 5-1/4".  This card opens on the bottom and the fold is on the top. I taped this piece to the front of the card.

Next I cut a 3-7/8" x 5-1/8" piece of DSP and taped it to the Night of Navy piece.

The top Basic White piece was die cut using the "Basic Borders" dies. I offset it on purpose. I didn't want it centered because I thought it would look like an envelope flap and that wasn't the look I was going for.  Before taping it to the upper part of the DSP piece, I stamped the words from the "Lovely & Lasting" set using Night of Navy ink.

The larger Night of Navy flower is from the "Hues of Happiness" DSP package. I used the die from the "Happiness Abounds" bundle. I added Dimensionals to the back and set it on top of the card. I didn't press down yet, I needed to add the leaves, which I die cut too. I added a little bit of glue behind the leaves and slipped them under the flower. I'm not sure if the Dimensional is on the leaf or not but it doesn't matter because the leaf is glued down.  And that was it.

This was a very fun card to make. I love being able to die cut flowers and leaves, it makes for an even quicker card. Plus no coloring!!  I like this layout and I like it that this card is a versatile one, it can be used for a number of occasions. 

Thank you SO much for stopping by to see today's "thinking of you" card,
Wanda

Sunday, May 15, 2022

Celebrating You, Awash in Beauty, Wedding Card 2022-2023 Stampin' Up! Catalog

Here's a layout I love to use with some pretty Designer Series Paper (DSP) and center wording. It's fun and easy to do too.

The base of my card is a folded half-sheet of Basic White card stock. This card opens on the right and the fold is on the left.

I cut my corner pieces as follows.  I cut the Blushing Bride card stock at 3-3/4" x 3-3/4" and then I cut it in half on the diagonal.  The DSP is from the "Awash in Beauty" 12" x 12" package and was cut at 3-1/2" x 3-1/2" and cut on the diagonal. I taped the DSP to the card stock and those pieces were set in the corners of the card. I originally wanted the opposite corners but I grabbed the wrong pieces when adhering the DSP.  So put the pieces on top of each other before taping to make sure that is they corners you want. It is still pretty but it's not what I had in my head!

The words are from the "Celebrating You" set and were stamped using Mossy Meadow ink on a scrap piece of Basic White card stock. I die cut them using the third "Stitched Shapes" circle die.  I got out my "Layering Circle" dies and found the scalloped one that was a bit smaller than the stitched circle and die cut it using Old Olive card stock. I added Dimensionals to the back and set the piece in place on the front of the card, centering it as much as I could without measuring.

I took some crystal rhinestones and colored them using the dark Cajun Craze Blends pen and I placed them on the front of the card.  And the card was done.

This was a very fun and easy card to make. I like this layout. It allows me to use up some nice pieces of DSP.

Thank you SO very much for taking your time to stop by and see today's wedding card,
Wanda


Saturday, May 14, 2022

Lovely & Lasting, Happiness Abounds, Thinking of You Card, 2022-2023 Stampin' Up!

I found that there's not many samples of card from the new stamp sets that I purchased. So there's no inspiration or no cards to copy. I had to come up with one on my own. Imagine that?  LOL

The base of my card is a folded half-sheet of Basic White card stock. This card opens on the right and the fold is on the left.

I cut a 4" x 5-1/4" piece of Highland Heather card stock for the layer.

Next I cut a 2-1/2" x 3-7/8" piece of Basic White for the scalloped edge layer. You can cut it a bit longer and trim the piece later if you want. It's really close here unless you cut your pieces longer. I die cut the scalloped edge using the die from the "Colors & Contour" bundle.

The Designer Series Paper (DSP) is from the "Hues of Happiness" 12" x 12" package. I cut a 3-7/8" x 3" piece.  I taped the DSP to the Highland Heather piece, leaving a 1/8" border. Then I added the scalloped edge piece. 

The words are from the "Lovely & Lasting" set and were stamped using Mossy Meadow ink. I die cut the stitched circle using the third circle die in the "Stylish Shapes" die set.

 The "Happiness Abounds" bundle had dies in it that fit with two of the sheets of DSP in the "Hues of Happiness" package. I die cut the flower and fussy cut the leaves. I taped them to the circle. I turned the circle over and added Dimensionals. I made sure they touched one of the leaves and the flower to give them some support. I set the circle in place on the front of the card about 1" from the top edge.  Then I added some Wink of Stella to the flower and to the center of all of the flowers on the bottom part of the card. I thought it could use a little bit of a sparkle

I took my dark Highland Heather Blends pen and colored three clear rhinestones. Those were set in place on the front of the card and the card was done.

This was such a fun card and I REALLY like this layout.

Thank you SO very much for taking your time to stop by and see today's Thinking of You card,
Wanda

Friday, May 13, 2022

True Beauty, Wedding or Anniversary Card, 2022-2023 Stampin' Up! Catalog

Today I thought I'd take a serious look at my new stuff!  I only got my feet wet yesterday but today I jumped in.  Here's how I made today's card. 

The base of my card is a folded half-sheet of Daffodil Delight.  This card opens on the right and the fold is on the left.

The dies that go with the "True Beauty" set have the lattice image with it. So I cut it from a piece of Basic White card stock that I used the double sided sticky sheet on so it would be a sticker. No gluing for me! I had cut a 4" x 5-1/4" piece of Basic White for the layer behind it but was 1/16" too small. SO I taped that piece to the inside and cut another piece that was 1/16" larger on both sides. I burnished the lattice piece to the Basic White piece and then taped it in place on the front of the card.

Next I die cut the stitched circle from the "Stylish Shapes" die set. I used the second largest one. 

Then I stamped the flower from the "True Beauty" set using Calypso Coral ink. the leaves were stamped using Granny Apple Green ink and those pieces were die cut.  I also die cut the pieces with the round balls on the ends and I took my blending brush and Balmy Blue ink and scrubbed on some color. 

I cut a 3/4" x 4" strip of Designer Series Paper (DSP) from the "Awash in Beauty" 12" x 12" package. I taped it to the front of the card 3/4" from the top and bottom of the card and 7/8" from the fold.

I set the flower in place using Dimensionals. I added a little bit of glue on the end and tucked the leaves in place. I tore the blue pieces so they were smaller and with a dot of glue on the end, I slipped them under the flower.  

The words are from the "True Beauty" set and were stamped using Mossy Meadow ink. 

The circle was set in place on the front of the card using Dimensionals and the card was done.

This was a fun card to make. I like the colors and the layout.  It's so bright and cheery.

Thank you SO very much for taking your time to stop by and see today's card,
Wanda

Thursday, May 12, 2022

Lovely & Lasting, Thinking of You Card, Stampin' Up!

The new stuff arrived!!!  So I started out simple.  I need to look at my sets and give them some thought before I really dig in. So here's how I made today's card.

The base of my card is a folded half-sheet of Basic White card stock. This card opens on the right and the fold is on the left.

I cut a 5" x 2" piece of Polished Pink card stock. Then I cut a 4-7/8" x 1-7/8" piece of Designer Series Paper (DSP) from the "Awash in Beauty" 12" x 12" package. This package has some really beautiful sheets in it and I'm SO looking forward to having fun with them!  I taped the DSP to the card stock strip and then I taped that to the front of the card base about 1/4" from the top, fold, and bottom.

The words are from the "Lovely & Lasting" set and were stamped using black Memento ink. The frame around it is from the same set and was stamped using Cherry Cobbler ink.  Though I think I should have used Lovely Lipstick ink so it would blend in better. Anyway, I punched the words with the matching punch and set them in place on the front of the card using Dimensionals.  The set comes with other words that I look forward to using too.  And all of them fit inside that frame!!  How fun is that going to be?

This was a super simple, quick, and easy card to make.

Thank you SO much for taking your time to stop by and see today's Thinking of You card,
Wanda

Wednesday, May 11, 2022

Artistically Inked, Color & Contour, Friendship Card, Stampin' Up!

I'm hoping my order will comes tomorrow.  But for now you get to view this card.  Though I do like the layout and might use it on a card with some new stuff that's coming. 

The base of my card is a folded half-sheet of Coastal Cabana card stock. This card opens on the right and the fold is on the left. 

I cut two 4" x 5-1/4" piece of card stock. One for the front and one for the inside. I taped the one on the inside so that was all set.

Next I die cut the large flower image from the "Artistically Inked" set using scrap card stock. I took my blending brush and colored over the piece using Coastal Cabana ink. I moved the piece around a few times to fill in the piece.  I taped that to the front of the card.

Then I die cut the scalloped rectangle piece from the "Color & Contour" bundle using Coastal Cabana card stock. And the Basic White piece on the inside measures 2" x 3-5/16".  I don't like doing the 16th of an inch thing, it's between 3-1/4" and 3-3/8".  My cutter doesn't have that line so I just eyed it up between those two lines.

I stamped the flower and leaves from the "Artistically Inked" set. I used Granny Apple Green ink for the leaves and Coastal Cabana ink for the flower. I die cut them with the matching dies. I set the flower and leaves on top of the Basic White piece to see where the words could go.

The words are from the "Artistically Inked" set and were stamped using Coastal Cabana ink. Then I taped that piece to the scalloped rectangle piece. 

The flower was added using Dimensionals. The leaves were slipped under the flower with a little bit of glue added to the backs. 

I cut a 4" x 1/2" piece of Coastal Cabana card stock and taped that strip to the front of the card.

Dimensionals were added to the back of the rectangle piece and it was set in place on the front of the card and the card was done.

This was a very fun, quick, and simple card to make. If I were to make another one, I think I would use Basic White for the "stencil" part so I could use it on a future card. Other than that all went well with this card!!

Thank you SO very much for taking your time to stop by and see today's card,
Wanda

Tuesday, May 10, 2022

Artistically Inked, Celebrating You, Anniversary Card, Stampin' Up!

I'm still waiting for my Stampin' Up! order to arrive so in the meantime, I thought I'd share this card with you. I found it here on Pinterest. 

The base of my card is a folded half-sheet of Basic White card stock.  This card opens on the right and the fold is on the left.

I cut a 4" x 5-1/4" piece of Highland Heather for the layer. I textured it with the "Painted Texture" embossing folder. I glued that on top of the card base. I prefer to glue my textured pieces because I know they will stay in place. With tape, because of the texture, I have found that some of the surface are doesn't get tape stuck to it and then it won't be adhered to the card and give a solid hold. Glue sticks!  Glue holds!

Next I cut a 4" x 2-1/4" piece of Basic White for the focal piece. I stamped some Gorgeous Grape dots on it from the "Artistically Inked" set. Then I stamped two of the larger flowers using Gorgeous Grape ink. I also stamped the dots once on the Highland Heather piece.

The words are from the "Celebrating You" set and were stamped using Granny Apple Green.

The smaller flowers were stamped using Fresh Freesia ink, and the leaves were stamped using Granny Apple Green ink. I die cut all the pieces and set them aside.

I cut a 4" x 2-1/2" piece of Gorgeous Grape card stock and glued the Basic White piece to it. 

I tied a piece of Fresh Freesia ribbon around the two layers, made a bow, and glued that in place on the front of the card. 

I added the flowers and leaves. The lower large flower was added using Dimensionals, the rest of the images were set in place using tape.  And that was it.

This was a very fun, quick, and easy card to make.

Thank you SO very much for taking your time to stop by and see today's anniversary card,
Wanda


Monday, May 09, 2022

Let's Set Sail, Celebrating You, Father's Day Card, Stampin' Up!

Today I was trying to use up a little more of the retired "New Horizons" Designer Series Paper (DSP) and here's what I ended up with.

The base of my card is a folded half-sheet of Basic White card stock. This card opens on the right and the fold is on the left.

I cut a 4-1/2" x 3-1/4" piece of Misty Moonlight card stock for the layer and a 4-3/8" x 3-1/8" piece of Basic White for the top layer.

I die cut the circle from the "New Horizons" DSP using the largest circle die.  I colored the top of the piece a little with some Cajun Craze ink.

I stamped the sails using Misty Moonlight ink and the boat using Soft Suede ink. Then I punched them out with the matching punch.  I set them on top of the circle to see where the birds were going to go.  Then I stamped the birds from the same "Let's Set Sail" set using black Memento ink.

The circle was set on top of the Basic White layer piece so I could see where the words would go. The words are from the "Celebrating You" set and were stamped using Misty Moonlight ink.

I taped the two layers together.  Then the circle was set on top. The boat was placed next and the sails were set in place using Dimensionals.  Then this piece was taped to the front of the card and the card was done.

This was a very fun and quick card to make. I think it could also be used for a masculine birthday, get well, thinking of you, or even a sympathy card.

Thank you SO very much for taking your time to stop by and see today's Father's Day card,
Wanda

Sunday, May 08, 2022

Grassy Grove, Masculine Card, Stampin' Up!

When I saw this card on Pinterest I knew I had to look into it.  I love the "Grassy Grove" bundle and I really liked the "New Horizons" Designer Series Paper (DSP) that went so well with it. But that paper retired but the stamp set didn't.  So I was wondering what I'd be using for the background. When I saw this card I knew I had to give this background a try. You can see the original card here

The base of the card is a folded half sheet of Basic White card stock. You can use Basic Black and add a piece of white to the inside. I opted to use Basic White for the card base. This card opens on the bottom and the fold is on the top.

I cut a 4" x 5-1/4" piece of Basic White card stock and used my Blending Brush to scrub on some So Saffron. Then some Pumpkin Pie. Next some Cajun Craze was added and Blackberry Bliss was added around the edges.

I die cut the trees and deer image at the same time. The deer fits inside the opening in the "forest".  I used Basic Black for that piece. Dimensionals were added to the back of both the trees and the deer. The Dimensionals were added around the edges of the trees piece and two Dimensionals were used for the deer.

The piece was set in place on top of the colored piece and then the deer was added. Then this piece was taped in place on top of the card base.

I didn't add any wording because I wasn't sure what I wanted to use it for. It would make a nice masculine birthday card, sympathy card, thinking of you card, or a get well card.   

What's fun about this background is, no two will ever be the same. Other colors can be added for a more fiery background.  Or more blues to make it look more like night time.  And then there's always the norther lights technique and that would be a stunning background.

This was a fun background and I'm happy that I can now continue to have pretty background with this set.

Thank you SO very much for taking your time to stop by and see today's masculine card,
Wanda

Saturday, May 07, 2022

Artistically Inked, Friendship Card, Stampin' Up!

I found this fun card on Pinterest. I had some Designer Series Paper (DSP) from the "Expressions in Ink" 12" x 12"package that was exactly what was used on their card. I have several other full sheets to use up too but as usual, I will not be using them all up before the new stuff arrives. You can see the original card here.  There is a PDF in a link with measurements there too.  

The base of my card is a folded half-sheet of Basic White card stock. This card opens on the bottom and the fold is on the top. 

I didn't have any Just Jade card stock so I uses Shaded Spruce. I cut the layer at 4" x 5-1/4".  And I cut the Basic White layer at 3-3/4" x 5".  It was textured using the "Tasteful Textile" embossing folder. I glued it to the Shaded Spruce layer and then that was taped to the card base.

The DSP was die cut using the stitched rectangle that is not in a group in the set of dies from the "Rectangle Stitched Framelits" package. I cut four of them.  You don't use up much DSP that way!!! But you can use scraps if you have a lot of them in your package.

Then I cut five Shaded Spruce layers for behind the DSP pieces and the word piece. They measured 1-7/8" x 1-3/8". I taped the DSP to the Shaded Spruce pieces. 

The words are from the "Artistically Inked" set and were stamped on a scrap piece of Basic White card stock using Shaded Spruce ink. The same die was used to cut the word out. Then it was taped to the last piece of Shaded Spruce.  Dimensionals were added to all five of the pieces and they were set in place on the front of the card.  And that was it.

This was a very fun and quick card to make. I can see using this layout with different DSP and different wording too.  

Thank you SO much for taking your time to stop by and see today's friendship card,
Wanda

Friday, May 06, 2022

Grassy Grove, Let's Set Sail, Wildflower Path, Masculine Birthday Card, Stampin' Up!

As I was looking at my stamp sets that carried over to the new catalog, I opted not to order any of the new masculine sets. I figured I had enough sets that would create nice masculine cards.  So while I'm waiting for my new stuff, I'm using the old stuff, most of it is current.

The base of my card is a folded half-sheet of Misty Moonlight card stock. This card opens on the bottom and the fold is on the top.

I cut a 4" x 5-1/4" piece of Rich Razzleberry card stock for the layer that is under the "New Horizons" Designer Series Paper (DSP). I sponged on some Rich Razzleberry ink below the horizon image to make it look like it's reflecting in the water. Then I added some Crushed Curry ink to the bottom center of the DSP. And a little Highland Heather was added to the bottom right.

The trees from the "Grassy Grove" set were stamped using Mossy Meadow ink. I also stamped again without adding more ink. this gives the trees a thicker look.

The birds are from the "Let's Set Sail" set and were stamped using black Memento ink. 

The words are from the "Wildflower Path" set and were stamped using black Memento ink. I had gotten them a little crooked.  The only way to fix that is to stamp the words on a piece of card stock and set it over the words with Dimensionals.  Or just leave it like I did!

A 4" x 5-1/4" piece of Basic White was added to the inside and the card was done.

This was a fun, quick, and easy card to make. Sponging the ink for additional color really added to the DSP.

Thank you SO much for taking your time to stop by and see today's masculine birthday card,
Wanda


Thursday, May 05, 2022

Artistically Inked, Friendship Card, Thinking of You Card, Stampin' Up! Catalog

I noticed that I had some fun sheets left in my "Expressions in Ink" Designer Series Paper (DSP) package and I thought I'd try to find a fun card to make with it since I've got card maker's block right now! You can see the original card here

The base of my card is a folded half-sheet of Basic White card stock.  This card opens on the right and the fold is on the left. On top of the card base is a 4" x 5-1/4" piece of Shaded Spruce card stock. I think Just Jade was supposed to be the color but I don't have anymore and it's retiring so I won't be getting anymore. 

I cut the DSP at 3-7/8" x 5-1/8".  Before I taped the DSP to the Shaded Spruce piece, I die cut the scalloped oval using the "Double Oval" punch.  I was careful not to get it too close to the edge. It's very close and I think I'd hunt for a scrap piece next time, it was kind of stressful making sure I didn't clip the edge with the smooth oval on the punch.  Now I was ready to tape the DSP to the card stock and then tape that to the front of the card base

I die cut the flowers from the "Artistically Inked" bundle. I used the double sided sticky sheet because I didn't want to try to glue the piece down.  I set it in place on top of the DSP and burnished it to make sure it stuck well. I did put a piece of scrap copier paper over the top before I burnished it. I didn't want to ruin it.

The words are from the same "Artistically Inked" set and were stamped using Shaded Spruce ink. Then I punched them using the smooth oval in the "Double Oval" punch. I taped the two ovals together and added Dimensionals to the back. I set the piece in place on the front of the card and the card was done.

This was a very fun, quick, and easy card to make.

Thank you SO very much for taking your time to stop by and see today's friendship card,
Wanda

Wednesday, May 04, 2022

Grassy Grove, Father's Day Card, Stampin' Up!

And the waiting continues.  I did not pay for the rush order so you're going to have to hear me whine until it arrives!!! LOL  And in the meantime I will have to play with what I have and count down the days!!

The base of my card is a folded half-sheet of Basic Black card stock.  This card opens on the right and the fold is on the left.

I die cut the tree scene from the "Grassy Grove" bundle. I also die cut the two deers. I tried to center the die as much as I could.

Then I added a piece of the "New Horizons" Designer Series Paper (DSP) to a piece of Basic White card stock that was cut at 5-1/4" x 4".  I cut two pieces that size.  One for the inside to write on.  After taping the DSP to the Basic White piece, I glued it onto the  Grassy Grove die cut piece. I added a little bit of glue to some of the tree branches so they wouldn't stick up. 

Next I tucked the deers in after adding tape to the back of them.

The words are from the "Celebrating You" set and were stamped using black Memento ink on a scrap piece of Smoky Slate card stock.  I trimmed it to measure 2-5/8" x 1/2". I snipped the ends and then added Dimensionals to the back and set it in place on the front of the card. 

This was a fun and super quick and easy card to make. What I like about this set is that it's versatile. This card could be used for a masculine birthday, get well, or a sympathy card.

Thank you SO very much for taking your time to stop by and see today's Father's Day card,
Wanda

Tuesday, May 03, 2022

Forever Fern, Peaceful Moments, Sympathy Card, Stampin' Up!

While I was looking on Pinterest for something else, I ran across this card and thought I'd give it a try. You an see the original card here.

The base of my card is a folded half-sheet of Basic White card stock. This card opens on the bottom and the fold is on the top.

I cut a 4" x 5-1/4" piece of Sahara Sand card stock and taped it to the front of the card base.

Next I cut a 3-1/4" x 5-1/4" piece of Basic White card stock and textured it using the "Painted Texture" embossing folder. 

I stamped the leaf cluster from the "Forever Fern" set using Sahara Sand ink. Then I die cut using the matching dies. I tied a piece of linen thread around the stem and tied a bow. I think it would have been much easier just to tie a bow and glue it down! I added Dimensionals to the back and the piece in place on the front of the card.

The words are from the "Peaceful Moments" set and were stamped using Sahara Sand ink.  I punched them out using the "Double Oval" punch. I set the words piece in place using Dimensionals and the card was done.

This was a very quick and easy card to make. I think if I were to make another one, I would cut the textured piece of card stock at 3" instead of 3-1/4".  But all in all, I like the card.

Thank you SO very much for taking your time to stop by and see today's sympathy card,
Wanda 

Monday, May 02, 2022

Sailing Home, Senior Years, Retirement Card, Stampin' Up!

Yesterday I made a super quick and easy card with a fun layout. SO today I thought I'd try another one. I do like this layout and I LOVE how quickly I can whip up a card.

The base of the card is a folded half-sheet of Basic White card stock. This card opens from the right and the fold is on the left.

I cut a 3" x 3" piece of Designer Series Paper (DSP) from the "New Horizons" 6" x 6" stack. 

For the layer behind the DSP, I cut a 3-1/8" x 3-1/8" piece of Misty Moonlight card stock. When I cut my card stock that is going to be used with a thin layer, I cheat up the card stock a little. This measured 3-1/8", so I cut it on the larger side of the 3-1/8" line on my cutter. The card stock measured 4-1/4" x 5-1/2" and I cut the 3-1/8" piece on the shorter side so I would have a strip of card stock leftover. 

The boat from the "Sailing Home" set was stamped on the DSP using black Memento ink. Then the birds from the same set were stamped with black Memento ink too.

The words are from the "Senior Years" set and were stamped using black Memento ink.

I taped the card stock strip 7/8" from the folded edge.

The DSP was taped to the Misty Moonlight square. Then Dimensionals were added to the back of that piece and it was set in place on the card. 

Another quick and easy card to make. I like the way it turned out and will probably use this layer again in the future!! If I remember!! I say that about a lot of quick and easy cards I've made but I forget about them after making several other cards. LOL

Thank you SO much for stopping by to see today's retirement card,
Wanda


Sunday, May 01, 2022

Color & Contour, Friendship Card, Stampin' Up!

It's getting closer to ordering from the new catalog and the bad part is the waiting for the items to arrive. That means I have to play with what I have until the new things are here. Like that's a bad thing. But I have been playing with them all along and all of a sudden they are not as fun!!! LOL  Strange how my mind works?  LOL I'm sure I will find plenty of things to make with what I have until my order arrives. Today's card was made using some soon to expire Designer Series Paper (DSP).  I found this card on Pinterest and you can see the original one here

The base of the card is a folded half-sheet of Basic White card stock. This card opens on the right and the fold is on the left.

The DSP is from the "New Horizons" set and was cut at 3" x 3".  Then I cut a piece of Misty Moonlight card stock at 3-1/8" x 3-1/8".  I cut it from a 4-1/4" x 5-1/2" piece of card stock. And I cut it on the short side so I would have a long strip left over. 

I took the strip, which measures 5-1/2" x 1-1/8" and taped it to the front of the card about 7/8" from the folded edge.

I taped the DSP to the 3-1/8" x 3-1/8" piece of card stock and added Dimenisonals to the back. I set it on the front of the card but didn't stick it in place, I needed to see how much room I had for words.

The words are from the "Color & Contour" set and were stamped using Misty Moonlight ink.

Once the words were stamped the square piece was set in place and the card was done.

This was a super quick and easy card to make. I would like to try this with some other card stock. It's a great way to use up some DSP and whip up some quick and pretty cards.

Thank you SO very much for taking your time to stop by and see today's friendship card,
Wanda