Pin It

Friday, September 30, 2022

Snowman Magic, Penguin Place, Christmas Card, Stampin' Up!

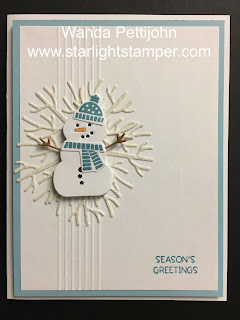
This card was SO much prettier in my head than what ended up on paper! And it's a bit better in person than it is on the screen, but just a little bit!

The base of my card is a folded half-sheet of Basic White card stock.  I cut a 4" x 5-1/4" piece of Balmy Blue card stock for the layer. Then I cut a 3-3/4" x 5" piece of Basic White for the focal piece.

I took the focal piece and set it on my scoring board. I turned it over so when I was done the raised bumps would be on the front. I scored the backside at 3/4" and every 1/8" up to 1-1/2".

The words are from the "Penguin Place" and were stamped using Balmy Blue ink.  I taped that piece in place on top of the Balmy Blue piece

The snowman was die cut using the die from the "Snowman Magic" bundle. I die cut two, one for the front and one for the back. I do this because I like to sandwich the arms between the layers, plus I color the face in on the back one using my Basic Black marker so when the face is die cut, the eyes and mouth are black and nice and neat looking. 

So once the snowmen were die cut, I die cut the face on the top one. I saved the nose and colored it with my Pumpkin Pie marker.  Then I stamped the buttons on the bottom part of the snowman.

I die cut and colored the arms using my Bronze Blends pen. You can also use Crumb Cake or Soft Suede Blends or markers.  I glued the arms to the second snowman. Then I glued the two snowman pieces together.

I stamped the had and scarf from the "Snowman Magic" set using Balmy Blue ink. I die cut them with the matching dies. I glued them in place. I added Dimensionals behind the snowman and set it aside.

Then I die cut the trees using glitter paper that has double-sided sticky paper behind it. I die cut 5 of them. The tree is from the same "Snowman Magic" bundle. I arranged them in a circle and set the snowman on top. 

It's different!!  LOL 

Thank you SO much for taking your time to stop by and see today's "different" Christmas card,
Wanda

Thursday, September 29, 2022

Scary Cute, Halloween Treat Box, Weekend Project, Stampin' Up! 2022 Fall Mini Catalog

While looking at a video on YouTube, I glanced over to the right at the sidebar and there was this cute Halloween box to make. Well, I couldn't wait for my video to get over so I could see how to make this box. It's pretty easy and very fun. You can see the video here

First you make the box by scoring a 6" x 7-1/2" piece of Basic Black card stock at 1", 3-1/2", 4-1/2" and 7" on the long side. Turn clockwise and score at 1", 4-1/2" x 5-1/2". Then you need to clip and cut away some pieces. I took a photo after I did my clipping and snipping. You also need to snip a partial circles  

The box was then glued shut on the side. I prefer to use glue because I know it's going to hold. Then the bottom is glued. 

The box is then decorated. First you cut your favorite Designer Series Papers (DSP). I used what what shown on the video. Mine is from the "Black & White" 12" x 12" package. I cut the front and back pieces at 2-1/4" x 3-1/4". The sides are cut at 3/4" x 3-1/4" and the bottom and top pieces are cut at 3/4" x 2-1/4".  When I cut my piece of DSP I cut the sheet at 2-1/4", then I cut the two 3-1/4" pieces. From what was left I was able to get all four strips. I cut a side and then a top and repeated that for the other strip. No waste there. Those pieces were all glued in place. I used the circle punch to punch the DSP on the backside where the other partial circle was cut on the Basic Black piece.

Here's where you add your treat. Then tie your favorite ribbon around the box and tie a bow on the top. 

The layers for the front are a 2" x 3" piece of Pumpkin Pie card stock and a 1-3/4" x 2-3/4" piece of DSP from the Brights Collection. The character is stamped on that piece, pretty much centering it. Then the piece was taped to the Pumpkin Pie piece. The instructions say to add Dimensionals and set it on the front of the box. I would recommend adding the moon and bats (die cut from the "Scary Cute" bundle). It's easier to press them down in place without the Dimensionals cushioning it. 

The words are from the same "Scary Cute" set and were stamped on a scrap piece of Highland Heather using black Memento ink. I die cut it with the die from the "Scary Cute" bundle and it was glued in place on the front of the panel. The top edge sits just under the foot of the character.

The moon and bats were glued in place and I added some iridescent sequins because I didn't have any of the gems used on the original box.  Then set the panel in place on the front of the box. Wink of Stella was added to the bats and the box was done.

Isn't it adorable?  I want to try this again with a Christmas theme.

Edited on 9-30-22.  I forgot to mention, the Oreo cookies in the cute little packages came from the Dollar Tree.

Thank you SO very much for taking your time to stop by and see today's fun Halloween project,
Wanda

Wednesday, September 28, 2022

Best Witches, Kid Friendly Halloween Card, Stampin' Up! 2022 Fall Mini Catalog

Here's another kid friendly Halloween card. I thought I'd make one more before I move onto something else for a little bit.

The base of my card is a folded half-sheet of Basic White card stock. This card opens on the bottom and the fold is on the top. I cut the bottom of the front piece off using a die from the "Basic Borders" die set.

I stamped the cute little witch from the "Best Witches" set using black Memento ink. I colored her in using my Blends pens. I used Highland Heather, Pumpkin Pie, Basic Black, Soft Suede, Petal Pink, Daffodil Delight and Balmy Blue.  Where is the Balmy Blue you ask?  It's just on the bubbles.  And right after I colored them I thought they should have been Granny Apple Green instead.

The little frog was stamped next and colored in using both light and dark Granny Apple Green. I took the light Balmy Blue Blends and colored a little under the images.

The words are from the same "Best Witches" set and were stamped using black Memento ink. I die cut them with the scalloped rectangle die from the "Mini Pocket Envelope" die set. I added a 1-1/2" x 2-1/4" piece of Basic Black card stock behind it. I taped those two pieces together. Dimensionals were added behind the piece and it was set in place on the front of the card. 

I die cut three bats from the "Scary Cute" bundle using Basic Black card stock. I glued them in place on the front of the card.

A 1-1/2" piece of Designer Series Paper (DSP) was cut from the "Gingham Cottage" 12" x 12" stack. You get a lot of fun papers in that stack, 48 pieces to be exact. And after taping that piece in place the card was done. Fun and cute.

Thank you SO very much for taking your time to stop by and see today's Halloween card,
Wanda

Tuesday, September 27, 2022

Best Witches, Kid Friendly Halloween Card, Stampin' Up! Fall Mini Catalog 2022

I had regrets about not ordering the Halloween stamp set with the witches hats but I have been having fun with the cute little witches from the "Best Witches" set. I found this card on Pinterest. You can see the original card here. 

The base of my card is a folded half-sheet of Basic White card stock. This card opens on the right and the fold is on the left.

I cut a 4" x 5-1/4" piece of Rich Razzleberry card stock for the bottom layer. Then I cut a 3-7/8" x 5-1/8" piece of Designer Series Paper (DSP) from the "Celebrate Everything" 12" x 12" stack. And no, I did not have to color in the stars! I taped the DSP to the Rich Razzleberry piece.

Then I cut a 2-1/4" x 4" piece of Basic White card stock for the focal piece. I stamped the witch from the "Best Witches" set using black Memento ink. The stars were also stamped using the black Memento ink. Those stars I did have to colors in and I used Daffodil Delight dark Blends pen to do it.

The dress and band on the hat were colored in using both light and dark Rich Razzleberry Blends pen. The legs and hat buckle were colored in using the light Smoky Slate Blends pen.

I colored the hat and cape were colored in using the light Basic Black Blends pen.

Light Petal Pink Blends pen was used on the face and hands. And I used the dark Petal Pink for the cheeks. 

Dark Daffodil Delight was used for the hair.

And the broom handle was colored in using the light Soft Suede Blends pen and the straw part was colored in using light Soft Suede and then light Cajun Craze on top. It gave it a nice redish-brown look.

I took my Wink of Stella pen and colord in the hat buckle, the stars, and the straw part of the broom. It gives it a bit of a magical look.

Next I cut a 2-1/4" x 4" piece of Rich Razzleberry for the layer behind the focal piece. I lines them up the way I thought it would look best and I turned it over and traced two edges on the Basic White piece so I could easily tape them back exactly where I wanted them to go. Once they were taped I taped them to the front of the card.

The words are from the same "Best Witches" set and were stamped on a 1/2" x 3-3/8" piece of Crushed Curry card stock using black Memento ink. I set the strip in place using Dimensionals.

Two pearls were colored black using my dark Basic Black Blends pen and they were set in place on each side of the words.  And the card was done.

This was a very fun, quick, and easy card to make. I had fun coloring and I thought this layout was fun and different.

Thank you SO very much for taking your time to stop by and see today's Halloween card,
Wanda

Monday, September 26, 2022

Snowman Magic, Christmas Card, Stampin' Up! 2022 Fall Mini Catalog

I have been having a lot of fun with the "Snowman Magic" set/bundle. Bundle because it's got matching dies!!  I LOVE that!  

The base of my card is a folded half-sheet of Granny Apple Green card stock. This card opens on the right and the fold is on the left.

I took a piece of Designer Series Paper (DSP) from the "Celebrate Everything" 12" x 12" stack and colored in the trees using my markers. I used Granny Apple Green, Garden Green, and Old Olive for the trees. I used Soft Suede for the trunks and I used Daffodil Delight for the stars. Once those were all colored I taped the DSP to the front of the card. That piece of DSP measured 4" x 5-1/4".

Next I made the frame using the die cut from the "Fabulous Frames" die set. I cut one out of  Granny Apple Green and one out of Basic White card stock. I used a double-sided sticky sheet on the Granny Green piece. I wanted it to be a sticker so I wouldn't have to do a lot of fine gluing.

I took the rectangle from the Granny Apple Green piece and set it aside. Then I took the rectangle from the Basic White piece and prepared the background. I tore a piece of card stock to make a hilly line for the snow and I used my Blending Brush and scrubbed on some Balmy Blue in the background. I added snowflakes but you can't see them. I used my chalk pen to do that. I have one with the tip so damaged because I use it on the edge of the cap to flick the ink onto my paper. But this time I just tapped it onto the sky but it doesn't show up on the photo much. You can click on the image and maybe you can see it better.

The words are from the same "Snowman Magic" set and were stamped using Garden Green ink. I die cut a tree from the die set using Garden Green card stock. I colored the trunk with my Bronze Blends pen because it was out. Soft Suede would have been my first choice but this pen was just sitting there.

I die cut two snowmen, one for the front and one for the backing. I colored the face of the backing one in using my Basic Black marker.  Then I die cut the face on the front piece. When you set the front piece on the back piece, the eyes and mouth will be black.  Super easy way to do those tiny parts. The hand were colored in using the Bronze Blends pen, see why that was sitting out?  The buttons were stamped using Basic Black ink. I glued the arms on the snowman but on the backing piece. This way you can see where they will go easier. Then I glued the two snowmen together.  I did save the nose when I die cut the face and I colored it in using my Pumpkin Pie marker. I used a tiny amount of glue on a toothpick and set the nose in place.

A hat and scarf were stamped using Granny Apple Green ink and were die cut. They were glued in place on the front of the snowman. Then I set the snowman on top of the rectangle piece using Dimensionals.

The rectangle piece was taped inside the frame and for a final touch I glued a snowflake on the front and added a little crystal rhinestone to the center.  A 4" x 5-1/4" piece of Basic White was added to the inside and the card was done.

This was another fun card to make. I LOVE snowmen! And I do love how this card turned out. 

Thank you SO very much for taking your time to stop by and see today's snowman Christmas card,
Wanda

Sunday, September 25, 2022

Best Witches, Halloween Card, Kid Friendly, Fall Mini Catalog 2022 Stampin' Up!

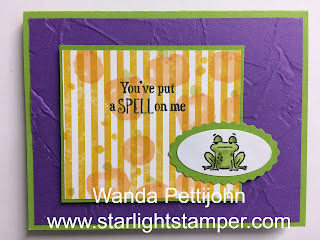
I had a piece of scrap Designer Series Paper (DSP) left over from a card I made last week. The DSP is from the "Celebrate Everything" 12' x 12" stack.  There's LOTS of fun sheets in this stack and for lots of occasions.  This piece in particular has ghosts and pumpkins on the backside. I had colored in the pumpkins using my light and dark Pumpkin Pie Blends pens. It was just sitting on my worktable and I thought it looked fun so I decided to use that side of the piece for my card. 

The base of my card is a folded half-sheet of Granny Apple Green card stock. I cut a 4" x 5-1/4" piece of Gorgeous Grape for the layer. I textured it using the "Painted Texture" embossing folder. I also cut a 4" x 5-1/4" piece of Basic White card stock for the inside. I taped both to the card.

Next I cut a layer to fit my piece of DSP. My DSP measured 2-7/8" x 3-3/8" and the Granny Apple Green layer measured 3" x 3-1/2". I stamped the words from the "Best Witches" set using black Memento ink. I taped the two layers together and added Dimensionals to the back.

The frog is from the same "Best Witches" set and was stamped using Basic Black ink. I've had the black Memento ink bleed too many times because it's an alcohol base too. But Basic Black is a water based ink so I knew it would be fine using Blends Pens.  As long as the ink was dry before I started coloring. I colored the frog in using both light and dark Granny Apple Green Blends pens. I punched him out using the "Double Oval" punch. I also punched out the layer behind the frog using Granny Apple Green and the same punch. I taped the frog oval to the scalloped layer. 

To assemble, I set the DSP layered piece in place using Dimensionals. I moved the piece over to the left.

I added a Dimensional to the right side of the oval and tape to the left. I set the oval in place and the card was done.

This was a fun, quick, and easy Halloween card to make.

Thank you SO very much for taking your time to stop in and see today's Halloween card,
Wanda

Saturday, September 24, 2022

Santa's Delivery, Christmas Card, Stampin' Up! Fall Mini Catalog 2022

I just love this little penguin from the "Santa's Delivery" set/bundle. He's so fun and cute.

The base of my card is a folded half-sheet of Basic White card stock. The sheet of card stock was cut in half on the shorter side so once it was cut it measured 4-1/4" x 11".  I took the "Wintry 3D" embossing folder and textured the front of the card. I had to use it twice because it's a narrower folder and didn't cover the whole area. You can't see where the "seam" is because the panel covers enough to help it hide.

I took the fourth largest stitched rectangle die from the "Rectangle Stitched" Framelits die set on a piece of Designer Series Paper (DSP) from the "Santa Express" 12" x 12" package.

A piece of Mint Macaron was cut at 2-1/2" x 4-1/8" for the layer behind the DSP. I taped the two pieces together and added Dimensionals to the back. I set the piece on the front of the card, centering it as much as I could by eyeing it.

Then I stamped the penguin from the "Santa's Delivery" set using black Memento ink on a piece of Basic White card stock. I colored him in using the light Basic Black Blends pen, dark Pumpkin Pie pen, and the dark Petal Pink Blends pen. Once he was colored in I die cut him using the matching die. Dimensionals were added behind him.

I used the "Double Oval" punch for the two layers. One was cut from a scrap piece of Mint Macaron and the other was from a scrap piece of Basic White card stock. I took that Basic White oval piece and scrubbed on some Mint Macaron with a Blending Brush. I taped the two ovals together and I set the penguin on top.

The words are from the same "Santa's Delivery" set and were stamped on a piece of Basic White card stock using Garden Green ink. I trimmed the piece to measure. 5/8" x 2" and the Mint Macaron layer behind it measures 3/4" x 2-1/8". I cut the layer over the line on my cutter so it was a hair wider than 3/4" x 2-1/8".  I taped the words to the Mint Macaron layer and Dimensionals were added to the back.

I set the words in place first, lining up the sides and bottom as equally as possible without measuring it. And then I added the penguin oval piece.

For a final touch I added tiny crystal rhinestones on the larger snowflakes on the DSP and the card was done.

This was a very fun, quick and easy card to make. I love the colors. This card was nothing like what was in my head when I started it and I'm glad!! LOL

Thank you SO much for taking your time to stop by and see today's Christmas card,
Wanda
Friday, September 23, 2022

Snowman Magic, Christmas Card, Stampin' Up! Fall Mini Catalog 2022


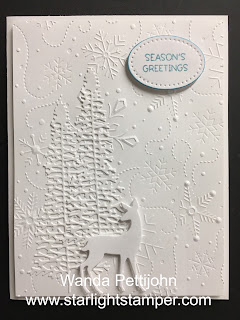
I saw this pretty card on Pinterest and thought I'd give it a try since I had everything to make it. You can see the original card here.

The base of the card is a folded half-sheet of Starry Sky card stock. This card opens on the right and the fold is on theleft.

Now had paid better attention to the video I would have known to cut my Designer Series Paper (DSP) larger so I would have had a wider border. But it still looks pretty like this. The DSP is from the "Lights Aglow" 6" x 6" stack. There's lots of fun double-sided sheets to play with in there. Once side has metallic gold on the images and the other is plain. This card used the vanilla colored piece with gold snowflakes all over it. 

The die from the "Snowman Magic" bundle measures about 3-1/8" x 4-3/8". I should have cut my DSP at 3-1/2" x 4-3/4".  So if you want a wider border use those measurements.  Center the die on the DSP and run it through the Big Shot.

The die cut piece was glued in place on the front of the card.

The words are from the same "Snowman Magic" set and were stamped using Versa Mark and gold embossing powder was sprinkled on them. Then they were heat set. I love using gold embossing powder, it's one of the powders that melt so smoothly. But to me it smells like crayons.

A 4" x 5-1/4" piece of Basic White card stock was added to the inside and the card was done.

This was a super quick and easy card to make. I think it took longer to get the items out to make it than it did to actually make the card.

Thank you SO very much for taking your time to stop by and see today's Christmas card,
Wanda

Thursday, September 22, 2022

Snowman Magic, Christmas Card, Stampin' Up! 2022 Fall Mini Catalog

I sure had a lot of fun making this card. I have no idea what this technique is called or if it even is considered a technique (I would think it would be one) but I liked making it and I'll tell you how. Just read on. 

The base of my card is a folded half-sheet of Basic White card stock. This card opens on the right and the fold is on the left.

I cut a 3-1/2" x 4-3/4" piece of Basic White for the top layer and a 3-5/8" x 4-7/8" piece of Evening Evergreen card stock for the layer. 

Now here comes the fun part. I took a piece of Designer Series Paper (DSP) from the "Lights Aglow" 6" x 6" stack and I cut five 1/2" strips. Now because I just used the 6" piece without cutting it shorter, I was able to make two cards at the same time. 

What you do is you take a piece of window sheet (acetate) and lay it on your worksurface. Dimensionals are added behind the strips and they are set in place on the acetate as close or as far apart as you'd like. I just eyed it and kept them close together. Once they were in place, I took the second largest circle die from the "Layering Circles" die set. It's the 2-11/16" one and I die cut it on my Big Shot. Here's where you die cut two. Move the die over fairly close to the left side and cut and there should be room for a second one.

Then I die cut the tree from the "Snowman Magic" bundle and glued it in place on top of the strips. I did trim the bottom of the tree trunk because it hung over. 

Next I die cut the snowman. I cut two, one for the front and one for the back. The arms, hat and snowflake were also die cut at the same time. I colored the arms with my Bronze Blends pen. As for the scarf, I stamped it using Mint Macaron ink and die cut it with the coordinating die. I cut a tiny strip of Daffodil Delight card stock for the hat brim. And next I die cut the face. I saved the nose and colored it using my dark Pumpkin Pie Blends pen. I also colored over the face of the second snowman using my Basic Black Blends pen. I did this so the mouth and eyes would be black.  And I stamped the buttons using black Memento ink. I only stamped them on the bottom because in the past the scarf hid the top ones.

To assemble the snowman I took the second one and glued the arms in place. Then I glued the top snowman over it. I added the hat, nose, and scarf. Dimensionals were placed on the back and the snowman was set on top of the circle. 

I didn't need to add any Dimensionals to the back of the circle since there were already Dimensionals on the strips of DSP. 

The snowflake was added to the top with glue and a crystal rhinestone was added to the center.

The words are from the "Snowman Magic" set and were stamped using Evening Evergreen ink.

I set the circle in place and then the Basic White/Evening Evergreen layers were set in place on the card base using Dimensionals.  And that was it.

This was such a fun card to make and I do like this "technique"! 

Thank you SO very much for taking your time to stop by and see today's Christmas card,
Wanda

Wednesday, September 21, 2022

Scary Cute, Halloween Card, Stampin' Up! Fall Mini Catalog

Okay. Last Halloween card for a few days.  I have other cards I want to make. I still have some Halloween ones to make but they are a few days further down on my list. Today's card was fun and quick too.

The base of my card is a folded half-sheet of Basic Black card stock.  This card opens on the right and the fold is on the left. 

I cut a 4" x 5-1/4" piece of Rich Razzleberry card stock for the front layer. And a 4" x 5-1/4" piece of Basic White card stock for the inside of the card. I taped both pieces in place.

Next I cut a 3-7/8" x 5-1/8" piece of Basic White card stock for the focal piece.  

I took two pieces of card stock and taped it to the right and left of the Basic White piece to form the sky panel. 

I punched out a 1" circle for the moon. I saved the part I punched out and scrubbed on some Crushed Curry ink and then a little Cajun Craze ink with my Blending brush. Then I removed the piece and used removable tape on the back of the circle and I covered the moon I just created.

With the sides and the moon covered I scrubbed on some Rich Razzleberry ink at the bottom and worked my way up to the top. Then I added some Blackberry Bliss a little bit higher up. And at the very top I added some Night of Navy ink. And that was it for the sky.

The bats are from the "Scary Cute" bundle. I die cut 12 bats from the matching die set. I glued them in place. I thought they were too tiny to use tape.

The "Boo" is from the "Scary Cute" set and was stamped using black Memento ink.  And the card was done.

It was a fun, quick, and easy Halloween card!!

I appreciate you taking your time to stop by and see today's Halloween card,
Wanda

Tuesday, September 20, 2022

Scary Cute, Halloween Card, Stampin' Up! Fall Mini Catalog

I thought I'd try another Halloween card before I move onto something else, maybe! LOL  Today's card was fun and didn't take much time at all to make.

The base of the card is a folded half-sheet of Basic Black card stock. Then I cut two 4" x 5-1/4" pieces of Basic White card stock. One for the inside and one for the outside. I taped both in place.

Then I took a 3-7/8" x 5-1/8" piece of Basic White card stock for the focal piece. I die cut a 2-1/8" circle and I set on my focal piece using removable tape. It's about 3/4" up from the bottom. 

I took out my Crushed Curry, Pumpkin Pie, Rich Razzle Berry, and Blackberry Bliss ink pads. Using my Blending brush, I scrubbed on some Crushed Curry first. Mostly around the moon area. Then I moved onto the next darkest color, Pumpkin Pie. Then Rich Razzleberry and finally the Blackberry Bliss. The sky got some fun movement to it because I would forget to start out my brush on my scrap paper and then move to the focal piece. But it ended up being a happy mistake because it makes the sky a bit ominous looking.  Once I was done with the sky, I removed the circle I had taped down. Once you do that, then you can see how the colors look. While you are doing it, it always seems to look too light. But once the mask is removed it's like magic. I was more than pleased with how it all worked out.

A piece of Basic Black was cut for the bottom, it was actually a scrap piece that was a bit longer on the sides and I trimmed it later. I tore the card stock and then taped it in place on the front of the card about 1-1/4" up from the bottom. You can adjust this for how much you want the moon to show on the horizon. Once I taped the piece in place I trimmed the sides and the bottom so it was back to measuring 3-7/8" x 5-1/8".  

The cat is from the "Scary Cute" bundle and I die cut it using Basic Black ink. I also die cut the bats at the same time. I took a tiny piece of Granny Apple Green and glued it to the back of the cat's head to make the eyes glow.

The "Boo" is from the same "Scary Cute" set and was stamped with Versa Mark and white embossing powder was heat set on it. 

I glued the cat in place. I chose glue because the legs are so tiny that it would be difficult to tape them.

And the bats were also glued in place. And the card was done!  Fun, huh?

Thank you SO very much for taking your time to stop by and see today's Halloween card,
Wanda 

Monday, September 19, 2022

Scary Cute, Halloween Card, Stampin' Up! Fall Catalog

I had a lot of fun making this card. I colored, die cut, stamped, taped and glued!! It was all fun! And I do like how it turned out!

The base of my card is a folded half-sheet of Basic Black card stock. I cut a 4" x 5-1/4" piece of Basic White for the inside.

Next I cut a piece of Designer Series Paper (DSP) from the "Gingham Cottage" 12" x 12" package. This package has 48 fun sheets in it. It's huge and I doubt I'll be using it all. I taped this piece to the front of the card. 

Next I cut a piece of DSP from the "Celebrate Everything" 12" x 12" package. Another one with 48 fun sheets, even more fun than the "Gingham Cottage"! I colored the pumpkins using my light Pumpkin Pie Blends pen. Then I colored over the lines in the pumpkins with my dark Pumpkin Pie Blends pen. The tops of the pumpkins were colored in using the light Old Olive Blends pen and I colored the stars using the dark Daffodil Delight Blends pen. This piece was cut at 3-1/4" x 4-1/2". The Basic Black layer behind it was cut at 3-1/2" x 4-3/4".  The two layers were taped together, Dimensionals were added to the back and the piece was set on top of the card.

The cat was die cut using the dies from the "Scary Cute" bundle. I used Basic Black card stock to cut them out. I also cut out the bats at the same time. I took a scrap piece of Granny Apple Green and cut it small enough to fit behind the cats eyes without any showing on the other side. Next I die cut the moon using Daffodil Delight card stock. And the oval frame was die cut using Basic Black card stock and I cut a second one using Pumpkin Pie card stock. I cut two because I needed that oval to fit inside the frame. I turned the piece over and added little pieces of scotch tape to hold the frame together. There's probably easier ways to do this but I wanted to make sure there were no gaps in the frame. The oval frame is from the "Fabulous Frames" die set.  After taping the frame I set the cat in place using Dimensionals. I glued the moon and bats to the oval piece. Dimensionals were added to the back of the oval and it was set in place on top of the card.

The words are from the same "Scary Cute" set and were stamped using black Memento ink. I die cut them with the die from the set that came with the bundle, it's called "Scary Silhouettes".  I took my Basic Black marker and I colored around the edges of the piece using the wide part of the marker. Dimensionals were added to the back and the words were set in place.  And the card was done.

I'm happy with the way it turned out. Plus I did have a lot of fun making it.

Thank you SO very much for taking your time to stop by and see today's Halloween card,
Wanda

Sunday, September 18, 2022

Scary Cute, Halloween Card, Stampin' Up!

Today's card was fun to make. Pretty quick and easy too. 

First I took a 1/4 sheet of Basic White card stock a Blending Brush and I scrubbed on some Daffodil Delight ink. Then I added some Mango Melody. And then some Cajun Craze on the outer edges. Then I die cut a 2-7/16" circle. I cut a piece of Basic White card stock and made some small waves on it. Then I set on top of the circle, exposing a little bit of the bottom edge. And I scrubbed on some Old Olive. 

Next I stamped the cute little Frankenstein kid on the circle using black Memento ink.

I die cut a circle one size larger than the focal piece. I also set three small bat dies in the center of that circle and I die cut them all at once. I taped the two circles together and I added Dimensionals behind them.

The words are from the "Scary Cute" set and were stamped using black Memento ink. I die cut it with the ribbon die in the "Scary Cute" bundle. I ran the widest part of my Basic Black marker around the edges of the piece and added Dimensionals behind it. I set it aside.

The base of the card is a folded half-sheet of Basic Black card stock. This card opens on the right and the fold is on the left. 

I cut a 4" x 5-1/4" piece of Basic White card stock and taped it to the inside.

Then I cut a 4" x 5-1/4" piece of Designer Series Paper (DSP) from the "Gingham Cottage" 12" x 12" package. I taped the DSP to the front of the card. Then I added the focal piece and the word piece and the card was done.  See, I told you it was quick and easy.  Oh and cute too!!!

Thank you SO very much for taking your time to stop by and see today's Halloween card,
Wanda

Saturday, September 17, 2022

Best Witches, Halloween Card, Stampin' Up! 2022 Fall Catalog

I was about to close Pinterest after making my card yesterday and I saw this one, so I figured as long as I had everything sitting out, why not make it?  You can see the original card here

The base of the card is a folded half-sheet of Basic White card stock. A piece of Basic Black card stock measuring 5-1/8" x 3-7/8" was taped on top and a 5" x 3-3/4" piece of Basic White was taped on top of that.

Next I stamped the witch from the "Best Witches" set and fussy cut her out. I colored her using the following markers: Smoky Slate, Crushed Curry, Blushing Bride, Crumb Cake, Petal Pink, Soft Suede, and Cajun Craze. The Cajun Craze on top of soft Suede in the broom made the reddish brown look.  I like that color. It's a nice cocoa looking color. I added Dimensionals to the back and set her aside. After looking at her, I regretted not using my Blends pens instead of markers. But she's done and I always post the good, the bad, and the ugly.

Strips of Designer Series Paper (DSP) were cut from the huge "Celebrate Everything" 12" x 12" package. This package has 48 sheets of fun DSP for, like the title of it says, everything! I cut the stars strip at 1" x 4". The criss cross strip was cut at 1" x 3-1/4" and the ghost and pumpkin strip was cut at 3/4" x 4-1/2". I taped the strips in place on the left side of the card starting about 3/4" from the fold and about 3/4" from the bottom and the top. Then the other strips were added. 

Two circles were die cut from the "Stylish Shapes" set. I used the second and third largest stitched circles. The largest circle was cut from a scrap piece of Basic White and the smaller one from a scrap piece of Crushed Curry.  I set them on top of the card for placement. Then I removed the white one and held the Crushed Curry one in place. I took a pencil and drew a line around the bottom of it so I could tape it down in the same spot I thought it looked good in. Then I added the white circle.

I took a glue dot and set it in the middle of the white circle and looped some black Baker's twine around the piece.

The witch was set in place on top of the twine.

The words were done on the computer since I didn't have any current "happy halloween" words. I used Cosmic Sans size 16 to do the them, I also bolded them. I trimmed them on the paper cutter and when I was done the piece measured 3/8" x 1-7/8". I added a small Dimensional to the right side and a little bit of snail tape to the left and set them in place on the card.

I took some black enamel dots I had and set them in place on the card and the card was done.

This was a very fun card to make. I think it's okay but I think I would have liked it better using Daffodil Delight instead of Crushed Curry.  But it is what it is and it's still okay!

Thank you SO very much for taking your time to stop by and see today's Halloween card,
Wanda

Friday, September 16, 2022

Best Witches, Halloween Card, Stampin' Up!

I had purchased the "Best Witches" set with my granddaughters in mind. I thought they'd have fun making some cards with this friendly witch. It's always fun to have kid friendly cards. I found this card on Pinterest but I did change a number of things on it. You can see the original card here

The base of the card is a folded half-sheet of Basic Black card stock. This card opens on the right and the fold is on the left. 

I cut a 4" x 5-1/4" piece of Basic White for the inside and a Mango Melody piece for the front. I taped them both in place.

I cut 3 one inch strips of Designer Series Paper (DSP) from the "Celebrate Everything" 12" x 12" package. I cut these 4-1/4" long. I taped them to the Mango Melody piece. 

The witch was stamped from the "Best Witches" set using black Memento ink on a piece of Basic White card stock. I fussy cut her out. I colored her with markers. I used Basic Black, Daffodil Delight, Pumpkin Pie, Blushing Bride, Petal Pink, Smoky Slate, and Granny Apple Green. 

The circle is from the "Layering Circles" die set. I used the 3rd largest one, (the 2-7/16" one) on a piece of Basic White card stock. I added the witch to it using Dimensionals. I added Dimensionals to the back and set the piece in place on the front of the card.

Then I stamped the words from the same "Best Witches" set using black Memento ink on a scrap piece of Basic White card stock. I die cut them using the second smallest ribbon die from the "Stylish Shapes" die set. I set the words in place using Dimensionals and I thought the card was done. But I decided to add some Wink of Stella to the buckle on the hat and the bristles on the broom.  Now the card was done.

This was a fun, quick, and easy card to make. Yes, even with the fussy cutting! 

Thank you SO very much for taking your time to stop by and see today's Halloween Card,
Wanda

Thursday, September 15, 2022

Grassy Grove, Art Gallery, Masculine Birthday Card, Stampin' Up!

As you probably already guessed it, I left the "Grassy Grove" stamp set/bundle out.  I'm not known for putting things back right away!!  But I'm glad it was still out because I saw a card on Pinterest and I was in need of a masculine birthday card. You can see that card here. I changed the backgrounds.

The base of my card is a folded half-sheet of Basic Black card stock. This card opens on the right and the fold is on the left. I cut a 4" x 5-1/4" piece of Basic White and taped it to the inside.

I die cut the deer and the trees using the dies from the "Grassy Grove" bundle. I used Basic Black card stock to do this. You can cut the deer from the center the same time you are cutting the trees, there's just enough space in there to put the deer die. I took the piece to my trimmer and I cut off the side. I tried to cut down the middle of the tree on the left and right. The tree on the right had an opening in the edge and I didn't like the look, so I took my black marker and colored on the background paper to it looked like it's a solid line. I also trimmed the top and bottom. When this piece was all trimmed, it measured 2-7/8" x 4".

That background paper from the "Hues of Happiness" Designer Series Paper (DSP) 12" x 12" package. I cut the piece 4" x 5-1/4".

Then I cut another piece of DSP to measure 2-7/8" x  3-1/2". I planned where the green was going to go before I trimmed up my piece. I added glue to the back of the die cut piece and set it on top of the DSP.  Since the size was equal on the short side, I had to make sure it lined up nicely. I added Dimensionals to the back and set the piece. 

The words are from the "Art Gallery" set and were stamped using black Memento ink. 

I set the deer piece in place on the front of the card and the card was done.

This was a very fun card to make. It was quick and easy too!

Thank you SO very much for taking your time to stop by and see today's masculine birthday card,
Wanda


Wednesday, September 14, 2022

Grassy Grove, Mountain Air, Penguin Place, Christmas Card, Stampin' Up!

The jury is still out on this card. I am not sure if I like it or not. Perhaps it's the background that is throwing me off because it's a bit too busy? I don't know, I can't put my finger on what I'm not liking about this card to make me like it! LOL I like the white on white. I'm okay with the blue words. Maybe if the trees could have been put on Dimensionals (but the Dimensionals would show). I just don't know.

Anyway, here's how I made today's card. I cut a sheet of Basic White card stock in half. This card opens on the right and the fold is on the left.

Then I cut a 4" x 5-1/4" piece of Basic White card stock and textured it using the "Wintry 3D" embossing folder. It's not wide enough to do the whole piece so I had to run it through my Big Shot twice. 

I die cut the trees from the "Mountain Air" bundle using Basic White card stock that had a double-sided sticky sheet on the back. There was no was I was gluing or taping those trees in place.  Oh, maybe a third tree is the answer???   Oops, got sidetracked here. I set the two trees in place on the left side of the textured piece.

Then I die cut the deer from the "Grassy Grove" set using Basic White card stock. I set it in place using a couple of Dimensionals.  

The words are from the "Penguin Place" set and were stamped using Balmy Blue ink. I die cut them with the cute little oval die from the "Mini Pocket Envelope" die set. I used the widest part of my Balmy Blue marker and ran the edge of the oval along it to give it some color. Dimensionals were added to the back and the oval was set in place. And the card was done. 

Now normally I will change a card later after I've given it a lot of thought but I don't post my changes on here because I'm posting something new. But the more I thought of that third tree, the more I thought that's what was missing.  What do you think? 

Thank you SO much for taking your time to stop by and see today's Christmas card,
Wanda

Tuesday, September 13, 2022

Color & Contour, Hues of Happiness, Thank You Card, Stampin' Up!

I needed a thank you card today and this is what I came up with.

I used a folded half-sheet of Basic White card stock. I die cut the edge using the stitched scalloped border from the "Color & Contour" bundle. I started it in about 1" from the side edge of the card. I took a 1-1/4" x 5-1/2" strip of Designer Series Paper (DSP) from the "Awash in Beauty" 12" x 12" package. I still have a lot of paper in that package to use up!! I know it's a long time till the new annual catalog comes out but what happens is the spring mini comes out and there's usually DSP in there that goes with the sets that will be tempting me and the DSP I have gets set aside. That's how you create a big stash.  See, it's a stash and not hoarding. I'm not afraid to use it, just don't get to use it all before I find something new! Anyway, I taped that DSP strip to the inside of the card.

The flowers were fussy cut from a sheet in the "Hues of Happiness" DSP 12" x 12" package. I fussy cut the small leaves but the flowers and other leaves were die cut. Gotta love those matching dies!! 

The words are from the "Color & Contour" set and were stamped using black Memento ink.

I set the largest flower in place using Dimensionals. Then I taped the two smaller ones under it. I added some tape behind the leaves and slipped them under the flowers and the card was done.

Thank you SO very much for taking your time to stop by and see today's thank you card,
Wanda


Monday, September 12, 2022

Sweet Songbirds. Penguin Place, Birthday Card, Stampin' Up!

Of course my "Sweet Songbirds" set was still sitting out on my worktable. I'm not known for putting things back right away.  Which was probably a good thing because I ran across this card right away when I opened Pinterest and I thought it was so cute. You can see the original here. And here's how I made my card. 

The base of my card is a folded half-sheet of Basic White card stock.

I cut a 4" x 5-1/4" piece of Basic White card stock for the top layer.  The Designer Series Paper (DSP) on the lower part is from the "Gingham Cottage" 12" x 12" package and was cut at 4" x 2-1/4".  I didn't have the same DSP that was used on the original card but I did have this and it worked!  I taped the DSP to the bottom of the Basic White piece.

Then I die cut the tag from the "Tailor Made Tags" die set, I used the second largest one with the clipped corners. 

Next I punched the bird using Fresh Freesia card stock. I also punched out a Basic White belly and a Mango Melody beak. The wing came with the Fresh Freesia punching.

The eyes were stamped using black Memento ink. Then the bird was assembled. The wing was added using a Dimensional.

I set the bird on top of the tag piece so I could see where the feet would be going. The feet were stamped using Mango Melody ink. After the feet were stamped the bird was set in place using Dimensionals.  The bird was added using Dimensionals.

The tag was set on top of the card for placement of the musical notes and the happy birthday.  After looking at the card I think the words would have been better where the notes are and the notes where the words are. But it's still nice just the way it is. The words are from the "Penguin Place" set and were stamped using black Memento ink. The musical notes were also stamped using black Memento ink.

The tag was set in place using Dimensionals. And then the Basic White piece was set in place using Dimensionals and the card was done.

This was a fun card to make and I can see making more using other pieces of DSP.  I have many scraps that would work!

Thank you SO very much for taking your time to stop in and see today's birthday card,
Wanda

Sunday, September 11, 2022

Sweet Songbirds, Penguin Place, Birthday Card, Stampin' Up!

Today I needed to make a birthday card. So I headed over to my current stamps and I saw the "Sweet Songbirds" set. I haven't played with that in a while so I went online to find a fun and quick card to make. You can see the original card here. If you click through you will be brought to the site but it's unsecure and there's no measurements or instructions.  SO here's how I made the card. 

The base of my card is a folded half-sheet of Basic White card stock.  This card opens on the right and the fold is on the left. This card would also be cute if the card opened on the bottom. It's kind of got that look.

I cut a 4" x 5-1/4" piece of Designer Series Paper (DSP) from the "Hues of Happiness" 12" x 12" package.  I taped it to the front of the card. 

Then I cut a 3-1/2" x 4-1/2" piece of Basic White for the focal piece.

I die cut the bottom using the stitched border die. I offset it so it would be longer on one side. The left side is about 2-1/4". I just eyed it when I set the die on the card stock. I set it very low on the card stock and later I cut the excess off the top. After cutting the piece measured 3-1/2" across the top and to the tip it's 4".

The bird was stamped next. I stamped it using Fresh Freesia ink and punched it out with the matching punch. I also punched out a Daffodil Delight beak. Though I could have just colored the Basic White one and a marker or Blends pen. I just preferred to punch one out in the color I wanted.

I set the bird on the Basic White piece and then set the branch stamp on top for placement. I used my Stamparatus to do this. I stamped the branch using Soft Suede ink. I stamped it twice and it came out a bit more darker than I wanted. 

The leaves were added next. I used Granny Apple Green for that. And the flowers were stamped using Fresh Freesia ink.

The feet and the musical notes were stamped using black Memento ink.

I used Dimensionals to set the bird in place and then Dimensionals were added to the back of the Basic White piece and it was set in place on the front of the card.

The words are from the "Penguin Place" and were stamped using black Memento ink. I die cut them using the oval die from the "Mini Pocket Envelope" die set. I took my Granny Apple Green marker and ran the edges of the oval on the wider part to add a bit of color to the piece. Dimensionals were added to the back of the oval and it was set in place on the front of the card and the card was done.

I was going to add some mini pearls to the center of each flower but I'm going to be mailing this card and didn't want to spend the extra money to send it as a non-machinable letter. Being cheap!!! Actually I'm saving my postage stamp money to mail out Christmas cards in December. It's getting more expensive each year.  Hopefully it plateaus soon.  Anyway, the card was done and I do like how it turned out. It's got some fun color to it that is perfect for a female birthday card.

Thank you SO much for taking your time to stop by and see today's birthday card,
Wanda


Saturday, September 10, 2022

Caroling Mice, Penguin Place, Christmas Card, Stampin' Up!

Today I was in the mood to color and I thought these three mice would be fun to color.  And they were!! I found this card on Pinterest. You can see the original card here.

The base of my card is a folded half-sheet of Mint Macaron card stock. I cut my sheet in half on the short side so once it was cut it measured 4-1/4" x 11".   I scored and folded it in half at 5-1/2". So this card opens on the bottom and the fold is on the top.

I cut two pieces of Basic White card stock that measures 4" x 5-1/4".  One for the inside and one for the front. I taped the inside one on first.

Next I stamped the mice and lantern using black Memento ink on Basic White card stock.  I also stamped the dirt on the ground using Gray Granite ink. Then I fussy cut the mice and the lantern.

The lantern and mice were colored in using Blends pens. For the lantern I used dark Basic Black, light and dark Real Red, and light and dark Daffodil Delight.

For the mice I used light Gray Granite for their bodies. Light Flirty Flamingo for the inside of the ears, the mouth, and the noses. I also used the light Flirty Flamingo for the mouse's coat and hat on the right.

The center mouse's coat and hat were colored in using light Balmy Blue. And the mouse on the left's coat and hat were colored in using light Mint Macaron.  

The scarves were colored in using light Flirty Flamingo, Daffodil Delight, and Mint Macaron. 

Then I set the mice on top of the Basic White piece to see where the music notes would be stamped. They were stamped using black Memento ink. I textured that piece with some musical staffs embossing folder that I had. It's not the current one but you get the idea. 

The words are from the "Penguin Place" set and were stamped using black Memento ink. I die cut them with the cute little oval die in the "Mini Pocket Envelope" die set. I took my Mint Macaron marker and colored the edges of the oval to give it a bit of color.

The mice were set back on the Basic White piece for placement of the lamp. I glued the lamp in place. 

I set the mice and words in place with Dimensionals and the card was done.

This was a fun card to make. I was SO in the mood to color. I do like how the card turned out.

Thank you SO very much for taking your time to stop by and see today's Christmas card,
Wanda


Friday, September 09, 2022

Santa's Express, Snowman Magic, Christmas Card, Stampin' Up!

Today I was going to make another Halloween card but as I was looking at some Designer Series Paper (DSP) I some scraps fell out of the "Santa Express" 12" x 12" package, so I took it as a sign and made a quick card with it.

The base of my card is a folded half-sheet of Basic White card stock. This card opens on the right and the fold is on the left.

I cut a 4" x 5-1/4" piece of Garden Green card stock for the layer. I had die cut the scalloped circle before I taped it to the front of the card. I used the second largest scalloped circle die from the "Layering Circles" die set.

Next I cut a 3-3/4" x 5" piece of DSP from the "Santa Express" package. I taped that on top of the Garden Green card stock.

Then I took my scraps and cut the red one at 2-1/2" x 2-1/2" and the tree with the packages was cut at 2" x 2-1/2". The Garden Green layer behind it was cut at 2-1/4" x 2-3/4". I taped the two pieces together.

The red piece was taped on the front of the card and then the tree and present layered piece next.

The words are from the "Snowman Magic" set and were stamped using Garden Green ink. I die cut them with the smallest circle die in the set and I taped the two circles together. Dimensionals were added to the back and the piece was set in place on the front of the card. A red crystal rhinestone was set on the bottom of the circle and the card was done.  One of the fun things about Blends pens is you can color your crystal rhinestones any color you have.  You can also use colored sharpie markers too. Though I have found a few of them to give off a strange tint.

It was fun to use some of those little scraps. Sometimes you just have to!

Thank you SO very much for taking your time to stop by and see today's Christmas card,
Wanda


Thursday, September 08, 2022

Scary Cute, Halloween Card, Celebrate Everything, Stampin' Up!

This card went in so many directions before it ended up like this. I wasn't sure where I was going with it and I just added stuff as I went. As I look at I see that the card base might have looked nicer if it were  a different color. But it is what it is and I can't always try it again with different colors and maybe a different orientation. Maybe!!!

The base of my card is a folded half-sheet of Basic Gray card stock. This card opens on the right and the fold is on the left.

I cut a 4" x 5-1/4" piece of Basic White and taped it on the inside. 

Then I cut a 4" x 5-1/4" piece of Crushed Curry and textured it using the "Painted Texture" embossing folder. I glued that in place on the front of the card.

The DSP is from the "Celebrate Everything" 12" x 12" package and was cut at 2" x 5-1/4". I also glued this piece in place.

The framed image is from the "Scary Cute" bundle. I die cut the framed piece using Basic Black card stock. I die cut the cat and bats at the same time. I also cut another solid piece using Basic White card stock. You can see a mark around the edge. I used that mark to trim the piece a bit smaller. This way I wouldn't have to be perfect in setting the piece behind the Basic Black frame.  I used my blending brush and scrubbed on some Gorgeous Grape ink and then some Blackberry Bliss ink. Then I splattered the piece using my chalk pen. I flicked it off the end of the cap. If you do this you will ruin the tip on the pen. I designated mine for this purpose and have another one for writing with.

The Basic White piece then glued to the back of the Basic Black tree framed piece. 

I die cut a circle from the "Layering Circles" set. I used the second smallest one and cut a piece of Very Vanilla. I used So Saffron ink and scrubbed over the circle with a Blending brush. I set the moon in place on the inside edge of the frame. Then I glued the cat in place. I added a couple of bats too. Dimensionals were placed on the back and the piece was set aside.

The words are from the "Scary Cute" set and were stamped using black Memento ink. I die cut them with the same size die as the moon. I thought the piece was too bright so I die cut a scalloped circle just a bit larger so it gave it a touch of color. I taped the two circles together. Dimensionals were added to the back.

I set the cat piece in place and then the word piece. I added some bats and the card was done.

This was a very fun card to make. I think a darker card base would be better but it's done and it is what it is.

Thank you SO very much for taking your time to stop by and see today's Halloween card,
Wanda

Wednesday, September 07, 2022

Happiness Abounds, Peaceful Moments, Celebrate Everything, Birthday Card, Stampin' Up!

Today I was in need of a birthday card. So here's what I came up with. It's simple and quick.

The base of the card is a folded half-sheet of Basic White card stock. This card opens on the right and the fold is on the left.

I cut a 1-1/4" x 5-1/2" strip of Designer Series Paper (DSP) from the huge "Celebrate Everything" 12" x 12" package. There's 48 double-sided sheets in this package and it covers all the holidays! I thought this piece would go well with these flowers. I cut a 1-1/2" x 5-1/2" piece of Bermuda Bay card stock for the layer.

Next I die cut the circle using the second largest stitched circle from the "Stylish Shapes" die package. I stamped the "Happy Birthday" from the "Peaceful Moments" set using black Memento ink.

The flowers are from the "Hues of Happiness" 12" x 12" package and were die cut using the matching dies, including the leaves.

I taped the DSP strip to the Bermuda Bay layer and I taped that in place on the front of the card about 1/2" from the fold. 

Dimensionals were added behind the circle and it was set in place on the front of the card.

The flowers were added to the left of the words and I slipped a few Dimensionals under the parts that hung over a lot so they wouldn't sag.  And the card was done.

This was a fun card to make. Very quick and super easy.

Thank you SO much for taking your time to stop by and see today's birthday card,
Wanda

Tuesday, September 06, 2022

Scary Cute, Grassy Grove, Halloween Card, Stampin' Up!

I had SO much fun making this card. When I saw it in Pinterest I saved it so I could make it, adding it to my list (it's a long list of cards I want to make). It was time and here it is. I found the original card here, there was no instructions on how it was made, so here's how I did it. 

The base of the card is a folded half-sheet of Rich Razzleberry. This card opens on the bottom and the fold is on the top.

I cut a 4" x 5-1/4" piece of Basic Black card stock and die cut the forest image from the "Grassy Grove" bundle die set. I also cut a piece of Basic White card stock that was just a bit shy of 4" x 5-1/4". I wanted it a bit smaller so I could layer it behind the trees and not have the white show.

The original card looks like it used the "Horizons" Designer Series Paper (DSP) that is retired. I think it was called "Horizons" or it could have had that word in the title.  I decided to take my blending brush and scrub in some Rich Razzleberry ink, trying to stay away from the middle area to keep it light.  Then I scrubbed in some Gorgeous Grape ink. I wanted it a bit darker so I scrubbed in some Blackberry Bliss ink.

For the dots, I have a chalk pen that I ruined the tip by flicking it on the edge of the cap to get some splatter. So that is what I use it for now. I put a piece of tape around it and marked it so I remember to grab that one for flicking.  I could have added more dots on the card but my pen wasn't cooperating.  But you can see some and it's pretty.

Next I die cut the house and bats using the piece of Basic Black that came out of the center of the forest piece. And I used Daffodil Delight for the moon. I also cut a scrap piece of Daffodil Delight to fit behind the haunted house. I glued that piece to the back of the house and I set it aside to dry.

I added Dimensionals to the back of the forest piece and set it in place on top of the Basic White piece I colored. Then I glued the house in place. The moon was added next and after coloring the bats with Wink of Stella, they were glued in place too.

The words are from the "Scary Cute" set and were stamped on a scrap piece of Basic White card stock using black Memento ink. I cut them in half and scrubbed over them with my blending brushes. I set them in place using Dimensionals.

A 4" x 5-1/4" piece of Basic White card stock was added to the inside and the card was done.

This was such a fun card to make. I love the colors and it's a great Halloween card. And I got to use the "Grassy Grove" set. I didn't get to play with that set much and I really do like it.+++++

Thank you SO very much for taking your time to stop by and see today's Halloween card,
Wanda

Monday, September 05, 2022

Snowman Magic, Stylish Shapes, Christmas Card, Stampin' Up!

This is not what I was thinking when I started out making this card. I was going to go with a floral motif but ended up with a snowman. Skipped fall all together!!! LOL

To make this card you will need the "Snowman Magic" bundle, the "Stylish Shapes" die set, Blends pens in Dark Pumpkin Pie, Dark Basic Black and Bronze, some glue, Balmy Blue ink, Night of Navy ink, some Dimensionals, Basic White card stock, and a crystal rhinestone.

The base of this card is folded half-sheet of Basic White card stock. This card opens on the right and the fold is on the left. I cut a 4" x 5-1/4" piece of Basic White and die cut the stitched square shape using the second largest die in the "Stylish Shapes" die set. Then I textured it using the "Brick & Mortar" embossing folder (I forgot to include that one in the list). I used brick because I was going to use flowers but since I had it done and switched gears, I just thought I'd use it anyway.

I set the embossed piece on top of my card base to see where the words would go. I lined up the words through the opening and stamped them using Night of Navy ink. Then I set the embossed piece in place using Dimensionals.

Next I die cut two snowmen using the die from the "Snowman Magic" bundle. I also die cut a pair of arms at the same time. Then I stamped the hat and scarf and set them up to be die cut. I set the face on the snowman and die cut all three at the same time.

I colored the arms using my Bronze Blends pen. I colored the nose using the dark Pumpkin Pie Blends and I colored in the face area on the second snowman using the Basic Black Blends pen. 

The arms were glued in place on the second snowman and then it was glued to the first one. The nose was glued on and then the hat. I stamped the buttons using black Memento ink before I set the scarf in place.

The snowman was then set in place on the front of the card using a few Dimensionals. Be careful not to put any where the opening is.

A crystal rhinestone was added to the snowflake in the words and the card was done.

I'm not overly fond of the card. It's okay but I think it would be better with a  snowflake background. Or maybe some embellishments. Or maybe a shaker card??

Thank you SO very much for taking your time to stop by and see today's Christmas card,
Wanda

Sunday, September 04, 2022

Merriest Frames, Snowman Magic, Christmas Card, Stampin' Up!

I bought the "Merriest Frames" die set and embossing folder but I didn't buy the stamp set that went with it. This is still a current item and I was glad because I hardly played with it last year. So now I have a second chance to work it into my cards this year. I did that the other day with my snowman card. You can see that card here.  I found this card on Pinterest. You can see it here

The base of the card is a folded half-sheet of Cherry Cobbler card stock. This card opens on the right and the fold is on the left. The front was scored at 2-3/4" and folded backwards so the right edge is now even with the fold. I glued the flap down. I am not a big fan of fancy fold cards and I prefer my cards to be flat unless they are a pop-up card. It has a cleaner look being glued down.

Next I die cut the pretty leaves using the die from the "Merriest Frames" die set. I used gold foil paper to do that. When the piece was die cut a rectangle in the center is a solid piece. There's a stitched rectangle die in the set that was used to cut it out. Also on that stitched rectangle piece, the poinsettia flower was cut in an area that won't show when glued to the front of the card.

The frame was then cut in half and glued to the front flap of the card. And then the stitched rectangle frame was glued in place.

The words are from the "Snowman Magic" set and were stamped on a 1-7/8" x 2-5/8". Very Vanilla card stock using Cherry Cobbler ink. Then it was glued to the gold stitched rectangle piece.

On the inside a 5-3/8" x 4-1/8" piece of Cherry Cobbler card stock was cut and textured with the embossing folder in the "Merriest Frames" set. I glued the piece in place. Taping on textured pieces doesn't always stick well, there's too many hills and valleys and the tape doesn't always make solid contact.  Once the piece was glued to the inside, I taped on a piece of Very Vanilla that measured 2" x 2-3/4".  

The little flower was glued to the bottom right corner and a crystal rhinestone was added to the center.  And the card was done.

This was a very quick and easy card to make. I think I'd like to make one with the whole gold frame.  Maybe in a few days and maybe in a different color!

Thank you SO very much for taking your time to stop by and see today's Christmas card,
Wanda


Saturday, September 03, 2022

Art Gallery, Hues of Happiness, Thinking of You Card, Stampin' Up!

Today I was going to make another Halloween card and as I was looking for something to inspire me or something to copy, I ran across this card. You can see the original card here. I love the Designer Series Paper (DSP) and I have lots of scraps but at this rate I'd never use up all my scraps, it's such a small piece that speaks volumes!

The base of the card is a folded half-sheet of Pool Party card stock.  My card opens on the bottom and the fold is on the top. I made mine this way because that was the way the piece was cut in my package of card stock. It measured 4-1/4" x 11" before I folded it in half at 5-1/2".  

A Night of Navy piece was cut at 4-3/4" x 3-1/2". Then a Basic White piece was cut at 4-1/2" x 3-1/4". The Pool Party piece on top was cut into two strips after it was textured using the "Pretty Flowers" embossing folder. The left strip measures 4-1/4" x 1-5/8" and the strip on the right measures 4-1/4" x 1/2".  And the DSP strip measures 4-1/4" x 1".  I taped the strips in place on top of the Basic White piece.

Next I taped the Basic White piece to the Night of Navy piece and I taped a piece of ribbon around the layers. I used scotch tape to hold the ribbon ends on in the back of the layers.

The words are from the "Art Gallery" set and were stamped using Night of Navy ink. I die cut them using the ribbon die from the "Stylish Shapes" die set. I cut off the right end to it was straight. I taped that to the front of the card, on top of the ribbon. 

Dimensionals were added to the layers piece and it was set in place on the front of the card.

I tied a bow and glued it to the left end of the words. A 4" x 5-1/4" piece of Basic White was added to the inside of the card and the card was done.

This was a very fun, quick, and easy card to make. It's a nice way to use scraps but if you have a lot of scraps you won't use them up very fast making a card with this layout!  But every scrap used is one less in the stash, right?  LOL  

Thank you SO much for taking your time to stop by and see today's thinking of you card,
Wanda