Pin It

Friday, August 31, 2012

Lovely as a Tree Birthday Wishes

Here is a card I made at Terri's last Stamp A Stack.  It's always great to have some masculine cards on hand.  This would also make a great masculine sympathy card too.  

The textured paper is called Core'dinations.  It is very fun to play with.  The raised area was sanded and that exposed the center core of the paper.  Isn't that cool?  

The words are from the Perfect Pairs set.

Isn't this a fun card?  It's quick, it's easy and it's a masculine card!!

Thank you SO much for visiting today,
Wanda


Thursday, August 30, 2012

A Mixed Bunch Punch Birthday

I just love that punch that matches the Mixed Bunch flowers.  Though I did not use the stamped flower image in this card I did use one image for the center of that flower.  


I liked making this card. It as so quick and easy to do too.   I used Melon Mambo for my color on the Whisper White.  I used Dimensionals under the smaller layer, the flower, the flower center and the colored layer of the sentiment circle.  Lots of Dimensionals used here.  And I wonder why I go through so many of those things!!  They're the best, aren't they?


If you need a quick card, this is the way to go.  Oh, I almost forgot to tell you, the words are from the Made for You set.  I fell in love with that set at Terri's last Stamp A Stack.

Thank you SO much for visiting today,
Wanda

Wednesday, August 29, 2012

Googly Ghouls

I was not going to make Halloween cards yet but I just couldn't help myself.  This is such a cute set.  Perfect for kids because it's not scary!  And speaking of scary, I'm SO looking forward to some scary movies this fall for Halloween.  Every now and then I get in the mood for a good scary movie!  


As I was putting this card together I had opened up the pack of Howlstooth decorative paper that I'm pretty sure belongs to my sister!  I know she will be fine with me using it, especially after I put the card in the package with the scraps from the sheet I cut!  


This card was made for the Wednesday Sketch Challenge at Split Coast Stampers.  There really was no sketch.  To commemorate their 400th sketch you were told to pick a prior sketch and play with it.  I chose sketch #242.  I picked that one because Frankie fit nicely into the focal piece!  I  had to dig out my Booglie Eyes set because that is where I had stored the wiggly eyes I had.  This set is designed for those eyes!!!  I can't wait to play with the rest of the images!


This was a fun card to make and I really do like this sketch!

Thank you SO much for visiting today,
Wanda

Tuesday, August 28, 2012

A Thank You Card Fit For A Wedding

I was looking through Yolanda's Pinterest board and found a card similar to this.  I say similar because I changed it a bit.  I was using what I had!!  Remember, we talked about that before?  LOL  Make what you have work and that is exactly what I did and the card turned out pretty!  I have taken a few cards of Yolanda's board and redid them.  A few of them I had to change things a little and make do and they still turned out cute!  So if you are going for an exact copy then you need the exact tools but if you are going to play with what you have you can still create nice cards.  Just don't compare them to each other!  Simple as that!


I used an embossing folder on the background and I got a little creative with my words.  I used the "Easy Events" set and taped off the flowers because I only wanted the words.  I stamped the words and then punched them out.  I didn't have a bigger oval so I punched out the scalloped oval and used that instead.  All layers were set in place using Dimensionals.  


I think it turned out nice and I am going to show my niece it to see if she would like me to make these for her wedding thank you cards!

Thank you SO much for visiting today,
Wanda

Monday, August 27, 2012

We're Off To See The Wizard

I did not add these photos in any particular order.  I just copied them out of the file I had them in and I will explain each one as I come up to them.  The first photo is of the side of the shoe showing you the lion in the shoe. Next to the lion are a couple of lolly pops. Under the shoe is the feet and legs of the Wicked Witch of the East and a few apples on the Yellow Brick Road.


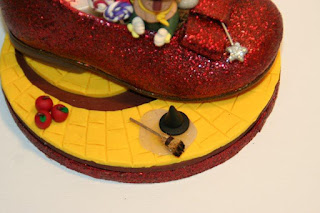
The second photo is showing you a close up of the star want that Glenda the Good Witch had.  There's a few apples on this side of the shoe. You can see the road is doing the spiral twist thing.  That was very hard for me to do here.  I probably should have done the spiral smaller and there would have been more showing.  But you get the idea with out more spirals anyway.  And in this photo is my favorite part of the whole things, the melted witch.  I TOTALLY enjoyed making it too!  The broom was very fun to make. I took a tiny sprig off our honeysuckle bush and tied some dried "something" to it. I had a decorative broom that I bought years ago and I keep cutting pieces off it for crafting. It has come in very handy and I will miss it when it's all chopped up!  I tied the bristles on using brown thread.  Then I trimmed them and lastly I burned them.  Did that ever stink but the effect is what I was going for.  I HAD to burn the broom.  When the witch was melted her broom had been burnt so I had to stick with the story!  

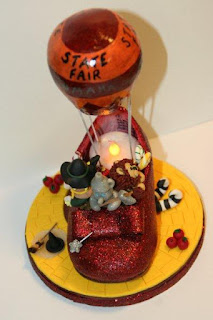
The third photo is more of an overview.  The hot air balloon was made using a Styrofoam ball and some paper clay.  There are 4 pieces of wire going from the tea light to the balloon.  The balloon piece is not attached to the shoe.  It couldn't be because I needed it to come out to turn the light on and off.  I just tilt it forward a bit to take it out and put it back in place.  It's really hard to see here but behind the characters I put in quite a few poppies.  

I forgot to tell you, the shoe was a white child's shoe I had gotten at the Goodwill.  I removed the strap that went across the sides.  I sprayed the shoe red.  That was a nightmare.  I sprayed it a month back when it was SO humid.  I had sprayed it in the garage and left it there all night.  I should have just sprayed it and brought it back in the house.  So when I did bring it in it was sticky.  3 days later it was still sticky.  I found some stuff in the linen closet that is suppose to make your nail polish dry faster so I put that on it and it wasn't sticky anymore but it did need a second coat.  I sprayed it again and immediately brought it indoors.  It got sticky again so I had to put more of that polish on it.  When that was all set I took some Crystal Lacquer (Crystal 

Effects works too) and covered the shoe. I immediately sprinkled it with the red glitter.  While that was drying I took some Real Red grosgrain ribbon and made the bow.  I covered it with the lacquer and sprinkled it with glitter.  Once that was dry I glued it in place on the top of the shoe.  Now I know the real Ruby Slippers had sequins on them but there was no way I was going to do that!  I did add one final coat of lacquer to the top of the shoe and bow so the glitter would stay in place.  Oh and the base of this is made using 6 CD's. I added 1/4" grosgrain ribbon and added the glitter like I did for the bow.  Yup, that simple to cover the edges of those CD's!

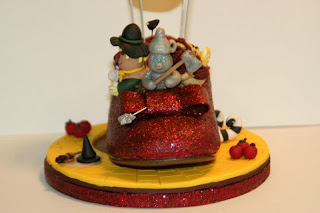
The final photo shows the Tin Man with his axe.  For a fun little touch (that my neighbor suggested) I added a tiny crow on a wire behind the scarecrow.  You can see it better in the last photo.  I did not take her advice about adding Toto.  I just didn't have it in me.  I have never been able to sculpt animals so there was no way I was even going to try. But I've got most of the "things" represented.  The Scarecrow, the Tin Man, the Cowardly Lion, the apples from the tree fight, the Ruby Slipper that Dorthy wore, the bad witches and even the wand from the good witch.  The lollipops and the poppies along with the hot air balloon. And of course the Yellow Brick Road!!  Monkeys would have been fun but I was limited with space and talent!  

So there you have it.  This is going to be ending up in the hands of a very special friend of mine!  I doubt she reads my blog but I know Mary is going to be very surprised to get this.  She LOVES the Wizard of Oz.  She is such a nice gal with a SUPER sense of humor and I am going to enjoy giving this to her. Oh and Mary, if you do read my blog you just ruined the surprise!!! LOL

So now it's back to cards and paper crafting!

Thank you SO much for visiting today,
Wanda


Sunday, August 26, 2012

A Curly Cute Birthday

Today I want to show you how you can make a beautiful card with limited stamps.  I used two stamps here.  One for the words and one for the center of the scalloped layers.  You could even get by with just one stamp and a button or other embellishment in the center of those layers.  I am not a minimalist, I need LOTS of stamp sets!  I just buy the ones I think I will get the most use out of plus a couple other ones I think are cute and I can stamp away for months!  

The paper used here is Midnight Muse, Cajun Craze, Very Vanilla and Comfort Cafe decorative paper.  

I am working on a couple of projects for you plus some other card ideas and finds.  It has been a busy week.  We are in the middle of some minor house repairs/replacements.  Today it was light fixtures in my workroom.  We didn't have to replace the fixtures, just the bulbs.  They are florescent.  I have two light fixtures in the main part of my workroom and each have two bulbs, you know, the long ones!  The one above my worktable had one working light and the other had two working lights but not very bright anymore.  I was not aware they lose their brightness in time.  We didn't have any spare bulbs so hubby had to run to the hardware store and get two.  He installed them and it was SO bright over my worktable and the other side of the room looked dull and dim.  So he switched a bright bulb on the other side for a dull one and  now I have a bright and dull in each fixture and it's still VERY bright in here.  I like it but it makes the room look messy! LOL  I have some tidying up to do this week in here too!  So the lights did not end there.  The covers on the fixtures were VERY old and brittle and even yellowed in the middle from the years of heat on them from the light.  We bought new covers 2 years ago and they have been hiding behind a spare folding worktable against the wall.  I move them when I vacuum and I think how nice it would be to have them installed.  But it's not a simple installation either.  These have to be cut to fit.  The length is right but the width is not.  There was about 6 inches too much on the side.  I took a piece out in the garage to see if I could cut it on the band saw but the plastic flying off there was a bit dangerous so I decided that was NOT a good idea.  I set up a fan and got out my wood burning tool and burned a line down the whole piece.  It took 4 to 5 times over the line to get it past the center thickness of the cover.  Once I got it past the center of the thickness I was able to set it along the edge of the table and snap it off.  I didn't learn that until I was at the end of the first one!  But they both got cut and I cleaned up the edges with a putty knife and I slid them in place.  But once again, it didn't end there.  When hubby removed the wood trim off one end the wood got scraped and I needed to touch it up.  SO once it was touched up I was able to hammer it back in place and enjoy the brightness of my workroom.  (I see dust!!! LOL).  Another project (ongoing) of the day was to take all the towels and sheet sets out of the linen closet and wash them up and see what I want to keep and what I don't.  In the mix were about 5 or 6 table cloths!  Really?  Do I need that many?  So once they are washed up I will see which ones I want to keep and the rest will be packaged up for the spring garage sale.  And of course I will price them before I box the packaged sets up.  I like to be ready for the sale LONG before the sale!  I keep a box on the bed in the guest room and when I run across something for the garage sale I price it and put it in the box.  When the box is full it goes out to the loft in the garage until spring.  It was such an easy garage sale to prep for this past spring because of doing that.  I have LOTS of stuff for the garage sale, mostly crafts but I hate to part with them.  You never know when you may need them.  Have you ever thought like that?  I bet most of you serious crafters have!  And then the other project is the stairs.  I still need to paint the wood on the sides and I'm done with my part.  Then I just sit back and wait for the carpet to come in.  It should be here any day now.  Whew!  It was a very busy day and it's not over yet.  I will be painting one side of the stairs tonight and the other side tomorrow morning and then I will officially be done with that.  I LOVE the "being done" with things!  Last night I finished up a Wizard of Oz project I had been working on for a few weeks now.  No, it really didn't take that long to do, I didn't work on it every day.  But last night I hit it hot and heavy with the clay items and I put it all together.  I think I will share that with you tomorrow.  I'll take some fun photos of it tonight.  I think you may be as amazed as I was!  And on that note I am going to end this long post and let you get back to your work!

See you tomorrow and thank you for stopping by today,
Wanda

Saturday, August 25, 2012

Sharing a Couple of Things That I Have Found

I have a couple of things to share with you today.  I found the first one on Pinterest.  And of course I have to test these things out before I share them with you.  Why pass something on that doesn't work?  I am doing a lot of taping and a little bit of painting in our home and I had seen this great idea to hold the end of your tape without wasting any tape.  You take a bread tag and stick it to the end of the tape.  Now the tape end is not only easy to find but you don't waste any.  I use to either fold the end of the tape back or just leave it and then try to find the end and once found I would try to grasp the end so I can use the darn thing.  Well, now my tape end can be found and there is a warm and friendly feeling associated to the tape rolls now!  They ARE your friend!!! LOL  As long as the other half puts the bread tag back on when he's done all will be happy here!!! 

And the other fun thing I want to share was something my friend Katie sent me.  It shows how to separate an egg with ease.  Almost every morning my cat Boo gets an egg yolk.  I hate giving them to her because it's so messy and she starts in with the meowing once she hears the egg crack on the counter edge.  Then the egg is moved back and forth between the shell halves to get rid of the white part.  I watched this video on You Tube and I will never have to spend more than a few seconds separating an egg ever again!  The video is not in English but it doesn't need to be to follow along.   You just crack your egg open (ignore the meowing cat) and take an empty plastic water bottle.  Squeeze the bottle and place the opening on top of the egg yolk.  Let up on the pressure on the bottle and watch the egg yolk get sucked inside the bottle.  And it's clean, the white "anchor" is gone (yup, actual word for that white "thing" stuck to the egg - which if left in the bowl ends up on the floor or the side of the cupboard!).  The egg yolk comes out of the bowl whole and clean. Then you just squeeze the bottle and the yolk comes out where ever you want to place it!  It's so simple and very amazing. It looked like the gal in the video put the cap back on the bottle once she was done. I'm not sure why she did that.  I rinsed the bottle out and put it in recycling.  I have this thing about egg and not cleaning up after it.  I just feel that one egg can contaminate everything it comes in contact with.  Simple solution here, get another water bottle.  Just open up a new one, put the water in a glass and you have a nice clean bottle every time!  I don't recommend saving the water bottle, it's not worth getting sick over.  Anyway, this is such a slick way to separate an egg.  Lucky Boo doesn't have to wait as long for her yolk anymore!!

I took the day off today from card making.  I do have some cards to share with you from a Stamp-A-Stack I was at last week and I card I was working on this morning but I just thought I would change things up a bit here today and share some fun finds with you!  I know you are curious about the egg yolk thing now!!  LOL

Thank you SO much for visiting today,
Wanda

Friday, August 24, 2012

Another Bright Blossoms Birthday


One can never have too many birthday cards, can they?  Here is another bright and cheery card.  I REALLY enjoyed making this one.  Mostly because it just has such a pleasant look to it that creates a happy feeling.  I used the Bright Blossoms set again on this one.  It was quick, easy and very fun!  The original card is from Jackie at KlompenStampers.  I tend to stalk her blog quite often.  She’s very talented and way too often she has card on her blog that are something I would make.  So when she posts them I HAVE to make them!  I didn’t have the same ribbon but as I’ve said before, we all make do with what we have.  Ribbon is way down on my wish list.  I know it should be higher but there’s too much stuff I want before I buy ribbon. 

This is one card I can see myself making again.  And this layout too.  I do like it and I have lots of small images that I know would fit in that 1” circle punch!  Sounds like a lot of future fun, doesn't it?

Thank you SO much for stopping by today,
Wanda

Thursday, August 23, 2012

A Bright Blossoms Birthday


I saw a card on Pinterest using this layout but where I put the flowers there were small stars punched out.  I did like that look but the star punch is a retired item so I thought I would play with something that was current.  Plus I want to play with these beautiful flower stamps before fall and winter come!  I really like the flower sets I bought but I don’t seem to use them enough.  And then the fall and winter stamps will be here soon enough and the flower stamps get pushed aside.  Sometimes they even get forgotten!  I hate it when that happens!

So today I played with the Bright Blossoms set.  The card turned out to be a very bright and festive one, didn’t it?  And easy to do.  The cards I’ve been posting lately are easy to make.  I want to do a week of quick and easy cards.  These are great for those of you who wish to do Stamp-a-Stacks or Make N Takes. 

The colored strips measure 1-5/8” x 2-3/4”.  The flowers were stamped and punched out with a 1” circle punch.  The strips were set in place using Dimensionals and the circles were just taped in place.  The words came from the “Happiest Birthday Wishes” set.  As simple as that.


Thank you SO much for visiting today,
Wanda

Wednesday, August 22, 2012

Need for Speed on Faux Metal

This is a very fun and easy technique.  You just need some aluminum foil and black StazOn.  Other colors of StazOn would work too but black fit this image so much better.  This card was made by Terri at her monthly Technique Class.  There's such a fun group of ladies there and I look forward to seeing them every month.  

I did this technique a while back.  You can find the instructions for it here.  

The only thing you really need to keep in mind when you are doing this technique is how much pressure you are putting on the textured foil.  The harder you rub the more your image will flatten out.  Not a good thing!

Terri always has such great card ideas.  The image is from The Need for Speed set and with the Argyle background embossing folder it was a perfect match!  I just got the Argyle folder and the Houndstooth one.  I won them in a drawing!!! Lucky me.  I have used the Argyle one but have not used the Houndstooth one yet!!  But it's on my long list of supplies for the cards I want to make.  I wish I had more time in a day to make more cards and projects!!!  I'm working on a way to accomplish that.  So far it's not working.  Housework, job, cooking and that darn sleeping get in the way!!! LOL

Anyway, this is a very fun, easy and super quick technique to play with. Oh and SO effective too!  

I have 4 packs of technique pages for sale in my web store.  I have some finished page sets and of course all the sets are available on CD.  You can print them out for classes.  Your customers/students will do the technique and take the page home with them and a card if you opt to include a card in the class too.  You can print out as many as you like, there's no limit.  Each technique comes with a photo of the finished page for reference.  It's an easy way to hold classes without a lot of time and planning on your part!

Thank you SO much for visiting today,
Wanda

Tuesday, August 21, 2012

Fun Kids Card


So have we recovered from yesterday's Pun Post?  I'm not a big fan of puns but that card and saying still makes me laugh.  I think I need to get out a bit more!! LOL 

I must be stuck in the "fun kids cards" mode because I ran across this card and I just HAD to make it.  I found it at Gina K's Stamp TV.  I just signed up on that web site.  What a fun site full of many interesting things to make and do! 


This card was SO easy to make. I cut the color strips at 1" each and I rounded the ends by putting them in a 1-1/4" circle punch from the backside.  You just slip the strip inside the hole and punch the edge.  So simple and very effective.  It's a perfect corner rounder! 


Next I taped the strips in place.  Line them up first to see how much space you want between each one.  Then I trimmed my card stock to 4-1/8" x 5-3/8".  I added the brads and then the "thing" that you bang on the keys to make the noise!!!  Can you tell I'm musically inclined?  LOL   I stamped the words in Tangerine Tango using the Perfect Pairs set.  And that was it.  SO easy, SO quick and SO cute!

This would be a great kids birthday party invitation card too!


Thank you SO much for visiting today,
Wanda

Monday, August 20, 2012

I Couldn't Help Myself!


Ok, I just couldn't help myself here.  A week or so back (maybe two months for all I remember!!! LOL) I saw this joke with a picture of Bert and Ernie on it and these words.  It made me laugh and I thought I had saved it but I couldn't find it.  The other day, while searching for a card on Split Coast Stampers I found Bert and Ernie done with punches and that groaner of a joke came to mind so I thought I would incorporate the two and this is what I got!

I think this would be a fun card for a kids ice cream party.  Or for those of us who have grown up but still love Bert and Ernie!!!


I just thought it was funny and I just couldn't help myself.  I promise I won't do it again (this month!!! LOL).  

Thanks for putting up with me  LOL!
Wanda

Sunday, August 19, 2012

Sizzlet Butterflies

I saw this card on Pinterest and linked up to the web site where it originated from. The original card was not made using Stampin' Up! products so this was a bigger challenge for me.  Stampin' Up! didn't have a butterfly punch that would allow me to make the smaller butterflies in the center of the white card stock and then add colored card stock behind it.  So I just used the Sizzlet and punched out some butterflies using decorative paper.  Each butterfly was done using different designs but the didn't show up very well in the photo.  Could be due to the texture but probably the lighting and user error!!!  


In spite of the butterflies colors I think the card turned out rather well.  If I make another one I will opt to use a different color.  Something that will show up more.  Maybe Melon Mambo or Pumpkin Pie. Something bright but not as soft as the Daffodil Delight.  But all in all I think it's a pretty card and in person the butterflies look SO much better.  It's a very easy card to make and would be a great Stamp-A-Stack card!

Thank you SO much for visiting today,
Wanda

Saturday, August 18, 2012

A VERY Colorful Summer Smooches Birthday

WOW, if this doesn't shout colorful, I don't know what does!!!  As I was playing with the Summer Smooches decorative paper I found some great colors to go with the new in color Dahlia adornment assortment.  These colors don't match the papers exactly because these papers are not the in color papers but they flowers match enough to get by with it!!! LOL

I used a layout from one of the Split Coast Stampers sketches.  It's #289 and modified to fit what I wanted to do with it.  I was looking for a focal piece to fit the flower vase and flowers and this is the one I ran across first so I ran with it!

Lots of layering, if you like to layer.  And you all know I LOVE to layer!!!  It was very fun making this card. I was anxious to put it together so I could get to the part where I could add the flowers.  Aren't they cute on there?  I made a pair of earrings with them a couple of weeks ago.  Click here to see them.  They were SO cute and very easy to make.  Just get a pair of flat earring pads (blank earrings) and just glue them on top.  SO simple and they make a great gift for a stamper who loves all of these fun products!

Thank you SO much for visiting today,
Wanda

Friday, August 17, 2012

A Summer Silhouettes Birthday

 Summer Silhouettes is such a fun set to play with and extremely versatile too.  This lonely image could be used for so many occasions, including a sympathy card. 

I thought this would be a fun image to use on this layout. I don't usually do these kinds of layouts but I saw one somewhere on the net and I thought I would run with it.  I guess I ran in a slightly different direction because the other one had the words on a scalloped layered piece and I opted to put the words directly on the focal piece.  I'm not sure why I did that.  Maybe because there was so much space there at the bottom but then again the scalloped layered piece could have gone there!  Who knows how I think?!  LOL


The Chocolate Chip focal piece was cut at 2-3/4" x 4" and folded to measure 2-3/4" x 2-3/4".  The excess folded part is tucked in behind the Whisper White and taped in place.  It's hidden between the layers for a neater, cleaner look.  Then the next layers were just cut 1/4" smaller. 


After I stamped the images I added the words and then taped the card together.  

The second photo shows how the card looks when it's partially opened.  The left flap is folded in first and then the focal image is folded on top of that.  It's a very simple fold to do, very fun and very different from the usual half fold card!  

Oh, that front layer was done by folding a half sheet of card stock in half and then cutting off 1-1/2" and then cutting the scallop.  You can cut off more or less depending on how you want your card to look.  

Such a fun card to make.  I highly recommend you giving this layout a try for something different to add to your collection of card layouts!!

Thank you SO much for visiting today,
Wanda

Thursday, August 16, 2012

Blooming With Kindness Photo Frame


 A while back when I was playing with the Blooming With Kindness set and VersaMark with chalks this idea came to mind. Well, not really that easy.  I was actually cleaning up a messy room and I ran across a bunch of frames that I was going to use for a project that has gone by the wayside.  I had this frame idea in mind and when I was using the chalk method on the VersaMark image I thought this would be the perfect thing for the frame.  I set the frame opening over the flower and saw that I did indeed have space for some wording.  I thought these words would be perfect with this picture and in the frame.  I stamped them using Early Espresso ink.  This was stamped after the chalking was all done.  I don't know what would happen if you did it before. I'm thinking you may have a smearing issue with the ink as you rub the chalks in.  Since I did the words last I really didn't have any issues with it.  Well, other than trying to make sure I got the words straight.  I know there is the Stamp-a-ma-jig but where's the challenge in that?? LOL  I'd much rather stamp it crooked, whine and redo the whole thing than use the Stamp-a-ma-jig!  Not true most of the time!  But for this I used a steady hand, I knew where my image would land on the paper and I went for it and it turned out!!!


The Wild Wasabi frame paper is from the Delicates paper pack.  I bought that pack when it first came out and I still have lots of sheets left. I need to start using them more before they retire!  But I thought the paper went well as a frame and it picked up the green in the stem.  I just wrapped the paper around the frame.  I cut a huge "X" in the center of the decorative paper and wrapped the paper over the inside of the frame.  I did glue them in place.  I was afraid tape would not hold so I played it safe and glued it in.  I wasn't to concerned on how the back of that part of the frame would look.  I knew the image was going over it plus the backing of the frame had to go on too so on one would know what the green frame looked like on the back until they took it apart to look.  And who would do that?  Let's have a show of hands!!!  I myself have been known to take things apart to see how they were put together.  But only on things I knew I could put back together!!!  Ever take something apart thinking you'd remember how to reassemble it and then find you can't?  I've done that way too many times!!!


This was a fun project and I'm sure you want to know where I got these frames!  I found them at The Dollar Tree.  Yup, only a dollar. The image inside was not display worthy but it is now!!  And this was a VERY easy project to do too!  I made it for a special friend and I know she will love it!

This would make a very fun and beautiful Stamp Camp project!!

Thank you SO much for visiting today,
Wanda


Wednesday, August 15, 2012

A Serene Silhouettes Birthday


It is Wednesday and I actually had time to do this weeks Split Coast Stamper's Sketch Challenge!  It has been quite a few weeks since I have played along!  This sketch was a bit of a challenge for me but I managed to get through it.  

It wasn't all that difficult to do, it was me messing up.  First I colored in the image with markers and huffed on it, I stamped it on my card stock only to find that I should have stamped it in the middle of the strip of card stock instead of the top! UGH!!!  SO I get another strip cut and stamp it in the middle like I should have done in the first place.  After that the rest of the card was easy.


I used Wild Wasabi on the greens of the image and then I thumped in some Always Artichoke.  I colored the flowers in using Regal Rose and then colored the tips and edges in using Melon Mambo.  It gave the flowers the bit of punch they needed.  


The words are from the Happiest Birthday Wishes set.    I punched them out using the large oval punch.  I punched out 3 small scalloped ovals and set two of them on the top and bottom of the large oval. I cut the third oval in half and taped it to the sides to give that oval the look of having a scallop all the way around it.  

I did forget to add two "somethings" in the upper left corner but I like my card the way it is.  I suppose I could punch a couple of black circles and add them but I don't think so.  I think it looks fine just the way it is.  What do you think?

This was a fun sketch to play with but I don't really see myself using it much.  Though I should never say that because that is when I find myself using the same one over and over and over!!! Crazy, I know!!! LOL

I have several cards I have to make and a little project to finish up.  The project I will show you tomorrow.  I think you will find it fun to do.  It would make a wonderful Stamp Camp project!!

Thank you SO much for visiting today,
Wanda

Tuesday, August 14, 2012

A Betsy's Blossom Birthday

I LOVE this little flower from the Betsy's Blossom set.  And I love this layout too!

I started out the flower using Pink Pirouette, the center flower was stamped in Pretty in Pink and the third flower was stamped in Regal Rose.  I wanted a graduated color scheme going here and I'm thinking I should have gone with some blues instead of the pinks because the Pink Pirouette is a bit too light.  Even in person it seems to be a bit too light.  Oh well, it's done and it is what it is!!  

I did have a little trouble with the words.  They came from the Bring on the Cake set.  I used Basic Black ink and of course it smeared.  I usually use Black StazOn and now and then I use the Basic Black just to refresh my memory of why I don't use it.  


I colored in the words with Pretty in Pink and because I used Basic Black instead of StazOn, the black smudged into the pink area while coloring.  UGH!!!  When will I learn?? LOL


The flowers were set in place with Dimensionals and the rest of the card was just taped layers.  It was a fun and very easy card to make.  I'd make another one but I'll remember to use StazOn.

Thank you for visiting today,
Wanda

Monday, August 13, 2012

Pillow Top Background Technique Page


I thought it was time to do a technique page. I forget about those things and every now and then I remember and pop one on here.  Today I found a technique called Pillow Top Background.  It is a very easy technique to do too.

You will need some acetate or plastic, a sponge, and ink pad and some card stock.  Not many supplies needed for this.  

You will line up your acetate from corner to corner and sponge in along the acetate line.  Slide the acetate to the left a little. On my background I moved mine about a half inch each time.  Sponge along the line and keep moving to the left until you are at the corner.  Then go back to the center and move the acetate over to the right and keep sponging as you did before.  Once that is done you need to turn your card ¼ turn and starting in the middle sponge as you did for the previous lines.  I marked my acetate with a ruler and drew a permanent line a half inch from the edge so I had a guide to follow on the lines going towards the right.  For the left side I just marked the edges of my card stock.  I knew I was going to be cutting those edges off anyway so a few light pencil marks didn’t really matter. 


Once I was done I took my sponge and sponged around the top near the edges and also on any spots that looked too bright.  I wanted a nice even look so I didn’t want one area or spot to look brighter than the other areas.  And that was it.  I trimmed it up and used it as the background for this card.


This card was done using 3 techniques.  Direct to rubber on the flower. Thumping on the flower and the new Pillow Top Background technique!  Isn’t it fun when you can combine these techniques.

I do have technique sets available on my web store.  I have some actual finished 6” x 6” sets left and the sets are also available on CD.  You just print out as many as you need for your classes.  Do the technique, put the pages together and begin your technique class albums!  The CD's also have samples of finished pages.

Thank you SO much for visiting today,
Wanda

Sunday, August 12, 2012

Love & Sympathy

I took the flower from the Love & Sympathy set and added words from the Petite Pairs set and created a pretty birthday card.

I used the new Polka Dot papers (Pumpkin Pie color), Whisper White and Basic Black.  The larger circles on the decorative paper are from the back of the other paper I used for the background.  That is a very fun pack of paper!

For the flower, I colored in the image with markers and stamped  it on Whisper White card stock.

I layered each panel on a piece of Basic Black card stock and taped them in place.  The center panel is set in place using Deminsionals, the other two panels are just taped in place.

This is a very easy card to make.  I copied the layout from a card I saw on Pinterest, it was a card done by Gina K.  I can't find the link to the card.  The link goes to their main page. 

This card was a LOT of fun to make!

Thank you SO much for visiting today,
Wanda 

Saturday, August 11, 2012

A Betsy's Blossom Birthday

This is one of those sets I bought because I saw a cute card done with it.  Well, I made that cute card (I think) and the set is just sitting on the shelf!  I took it out today to play with it.  This is not what I originally had in mind for the card when I started.  The base of the card was originally white but after I got the card put together I didn't like the white so I trimmed it up and added the Raspberry Ripple behind it.  It was fun to play with the new in colors too. I LOVE those new stamp pads.  Though I do have to remember not to press down as hard on them as I do on the old ones.  


I was disappointed in the wording here. I got it crooked.  I may stamp it on a separate piece of white card stock and tape it on top of the crooked ones.  Then again I just may leave it, it is after all a handmade card!!!  I was unhappy about the words because I actually practiced with the image on some scrap paper to make sure I got it straight.  It was straight on the practice paper.  UGH!! It's one of the joys of stamping!!  LOL


I did cut each flower out and the centers of each flower (stamped in Daffodil Delight).  And of course the bird was cut out.  Two of the flowers were set in place using Dimensionals and the other (top right flower) was taped in place as is.  The bird was also set in place with Dimensionals.  And the leaf (stamped in Gumball Green) was just stamped directly onto the paper.  I did have to remove some ink from the edges of the rubber before I stamped it on my card stock.  It got there because I'm sure I pressed too hard on the new ink pad.  I just took my blender pen and removed the color.  I used my thumb at first but I didn't like the greasy feel of the ink.  I'm not sure if there is oils in it or not but it felt like it on my thumb.  Anyway, I removed the ink from the edges to avoid that horrible line that sometimes appears when that happens.  And that's probably because of pressing too hard with the stamp too!  It's all about pressure on the stamp here! 

So here you have it.  A Betsy's Blossom card.  And I didn't copy it from anyone!  Shocker, I know!!! LOL

I'm working on a little fun project for you that would be a great Stamp Camp project and a wonderful gift too!  I should have it completed later in the week.  I have a ton of projects going on all at once here and I wonder why I can't finish anything!!!  I'm getting to the finishing point on lots of them.  I like to keep busy with different projects because I don't want to become bored with one, I tend to abandon them when they take too long.  So it's just easier to have a bunch of them going and work on them as I choose and eventually they get done.  It's fun when a bunch of them get done in one week too!!!  That doesn't happen very often but I do have a few of them coming up that will be ALL DONE!  And of course I will share them with you!

Thank you ever SO much for visiting today,
Wanda


Friday, August 10, 2012

A Summer Silhouettes Birthday

I found this at Becky's Scrappin' and Stampin' in GJ blog.  I did change the bottom of the card a little but for the most part it does look like the card she has posted.  I'm not sure if she is the original designer of this card or not. She does state that most of the cards on her blog are a CASE (Copy And Share Everything). 

Oh and I did use different words on mine too since I didn't have the image that was on the original card.  But that's ok, it allows us to use what we have and be happy with it.  I like how it turned out.  It's pretty enough to mail out!


And one other change I made was the ribbon.  Again, it was a case of using what you have and making it work.  Plus it's a good way to use up ribbons so I can buy newer more current ones!!  

This was a very fun card to make. I LOVE the colors of it, it's so eye catching.  It was also a very simple card to make.  A few trips to the Big Shot and a few to the paper cutter and that was it.  One punch was used and then a lot of fun stamping.  This stamp set is very versatile and extremely easy to work with.  


Thank you SO much for stopping by today,
Wanda

Thursday, August 09, 2012

A Bright Blossoms Thank You

This is another card I had taken a photo of at one of the Stamp-A-Stacks I was at.  I must have REALLY liked this card because I had taken several photos of it.  

I liked this card because it is so bright and cheery and it was unbelievably easy and quick to make.  

The vase is cut out and set in place using Dimensionals.  The flowers were punched out and set in place over the dots that are on the stamped image.  What a perfect way to hide them!  I thought I was going to have to color in the stem and leaves with a marker but I was able to just stamp the whole image and cover the round "buds."  

Whoever made this card, I love it and if it is your card, please let me know so I can give you credit and a link back to your blog!

Thank you SO much for visiting today,
Wanda

Wednesday, August 08, 2012

A Bright Blossoms Birthday


This is such a fun set to play with.  You don't have to stamp much to get a cute card made!  Here I used 2 of the images from the set and layered them and added some layered words, topped it off with a ribbon and that was it.  You can't get much simpler than that!!!

I first stamped the stem using Certain Celery and then I stamped the tulip image using Real Red.  Then I punched it out.  I punched out the larger scallop punch and poked holes in the center of each "petal." I layered the flower image on it and added Dimensionals to the back.  I added a piece of ribbon to the scallop before I set it in place on the front of the Dotted background card front.


The words came from Teeny Tiny Wishes and I used the Word Window punch to punch it out and the Modern Label punch to layer it. I also set that in place using Dimensionals.  And that was it.  SO quick and every SO simple!

Thank you SO much for visiting today,
Wanda

Tuesday, August 07, 2012

Bag Dispenser Weekend Project

 Now this would be a very fun Stamp Camp project.  You'd have to start collecting these containers way in advance.  Though you may be able to get your hands on a lot of them in a short time by contacting a local daycare provider and asking them to save them for you!  And new moms!  I'm sure you could collect them quickly if you really wanted to. It's amazing how quickly we can accomplish things if it is something we REALLY want to do! Isn't it? 


This is a very fun and easy project.  The trouble I had was with the color.  I needed to find a color that matched the lid of the container.  I went with Melon Mambo. It matches well enough so I was happy with that part.  I did take a piece of copier paper and wrapped it (the long way) around the container to make a pattern for it.  Then I traced it onto the back of the decorative paper.  Be sure you flip the pattern too!  I wrote "front" on the pattern so I would remember which side I needed to face the back of the decorative paper.  Once I got the paper cut I used the Sticky Strip to affix it to the container.  All but the final edge.  There I glued it in place.  And decorate it as you wish.  I used the computer to do the words and the Labels collection Framelets on the front.  I added some Baker's Twine and some button with Baker's Twine on them.  I didn't want to dress it up too much because I wasn't sure how much use and abuse the container was going to take so I just kept it simple.


For the bags on the inside you must take your bags and straighten them out, including the handles. Then fold them in half.  With the fold on the left lay the bag down and set another folded bag at the bottom of the first bag with the handles over the first bag.  I rolled the brownish bag up to the handle and then I just slid the white bag on the top edge of the brownish bag and I made sure the handles were on top of the white bag.  Then I rolled up the white bag and when I got to the handles of that bag I added another and so on.  When I got done (eyeing up how big the roll of bags was and how big the container is) I pulled out two of the bags from the center.  I felt I had rolled them too tight and I didn't want to screw up the whole concept I had going here of having a bag dispenser.  I took those two bags and rolled them up on the outside of the roll of bags. Then I put the roll in the dispenser and pushed the next handles through the hole in the lid of the dispenser and of course I had to pull one out.  Oh my goodness, it worked!!!! How cool is this? 

I found this idea on Pinterest (along with a million other things I pinned - but this is one I actually did!!).  I use to fold my bags to the size of a greeting card and put them in a tote (I know, how picky can you be about storing bags??? LOL) but now I will be folding them in half and just rolling them up until I need to refill the dispenser!!!  Now don't you think it would be a great Stamp Camp idea?  


Thank you SO much for visiting today,
Wanda

Monday, August 06, 2012

Blooming With Kindness

This card is LONG overdue.  I have been meaning to make a card and send it off to a friend for a while now and I want to say I keep putting it off but the truth is, I just get too busy doing other stuff that I forget.  So today I decided it was time to get that card made and sent off in the mail. 


I don't want my friend to think I've forgotten about her.  I have not.  I'm hoping that when she gets this card that she will know that I do think about her even though she doesn't hear from me.  I'm so awful lately about staying in touch with people.  But then again that works both ways, doesn't it?  They have not (for some reason or another) gotten back to me!  I don't usually look at it that way though!


Today I used the Blooming with Kindness set for the image on my card.  I just love that flower.  It looks like a peony to me. Maybe it is, I don't know and I don't really care what kind of flower it is, I just think it's pretty and that is all that matters to me!


At the bottom right I added a little "thinking of you" from the Teeny Tiny Wishes set.  I wanted to use the Petite Pairs set but there wasn't anything it that would fit the occasion.  I love the font in that set.  But this worked out just fine and I will be getting this in the mail tomorrow since the mail has already gone out for the day.  It was a very simple card to make too.  If I make another one I think I may use a bit more color!  But if you need a quick card, this is the way to go!

Thank you SO much for visiting today,
Wanda

Sunday, August 05, 2012

Just Believe Birthday Card

It wasn't my intentions to make a birthday card.  I really needed a thinking of you card but not one that would look like a sympathy card.  When I added the "Thinking of you" onto the card that is exactly what it looked like so I changed it to "Happy Birthday" and it just made the card look cheerier!!

I found this card at Vicki's "It's a Stamp Thing"  website.  The layout is from one of the Split Coast Challenge Sketches.  

I remember doing this sketch and it was a lot of fun but I didn't use this image.  When I ran across this card I knew I just had to copy it.  Mine did turn out a bit different but it's ok. I like how it ended up. It's still pretty and cheery!  


Now I'm off to make that "thinking of you" card I started out to make!

Thank you SO much for visiting today,
Wanda

Saturday, August 04, 2012

A Papillon Potpourri Birthday

I am having a lot of fun with the Papillon Potpourri set and the butterfly punch!  I just LOVE that punch.  It sure makes it easier to make the cards I want with butterflies on them because I know I don't have to cut them out by hand. I've had several cards I wanted to make but the thought of cutting out the image turned me off and it went by the wayside.  But with this set and the butterfly punch I can make all the beautiful butterfly cards I want and not have to cut a single one of them out!  Well, unless I want to incorporate the smaller butterflies in the set into my card.  But for now I don't!!!

This card was fun and easy to make.  I added an embossed Dotted background piece to the Whisper White card base.  Then I punched out three strips using the Ribbon Punch.  The hard part of that was getting a thin layer of Dimensionals scrap to the back of the strips. But I did manage.  And I did manage to get them just a bit crooked too but oh well, what's done is done and besides, it is a handmade card, isn't it???  I put those 3 strips onto a strip of white and then taped that to the front of the card.

The words came from the Teeny Tiny Wishes set.  I stamped them and then punched them out with the 1-3/8"" circle punch.  I punched out a Daffodil Delight scalloped circle and taped the words to it.  I did trim the bottom up a bit.  Why I don't know, it all was hidden behind the white strip.  I just wanted them to be evened up.  See how nice it looks on the card with the scalloped piece and circle evened up?  LOL  It didn't make a bit of difference, just me being picky!!! LOL

Then I stamped the butterfly using black StazOn ink.  I colored it in with markers and a blender pen and then I punched it out.  I taped it in place on the punched ribbon pieces and that was it.  Very easy, simple and clean!

Thank you SO much for visiting today,
Wanda

Friday, August 03, 2012

A Pretty Postage Birthday


Once again the card looks SO much prettier in person than in this photo.  There is a nice shadow at the bottom of the card from my camera.  I need to learn to always take the photos with the card standing erect instead of laying it down.  

I used the Pretty Postage set for the Happy Birthday cakes.  I used Raspberry Ripple, Daffodil Delight and Pacific Point.  The only pad of the three that is new is the Raspberry Ripple and it sure does make a difference in stamping between the old pads and the new ones.  It will take a long time before I get all new pads.  Most of mine are in mint condition so I can't justify replacing them.  I have plenty of ink, though the new ink will work on the old pads so that's not really an issue.  It is nice to use the new pads and I will replace the old ones as needed.


Back to my card.  The base of the card is Very Vanilla.  The decorative paper is from the Comfort Cafe pack.  I layered it on top of a piece of Pacific Point card stock.  The 2 punched stamp images were also set in place (with Dimensionals) on top of a piece of Pacific Point card stock.  And behind that on the bottom is a piece of the Raspberry Ripple punched out and set in place.


At the very bottom, the Happy Birthday is from the Perfectly Penned set.  I just need to write a few words on the inside and get this sent off to my sister-in-law for her birthday early next week.  WOW, can you believe it, I'm actually on time with a card?  I'm just as shocked as you are!!! LOL


Thank you SO much for visiting today,
Wanda

Thursday, August 02, 2012

Designer Buttons Push Pins Weekend Project


I actually had to look to see if the "things" were still called "thumb tacks."  And they were.  I didn't want to date myself here!!! LOL  

I saw this on Pinterest.  You just take buttons and glue them onto thumb tacks and you have VERY pretty decorative push pins for your bulletin boards. how cool is that?  Aren't they cute?

I used E-6000 glue to stick them to the thumb tacks.    It was easy to do too.  I just set a piece of card stock over a piece of thick Fun Foam.  Then I pushed a few thumb tacks through the paper and into the foam a bit.  Then I put a bit of E-6000 on the thumb tack and set the button on top.  I just let them dry over night and they were completely set and usable.  Aren't they pretty?  What a cute way to dress up a bulletin board, huh?  And SO simple.  You can add ribbons to the buttons and tie in a bow before gluing in place and you can even cut the prongs off brads and glue them to the center of the buttons for some added depth.  It's a great way to use up old buttons too.  Though these were not old but it's ok, they were pretty and fun!

Thank you SO much for visiting today,
Wanda

Wednesday, August 01, 2012

Dahlia Adornments Earrings Weekend Project

Today I thought I would play with the new in-color Dahlia Adornments.  When I started out I was thinking of something in the line of an embellished card but I ran across a pair of earring backs and thought the adornments would fit on them nicely and they sure did!  SO I headed for the drawer I keep my glues in and hoped that my E-6000 was not dried up!  It wasn't so off I went to my worktable.


Then the next issue was what color of earrings should I make?  All the colors in the container were so pretty but I only had one pair of earring backs!  So I opted for the Raspberry Ripple.  I know my sister is going to LOVE these!  I may even make some for the fall craft fair.  I have lots of flowers left from last catalog.  It's a great way to use them up!!  And it's not very expensive at all to do either!


You can click on the photo for a closer view.  I didn't have my big camera battery charged so I had to use the one on my phone so I wasn't able to get as close as I wanted to.  But you know what earring backs look like and you can see the flowers so I guess it worked out well enough!

You can get those earring backs at Bead Basics. Just give Jill a call at 763-717-4200 and she can get them sent out to you so you can get your earrings made for gifts and to sell.  They would also make a great Stamp Camp project, Customer Appreciation Gifts, Hostess Gifts and of course Craft Fairs.


These are fun and very easy to make too!

Thank you SO much for visiting, 
Wanda