Pin It

Thursday, September 28, 2023

Sending Cheers, Gingerbread Man Christmas Card, Stampin' Up! 2023

Hello and welcome to my blog. Today I have a fun Christmas card to share with you. I love gingerbread men and I can't resist making a card using them. Please read on to see how I made today's card.

The base of my card is a folded half-sheet of Basic White card stock. I cut a 4" x 5-1/4" piece of Designer Series Paper (DSP) from the "Joy of Christmas" 12" x 12" package. I taped that to the card base. Then I cut a 2" x 5-1/4" piece of DSP from the same package. I taped that to a 2-1/4" x  5-1/2" piece of Basic White card stock and I taped that to the front of the card. It's about 3/8" from the side edge of the card.

Three gingerbread men were stamped using Pecan Pie ink. I stamped the hearts using Real Red and the eyes and mouth using black Memento ink. I die cut them with the matching die from the "Sending Cheer" bundle. 

The words are from the same bundle and were stamped using Real Red ink. I punched them out using the "Double Oval" punch. And the layer behind it is a scrap piece of the same DSP that was used on the background. It was nice to use up that little scrap piece!  Working hard to use up my DSP! The ovals were taped together and Dimensionals were added to the back. I set them in place on the bottom right of the card about 1/8" from th eright side and 1/4" from the bottom.

The gingerbread men were set in place using Dimensionals. I did add a little dot of glue where they touched each other to make sure the limbs stayed down.  And the card was finished.  

Many times I notice something about the card once I see it posted on the page. I think it could use some bling. Some little rhinestones or tiny pearls. It needs something light in that dark green area. But all in all I do like how it turned out.

Thank you SO very much for taking your time to stop in and see today's Christmas card,
Wanda

Wednesday, September 27, 2023

Bag of Bones, Halloween Card, Stampin' Up! 2023

Hello and welcome to my blog.  Today I'm going to share a Halloween card with you using the "Bag of Bones" set. I just had to have this set. I'm not sure what I saw on the internet that drew my attention to it but I just knew I wanted it. When I sent my catalog order in it was not in stock. So I had to wait. And wait. And wait. I was finally able to order it, it arrived and now I'm ready to play. Please read on to see how I made today's card.

The base of the card is a folded half-sheet of Basic Black card stock, it opens on the right and the fold is on the left.

I cut a 4-1/8" x 5-1/8" piece of Cajun Craze card stock for the top layer. I textured it using the "Painted Texture" embossing folder. I didn't have anything spooky but I thought this would look good. It worked! I glued this to the card base. I also cut a 4" x 5-1/4" piece of Basic White card stock for the inside of the card. I taped that in place.

Next I die cut three stitched rectangles from the "Them Bones" 12" x 12" Designer Series Paper (DSP) package from the "Nested Essentials" die set.  I glued these pieces in place. I started with the top one, then the bottom one and the middle piece was added last. I just eyed it on those. But for those of you who like to measure, the top and the left side are about 3/8" from the edges. Same with the bottom and center piece.

The Basic Black shape was cut next, it's from the same "Nested Essentials" die set. I set that in place on the front of the card using Dimensionals.

I die cut the skeleton from a sheet of DSP from the "Them Bones" package. There's two sheets of skeletons, there's even dog and cat skeletons.  That should be fun to play with too! Before I die cut the skeleton I added a piece of double-sided sticky sheet to the back. I wanted this to be a sticker because I thought it would be a bit of a mess gluing it down. I set the skeleton in place and burnished it so it would stick nicely to the card stock. I should have waited to put the Basic Black piece down before adding the skeleton. It was kind of hard to press it in place with the Dimensionals under it.

The words are from the same set and were stamped using black Memento ink. I die cut them using the die from the "Stylish Shapes" set. I moved the die over so I'd have some room on the left for whatever I could think of later to add to it. I had nothing in mind at that moment. I saw that there were some bat dies in the bundle so I took a scrap piece of Basic Black card stock and die cut them. Three of them are on one die so it made that part quick. I added a dot of glue for each one and set them in place on the word piece. Dimensionals were used on the left side and some glue on the right to hold the piece down. 

This was a fun card to make and I hope to have a lot more fun with it before Halloween.

Thank you SO very much for taking your time to stop in and see today's Halloween card,
Wanda

Tuesday, September 26, 2023

Sending Cheer, Throughout The Year, Christmas Classics, Christmas Card, Stampin' Up!

Hello and welcome to my blog. Today I have another gingerbread boy card to share with you. Please read on to see how I made today's card.

The base of the card is a folded half-sheet of Basic White card stock. It opens on the right and the fold is on the left.

I cut a 4-1/8" x 5-3/8" piece of Pecan Pie card stock and a piece of Designer Series Paper (DSP) from the "Joy of Christmas" 12" x 12" package. I only bought one package of Christmas DSP so I can challenge myself to work with it and use it up so I will have nothing but scraps left that I won't give a second thought to recycling at the end of the catalog! Fingers crossed!!! Wish me luck. Ok, I had taped those two layers together and then taped that to the card base.

Next I took the die from the "Christmas Classics" bundle and cut it from a piece of Shaded Spruce card stock. Then I die cut the center piece from the same bundle using Basic White card stock. I had scrubbed on some Real Red ink using my Blending Brush. I thought the white was just a bit too bright.

The gingerbread boy is from the "Sending Cheer" set and was stamped using Pecan Pie ink on a piece of Basic White card stock. I stamped the eyes using black Memento ink and the hearts using Real Red card stock. 

The words are from the "Throughout The Year" set and were stamped on a 7/8" x 3-1/8" piece of Basic White card stock. I also scrubbed on some Real Red ink to tone it down a bit.

The card was now ready to assemble. I added Dimensionals behind the Shaded Spruce piece and then taped on the Basic White square. I set that piece in place on the upper part of the card.

Next the gingerbread boy was added using Dimensionals. I thought he should be added at an angle because the DSP was not straight (designed that way) and setting him that way made it not look so  obvious that it's not straight.  That left the upper left corner a bit empty looking so I added some holly sequins from the "Holly Gems & Sequins" container. 

The words were added using Dimensionals and a couple of colored rhinestones were added, they were also from the same  "Holly Gems & Sequins" container.

After looking at the card I thought the Shaded Spruce border could use some sprucing up so I added some rhinestones to it. I had colored them with my dark Real Red Blends pen but it wasn't dark enough so I used the dark Cherry Cobbler pen and I got the color I needed.  I know more is less but this really needed more!  And that was it, the card was done.

I like how it turned out and I did have fun making it.

Thank you SO very much for taking your time to stop in and see today's Christmas card,
Wanda

Monday, September 25, 2023

Sending Cheer, Christmas Classics, Christmas Card, Stampin' Up!

Hello and welcome to my blog. Today I have a Christmas card to share with you. I figure if I can make a few Christmas cards a week I should have enough to send out by the 1st of December. I don't like to stress over getting my cards out and I like to try to be prepared. There's enough stress associated with Christmas as it is and cards shouldn't be one of them. So here's my jump start on a Christmas card. Please read on to see how I made today's card.

The base of the card is a folded half-sheet of Basic White card stock. To save money I used Basic White for the base instead of a half-sheet of Pecan Pie card stock. I can now get 4 cards with the Pecan Pie card stock instead of 2. My card opens on the right and the fold is on the left.

I cut a 4-1/8" x 5-3/8" piece of Pecan Pie card stock for the layer. And then I cut a 3-7/8" x 5-1/8" piece of Designer Series Paper (DSP) from the "Joy of Christmas" 12" x 12" package. I taped the DSP to the Pecan Pie piece and then I taped that to the card base.

I also cut another piece of DSP from the same package, it's actually on the other side of the piece I just taped down. It measures 3-7/8" x 1-5/8".  I taped that to the center of the card. I just eyed it, I don't often measure to get it perfect, it's a handmade card after all.

The gingerbread boy is from the "Sending Cheer" bundle. I stamped him using Pecan Pie ink. I stamped his face using black Memento in and I stamped the buttons using the heart stamp in the set with Real Red ink. I die cut him with the matching die.

The words are from the "Christmas Classics" bundle and they were stamped using Real Red ink. I die cut them using the 11th die in the "Deckled Circles" die set. I sponged the edges using Garden Green ink and I set it aside.  I also cut another circle from the same "Deckled Circles" set using the 9th die. I sponged those edges using Real Red ink.

I set the large circle in place using Dimensionals. Then I added the gingerbread boy using Dimensionals. And the other circle was set in place using Dimenisonals but not on the are that was going to be overlapping the larger circle. 

I added some of the fun sequins from the "Loose Holly Gems & Sequins" package. I glued them in place. In the container there's some small red rhinestones so I glued one to each button on the gingerbread boy and the card was done.

This was such a fun card to make. I love gingerbread boys and this one is SO cute. 

Thank you SO very much for taking your time to stop in and see today's Christmas card,
Wanda

Sunday, September 24, 2023

Autumn Leaves, Thanksgiving or Thank You Card, Stampin' Up!

Hello and welcome to my blog. Today I have a card using the "Autumn Leaves" bundle. I found a similar card on Pinterest. What I liked about it was the die used on the Basic White piece and how the pieces were filled in. You can see the original card here. Please read on to see how I made the card.

The base of the card is a folded half-sheet of Cajun Craze card stock. It opens on the right and the fold is on the left.

I cut a 4" x 5-1/4" piece of Basic White card stock for the inside and another for the outside. I taped one of them to the inside.

Next I took the die from the "Split Card Textured" die set and lined it up on the left and top. I had saved some of the pieces and colored them with my Cajun Craze marker. I was going to be clever. Very clever since the color was supposed to be Crushed Curry. So after some other issued I ended up die cutting a scrap piece of Crushed Curry so I had enough for my needs. After cutting the Basic White piece, I stamped the words from the "Autumn Leaves" set using Cajun Craze ink. Then I taped the solid part of the white and I used glue on the die cut part. I had started using tape on my silicone mat and made a mess. I had a lot of tape removal to tend to before I could go any further.  I glued the top part by spreading some glue on a piece of "paper" that had once held my Dimensionals. I use those as a mat sometimes. I spread the glue around and then pressed the die cut part into it. Then I set the piece in place on the front of the card.

The leaf was stamped and die cut next. I used Crushed Curry ink and then took my Cajun Craze cube and touched around the edges to give them a bit more color. I stamped the leaf veins using Pecan Pie ink and then I die cut the leaf. 

The smaller leaves were stamped using Garden Green ink and then die cut. They are one piece so I cut them apart. I set the larger leaf in place using Dimensionals and I glued the smaller leaves on.

I took a little bit of glue and added the Crushed Curry pieces in the grid and the card was done.

This was a fun and fairly quick card to make. If I were to make another one I would use a double-sided sticky sheet and make the piece a sticker to avoid the mess of taping and gluing.

Thank you SO much for taking your time to stop in and see today's Thanksgiving/Thank You card,
Wanda

Saturday, September 23, 2023

Autumn Leaves, Thanksgiving or Thank You Card, Stampin' Up! 2023

Hello and welcome to my blog. Today I have a card to share with you using the "Autumn Leaves" bundle. Please read on to see how I made the card.

The base of the card is a folded half-sheet of Basic White card stock. This card opens on the right and the fold is on the left.

I cut a 4" x 5-1/4" piece of Basic White and textured it using the "Exposed Brick" embossing folder. I glued this piece to the front of the card.

Next, using the 9th circle in the "Deckled Circles" die set I cut a Basic White circle. I added Dimensionals to the back and centered the piece as best as I could by eyeing it.

The leaf from the "Autumn Leaves" set was stamped next using Crushed Curry ink. I took my Cajun Craze in spot and touched around the edges to give them a bit more texture. Then I stamped the leaf veins using Pecan Pie ink. I die cut the leaf using the matching die in the bundle. 

I also die cut two Basic White veins from the die set, they were the smallest veins in the set and I cut three little Basic White leaves.

The words are from the same set and were stamped using Pecan Pie ink on a scrap piece of Basic White card stock. I die cut them with the matching die from the bundle.

To assemble the rest of the card I set the leaf in place using Dimensionals. Then I set the word piece in place by adding two Dimensionals on the right side and glue on the left side. I added glue to the Basic White pieces and tucked them in one at a time under the word piece.

And for a final touch I added three of the green "Blooming Pearls" pearls. And the card was done.

This was a fun card and would also make a great fall masculine birthday card.

Thank you SO very much for taking your time to stop in and see today's Thanksgiving/Thank You card,
Wanda

Friday, September 22, 2023

Christmas Classics, Christmas Card, Stampin' Up! 2023

Hello and welcome to my blog. Today I have a Christmas card to share with you. I found it on Pinterest. You can see the original card here. Please read on to see how I made this card.

The base of my card is a folded half-sheet of Basic White card stock. I cut a 4-1/8" x 5-3/8" piece of Cherry Cobbler for the layer. Before taping it on top of the card base I cut out several berries using the die from the matching "Christmas Classics" bundle. Some of the berries are double, stuck together so I did trim a few of them for the smaller berries on the main die. I had cut out 8 sets and I figured I would just save any extra. I pop my extras in little baggies and keep them inside the stamp sets. You never know when you'll use them.

Next I textured a 3-7/8" x 5-1/8" piece of Basic White card stock. I textured it using the new "Snowflake Sky" embossing folder. I glued that to the Cherry Cobbler piece and that piece was then taped to the Basic White card base.

Then I took a piece of Shaded Spruce card stock and die cut the holly word piece. I die cut two leafy branch pieces using gold foil paper.  

The words are from the same "Christmas Classics" stamp set and were stamped on a scrap piece of Basic White card stock using Cherry Cobbler ink. I die cut them out using the matching die from the bundle. I taped them to the Shaded Spruce piece. Dimensionals were added to the back and the piece was centered on the card. I just eyed it.

I added a little bit of glue to the berries on the Shaded Spruce piece and set them in place. A few of them needed to be trimmed down and I used the double ones for that. Then I glued in the gold foil leafy branches.  

For a final touch I used my Wink of Stella pen and added some sparkle on the berries.

This was a fun and quick card to make. It didn't take long and I could see myself making these for our holiday cards this year.

Thank you SO very much for taking your time to stop in and see today's Christmas Card, 
Wanda


Thursday, September 21, 2023

Sending Cheer, Christmas Tags, Stampin' Up! 2023

Hello and welcome to my blog. Today I decided to play with the new "Sending Cheer" stamp set. I thought I'd try a gift tag. I usually just purchase them from the Dollar Tree because they are 99.999% tossed out. I will admit I have saved some gift tags because I thought they were cute (they were NOT from the dollar store!) That's why I didn't say 100%! LOL  But today I thought I'd take a chance at that .001% and make a tag. I will probably make a few more and put them on special packages but ones for the grandkids will be from the dollar store.  Please read on to see how I made today's tag.

The tag is punched out using the die from the "Sending Cheer" bundle. I cut a 2-3/8" x 1-5/8" piece of Basic White card stock for the front of the tag. I had originally cut a Basic White tag but it was too white for the piece and looked a bit blah.

Next I stamped the cute gingerbread boy using Pecan Pie ink on a scrap piece of Basic White card stock. The hearts were lined up and stamped using Real Red ink and the eyes and mouth were stamped using black Memento ink. I die cut him using the matching die.

I set the pieces together on my worktable so I could see where to stamp the "to" and "from".  I did cut my "to" and "from" apart so they are no longer one stamp. I thought they were just too close together. What if someone has a longer name or what if the gift is for more than one person. It always seems like there's more room to write on the "from" part of tags. So cutting it made it easier to place wherever you want on your tags. After seeing where I wanted them to go I stamped them using black Memento ink.

Next I taped the stamped "to" and "from" piece to the Real Red tag. Then I set the gingerbread boy on to to see where it will look the best. I held it firmly and turned it over.  I slit it a little bit away from the edge and I lightly drew a pencil line. I did this so I would know where to not put any glue or tape. I used glue for mine because I wanted those few seconds of movement to get him exactly where I wanted him. Once the gingerbread boy was set in place the tag was done. 

This was such a quick tag to make. Causing me to rethink the homemade tags thing this year even with the 99.999% in mind!

Thank you SO very much for taking your time to stop in and see today's Christmas tag,
Wanda

Wednesday, September 20, 2023

Pick of the Patch, Halloween Card, Stampin' Up!

Hello and welcome to my blog. Today I have a fun Halloween card to share with you. Please read on to see how I made the card.

The base of my card is a folded half-sheet of Granny Apple Green card stock. It opens on the right and the fold is on the left. I cut a 4" x 5-1/4" piece of Basic White card stock and taped it to the inside.

Next I cut a 4" x 5-1/4' piece of Crushed Curry card stock and textured it using the "Painted Texture" embossing folder. I glued that to the Granny Apple Green card base.

The scattered pumpkins background paper was done by using the "One Sheet Wonder" technique. You can click here to see more items I've made using this technique. If you've never done this technique, it's fun and depending on what you are going to be doing it can either be quick or take a while. Mine took a while because I stamped off and then misted the stamp and then stamped onto my card stock. I did do a full 8-1/2" x 11" sheet of Basic White card stock. The first thing I did was to take my Blending Brush and lightly scrub on some Pumpkin Pie and Garden Green ink. Then the pumpkins were added, the stems followed and don't forget about the curly greens. All of these items were stamped off once, spritzed with water and stamped on the card stock. Once it was done I gave the full sheet a bit of a spritz (about 8" away). I let it dry. It did curl up a bit but I wasn't concerned because I figured I would just glue the card stock and it would lay flat.

I cut a piece of my pumpkin sheet to measure 2" x 4-3/4". The Pumpkin Pie card stock layer behind it was cut at 2-1/4" x 5". I glued the stamped piece to the Pumpkin Pie piece. I then glued this to the textured Crushed Curry piece.

The pumpkins were stamped using Pumpkin Pie ink on the larger one and Cajun Craze on the smaller one. I had made these a while ago and they were in a little baggie inside my stamp set for future use and safe keeping. I stamped one of each of the leaves in the set using Garden Green. I fussy cut them and then took my Garden Green marker and traced around them to hide any white showing from not so perfect cutting. The pumpkins had been punched out using the matching punch. I also stamped two stems using Pecan Pie ink and punched them out too. I glued the pieces to the tops of the pumpkins. I made a little slit in the larger leaf and slipped it under the stem of the larger pumpkin.

Using Garden Green ink on Basic White card stock, I stamped the words from the same "Pick of the Patch" set. I trimmed it to measure 3/4" x 2". The Pumpkin Pie layer was cut at 1" x 2-1/4" and the Granny Apple Green layer was cut at 1-1/4" x 2-1/2". I taped these layers together. Then the piece was set in place on the front of the card using Dimensionals.

The pumpkins were added using glue on the bottom part and Dimenisonals on the upper part. I made sure I got a Dimensional to stick where the leaves and stems were to help hold them in place and to support them. And that was it.  

Even though it did take me a while to make the background piece, it was worth it and I still have a lot of that sheet left to play with.

Thank you SO very much for taking your time to stop in and see today's Halloween card,
Wanda


Tuesday, September 19, 2023

Darling Details, Happiness Abounds, Give It A Whirl, Wedding Card, Stampin' Up!

Hello and welcome to my blog. Today I have an easy wedding card to share with you. Please read on to see how I made this card.

The base of the card is a folded half-sheet of Basic White card stock. It opens on the right and the fold is on the left. 

I cut a 4" x 5-1/4" piece of Basic White card stock and taped it to the front of the card base. Then I cut another piece of Basic White card stock at 3-3/4" x 5".  I textured this piece by using my scoring board. I turned the piece over and going from right to left I started scoring it at 3-1/4" and finished at 1-5/8", making 14 scored lines on the card stock. 

Next I die cut the flowers from the "Darling Details" bundle using Basic White card stock. I die cut two of the long flowers and one of the shorter bunch. 

The circle and hearts are from the "Give it a Whirl" die set and were cut using Basic White card stock. Before I cut the hearts I textured them using the "Exposed Brick" embossing folder. I tried to cover up as much of the brick as possible so I would mostly have bumpy texture. I glued the two hearts together. And the circle piece I ended up taping the circle back on using scotch tape. If I were to make another one I would see if the "Layering Circled" die set would have one that would cover most of the back of that piece so I could just glue it instead of taping it.

The words are from the "Happiness Abounds" set and were stamped on a scrap piece of Basic White card stock using Smoky Slate ink. I trimmed them to measure 3-1/4" x 1/2".

I was now ready to assemble the card. Dimensionals were used on the back of the scored piece and it was set in place on the front of the card base. 

The circle was added next. Dimensionals were used on the back of it but I didn't press it in place because I needed to slip the die cut flower pieces under it. I had used a lot of Dimensionals on the back so I knew that the flower pieces would stick and the circle would stay in place too.

The hearts were added next using more Dimensionals. And then the word were added using even more Dimensionals!

I added a few pearls and the card was done.

This was a very easy wedding card to make and I do like how it turned out.

Thank you SO very much for taking your time to stop in and see today's wedding card,
Wanda

Monday, September 18, 2023

Pick of the Patch, Timeless Arrangements, Halloween Card, Stampin' Up! 2023

Hello and welcome to my blog. Today I have a Halloween card to share with you using the "Pick of the Patch" Halloween stamp set. I don't usually buy Halloween stamp sets but I picked this one because of the pumpkins that I can use on fall, fall birthday, and Thanksgiving cards. So it's a bit more versatile than the other set I bought!  We'll discuss that one this weekend!! Please read on to see how I made today's card.

The base of my card is a folded half-sheet of Basic White card stock. I took a 4-1/4" x 5-1/2" piece of Cajun Craze card stock and I textured it using the "Exposed Brick" embossing folder. I glued this piece to the card base.

The cat on the headstone image is from a piece of Designer Series Paper (DSP) 12" x 12"package. It was on sheet with 8 images to have fun with.  I chose this one. Oh the DSP is called "Them Bones". 

The Basic Black layer behind the DSP piece was cut at 3-1/4" x 5-1/8".  The DSP pretty much measured itself out by cutting on the dividing lines from one image to the other. But I did measure it anyway because I always include measurements on the cards I make so you can easily make them. That DSP piece measures. 4-7/8" x 3". I taped the DSP to the Basic Black piece and then I glued that in place on the front of the card.

I stamped a pumpkin and leaves from the "Pick of the Patch" using Pumpkin Pie and Garden Green inks. I fussy cut the leaves and I had punched the pumpkin using the matching punch. Then I sponged on some Pumpkin Pie ink around the pumpkin and for the leaves I took my Garden Green marker and traced around them to hide any white card stock showing after I had fussy cut them. I'm not a perfect fussy cutter but using the marker around the edges it sure looks like I am.  My secret I'm sharing with you! 

The pumpkin needed a face. I stamped that using black Memento ink. Then I added a larger leaf in the back and after cutting the stem off I glued on the smaller leaf on the front. The pumpkin was then set in place on the front of the card using Dimensionals.

The words are from the same "Pick of the Patch" set using black Memento ink on a scrap piece of Basic White card stock. I used a die from the "Timeless Arrangements" die set. I took the die and after cutting the words I moved it over on the word piece so I could shorten it. I tried to line up the holes but I didn't get it right. But it's close enough and who would know it unless I pointed it out. And as always, I share the good, the bad, and the ugly with you!! Mistakes and all. I took my Pumpkin Pie ink and sponged the edges, and that hid the double dots a bit too. Oh and one thing nice about the double dots, it's right in the middle of the piece equally.  I set the word piece in place using Dimensionals. I thought the piece could use something more so I added one of the larger leaves from the "Pick of the Patch" set that I had fussy cut along with the other leaves for the pumpkin. You can never have too many leaves when it comes to making Halloween and fall cards! I had glued that leaf in place and the card was done.

This was a very fun and super quick card to make. I love playing with fun sheets of DSP!

Thank you SO very much for taking your time to stop in and see today's Halloween card,
Wanda


Sunday, September 17, 2023

Pick of the Patch, Them Bones, Halloween Card, Stampin' Up! 2023

Hello and welcome to my blog. New stuff!!!  My order arrived and today I have a fun Halloween card to share with you.  Please read on to see how I made today's card.

The base of my card is a folded half-sheet of Basic Black card stock. It opens on the right and the fold is on the left. I cut a 4" x 5-1/4" piece of Basic White card stock and taped it to the inside of the card.

Next I cut a 4" x 5-1/4" piece of Designer Series Paper (DSP) from the "Them Bones" 12" x 12"package. I taped that to the front of the card.

I used the "Polaroid" technique to make this card. I have used this technique many times. Click here to see the cards I made using this technique.  I cut my pieces for the "Polaroid" technique as follows. The layer was cut at 3-1/8" x 3-7/8" and the Basic White piece was cut at 3" x 3-3/4".  I took my Blending Brushes and scrubbed on some Pumpkin Pie ink and Garden Green ink. Then I added some dots using the image from the "Pick of the Patch" set. I used Smoky Slate ink that was stamped off once. 

Next I took the second largest stitched square from the "Stylish Shapes" die set and eyed it so it looked even on the left, top, and right. The words from the same "Pick of the Patch" were stamped next using black Memento ink.  

The background inside the "Polaroid" piece from the same DSP was cut at 3" x 3-3/4". It's the backside of the large background sheet that was used for the base of the card. I taped the DSP to the Basic White piece, making sure it didn't show on any sides. Then I taped that to the Basic Black piece.

The pumpkins were stamped using Pumpkin Pie ink on the two larger ones and Cajun Craze on the smaller one. I punched out the matching punch. The stems were stamped using Pecan Pie ink and punched out.  And the leaves were stamped using Garden Green ink and the two for the larger pumpkins were punched out. I ended up fussy cutting them because I didn't like the white showing. One fun tip here, when you fussy cut you don't have to be concerned about some white showing. I just take the matching marker and set it on some scrap paper and trace it. Then all of those white lines are gone and you look like you are the most perfect fussy cutter!!  

I also stamped a crow and fussy cut it too, tracing the edges like I did for the leaves and stems.

I was now ready to add my stamped images. I taped the two pumpkins in the background first. I added their stems and leaves. For the larger pumpkin I glued the stem on and then the leaf. Small Dimensionals were added to the back I set it in place on the front of the card.

Dimensionals were added to the back of the Polaroid piece and it was set in place on the front of the card. And that was it, the card was done.

This was a very fun card to make. I have always liked playing with the "Polaroid" technique. It's easy and fun.

Thank you SO very much for taking your time to stop in and see today's Halloween card,
Wanda

Saturday, September 16, 2023

Darling Details, Layering Leaves, Thinking of You Card, Stampin' Up!

Hello and welcome to my blog. Today I'm going to share with you a card that I found on Pinterest. You can see the original card here.  When I saw it I knew I had to make one.  There was a lot more to this card than you realize.  All the pieces and assembly. I was just in awe of the beauty of the card and didn't think beyond that.  But I went on to make it and I'm glad I did. I didn't see any measurements for the original card so please read on to see how I made this card.

The base of the card is a folded half-sheet of Pretty Peacock card stock. My card opens on the bottom and the fold is at the top. Mine is cut this way because I found it in my Lost Lagoon package of paper already cut and folded. If you cut your card stock like this, cut the sheet in half on the short side so it measures 4-1/4" x 11".

Now comes all of the die cutting. First I die cut the Lost Lagoon card stock to measure 4" x 5-1/4". I lined up the die from the "Darling Details" bundle. Then after cleaning out all of those dots from the die I die cut a Pool Party piece. I had cut that one to measure 3-1/2" x 4-3/4". And again after cleaning out all of those dots from the die cut I then die cut a piece of Basic White for the inside word piece. I did cut it nicely so I could use the other part on a future card.

All of the flowers were stamped using Crushed Curry ink. I stamped off once on the flowers and then used the ink full strength for the outline details. The leaves were stamped using Granny Apple Green ink and stamped the same way as the flowers, stamping off once for the solid part and full strength for the details. All of the pieces were die cut. I also die cut the Granny Apple Green and Crushed Curry card stock long floral sprigs.  Typing this out seems like it's shorter than all the stamping and die cutting I did. It does take a little while to do all of this. But like I said, it's SO worth it.

I didn't want to use the same words as on the original card. Mine are from the "Layering Leaves" set and were stamped using Lost Lagoon ink. 

Now let's begin the assembling. The first thing I did was I glued the Pool Party piece to the Lost Lagoon piece. Then I glued that to the front of the card. I added the Basic White piece that the words are stamped on. The small flowers were added first. Then the card stock sprigs. The large flower was set in place using Dimensionals. I didn't press down firmly on them because I am not sure where the leaves are going to go and I wanted to make sure that the leaved will be able to go under it. I cut off one leaf from the cluster and tucked it behind the upper right flower with a little bit of glue behind it. Then the rest of the leaves from that piece were tucked under the left side of the large flower. And the group of three leaves were added to the lower right of the large flower.  

A 4" x 5-1/4" piece of Basic White card stock was added to the inside and the card was done.

This is such a pretty card and I love the color combination.  I really can't see myself making another one like this though, it did take a lot of time.

Thank you SO very much for taking your time to stop in and see today's thinking of you card,
Wanda


Friday, September 15, 2023

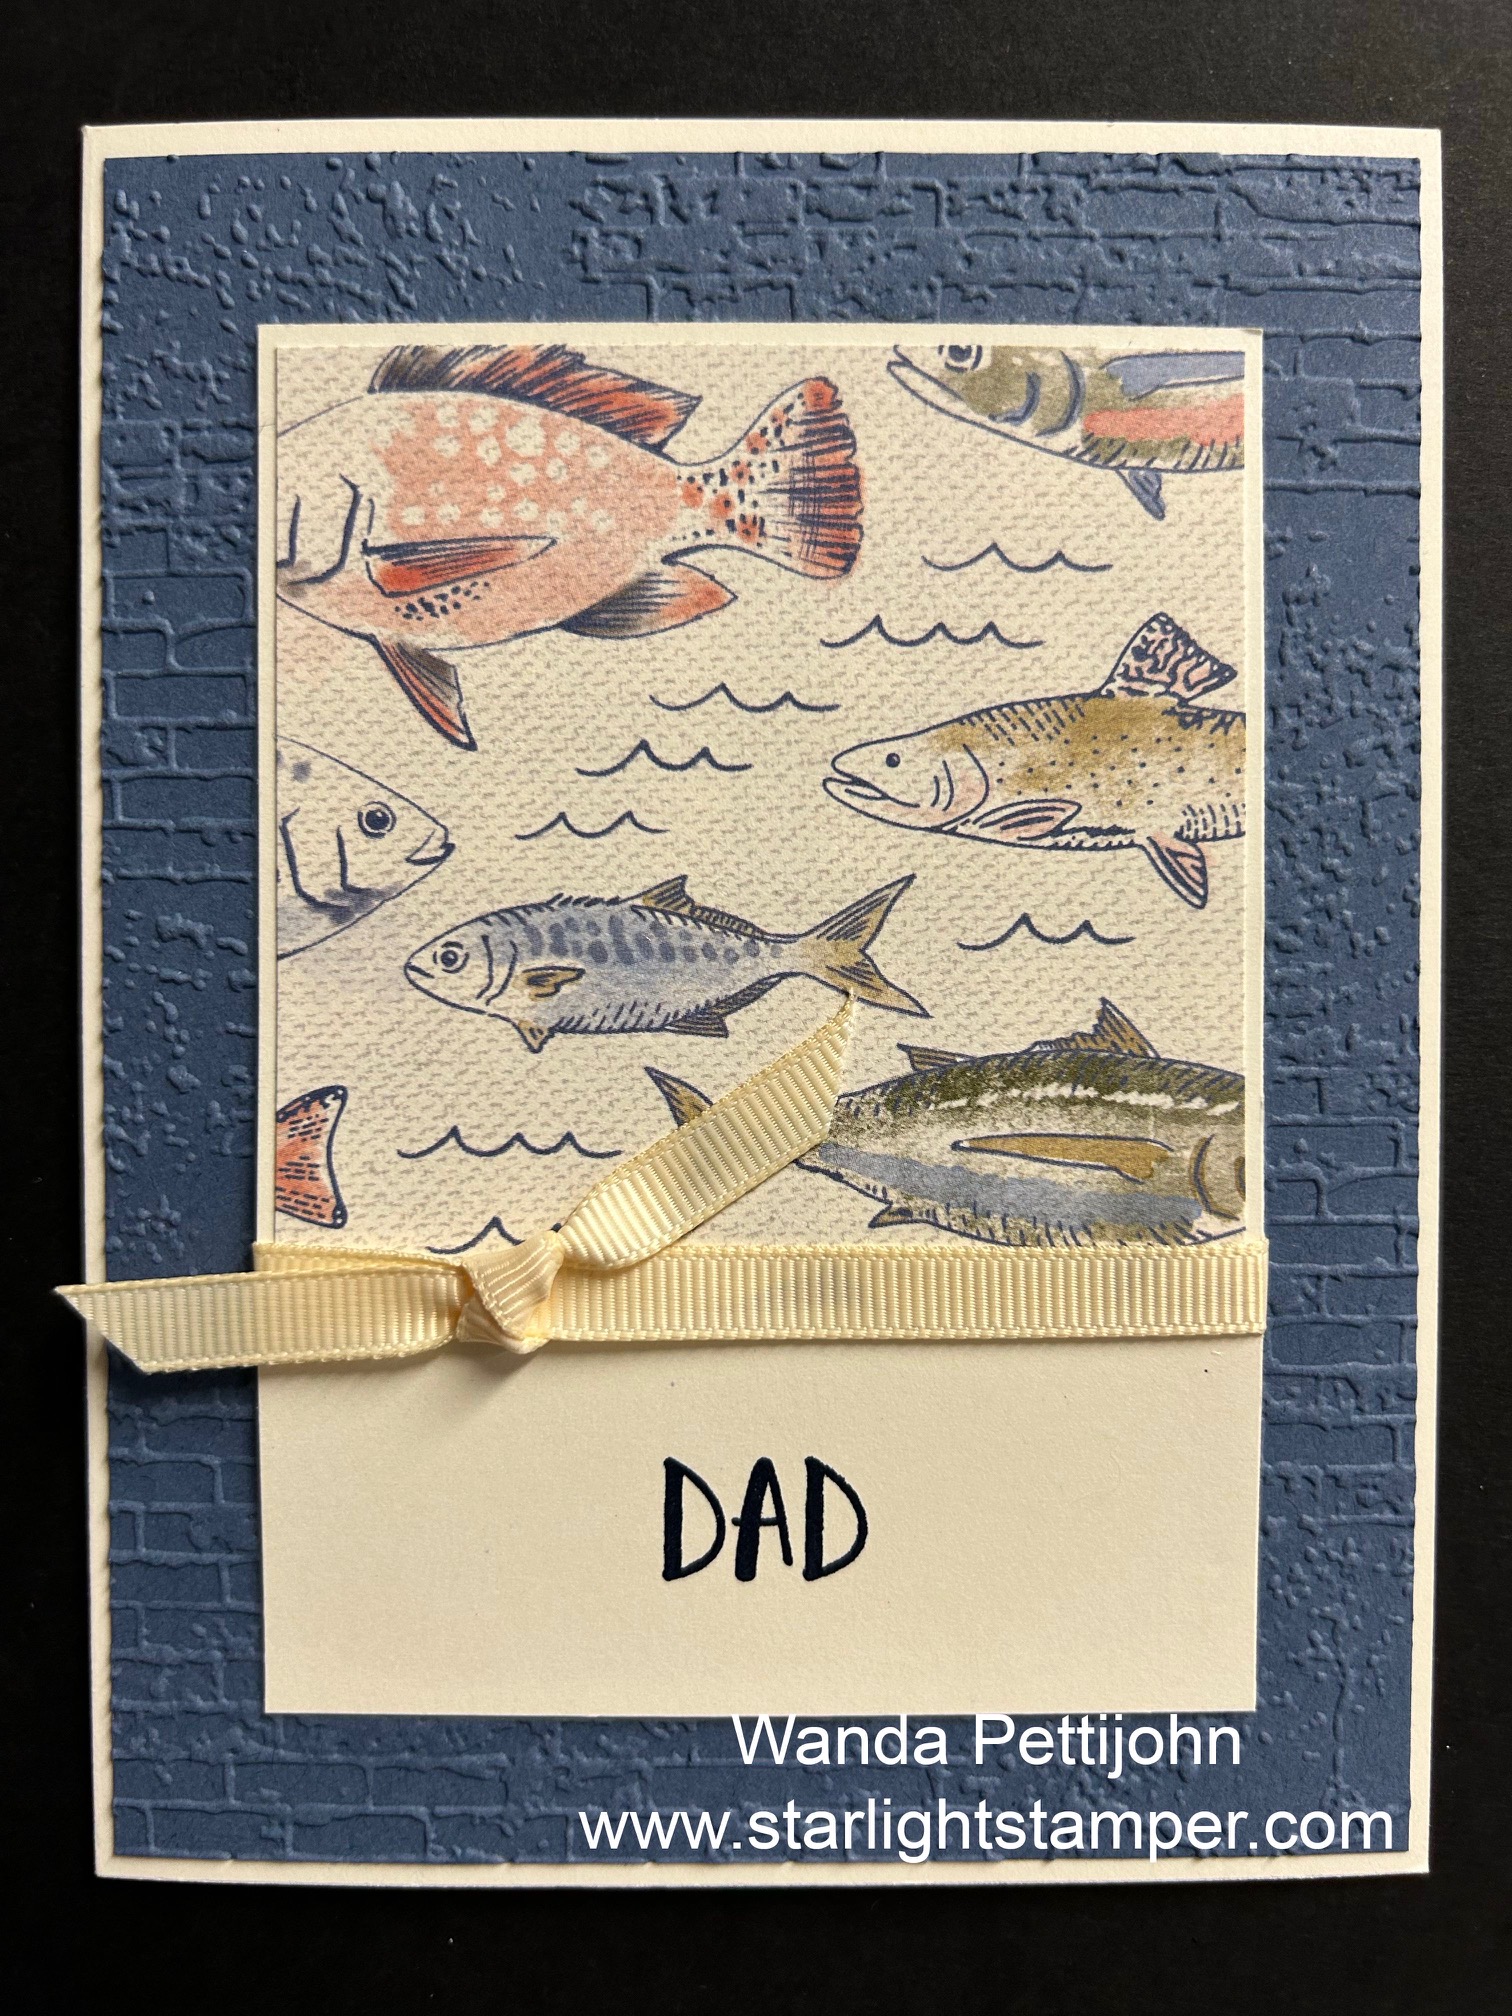
Let's Go Fishing, Best Family Every, Dad Birthday or Father's Day Card, Stampin' Up!

Hello and welcome to my blog. Today I'm going to share another card with you using the same layout as yesterday. You can click here to see that card. I just wanted to show you how versatile this layout is. Please read on to see how I made today's card.

The base of my card is a folded half-sheet of Very Vanilla card stock. It opens on the right and the fold is on the left.

I cut a 4-1/8" x 5-3/8" piece of Misty Moonlight card stock and textured it using the "Exposed Brick" embossing folder. I glued the piece in place on the top of the card base.

Next I cut the Very Vanilla piece to measure 4-1/4" x 3-1/8".  The Designer Series Paper (DSP) I used is from the "Let's Go Fishing" 12" x 12" package and was cut at 3" x 3".  I taped that to the Very Vanilla piece. Like I had stated in my post yesterday, if you are not sure about the stamping of your words (anything can happen) you can add a little bit of tape to the center of the DSP and set it on top of the piece. If you mess up the stamping you can just remove the DSP and cut another piece of card stock. 

The "DAD" is from the "Best Family Ever" set and were stamped using Night of Navy ink.  Once the words were stamped I took a 4-1/2" piece of very old SO retired Very Vanilla ribbon and taped the ends to the back. I used snail tape along the area where the DSP edge is that you can see through on the backside. The ribbon ends were set in place and then taped down with scotch tape. I stayed away from the edges so I could have room for glue. The piece needs to be glued to the embossed card stock. Tape just doesn't make enough contact to stick well so I just use glue and I know it's going to stay.

I took a 4" piece of ribbon and slipped one end under the taped ribbon and a knot was tied. And the card was done.

See, super quick and easy! Oh and a very versatile layout!

Thank you SO very much for taking your time to stop in and see today's "dad" card,
Wanda