Pin It

Sunday, December 06, 2009

Oh My!

That was all I could say when I was working on this card and when I finished it. I struggled with this card. As most of you know, I am a "layers" person. I LOVE cards with LOTS of layers. This one didn't fit that bill. and as I worked on it all I kept saying is "Oh my." Nothing on it was turning out the way I wanted it to and the more I did to it the uglier it got. But I decided to post my ugly card on here anyway so you all could see that not all of my cards are beautiful or perfect!!! I like you struggle with designs and layouts too.

And seriously, I am almost ashamed to show you all this card!!! It's just awful!! My intent here was to make a simple card. Not a simply ugly card! I don't have much to say about it either!!! LOL

I did use the Stampin' Up! "Delightful Decorations" set and the punch that goes with it. I stamped the image on white card stock and used white embossing powder. After punching it out I sponged the bulb with Real Red ink.

The background on the Old Olive card stock is done using VersaMark and the "Sparkle and Shine" jumbo wheel.

The paper is from the "Merry Moments" package. I have used up almost all of my first pack and a few from the second pack. Why is there always one design in a package that you think is the absolute best and you use it up, wishing the whole time that the whole package was full of that design only??? Like I've said lately, I have quit hoarding my decorative papers and in using them I sometimes wish I had hoarded a piece of it!!! It's a tough addiction to totally overcome but I am on the road to recovery!!! LOL

I do thank you for stopping by and having a look at this card. You are permitted to say "Oh My" too!!! LOL
Thank you SO much for visiting today,
Wanda

Saturday, December 05, 2009

Blog Candy! Just Squeeking by Here!

I nearly forgot this weeks Blog Candy for the New Year's Day post! I am not sure what time Blogger does it's big mail post but I'm really hoping I'm getting this in before it all goes out. If not it will be posted on Sunday morning. Well, it's not like it HAS to be posted tonight. New Year's Day is a ways off yet. Shhhh, I know it's coming up fast but I don't want to think about it. I'm trying to get done with all of my Christmas "stuff." The shopping, the baking, the wrapping, the house decorating oh and let's not talk about the Christmas cards. I'm still working on them!!! I'm hoping to find some time to finish them up tomorrow!!!

Anyway the blog candy here is a package of olive colored eyelets and a container of Hero Arts Valentine's Day stamps. These stamps measure 3/4" x 3/4" and there are 9 in the container. The lucky winner will receive these in plenty of time to play with them on their Valentine's Day cards!!!

So here is today's blog candy. If you'd like to see what the other items are that will be in the box sent to one lucky person just click here. With this one there are 5 weeks worth so far!! A few more to go before the "BIG" post and drawing!

There will be a quiz!!! LOL
Have a great day, Wanda

Sparkle and Shine Bulbs Card

Talk about a quick and simple card to make. I used the new Stampin' Up! "Sparkle and Shine" jumbo wheel. I LOVE wheels. This one was perfect for a quick and simple card.

I used the Embossing Buddy on the Real Red card stock. I didn't want any of that white embossing powder sticking where I didn't want it to. I got a few grains here and there but not too bad. I had an empty cartridge for the wheel so I inked it up with VersaMark. If I had to make a lot of these cards it would be VERY easy to do with the cartridge in the wheel. I then embossed it in white.

I layered the red piece (cut 4" x 3") on top of a piece of white card stock (cut 4-1/8" x 5-3/8").

I stamped the "Christmas Greeting" on using Black ink. The words came from the Stampin' Up! "Grateful Greetings" set.

Before I taped the white layer on I added the ribbon and tied a knot on. When I add my ribbon like this I cut a piece about 6" long and I tape the edges on the back. Then I slip a piece of ribbon on and tie it in a knot. Doing the ribbon this way allows it to lay nicer and it's not as bulky because there is only one knot in it. Plus it allows you to slide the knot where you want it. I LOVE that part the most!!!

If you need a quick Christmas card, this is the way to go!

Thank you SO much for visiting today,
Wanda

Friday, December 04, 2009

Die Cut Suitcase

Isn't this little case just adorable? It is made using the Sizzix "Bag, Suitcase" die. It measures 3-3/4" wide by 2-1/2" tall by 1-3/8" deep. It's a pretty nice size to work with. It should hold a couple of fun size Snicker's bars. I didn't put anything in mine yet. I had other plans for it but once I got it assembled it didn't open the way I thought it would so I will be going to plan "B."

These will be a lot of fun to put bath salts in for the fall craft fairs and a perfect way to use up scraps of decorative papers. Or papers you've been hoarding!!! The paper here came from the Stampin' Up! "Night and Day" package. This particular piece just screamed for me to put it on this suitcase!!! I'll post more when I make them using different colors of card stock and decorative papers.

These would also be fun for Stamp Camps, Make N Takes, Hostess Appreciation Gifts, Customer Appreciation Gifts and Craft Fairs!

Thank you SO much for visiting today,
Wanda

Thursday, December 03, 2009

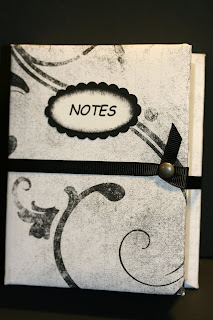
Altered Notepaper Holder Weekend Project

I had purchased these notepaper holders at Target a while back. Every now and then they have these in their Dollar Spot and the last time they had them I picked up a bunch! I had them in a room where they just do NOT belong and I'm trying my hardest to get that room organized again. It's coming along slowly but at least it's coming along. Hopefully by the first of the year it will be back to normal or at least close to it!! There is nothing "normal" in this house (including me!!!) LOL

Ok, back to this cute note paper holder. I took out the paper. It was blue with the guy on the right on one part of it. I will be cutting that part of the paper off and making a spiral notebook with it in the future. And I also just use some of the pages for little notes to myself. I then took the white box part off. I did have to pry it up a bit. I took my little 6" metal ruler and slid it under it and the glue gave way and the box lifted off. It did rip the paper backing a bit but it doesn't matter because it's all being covered up by the paper you add.

Now the REALLY nice thing about these holders is the part that actually holds the paper is white so I didn't have to do a thing to it. The ones I got last time were colored and I had to cover them with white card stock.

Once I got the box part out I took my decorative paper and covered the outside of the box. I used about a half sheet of 12" x 12" paper. I glued the paper on with a glue stick. It covered the area well and didn't dry before I was ready to set the paper in place. Glue sticks allow you to move the paper around a bit before it sets up. The paper is from the Stampin' Up! "Night and Day" package. The piece I used had a wonderful design in it so I didn't need to add much for embellishments. I let the paper speak for itself here.

On the inside I had added a piece of white copier paper to cover the seams and edges of the decorative paper. Again I used the glue stick on the paper to hold it in place. While that was setting up I added the "notes" oval and oval scallop. The word "notes" came from a stamp I had made at VistaPrint.

I eyed the cover and found what I thought to be close enough to "center" and punched a hole with the Crop-a-dial. I inserted a large brad through a piece of 1/4" black grosgrain ribbon and then through the hole I made and through the other end of the grosgrain ribbon. I left about a half inch of a tail on the ribbon. I wanted to make sure I had enough for the brand to go through. I did use the piercing tool on the ribbon first. The brads are just not sharp enough to poke through the ribbon. Once the brad was through the ribbon I opened up the prongs to set the brad in place.

Next I glued the box part back in place. I used tacky glue here. I needed something stronger than the glue stick. Then I took the ribbon and went around the back of the holder and brought the free end to the front. I slipped it under the brad to hold it down. This keeps the box shut and secure enough to keep the cover closed.

I did add new paper to the box. I cut some white copier paper the same size of the paper that came from inside the box. It was simple enough to do! I'm not a big fan of cutting copier paper but if you do a little at a time it doesn't seem like such a chore. And like I said I bought a bunch of these so I will be making them up for the craft fairs I will be in next fall. I have PLENTY of time to cut copier paper!!! LOL

I find altering items a very fun thing to do and when they turn out great it makes them even more fun to do!!

These are not only great for Craft Fairs but for a Make N Take, Customer Appreciation Gifts, Hostess Appreciation Gifts and even a fun Stamp Camp project.

Thank you every SO much for visiting my blog today,
Wanda

Wednesday, December 02, 2009

Wednesday Sketch Challenge

This is a VERY special Sketch Challenge for me because I was asked by Roxie (the gal who is head of the SplitCoastStampers Sketch Challenge) to make the extra sample for the sketch. Well, I could hardly say no, it was such an honor to be asked!! And seriously you could have knocked me over with a feather and there was no way of wiping the smile off my face when I got the message from Roxie! I wanted to wake hubby up and tell him but I didn't dare. And the nerve of him the next day, he was stuck in traffic and came home later than normal!!! I couldn't wait to tell him and show him my card! I know, I'm silly but that's ok. There are worse things to be!!! LOL

SO the card I made was the Santa's sleigh one. The image came from the Stampin' Up! "Wandering Words" set. I've used this image a few other times. I have yet to use the one with the hearts on it but then again it looks more like an image you would use for Valentine's Day so I will be using it shortly after Christmas!

Anyway, my card was done on white card stock and the images were stamped using StazOn ink. The trees are from the "Lovely as a Tree" set. I added a bit of glue and Dazzling Diamonds to it and some in the sky too. The background was sponged in using lighter blues and then blending to the darkest blue. The background was done using the "Snowflakes" Cuttlebug folder. One of my favorite folders. It was a pretty easy card to put together. I had it all ready to go and awaited the message to upload it so it could be linked to the sketch page.

After I did that my night seemed strange. Usually I am working on the Sketch Challenge and I really felt like something was missing so I thought I would go ahead and make another card. SO lucky you, you get two cards to see today!!

The second one was made using the "Bethlehem" set by Amuse. I bought this set last year and have not used it much. This sketch was a perfect one to use it on! I colored the image in using a blender pen and chalks. The sky and foreground was done with chalks and a sponge dauber. I sponged the edges with Bashful Blue ink and put it all together. Once again it was a pretty easy card to put together!

It was a very exciting night for me and I checked in my gallery at SplitCoast and I've gotten a lot of nice compliments on my posts!!! Everyone is SO nice over there!.

Thank you all for visiting today,
Wanda

Tuesday, December 01, 2009

Technique Tuesday Technique Page

Shocker I know. Three weeks in a row!!! I'm going for a record. Or is this a record??? Don't look it up, I don't want to know!!! LOL

This was a fun technique I saw on SplitCoastStampers last week. I thought I would give it a try and see how much I liked it. It is fun to do and I'm saying that now because I only made the one little square for the technique page. I still have 30 more pages to make and I'm sure by the end of them I won't be so fond of this technique!!! One good thing about all of these techniques, by the time I come back to use one for a project some time has passed and I like it again!!! Time is such a good healing factor!!!

For this technique you just rip up some decorative paper. It's a great way to get rid of some of those scraps that you are hoarding!!! You sponge the edges of each piece. That is where it would get to be a bit much if you were making a bunch of cards using this technique. You glue the pieces in place, trim the edges and sponge the straight edges too. Then you are suppose to cover it with Modge Podge. Well, I have some but wasn't sure if it was solid in the bottle or not and I was too lazy to go look. Then I thought I would give the Crystal Effects a try since most demonstrators don't use the Modge Podge. And it did work!!! It's shiny. I'm not sure if that matters or not. I wouldn't think so. I would especially like it shiny if I were doing a winter scene and the background was in soft blues with snowflakes!!!

Anyway, the technique is fun and easy, just a bit tedious sponging all those edges. Pop in a movie and sponge away!!


You can view the other technique pages here. And you can purchase the technique pages on CD to use for your own personal use, for a Technique Page class or for a Technique Club. Just print, trim and they are ready to decorate and set on your 6" x 6" card stock. The CD's come with the photos you see on the blog so you can make them the same colors if you wish. Click here to be taken to the web store.

Thank you SO much for visiting today,
Wanda

Monday, November 30, 2009

One Man's Junk....

Actually this was beyond junk, it was really garbage!!! Recycling garbage of course. And I punched up the recycling part of it.

Some months ago I had gotten a garden flag holder from my dear friend Ann. And a cute kitten flag that read "welcome to my garden." Well when I was out shopping I had found a fall one on clearance and hung that one up. Then I was out shopping with hubby and found this cute snowman one. Well.... you know me and snowmen!!! I just HAD to have it and it really wasn't all that expensive. Plus there was only one left and that alone tells me that I just HAD to buy it!!! SO I got home with this cute flag and I proceeded outside to the flag holder and put it on. It's just TOO darn cute!!! I just LOVE looking at it and in putting it up I was REALLY hoping that it would help make it snow here. I even wore my snowflake socks!!! But alas, no snow. Though we did get some last night and it's almost all gone today. That was just a tease.

Anyway, I came back indoors and was in the process of tossing the plastic part of the packaging and was going to put the cardboard part in the recycling bin when I got a brilliant idea that I could make a card with it.

I headed to my workroom (only to look at the BIG mess I had left from my last little project!!!) and I set the cardboard piece down and walked out!!! I cleaned up my mess later and then worked on the card.

I took out my album of SplitCoastStampers Sketch Challenges that I print out every week and I paged through it looking for a layout that would work with this little image! I found one close enough and I just worked a bit with the sizes and it turned out like this! I kept it simple. It didn't need words because it already had them in the picture. Adding anything else to it didn't make it as sweet looking as it is without any other embellishments. I like the simplicity of it plus I like that I made a card and didn't touch an ink pad. Something that doesn't happen very often at all.

The background matched the Almost Amethyst card stock perfectly! You can't ask for more than that when doing something like this!!!

So now you need to keep an eye on what you toss in the garbage or recycling bin!!!

Thank you SO much for visiting today,
Wanda

Sunday, November 29, 2009

Santa Theme Gift Card Holder

Adding yet another item to the growing list of "Santa Themed" items! Here I created a gift card holder. There are over a dozen "Santa Theme" items on my blog. Just click here to view them.

These don't take long to make either. Well, that all depends on you and how much decoration you want to add to it. You can use real fur, flocking, liquid applique or other textures on the white area. You can add on real buttons or paper ones. A real buckle or a paper one.

And here is how to make it!

Cut your card stock 4-1/2" x 7-1/2"
Score at 1-3/4" and 4-3/4"

Fold in all score lines.

The 1-3/4" part is the pocket. Fold that piece up and glue the edges. Don't use a lot of glue, you do want to have room to slide the gift card in. Glue works better here than tape because tape has a tendency to pull apart from the card stock when the gift card is inserted. So to keep the item looking it's best I just used glue.

I took clothespins to hold the edges down while I got the rest of my elements ready for the front.

I used a scallop punch and made the bottom part of Santa's coat. I have a GREAT Sizzix buckle die so I cut out my buckle. You can do yours by using a square piece of More Mustard card stock and then either using the "Double Rectangle" punch or a craft knife to make the opening for the ribbon. You can also just use a square piece of More Mustard and cut a small square piece of black card stock the width of the ribbon and glue or tape it on top of the More Mustard piece. It will give the illusion of a buckle. So regardless if you have the fun die cuts or not you can still make this gift card holder!

It's as simple and as quick as that. I think the part that took the longest to make was the white "fluffy" stuff at the bottom. Had I had any of that fun fur stuff I would have used that since this gift card holder wasn't going to be going through the mail.

Have fun making these! They are a nice way to dress up your gift cards!

Thank you SO much for visiting today,
Wanda

Saturday, November 28, 2009

Blog Candy, I Almost Forgot Again!!!

I bet you thought I forgot about this weeks Blog Candy item! Well, you know me all too well!!! LOL I almost did!

This week I am adding the C-Thru "Daja Views "Templates & Edger Journaling #1 package. Most of the items I have for the New Year's Day Blog Candy are for mostly card making so I thought I would add something in for the scrapbookers too!! These would work on cards too but are a BIG help in the journaling part of your scrapbook if you like to write by hand. I myself chose to have the computer do my writing for me since my writing starts out nice about the first line or two and then gets rushed and the lettering somehow gets smaller!! The computer doesn't do that the more you ramble on at the keyboard!! See, proof right here!!! LOL

So on New Year's Day I will have the "Official Blog Candy" post where you can leave your comment or maybe an answer to a question!!!

Stay Tuned!
(To view the other items in the GREAT give away just click here.)

Have a great day,
Wanda

Bulb Card Money Holder

While blog hopping I ran across this most adorable money holder. I was at Carolina's Creative Pad and this "Bulb Money Holder" caught my eye.

It's easy enough to make too. You just need a 4" x 8" piece of decorative paper. The paper I used here is from the Stampin' Up! "Merry Moments" package. Her instructions show you how to cut and fold the decorative paper. How to add the ribbon to make it look like a package and how to make the bulb that holds the money.

You do need the Nestabilities to make the scallop. The circle can be done using the "Circle Scissor." I bought one and have yet to use it. I think I will get some use out of it when I start scrapbooking. Those 12" x 12" pages need a LOT of filling up!!!

Anyway back to the bulb. There was one part of the bulb I thought could use a little improvement on in the construction of it. It is the part where you thread/cording the cord through the bulb top with is made using the "Tab" punch. If you cut your thread/cording first and tie the knot in it you can add it to the bulb top when you glue the bulb top in place instead of trying to thread it through later. Once it's in the bulb top you just slide it so the knot is inside and no longer visible. Other than the thread/cording thing everything else was easy enough to do.

Hop on over to her site to get the instructions to make this adorable "Bulb Money Holder."

Thank you SO much for visiting today, Wanda

Friday, November 27, 2009

Silvery "Gifts of Christmas"

The day that Kay brought over her Stampin' Up! "Gifts of Christmas" set I also made this card with it.

I don't like this card as much as I liked the other one but this one didn't really take as long to make.

I LOVE embossing with silver. It melts so nice and smooth.

Embossing seems to give the card a very elegant look to it.

I also used the Stampin' Up! "Serene Snowflakes" set. I hadn't used that one yet and was SO looking forward to it. You all know how much I LOVE snow. I'm still waiting for snow here. It was 50 degrees here today, not great weather for snow. But as the week progresses the temps are suppose to drop and we've got rain in the forecast and hopefully turning to snow midweek!!! I'm digging out the mittens and boots and having the camera ready. I'm making a snowman!!! And of course I will post a picture of it here too!!

Ok, back to the card (I'm SO easily distracted LOL). When embossing the snowflakes I found it difficult to tell where I put them on the brushed silver card stock so I did have to do a couple of embossings. I embossed the area and then inked up the stamp and filled in the empty spots and embossed them. It took a couple of tries but I did get the snowflakes in the areas I needed them to be in.

The base of this card is white and the silver is layered on top of that. It's an easy card to assemble and it's actually an easy card to do too. It really didn't take long at all even with having to emboss it a couple of times.

Does it look like it's missing something? It seems a bit blah to me but then again I'm such a layers person. It maybe could have stood to have a scallop in white with a silver layer on top and a white "Merry Christmas" round layer on top of that and set in the bottom right or left corner. Well, it's too late for that now. I sent the card home with Kay!! If she reads my blog she will know what to do to maybe dress it up a bit. It just needs "something."

It was fun to play with that set. I also have a couple of other images I made from the stamps the gals brought with last week and hopefully I will have time to play with them this week.

Thank you SO much for visiting my blog today,
Wanda

Thursday, November 26, 2009

Happy Thanksgiving!

I received this card from a fellow stamping DIVA Sue! It's such a FABULOUS card, isn't it? It's simple enough to make and yet it has a lot of movement to it.

The Stampin' Up! "Autumn Meadows" decorative paper was used here. It was just cut into pieces and taped in place on Soft Suede card stock. I love how the ribbon is just wrapped around the orange piece and the sponging on the orange piece tones it down just enough too.

I am SO loving this layout and I'm going to have to use it on a future card. And one of the great things about this card is, even with the ribbon it won't cost any extra postage to mail it!! Gotta LOVE that!

I hope you all have a WONDERFUL Thanksgiving and thank you for visiting my blog today, Wanda

Wednesday, November 25, 2009

Wednesday Sketch Challenge

I found this sketch to be a BIG challenge for me. This is totally stepping out of the box. I tried to do the wave with the Stampin' Up! Cutter Kit but I didn't have much luck with that. So what I ended up doing was printing out the sketch (I always print one out for my album) and I cut the wave out and used it as a pattern.

I'm not real thrilled with the card. I don't really care much for all the snowflakes on the wave. I think I over did it there!

The background was done using the "Ho Ho Ho" wheel. I just kept running it over the page until it was filled. Then I cut it to size and sponged the edges in Real Red.

The "Merry Christmas" was done on the computer.

Santa is from the "A Holly Jolly Christmas" set. I just love him and the snowman in that set, they are my favorite!

The snowflakes were made using the Martha Stewart snowflake punch. And I added some rhinestones to the centers of the snowflakes because they looked worse without them.

I'm not real great outside the box. WAY out of my comfort zone and it shows!!!

I am not sure I will be posting on Thanksgiving day. It all depends on if I get my work done right away in the morning. We are not having our dinner until 5 or 6 pm. SO that may give me some time to play. I wish you all a very WONDERFUL Thanksgiving!

Thank you SO much for visiting today,
Wanda