
The base of the card is a folded half-sheet of Basic White card stock. This card opens on the right and the fold is on the left.
I cut a 4" x 5-1/4" piece of Designer Series Paper (DSP) from the "Penguin Playmates" 12" x 12" package and taped it to the front of the card.
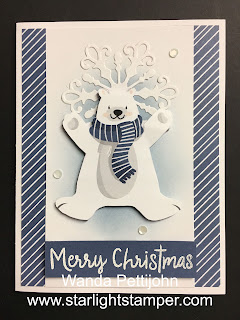
Then I fussy cut the bear from another piece of the DSP. I cut it close to the image, pretty much right on the image. Then I die cut my snowflake from and old die I had. I did use the double sided stick sheet to make it into a sticker because I don't like gluing things that are not very wide. I get glue all over my fingers and sometimes on everything else! I set them aside for now.
The Basic White strip in the middle was cut at 3" x 5-1/4". The bear and snowflake were set on top in the area they were about to be placed and then I took my blending brush and scrubbed on some Misty Moonlight ink. I had marked my area on the upper and lower part of where I wanted the Misty Moonlight ink to be. The snowflake hid the upper pencil mark and the pencil mark in the lower area disappeared. Once the ink was brushed on to my satisfaction, I set the snowflake in place about 1/4" from the top and then set the bear in place using Dimensionals.
I stamped the words from the "Snowman Season" using Versa Mark. I heat embossed them with White embossing powder. That strip of Misty Moonlight measured 3" x 3/5". The "Merry Christmas" fit in that space perfectly. I set the words in place using Dimensionals.
Then a few sequins from the "Subtle Shimmer" sequins pack were set in place on the front of the card with a tiny dot of glue and the card was done.
I hope you like this card as much as I do. I love the background behind the bear. It makes him stand out more. And the colors are very pleasing to the eye! I'm glad I decided to use what I had so I could recreate this card.
Thank you SO very much for taking your time to stop by today to see this cute bear Christmas card,
Wanda

1 comment:
Your card is ADORABLE. Thanks for sharing.
Post a Comment