
I opened up Pinterest and this was the first card I saw. I thought it was so cute to I got out my materials to make it. There was no link but I did Google the name on the front of the card. I found Julie's blog and I went through 20 pages to find the card but I couldn't so I gave up. I didn't have that kind of time to invest in searching. It would be nice if people could provide a direct link to their cards. You can see the original card here. So here is how I made it.
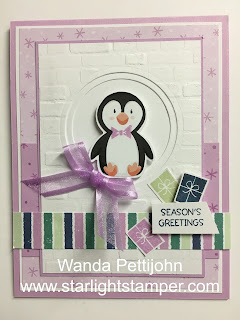
The base of the card is a folded half-sheet of Fresh Freesia card stock. I cut the sheet in half on the short side so when I was done cutting it measured 4-1/4" x 11". I scored and folded it at 5-1/2".
Next I cut two 4" x 5-1/4" pieces of Basic White card stock and I taped one to the inside and one on the outside.
The Designer Series Paper (DSP) if from the "Penguin Playmates" 12" x 12" package. I cut that piece at 3-7/8" x 5-1/8". I taped that to the Basic White piece on the outside.
I cut a 3-1/8" x 4-1/2" piece of Basic White card stock and I took the 2-1/8" circle die and die cut the hole. I did this before texturing because I didn't want to crush the texture. Then I textured it using the "Brick & Mortar" embossing folder. I took a 2-1/2" x 2-1/2" piece of Basic White card stock and I die cut a circle using the 1-7/8" die. I taped it behind the circle on the textured piece. Then I cut another 2-1/2" x 2-1/2" piece of Basic White card stock and taped it to the back of that second circle. After that was done I taped that piece to a 3-1/4" x 4-5/8" piece of Fresh Freesia card stock.
A 2-1/8" x 3-7/8" piece of Fresh Freesia card stock was cut for the strip behind the focal piece. The snowflakes were stamped on it using Fresh Freesia ink. It was taped in place and then the focal piece was taped on top of that.
The fun striped piece is from the same "Penguin Playmates" DSP and was cut at 3/4" x 4-1/4". I glued that piece in place. I wasn't sure if the ends would come back up on me, so I thought I'd use glue and be sure they'd stay down.
The packages were stamped on a scrap piece of Basic White using Fresh Freesia, Misty Moonlight and Soft Seafoam ink. I fussy cut them.
Next the words were stamped using Misty Moonlight ink on a scrap of Basic White card stock. They were also fussy cut. The were set in place on the card using Dimensionals. Then the packages were taped in place except the Misty Moonlight one, it was set in place with a Dimensional.
I punched out the penguin shape from a scrap piece of Basic White. The penguin is from the DSP and it was fussy cut very close to the printed image. I gage the little guy a Fresh Freesia bow tie. Then it was taped to the Basic White penguin that was punched out. I added a few Dimensionals on the back and set it in place on the bottom of the smaller circle.
A Fresh Freesia bow was tied and set in place with a glue dot. And that was it.
This was a very fun card to make. Lots of little pieces, but too darn cute and so worth it.
Thank you SO very much for stopping by and seeing today's Christmas card,
Wanda

1 comment:
Even better then described in your post yesterday. Thanks for sharing. LOVE IT!
Post a Comment