
For this card I took one of the printed cards in the kit and I first cut it in half. It's printed on the front and back so you can get 12 cards from the 6 in the kit!! I think it was 6, could be 5. I don't recall but you will get twice as many if you make them all like this.
The base of this card is a folded half-sheet of Basic Black card stock. This card opens on the right and the fold is on the left.
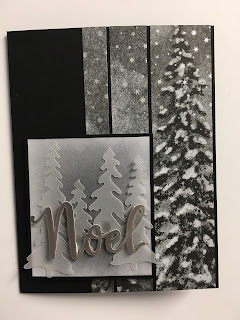
The strips were cut at. 5-1/2" long x 1-1/4" wide, 3/4" wide and 1/2" wide. I taped them to the right side of the card leaving about 1/8" space between them.
Now that I had that on the card I wasn't sure where I was going to go with it. I didn't care much for the green. So I thought I'd just add some words. I cut a piece of Basic White card stock at 2-1/2" x 2-7/8" and I cut the Basic Black layer at 2-3/8" x 3". I took my Smoky Slate ink pad and my blending brush and started scrubbing on some ink but it was just too light. So I took my Basic Black ink pad and used it instead. It was just the darkness I was looking for. I taped this piece to the Basic Black layer.
The vellum trees came with the kit. I cut the one off on the far left. After I had taken the photo, I added a little glue to the trunk of the tree I had cut off and I slid it between the second and third tree. The trunk went down where the "Noel" is and looked just fine. It's always those things I do after that add just a little bit more to the card.
The silver "Noel" is also in the kit. You get four of them. So you may have to be a bit creative if you are making more than 4 cards using this layout. Same with the Vellum trees.
When you glue the trees in place, make sure the glue is going where the "Noel" is to cover it up. It will show through. Look above the "e" in "Noel". See the dot??? OOPS!! Live and learn and share your mistakes and finds!! I had cut my Dimensionals into smaller pieces so they would fit on the "Noel" so I could have it raised on the card.
A 4" x 5-1/4" piece of Basic White card stock was added to the inside and the card was done.
It was fun making this card and my friend was thrilled with it.
Thank you SO much for taking your time to stop by and see today's Paper Pumpkin alternative card,
Wanda

1 comment:
HANDS DOWN.......FABULOUS looking card Wanda.
Post a Comment