Pin It

Wednesday, June 30, 2010

Studio Sketches Wednesday Sketch Challenge

I just love this weeks Sketch Challenge. The panels were very fun to work with. I spent a lot of time deciding what I was going to use for the focal point of my card. I started out with the "Studio Sketches" but then I set it aside. I then took out "Hello Again, "Pocket Silhouettes" to be used along with "Oval All" and "Friends 24-7". As I looked at each one I kept leaning towards the "Studio Sketches" and obviously that's the one I ran with.

I knew what colors I wanted to play with. I just LOVE the new Cherry Cobbler, it's SO rich looking. I was going to use the Daffodil Delight for the panel #2 but once I got the piece cut and set in place it was a bit too bright. And after realizing that the pears were going to be green, I thought I'd better go with a green. I opted for Garden Green. I used it in the pears too but use a blender pen to wash out the color a bit more. They are not exactly the colors of pears but that is what I ended up with so I left it. Same with the pitcher. I am not thrilled with how dark it came out. I used the Cherry Cobbler marker only. I think I may have been happier with it had I used the Cherry Cobbler color with a blender pen.
I did get to play with the Smooch Spray. I sprayed it on the #1, #2 and #1 panels. Plus I sprayed it on my key board, mouse and worktable. I swear I looked at the nozzle before I went to spray!!! It was easy enough to clean up but cleaning up wasn't on my agenda. I just wanted to stamp. But I had to stop and clean because I didn't want that mess on my cards or the side of my hands, oh and fingertips from my keyboard!!! And yes, I did spray into the new "Color Catcher". It's designed to place your work inside and spray away with no mess. Just make sure you aim your sprayers right!!! LOL I am SO loving those Smooch Sprays and I can't wait to have the gals play with them when they come to stamp next month!! They're just TOO fun!
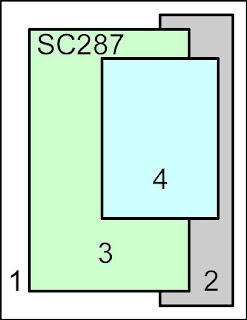
Ok, back to my card and me! It's all about "me" you know!!! On the #3 panel I used the Smooch Spray on the Cherry Cobbler card stock. The Smooch Spray does moisten your card stock so while it was still moist I covered it with clear embossing powder and heat set it. I like the texture it gave that panel. On panel #2 I just left it with the Smooch Spray only and same with the #1 background piece. I sponged the edges of some of the panels with Chocolate Chip.

I had the card all put together and was about to take the photo of it when it caught my eye that on the left side of the #3 panel there was a lot of empty looking space. What to do??? I lifted the panel off the background piece without ripping it. Then I slid the foamy mat pad under it and punched holes in it for brads. I used black brads but brown would have been nicer since the base of the card is the new Early Espresso card stock. But no one will notice if I don't tell them!!! LOL
I do like the card, except for the darkness of the pitcher. I especially like the Sketch and plan to use it on some other cards I need to make. I need to make a masculine card. I think I'll try to make this sketch work with it. It's for my nephew's birthday (on the 26th - I'm late with it!!!).
If you have time play with this sketch. It's something you can work with for your Christmas cards. Yup, it's time to start thinking about what you are going to make this year for your Christmas cards. Get them started early so you aren't rushing at the last minute to get them done. I love to start mine in September. I get them all stamped and I get one made up. Then I cut all the parts and pack them up in a box to take with me when we go up to Duluth for a few days in the fall. I am fortunate that I can work on things in the car. I get a lot of stuff done that really hate to sit and do at home. I have a great set-up in the car. I'll have to have hubby take a picture of it this fall. It's kind of comical too. But it's what I like to do and it doesn't bug him while he drives so it's all ok! I promise I'll have him take a picture then you'll know what I'm talking about.

Thank you SO much for visiting today,
Wanda

Tuesday, June 29, 2010

Friends Never Fade

This is one of the cards from the DIVA Day event and Shoe Box Swap on Sunday. I don't know who made this card. We forgot that part of the swap!! So, whoever made this card, thank you. It was a very fun card to make. It is a nice clean layout and the colors are fabulous.

The decorative paper is from the new "Greenhouse Gala" package. I wasn't going to put this on my wish list but.....
And the image used here is from the new "Friends Never Fade" set. Again something that wasn't going on my wish list but now it is!!! UGH!!!
The Chocolate Chip background was dry embossed using the Dotted Swiss embossing folder. It adds a nice touch to that background.
The image was stamped, then cut by hand around the edges and then layered on top of a piece of the new Pear Pizazz card stock. It was set on the card with Dimensionals with the ribbon running under it. Such a pretty touch.
And I really like this layout too. It can be used for a lot of the smaller images. It's always good to find layouts that will help you use those smaller stamps without them getting lost on the card stock.
It was a quick card to do but I must keep in mind that all of the card stock was cut out for me. But even with that in mind I think it would be a very quick card from start to finish.
Isn't it just a FABULOUS card?
Thank you for visiting today,
Wanda

Monday, June 28, 2010

Decor Elements Wall Art

A while back when I was at my friend Denise's home she had this Decor Element on a frame on a wall in her bathroom. I just loved the way it looked. You could see the wall behind it. Well, when I bought my frame I wasn't thinking about the wall behind the glass. I got the words on and I held it up and I could see all the little staple prong things that hold the glass in place. UGH!! SO I thought I'd better come up with a Plan B. I dug out a bunch of decorative papers and started looking through them. I ended up using the stripped paper from the "Bride" package. I just LOVE that paper. And once I got it put in place and got it all together I liked it even more. That bride paper went so well with the wallpaper I have.

After I finished it I had to hang it up. SO I'm taking things off the walls trying to find a place for it in my workroom. It now has a home and I'm thrilled to have it on the wall.

The last time I did one of these rub-ons on glass I got it crooked. SO this time I used a permanent marker on the glass and marked the spots where the words are to line up. I also went online and found some free graph paper. I downloaded it, printed one out and taped that to the glass too so I had no excuse for crooked words!! They look pretty straight, don't they? And don't you just LOVE that background paper? It looks SO much better in person. If you click on the photo you can see a closer view of it and you'll see the decorative paper better too.

I saw the new Decor Elements and there is one I think I'm going to HAVE to get for my wall in the hallway. They are SO easy to put up and look FABULOUS on the wall. You never have to worry about them getting crooked once they are up like frames sometimes do. No edges to dust or polish either!! My kind of wall art!! They are fun and easy to put up too! And it also makes a wonderful gift too!
Thank you SO much for visiting today,
Wanda

Sunday, June 27, 2010

Baby Bundle Pink and Blue Cards

These are the cards I made for the Shoe Box Swap I participated in today. I just LOVE those kind of swaps. You get to make cards but everything is all cut for you!!! And it's always fun to see what the other gals have come up with too!

For my card I used the "Baby Bundle" set. I made two cards, one in pink and one in blue. I was going to make them all pink because I was using the Pirouette Pink card stock but I thought I could work a new blue into the layout and I used a returning color Baja Blue.

On the pink card, Pretty in Pink was the color of the bottom layer and on the blue card Bashful Blue is the color on the top layer.

I also got to play with the little button die cut. It's one that I do like but I forget I have it. This little die is a Sizzlet and it has 4 different buttons on it. Just TOO cute. So on my card I cut out two buttons. One in the light color and one in the darker color. I took the lighter color buttons and cout the outer edge off. It's easy to see and do because it's kind of perforated. Then I sponged the edges with the lighter color of ink. I glued the center piece on and then tied a piece of hemp cord on. I wanted to use linen but I didn't have any. I do have some, I just don't know where it is. It wasn't in the place where I usually keep it.
I also LOVE the "Lattice" die. Another die I like but don't use often enough.
And for some final touches I added some brads to the top part of the baby buggy (or is it a pram? Is there a difference?) and I added brads to the wheels. Just something to give the card a bit more dimension and texture. I think they turned out cute. I don't know why I chose to make a baby card. I don't need any right now. I do need a birthday shower card so I guess I should get on the ball and get that made soon. I don't want to fall too far behind on my card making.
Thank you SO much for visiting today,
Wanda

Saturday, June 26, 2010

Just Buzzin' By Flowers Card

Here is the last bee card I made using the "Just Buzzin' By" set. This card went home with Sharon last week. It was fun playing with her stamp set. Now I know how the gals feel when they come here to stamp using my new sets!!! It's a lot of fun!!
I had some fun Dotted Swiss decorative paper that I used for the background.

The center piece was dry embossed with the Dotted Swiss embossing folder.
What was really fun about this card was that after stamping the flowers I just used a square punch to punch them out. Gotta LOVE that. It makes doing the flowers SO much easier. And the scalloped layer behind it is a punch too! Talk about simple!!! I LOVE simple cards!
Now as I'm looking at this card and thinking that there is something wrong with it I finally saw it. It's the first flower. I didn't put it on straight. the stem should be at the bottom, not the side! Sharon, if you read this post remove that first flower and turn it so the stem is at the bottom. I must have been so excited to get it done that I didn't pay attention to that little detail!!
Now to explain further about the "easy" part. I just colored in the flower with a marker and then colored over a few areas of the flower with the same marker, it just made that area look darker. It was nice to be able to do that with just one marker and no blender pen! Simple, simple, simple!!!!
This just made a fun and bright and cheery birthday card. A versatile set for sure!!!
Thank you SO much for visiting today,
Wanda

Friday, June 25, 2010

Studio Sketches Friendship Card

I'm not really sure why I bought this set. It's not really my style. Maybe on the day I was placing my order something sparked my interest in it. What happened was I probably saw a sample done with one image and was hooked!!! Silly me. SO I figured since I had the set I might as well put it together and play with it. And this is what I came up with.

I took the "En Francias" background stamp and stamped it on Whisper White card stock using VersaMark ink. I embossed it with white embossing powder.

Next I took 3 sponges and sponged on some Pacific Point, Elegant Eggplant and Certainly Celery ink. Start out with the Certainly Celery then add some Pacific Point and finally fill in the open areas with Elegant Eggplant.
Then I used the new Smooch spray. I used "Log Cabin" and "Vanilla Shimmer." I set it aside to dry. When it was time to use it I did take a paper towel and blotted the piece. I thought some of the Smooch spray may be beading up on the embossing. I wasn't sure if it would dry on the embossing or not. I'm not really sure if it does. What was on the embossed areas did blot up and what didn't easily rubbed off. I do like the effect it has on my card. I should have Smooched the image and word but I didn't. It may be too muted to see the image. I'll have to play with those Smooches more! They are fun. Everyone LOVES Smooches!!! LOL If you click on the photo you can see bits of splatter and some sparkle from the Smooches.
The words came from the "Oval All" set. A must have for me. There are 4 wonderful and extremely useful images in it. I think I have used them all many times.
I tied a piece of Elegant Eggplant around the card and tied a piece of ribbon on top. It really was a quick and simple card to make.

There's three more images in this set and I'm going to challenge myself to use them all! Though I may surf the net for some samples to get me inspired!

I thank you SO much for visiting today,
Wanda

Thursday, June 24, 2010

Just Buzzin' By Card

Here is another card I made using the "Just Buzzin' By" stamp set. Aren't those little bees just adorable? I found this image at SplitCoastStampers, it was made by TBevier (that is her user name on SplitCoast).

When I saw this card I thought it was just too adorable not to copy. SO I downloaded the photo and saved it for a later date!
Once again I used the "Brayered Bubbles technique here. It's a very fun technique and extremely easy to do too! I think it would be fun to color on the bubbles with different color markers to give it a whole new look!
This card was very fun to CASE (copy). Now I didn't copy this card exactly. The original one has a different background than the Brayered Bubbles and the bottom not only has a ribbon but wording too and a different color of paper at the bottom too. I like both cards!
And like the last "Just Buzzin' By" card I made this one when home with Sharon too! She's such a sweetie!
Thank you for visiting today,
Wanda


Wednesday, June 23, 2010

Watercolor Trio Wednesday Sketch Challenge

I think I may have used this "Watercolor Trio" set on last weeks Sketch Challenge! I guess that must mean that I REALLY like the set!!! I do love this little flower from the set!

I have several techniques going in this card. On the main piece (#1) I used my scoring tool and made some lines across the bottom (three of them) and one across the top. They don't show up well in the photo but trust me, they are there.

The #3 layer is done using the "non-metallic Polished Stone" technique. I used the new Cherry Cobbler color too! It's SO pretty.

And the final technique I have on here is "Direct to Rubber". I colored with the markers directly on the rubber. I huffed on the image when I was done and then stamped it.

I added three black brads to the right on that #2 panel. It just needed something there. I kept the sketch pretty simple. I just liked the layout a lot and didn't want to add or take away anything from it. I could have added soem ribbon at the bottom but I liked the clean look of the embossed lines.
It was a very fun sketch and if you have time play with it. This sketch has smaller pieces to it and it will let you use some of those smaller scrap pieces of decorative paper you've been hoarding!!! Raise your hand if you hoard your decorative paper. Did you actually raise your hand??? LOL
I can see myself using this layout for other cards. I have a lot of images that would fit in the #4 piece. And I have LOTS of scrap pieces of decorative paper!!

Thank you SO much for visiting today,
Wanda

Tuesday, June 22, 2010

Just Buzzin' By Flower Card

I get all done making this card, so I thought. I take the photo for the blog and I get it all set up to enter it in and I'm thinking to myself, "what is wrong with this card?" I knew there was something missing but I just couldn't put my finger on it. I'm putting away the ink pad and other items I used to create this card and there it is, the missing item. It's the vase! It was all colored and ready to go. Go where? DUH!! So I take the card and actually finish it. I'm showing you both so you can see how easy it is to miss something like that. Actually I like them both but the vase sure does add a lot, doesn't it?
I used the "Perfect Plum" designer series paper along with a piece of Perfect Plum card stock and black card stock. The image was stamped on white card stock using black StazOn ink. The words were done on the computer.
This was actually a very simple and quick card to make.

The cute vase is made using the honey pot in the "Just Buzzin' By" stamp set. You take a marker and color over the part of the image you want to stamp. The drip of honey wasn't something I wanted on the vase and maybe if I were using a different flower it may have hid the honey drip and the image could have been stamped as is. And the best thing about this is the flower came with the "Just Buzzin' By" set!!! Thus making the set more versatile and you know how much I LOVE it when I get a set that is versatile!!!
This is a fun set and Sharon was such a sweetie to leave it with me to play with. All the cards I made with it I sent home with her!
Thank you SO much for visiting today,
Wanda

Monday, June 21, 2010

Butterfly Punch Magic!

Ok, so it's not magic but it is unique. I made this card at Sue's a few weeks back. It's a fun way to make the pansy too. You just punch out two butterflies and color them like the flower is colored. I didn't do a good job coloring my flowers. I have seen some that REALLY look like a pansy is right on the card. But I did finish my card and that says a lot right there!!! Sometimes when I take things home with me to work on they rarely get finished. But I really wanted to try this butterfly flower thing and in the process I finished the card. I'm not sure if I would make any more cards like this though. I thought it was a lot of work to get those butterflies to look like a pansy.
I used the "Birthday Wishes" from the Sincere Salutations stamp set. One of my favorites!! The words were stamped on a piece of card stock that was dry embossed in the corner.
I used watercolor crayons to color the butterflies and an aqua painter. You start out with the center color and work your way out to the edges. Once they dry you will add the black lines with a marker. Then you will want to curl up the edges a bit. Layer two butterflies together and poke a hole in the middle. Add a brad and tape in place on your card. There's not a lot to it, it's just a matter of getting the colors on there right and getting them to bleed just enough. I used white card stock here. I did try it with watercolor paper and found it even more difficult to deal with. The watercolor paper holds the moisture a lot longer and I got too much bleeding going on. To the point to where the center of the flower was almost gone. I misted the butterfly and placed a paper towel over it to see if I could lift a bit of color off because it was way too dark. Misting watercolor paper like that and using the paper towel caused almost all the color to lift off. UGH! So back to the regular white card stock! I redid them as best as I could and called it a done deal!!!
In person it is a very pretty card!
Thank you SO much for visiting today,
Wanda

Sunday, June 20, 2010

Star Guitar Wall Decor

I finally got this guitar up on the wall. I have had it for a while and had good intentions of getting it up on the wall but something always came up. It went in hubby's office/music room. So if I wasn't busy and had time to put it up hubby was not home or didn't have time to clean off that counter. I didn't want to touch his stuff so we just had to wait for the right time. So it took almost 6 months!!!

When I saw this guitar in the "Definitely Decorative" brochure I knew it would look great on his one wall. He liked the idea of it but he didn't like the heart in the middle of the guitar. I told him I would cut that heart out into a circle and it would look just FABULOUS on the wall. It came with 8 musical notes too. One is hidden behind the guitar hubby is building. He's been working on it a very long time and it's slowly coming along. Inside the guitar is a margarine dish of some type. I keep asking him how he's going to get that out of there and all he tells me is that it's up to the instructor to do that!!! I'm assuming he really means he has no idea how to get it out of there and the guy teaching the class is going to have to help him with that. The handle part of the guitar is out in the garage. I think he's working on the frets for it. Then he'll be gluing that part in place. Then a finish is put on and finally, I think, the rest is adding the hardware and strings. I'm guessing there, I really have no idea. I just know he's been working on it about as long as I've had the wall art. Now that I'm done he should get busy and get his done!
I had him come down and see his wall and he really liked it. I knew he would! I just LOVE that Definitely Decorative "stuff." I got the new book in the mail a week or so ago and I have picked out a few that I am adding to my wish list. I have a wall in mind for one of them right now but I have to wait for a bit to see how bad I REALLY want it or if I just want to want it!
I have two more items that I bought and I need to work on them. One of them is the kitty from the "All in the Family" and I'm not sure what I'm going to do with it. I only bought it because it was a kitty. LOL I'm such a sucker for cat things like that. I may just put it on the bedroom door we keep our old cat Millie in. Oh, don't feel bad for her. I take her out of there when I need to vacuum the room. I don't want her to be in there when I vacuum. I don't want her to be scared. She goes out in the living room and hubby brushes her there while I vacuum. Boo loves to go in there and spend the night. I call it "girls night out!" And K.C. likes to go in there but he goes in there because he thinks the food is different so he has to go eat Millie's food too! Silly cats. SO at times all three of them are in there but usually there is two in there at a time. I open the door and one (that is allowed to) will leave and the other one will go running in. Cats are the craziest people! Anyway, the door may be a good place for that Decor Element! I may just go put it on there when I'm done with this post!
Thank you SO much for visiting today,
Wanda

Saturday, June 19, 2010

Trendy Trees Thank You

You are NOT going to believe this. I did not CASE this card from anyone. I didn't yesterday either! I must be slowly getting my mojo back. I didn't realize it was gone until I had taken some "mental" time off and CASEd a few cards. Nothing wrong with copying cards others make. That is how we learn and for some that is just how they stamp. As long as you give credit where credit is due it's all ok.
I LOVE the Stampin' Up! "Trendy Trees" set and don't play with it as much as I would like to. This card could use a bit more finesse to it but for now I'm just keeping it simple. I am aware that not everyone enjoys making cards with lots of layers. I LOVE layers but at times do need a break from them too!
The "thanks so much" is from the "Teeny Tiny Wishes" stamp set. A set I just LOVE using. It's got pretty much all the words you need and they all fit in the Word Window punch. I didn't use that punch here, I only layered the tree.
I did use a Stamp-a-ma-jig to line up the tree and the trunk. I stamped the trunk first and then the green. I used the oval punch and lined up the tree and punched it out. I used the scalloped oval punch for the layer behind it. I set the layers on top of the card stock and I could see how blah the card was. I decided to punch the corners but I didn't want to get too carried away, I wanted to keep it simple and after I punched the corners I saw that the "blah" I had before wasn't all that blah! I think I liked it better before the corners were punched! It's quick and simple to make, that's for sure!
Thank you SO much for visiting today,
Wanda

Friday, June 18, 2010

Beautiful Wings Sympathy Card

I LOVE this Stampin' Up! "Beautiful Wings" embosslet! Embosslets are fun because you not only get the image punched out but it also embosses it at the same time! I love the bit of flourish on the large butterfly's wing.

I also used the "Elegant Boutique" embossing folder for the white background piece. I did have a little problem making this card. First I did the white background piece. Then I stamped the words on and got them not only crooked but too far over. Then I took a piece of card stock and stamped the words where I thought they should got. I got them on nice and straight. I got interrupted and had set the card stock down somewhere and lost it! I have since cleaned up my stamping stuff for this card and that piece has not shown up. I wonder what happened to it? It may be hiding with the earring I lost a few days ago, though I am suspecting it may be one of the cats who has something to do with that. I suppose I could blame the cat for this too, I know it would make me feel better about it!!! LOL Anyway, I stamped another one and then embossed it. After I removed it from the embossing folder I could see how crooked the wording was. UGH! But I decided to just leave it as it is. I was too anxious to see the butterflies on the card. I can't even begin to tell you how many colors of card stock I went through before I found a color I liked. Too bad the Almost Amethyst is retiring. But there will be better and more fun colors to play with next month!!
This is a very simple and versatile card to make. It will work for a number of occasions like birthdays, wedding, anniversary, thinking of you, friendship, get well and yes, even a sympathy card. And it's quick to make too (if you don't want your words perfectly straight!!!).
Thank you SO much for visiting today,
Wanda

Thursday, June 17, 2010

Just Buzzin' By Card and Technique Page

Isn't this card adorable? Of course it is. It's another treasure I found while surfing the net. I actually found this gem at SplitCoastStampers. It was made by Julie deanat. I copied almost exactly as she made it except I moved the hive up and added the words under it. She has her hive centered in the square which is cute too but I wanted to add the words to the front. Adorable, isn't it?
Now for the technique. I have not done this technique in years. It's called "Bubbled Brayer." You just take bubble wrap and your brayer and brayer over the bubbled with your favorite color of ink. Here I used So Saffron. It gave it the look of a bee hive. Oh and when doing this technique you will be able to see which bubbles have been popped too! You will have blank open spaces on the card stock! I managed to work around them or under them! I think there is a blank one under the bee hive. No one will ever know now! I just thought it was an adorable card and a perfect way to display the technique!
Thank you SO much for visiting today,
Wanda