
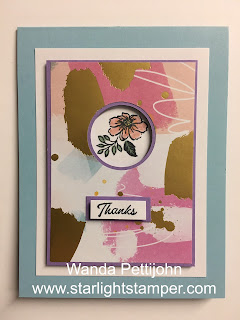
This is one of my favorite layouts because it allows you to really highlight and focus on smaller images in stamp sets. This card is much prettier in real life, the gold that looks like dark mustard here is a gold foil and the light catches it so nicely. But in the pic it looks like blah splotches. If you have this DSP you'll see how pretty the gold is.
The base of my card is a half-sheet of Balmy Blue card stock. The full sheet was cut on the 8-1/2" side so after it was cut the piece measured 4-1/4" x 11". I scored it at 5-1/2" and folded it. I used my bone folder to make a nice sharp fold.
Next I cut a Basic White piece that measured 3-1/2" x 4-5/8".
I cut a piece of Highland Heather card stock to measure 3" x 4-1/8" and I cut the DSP to measure 2-7/8" x 4".
I added a little bit of tape on the area where I thought the hole would be punched out. I set the DSP and the Highland Heather pieces together, making sure they lined up nicely. I took my 1-1/4" circle punch and punched the two pieces together.
Next I took the DSP piece and my 1-3/8" circle punch and with a piece of scrap card stock behind the DSP, I punched out a small thin ring. I tried to line the piece up so the ring was equal on all sides. Then I taped the DSP to the Highland Heather piece.
I stamped the flower image from the "Friendly Hello" set using black Memento ink on a scrap piece of Basic White card stock. I colored in the leaves using my dark Mint Macaron Blends pen. The flower center was colored in using the light Daffodil Delight blends pen and the flower was colored in using my Blushing Bride marker. I could have used markers for all of them but as I was coloring I didn't pay attention that I didn't have a Blushing Bride Blends pen. I don't think Stampin' Up! makes one. And if they do, I will need to order them! Anyway, after I was done coloring I added some Dimensionals around the circle on the backside, centered the flower and set it in place. Then I added more Dimensionals around the rest of the piece and some double-sided tape to the backside of the Basic White stamped piece. If you add Dimensionals there your card will have a big bulge in the center. And no, I have not done that (yet) to speak from experience. I'm sure a day will come when I do make that mistake. But at least it will be on the back so when the unnecessary Dimensionals are removed it won't show. So, I set this piece in place on top of the 3-1/2" x 4-5/8" piece of Basic White. Tape was added to the back of the Basic White piece and I taped that in place on the front of the card.
The words are from the "Special Moments" set and were stamped on a 3/8" x 1-1/8" piece of Basic White card stock. I am not really fond of the word "thanks". It doesn't sound as sincere as the full "thank you" does. But I needed something small and this is what I could find. I think something better could have been used there. Something wider maybe? But this is what was in my head and this is what it looks like on paper! Not exactly what I was thinking but it's close!
I cut a 4" x 5-1/4" piece of Basic White card stock for the inside and the card was done. On other cards I've made using this layout, I had wrapped a ribbon around the word area and tied a knot. I mostly do that when there are words inside the circle. I've never done both, but I'm sure that would work if you place the ribbon a bit higher and the words right under it. I'll have to give that a try sometime.
So that is it. This card didn't take long at all to make and I was able to use a piece of DSP that I thought was rather challenging.
Thank you SO very much for taking your time to see today's thank you card,
Wanda

1 comment:
You NAILED this one Wanda. Lovely looking card.
Post a Comment