Pin It

Sunday, December 05, 2021

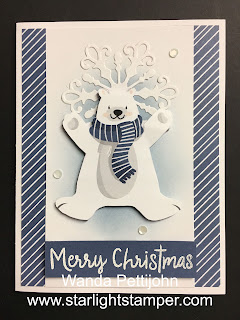
Penguin Playmates, Snowman Season, Christmas Card, 2021 Stampin' Up! Holiday Catalog

Did you ever want to make a card you saw but didn't have all the same items to create it?  I have seen this card many times on Pinterest and I've wanted to make it but I didn't have that beautiful snowflake. I didn't order any so there I was with big sad eyes regretting not buying that and about 40 other things I saw!!! LOL  But I thought I could just use a snowflake I had here and be happy with it. I guess it doesn't take much to make me happy because it worked.  Though I still have regrets about not getting those snowflakes. This isn't the only card I saw with it on it! You can see the original card here

The base of the card is a folded half-sheet of Basic White card stock. This card opens on the right and the fold is on the left.

I cut a 4" x 5-1/4" piece of Designer Series Paper (DSP) from the "Penguin Playmates" 12" x 12" package and taped it to the front of the card.

Then I fussy cut the bear from another piece of the DSP. I cut it close to the image, pretty much right on the image.  Then I die cut my snowflake from and old die I had. I did use the double sided stick sheet to make it into a sticker because I don't like gluing things that are not very wide. I get glue all over my fingers and sometimes on everything else!  I set them aside for now.

The Basic White strip in the middle was cut at 3" x 5-1/4".  The bear and snowflake were set on top in the area they were about to be placed and then I took my blending brush and scrubbed on some Misty Moonlight ink. I had marked my area on the upper and lower part of where I wanted the Misty Moonlight ink to be.  The snowflake hid the upper pencil mark and the pencil mark in the lower area disappeared.  Once the ink was brushed on to my satisfaction, I set the snowflake in place about 1/4" from the top and then  set the bear in place using Dimensionals.

I stamped the words from the "Snowman Season" using Versa Mark. I heat embossed them with White embossing powder. That strip of Misty Moonlight measured 3" x 3/5".  The "Merry Christmas" fit in that space perfectly. I set the words in place using Dimensionals.

Then a few sequins from the "Subtle Shimmer" sequins pack were set in place on the front of the card with a tiny dot of glue and the card was done.

I hope you like this card as much as I do. I love the background behind the bear. It makes him stand out more.  And the colors are very pleasing to the eye!  I'm glad I decided to use what I had so I could recreate this card.  

Thank you SO very much for taking your time to stop by today to see this cute bear Christmas card,
Wanda

Saturday, December 04, 2021

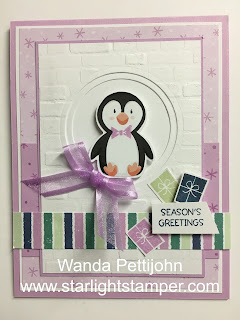
Penguin Place, Christmas Card, 2021 Stampin' Up! Holiday Catalog

Blogger fixed their photo issue!  YAY!!!  I was able to add my photo today with no issues. So here we go!

I opened up Pinterest and this was the first card I saw. I thought it was so cute to I got out my materials to make it.  There was no link but I did Google the name on the front of the card. I found Julie's blog and I went through 20 pages to find the card but I couldn't so I gave up. I didn't have that kind of time to invest in searching.  It would be nice if people could provide a direct link to their cards.  You can see the original card here. So here is how I made it.

The base of the card is a folded half-sheet of Fresh Freesia card stock. I cut the sheet in half on the short side so when I was done cutting it measured 4-1/4" x 11". I scored and folded it at 5-1/2".

Next I cut two 4" x 5-1/4" pieces of Basic White card stock and I taped one to the inside and one on the outside.

The Designer Series Paper (DSP) if from the "Penguin Playmates" 12" x 12" package. I cut that piece at 3-7/8" x 5-1/8".  I taped that to the Basic White piece on the outside. 

I cut a 3-1/8" x 4-1/2" piece of Basic White card stock and I took the 2-1/8" circle die and die cut the hole. I did this before texturing because I didn't want to crush the texture.  Then I textured it using the "Brick & Mortar" embossing folder.  I took a 2-1/2" x 2-1/2" piece of Basic White card stock and I die cut a circle using the 1-7/8" die.  I taped it behind the circle on the textured piece. Then I cut another 2-1/2" x 2-1/2" piece of Basic White card stock and taped it to the back of that second circle. After that was done I taped that piece to a 3-1/4" x 4-5/8" piece of Fresh Freesia card stock.

A 2-1/8" x 3-7/8" piece of Fresh Freesia card stock was cut for the strip behind the focal piece. The snowflakes were stamped on it using Fresh Freesia ink. It was taped in place and then the focal piece was taped on top of that.

The fun striped piece is from the same "Penguin Playmates" DSP and was cut at 3/4" x 4-1/4". I glued that piece in place. I wasn't sure if the ends would come back up on me, so I thought I'd use glue and be sure they'd stay down.

The packages were stamped on a scrap piece of Basic White using Fresh Freesia, Misty Moonlight and Soft Seafoam ink. I fussy cut them. 

Next the words were stamped using Misty Moonlight ink on a scrap of Basic White card stock. They were also fussy cut.  The were set in place on the card using Dimensionals. Then the packages were taped in place except the Misty Moonlight one, it was set in place with a Dimensional. 

I punched out the penguin shape from a scrap piece of Basic White.  The penguin is from the DSP and it was fussy cut very close to the printed image. I gage the little guy a Fresh Freesia bow tie. Then it was taped to the Basic White penguin that was punched out. I added a few Dimensionals on the back and set it in place on the bottom of the smaller circle.

A Fresh Freesia bow was tied and set in place with a glue dot.  And that was it.

This was a very fun card to make. Lots of little pieces, but too darn cute and so worth it.

Thank you SO very much for stopping by and seeing today's Christmas card,
Wanda

Friday, December 03, 2021

Bright Baubles, Snowman Season, Christmas Card, 2021 Stampin' Up! Holiday Catalog

I have been having some issues with Blogger tonight and I can't get the photo to load. It's not just today's photo because I tried to add one from yesterday and it created the same problem, no image.  I found the original card here. I pretty much copied it as it was except for the background. I have no idea what the issue is. It's not my computer because I tried this on two different computers.

I will describe how the card was made though.  The base of the card is a folded half-sheet of Shaded Spruce card stock. I cut the card stock in half on the 8-1/2" side. So after it was cut it measured 4-1/4" x 11".  I folded it in half. This card opens on the bottom and the fold is on the top.

I cut a 4-1/8" x 5-3/8" piece of Crumb Cake card stock and taped it to the front of the card.  Then I cut a 4" x -5-1/4"piece of card stock that was textured with a snowflake embossing folder. I glued that to the Crumb Cake piece.

I die cut the tree from the "Bright Baubles" set. I did use double sided sticky sheet so I could make this into a sticker because I hate gluing pieces like this.  I cut the piece using Early Espresso ink. Then I cut the piece again using Shaded Spruce. I also used the sticky sheet on that too.  There's an outline bulb piece and I cut one using Basic White card stock.   I also slipped the top part of the die in the Big Shot to cut a Daffodil Delight star. I did not use the double sided sheet for that, I just added a dot of glue.

When I removed the pieces from the Early Espresso frame, I threw them in the garbage. When I removed the pieces from the Shaded Spruce tree, I threw them in the garbage. I had to go digging for them. UGH.   LOL

I set the Early Espresso frame onto the Basic White bulb shape. Then I added the Shaded Spruce pieces to the tree and the star on top.  I also used my Wink of Stella pen on the star and tree. It just needed some shimmer.

The bulb was set in place on the card using Dimensionals.

The words are from the "Snowman Season" set and were stamped using Shaded Spruce ink. I die cut them using a Stitched Rectangle die for the words. I set them in place using Dimensionals.

I tied a green ribbon to the top of the bulb and a 4" x 5-1/4" piece of Basic White card stock on the inside of the card and the card was done.

This is a really pretty card and I'm sorry the image won't open on here. I will be looking into this further.  

Blogger seems to be working now. I did leave the blank photo on here not only to show you what I had to deal with yesterday but also there's no way to remove it.  I guess they are not done fixing their issues yet.  Thank you for hanging in there!

Thank you SO very much for taking your time to stop by and for your patience and understanding,
Wanda

Thursday, December 02, 2021

Snowman Season, Penguin Playmates, Stitched Snowflakes, Christmas Card

I LIKE IT!!!  Not too often do I finish a card and immediately like it.  They often have to grow on me or wait until I start writing my post with it on my screen to really "see" the card.  But this one I liked right away and still like it.  I've made plenty of "Polaroid" technique cards but this one is one I just REALLY like!  Ok, now let me tell you how I made it so you can make one too!

The base of my card is a folded half-sheet of Basic White card stock. I cut a 4-1/8" x 5-3/8" piece of Misty Moonlight card stock and taped it to the front of the card.

Then the Designer Series Paper (DSP) from the "Penguin Playmates" 12" x 12" package was cut at 4" x 5-1/4" and taped to onto the Misty Moonlight card stock. 

For the Polaroid technique you just cut the Basic White piece at 3" x 3-3/4".  I like to add a layer behind mine so it stands out better. That piece is Misty Moonlight and was cut at 3-1/8" x 3-7/8".  I set these pieces aside. I needed to stamp on them.

For the center of the Polaroid piece, I cut a piece of Misty Moonlight card stock at 2-1/4" x 2-1/4".  Then I cut the DSP at 2-3/8" x 2-3/8".  I taped the two pieces together.

I die cut a snowflake from the "Stitched Snowflakes" die set using Basic White card stock.

Then I die cut the penguin using the 1-1/8" circle die from the Circle Dies set. I wanted a border behind it but the next larger size circle was too big, so I grabbed the smallest scalloped circle and used that. I die cut it from a scrap piece of Misty Moonlight card stock.  I taped the two circles together.

I set the squares on top of the "Polaroid" piece so I could see where the words would go. I wanted some long words, something that would fill up that area.  The "Merry Christmas" from the "Snowman Season" set did just that, with just a bit of room to spare! I stamped them using Misty Moonlight ink.

Next I taped the square in place on top of the "Polaroid" piece. Then I taped the snowflake in place. I just added tape to the center of it. It's not going to show.  Dimensionals were added to the back of the cute penguin circle layers and I centered it as much as I could over the snowflake.

The Polaroid piece was set in place using Dimensionals and the card was done.

This was a very fun card to make and once again, I REALLY like it! I love the colors and the layout!

Thank you SO very much for taking your time to stop by and see today's Christmas card,
Wanda

Wednesday, December 01, 2021

Penguin Place, Matchbook Candy Holder, Stocking Stuffer, 2021 Stampin' Up! Holiday Catalog

Today I thought I would make a matchbook candy holder.  These are easy and fun to make.  Play along and I'll show you how! Yesterday I had made a "Penguin Place" penguin tag that went on top of the Twix bar holder.  I had made several penguins yesterday and today I'm using another one.

The base of the holder is a 6-1/2" long strip of Basic White card stock that is 1-5/8" wide.

I scored the strip at 1/2", 7/8",3-3/4" and 4-1/8".  I folded all the score lines inward. Use your bone folder to make those score lines nice and crisp.

I cut a 1-5/8" x 2-5/8" piece of Designer Series Paper (DSP) from the "Penguin Playmates" 12" x 12" package and glued it to the front of the holder.  That would be on the part that is from the 4-1/8" score to the edge of the card.

The candy bar is from the Dollar Tree. There were 4 in a package and they measure 2-3/4" x 1-3/8" and it's 3/8" thick.  I used 4 glue dots on the back of the candy bar to hold it in place.

I had die cut the rectangle from the "Color & Contour" bundle set using Basic White card stock.

The penguin was punched using Basic Black and Basic White card stock.  The eyes were stamped using black Memento ink. The beak and feet were stamped using Pumpkin Pie card stock. The penguin was glued to the front of the rectangle piece and moved up a bit on that piece. That would make room for the words which were from the "Penguin Place" set and black Memento ink was used. The words were trimmed by had and glued in place.  If you are not sure where to place the penguin, add the words first and then you'll be able to better see where the penguin can go.

I taped the rectangle in place on the front of the matchbook cover but I did not add any tape to the bottom part under the words. That part is where the bottom of the matchbook will be tucked in to.  

You can dress it up more with sequins or ribbons or both!  I just left it plain because I didn't want anything falling off in the bag that I was going to be putting them in to deliver them.

This was a very fun, quick and easy matchbook holder to make. And even more fun to give away!!   I'm not sure how tasty this candy is, I have never tried it.  But I do know it's cute and a fun size. You can adjust your strip for different lengths and thicknesses of candy bars if you can't find these. 

Thank you SO very much for taking your time to stop by and see today's stocking stuffer,
Wanda

Tuesday, November 30, 2021

Penguin Place, Penguin Playmates, Stocking Stuffer, Weekend Project, 2021 Stampin' Up! Holiday Catalog

As I was trying to find a card to make today, I ran across this cute little gifty item to make. I found it here on Pinterest. There is also a video you can follow along to. I thought it would be great to make several of these to pass out to the mail carrier, USP driver, the ones who load my groceries in my trunk each week and more. I have a long list.  Just a little fun something. These are SO quick and easy to make. Plus they are a great way to use up some of that extra Designer Series Paper (DSP) you have. 

The DSP is from the "Penguin Playmates" 12" x 12" package and was cut at 3-3/4" x 6".  I added a strip of strong tape to one of the long sides. You just set the candy bar on top. This candy bar is not  a full-sized bar, it's a .071 oz. bar. Or the 100 calorie bar, whichever way you can find it in the store. If you're using the smaller ones, just adjust your DSP to fit. You will still need it to be 3-3/4" on the one side. You will need 1-3/4" more for the slack inside the tube. So measure your candy bar and add 1-3/4".  

Set the DSP face down and place the candy bar on top. Wrap the piece without the tape over it first and then affix the other edge on top. 

The bottom was just stapled. You can glue it or enclose that end any way you'd like. The instructions showed stapling it so I just followed a long.

I did have the "Label Me Fancy" punch that was used to make the hole in the top. Though you could use a anything to make a hole. I saw how she struggled to get the ribbon through the hole so I punched a little to the left of my first hole and then a little to the right so it was more elongated and wide enough for the ribbon. I added the ribbon and was ready to move onto the tag.

The white scalloped rectangle tag part is from the "Color & Contour" bundle. I cut it from a scrap piece of Basic White card stock.

I punched out the penguin body from a scrap piece of Basic Black card stock and the white part from a scrap piece of Basic White card stock.

The eyes were stamped using black Memento ink and the beak and feet were stamped using Pumpkin Pie ink. I glued it higher up on the rectangle

I stamped the words from the "Penguin Place" and trimmed them so only the "Be Merry" was left. They were just fussy cut and taped in place just under the Penguin.  I glued the piece to the front of the tube and it was done. I chose glue because I wanted to make sure it was going to stay put since it hangs over on the edges and could get caught on something and rip off. 

If you like to give it a more personal touch, you could always print out the names of the people you are giving these to and tape it on the tag.   

This was such a cute idea, wasn't it? I am glad I ran across it. It's very quick and easy to make too! Can't ask for more than that, especially this time of the year.

Thank you SO very much for taking your time to see today's fun Christmas project,
Wanda


Monday, November 29, 2021

Bright Baubles, Delicate Baubles Dies, Christmas Card, 2021 Stampin' Up! Catalog

I'm playing with the "Bright Baubles" set again. Well, not really again, I haven't played with it for a while so I thought I should get it out and see what I can create with it.  Here's how I made today's card.

The base of the card is a folded half-sheet of Basic White card stock. This card opens on the bottom and the fold is on the top.

I cut a 4" x 5-1/4" piece of Pacific Point card stock. Before I taped it on top of the card base, I die cut the solid bulb image from the "Delicate Baubles" die set and I set it aside.

Then on top of the Pacific Point card stock is a 3-3/4" x 5" piece of Basic White card stock that I textured with a snowflake background. I didn't have anything current that would work, so this is what I used. I glued it in place on top of the Pacific Point piece. I prefer to glue because there's so much texture that I'm never sure if I get enough tape on it to hold it in place. But I do know the glue will hold it. I prefer to use the Tombow Mono glue because it doesn't not warp your card stock. I have a love hate relationship with this glue. I love how it holds but I hate it when I get it on my fingers because I find it difficult to get off.

Next I die cut the "Joy" bulb from the "Delicate Baubles" die set. I did use a double sided sticky sheet on my Basic White card stock to make this a sticker instead of something I needed to try to tape or glue in place. It saves SO much time and it's a lot cleaner too! I set this piece on the Pacific Point solid bulb. I added Dimensionals behind it and set it aside.

I cut a 1" x 5" strip of Pacific Point card stock and glued it to the front of the card about 1" up from the bottom edge of the embossed piece.  I wanted that area to have something but what? I thought ribbon might be pretty but I wanted some lacy ribbon.  So I took out my "Natures Thoughts" die set from the "Positive Thoughts" bundle and I die cut the fun border strip using the sticky backed card stock to make it into a sticker too. I cut the piece to fit my area. I cut the left piece so it was three bumps long. I removed the backing and set it in place on the left side of the card. Then I removed the backing on the remainder of the other piece and set it on the right. 

The bulb was placed over the the Pacific Point strip.  A bow was tied and set in place with a glue dot and the card was done.

Did you ever get that panicked feeling when you go to open the card and it won't open because you are trying to open the fold?  I did. I don't often check when I'm putting a card together, I just assume I have it right. I did have it right!  My card was folded so perfectly that the ends matched exact that it was difficult to separate them.  I caught a break there!! LOL

This was a very fun and easy card to make. I do like how it looks. I think that border strip piece fit this card perfectly!

Thank you SO very much for taking your time to see today's Christmas card,
Wanda

Sunday, November 28, 2021

Penguin Place, Penguin Playmates, Christmas Card, 2021 Stampin' Up! Catalog

I have a fun and quick card for you today.  I love this layout. You can use it for a lot of other sets too, it's quick and simple.

The base of the card is a folded half-sheet of Fresh Freesia card stock. It was cut on the short side. It measured 4-1/4" x 11" after cutting.  I folded it in half at 5-1/2".

I cut a 4" x 5-1/4" piece of Basic Black card stock for the layer.

The Designer Series Paper (DSP) was cut at 3-3/4" x 3-1/2". The dotted piece was the backside of the top piece and was cut at 1-1/2" x 3-3/4".  I taped those to the Basic Black piece and then taped them to the front of the card base.

I fussy cut a penguin from another sheet of DSP. I could have used the matching punch but I was too lazy to get up and get it and since it was only one penguin and simple cutting, I just took my scissors and cut it out. 

Then I had to get up anyway to die cut the circle. I took a scrap piece of DSP and die cut a 1-7/8" circle. I glued the circle to the front of the card and then I set the penguin in place using Dimensionals.

I stamped the words from the "Penguin Place" set using black Memento ink. I trimmed it to measure 1-1/8" x 9/16".  I cut the Fresh Freesia layer 1/8" larger all around. I taped the two layers together and then set it in place on top of the card using a couple of Dimensionals.

A 4" x 5-1/4" piece of Basic White card stock was taped to the inside of the card and the card was done.

This was a very fun and quick card to make. I love the fun background too!

Thank you SO very much for taking your time to stop by and see the fun penguin Christmas card,
Wanda


Saturday, November 27, 2021

Stitched Snowflakes, Penguin Place, Christmas Card, 2021 Stampin' Up! Holiday Catalog

Today I thought I'd make a snowflake card. Still no snow on the ground here in central Minnesota but it is a bit chilly.  And I know the snow will come.  What we had a couple of weeks ago here melted. What the people in the upper part of Minnesota got a couple of weeks ago they still have! They will get more too! SO for today I'll look at snowflakes on paper.

The base of my card is a folded half-sheet of Basic White card stock.  I cut a 4" x 5-1/4" piece of Basic White card stock for the top layer.

I took a 1-7/8" circle and I placed it behind the top layer piece so I could see where center was. Then I stamped the words from the "Penguin Place" set using Real Red ink. 

The snowflakes were colored using my Wink of Stella pen, (something I'm going to be adding to my Christmas wish list!) and I colored each snowflake to give it some sparkle. 

I have a lightbox so I set my front layer piece on it and slid the 1-7/8" circle behind it, making sure the words were centered.  Then I glued on each snowflake around the circle. You could lightly draw the circle with a pencil but I think it would be a little difficult to erase once the snowflakes are in place. You'd have to be really careful at the placement of the snowflakes to cover the lines. But it can be done. Anyway, I used my lightbox and glued each one around the circle. I removed the circle and added Dimensionals to the back of the piece and set it in place on top of the card base. 

Tiny crystal rhinestones were added to the center of each snowflake and the card was done.

This is a very fun, quick and easy card to make.

Thank you SO very much for taking your time to stop by and see today's Christmas card,
Wanda

Friday, November 26, 2021

Snowman Season, Stitched Snowflakes, Christmas Card, 2021 Stampin'' Up! Catalog

I wasn't sure where I was going with this card. All I knew was I wanted a silver snowflake.  This in what I came up with.

The base of my card is a folded half-sheet of Basic White card stock.

Next I cut a 4-1/2" x 3-1/4" piece of silver foil card stock. And on top of that is a 4-1/4" x 3" piece of Basic White card stock.

I stamped the words from the "Snowman Season" set using Versa Mark. Then I sprinkled on some silver embossing powder and heat set it. 

I die cut the snowflake from a scrap piece of the silver foil. I wasn't thinking or I would have just cut it from the silver rectangle I had cut for the layer. Oh well, I got my snowflake either way. The snowflake is from the "Stitched Snowflakes" die set. 

The silver foil layer and white top piece were taped together and then taped to the front of the card.

I set the snowflake in place using a small Dimensional and I added a crystal rhinestone to the center and the card was done.

Yup, just as simple as that!

This is a very quick, easy and elegant Christmas card.

Thank you SO very much for taking your time to stop by and see today's Christmas card,
Wanda

Thursday, November 25, 2021

Penguin Place, Penguin Playmates, Chap Stick Lip Balm Holder, Stocking Stuffer, Weekend Project

It's time for a project. I like to call them my "Weekend Projects" because I most often work on the on the weekends.  But it's the night before Thanksgiving and I was caught up on everything I need for tomorrow so I thought I'd work on something other than a card.  A Chap Stick holder is on the worktable! I have made these before and they are fun to make. They are useful and they make great stocking stuffers.

I found the holder on Split Coast Stampers many years ago. Click here for the link to the pattern.

Here's how I did mine. The outside of my holder is 5-3/4" x 3-1/2".  I scored it at 2-1/2" and 3-1/4" on the long side.

The inside is done the same except there will be some cut lines. Once you've scored the inside, you will be making cuts that will be supports for the Chap Stick.  See the photo for cutting.  You can also cut the slots for the ribbon or you can use a small punch to make a line or you can use a single larger round punch. As long as it's big enough to get the ribbon through.

Once you have your front and inside done, start by gluing the inside piece in the center. Be sure not to glue over the areas you made the supports.  If you do that, it will be glued shut and not hold anything! And no, I have not glued mine shut! I actually paid attention.  After the center was glued, I glued the front and then the back.  I cleaned up my slit marks to make sure they lined up.  

Now it's time to decorate. The front piece of Designer Series Paper, DSP was cut 2" x 3".  It's from the "Penguin Playmates" 12" x 12" package.

The words are from the "Penguin Place" and were stamped using black Memento ink. I used the smallest circle die to cut them and I grabbed a scrap piece of Just Jade card stock and I used the smallest scalloped circle. I taped the two circles together and then set it in place using a few Dimensionals. 

Then I took some ribbon and threaded it through the holder and I tied a bow. The ends were trimmed and the holder was done.  

I really enjoy making these. They are fun and easy and don't take much time at all. I think the cutting the lines with an x-acto blade is the longest part of the card. I rounded my corners but you don't have to, you can leave them as they are. I just thought it gave them a more finished look.

I need to get some more lip balm so I can whip up a few more of these for stocking stuffers.  This would also make a great teacher gift. 

Thank you SO very much for taking your time to see today's weekend project,
Wanda

Wednesday, November 24, 2021

Little Delights, Merriest Frames Dies and Embossing Folder, Forever Fern, Christmas Card, Stampin' Up!

I was having a little bit of regret not getting the stamp set that went with the "Merriest Frames" dies and embossing folder. But a bright idea came to mind and the regret went away!  (That was a close call!!  LOL).  I went for white, light and elegant!

The base of my card is a folded half-sheet of Basic White card stock.  I cut my card stock on the short side of the sheet so it measured 4-1/4" x 11".  I folded it in half.  Next I textured the front using the  "Merriest Frames" embossing folder. My card opens on the right and the fold is on the left. A little different than I usually do but it's okay, I like it.

I cut a 2-1/8" x 2-7/8" Piece of Real Red card stock for the inside of the embossed frame. There's also a fun stitched rectangle die in the "Merriest Frames" die set. I die cut it out of Basic White card stock.  I stamped the words from the "Little Delights" set using Real Red ink. I centered them as much as I could. Then I taped the stamped piece to the stitched rectangle piece and those were then taped to the center of the embossed card.

There are two larger flowers and two small flowers in the die set so I cut them using Basic White card stock. I colored them with Wink of Stella and set them aside. 

I wasn't sure what I was going to do about the leaves. I didn't have the stamp set and just die cutting the leaf image wasn't going to work. So I got out the "Forever Ferns" set and die cut two sets of leaves. I also colored them with the Wink of Stella pen.

I set the leaves on the card for placement. I ended up trimming off some of the leaves and moving them to the upper corner and keeping the larger parts at the bottom. I added a little tape to the corners of the rectangle piece and set the leaves in place.  

The largest flower was placed at the bottom left and the smaller one on the upper right.  I used a Dimensional to set them in place. The Dimensional will also help keep the leave in place more too.  The tiny flower parts were added to the center of each of the larger flowers with a dot of glue. 

For the final touch, I added a tiny pearl to the center of each flower and the card was done.

I think it has a very elegant look and I was thrilled that I was able to make a fun card without the use of the stamp set that went along with it!!!  YAY!!!  

Thank you SO very much for taking your time to stop by and see today's Christmas card,
Wanda

Tuesday, November 23, 2021

Forever Fern, Many Messages, Fall Friendship Card, 2021-2022 Stampin' Up! Catalog

Once again I thought I'd play with the "Forever Fern" set to see if I could get some fall or even winter cards made using it.  These colors scream Christmas.  Mostly because I was leaning towards a Christmas card when I made it but after reading some email, I realized I needed to change the genre. So here's what I ended up with.

The base of the card is a folded half-sheet of Real Red card stock. This card opens on the right and the fold is on the left.  I cut a 4-1/8" x 5-3/8" piece of Mossy Meadow for the layer and a 4" x 5-1/4" piece of Basic White for the top. I textured that Basic White piece using the "Painted Texture" embossing folder. I glued it to the Mossy Meadow piece and then I taped that to the front of the card.

I cut a 3-1/4" x 2-1/4" piece of Basic White for the focal piece. I used Crumb Cake ink and the dotted stamp from the "Forever Fern" set on it. I did stamp off once because I didn't want the dots too dark. I taped that to a 3-3/8" x 2-3/8" piece of Mossy Meadow and then I taped those two to a 3-1/2" x 2-1/2" piece of Real Red card stock. Then that was taped to the center of the front of the card.

Next I die cut the gold foil leaves and set them aside. 

The swirl was from a retired set and I had found it in my "Forever Fern" set just sitting there waiting for me to do something with it. SO I thought I'd tuck it in behind the gold foil leaves and see what happens when all is said and done!

I stamped the leafy green images using Mossy Meadow ink. I die cut both of them. And I stamped the round leaves (I always think they look like a cluster of berries), I used Real Red ink.  Before I set the red leaves on top of the green ones, I colored them in using my Wink of Stella pen. It helped blend the colors a bit. The pen picked up some of the ink and moved it around on the image. I like that look, it looks like the image was stamped in color instead of just outlined.  I held the leaves in my hand and set them up where I liked them. I turned them over and taped them together. I was careful not to move them because I really liked my placement.  I set them aside while I taped down the circle piece and the gold foil leaves. Then I added Dimensionals to the cluster I created and set them in place on top of the card. 

The words are from the "Many Messages" set and were stamped using black Memento ink. I had used my "Classic Label" (retired) punch to punch them out. I trimmed off the points on each end and set them in place just below the bottom of the cluster. Oh, I did have to trim off the stems at the bottom of the cluster of leaves, they didn't look good sticking out the bottom of the words.

I added a 4" x 5-1/4" piece of Basic White card stock to the inside of the card and it was done.

I really do like how this card turned out. I think I'd like to try this set again using the Christmas theme.

Thank you SO very much for taking your time to stop by today,
Wanda

Monday, November 22, 2021

Snowman Season, Wintry 3D Folder, Christmas Card, 2021 Stampin' Up! Holiday Catalog

I had purchased the "Wintery" 3D embossing folder and have not used it much. It's not a full size folder so that's part of the reason. But today I thought I'd use it in strips and make it fill up a page. So here's how I made my card.

The base of the card is a folded half-sheet of Basic White card stock. This card opens on the right and the fold is on the left.

I embossed the card stock. The piece of card stock that fit in the folder was enough to cut three 7/8" wide by 4" long pieces. So I had to texture another piece because I needed one  more.

I cut a 3-7/8" x 5-1/8 piece of Basic White card stock and glued the 4 strips to the top, leaving 1/8" on the sides and top.  Then I stamped the words from the "Snowman Season" set using Pool Party ink.

I took some white ribbon that I had and wrapped it around the card stock. Then I added a thinner Pool Party colored ribbon on top of it to bring in a bit more color to the card.  I taped the ribbon to the back and then added scotch tape to secure it even more.  I added Dimensionals to the back and set the piece on top of the card base.

I had snowflakes left from the card I had made on the 18th. You can see hit by clicking here.  I have several of the spritzed Stitched Snowflakes sitting around from that card.  It was nice to actually be able to use one. I set the snowflake in place using a small Dimensional and then I added a crystal rhinestone to the center and the card was done.

This card was super quick and easy and I could see myself using up those larger snowflakes making more cards like this. I have three more so that shouldn't be too bad.  Plus I have an extra panel because you can get three off one piece of textured card stock. So I guess I'll be making them!!

Thank you SO very much for taking your time to stop by and see today's Christmas card,
Wanda