Pin It

Thursday, July 31, 2025

The Right Words, Painterly Pears, Birthday Card, Stampin' Up!

Hello and welcome to my blog. Today I have a pretty card that I found on Pinterest that I thought I'd give a try. You can see the original card by clicking here. It will open in a new window so you can easily find your way back here. There were no instructions in the link and I didn't have a lot of time to look any other info on the card. So I just thought I'd go for it. Please read on to see how it was made. 

The base of the card is a folded half-sheet of Basic Black card stock. It was cut in half on the short side. Once cut it measured 4-1/4" x 11". I cut a 4" x 5-1/4" piece of Basic White card stock and taped it to the inside.

Now for the outside. A 4" x 5-1/4" piece of Daffodil Delight was cut for the largest layer. ON top of that layer is a piece of Designer Series Paper (DSP) from the "Painterly Pears" 12" x 12" package. I cut the black with lines piece at 3-7/8" x 2-3/4" and I tore the bottom  so it was roughly 2-1/2". Then I cut a 2" x 3-7/8" piece of Peach Pie card stock. I taped that in the center area of the Daffodil Delight piece. You don't have to have it perfectly centered, most of it is going to be covered up anyway. You can make the piece a bit smaller if you want, I just thought 2" was a safe amount, it gave me some wiggle room. Then the bottom piece was cut just like the top piece, measuring 3-7/8" x 2-3/4" and ripping the top edge. I taped the top piece on first and then the bottom piece. I made sure I had enough of the Peach Pie showing. I had tore my Mossy Meadow piece a little shy so I trimmed the bottom a bit. My Mossy Meadow is card stock. I couldn't find the Mossy Meadow DSP like was used on the original card. It still worked out just fine. It's very difficult to make a mistake on this part. The larger you rip the card stock or DSP the more the Peach Pie will show. What could go wrong there? Well, if you tear over an inch of the DSP or card stock but that's a ways from the edge. 

The top layer was done next. The Basic Black layer was cut at 4-1/8" x 2-7/8" and the DSP from the same package was cut at 4" x 2-3/4". The DSP was taped to the Basic Black piece. 

I took some linen thread and doubled it. I tied it around the panel and tied a bow. Dimensionals were added to the back of the panel and it was set in place on the front of the card. 

The words are from "The Right Words" set and were stamped using black Memento ink on a scrap piece of Peach Pie. It was trimmed to 3-8" wide by 2-3/8" long. I trimmed the ends at an angle. Dimensionals were added to the back and it was set in place on top of the thread. Press those Dimensionals down hard to they stick over the thread. 

I had some leftover "Genial Gems" from a few yeas back so I added them to the front of the card and the card was done. 

This card has lots of layers, which is what I LOVE. I haven't made a card with lots of layers in a very long time. It does take a little longer to make one like this but it was so worth it. I do like how it turned out using what I had on hand.

Thank you SO very much for taking your time to stop in and see today's birthday card,
Wanda

Wednesday, July 30, 2025

Simply Said, Fully Flowering Ephemeras, Friendship Card, Thinking of You Card, Stampin' Up!

Hello and welcome to my blog. Today I have a super quick and easy card to share with you. Please read on to see how it was made.

The base of my card is a folded half-sheet of Basic White card stock. It opens on the right and the fold is on the left.

I cut a 4-1/4" x 5-1/2" piece of Basic White card stock and textured it using the "Damask Design" embossing folder. I trimmed it to measure 4" x 5-1/4" and I glued it to the front of the card.

Next I cut a piece of Designer Series Paper (DSP) from the "Subtles" 6" x 6" stack. I used the "Petal Pink color. The piece measures 3-3/4" x 1-3/4". I glued it to the front of the card about 1-5/8" from the top edge.

Using the "Stylish Shapes" die set, I cut a circle using the largest die. 

The flowers and leaves are from the fun "Fully Flowering" ephemera pack. I laid them out on the circle to see where I could add some words. That's when I decided that this was going to be a friendship or thinking of you card. 

The "hello" came from the "Simply Said" set and it was stamped using Garden Green ink. I glued the circle to the front of the card. I tried to get it centered on the left and right and then centered it from the top and bottom of the piece of DSP. The top of my circle ended up being 7/8" from the top edge of the card.

The flowers were added next. I picked out two flowers and one of the leaves. The leaves were from the same sheet as the big flower. I cut it apart because it was a bit too long and this way I could make it look like I had two sets of leaves. 

Dimensionals were added to the back of the large flower. I slipped the other flower piece under the large flower a bit and then the leaves. Some of the pieces caught a bit of the Dimensionals but some parts didn't so I lifted it up a bit and added some glue. 

For a bit of sparkle, I had some pink rhinestones so I added three to the card and the card was done.

Such a quick and easy card to make and I do like how it turned out. There's lots of flowers and leaves in that package and I hope to fine a way to use them that's just as creative as this one was. Wish me luck on that!

Thank you SO much for taking your time to stop in and see today's friendship/thinking of you card,
Wanda


Tuesday, July 29, 2025

The Right Words, Beautiful Gallery, Sympathy Card, Stampin' Up!

Hello and welcome to my blog. Today I have a sympathy card to share with you. I found it on Pinterest. You can see the original card by clicking here. There weren't any instructions so please read on to see how I put it together. 

The base of the card is a folded half-sheet of Basic White card stock. It opens on the right and the fold is on the left.

Using the flowered piece of Designer Series Paper (DSP) from the "Beautiful Gallery" 6" x 6" stack, I cut the piece to measure 3" x 5-1/2". On the flip side of that image is the piece that is on the left. It's cut at 1-1/4" x 5-1/2".  I taped both pieces to the front of the card.

The strip on the left was made using a piece of Cloud Cover card stock that I textured using the "Damask Designs" embossing folder. I trimmed it to measure 1" x 5-1/4".  I glued that to the left side.

The words are from "The Right Words" set and were stamped using black Memento ink. I punched them out using the "Labeled With Love" punch. I also punched out a Secret Sea" piece too. I cut the Secret Sea piece in half and taped each half to the back of the word piece. Dimensionals were added to the back and it was set in place on the front of the card and the card was done.

This is such a quick and easy way to use up DSP! And I have LOTS!  I love that I could use Basic White card stock for the card base and add the DSP to the front. I'm going to have to use this layout again!

Thank you SO very much for taking your time to stop in and see today's sympathy card,
Wanda

Monday, July 28, 2025

Sunrise Sailing, Beautiful Gallery, Masculine Sympathy Card, Stampin' Up!

Hello and welcome to my blog. Today I have a card to share with you that I found on Pinterest. You can see the original card by clicking here. It will open to a new window so you can easily find your way back here. I made a few small changes. There were no instructions, so please read on to see how I put the card together.

As usual, I make my card bases using Basic White card stock. It's rare that I make them with colored card stock. So, the base of my card is a folded half-sheet of Basic White card stock. It opens on the right and the fold is on the left.

I cut a 4-1/8" piece of Balmy Blue card stock for the largest layer. Before taping it down I used the 5th die in the "Everyday Arches" die set. They are still available in the catalog. I cut it from the center of the piece of card stock.

Next I cut a 4" x 5-1/4" piece of Night of Navy card stock and textured it using the embossing folder in the "Sunrise Sailing" bundle. I taped it to the Balmy Blue layer and then that was taped to the front of the card.

The Designer Series Paper (DSP) is from the "Beautiful Gallery" 6" x 6" stack. I cut the image out using the 6th die in the "Everyday Arches" die set. I taped that to the Balmy Blue arched piece and set it in place on the front of the card using Dimensionals.

The sail boat is from the "Sunrise Sailing" bundle. I cut the boat part out using Pecan Pie card stock. The sails were cut using both Balmy Blue and Night of Navy card stock. I taped the Balmy Blue piece to the Pecan Pie sail and then the Night of Navy piece on top of that. I taped the piece to the front of the card.

I die cut the birds from the same bundle using Basic Black card stock. I glued them in place.

The words were done on my computer. I couldn't find any that were the right size for this so I had to resort to typing them out. I used the die from the "Heart Shaped" bundle to cut them out. Dimensionals were added to the back and it was set in place on the front of the card and the card was done.

This was a very easy card to make and it really didn't take much time at all. I like how it turned out and I have a few more sheets of that DSP and I think I'm going to make a couple more before I leave my workroom.

Thank you SO very much for taking your time to stop in and see today's sympathy card,
Wanda

Sunday, July 27, 2025

Charming Day, Simply Said, Birthday Card, Stampin' Up!

Hello and welcome to my blog. Today I have a birthday card to share with you. Please read on to see how it was made.

The base of my card is a folded half-sheet of Basic White card stock. It opens on the right and the fold is on the left.

I cut a 4-1/4" x 5-1/2" piece of Basic White card stock and textured it using the "Damask Designs" embossing folder. Then I cut it to measure 4" x 5-1/4". I glued it to the card base.

Next I cut a piece of Designer Series Paper (DSP) from the "Floral Charm" 12" x 12" package. It mdasured 4" x 2-3/4". Then I cut the layer using the new Secret Sea card stock. I haven't used it yet. It's so dark it almost looks black. I didn't think I had any but I forgot I had ordered a variety pack of the in colors and there's four sheets of each color in it. I taped the DSP to the card stock and then glued that to the front of the card using equal spacing all around. I just eyed it. I rarely measure. If it looks good then it is good!

The leaves/branch were cut using the die from the "Charming Day" bundle. I cut it using Secret Sea card stock. 

The words were done next. They are from the "Simply Said" set and were stamped on a scrap piece of Basic White card stock using Secret Sea ink. They were punched out using the "Labeled With Love" punch. I also punched one using Secret Sea card stock. I cut the Secret Sea card stock piece in half and taped each half to the back of the word piece. Dimensionals were added to the back. 

I laid the leaves/branch piece on top of the DSP and then set the word piece in place. The Dimensionals will help hold the piece down. I gave it a little tug to see if I needed to add a little glue behind a leaf or two but it held tightly.  And that was it, the card was done.

This was a very quick and easy card to make. It's a simple layout that will work with lots of the DSP in your stash!

Thank you SO very much for taking your time to stop in and see today's birthday card,
Wanda

Saturday, July 26, 2025

Charming Day, Label Me Grateful, Thank You Card, Stampin' Up!

Hello and welcome to my blog. Today I created a thank you card to share. Please read on to see how it was made.

The base of my card is a folded half-sheet of Basic White card stock. It opens on the bottom and the fold is on the top.

I cut a 4-1/4" x 5-1/2" piece of Basic White card stock and textured it using the "Damask Design" embossing folder. After texturing it I cut it to 4" x 5-1/4". Then I glued it to the front of the card base.

Next I stamped the word piece from the "Label Me Grateful" bundle using black Memento ink on Basic White card stock. I cut them out using the die that came with the bundle.

Then I stamped the flowers from the "Charming Day" bundle. I stamped them using black Memento ink on a piece of Basic White card stock. I cut the piece out using the matching die. It was then colored in using both light and dark Granny Apple Green and Highland Heather Blends pens.

I added a little tape to three of the leaves that would be touching the word piece. I set the word piece on top of the card front and then added the flowers. I wanted it to become one piece. I then turned the piece over and added Dimensionals. I made sure I added Dimensionals over the areas where the flowers met the word piece for extra security.  The piece was then set in place on top of the card base.

I liked how it looked but it still needed something so I found some little colored rhinestones and I added them to the card and the card was done.

This was a fun, quick and easy card to make. It would have been a lot quicker for me if I could have given more thought to the embossing folder. I put the card stock in the wrong orientation twice. Third times a charm, right?  What does that really mean?  I'm going to have to look that up sometime when I have nothing better to do. LOL

Thank you SO very much for taking your time to stop in and see today's thank you card,
Wanda

Friday, July 25, 2025

Charming Day, With You In Mind, Thank You Card, Stampin' Up!

Hello and welcome to my blog. I have a thank you card to share today. My "Charming Day" bundle was still sitting out and I saw that there as another flower with leaves image that I hadn't played with yet. Please read on to see how it was made.

The base of my card is a folded half-sheet of Basic White card stock. It opens on the right and the fold is on the left.

I cut a 4" x 5-1/4" piece of Basic White card stock and I textured it on using my scoring tool. I turned the piece over and scored on the left side about 1/4" from the edge. I scored 1/4" from the top and bottom. The score lines are 1/8" apart. I made 5 of them. I repeated that for the bottom. 

I turned the piece over and stamped the "Thank you" from the "With You in Mind" set using black Memento ink. I added Dimensionals to the back of the piece and I set it in place on the front of the card.

The flower is from the "Charming Day" bundle. I stamped it using black Memento ink on a piece of Basic White card stock. I cut it out using the matching die. I also cut out two leaf branches and I set those aside. Using both light and dark Blends pens I colored the leaves with Granny Apple Green and the flower with Poppy Parade. Dimensionals were added to the back and it was set on top of the scored piece. I didn't press down because the leaf branches needed to be tucked in. I added a little glue to the ends of the leaf branches and slipped them under the flower piece on both sides. Then I glued one leaf on each of the sets. If you look hard you can see the leaf that is not sticking up in the air, that's the ones glued down! And that was it, the card was done.

This was a super quick and easy card to make. Of all the pieces to it, I think the flower with leaves took the longest because of the coloring. Everything else was super quick. I can see myself making more like this. It was fun and quick.

Thank you SO very much for taking your time to stop in and see today's thank you card,
Wanda

Thursday, July 24, 2025

Charming Day, Simply Said, Friendship Card, Stampin' Up!

Hello and welcome to my blog. Today I have a simple friendship card to share with you. Please read on to see how it was made.

The base of my card is a folded half-sheet of Basic White card stock. It opens on the right and the fold is on the bottom.

I cut a 4" x 5-1/4" piece of Berry Burst card stock for the layer. I taped it to the front of the card.

The Designer Series Paper (DSP) is from the "Floral Charm" 12" x 12" package was cut at 3-3/4" x 5" and then I cut that piece in half at 2-1/8". I taped one piece on the left side and I flipped the piece over and taped it to the other side.

I had an oval leftover from making a card using the ring that was die cut. I'm not very good at explaining that, am I? Look at the card here. I cut the center oval piece using one die from the "Impressions Abloom" bundle and the other oval die is for the ring. A visual usually works better for me. So when you use the die that creates the ring you end up with an oval. I put them in my stash of parts. Well, today I actually used something from that stash! YAY me! I textured that piece using the "Damask Design" embossing folder. I glued it to the front of the card.

The flowers from the "Charming Day" bundle were stamped using black Memento ink on a scrap piece of Basic White card stock. I colored it using my light and dark Shaded Spruce and Berry Burst Blends pens. Then I cut it out using the matching die. Dimensionals were added to the back and it was set in place on the front of the card.

The "hello" is from the "Simply Said" set and was stamped using black Memento ink on a scrap piece of Basic White card stock. I fussy cut around the word and then glued it on the oval.

I thought the oval needed some embellishments so I found some retired Candy Dots that matched close enough and used them on the piece and the card was finished.

This was a fun, quick and easy card to make. I love it when I can use up some of the things I have sitting around here.

Thank you SO much for taking your time to stop in and see today's friendship card,
Wanda

Wednesday, July 23, 2025

Charming Day, Simply Said, Friendship Card, Note Card, Stampin' Up!

Hello and welcome to my blog. Today I have a friendship/note card to share with you. It's quick and easy to make. Please read on to see how it went together.

The base of my card is a folded half-sheet of Basic White card stock. It opens on the bottom and the fold is on the top. 

I cut a 4" x 5-1/4" piece of Designer Series Paper (DSP) from the "Perennial Lavender" 12" x 12" package. I taped it to the front of the card.

Next I stamped the flower image from the "Charming Day" bundle using black Memento ink on Basic White card stock. I colored the flowers in using both light and dark Highland Heather Blends pens. The leaves were colored in using both light and dark Lost Lagoon Blends pens. I don't think I've ever used Lost Lagoon for the color of leaves before but it works so well here. Once colored, I cut them out using the matching die. Dimensionals were added to the back and the piece was set in place on the bottom left corner of the card.

The words are from the "Simply Said" set and were stamped using Lost Lagoon ink. They were cut out using the die from the "Stylish Shapes" set. The layer behind it was cut using a 1-7/8" circle die (retired). I taped the layers together. Dimensionals were added to the back and the piece was set in place on the front of the card.  And the card was done. 

I thought about adding some embellishments but the background is a bit too busy for that. I think any embellishment would get lost in all that business. It looks fine the way it is. It was a fun, quick and easy card to make.

Thank you SO much for taking your time to stop in and see today's friendship/note card,
Wanda

Tuesday, July 22, 2025

Impressions Abloom, Charming Day, Birthday Card, Stampin' Up!

Hello and welcome to my blog. Today I have a card to share with you that I found on Pinterest. You can see the original card here. The link will open to a new window. Please read on to see how I made this card.

The base of the card is a folded half-sheet of Basic White card stock. It opens on the bottom and the fold is on the top. 

I cut a 4-1/4" x 5-1/2" piece of Basic White card stock and I textured it using the "Damask Design" embossing folder. After texturing I cut it to measure 4" x 5-1/4" and then I glued it to the front of the card.

The oval was cut next. It's from the "Impressions Abloom". I cut the center piece and then the ring piece. I glued the ring to the center piece.

Next the flowers image was stamped and cut. It's from the "Charming Day" bundle. I colored it in using my light and dark Blends pens, I used Bubble Bath, Pumpkin Pie and Granny Apple Green. I didn't have the same colors that were on the original card. 

Two branches of leaves were die cut using the die from the "Charming Day" bundle. I cut them from Basic White card stock. I set the branches in place using a dot of glue here and there.

The flowers were set in place using Dimensionals. 

I should have stamped the words before I added all the other pieces, but I was not thinking so they had to be added on separately.  The words are from the "Charming Day" bundle and were stamped using black Memento ink on a piece of Basic White card stock. I trimmed it down to 5/8" x 3". I snipped the ends to give the piece a bit of character. It was then set in place using Dimensionals.

I added some rhinestones to the front of the card and the card was finished.

Even though I didn't have the same colors, embellishments, or dies I think the card turned out nice.

Thank you SO very much for taking your time to stop in and see today's birthday card,
Wanda

Monday, July 21, 2025

Charming Day, Birthday Card, Stampin' Up!

Hello and welcome to my blog. Today I'm sharing with you a card I found on Pinterest. You can see the original card here. It will open to a new window so you can easily find your way back here. Please read on to see how I made the card. I did make a few changes.

The base of my card is a folded half-sheet of Basic White card stock. It opens on the bottom and the fold is on the top.

The Designer Series Paper (DSP) is from the "Floral Charm" 12" x 12" package. It measures 5-1/4" x 1-1/2". I taped this piece to the bottom of the card.

The Lost Lagoon piece measures 2-1/8" x 5-1/4". I stamped the flowers on it using the "Charming Day" bundle and black Memento ink. I taped that piece to the upper part of the card.

The words are from the same bundle and were stamped using black Memento ink on Basic White card stock. After trimming the piece measures 5-1/4" x 3/4".  I taped the piece over the open area on the card

I stamped the flower on the left using black Memento ink on Basic White card stock. I colored it in using Lost Lagoon ink with my blending brush. I also added the Cajun Craze color using my blending brush. Then I thought the images could use a bit more detail so I used my light Lost Lagoon and Cajun Craze Blends pens. I also colored the center in using my dark Daffodil Delight blends pen. The piece was cut out using a matching die. Dimensionals were added to the back and it was set in place on the front of the card.

I tied a double baker's twine bow and set it in place using a glue dot.

I had some retired enamel dots and I added them to the right side of the word piece and the card was done.

I thought this card looked so pretty when I ran across it in Pinterest that I just had to make it. I'm pleased with the way it turned out.

Thank you SO very much for taking your time to stop in and see today's birthday card,
Wanda


Sunday, July 20, 2025

Extraordinary Flora, Simply Said, Birthday Card, Stampin' Up!

Hello and welcome to my blog. Today I have a birthday card to share with you using the "Extraordinary Flora" washi tape. Please read on to see how it was made.

The base of my card is a folded half-sheet of Basic White card stock. It opens on the right and the fold is on the left. 

I cut the first three layers as follows: Old Olive was cut at 3-7/8" x 4-7/8". The Strawberry Slush was cut at 3-3/4" x 4-3/4". And the Basic White piece was cut at 3-1/2" x 4-1/2".

I took a 4" x 3/4" piece of Basic White card stock and loaded it up with the images from the Extraordinary Flora" washi tape. I had a little baggie full of pieces and was wondering what I could to to get that bag used up. SO I ended up doubling the size of this piece and taped the images all over the piece. My images had been put on Basic White card stock and then cut using the matching die. 

Once the pieces were taped all over my card stock I textured the whole piece using the "Damask Design" embossing folder and then I cut them into strips. The first two measured 1" x 4" and the last one measured 3/4" x 4".  Had I been paying better attention I would have cut the second one at 3/4" so the thinner one would be in the middle. It still worked this way but I think it would look better the other way. I could have changed it and added the thinner one in the middle but then the pieces wouldn't match being across from each other. And again, that doesn't matter either but it wasn't the look I was going for, I wanted them to look like they belong together but are cut apart. Anyway, I taped the strips to the 3-1/2" x 4-1/2" piece of card stock. Then I taped that to the Strawberry Slush piece, that was then taped to the Old Olive piece and the whole thing was taped to the front of the card.

The words are from the "Simply Said" set and were stamped using Old Olive ink. I trimmed them to measure 3/8" x 3". I snipped the ends at an angle and then I taped it to a 5/8" x 3-1/4" piece of Old Olive card stock and snipped the ends to match the word piece.

Right about where the "Y" is in "HAPPY" I placed a glue dot on the first strip. Then I took a piece of Baker's Twine and made a couple of loops and stuck them to the glue dot. 

Dimensionals were added to the back of the words and they were set in place over the twine. And that was it.

This was a fun card to make and I love how the texture gave the flowers a more fun look.

Thank you SO much for taking your time to stop in and see today's birthday card,
Wanda

Saturday, July 19, 2025

Simply Said, Perennial Lavender, Friendship Card, Note Card, Stampin' Up!

Hello and welcome to my blog. Today I have a note card to share with you. Please read on to see how it was made.

The base of my card is a folded half-sheet of Basic White card stock. It opens on the bottom and the fold is on the top.

I cut a 2" x 5-1/4" piece of Lost Lagoon card stock and textured it using the "Damask Designs" embossing folder. I chose 2" because the piece of Designer Series Paper (DSP) from the "Perennial Lavender" 12" x 12" package measured 3" x 5-1/4".  I wanted to use that piece of DSP but it didn't cover the whole front of the card. So I thought the Lost Lagoon card stock would make up the difference. But first it needed some texture. 

I glued the textured piece in place first and then the DSP was glued on top of that.

This piece of DSP had a nice open space on the right for some wording. Using Basic White card stock I stamped the words from the "Simply Said" set using Gorgeous Grape ink. I cut them out using a die from the "Stylish Shapes" set. Then I used a 1-7/8" circle die (retired) for the layer.  I taped the two layers together, added Dimensionals to the back and set the piece in place on the front of the card.

I added a couple of brass butterflies to the front and the card was done.

It's a simple card but has a nice look to it. I was glad I was able to use up that piece of DSP.

Thank you SO much for taking your time to stop in and see today's friendship/note card,
Wanda

Friday, July 18, 2025

Impressions Abloom, The Right Words, Birthday Card, Stampin' Up!

Hello and welcome to my blog. Today I have a birthday card to share with you. I found it on Pinterest but there were no instructions. Please read on to see how it was made.

The base of my card is a folded half-sheet of Basic White card stock. It opens on the right and the fold is on the left.

For the strips of Designer Series Paper (DPS), I cut 1" x 4" strips from various sheets in the "Perennial Lavender" 12" x 12" package.

I had never done this technique before and I had no idea where to begin. So I started with the piece on the right that is second from the bottom. I lined it up on the right side of the corner and made sure it was straight. I taped it in place and left what was hanging over to be trimmed later. 

The next piece I added was the bottom piece. Then the left side longest piece and then the shorter one next to it. The checkered one was added and then the tiny purple one in the middle. I took my scissors and trimmed the ends off. I was surprised at how easy that was to do after I pondered how difficult it looked!

The flower was cut next. It's from the same package of DSP. I used the "Impressions Abloom" bundle. The flower center is from the same package of DSP. The leaves were cut using Lost Lagoon card stock. Dimensionals are added to the back of the flower and were set aside.

The words were added next. I did lay the flower over the area where it was going to go so I can see where I need to stamp the words. The words are from "The Right Words" set and stamped using Gorgeous Grape ink.

I thought the white area looked like it needed something so I took a scrap piece of copier paper and covered the DSP. Using my dark Highland Heather Blends pen I tapped ink over the white area.

The flower was then added and the leaves were tucked under it.

I had some retired enamel dots and added them to the front of the card and the card was done.

This was actually a very fun card to make and I'm happy with the way it turned out.

Thank you SO very much for taking your time to stop in and see today's birthday card,
Wanda


Thursday, July 17, 2025

Charming Day, Floral Charm, Simply Said, Friendship Card, Stampin' Up!

Hello and welcome to my blog. Today I have a friendship card to share with you. Please read on to see how it was made.

The base of my card is a folded half-sheet of Basic White card stock. It opens on the right and the fold is on the left.

I cut a 4-1/4" x 5-1/2" piece of Basic White card stock and textured it using the "Damask Design" embossing folder. It was trimmed to 4" x 5-1/4". I glued it to the front of the card.

A 1-3/4" x 5-1/4" piece of Designer Series Paper (DSP) from the "Floral Charm" 12" x 12" package was cut and then glued to the front of the card about 1/2" from the fold.

Using a piece of Basic White card stock, the oval piece is from the "Impressions Abound" bundle. 

Next I stamped the flowers piece from the "Charming Day" bundle using black Memento ink on a piece of Basic White card stock. I colored the flowers in using both light and dark Pumpkin Pie Blends pens and the light Cajun Craze pen for details. The leaves are colored in using both light and dark Old Olive Blends pens. The flowers were then cut out using the matching die.

I laid piece on top of the oval so I could see how much space I had to stamp the words. I ended up using the "hello" from the "Simply Said" set. They were stamped using Old Olive ink.

The oval piece was glued in place about 1/2" from the right side and equal spacing on the top and bottom. It's not completely centered from left to right because I wanted some of the DSP to show.

The flower piece was set in place using Dimensionals. I had some enamel dots that I had gotten at a retired stamp sale. The header wasn't on them so I don't know the name. I just know they are retired. The color was close enough so I used them.

This was such a fun, quick and easy card to make and I can see myself making more like this in the future.

Thank you SO much for taking your time to stop in and see today's friendship card,
Wanda

Wednesday, July 16, 2025

Charming Day, Simply Said, Perennial Lavender, Friendship Card, Stampin' Up!

Hello and welcome to my blog. Today I have a friendship card to share with you. Please read on to see how it was made. 

The base of my card is a folded half-sheet of Basic White card stock. The large Basic White layer on top of it measures 4" x 5-1/4", it was taped in place.

The smaller Basic White layer measures 3" x 4-1/4". 

A 3" x 2-1/8" piece of Designer Series Paper (DSP) from the "Perennial Lavender" 12" x 12" package. I taped it to the bottom of the Basic White piece.

I took some linen thread and wrapped it around the center of the piece three times and I tied a knot. I left the tails long so I could trim them.

I stamped the flower from the "Charming Day" bundle using black Memento ink on a piece of Basic White card stock. I colored the flowers in using both light and dark Highland Heather Blends pens. And for the leaves I used both light and dark Old Olive Blends pens. This is SO much easier coloring than using markers. I cut the flowers out using the matching die. Dimensionals were added to the back and the piece was set aside.

The "hello" is from the "Simply Said" set and was stamped using Gorgeous Grape ink. Dimensionals were added to the back of the piece and it was centered on the front of the card.

The flower piece was then added. The linen ends were trimmed and a little brass butterfly was added.  And the card was done.

I do like how it turned out, it was quick and easy to make and it turned out better than what I had envisioned.  

Thank you SO much for taking your time to stop in and see today's friendship card,
Wanda

Tuesday, July 15, 2025

Label Me Grateful, Thank You Card, Florals in Bloom, Stampin' Up!

Hello and welcome to my blog. Today I have a thank you card to share with you. Please read on to see how it was made.

The base of my card is a folded half-sheet of Basic White card stock. It opens on the bottom and the fold is on the top.

I cut a 4-1/4" x 5-1/2" piece of Petal Pink card stock. I textured it using the "Damask Designs" embossing folder. I cut it to 4" x 5-1/4".  I glued it to the front of the card.

Next I was looking for some Designer Series Paper (DSP) that I thought would go with the Petal Pink. I found this one in the "Florals in Bloom" 12" x 12" package. It was leftover from a previous card and it measured 2-1/2" x 5-1/4". I didn't want to cut it down so I used it as it was. I glued it to the bottom of the Petal Pink piece. Had I known where I was going with this I would have cut my Petal Pink in half and used the other half on a future card.  But it is what it is. 

The word piece was done next. I stamped the words from the "Label Me Grateful" bundle. I cut them out using a die in the bundle.

The flowers and greenery dies were also in the bundle. I cut three flowers using Cajun Craze card stock and one of Basic White card stock. The greenery was cut using Old Olive card stock. I glued the flowers in place on the word piece. 

I turned the word piece over and added Dimensionals. I did add one to the small leaves on the right and one to the backside of the white flower.

Using some enamel dots I had (retired) I stuck them to the center of the flowers and the card was done.

This was a very quick and easy card to make. It's too bad the bundle didn't come with a smaller flower in it because it would make easy poinsettias. Anyway, it was a fun card to make.

Thank you SO very much for taking your time to stop in and see today's thank you card,
Wanda

Monday, July 14, 2025

Beautiful Gallery, The Right Words, Sympathy Card, Stampin' Up!

Hello and welcome to my blog. Today I have a thinking of you card to share with you. Please read on to see how it was made.

The base of my card is a folded half-sheet of Basic White card stock. It opens on the bottom and the fold is on the top.

I cut a 4" x 5-1/4" piece of Misty Moonlight card stock for the layer. I punched out a piece using the "Labeled with Love" punch. I set it aside.

Next I took the image from the "Beautiful Gallery" 6" x 6" stack. I trimmed off 3/4" off the bottom first and then cut the top off so it measured 3-3/4". I also trimmed off the right side only so it measured 5" long. I taped that to the Misty Moonlight layer and then that was taped to the card base.

The words are from "The Right Words" set. They were stamped using black Memento ink on a scrap piece of Basic White card stock. The words were punched out using the same "Labeled with Love" punch.

I took the Misty Moonlight punched piece and cut it in half on the long side. I taped each half to the upper part of the word piece. Dimensionals were added to the back of it and it was set in place on the front of the card.

I thought the word piece was a bit too bright so I took my blending brush and Misty Moonlight ink and lightly scrubbed on some color. It looked SO much better after that.

This was a super quick and easy card to make. And I think the image made a nice sympathy card.

Thank you SO very much for taking your time to stop in and see today's sympathy card,
Wanda

Sunday, July 13, 2025

Cute as Can Bee, Charming Day, Friendship Card, Thinking of You Card, Stampin' Up!

Hello and welcome to my blog. Today I have a friendship/thinking of you type card to share with you. Please read on to see how it was made.

The base of my card is a folded half-sheet of Basic White card stock. It opens on the bottom and the fold is on the top. 

I cut a 4" x 5-1/4" piece of Daffodil Delight card stock and textured it using the "So Swirly" embossing folder. I glued it to the front of the card.

The Designer Series Paper (DSP) is from the "Cute as Can Bee" 12" x 12" package. It measures 3-3/4" x 2-3/8". It was glued to the front of the card leaving 1/4" around the top, bottom and left side.

The hexagons were cut using the dies in the "Meant to Bee" bundle. A Basic Black and a Basic White were cut. Before taping them together I punched out the black circle using the 1-3/8" punch.  After taping them together I centered the piece on the front of the card and then glued it in place.

The bee is from the same "Cute as Can Bee" DSP and was fussy cut. Dimensionals were added to the back and it was set in place on the front of the card.  

The words are from the "Charming Day" bundle and were stamped using black Memento ink on a scrap piece of Basic White card stock. I cut it out using the second smallest die in the "Stylish Shapes" set. I taped it to the black circle and then that was placed on the front of the card using Dimensionals. And the card was done!

This was a fun card to make and I just love those little bees in that package of DSP!

Thank you SO very much for taking your time to stop in and see today's friendship, thinking of you card,
Wanda

Saturday, July 12, 2025

Impressions Abloom, The Right Words, Thinking of You Card, Stampin' Up!

Hello and welcome to my blog. Today I have a thinking of you card to share. Please read on to see how it was made.

The base of my card is a folded half-sheet of Basic White card stock. It opens on the bottom and the fold is on the top.

I cut a 4" x 5-1/4" piece of Bubble Bath card stock for the layer and on top of that is a 3-7/8" x 5-1/8' piece of Designer Series Paper (DSP) from the "Regal Distressed" 12" x 12" package. Before taping the DSP to the Bubble Bath piece I die cut the word piece from the center using the die from the "Stylish Shapes" set.

Once the layers were taped together I taped them to the front of the card.

The flowers were stamped next using the "Impressions Abloom" bundle. I stamped them using Bubble Bath ink for the solid part and Fresh Freesia for the details. The centers were first stamped using Daffodil Delight but I thought it looked too washed out so I stamped over them using Pecan Pie ink. I liked how the yellow showed through. A fun accident.

I took some gold thread and using glue dots I stuck it to the front of the card. Then I place the first large flower in place using Dimensionals. The next largest flower was added using Dimensionals on the lower part and glue on the part that touches the large flower. The same was done for the smallest flower.

The leaves were cut using Granny Apple Green card stock and were glued in place under the flowers. Once the leaves were in place I pressed down on the flowers to set them.

The words are from "The Right Words" set and were stamped using black Memento ink. I trimmed the right side and glued it to the front of the card. I chose glue so I could move it around a bit and make sure it was straight.

A couple of "Brass Butterflies" were added and the card was done.

This was a fun, quick and easy card to make. I like now it turned out. I'm not a big fan of pink but it worked so well here.

Thank you SO very much for taking your time to stop in and see today's thinking of you card,
Wanda

Friday, July 11, 2025

Extraordinary Flora, Party Favors, Weekend Project, Stampin' Up!

Hello and welcome to my blog. Today I have a fun weekend project to share with you. It's great for birthday parties, weddings, anniversaries or whatever party you have in mind. It's simple to do. Please read on to see how to make these.

I took Pearson's Peppermint Patties for the candy. You can use other covered round candies too. I just like the mints because the are great for after eating at a party.

Using the smallest circle die in the "Stylish Shapes" set I cut 3 using Basic White card stock. I stuck them to the backs of the patties using tear and tape. You want something pretty sticky for this. Do NOT use hot glue or even school glue. It's best to stick with the double sided tape. Glue dots would work too.

Next I took a panel of my "Extraordinary Flora" washi tape and placed it on Basic White card stock. Then I cut them out using the matching die. Using mono glue I glued two of the flowers down. On the melon colored one I added a tiny flower using a Dimensional.

On the purple one, I glued one flower over the flower that was already on the image and I used Dimensionals on the other two flowers.

And for the third one I just added a few small Dimensionals to the back of it and set it in place on the circle.  And that was it.

If you need to make a lot of these, a roll of the washi tape should do it, there's 66 sets per roll.  33 of the melon and 33 of the purple.  These make great party favors! I thought they went together rather quickly. It would be a lot quicker if you had a circle punch instead of a die. As long as it covers the back of the mint without going over the edges it will work. A 1-3/8" is about as big as you'd want to go.

Thank you SO very much for taking your time to stop in and see today's party favors,
Wanda


Thursday, July 10, 2025

Impressions Abloom, Simply Said, Friendship Card, Stampin' Up!

Hello and welcome to my blog. Today I have a card to share with you that I found on Pinterest. I changed it a bit to suit my supplies and needs. The original card can be found here. Please read on to see how it was made. There were no instructions so I had to use my best guess.

The base of my card is a folded half-sheet of Basic White card stock. It opens on the right and the fold is on the left.

I cut a  4" x 5-1/4" piece of Designer Series Paper (DPS) from the "Perennial Lavender" 12" x 12" package. I taped it to the front of the card base.

Next I cut the Basic White oval using the die from the "Impressions Abloom" bundle. 

The flowers are from that same bundle and were stamped using Gorgeous Grape for the details and Highland Heather for the solid part of the flowers. The centers were stamped using Pecan Pie ink. 

The leaves were cut next. I used Granny Apple Green card stock and the dies from the same bundle. 

I laid the flowers on the oval so I could see where the wording would go. I used the "hello" from the "Simply Said" set and it was stamped using Gorgeous Grape ink.

The flowers were added next. I started with the large flower on the left. I used a few dots of glue on the center area of the flower. The second large flower was set in place using a Dimensional on the center and the smaller flower had a small Dimensional added to the center. Once the flowers were in place the greenery was added.

I removed the bottom leaf from the long stem of leaves. I added a little glue to the bottom leaves and stem and slipped it under the large lower flower. I took the leaf I cut off and added a little glue to the end and slipped it under the large flower. The two other fan looking leaves were glued in place under the large flowers.

Dimensionals were added to the back of the oval and it was set in place on the front of the card.

I didn't like how bright the center of the flowers looked so I took my Wink of Stella pen and colored it in. It picked up a bit of the Pecan Pie color and it toned down the brightness of the white.

I had some retired dots from the "Halloween Night" package. It's what I had that matched and I need to use up my stash.

This was a fun card to make and I do like how it turned out.

Thank you SO very much for taking your time to stop in and see today's friendship card,
Wanda

Wednesday, July 09, 2025

Simply Said, Impressions Abloom, Extraordinary Flora Washi Tape, Birthday Card, Stampin' Up!

Hello and welcome to my blog. Today I have a birthday card to share with you that I found on Pinterest. You can see the original card here. This will open up to a new window so you won't lose your place here. I changed the card a little. There was no link to the original post so I just winged it. Please read on to see how it was made.

The base of my card is a folded half-sheet of Highland Heather card stock. It opens on the right and the fold is on the left. 

I cut a 4" x 5-1/4" piece of Basic White card stock for the inside and then I cut another one for the outside. I taped the inside piece in place. On the other piece, I textured it using the "Damask Design" embossing folder.  I glued that to the front of the card. I placed it under my stamping mat to help keep it flat while I worked on the other parts of the card.

The ovals were cut next. The Basic White one was cut first and the words from the "Simply Said" set were stamped on it using black Memento ink.

The other oval is a frame piece. It was cut from Highland Heather card stock. It's very thin and it was glued to the Basic White oval. I was surprised that I got it on the oval straight with one try! I used the mono glue so I could move things around a bit if I had to but fortunately this time I didn't have to! I moved it aside to set up.

In the meantime I took a strip from the "Extraordinary Flora" washi tape roll and stuck it to a piece of Basic White card stock. Using the matching die I cut the pieces out. 

I glued the oval to the front of the card and then I began adding the flowers. For the bottom area I started out with the large flower. I added it using a Dimensional. I didn't press down on the piece because I thought I would need to slip other pieces under it. As a rule of thumb I never press down on items with Dimensionals on it because I may have to move them or slip elements under them. Next I slipped the long piece of greenery under the flower. The leaves to the left of the long one was added next and then the lighter green one. The flower piece is actually three pieces. It's one of the daisy pieces like on top but I wanted more color on it so I glued two flowers to it.

For the top part I started out with the piece with the flower on it. It was set on the piece using a Dimensional. I slipped the yellowish leaves under the bottom leaf. Then the daisies were slipped under the upper leaf. The darker green leaves were added, they were slipped under the daisies. I took one of the larger single flowers and added a Dimensional to the back and placed it over the flower that was with the two leaves. A smaller flower was added just under that flower.

Three rhinestones were added to the oval and the card was done.

This is such a pretty card and I love how it turned out.

Thank you SO very much for taking your time to stop in and see today's birthday card,
Wanda

Tuesday, July 08, 2025

Extraordinary Flora Washi Tape, Layers of Beauty, Anniversary Card, Stampin' Up!

Hello and welcome to my blog. Today I have a much better card to share with you than the one I posted yesterday! I can't get enough of the "Extraordinary Flora" washi tape. I found this card on Pinterest. You can see the original here, it will open to a new window so you can come back here easily. I did change it a bit to suit the materials I had on hand. Please read on to see how it was made.

The base of my card is a folded half-sheet of Basic White card stock. It opens at the bottom and the fold is at the top. I cut a 4" x 5-1/4" piece of Basic White card stock and textured it using the "Damask Design" embossing folder. 

I cut a 6" piece of ribbon (retired) and taped the ends to the back of the embossed piece. Then I glued that piece to the front of the card base. I set it under my stamping mat while I worked on the other parts of the card.

The words are from the "Layers of Beauty" bundle and were stamped using black Memento ink on a scrap piece of Basic White card stock. I cut them out using the third rectangle die in the "Stylish Shapes" set. 

Next I took out my little baggie of pieces that were left over from die cutting out numerous sections of the "Extraordinary Flora" washi tape roll. I actually had all the pieces so I didn't need to cut another section and have even more pieces to add to the baggie! The card uses 6 pieces of the washi tape images.

Dimensionals were added to the back of the word piece and it was centered on the front of the card. I just eyed it as best as I could. But if you like to measure, it's 1-5/8" from the side edges and from the fold and bottom edge. 

The flowers were added next. I used glue to put the top flower on as best as I could. Since my wording was different, I didn't have a lot of space to glue the images. The leaves behind it were trimmed down a bit so it would fit under the word piece without having to move any Dimensionals. It too was glued in place.

For the bottom flowers and greenery, I added the top greenery piece first and then there was a smaller one that kind of looked like the top one but it only has 3 leaves, was glued around the bottom corner area. I had it stick out more because again, I didn't have a lot of room on the word piece for adding my flowers. I did have to pull the lower leaf piece down a bit once the flower was glued in place so it would show more. That is the advantage of using the mono glue. The little flower was glued in place and that part was done.

I had some retired "Polished Dots" in my stash so I added three of them to the card and the card was done.

I really like the looks of this card. It was SO fun to make and it made a perfect anniversary card.

Thank you SO very much for taking your time to stop in and see today's anniversary card,
Wanda

Monday, July 07, 2025

The Right Words, Thoughtful Journey, Sympathy Card, Stampin' Up!

Hello and welcome to my blog. Today I have a sympathy card to share with you. This card was not what I had in mind when I started working on it. But you know that I share the good, the bad and the ugly with you. I feel like this sympathy card needs a sympathy card. Hopefully you can improve on it. Please read on to see how it was made.

The base of the card is a folded half-sheet of Basic White card stock. It opens on the bottom and the fold is on the top.

A 4" x 5-1/4" piece of Basic White card stock that was textured using the "Damask Design" embossing folder was glued to the front of the card base. 

I cut a 3-3/4" x 5" piece of Designer Series Paper (DSP) from the "Thoughtful Journey" 6" x 6" stack was glued to the front of the card.

The words are from "The Right Words" set and were stamped using black Memento ink on a scrap piece of Basic White card stock. I fussy cut around the words and set them in place using Dimensionals. 

I thought the card looked pretty blah so I added some orangish glass embellishments. It didn't help but there was not much else I could do to save this card. I think it was destined to be ugly from the very beginning.  But it is what it is and it's here!

Thank you SO much for taking your time to stop in and see today's sympathy card,
Wanda

Sunday, July 06, 2025

Thoughtful Journey, Simply Said, Friendship, Note Card, Stampin' Up!

Hello and welcome to my blog. Today I have a quick and easy friendship card to share with you. Please read on to see how it was made.

The base of my card is a folded half-sheet of Basic White card stock. It opens on the right and the fold is on the left.

I cut a 4" x 5-1/4" piece of Petunia Pop card stock for the layer. On top of that is a 3-3/4" x 5" piece of Designer Series Paper (DSP) from the "Thoughtful Journey" 6" x 6" stack. These stacks are so much fun to use. There's lots of different images and lots of pages per stack.  

The DSP was taped to the Petunia Pop piece and that was taped to the front of the card.

The words are from the "Simply Said" set and were stamped using Mossy Meadow ink. I cut them out using the round die from the "Stylish Shapes" set. I wanted a layer behind it but nothing too big. The next size circle in that set was just too big so I found my 1-3/4" punch and punched out the circle from a scrap piece of Petunia Pop.  You can also punch out the circle from the Petunia Pop layer before you tape the layers together.

I taped the word piece to the Petunia Pop layer. Dimensionals were added to the back and the card was done.

This was such a quick card to make. I was going to just use the DSP alone but I thought it really needed a layer. Plus it felt like it was just too simple without layers, though it still did look nice. 

Thank you SO much for taking your time to stop in and see today's friendship/note card,
Wanda

Saturday, July 05, 2025

Simply Said, Extraordinary Flora, Birthday Card, Stampin' Up!

Hello and welcome to my blog. Today's card has a few pieces to it but it did go together pretty fast. Please read on to see how I made it.

The base of my card is a folded half-sheet of Basic White card stock. It opens on the right and the fold is on the left. 

I cut a 3" x 4-1/4" piece of Basic White for the large layer. On top of that layer are three strips of Basic White card stock that was textured using the "Damask Design" embossing folder. After embossing it I cut the pieces at 4" x 1", 4" x 7/8" and 4" x 1/2". I glued them to the large layer and then that was taped to the front of the card.

Using the two smaller dies from the "Stylish Shapes" set, I cut them using Basic White card stock. I taped the little one to the larger one. I added Dimensionals to the back and set it in place on the front of the card about 1/2" from the top edge and 1/4" from the fold. 

A flower from the "Extraordinary Flora" washi tape roll was set on the rectangles using Dimensionals. I had some parts leftover from cutting a section of them from a previous card. I have a little baggie full of parts! 

The words are from the "Simply Said" set and were stamped using Gorgeous Grape ink. They were in the stamp set and I thought I'd use it. It blended in well enough with the color of the flowers. It set in place using Dimensionals.

This was a fun card to make and would make a great wedding, get well, thinking of you or thank you card too.

Thank you SO very much for taking your time to stop in and see today's birthday card,
Wanda

Friday, July 04, 2025

Impressions Abloom, Simply Said, Extraordinary Flora, Friendship Card, Stampin' Up!

Hello and welcome to my blog. Today I have a super quick and easy card to share with you. Please read on to see how it was made.

The base of my card is a folded half-sheet of Basic White card stock It opens on the right and the fold is on the left.

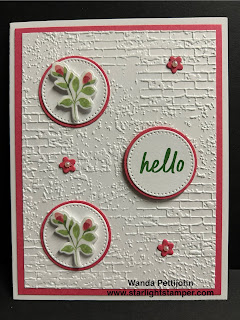
I cut a 4" x 5-1/4" piece of Strawberry Slush card stock for the layer. I used my 1-3/8" punch and punched out three circles from the center area of that piece.

The Basic White layer measured 3-3/4" x 5" and was textured using the "Exposed Brick" embossing folder. I glued that to the Strawberry Slush piece and then that was taped to the front of the card. 

Using the second smallest die in the "Stylish Shapes" set I cut three circles. One of them I stamped the "hello" from the "Simply Said" set using Garden Green ink. I taped the white circles to the strawberry circles. Dimensionals were added to the back of the "hello" one. 

The flowers are from the "Extraordinary Flora" washi tape roll. I put the section I was using on a piece of Basic White card stock and then cut them out using the matching die. I popped the flowers up using two small Dimensionals on each one. 

The circles with the flowers were glued in place about 3/4" from the edge of the card and 5/8" from the fold. The "hello" circle as centered as much as I could by eyeing it. It's about 5/8" from the side edge of the card and 2" from the top and bottom edges.

I thought the card could use a little something in those empty spots so I cut the flowers from the "Impressions Abloom" bundle using a scrap piece of Strawberry Slush card stock. It looked okay but it still needed something else. I was going to add Wink of Stella but decided to just add some tiny pearls and that's just what it needed. It's sweet and simple.

This was a fun card to make and so very quick.

Thank you SO very much for taking your time to stop in and see today's friendship card,
Wanda

Thursday, July 03, 2025

Impressions Abloom, The Right Words, Birthday Card, Stampin' Up!

Hello and welcome to my blog. Today I have a birthday card to share with you. Please read on to see how it was made.

The base of my card is a folded half-sheet of Basic White card stock. It opens on the bottom and the fold is on the top. 

I cut a 4" x 5-1/4" piece of Fresh Freesia card stock for the layer. On top of that is a 3-3/4" x 5" piece of Basic White card stock. First I cut the hole on the left side using the largest die from the "Stylish Shapes" set. Once the circle was cut I textured the piece using the "Damask Design" embossing folder. Then I glued that to the Fresh Freesia piece. Then that was taped to the card base.

The flowers came next. They are from the "Impressions Abloom" bundle and were cut using Basic White, Daffodil Delight and Garden Green card stock. Using my blending brush I scrubbed on some Fresh Freesia ink on the center are of the white flowers. Then the Daffodil Delight centeres were glued in place. I glued the double stem on the front of the card. I took the top two leaves off the branch of four leaves and I glued them in place. The bottom flower was taped in place and the top one was added using a Dimensional. 

The words are from the "Right Words" set and were stamped using Garden Green ink. I cut them out using the die from the "Stylish Shapes" set. I also cut a Garden Green piece using the same die. I cut that die in half down the center and I taped the pieces to the top and bottom of the word piece. Dimensionals were added to the back and it was set in place on the front of the card.

At this point I thought the card was done but that upper right area just needed something. SO I took the flower die from the "Impressions Abloom" bundle and cut them out. The one die cuts out three flowers at a time. Nice! Makes it quicker! I used Fresh Freesia ink for those little flowers. I glued them in place but the card still needed something.

I took my Wink of Stella pen and added a bit of sparkle to the center of the big flowers and I colored the little flowers with it. It looked good but still needed something more. I dug out my tiny pearls and added one to each little flower and the card was done!

This was such a fun card to make and I do like how it turned out.

Thank you SO very much for taking your time to stop in and see today's birthday card,
Wanda

Wednesday, July 02, 2025

Peaceful Pier, Thinking of You Card, Stampin' Up!

Hello and welcome to my blog. Today I have a thinking of you card to share with you. I found the card on Pinterest and I changed it a bit. You can see the original card here. Please read on to see how it was made.

The base of my card is a folded half-sheet of Basic White card stock. It opens on the bottom and the fold is on the top.

I cut a 4-1/8" x 5-3/8" piece of Strawberry Slush card stock for the largest layer. On top of that is a 4" x 2-5/8" piece of Pretty in Pink card stock and a 4" x 2-5/8" piece of Basic White card stock.

The Pretty in Pink card stock was textured using the "Damask Design" embossing folder. I glued that to the left side and the Basic White piece was taped to the right side.

The center focal piece was cut as follows. The largest layer is a 3" x 3" piece of Strawberry Slush. On top of that is a 2-3/4" x 2-3/4" piece of Pretty in Pink card stock and on top of that is a 2-1/2" x 2-1/2" piece of Basic White card stock. 

On the Basic White square I added the flowers from the "Extraordinary Flora" washi tape roll. I laid the strip out on a piece of Basic White card stock and then using the matching die, I cut them out. I placed them on the piece using glue. I did change the layout there a bit too. 

I set the square on top of the card front for placement of the words. The words are from the "Peaceful Pier" set and were stamped using black Memento ink.

Dimensionals were added to the back of the square layers and then it was set in the front of the card centering it using the lines where the Pretty in Pink and Basic White pieces line up. I got those two pieces butted up to each other so well that you couldn't see any gaps. And did that matter? NO, it did not. It was all covered by the layered squares. Usually, when it does matter I don't always get it exact but this time I did and no one can see it! LOL  Okay, done whining. LOL 

Using glue, I added some glass raindrops that I had and the card was done. 

I opted to make it a regular card instead of a fancy fold because the ones receiving it won't understand the concept of the diamond being part of the opening. Plus my diamond is centered. I didn't want to move it over to the right because I thought the words would look squished. This way it gave nice spacing in front and in back of the words. 

It was a fun card to make and I am pleased with the way it turned out.

Thank you SO very much for taking your time to stop in and see today's thinking of you card,
Wanda

Tuesday, July 01, 2025

Beautiful Gallery, Simply Said, Friendship, Note Card, Stampin' Up!

Hello and welcome to my blog. Today I have a friendship/note card to share with you. Please read on to see how it was made.

The base of my card is a folded half-sheet of Basic White card stock. It opens on the right and the fold was on the left. 

I cut a 4" x 5-1/4" piece of Basic White card stock and textured it using the "Damask Design" embossing folder. I glued that to the front of the card.

Next I cut my piece of Designer Series Paper (DSP) from the "Beautiful Gallery" 6" x 6" stack. It was leftover from the card I made on June 29th.  It was sitting on my worktable (because I rarely put anything away) and I thought I'd make a card using it. I cut the piece to measure 3" x 4".  For the layer behind the DSP, I cut a 3-1/4" x 4-1/4" piece of Mossy Meadow card stock. I taped the two pieces together and then glued that to the front of the card. I prefer to glue anything that comes in contact with textured card stock because tape doesn't always stick. 

The words were stamped next. Using the "Simply Said" set I stamped them using Mossy Meadow ink on a scrap piece of Basic White card stock. I cut them out using a die from the "Stylish Shapes" set. The Mossy Meadow circle measures 1-7/8". I taped the two layers together. Dimensionals were added to the back and the piece was set in place on the front of the card.  And the card was done.

I was so glad I was able to use up that leftover piece of DSP (before it got ruined) and make a quick and easy card with it.

Thank you SO very much for taking your time to stop in and see today's friendship/note card,
Wanda