
The base of my card is a folded half-sheet of Basic White card stock. This card opens at the bottom and the fold is at the top.
I cut two pieces of Real Red card stock measuring 2-1/2" x 3-5/8" for the back layers.
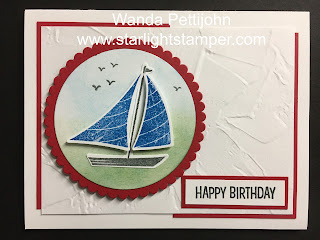
A 3-5/8" x 4-7/8" piece of Basic White card stock was cut and then textured with the "Painted Texture" embossing folder. I glued the Real Red pieces to the upper left and lower right corners of this piece of card stock and I set it aside to dry.
I die cut the second largest circle from the "Layering Circles" dies using Basic White card stock. I used my blending brush and scrubbed in some Soft Sea Foam at the bottom. Then I added some Mossy Meadow. I wanted a greener looking ocean because I needed a blue sky. I used Pacific Point ink for the sky and I also moved a bit of that color into the sea too.
The sail boat was stamped using Basic Gray ink for the boat and Pacific Point for the sails. I punched them out using the "Sailboat Builder" punch. I set the pieces on the circle so I could see where to place the birds. I stamped the birds using Basic Gray ink. Then the boat was set in place on the circle using glue. I added the sails using Dimensionals.
Next I punched out the largest scalloped circle using Real Red card stock. I taped the Basic White circle to the scalloped circle. Dimensionals were added to the back and the piece was set aside. I wanted to make sure I had room for the words.
The words are from the "Catch You Later" set and were stamped using Basic Gray ink on a piece of Basic White card stock that measured 1/2" x 1-7/8". I cut a 5/8" x 2" piece of Real Red card stock for the layer. I taped the two pieces together and then glued them to the bottom right side of the card.
Then the large circle was set in place on the textured piece. This was then glued to the card base and the card was done.
This card could be made into a masculine get well card, thinking of you card, and even a sympathy card.
Thank you SO very much for stopping by to see today's masculine birthday card,
Wanda

1 comment:
Love this layout Wanda. The POP of red on the two corners is BRILLIANT.
Post a Comment