Pin It

Saturday, March 18, 2023

Around the Bend, Thank You Card, Stampin' Up!

Hello, I'm happy to see you here today. I have a fun find card to share with you.  I was moving some stuff on my worktable (I did not say cleaning it off, we all know that's not going to happen!) and I ran across some pieces I thought I'd put together to make a quick card.

The base of my card is a folded half-sheet of Basic White card stock. I textured it using the "Painted Texture" embossing folder. I added Dimensionals to the back and set it in place on the front of the card base.

I found the two Designer Series Paper (DSP) strip on my worktable. The DSP is from the "Dandy Designs" 12" x 12" package.  I don't remember why I had die cut them but there they were just waiting for something to happen to them. Whether it be to be ruined by laying around or to be used on a card. I discovered them before they had a chance to get ruined.  I had used the stitched rectangle frame from the "Stylish Shapes" set. I glued them in place on top of the embossed layer.

The words are from the "Around the Bend" set and were stamped using black Memento ink. I used the stitched circle from the same "Stylish Shapes" set and I used the scalloped circle die from the "Layering Layers" set. I taped the two pieces together. Dimensionals were added to the back and the piece was set in place on the front of the card.  And that was it, the card was done. 

Don't you just love it when you can use up stuff you find and make it into something decent too?!!!

Thank you SO very much for stopping by to see today's thank you card,
Wanda


Friday, March 17, 2023

Best Day, Framed Florets, Birthday Card, Stampin' Up!

Welcome! I'm happy you are here today to see my creations. Today's creation kind of has a gag factor to it. I'm not fond of the colors I chose but it is what it is.  I'm sure a kid wouldn't care what the colors are, they are bright and there'd probably be money inside!!! LOL So I'm hoping you'll pick better colors for your cake! But I will share with you how I made mine so we don't make that mistake gain!

The base of my card is a folded half-sheet of Pear Pizzazz. My card was cut in half on the short side of the sheet so once it was cut it measured 1/4" x 11".  The fold is on the top and the card opens at the bottom.

I cut a 4" x 5-1/4" piece of Basic Whit for the outside and one for the inside. I taped the inside piece in place so I wouldn't lose it or get it dirty. Plus once the front is done the card is all done!

Next I cut a 3-7/8" x 5-1/8" piece of Pear Pizzazz card stock for the layer to go on top of the Basic White piece. And a 3-3/4" x 5" piece of Designer Series Paper from the 6" x 6" "Subtles" stack. I taped the three pieces together. Dimensionals were added to the back and the piece was set in place on the front of the card base.

Next I die cut the oval. Which could have been cut from the Pear Pizzazz layer but I had a scrap piece I wanted to use up so I didn't cut corners that way.  And I also die cut a Basic White oval. The oval is from the "Framed Florets" bundle. I placed the white oval inside the Pear Pizzazz frame and taped them together using some scotch tape. Then I decided I wanted it a bit stronger so I traced the oval onto a scrap piece of card stock and then taped the ovals to it. Now it was nice and stable. I could have avoided the scotch tape doing this in the first place.  Dimenisonals were added to the back of the ovals piece and it was set in place on the front of the card.

I stamped the cake from the "Best Day" set using Black Memento ink on Basic White card stock. The piece was fussy cut out and then colored using markers. I should have used my Blends pens, I would probably have gotten nicer looking colors but I didn't.  I used So Saffron, Daffodil Delight, Flirty Flamingo, Balmy Blue and Pear Pizzazz.  Once thing I can say is, it's colorful!! Dimensionals were added to the back of the card and it was set in place on the oval and the card was done. I may go back and add some Wink of Stella because I feel the poor thing could use a little bling!

It's not one of my better works! I'm still working with this image and obviously I'm struggling with it. There's not a lot of cards on the internet to get ideas from either.  Wait till they see this one!!! LOL

Thank you SO very much for taking your time to stop in and see today's birthday card,
Wanda

Thursday, March 16, 2023

Best Day, Birthday Card, Stampin' Up!

Hello there! I'm happy you found your way here today. I have a fun, easy and quick card to share with you. I am trying to use some Designer Series Paper (DSP) that I don't care much for. And now I like it!! Funny how that goes, isn't it? Read on to see how you can make a card like this.

The base of the card is a folded half-sheet of Melon Mambo card stock. The card opens on the right and the fold is on the left. 

I cut a 4" x 5-1/4" piece of melon Mambo and texture it using the "Painted Texture" embossing folder. I added dimensionals to the back and set it in place on the front of the card.

A 4" x 5-1/4" piece of Basic White card stock was cut for the inside of the card and it was taped in place.

Next I cut the DSP. It's from the "Hues of Happiness" package and I cut a 1-3/4" strip and then I cut a 4" piece from it and a 2-3/4" piece.  The pieces have Basic White layers which measured 1-7/8" x 4-1/8" and 1-7/8" x 2-7/8". I taped the DSP to the Basic White layers and set them in place on the front of the card using mono glue.

The image is from the "Best Day" set and was stamped on a piece of Basic White card stock using black Memento ink. The piece was cut out and then colored using Melon Mambo light and dark and So Saffron light and dark Blends Pens. I added some Wink of Stella to the words, the center strip on the cake and to all of the dots. I added Dimensionals to the back of the piece and set it aside.

A 2-3/4" x 3-1/2" piece of Basic White card stock was cut for the front and a 2-7/8" x 3-5/8" piece of Melon Mambo was cut for the layer behind it. I taped the Basic White piece to the Melon Mambo piece and then that piece was set in place on top of the card front. The stamped image was added to the piece and the card was done.

I didn't even have to stamp any words, they were already on the image!!! I thought it was a fun card and I think I should have added some So Saffron ink to the Basic White piece before the cake was set in place. Maybe if I do another one sometime I'll give that a try.

Thank you SO very much for stopping in to see today's birthday card,
Wanda


Wednesday, March 15, 2023

Best Day, Birthday Card, Stampin' Up!

Hello. I'm so happy you are here to see today's birthday card. It was fun, quick and easy to make. Read on to see how to make one yourself.

The base of my card is a folded half-sheet of Basic White card stock. My card opens on the right and the fold is on the left.

I cut a 4" x 5-1/4" piece of Designer Series Paper (DSP) from the "Country Floral Lane" 12" x 12" package. I taped it to the front of the card base.

Next I took a 4" x 5-1/4" piece of Basic White card stock and cut it on the bottom at 1-1/4" on each side and up to the corners. I set the piece aside until I was done with the cupcake.

The cupcake cat is from the same "Best Day" set. It was stamped using black Memento ink and was fussy cut out.

I colored the cat in using my dark Blushing Bride Blends pen and then I added some highlights using the Nude Blends pen. I also colored the eyes in using my light Granny Apple Green Blends pen. The cupcake "paper" was colored using the light "Crumb Cake" Blends pen. Then I switched to markers for the rest of the piece. I colored in the dots using Daffodil Delight and Mint Macaron along with the hat. The balloon is also Daffodil Delight. And the bow tie was colored in using Poppy Parade.  Dimensionals were added to the back. I set the piece on top of the Basic White piece to see where the words should go. 

The words are from the same set and were stamped using the black Memento ink. And then I took my Blending Brush to scrub on some Mint Macaron ink where the cat image will be. Dimensionals were added to the back of the Basic White piece and it was set in place on top of the DSP.

Dimensionals were added to the back of the cat piece and it was set in place on top of the Basic White piece. And the card was done.

This was a fun card and I'm excited to make another one using this adorable cat!

Thank you SO very much for taking your time to stop in and see today's birthday card,
Wanda

Tuesday, March 14, 2023

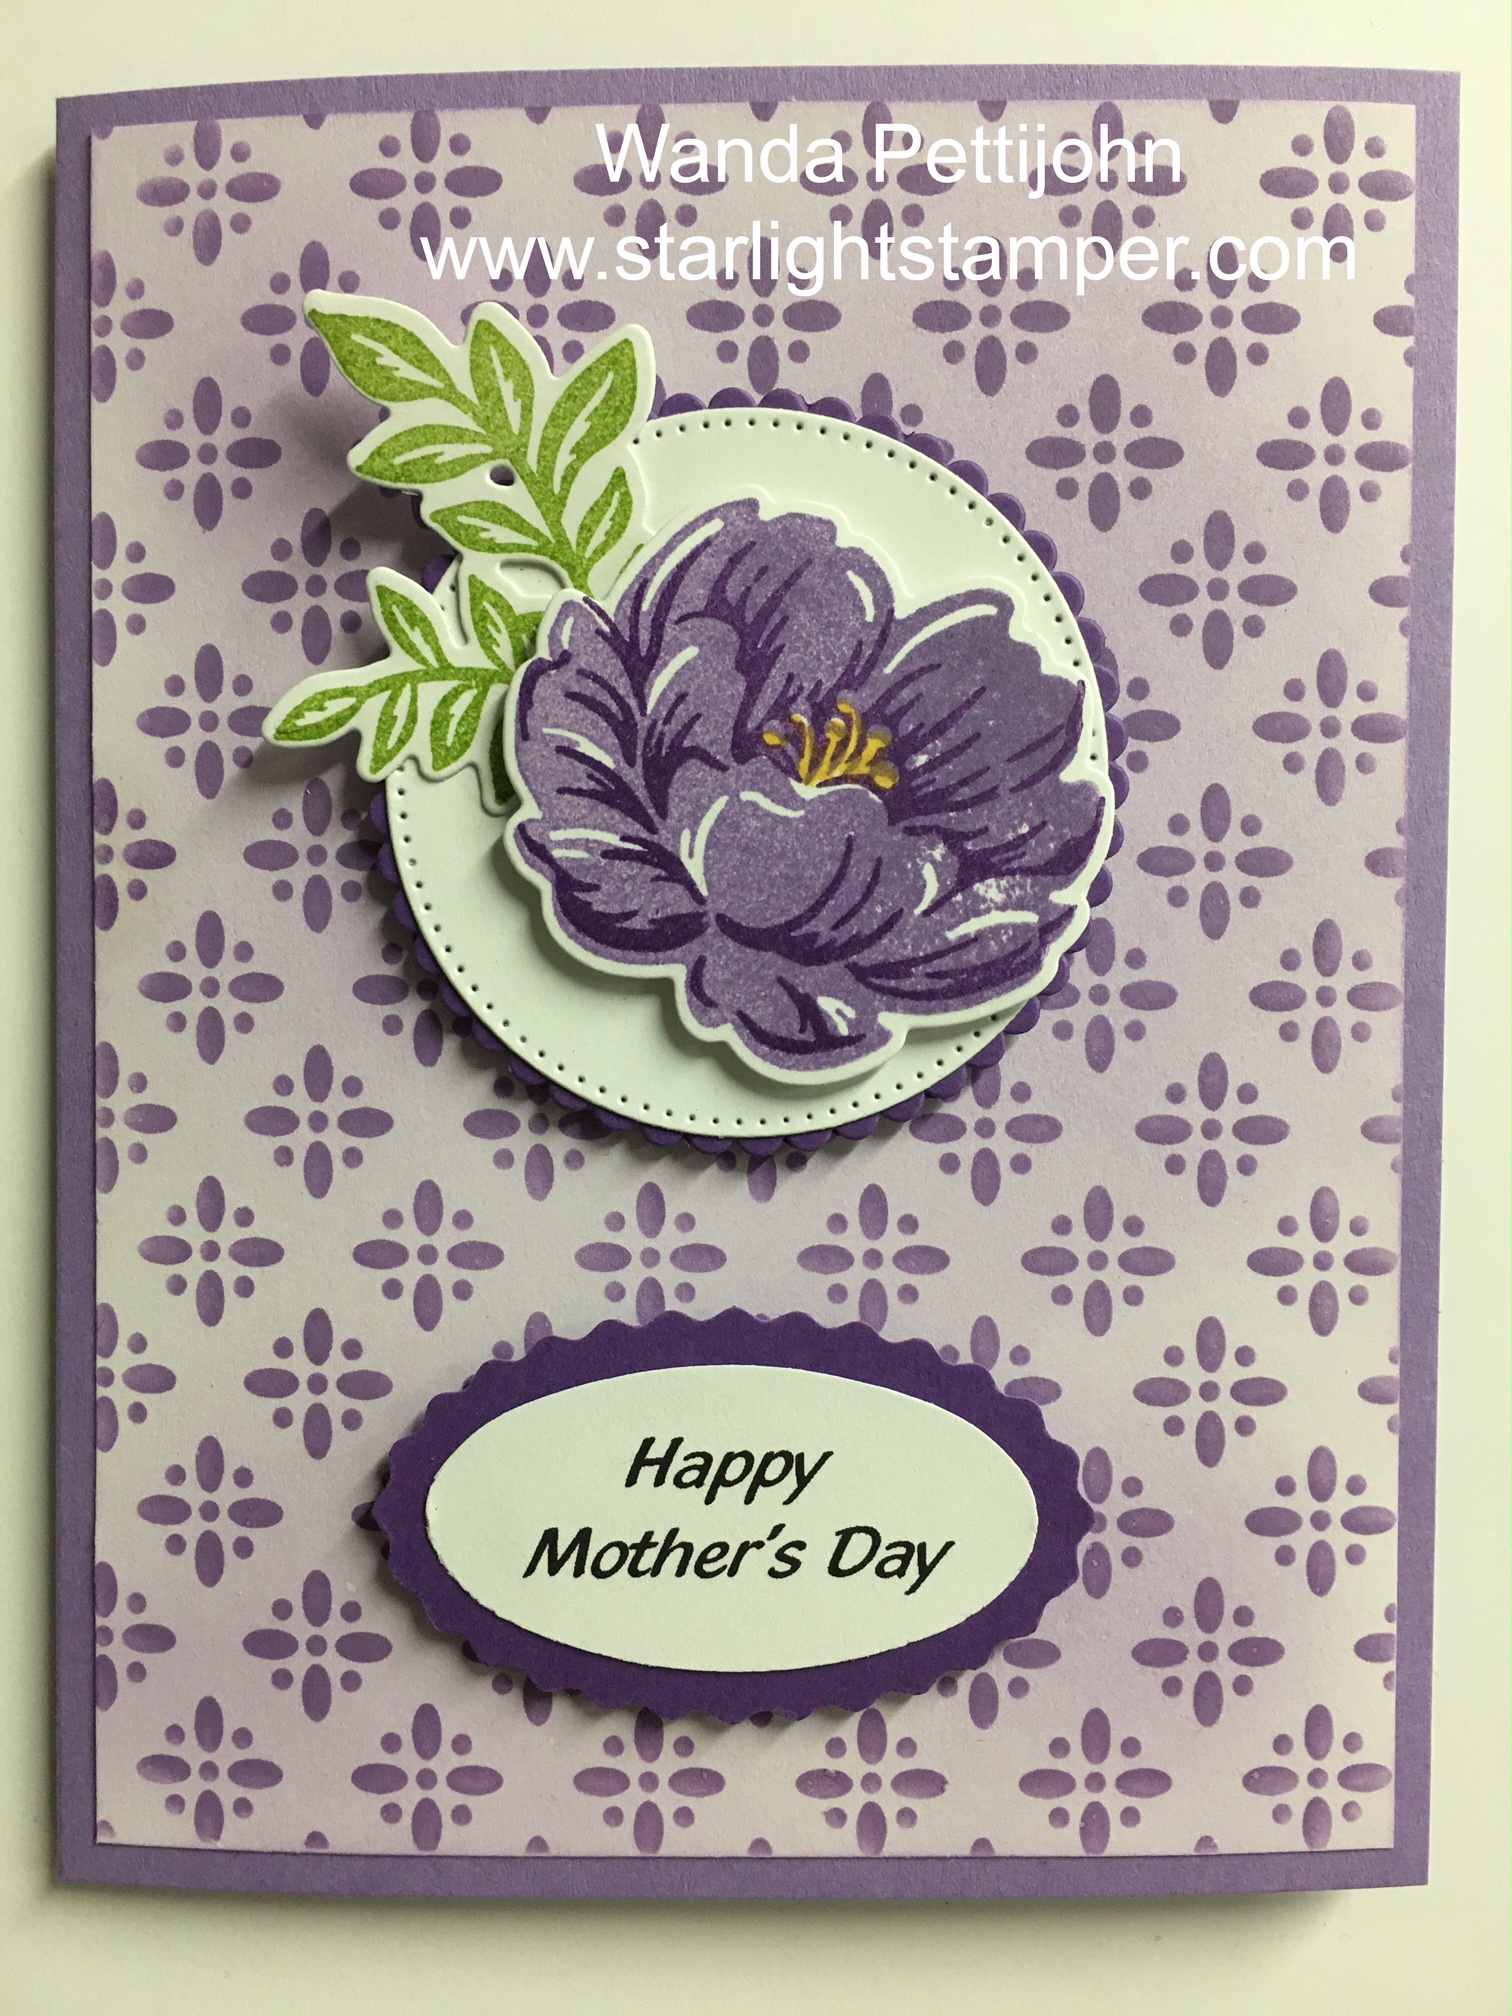
Two-Tone Flora, Mother's Day Card, Stampin' Up!

Hello. I'm happy to see you here today. I have a very versatile card to share with you. Oh and quick and easy too!

The base of my card is a folded half-sheet of Highland Heather card stock. This card opens on the right and the fold is on the left.

I cut two 4" x 5-1/4" pieces of Basic White card stock. One for the inside and one for the outside. The inside piece was taped in place and the outside piece was colored in using one of the "Artistic Mix" Decorative Masks.  I used my Blending Brush and Highland Heather ink on the stencil/mask. Then I took the Blending Brush and colored over the whole piece. I thought the white showing on the piece was a bit too bright. I taped the piece in place on the front of the card.

Next I stamped the flower from the "Two-Tone Flora" set using Highland Heather ink on the solid image. Then I used Gorgeous Grape ink for the detailed part of the flower. I colored in the center with my Daffodil Delight marker.

I also stamped the leaves from the same "Two-Tone Flora" set using Granny Apple Green ink. I then die cut the flower and the leaves at the same time.

Using the "Stylish Shapes" die set I cut a stitched circle from a piece of Basic White card stock. I used the third largest die. And I die cut a Gorgeous Grape scalloped circle using a die from the "Layering Circles" die set that was just a bit larger than the stitched circle. I taped the two circles together. I added some Dimensionals to the back. I set the circles in place on the front of the card.

The leaves were taped down on the circle and the flower was set in place using Dimensionals.

The words are were done on my computer. I don't have a current set with "happy Mother's Day" in it so I thought I'd just type them out and print them. I used the "Dual Oval Punch" to punch them out. And I used the same punch to punch out a Gorgeous Grape oval for the back layer. I taped the ovals together. Dimensionals were added to the back and the words were set in place.  Oh, the font I used for the words was BlacklightD.  I'm trying to get a jump on the cards I need for this year. 

This was a quick card to make, though I am not all that fond of the mask background. I'm not very creative with masks.  But I thought I'd give it a try. And it is what it is!

Thank you SO very much for taking your time to stop in and see today's Mother's Day card,
Wanda

Monday, March 13, 2023

Rain or Shine, Around the Bend, Thank You Card, Stampin' Up!

Welcome. I'm happy you are here to see how I made today's card. It's fun and pretty simple.

The base of my card is a folded half-sheet of Daffodil Delight card stock. The card opens on the right and the fold is on the left.

I cut a 4" x 5-1/4" piece of Designer Series Paper (DSP) from the "Hues of Happiness" 12' x 12" package. I set the piece in place on top of the card base using Dimensionals.

Next I took a 1/4 piece of Basic White card stock and using the largest and second largest stitched circle dies from the "Stylish Shapes" set I cut the two circles together. I used post it tape to hold them in place. Once I was done die cutting them I took my Old Olive marker and used the edge of the pen cap to flick the tip of the marker to splatter the two pieces. 

I die cut the ribbon end label looking piece from the same piece of Basic White card stock and die cut it. This die is from the same "Stylish Shapes" set. I also used the Old Olive marker to make the splatter marks. The circle ring was glued in place on the upper part of the card. Then the label piece was taped in place. Before adding the splattered circle, I took my Blending Brush and scrubbed on some Old Olive ink. I taped that piece in place. 

The turtle was stamped from an image from the "Playing in the Rain" set. This turtle is facing the opposite direction because it was going to be used in the spinning card that I didn't get to work properly. So I'm using the two images so my efforts don't go to waste. I set the turtle in place on the circle using Dimensionals.

The words are from the "Around the Bend" set using black Memento ink on the same piece of Basic White card stock. I die cut it using the 4th stitched circle in the "Stylish Shapes" die set. The word piece was set in place using Dimensionals.

For a final touch I glued on some flowers from the "Loose Daisy" embellishments package. 

A 4" x 5-1/4" piece of Basic White card stock was taped to the inside of the card and the card was done.

This was a fun card to make and I was glad I was able to use the other turtle I had sitting on my worktable.

Thank you SO very much for taking your time to stop in and see today's thank you card,
Wanda

Sunday, March 12, 2023

Rain or Shine, Go To Greetings, Note Cards, Stampin' Up!

Welcome, I'm happy you are here to see today's card. I am still playing with the "Rain or Shine" Designer Series Paper (DSP).  There's not many characters in the package to cut out and I do promise you I won't be making card after card each day using them. I'll take a break and use other stamps to mix it up a bit but I am on a mission to use up the DSP in that package before the new catalog comes out.

So onto how I made this quick and easy card. The base of the card is a folded half-sheet of Basic White card stock. I cut a 4" x 5-1/4" piece of DSP from the "Rain or Shine" package. I taped it to the card base. 

Next I cut a 2" x 5-1/4" piece of Basic White for the strip. And I also cut a 2-1/4" x 5-1/4" piece of Flirty Flamingo for the layer. 

The words are from the "Go To Greetings" set and were stamped using black Memento ink. I taped that strip to the Flirty Flamingo strip. But don't do that yet. You will want to cut your character out. Mine is from the "Rain or Shine" package and I fussy cut him because I didn't purchase the matching dies. But it wasn't that bad to fussy cut, not like it is with flowers and leave.  I set the bunny on the Basic White strip to see where  I needed to scrub on some Flirty Flamingo ink with my Blending Brush.  Once the ink was scrubbed on then you can tape the strips together.  I didn't do it that way so I had to be careful not to get ink on the layer. The layers were taped to the front of the card.

Dimensionals were added to the back of the bunny and then he was set in place over the scrubbed area. And the card was done.  Yup, as quick and easy as that! And fun too!

I did enjoy making this card and I do like how it turned out. I'd like to make an Easer card using these bunnies but I don't have any current "happy Easter" word stamps.  I may just print them out on the computer and run with that.

Thank you SO very much for taking your time to stop in and see today's note card,
Wanda

Saturday, March 11, 2023

Rain or Shine, Around the Bend, Thank You Card, Stampin' Up!

Hello and welcome. I'm happy you are here today to see my latest thank you card. I told you yesterday I had made the card using the center of a card I had cut and was working on.  Well, the card didn't turn out the way I hoped it would so it ended up like this.

The base of my card is a folded half-sheet of Basic White card stock. This card opens on the right and the fold is on the left.

Using removable tape, I had taped a piece of Designer Series Paper (DSP) from the "Rain or Shine" 12" x 12" package to the front and then die cut the second largest stitched circle in the "Stylish Shapes" die set, cutting through both at the same time. And on the inside I added another piece of DSP from package. Now I taped this to the inside because that little turtle was supposed to be a spinner. I stamped the mirrored image of the turtle and fussy cut it out so they matched. I added the red line tape to the inside and I used Fire Line fishing line sandwiched between the two turtle pieces. I taped it to the inside cover and added another piece of DSP to hind that tape and fishing line. I wound the turtle up and it didn't spin very nice. I think it was because I couldn't get the fishing line straight on the turtle. This wasn't a good choice for a spinning card. So I will try that technique another time using a different image. SO now the question was "what do I do with the card". Well, I had two turtles. So I took one of them and added Dimensionals and set it in place inside the circle.

The words are from the "Around the Bend" set and were stamped using black Memento ink. I die cut them using the 4th largest stitched circle in the "Stylish Shapes" set. I set them in place using Dimenisonals and the card was done.

I really did want to make a spinning card with this turtle but this is what I ended up with. He's cute and it was almost all done before I had to change it to finish it. I like it, how can you not like this little guy!!

Thank you SO very much for taking your time to stop in and see today's thank you card,
Wanda

Friday, March 10, 2023

Rain or Shine, Days to Remember, Birthday Card, Stampin' Up!

Hello! I'm happy you are here so I can share another quick, easy and fun card.  And you will get all of the instructions so you can make it yourself, read on!

The base of my card is a folded half-sheet of Basic White card stock. I cut a 4" x 5-1/4" piece of Basic White card stock and textured it using the "Painted Texture" embossing folder.  I added Dimenisonals to the back and set it in place on the front of the card base.

Next I die cut some circles. from the "Rain or Shine" Designer Series Paper (DSP).  I liked the Mango Melody looking colored ones so I ran with them. I used the 1-7/8" die from the "Layering Circles" die set. I cut two circles and one of them I cut in half.  After cutting it in half I glued each half to the ends of the textured piece. Then I added the other small whole circle. 

The larger circle was die cut from the same "Rain or Shine" DSP using the second largest stitched circle from the "Stylish Shapes" die set. I had die cut this circle from the front of a card I was going to try. The circle was "scrap" from that card. I left it on my worktable and I thought it would be great with the focal piece of today's card. I added Dimensionals to the back. Then the circle was set in place on the front of the card.

The turtle is fussy cut from a piece of DSP in the same "Rain or Shine" DSP.  I added Dimensionals behind him and I set him in place on the circle.

The words are from the "Days to Remember" set and were stamped on a scrap piece of Basic White card stock using black Memento ink. I fussy cut them. Then I added Dimensionals to the back and set it in place on the small full circle.  And the card was done.

I do like how it turned out. I was glad I was able to use the larger circle. Now to see if I can get the card made that that circle came from!!!  Hopefully soon!

Thank you so very much for taking your time to stop in and see today's birthday card,
Wanda

Thursday, March 09, 2023

Days to Remember, Rain or Shine, Birthday Card, Stampin' Up!

Hello! I'm so happy you are here today so I can share with you the card I made using the small flower cluster from the "Rain or Shine" Designer Series Paper (DSP).  I had mentioned that I had a lot of these little flower clusters and I made one card using one but today I came up with a card that uses three of them!!  Read on to see how the card is made.

The base of the card is a folded half-sheet of Basic White card stock. The card opens on the bottom and the fold is on the top. 

I cut a 4" x 5-1/4" piece of Basic White card stock and textured it using the "Painted Texture" embossing folder. I added Dimensionals to the back and set it in place on the front of the card base.

Next I punched out three of the flower clusters. I had the punch sitting out from yesterday (no surprise, I rarely put anything away) using the 1-1/4" punch and the Flirty Flamingo layer is punched from the 1-3/8" circle punch.  I taped the circles together. Dimensionals were added to the back and and they were set in place on the upper part of the card.

The words are from the "Days to Remember" set and were stamped using black Memento ink on a scrap piece of Basic White card stock. I punched them out using the "Dual Oval" punch. And the Flirty Flamingo layer was punched using the scalloped punch in the same "Dual Oval" punch.  I taped the ovals together. Dimensionals were added to the back and the piece was set in place on the front of the card. And that was it. 

The "Layering Circles" die set has a 1-1/8" circle die that will work and it has a 1-3/8" for the back layer. I still have my retired punches so I use them when needed.

Not only was this a nice way to use those small flower clusters but it was quick and easy too!

Thank you SO very much for taking your time to stop in and see today's birthday card,
Wanda


Wednesday, March 08, 2023

Playing in the Rain, Rain or Shine, Beautifully Happy, Thank You Card, Stampin' Up!

Hello! I'm happy to see you here today so I can share with you a fun find. As I was fussy cutting a turtle from the "Rain or Shine" 12" x 12" package of Designer Series Paper (DSP), I looked in the package and saw lots of these little flower clusters that I had no idea what I was going to do with but I was saving them anyway! And then I remembered a card layout I like to use with the smaller images and I thought these flowers might fit in the circles and they did. So read on to see how you can use your smaller images to make a card.

The base of my card is a folded half-sheet of Old Olive card stock. On top of that is a piece of Basic White that measures 3-1/2" x 4-5/8". 

Next I cut the DSP from the "Rain or Shine" package to measure 2-7/8" x 4" and the Balmy Blue layer behind it measures 3" x 4-1/8".  I used a little dot of tape to hold the two layers together. I taped it in the area where I'd be cutting out the circle. I used my old punches to do this. I used the 1-1/4" punch first. Then I removed the DSP from the top and put a piece of copier paper behind it and punched a ring from the DSP using the 1-3/8" punch. The two pieces were then taped together. 

I added small Dimensionals around the back of the circle and set the flower cluster in place over the circle. Then Dimensionals were added to the rest of the back of the piece and it was set in place on top of the Basic White piece. Then that was taped to the front of the card. 

The words are from the "Beautifully Happy" (retired) set and were stamped using black Memento ink on a scrap piece of Basic White card stock. I punched them out using the "Dual Oval" punch. Then I punched out the scalloped oval on that same punch using Old Olive card stock. I taped the words to the scalloped oval and I set the scalloped oval in place on the front of the card using Dimensionals.  A 4" x 5-1/4" piece of Basic White was added to the inside of the card and the card was done.

It's a pretty simple card to make. You can do this using other circle dies too for larger images.

It's a fun layout and perfect for those smaller images that you find difficult to work with.  I'm not overly fond of the card base color but it matched the ground in the image so I went with it. But other than that I'm okay with how it turned out. Sometimes when I use this layout, I will wrap a ribbon around the two top layers and add a bow before setting it in place. Then I don't usually add any words. The ribbon does add a lot.

Thank you SO very much for taking your time to stop in and see today's thank you card,
Wanda

Tuesday, March 07, 2023

Playing in the Rain, Around the Bend, Thank You Card, Stampin' Up!

 Hello! I'm happy to see you here today! I have a quick and easy card to share with you. You gotta love circles when making this card!!!  It could have been worse, all of the circles could have had layers! LOL

So to start the card I took a folded half-sheet of Basic White card stock. This card opens on the right and the fold is on the left.

Then I cut a piece of Old Olive card stock to measure 4" x 5-1/4".  I textured it using the "Painted Texture" embossing folder. I glued it to the card base.

For the two larger circles I used the second largest stitched circle in the "Stylish Shapes" die set. The Designer Series Paper (DSP) is from the "Awash in Beauty" 12" x 12" package. And the other large circle is a piece of Basic White card stock that I scrubbed on some Blushing Bride ink using my Blending brush. I glued the DSP circle in place about 3/8" from the left edge and 3/8" from the top edge of the Old Olive card stock. I used glue because I knew I'd get a better contact than I would using tape on a textured surface. Dimensionals were added to the back of the Basic White circle and it was set in place on top of the DSP circle, catching the right and bottom areas. 

The words are from the "Around the Bend" set and were stamped using black Memento ink and then die cut using the 4th stitched circle die in the the "Stylish Shapes" die set. And the Blushing Bride layer behind it was die cut using the 1-7/8" circle die from the "Layering Circles" die set. I taped the two layers together. Dimensionals were added to the back and they were set in place on the lower left side of the card.

The bunny is from the "Rain or Shine" DSP package and was fussy cut. He's so cute, isn't he. I didn't keep the rain puddle he was standing in.  I just wanted him to be free and happy in his Blushing Bride circle.  He was set in place using Dimensionals and the card was done.  As quick and simple as that!

This was a very fun, quick and easy card to make. I have some holiday DSP with characters that need to be cut out so I can use them in layers like this and get the DSP used up!  

Thank you SO very much for taking your time to stop in and see today's thank you card,
Wanda


Monday, March 06, 2023

Playing in the Rain, Rain or Shine, Friendship Card, Stampin' Up!

Hello! I'm happy you are here to help me decide what the genera of this card should be. Is it a friendship card, a get well card, a thinking of you card, a birthday card, a Mother's Day card?  I can't decide.  What did you see when you first looked at the card? Read on to see how the card was made.

The base of the card is a folded half-sheet of Old Olive card tock.  The card opens on the right and the fold is on the left. I cut two 4" x 5-1/4" pieces of Basic White card stock, one for the inside and one for the outside. The one on the outside was textured using the "Painted Texture" embossing folder. I glued it to the front of the Old Olive card base. 

I have not played with this layout in a very long time. It's fun and a great way to use small pieces of Designer Series Paper (DSP). Next I took out my "Stylish Shapes" die set and used the three smallest stitched squares. I cut two from the smallest dies using the "Rain or Shine" DSP. Then I two squares of Old Olive using the next size up. And I also cut one Basic White piece.  And the largest of the three I cut an Old Olive piece. I taped the squares together. On the larger one I added Dimensionals to the back. I set the piece in place on the front of the card. I glued the two smaller pieces down and I set the larger one in place with Dimensionals.

The adorable turtle was already done up, he's from the "Rain or Shine" DSP and I fussy cut him. I didn't  buy the die set or I would have just die cut him out. I had a limited budget for shipping so I figured I could fussy cut my own. I also could have just stamped him and colored him in myself, but this guy has a colored enameled back and flower.  It's just TOO cute!!!I set him in place using Dimensionals. I was careful not to add any where the pieces would hang over the squares.

I thought the textured background was a bit plain so I added some "Loose Daisy" embellishments, a dot of glue and they were secure. It's just what the background needed!! Now it just needs a genera!!

Thank you so very much for taking your time to stop by and see today's card,
Wanda

Sunday, March 05, 2023

Petal Park, Toffee Coffee, Weekend Project, Stampin' Up!

Hello, I'm so happy you found your way here today. I have a fun and easy project for you to make. It's a "Toffee Coffee" label. And the recipe too!!! I made this for a friend of mine and I hope she loves the beverage as much as my hubby and I do. I did use my computer for the printing and I used the "Petal Park" set for the flowers. 

The jar is what the instant coffee came in. After using all the coffee, I removed the label and washed out the jar and lid. I got this coffee at the Dollar Tree. I know it's cheaper to buy a larger container at the grocery store but I was at the Dollar Tree and I had just ran across the recipe so I thought I'd give it a try with the smaller amount in case it's not good since we don't usually drink instant coffee in our home.

I measured the space the label would be taped to so I could adjust the size of the words so it would look nice.  I did have to print it out several times (on draft mode) to get the size right. Plus on the back the ingredients and instructions are listed. 

Once I got the label part to size, I stamped the flowers from the "Petal Park" set using black Memento ink and then coloring them in using my light Balmy Blue and light Daffodil Delight Blends pens. 

The width of my label was a bit smaller than my packing tape so I was able to get the label on a piece of tape and affixed it to the jar. If it wouldn't have been wide enough I was prepared to use clear contact paper.  

After I got the label on I added the Toffee Coffee mixture and put the cover on. And that was it.

Now you probably want the recipe, right?  Well, it's pretty simple. It's equal parts. I make mine by the cup. I used a cup of instant coffee, a cup of coffee creamer and a packed cup of brown sugar. I put it in the blender to make it even smoother and less grainy. I put mine in a large bowl with some food safe silicone packets because the brown sugar is moist and I don't want any mold to grow. I don't know if it would but I'm not going to take any chances.  

I think these would be great for gifts and I'm playing around with the idea of selling them at the fall craft fair.  Now go make some and give them to your friends or for yourself!!

Thank you SO very much for taking your time to stop in and see today's fun project!
Wanda