Pin It

Tuesday, July 01, 2025

Beautiful Gallery, Simply Said, Friendship, Note Card, Stampin' Up!

Hello and welcome to my blog. Today I have a friendship/note card to share with you. Please read on to see how it was made.

The base of my card is a folded half-sheet of Basic White card stock. It opens on the right and the fold was on the left. 

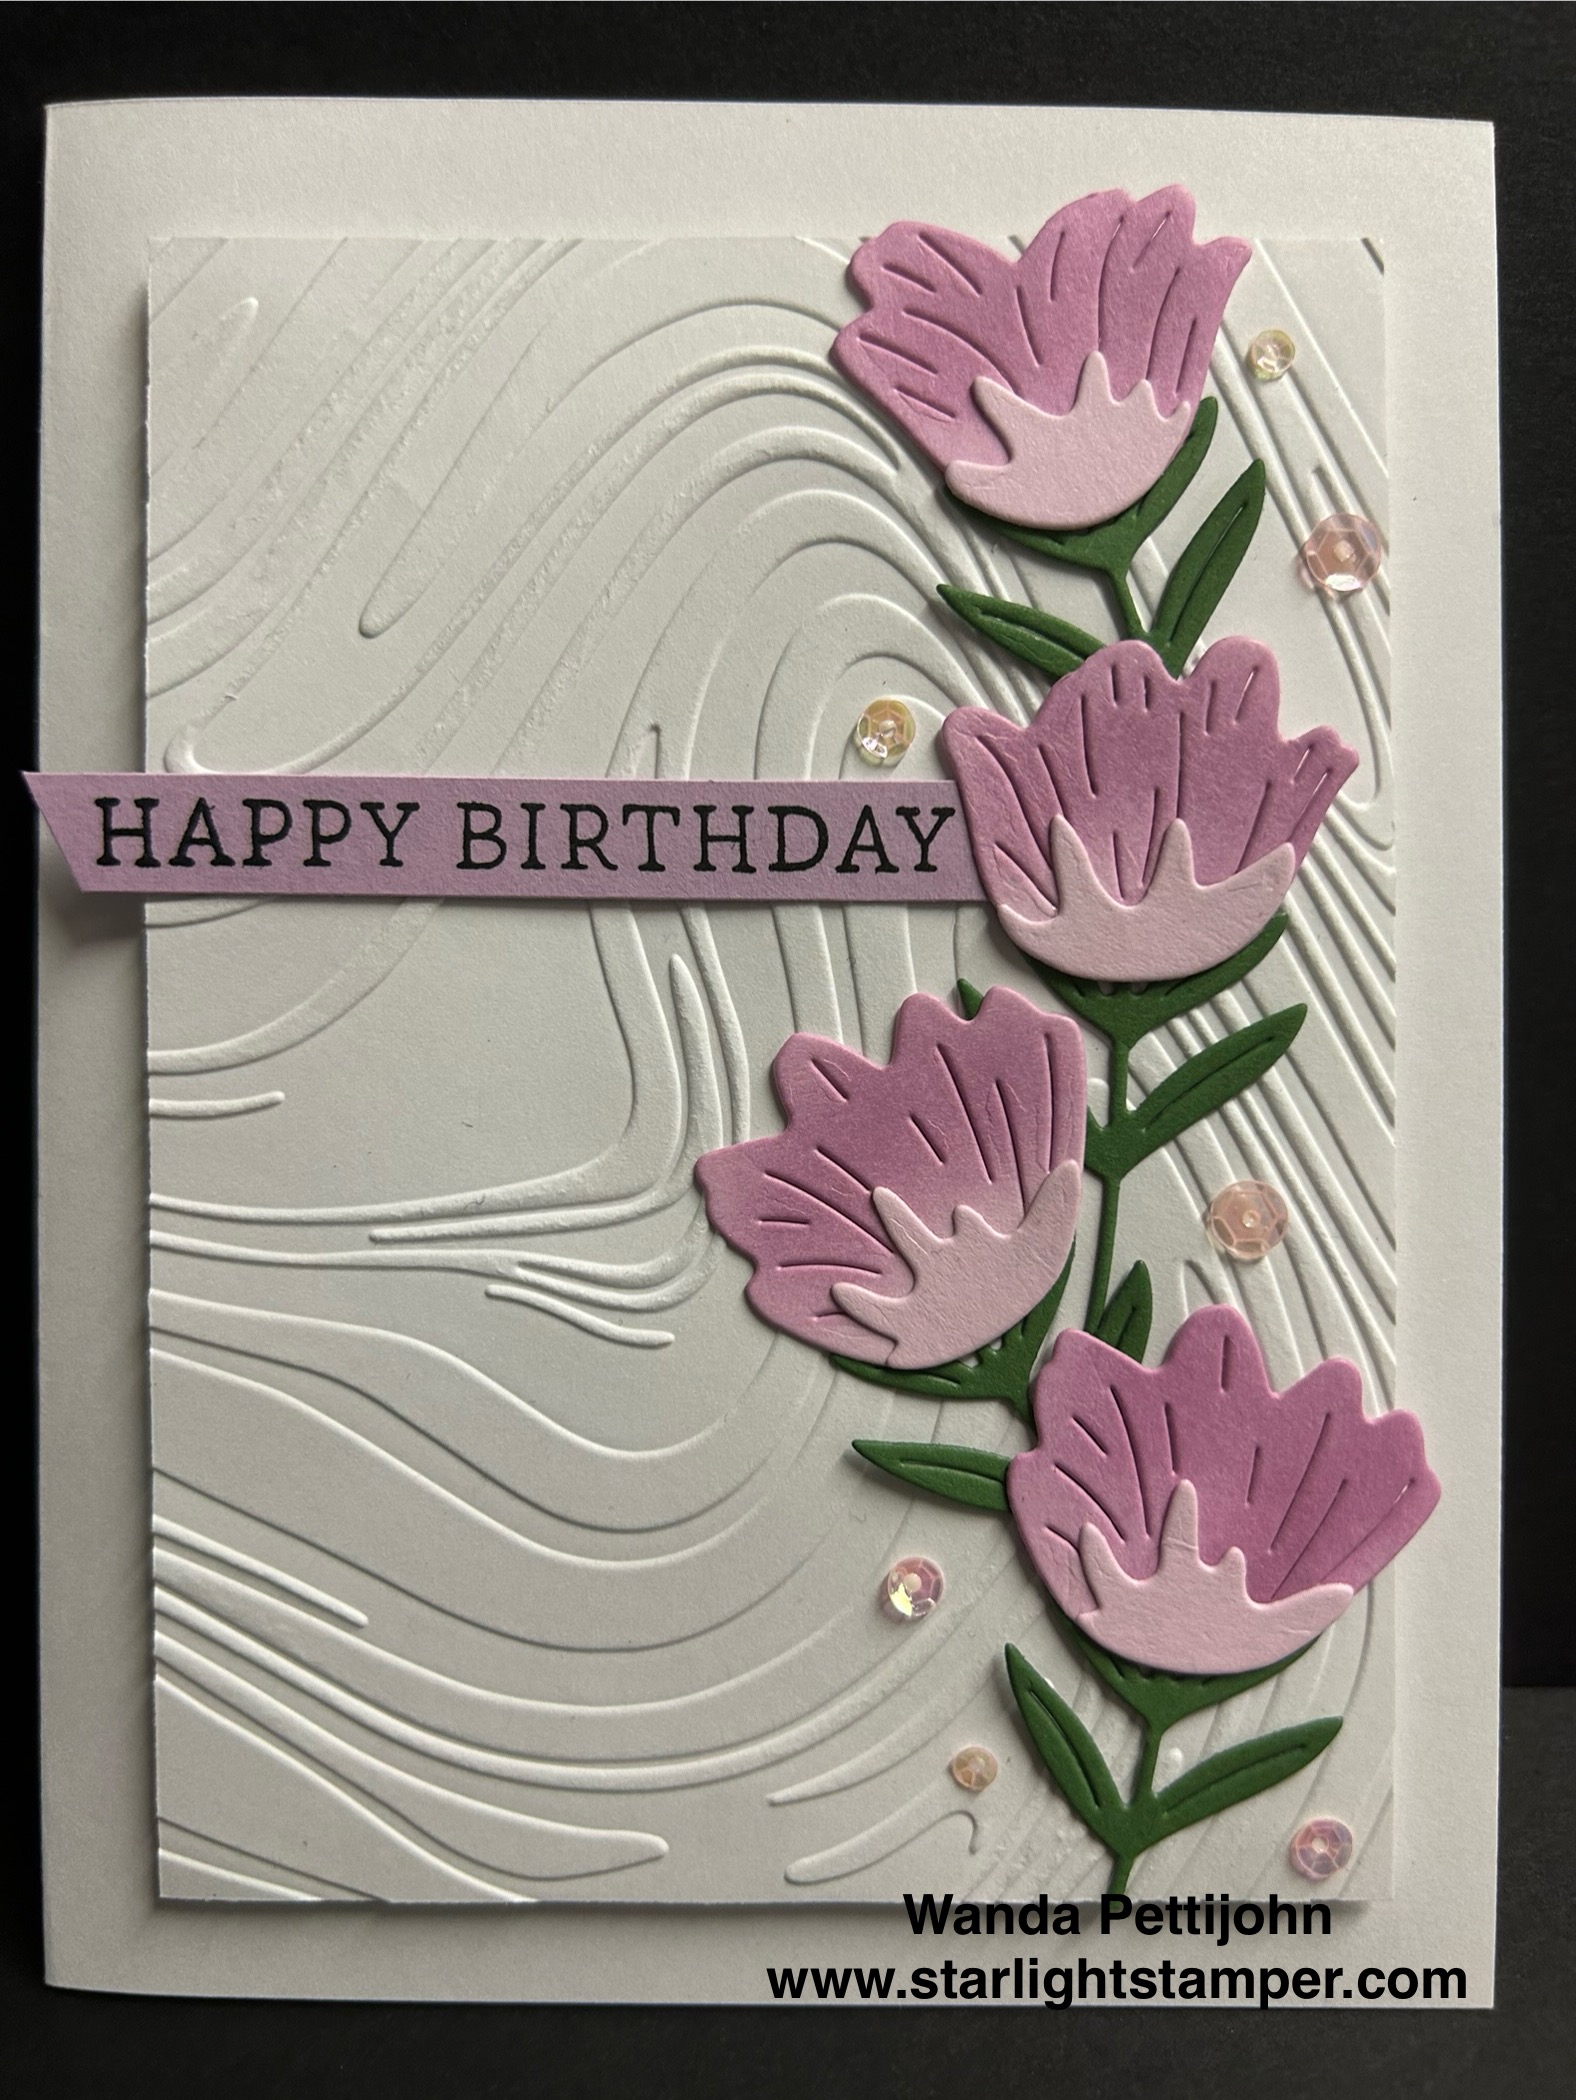
I cut a 4" x 5-1/4" piece of Basic White card stock and textured it using the "Damask Design" embossing folder. I glued that to the front of the card.

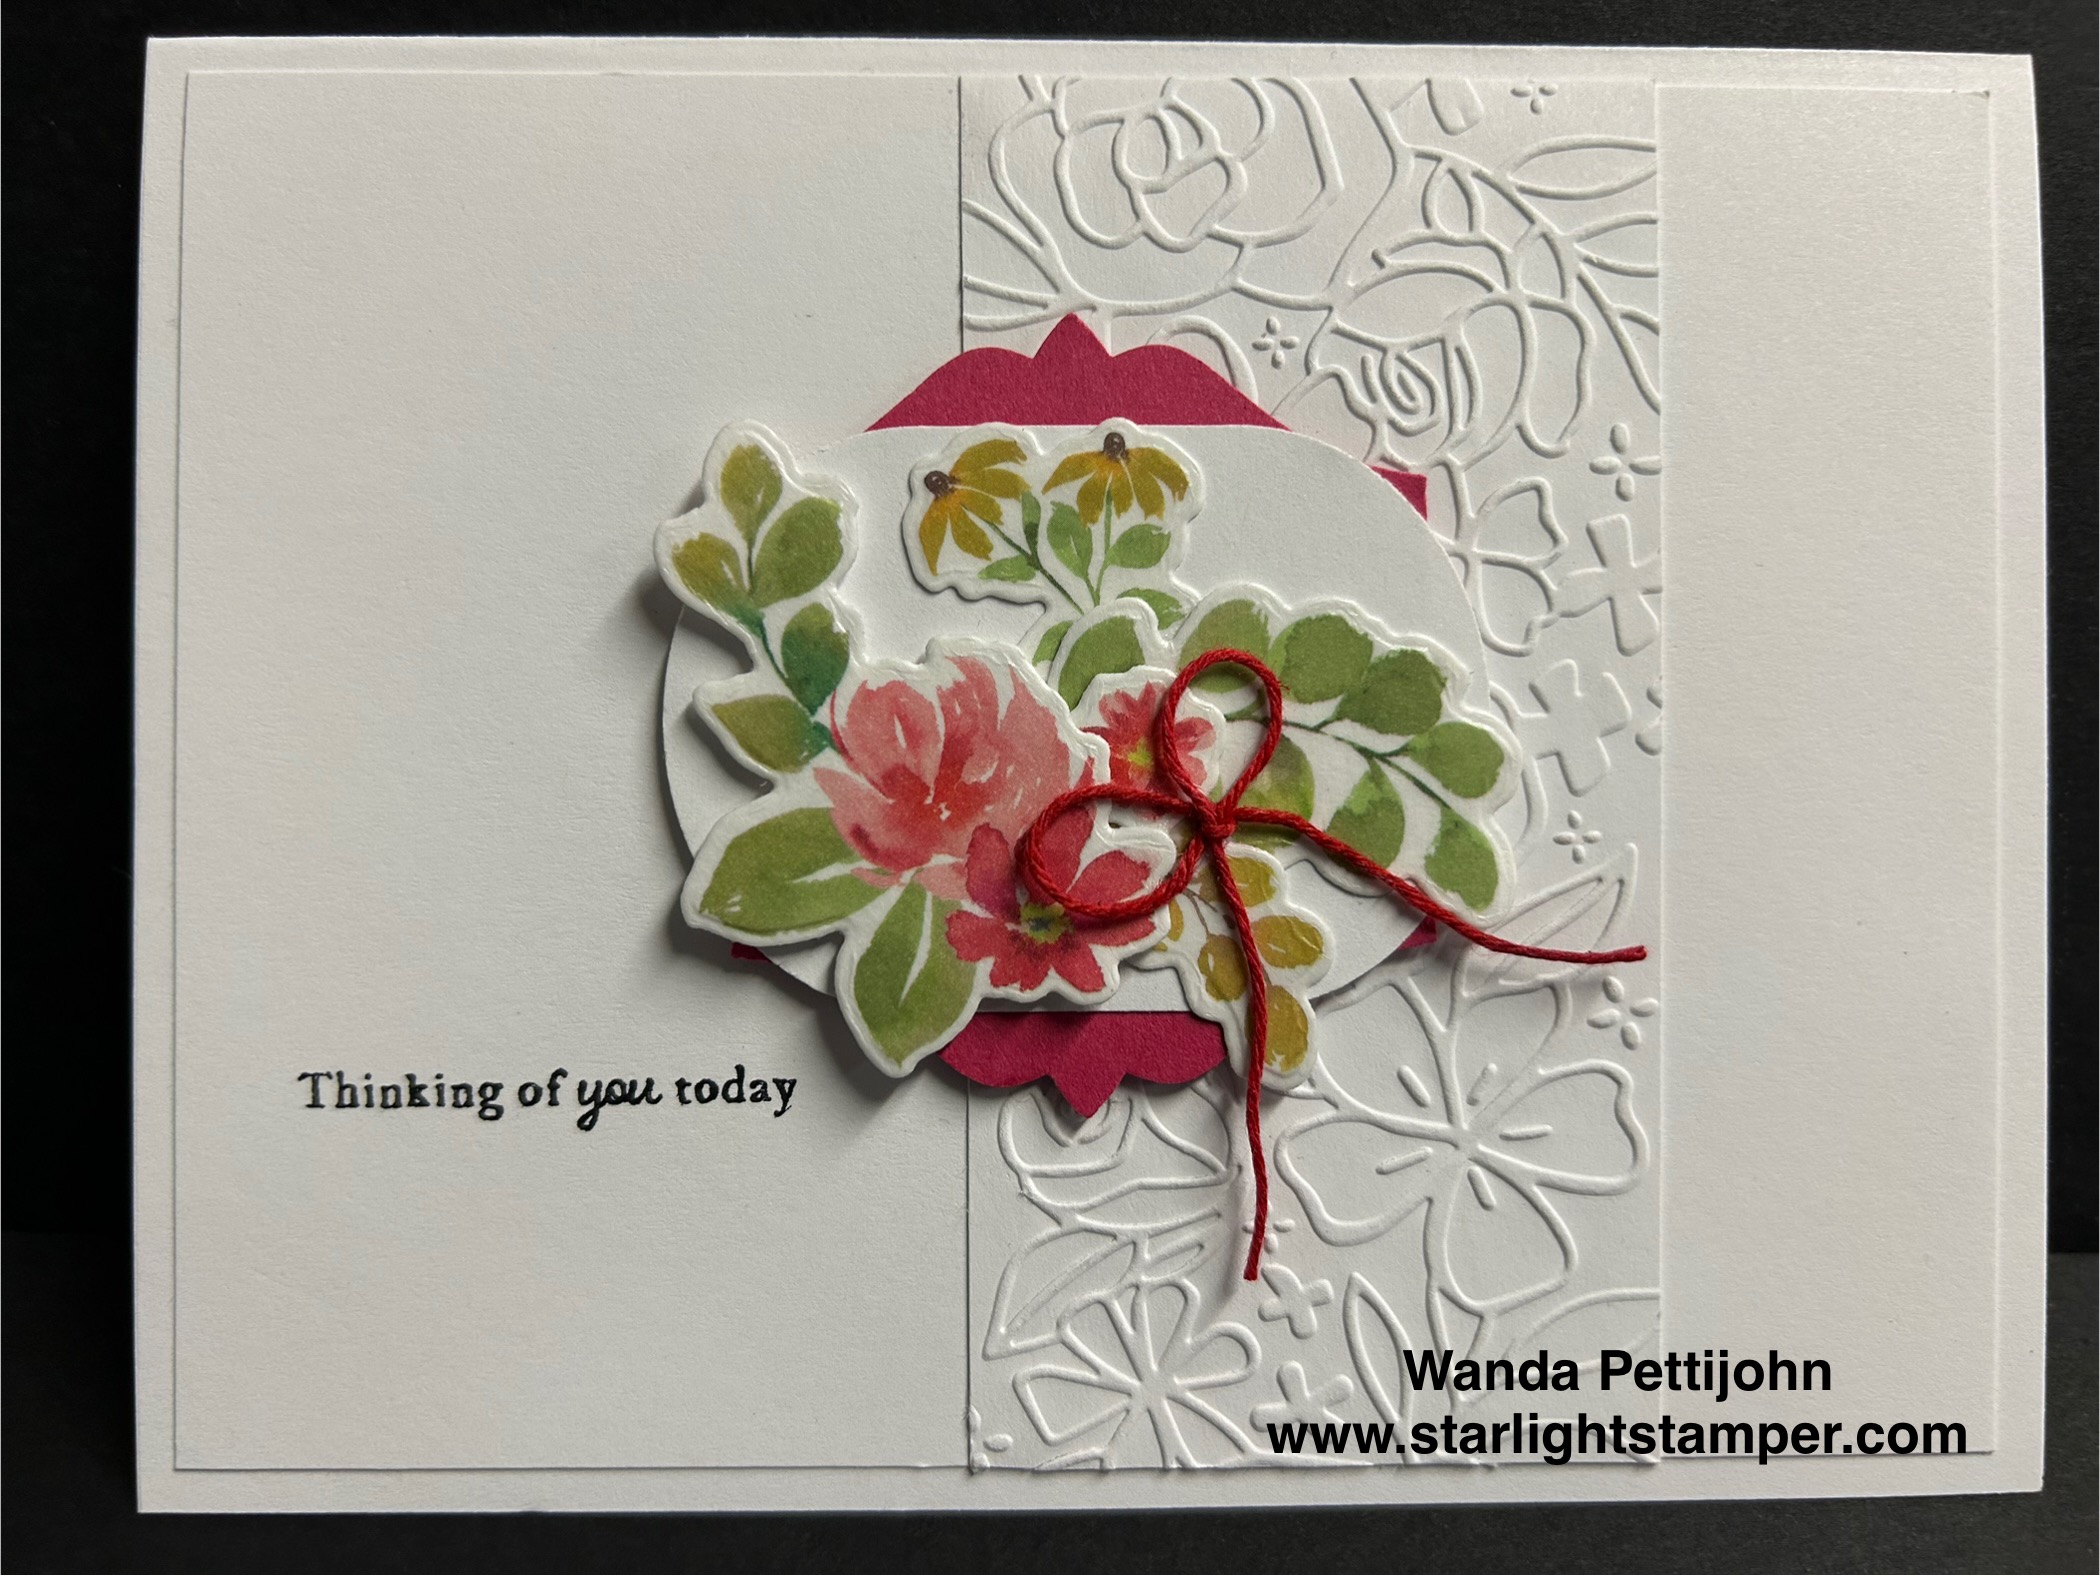
Next I cut my piece of Designer Series Paper (DSP) from the "Beautiful Gallery" 6" x 6" stack. It was leftover from the card I made on June 29th.  It was sitting on my worktable (because I rarely put anything away) and I thought I'd make a card using it. I cut the piece to measure 3" x 4".  For the layer behind the DSP, I cut a 3-1/4" x 4-1/4" piece of Mossy Meadow card stock. I taped the two pieces together and then glued that to the front of the card. I prefer to glue anything that comes in contact with textured card stock because tape doesn't always stick. 

The words were stamped next. Using the "Simply Said" set I stamped them using Mossy Meadow ink on a scrap piece of Basic White card stock. I cut them out using a die from the "Stylish Shapes" set. The Mossy Meadow circle measures 1-7/8". I taped the two layers together. Dimensionals were added to the back and the piece was set in place on the front of the card.  And the card was done.

I was so glad I was able to use up that leftover piece of DSP (before it got ruined) and make a quick and easy card with it.

Thank you SO very much for taking your time to stop in and see today's friendship/note card,
Wanda

Monday, June 30, 2025

Impressions Abloom, Simply Said, Birthday Card, Stampin' Up!

Hello and welcome to my blog. Today I have a simple birthday card to share with you. Please read on to see how it was made.

The base of my card is a folded half-sheet of Basic White card stock. It opens on the right and the fold is on the left. 

I cut a 4" x 5-1/4" piece of Basic White card stock and textured it using the "Exposed Brick" embossing folder. Then I turned it over and made 8 score lines starting at the 1" mark on my scoring board. I scored every 1/8". I added glue to the back and set the piece in place on the front of the card.

Using Granny Apple Green card stock I cut the stem from the "Impressions Abloom" bundle.  Using the same bundle I cut two flowers using Lemon Lolly card stock and for the center of the flowers I cut them using Basic White card stock. I took my blending brush and scrubbed on some Pecan Pie ink. I thought Pecan Pie card stock would be too dark. 

Before gluing the flower centers in place I took another blending brush and scrubbed on some Daffodil Delight ink to the center of the flowers. Leaving them plain made them look washed out. The centers were glued in place and a little Wink of Stella was added to them.

I glued the stems in place starting with the bottom of the stem on the 6th score line about 1" up from the bottom edge of the card and the left stem is about 1" from the fold. Once that was glued in place I glued one flower in place and the other was set in place using a Dimensional. 

The words are from the "Simply Said" set and were stamped using black Memento ink. I found this in the stamp container. I must have had extras. It was die cut too. The die is from the "Heart Shaped" set from the Sale-a-Brations earlier in the year. I set the words in place using Dimensionals. 

I thought about adding some embellishments but I opted to just leave it clean and simple.

This was a fun card to make and I love how quickly it went together.

Thank you SO very much for taking your time to stop in and see today's birthday card,
Wanda 

Sunday, June 29, 2025

Simply Said, Beautiful Gallery, Birthday Card, Stampin' Up!

Hello and welcome to my blog. Today I have a birthday card to share with you. Please read on to see how it was made.

The base of my card is a folded half-sheet of Basic Beige card stock. It opens on the right and the fold is on the left.

I cut a 1-1/2" x 5-1/2" piece of Basic Beige and textured it using the "Damask Design" embossing folder. Then I trimmed it to 1-1/2" x 5-1/4". I taped it to the left side of the card.

Next I cut a piece of Designer Series Paper (DSP) from the "Beautiful Gallery" 6" x 6" stack. I cut it to measure 3" x 5-1/4". I taped that to the front of the card. I did overlap the textured piece a bit but that was my plan. I didn't want to just add a strip and hope there were no gaps. This way I was positive there would be no gaps. 

The words are from the "Simply Said" set and were stamped using Mossy Meadow ink on a scrap piece of Basic Beige card stock. I cut them out using the "Labeled With Love" punch. Dimensionals were added to the back and it was set in place on the front of the card.

For my embellishments, I used some glass raindrops I found in my stash. Those things are pretty old! But they are still useful! 

A 4" x 5-1/4" piece of Basic White card stock was added to the inside and the card was done.

This is such a quick, easy and pretty card.

Thank you for taking your time to stop in and see today's birthday card,
Wanda

Saturday, June 28, 2025

Simply Said, Impressions Abloom, Birthday Card, Stampin' Up!

Hello and welcome to my blog. Today I have a birthday card to share with you. I found the bulk of the card on Pinterest. You can see that card here. It will open up to a new window. Please read on to see how it was put together. 

The base of my card is a folded half-sheet of Basic White card stock. It opens on the right and the fold is on the left. 

I cut a 4-1/4" x 5-1/2" piece of Basic White card stock and textured it using the "Corrugated" embossing folder. Then I cut it to 3-3/4" x 5".  I glued it to the front of the card with equal spacing all around.

The flowers are from the "Impressions Abloom" bundle. I cut the stems and leaves using Granny Apple Green card stock and the flowers from Lemon Lolly card stock. Using Daffodil Delight ink and my blending brush, I scrubbed the ink on the bottoms of the large flowers and over the entire tiny flowers. I also added Wink of Stella on the tiny flowers. 

The words are from the "Simply Said" set using Granny Apple Green ink on a scrap piece of Basic White card stock. I cut them out using the "Labeled With Love" punch. Dimensionals were added to the back and it was set aside. 

I glued the flower stems on first and then the leaf cluster was glued in place.

The flowers were added to the stems and the three tiny flowers were glued in place around the card. I couldn't find any yellow embellishments so that's why I cut the little flowers. You need to do what works and work with what you have on hand, right?

The word piece was set in place on the right.

Taking some white baker's twine, I wrapped it around two fingers (in figure 8's) and tied them in the center. I glued that to the front of the card and the card was done.

This was a very quick card to make and I love how bright and cheery it is.

Thank you SO very much for taking your time to stop in and see today's birthday card,
Wanda

Friday, June 27, 2025

Simply Said, Extraordinary Flora, Note or Friendship Card, Stampin' Up!

Hello and welcome to my blog. Today I have a note card to share with you. I found it on Instagram. You can see the original card by clicking here. A new window will open. Please read on to see how it was made.

The base of my card is a folded half-sheet of Basic White card stock. It opens on the right and the fold is on the left. I cut a 2-1/2" x 5-1/4" piece of Designer Series Paper (DSP) from the "Brights" 6" x 6" stack. I taped it to the left side of the card front.

The words were stamped next. They are from the "Simply Said" set and were stamped using black Memento ink on a scrap piece of Basic White card stock. I cut them out using the 4th circle die in the "Stylish Shapes" set. Dimensionals were added to the back and the piece was set aside.

Next I cut the flowers from the "Extraordinary Flora" Washi tape strip. I added the strip to a piece of Basic White card stock and then cut them out using the matching die. 

I glued the pieces in place on the upper part first. Then the word piece was added and then the last 4 pieces. And the card was done.

Mine is a bit different than the original because I didn't have all of the same parts but I made it work. I did forget to add some bling to the card. I may add a few pearls or some retired dots or I may just leave it as it is since the DSP is speckled.

This was a fun card to make and SO quick too!

Thank you SO very much for taking your time to stop in and see today's note/friendship card,
Wanda

Thursday, June 26, 2025

Impressions Abloom, Simply Said, Birthday Card, Stampin' Up!

Hello and welcome to my blog. Today I have a quick and easy birthday card to share with you. Please read on to see how it was made.

The base of my card is a folded half-sheet of Basic White card stock. It opens on the right and the fold is on the left.

I cut a 4" x 4" piece of DSP from the "Perennial Lavender" 12" x 12" package and a 4" x 2" piece. I marked the smaller piece at 1/2" up on each side and on the bottom I marked it at 2-1/2". I set the piece in my paper cutter and cut from the side marks to the center mark. I taped that to the top part of the 4" piece and then that was taped to the front of the card. Something I don't usually do until after the words were added but I was using my Stamperatus/MISTY to line up my stamp. 

The words are from the "Simply Said" set and were stamped using Gorgeous Grape ink. 

The flower is from the "Impressions Abloom" bundle and were cut using Gorgeous Grape for the flower, Old Olive for the leaf and I had used Daffodil Delight for the center and ended up tapping my Pecan Pie ink pad on it because the yellow was just too bright. 

Dimensionals were added to the back of the flower and it was set in place on the left side of the card. The leave was glued in place under the flower and the center was glued in place.

I thought the bottom part looked too open so I glued on a few purple sequins that I had in my stash. And the card was done.

This card went together so quickly and I love it that I was able to use up some of my DSP stash!

Thank you SO much for taking your time to stop in and see today's birthday card,
Wanda

Wednesday, June 25, 2025

Damask Designs, With You in Mind, Extraordinary Flora, Anniversary Card, Stampin' Up!

Hello and welcome to my blog. Today I have an anniversary card to share with you. It's quick and easy to make. Please read on to see how it's made.

The base of my card is a folded half-sheet of Basic White card stock. It opens on the right and the fold is on the left. 

I cut a 4" x 3-1/2" piece of Basic White and textured it using the "Damask Designs" embossing folder. I glued it to the lower part of the card.

Next I stamped the words from the "With You in Mind" set using Lost Lagoon ink.

The flowers are from the "Extraordinary Flora" Washi tape roll and were placed on a piece of Basic White card stock and then cut using the matching die. I randomly placed the pieces until I thought it looked full enough. I started with the greenery, the long one on the left and the broader leaf one near the "A", I glued them in place.  The large flower was added next using Dimensionals. The little flower on the long piece of greenery was added with a Dimensional and the rest of the flowers were glued in place. And that was it.

Super easy. Super quick. Super fun! And elegant too!

I thought this was a very quick card to make and would be great for a birthday, wedding, thinking of you, get well and a friendship card. I love cards that are versatile.

Thank you SO very much for taking your time to stop in and see today's super quick anniversary card,
Wanda

Tuesday, June 24, 2025

With You in Mind, Perennial Postage, Perennial Lavender, Birthday Card, Stampin' Up!

Hello and welcome to my blog. Do you ever have some Designer Series Paper (DSP) that looks too busy or you're not sure what to do with it? I have that happen a lot. But today I made a card using some I thought was difficult. Please read on to see how it was made.

The base of the card is a folded half-sheet of Basic White card stock. It opens on the bottom and the fold is on the top.

Using the second largest die in the "Perennial Postage" set I cut the piece from Basic White card stock. I

The DSP is from the "Perennial Lavender" 12" x 12" package. It measures 4" x 2-3/4". I taped that to a 4-1/8" x 2-7/8" piece of Gorgeous Grape card stock. Then that was taped to the die cut piece. Dimensionals were added behind the piece and it was set in place on the front of the card. I centered it as much as I could by eyeing it.

The words are from the "With You In Mind" set and were stamped using Gorgeous Grape ink on Basic White card stock. I cut it to measure 3-3/16" x 1-11/16". If you don't like working in 1/16th inches you can cut the piece to measure 3-1/4" x 1-3/4". Dimensionals were added to the back and it was set in place on top of the DSP. Again, I eyed it as much as I could.

I took two retired enamel dots and added them to the word piece and the card was done.

This was such a great way to use that busy paper. Plus using larger wording helps too. I may be digging out some other busy papers and making some quick cards! Though I think I will cut my word piece first and then set up the stamp in my Stamperatus/MISTY and stamp several. I would probably stamp the words in black Memento ink so I can use them on future cards because black goes with all cards, right? Black would have looked just fine here too! I'm looking forward to using up some of that DSP that I have stacked here!

Thank you SO much for taking your time to stop in and see today's birthday card,
Wanda

Monday, June 23, 2025

Extraordinary Flora, Peaceful Pier, Thinking of You Card, Stampin' Up!

Hello and welcome to my blog. Today I have another pretty card that was made using the "Extraordinary Flora" Washi tape. I have a lot of this Washi tape and I plan on making some more cards using it in the near future. I also plan on making more than one when I make the upcoming cards. I want to make some for Christmas gifts. A nice bundle of cards is always a great gift! I found today's card on Youtube. It was made by Terri Gaines. She's such a great stamper. You can see the video for this card here. And you can see her website here. Subscribe to her Youtube channel, she's got SO many great tips, techniques and card samples with step by step details on how to make the card presented! I followed along with this one because I wanted to get my card to look as close to Terri's as possible. Just because I loved how she made her card!

The base of the card is a folded half-sheet of Basic White card stock. It opens on the bottom and the fold is on the top.

A 4" x 5-1/4" piece of Flirty Flamingo was cut for the layer. Before I did anything else, I took the die from the "Stylish Shapes" and cut one from the middle of the piece.

A 3-7/8" x 5-1/8" was textured on each side using one of the images the "Glass Garden" embossing folder set. The center gets squished a bit but the flowers hide it. When I embossed my piece I set the card stock inside the folder and lined it up with the upper little flower that looks like a plus sign. It's lined up along the outside of that plus sign. I needed a reference to make sure I got the piece in far enough. 

Once the piece was textured I taped it to the Melon Mambo piece and then that was taped to the front of the card base.

I followed along with Terri's video on placing the flowers and greenery. It doesn't look exactly like hers and I didn't expect it to. It is pretty and that's what I was going for. Plus it used up all the pieces from one section of the Washi tape! 

The words are from the "Peaceful Pier" set and were stamped using Melon Mambo. It should have been Flirty Flamingo but by the time I realized that it was too late. I don't think you would have noticed that had I not said anything! I cut the word piece using the same size die. I taped the word piece to the Flirty Flamingo piece and I cut off the right end. I glued that to the front of the card and the card was done.

This was such a fun, quick and easy card to make!

Thank you SO very much for taking your time to stop in and see today's thinking of you card,
Wanda

Sunday, June 22, 2025

Perennial Lavender, Simply Said, Birthday Card, Stampin' Up!

Hello and welcome to my blog. Today I have a super quick and easy card to share with you. Please read on to see how it was made.

The base of my card is a folded half-sheet of Gorgeous Grape card stock. It opens on the right and the fold is on the left.

Next I cut a 4" x 5-1/4" piece of Basic White card stock and I taped it to the inside. I also cut a 4" x 5-1/4" piece of card stock from the "Perennial Lavender" 12" x 12" package. I taped that to the front of the card.

I stamped the words from the "Simply Said" set using Gorgeous Grape ink. I punched them out using the "Modern Oval" punch. And for the interesting layer behind it, using the "To the Point" punch I punched out a Highland Heather piece. I taped the two punched pieces together, added Dimensionals to the back and set the piece in place on the front of the card.

A couple butterflies from the "Brushed Brass Butterflies" package were added and the card was done.

I was amazed at how fast this card went together. It took me longer to get the items out, put them away and type this up than it did to make the card! It was fun and I love how quick it was.

Thank you SO very much for taking your time to stop in and see today's birthday card,
Wanda

Saturday, June 21, 2025

Peaceful Pier, Extraordinary Flora Washi Tape, Thinking of You, Stampin' Up!

Hello and welcome to my blog. Today I have a thinking of you card to share with you. Please read on to see how it was made.

The base of the card is a folded half-sheet of Basic White card stock. It opens on the bottom and the fold is on the top. 

I cut a 4" x 5-1/4" piece of Basic White for the top layer. Then I cut a 4" x 2" piece of Basic White and textured it using the floral image from the "Glass Garden" embossing folders set. I glued it in place 1" from the right edge. 

Using the Melon Mambo colored flowers from the "Extraordinary Flora" Washi tape I cut out the images you see on the card. I used 5 of the pieces. What was fun was that I had these already cut and sitting in a little baggy. Every time I need to cut some flowers out because I want a certain one I end up with extras and I put them in a baggy for later use. I laid my Washi tape on a piece of Basic White card stock before I cut them out. You can cut them out without the card stock behind it. You can put it on parchment paper and cut them out that way and have them more transparent. I didn't like that look. Plus I think it's difficult to cut it out on parchment paper. 

For the piece that the flowers were added, I used the "Modern Oval" punch and the "To The Point" punch. Melon Mambo was used for the "To The Point" punch piece. I taped the oval to the top of the Melon Mambo piece. Then I added the flowers. The large flower on the front was added using Dimensionals and the rest of the pieces were glued in place. Dimensionals were added to the back of the piece and it was just laid on top of the card, not affixed.

I didn't have any Melon Mambo ribbon or thread to use so I used the dark Melon Mambo Blends pen to color a piece of white Baker's Twine. It took a few minutes to dry. Once dry I tied a bow and I glued it in place. 

Before affixing the focal piece, I stamped the words from the "Peaceful Pier" set using black Memento ink. Once the words were added then the floral focal piece was affixed and the card was done.

This was a super quick and easy card to make. I think it would make a pretty birthday or get well card too.

Thank you SO very much for taking your time to stop in and see today's thinking of you card,
Wanda

Friday, June 20, 2025

Extraordinary Flora, Peaceful Pier, Thinking of You Card, Stampin' Up!

Hello and welcome to my blog. Today I have a card to share with you that I found on Pinterest. You can see the original card here. Please read on to see how it was made. 

The base of the card is a folded half-sheet of Basic White card stock. It opens on the right and the fold is on the left.

I cut a 4-1/4" x 2" piece of Basic White card stock and textured it using the flora image in the "Glass Gardens" embossing folder set. I glued it to the front of the card about 1" from the top. 

Using the "Extraordinary Flora" washi tap, I affixed the pink flowers to a 3-1/4" x 5-1/4" piece of Basic White card stock. Then I cut them out using the matching die. I had to cut two because of the roses on the sides. You only get one per set. But that's okay the other pieces will be used for future cards and the best part is they will already be cut out!

Before adding the flowers I stamped the words. They are from the "Peaceful Pier" set and were stamped using black Memento ink.

I started with the middle rose. I set it in place with Dimensionals. Actually, all of the pieces were set in place with Dimensionals except for the greenery. Next I added the two pieces on each side of the center rose. Then the twin rose buds were set in place. And the greenery was added last using glue. I did have to lift up a flower or two to get the greenery under it but I didn't press down firmly when I set them in place so the Dimensional hadn't stuck all the way. 

A linen bow was tied and then glued in place.  And that was it. I love the look of this card. It's got a clean and fresh feel to it. Plus I LOVE the tiny print on the wording.

Thank you SO very much for taking your time to stop in and see today's thinking of you card,
Wanda

Thursday, June 19, 2025

Impressions Abloom, Simply Said, Birthday Card, Stampin' Up!

Hello and welcome to my blog. Today I worked on a card using the "Impressions Abloom" bundle. I found the card on Pinterest and thought it looked like it would be fun to make. You can see that card here. The link will open to a new window so it will be easier for you to come back here. Please read on to see how today's card was made.

The base of my card is a folded half-sheet of Basic White card stock. It opens on the bottom and the fold is on the top.

I cut a 4-3/4" x 2-5/8" piece of Basic White card stock and textured it using the floral folder from the "Glass Gardens" embossing set. A 4-3/4" x 2-7/8" piece of Mossy Meadow was cut for the back layer. You can cut strips of card stock instead of a solid piece if you want to save on card stock. I glued the textured piece to this piece and then taped that to the front of the card. I centered it as much as I could by eyeing it.

The flowers, stems and leaves are from the "Impressions Abloom" bundle. I cut the flowers using Berry Burst card stock and the stems and leaves are from Mossy Meadow card stock. I glued the pieces in place. I started with the big leafy branch. Glue the stems to the flowers and then set the flowers in place, trimming the ends as needed.

The words are from the "Simply Said" set and were stamped using Berry Burst ink on a piece of Basic White card stock. I used a retired die (from the "Heart Shaped" bundle) to cut them out. Dimensionals were added to the back and it was set in place on the front of the card.

I didn't have any berry colored elements so I cut out some flowers from the same "Impressions Abloom" bundle using Berry Burst card stock. I glued them in place on the front of the card and added a tiny pearl to the center of each one. And that was it, the card was done.

This was a fun, quick and easy card to make. I love that strip of textured flowers, it adds a lot to the card.

Thank you SO very much for taking your time to stop in and see today's birthday card,
Wanda

Wednesday, June 18, 2025

Pretty Florals, Simply Said, Birthday Card, Stampin' Up!

Hello and welcome to my blog. Today I have a birthday card to share with you. I found the basics of this card on Pinterest. You can see the original card here. Please read on to see how it was made.

The base of my card is a folded half-sheet of Basic White card stock. It opens on the right and the fold is on the left.

I cut a 4-3/4" x 3-1/2" piece of Basic White card stock and textured it using the "So Swirly" embossing folder. Dimensionals were added to the back and it was placed on the front of card base. I centered it as much as I could by eyeing it.

Next I die cut the flowers from the "Pretty Florals" bundle using Bubble Bath ink. Taking my blending brush I scrubbed on some Fresh Freesia ink on the large flowers. I glued the flower pieces together and set them aside.

The stems were cut next using Garden Green card stock. I glued the stems to the flowers. Then I glued the flowers in place on the front of the card.

The words are from the "Simply Said" set and were stamped using black Memento ink on a piece of Fresh Freesia card stock. I trimmed it to 3/8" x 3". I snipped the left side at an angle and the right side was cut to fit under the flower. I glued the word piece in place.

I added some sequins I had in my stash and the card was finished.

This was a fun card to make an I think if I were to make it again I would add Dimensionals behind the flowers and not glue the stems to them. And I'd add Dimensionals to the back of the word piece.

Thank you SO very much for taking your time to stop in and see today's birthday card,
Wanda