
I am SO loving this "Snowman Season" set. It's so easy and fun to play with. I will move onto something else tomorrow. I promise! With it being October, I only have so many days to play with the Halloween set I have and the Halloween papers, SO you will be seeing some more Halloween cards coming up. But if I happen to run across or think on my own a fun snowman card, I will probably be making it!!! And it will be SO worth it, right? LOL
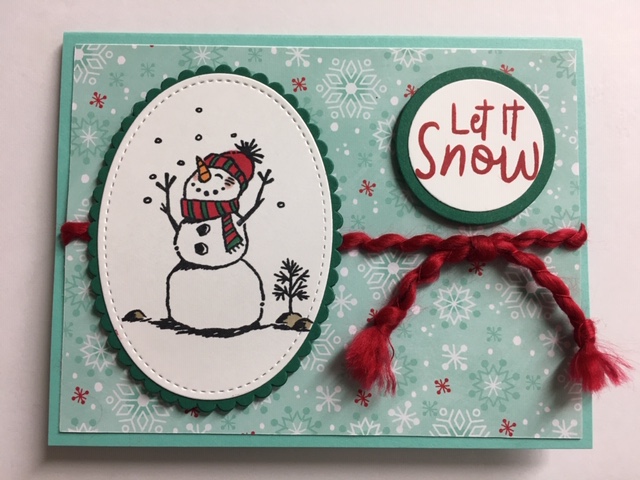
The base of my card (yes, "my" card, no copy) I used Coastal Cabana card stock. On top of that is a piece of the Designer Series Paper (DSP) from the "Let it Snow" 12" x 12" paper pack. On the backside of this paper is a bunch of winter head cover. Hats and caps. And one of the hats can be punched out using the matching punch for this stamp set. I cut my DSP 4" x 5-1/4" and I taped it to a piece of Whisper White card stock so it was more firm so I could wrap the cute "Real Red Curly Ribbon". It's a fun yarn ribbon and you can tie a knot at the end and fray it out a bit. SO cute and easy to use too. I love ribbons that are easy to tie and work with. I taped the piece to the card base.
I stamped the snowman using black Memento ink. I die cut it out using the Stitched Oval die. And I also die cut a scalloped oval for the layer. I colored the snowman using my Blends Pens. I used the dark Real Red and Shaded Spruce. I also used the dark Pumpkin Pie and Crumb Cake. The Pumpkin Pie was used on the nose and the Crumb Cake was used on the ground mounds. It could be snow but to me it seemed like dirt. I used the dark Powder Pink Blends Pen for the cheeks. I taped the layers together and I set it in place using Dimensionals.
I stamped the words from the same "Snowman Season" set using Real Red ink. I die cut them using the circle dies. I wasn't smart enough to die cut the Shaded Spruce circle from the scalloped oval. But, fortunately I did have a scrap piece of Shaded Spruce. I taped those two layers together and set them in place using Dimensionals.
I stamped the words from the same "Snowman Season" set using Real Red ink. I die cut them using the circle dies. I wasn't smart enough to die cut the Shaded Spruce circle from the scalloped oval. But, fortunately I did have a scrap piece of Shaded Spruce. I taped those two layers together and set them in place using Dimensionals.
I added a 4" x 5-1/4" piece of Whisper White to the inside of the card and the card was finished.
This was a very fun card to make and easy too!!
Thank you SO much for visiting today,
Wanda
No comments:
Post a Comment